# StackGuardian Documentation
> Documentation for the StackGuardian platform
## api-reference
- [StackGuardian](/api-reference/)
## docs
- [StackGuardian Docs](/docs/): Master cloud security with StackGuardian:A no-code DevSecOps platform for IaC, compliance, and orchestration. Explore workflows, stacks, and integrations now!
- [API Overview](/docs/api/overview/): API keys for the StackGuardian platform. Learn how to authenticate and make requests securely using our RESTful APIs.
- [StackGuardian Backstage Plugin](/docs/backstage-plugin/): The StackGuardian Backstage Plugin seamlessly integrates the StackGuardian platform into your Backstage developer portal.
- [1.30.0 🎉](/docs/changelog/1.30.0/): What's Changed
- [1.30.1 🎉](/docs/changelog/1.30.1/): What's Changed
- [1.30.2 🎉](/docs/changelog/1.30.2/): What's Changed
- [1.30.3 🎉](/docs/changelog/1.30.3/): What's Changed
- [1.30.4 🎉](/docs/changelog/1.30.4/): What's Changed
- [1.30.5 🎉](/docs/changelog/1.30.5/): What's Changed
- [1.30.6](/docs/changelog/1.30.6/): What's Changed
- [1.30.7](/docs/changelog/1.30.7/): What's Changed
- [1.30.8](/docs/changelog/1.30.8/): What's Changed
- [1.30.9](/docs/changelog/1.30.9/): What's Changed
- [1.31.0](/docs/changelog/1.31.0/): What's Changed
- [1.31.1](/docs/changelog/1.31.1/): What's Changed
- [1.31.2](/docs/changelog/1.31.2/): What's Changed
- [1.31.4](/docs/changelog/1.31.4/): What's Changed
- [1.31.5](/docs/changelog/1.31.5/): What's Changed
- [1.31.6](/docs/changelog/1.31.6/): What's Changed
- [1.31.8](/docs/changelog/1.31.8/): What's Changed
- [1.31.9](/docs/changelog/1.31.9/): What's Changed
- [1.32.0](/docs/changelog/1.32.0/): What's Changed
- [1.32.1](/docs/changelog/1.32.1/): What's Changed
- [1.32.4](/docs/changelog/1.32.4/): What's Changed
- [1.32.5](/docs/changelog/1.32.5/): What's changed
- [1.32.6](/docs/changelog/1.32.6/): What's changed
- [1.32.8 🆕](/docs/changelog/latest/): What's changed
- [1.28.8 🎉](/docs/changelog/older-versions/1.28.8/): What's Changed
- [1.28.9 🎉](/docs/changelog/older-versions/1.28.9/): What's Changed
- [1.29.0 🎉](/docs/changelog/older-versions/1.29.0/): What's Changed
- [1.29.1 🎉](/docs/changelog/older-versions/1.29.1/): What's Changed
- [1.29.2 🎉](/docs/changelog/older-versions/1.29.2/): What's Changed
- [1.29.3 🎉](/docs/changelog/older-versions/1.29.3/): What's Changed
- [1.29.4 🎉](/docs/changelog/older-versions/1.29.4/): What's Changed
- [1.29.5 🎉](/docs/changelog/older-versions/1.29.5/): What's Changed
- [1.29.6 🎉](/docs/changelog/older-versions/1.29.6/): What's Changed
- [1.29.7 🎉](/docs/changelog/older-versions/1.29.7/): What's Changed
- [1.29.8 🎉](/docs/changelog/older-versions/1.29.8/): What's Changed
- [1.29.9 🎉](/docs/changelog/older-versions/1.29.9/): What's Changed
- [1.25.0 🎉](/docs/changelog/older-versions/v1.25.0/): What's Changed,
- [1.25.1 🎉](/docs/changelog/older-versions/v1.25.1/): What's Changed,
- [1.25.2 🎉](/docs/changelog/older-versions/v1.25.2/): What's Changed,
- [1.25.3 🎉](/docs/changelog/older-versions/v1.25.3/): What's Changed,
- [1.25.4 🎉](/docs/changelog/older-versions/v1.25.4/): What's Changed,
- [1.25.5 🎉](/docs/changelog/older-versions/v1.25.5/): What's Changed,
- [1.25.6 🎉](/docs/changelog/older-versions/v1.25.6/): What's Changed,
- [1.25.7](/docs/changelog/older-versions/v1.25.7/): What's Changed,
- [1.25.8 🎉](/docs/changelog/older-versions/v1.25.8/): What's Changed,
- [1.25.9 🎉](/docs/changelog/older-versions/v1.25.9/): What's Changed,
- [1.26.0 🎉](/docs/changelog/older-versions/v1.26.0/): What's Changed,
- [1.26.1 🎉](/docs/changelog/older-versions/v1.26.1/): What's Changed,
- [1.26.2 🎉](/docs/changelog/older-versions/v1.26.2/): What's Changed,
- [1.26.3 🎉](/docs/changelog/older-versions/v1.26.3/): What's Changed,
- [1.26.4 🎉](/docs/changelog/older-versions/v1.26.4/): What's Changed,
- [1.26.5 🎉](/docs/changelog/older-versions/v1.26.5/): What's Changed,
- [1.26.6 🎉](/docs/changelog/older-versions/v1.26.6/): What's Changed,
- [1.26.7 🎉](/docs/changelog/older-versions/v1.26.7/): What's Changed,
- [1.26.8 🎉](/docs/changelog/older-versions/v1.26.8/): What's Changed,
- [1.26.9 🎉](/docs/changelog/older-versions/v1.26.9/): What's Changed,
- [1.27.0 🎉](/docs/changelog/older-versions/v1.27.0/): What's Changed,
- [1.27.1 🎉](/docs/changelog/older-versions/v1.27.1/): What's Changed,
- [1.27.2 🎉](/docs/changelog/older-versions/v1.27.2/): What's Changed,
- [1.27.3 🎉](/docs/changelog/older-versions/v1.27.3/): What's Changed,
- [1.27.4 🎉](/docs/changelog/older-versions/v1.27.4/): What's Changed,
- [1.27.5 🎉](/docs/changelog/older-versions/v1.27.5/): What's Changed,
- [1.27.6 🎉](/docs/changelog/older-versions/v1.27.6/): What's Changed,
- [1.27.7 🎉](/docs/changelog/older-versions/v1.27.7/): What's Changed,
- [1.27.8 🎉](/docs/changelog/older-versions/v1.27.8/): What's Changed,
- [1.27.9 🎉](/docs/changelog/older-versions/v1.27.9/): What's Changed,
- [1.28.0 🎉](/docs/changelog/older-versions/v1.28.0/): What's Changed,
- [1.28.1 🎉](/docs/changelog/older-versions/v1.28.1/): What's Changed,
- [1.28.2 🎉](/docs/changelog/older-versions/v1.28.2/): What's Changed,
- [1.28.3 🎉](/docs/changelog/older-versions/v1.28.3/): What's Changed,
- [1.28.4 🎉](/docs/changelog/older-versions/v1.28.4/): What's Changed,
- [1.28.5 🎉](/docs/changelog/older-versions/v1.28.5/): What's Changed,
- [1.28.6 🎉](/docs/changelog/older-versions/v1.28.6/): What's Changed,
- [1.28.7 🎉](/docs/changelog/older-versions/v1.28.7/): What's Changed
- [Community](/docs/community/overview/): Share your feedback and experience with the StackGuardian
- [Connect AWS to StackGuardian](/docs/connectors/csp/aws/): Authenticate your AWS workloads with StackGuardian using Roles, Access Keys, or OIDC Identity Provider. Simplify cross-account access and compliance discovery.
- [Connect Azure to StackGuardian](/docs/connectors/csp/azure/): Integrate your Azure Service Principal with StackGuardian using Client Secret or Workload Identity for secure access management and compliance monitoring
- [Connect GCP to StackGuardian](/docs/connectors/csp/gcp/): Integrate Google Cloud Platform with StackGuardian using Service Account or Workload Identity Federation for secure and efficient cloud management without managing keys.
- [Overview](/docs/connectors/overview/): Explore StackGuardian's Connectors:Integrate cloud services, version control, and vaults for enhanced security and seamless cloud infrastructure management."
- [Vaults](/docs/connectors/vaults/): Securely store and manage sensitive data like credentials and API keys with StackGuardian Vaults. Simplify integration with third-party secret stores."
- [AWS CodeCommit](/docs/connectors/vcs/awscodecommit/): Integrate AWS CodeCommit with StackGuardian by configuring IAM user access, generating and uploading SSH keys, storing private keys in StackGuardian, and creating workflows for seamless collaboration
- [Azure DevOps](/docs/connectors/vcs/azuredevops/): Integrate Azure DevOps with StackGuardian using Personal Access Token, Client Secret, or Workload Identity authentication methods
- [Bitbucket](/docs/connectors/vcs/bitbucket/): Integrate Bitbucket with StackGuardian by creating an App password in Bitbucket and configuring the connector with your Bitbucket username and password in StackGuardian.
- [GitHub Enterprise](/docs/connectors/vcs/github_enterprise/): Learn how to integrate GitHub Enterprise with StackGuardian for secure, scalable collaboration with advanced permissions and seamless GitHub App setup.
- [GitHub](/docs/connectors/vcs/githubcom/): Integrate GitHub with StackGuardian to fetch IaC/Policy code and trigger workflows on pull requests, push events, or tag creations
- [GitLab](/docs/connectors/vcs/gitlabcom/): Integrate GitLab with StackGuardian by creating a Personal Access Token, setting up the connector in StackGuardian, and configuring GitLab triggers for workflow automation.
- [Overview](/docs/deploy/overview/): Explore the Deploy > Overview tab in StackGuardian to manage workflows, stacks, and reference variables for seamless cloud resource deployment.
- [Stack](/docs/deploy/stack/overview/): Stacks organize and execute related workflows in a specific order, ensuring smooth integration. Workflows in stacks depend on each other, while workflow groups are independent.
- [Meta](/docs/deploy/stack/stack_components/meta/): View and manage stack metadata including creation details, configuration source, tags, and context information for traceability.
- [Outputs](/docs/deploy/stack/stack_components/outputs/): View and manage stack outputs, grouped by workflow, enabling integration with other workflows and systems for seamless operations.
- [Overview](/docs/deploy/stack/stack_components/overview/): Explore stack overview with policy checks, cost estimation, and managed resources for comprehensive stack insights.
- [Runs](/docs/deploy/stack/stack_components/runs/): Explore stack runs with detailed logs, errors, compliance checks, cost estimations, and execution details for efficient stack management.
- [Settings](/docs/deploy/stack/stack_components/settings/): Configure and manage stack settings, including workflow management, actions, permissions, and execution rules for optimal stack operations.
- [Global Section](/docs/deploy/stack/stack_components/stack_header/): Learn about the Stack Header component that displays identifying information about the stack including display name, ID, and description.
- [Create Stacks](/docs/deploy/stack/stack_create/): Create a stack in StackGuardian by configure meta details, select the aws-full-stack template, and customize workflows for AWS resources like VPC, EKS, and Nginx.
- [Update Stacks](/docs/deploy/stack/stack_upgrade/): Update a stack in StackGuardian by editing workflows, updating configurations, and adjusting execution order to ensure your infrastructure is aligned with the latest templates
- [Activate and deactivate workflows](/docs/deploy/workflows/active-inactive/): Learn how active and inactive workflow statuses work in StackGuardian, including automatic transitions, manual activation and deactivation, billing limits, and behavior when inactive.
- [CLI-driven Workflow](/docs/deploy/workflows/cli-driven-workflow/): Use Terraform CLI commands with StackGuardian's HCP Terraform integration for remote execution, state management, and collaboration features from your terminal.
- [Dev Portal](/docs/deploy/workflows/create_workflow/devportal/): Streamline workflow creation with StackGuardian's Dev Portal. Deploy cloud resources easily using templates, configure variables, and manage runtime environments.
- [JSON](/docs/deploy/workflows/create_workflow/json/): Create workflows efficiently in StackGuardian using Workflow as Code. Import JSON or use key-value pairs to define, configure, and launch workflows seamlessly.
- [Overview](/docs/deploy/workflows/create_workflow/overview/): Discover how StackGuardian simplifies deployment with Workflow Groups and intuitive tools like Dev Portal, Wizard, and Workflow as Code creation methods.
- [Wizard](/docs/deploy/workflows/create_workflow/wizard/): Build workflows in StackGuardian using the Wizard, with options to select templates or Git repositories, configure runtime environments, and automate tasks seamlessly.
- [Overview](/docs/deploy/workflows/overview/): Explore StackGuardian Workflows. Create, manage, and automate workflows with Terraform, Ansible, Helm & more. Integrate with VCS, webhooks & customize settings.
- [Update Workflows](/docs/deploy/workflows/update-workflow/): Update a workflow in StackGuardian by updating configurations to ensure your infrastructure is aligned with the latest templates
- [Workflow](/docs/deploy/workflows/workflow_components/): The Workflow feature in StackGuardian allows users to define, manage, and automate Infrastructure-as-Code (IaC) executions.
- [Review and approve Workflow Runs](/docs/deploy/workflows/workflow_components/approvals_config/): Review and approve workflow runs before deployment. Configure internal approvals with eligible approvers and required approval counts, understand approval logic for mixed identity types (SSO and local users), and integrate external approval systems.
- [2.2. Custom Workflow Configuration](/docs/deploy/workflows/workflow_components/custom_config/): Configure non-Terraform workflows for tools like Ansible, Helm, and custom automation pipelines. Set up VCS integration, define workflow steps, configure step-level approvals, and create workflow chains and webhooks.
- [3. Deployment Environment](/docs/deploy/workflows/workflow_components/deployment_environment/): Connect workflows to cloud platforms, manage environment variables, and securely store sensitive data with Vault integration using StackGuardian's Deployment Environment.
- [Execution Environment](/docs/deploy/workflows/workflow_components/execution_environment/): Configure the execution environment for StackGuardian workflows.
- [Lifecycle Custom Steps](/docs/deploy/workflows/workflow_components/lifecycle_custom_steps/): Enhance Terraform workflows with StackGuardian's Lifecycle Custom Steps, offering pre- and post-deployment hooks, custom integrations, and IAC tool-specific flexibility.
- [6. Meta](/docs/deploy/workflows/workflow_components/meta/): Manage workflow metadata in StackGuardian, including tags, context tags, author information, and timestamps for better organization and tracking.
- [7. Notifications](/docs/deploy/workflows/workflow_components/notifications/): Manage workflow notifications in StackGuardian, including email alerts for execution errors and drift detection to keep teams informed.
- [Outputs Tab](/docs/deploy/workflows/workflow_components/outputs/): View and manage workflow outputs, output references, and artifacts in StackGuardian, enabling integration with other workflows and systems for seamless operations.
- [Overview Tab](/docs/deploy/workflows/workflow_components/overview/): Explore the workflow overview with compliance checks, cost estimates, resource summaries, and drift status for efficient management and monitoring.
- [Reference Variables](/docs/deploy/workflows/workflow_components/reference_variables/): Learn how to reference variables within Stacks, workflows, and templates. Streamline processes by utilizing output variables, secrets, and template data for seamless data transfer and modular system integration in StackGuardian.
- [Runs Tab](/docs/deploy/workflows/workflow_components/run/): Explore workflow runs with detailed logs, errors, compliance checks, cost estimations, and access to workflow files in StackGuardian for efficient management.
- [4. Execution Schedules](/docs/deploy/workflows/workflow_components/scheduled_workflow/): Automate tasks with Scheduled Workflows using cron expressions. Configure execution schedules and enforce security policies for seamless automation
- [Settings Tab](/docs/deploy/workflows/workflow_components/settings/): Configure and update workflow settings, including source, parameters, Terraform settings, deployment environment, and metadata for optimal workflow management
- [1. Source and Parameters](/docs/deploy/workflows/workflow_components/source_parameters/): Configure source settings for Terraform workflows, including Git repository integration, subscribed templates, and advanced options for parameterized inputs and configurations
- [2.1. Terraform/OpenTofu Configuration](/docs/deploy/workflows/workflow_components/terraform_config/): Configure how Terraform and OpenTofu execute within your workflows. Set up state management, approval checkpoints, drift detection schedules, CLI customizations, lifecycle custom steps, and workflow triggers for automation and notifications.
- [Webhook 🆕](/docs/deploy/workflows/workflow_components/webhook/): Integrate external services with StackGuardian workflows using webhooks. Trigger HTTP POST requests for success, failure, or drift detection events, enabling real-time automation and communication.
- [2. Configuration](/docs/deploy/workflows/workflow_components/workflow_config/): Enhance Terraform workflows with StackGuardian's Lifecycle Custom Steps, offering pre- and post-deployment hooks, custom integrations, and IAC tool-specific flexibility.
- [Workflow Groups](/docs/deploy/workflows/workflow_groups/): Learn how Workflow Groups in StackGuardian simplify workflow organization, provide access control, and streamline management for teams and environments.
- [Terragrunt Workflow](/docs/deploy/workflows/workflow_types/terragrunt/): Simplify Kubernetes app deployment with Terragrunt workflows on StackGuardian. Manage, upgrade, and roll back Helm releases for seamless application lifecycle management
- [Workflow triggers](/docs/deploy/workflows/workflow-triggers/): Learn how active and inactive workflow statuses work in StackGuardian, including automatic transitions, manual activation and deactivation, billing limits, and behavior when inactive.
- [Ansible Workflow](/docs/deploy/workflows/workflows_types/ansible/): Streamline infrastructure management with Ansible workflows on StackGuardian. Automate playbooks, deploy applications, and ensure consistency with ease.
- [CloudFormation Workflow](/docs/deploy/workflows/workflows_types/cloudformation/): Automate AWS resource deployment and management with CloudFormation workflows on StackGuardian. Use change sets, apply changes, and monitor stack drift.
- [Custom Workflow](/docs/deploy/workflows/workflows_types/custom/): Create custom workflows on StackGuardian to automate processes using personalized templates and tools like Bash, Python, and cloud provider CLIs.
- [Helm Workflow](/docs/deploy/workflows/workflows_types/helm/): Simplify Kubernetes app deployment with Helm workflows on StackGuardian. Manage, upgrade, and roll back Helm releases for seamless application lifecycle management
- [Kubectl Workflow](/docs/deploy/workflows/workflows_types/kubectl/): Automate Kubernetes resource management with Kubectl workflows on StackGuardian. Apply, retrieve, or delete manifests, and manage cluster resources with ease.
- [OpenTofu Configuration](/docs/deploy/workflows/workflows_types/opentofu/opentofu_configuration/): SG Managed OpenTofu Backend
- [OpenTofu Workflow](/docs/deploy/workflows/workflows_types/opentofu/opentofu/): OpenTofu is an open-source infrastructure-as-code (IaC) tool that helps you define and manage cloud infrastructure through code. It offers a transparent, community-driven alternative to Terraform, ensuring open usage without licensing restrictions.
- [Terraform Configuration](/docs/deploy/workflows/workflows_types/terraform/terraform_configuration/): Learn how to configure Terraform workflows on StackGuardian with custom backends, drift checks, and lifecycle steps. Manage Terraform state, approve plans, and optimize resources for secure, automated infrastructure deployments.
- [Terraform Workflow](/docs/deploy/workflows/workflows_types/terraform/terraform/): Create and manage Terraform workflows in StackGuardian with options for Git repositories, subscribed templates, and advanced lifecycle steps for seamless infrastructure automation.
- [Custom Runtime Image](/docs/develop/library/custom-runtime-image/): Learn how to extend the StackGuardian Terraform/OpenTofu runtime image with your own tools and dependencies.
- [Policies Templates](/docs/develop/library/iac_policies/): Create and enforce IAC policies in StackGuardian to align infrastructure with security standards and best practices, such as restricting root user access keys.
- [Workflows & Stacks Templates](/docs/develop/library/iac_stack_templates/): Create and manage IAC or Stack templates for AWS EC2 instances with Terraform. Automate infrastructure provisioning and enhance collaboration.
- [Manage Template Revisions](/docs/develop/library/manage_template_revisions/): Create and manage workflow templates with revisions and automation.
- [SG noCode Form Builder](/docs/develop/library/nocode_template_builder/): Create no-code templates with StackGuardian's Template Builder using JSONSchema Form, custom UI widgets, and dynamic data fetching to enhance workflow design.
- [Library](/docs/develop/library/overview/): Discover StackGuardian's Library for managing IAC resources. Easily create templates, groups, and policies, ensuring secure, compliant, and efficient cloud automation.
- [Runtime containers](/docs/develop/library/workflow_step/): Create and manage customized Runtime containers templates in StackGuardian with Terraform integration for seamless infrastructure automation.
- [Overview](/docs/develop/overview/): Explore StackGuardian's Templates, workflows, and policies. Manage cloud infrastructure with ease using workflow groups, stacks, and policy tools.
- [Create Policy](/docs/develop/policies/create_policy/): Create and enforce compliance with StackGuardian's 250+ policies or customize your own. Streamline approvals and secure workflows with ease.
- [NoCode Policy Builder](/docs/develop/policies/nocode_policy_builder/): Learn how to craft policies using StackGuardian's NoCode Policy Builder. Explore providers, operations, conditions, and error tolerance guidelines.
- [Policy Types](/docs/develop/policies/policy_types/): Explore StackGuardian's Policy Builder for enforcing workflows and cloud compliance. Learn about infrastructure, cost control, security, and tagging policies.
- [workflow-policies](/docs/develop/policies/workflow-policies/):
[llms.txt](/llms.txt). An extended version with full page content is available at
[llms-full.txt](/llms-full.txt).
[Skip to main content](#__docusaurus_skipToContent_fallback)
[](/)
[****](/)[Guides](/docs/)[API Explorer](/docs/api/overview/)[Community](/docs/community/overview/)
[SG-CLI](https://github.com/StackGuardian/sg-cli/blob/main/README.md)[GitHub](https://github.com/stackguardian/)
Resources
* [Guides](/docs/)
* [API Explorer](/docs/api/overview/)
* [Changelog](/docs/changelog/latest/)
Community
* [Stack Overflow](https://stackoverflow.com/questions/tagged/stackguardian)
* [Slack](https://join.slack.com/t/stackguardian-ol78820/shared_invite/zt-2ksag36j9-OjmXqQmyXudgYrV6FmesIQ)
* [LinkedIn](https://www.linkedin.com/company/73207926)
More
* [Website](https://stackguardian.io/)
* [Platform](https://app.stackguardian.io/)
* [GitHub](https://github.com/stackguardian/)
©2023 StackGuardian
---
# StackGuardian Docs
**StackGuardian** gives DevSecOps teams a faster, more controlled way to manage Infrastructure as Code (IaC) — with self-service workflows, governance, and orchestration built in. Browse the guides and references to set up, configure, and manage your infrastructure. New to StackGuardian? [Try the platform](https://app.stackguardian.io/login).
## Quick Starters[](#quick-starters "Direct link to Quick Starters")
Explore these guides to get up and running with StackGuardian:

#### Onboard on Platform
Get started by registering and launching workflows. Simplify your organization setup.

#### Create Workflow
Set up Terraform workflows seamlessly. Simplify provisioning and infrastructure management.

#### Create Stack
Group workflows into reusable stacks. Execute projects with seamless interoperability.

#### Private Runner Groups
Securely run tasks with self-hosted runners. Enhance control within your organization.

#### Connectors
Integrate cloud infrastructure with VCS, CSPs, and secret management vaults

#### Workshop
Experience hands-on IaC workshops with collaborative, standardized blueprints.
## Core Concepts[](#core-concepts "Direct link to Core Concepts")
Learn the fundamentals to build a solid foundation before diving into the platform:
#### Basics
Organize IaC templates and groups to streamline cloud infrastructure management.
#### Stacks
Bundle workflows into stacks for reusable, sequential infrastructure deployment.
#### Library
Explore pre-built templates and policies with no-code configuration tools.
#### Connectors
Integrate cloud infrastructure with VCS, CSPs, and secret management vaults.
#### Policies
Ensure compliance with 250+ policies or create custom tailored rules.
#### Runtime Containers
Create templates to integrate personalized automation into workflows easily.
## Connect and Extend[](#connect-and-extend "Direct link to Connect and Extend")
Effortlessly integrate with cloud providers and version control systems for streamlined workflows:
#### Cloud Providers
Connect StackGuardian to popular Cloud Providers

Amazon Web Services

Google Cloud Provider

Azure
#### Version Control
Streamline collaboration with Version Control integration

GitHub

BitBucket

Azure DevOps

AWS CodeCommit

GitLab

GitHub Enterprise
## Additional Resources[](#additional-resources "Direct link to Additional Resources")
Discover, learn, and master StackGuardian:
#### API Explorer
Explore StackGuardian API documentation for integration and automation workflows.
#### SG-CLI
Interact with StackGuardian’s platform efficiently via a command-line interface.
#### Changelog
Track every tweak, feature, and fix with our detailed update history.
#### SG-Terraform-Provider
Programmatically integrate Terraform with StackGuardian for resource management.
#### Tirith Copilot
Ensure compliance with StackGuardian’s robust policy framework effortlessly.
---
# API Overview
StackGuardian APIs use predictable, resource-oriented URLs, accept JSON-encoded request bodies, and return JSON-encoded responses. The API uses standard HTTP response codes and verbs to indicate success or failure.
**Base URL:** Use this as the base for all API endpoints.
* EU Region
* US Region
```
https://api.app.stackguardian.io/api/v1
```
```
https://api.us.stackguardian.io/api/v1
```
tip
Use the base URL that corresponds to the region where your StackGuardian organization is hosted.
## Authentication[](#authentication "Direct link to Authentication")
Authenticate against the StackGuardian API using an API Key. Generate the API Key in your Organization's settings, then pass it in the `Authorization` HTTP header:
```
Authorization: apikey
```
## Steps to Generate an API Key[](#steps-to-generate-an-api-key "Direct link to Steps to Generate an API Key")
Access, generate, and use StackGuardian API key for secure authenticated requests.
### 1. Open the API Key Tab[](#1-open-the-api-key-tab "Direct link to 1. Open the API Key Tab")
To access your API key:
* Click on profile, navigate **Profile Settings → API Key**
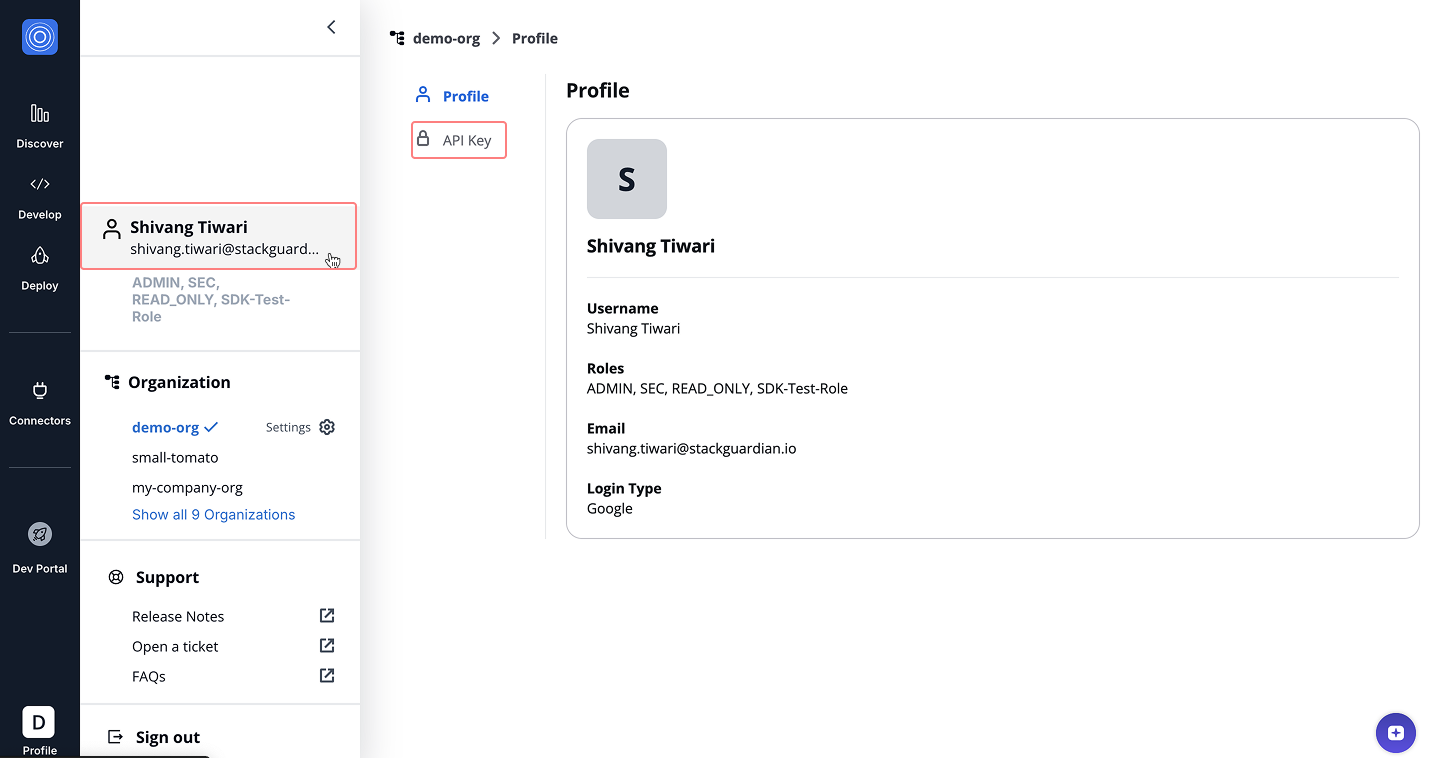
### 2. Generate and Copy the API Key[](#2-generate-and-copy-the-api-key "Direct link to 2. Generate and Copy the API Key")
Manage current API key or generate a new one.
#### Viewing an Existing Key[](#viewing-an-existing-key "Direct link to Viewing an Existing Key")
Click the **View** button to reveal currently active API key.
* The key will be masked by default. Once visible, you can use the **Copy** button to copy it securely.
note
Keep the key confidential and store it in a secure password manager.
#### Regenerating the API Key[](#regenerating-the-api-key "Direct link to Regenerating the API Key")
If you want to invalidate the current key and create a new one:
* Click the **Regenerate** button. This action deactivates the existing key and replaces it with a new one.
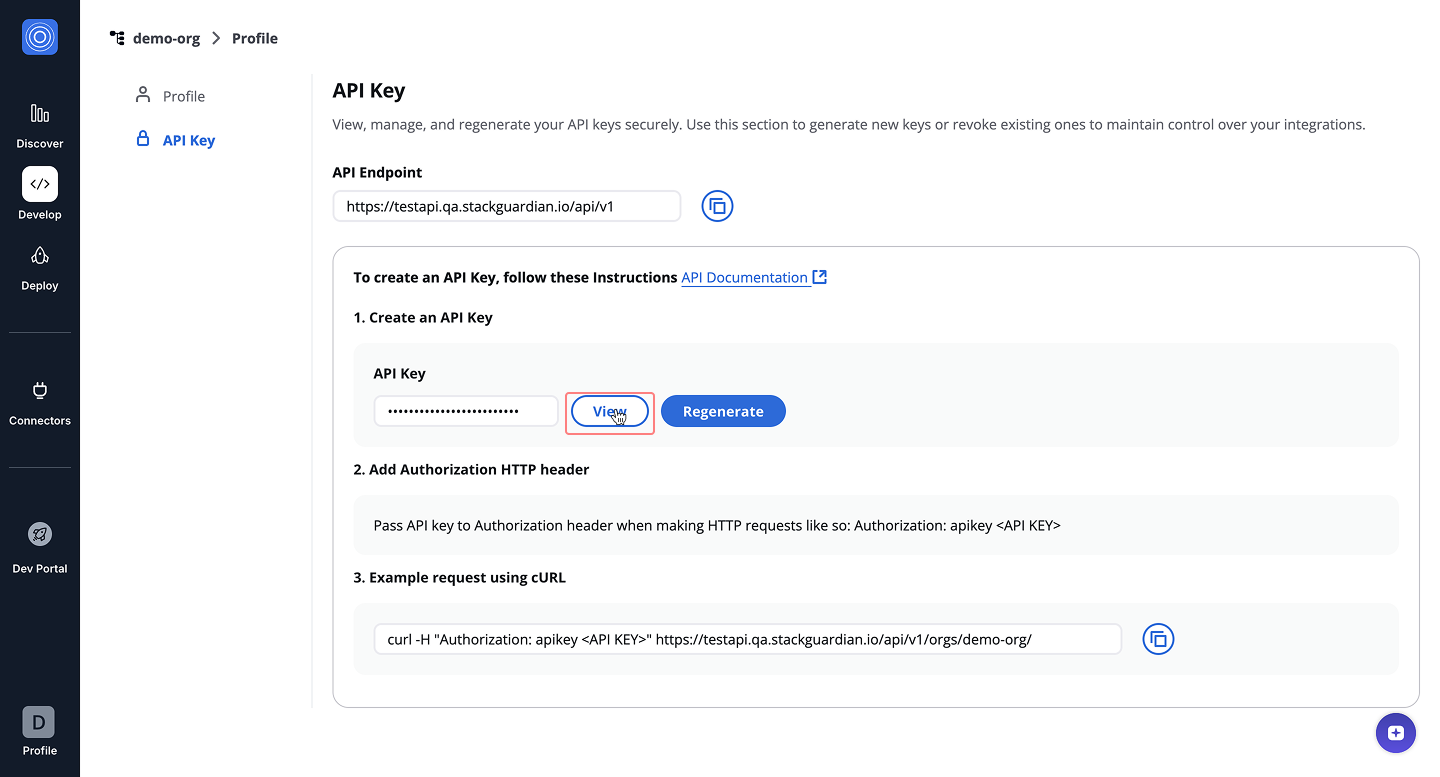
### 3. Making Requests[](#3-making-requests "Direct link to 3. Making Requests")
Once your key is copied, you can use it to authenticate HTTP requests to the StackGuardian API.
* EU Region
* US Region
```
curl -H "Authorization: apikey " https://api.app.stackguardian.io/api/v1/orgs//
```
```
curl -H "Authorization: apikey " https://api.us.stackguardian.io/api/v1/orgs//
```
info
You can run the command directly in a **Unix-based terminal** (Linux/macOS) or via **Git Bash** or **WSL** on Windows.
## Errors[](#errors "Direct link to Errors")
StackGuardian APIs follow standard HTTP response codes:
| **Status Code** | **Description** |
| ---------------------- | ----------------------------------------------------------- |
| **200 - OK** | Request was successful. |
| **204 - OK** | Request was successful, but no content to return. |
| **400 - Bad Request** | Request was invalid due to missing or incorrect parameters. |
| **401 - Unauthorized** | Invalid or expired API Key. |
| **403 - Forbidden** | Access to the requested resource is not permitted. |
| **404 - Not Found** | Resource does not exist. |
| **5xx - Server Error** | Server encountered an issue. Please report it to support. |
## Reporting Issues[](#reporting-issues "Direct link to Reporting Issues")
If you encounter any issues:
* Raise a support [**ticket**](https://support.stackguardian.io/ticket)
* Connect with us on [**Slack**](https://join.slack.com/t/stackguardian-ol78820/shared_invite/zt-2ksag36j9-OjmXqQmyXudgYrV6FmesIQ)
---
# StackGuardian Backstage Plugin
## Overview[](#overview "Direct link to Overview")
The **StackGuardian Backstage Plugin** seamlessly integrates the [StackGuardian](https://stackguardian.io/) platform into your Backstage developer portal. It enables teams to **discover, configure, and deploy IaC templates and workflows** directly from Backstage without switching tools. Through an intuitive interface, users can browse reusable infrastructure templates, trigger deployments, and monitor their status — all within a single developer experience.
## Installation & Usage[](#installation--usage "Direct link to Installation & Usage")
The plugin is available as [**NPM package**](https://www.npmjs.com/package/@stackguardian/backstage-plugin-sg-library) and to install this plugin into your Backstage app, run the following command at the root of your project:
```
yarn --cwd packages/app add @stackguardian/backstage-plugin-sg-library
```
## Configuration[](#configuration "Direct link to Configuration")
* Update your `app-config.yaml` file to include the following configuration:
```
integrations:
stackguardian:
organization: '' # StackGuardian Organization name
backend:
baseUrl: '' # Backstage Backend URL
listen:
port: 7007
proxy:
'/stackguardian':
# EU region: https://api.app.stackguardian.io/api/v1
# US region: https://api.us.stackguardian.io/api/v1
target: 'https://api.app.stackguardian.io/api/v1'
headers:
Authorization: 'apikey {SG_API_KEY}'
allowedHeaders:
- x-sg-orgid
changeOrigin: true
```
Region Configuration
Use the API URL that corresponds to your StackGuardian organization's region:
* **EU region**: `https://api.app.stackguardian.io/api/v1`
* **US region**: `https://api.us.stackguardian.io/api/v1`
- Set your API key environment variable:
```
export SG_API_KEY=
```
You can obtain the API key from the [**StackGuardian Platform**](https://app.stackguardian.io/orchestrator/orgs). Refer to following docs for details on generating an API keys.
* [**API Keys**](https://docs.stackguardian.io/docs/profile/api_keys/)
* [**API Access**](https://docs.stackguardian.io/docs/organisation_settings/api_access/)
info
The plugin uses the Backstage proxy server to communicate with StackGuardian APIs to avoid CORS errors and prevent exposing the API key in the browser’s network tab. You can read about proxy server [here](https://backstage.io/docs/plugins/call-existing-api/)
## Functional Overview[](#functional-overview "Direct link to Functional Overview")
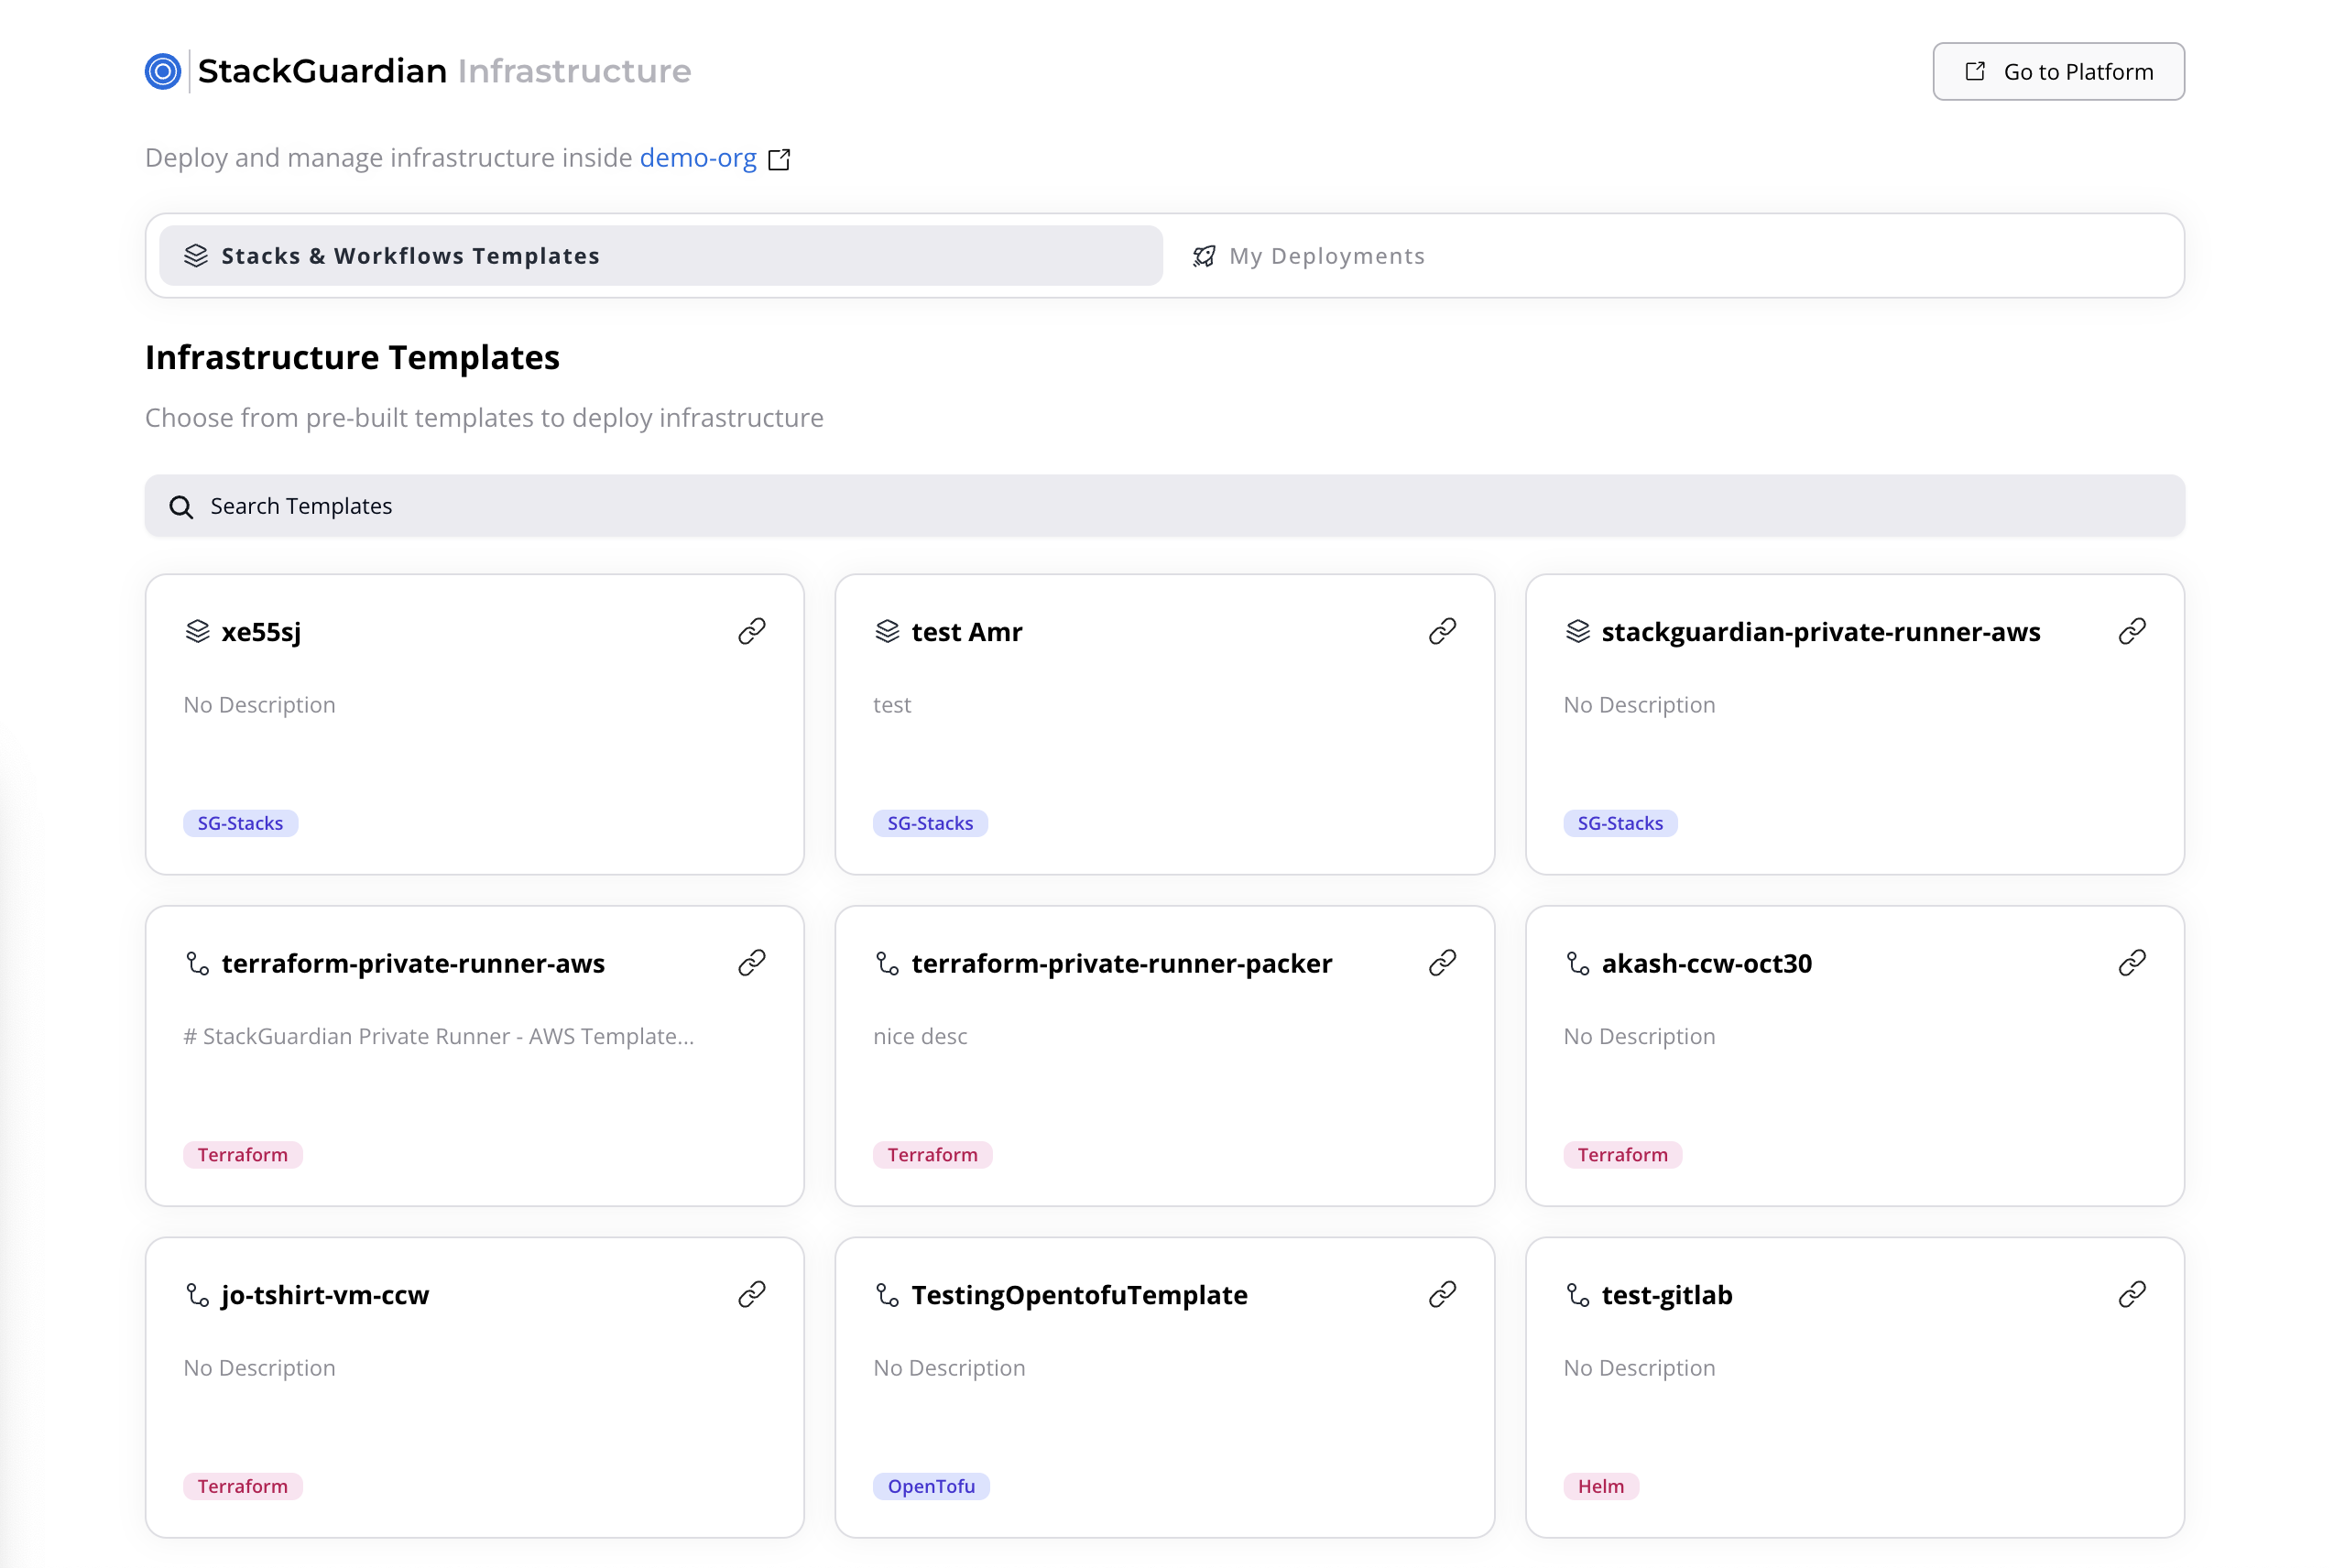
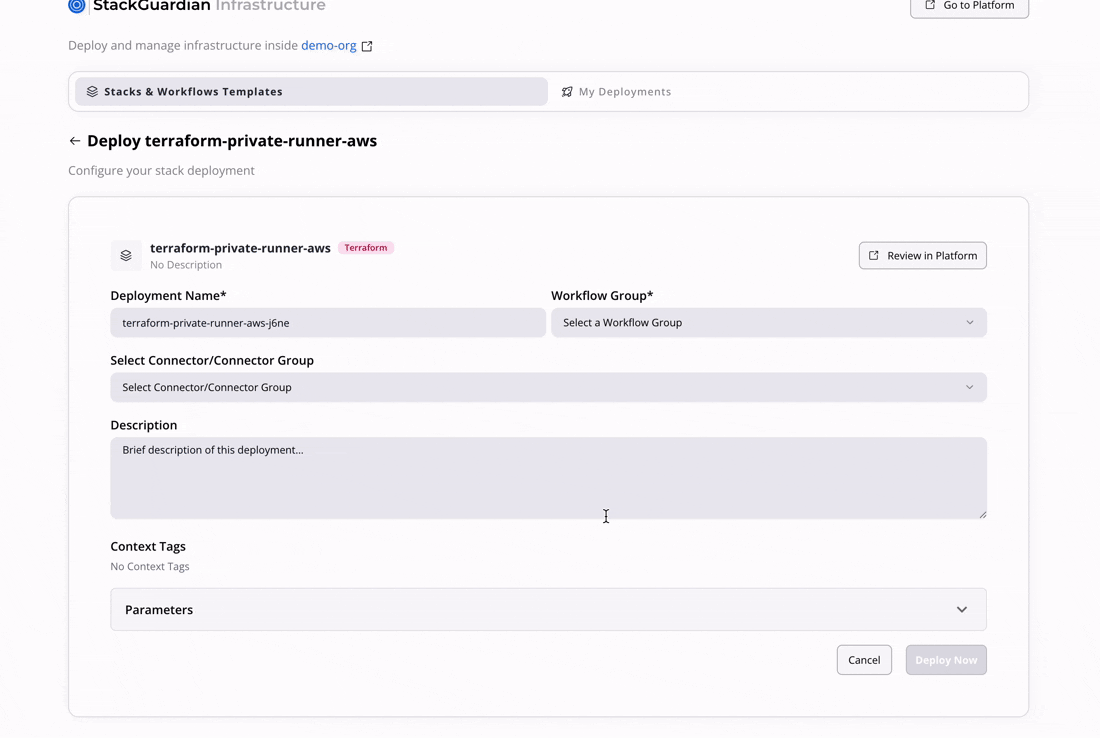
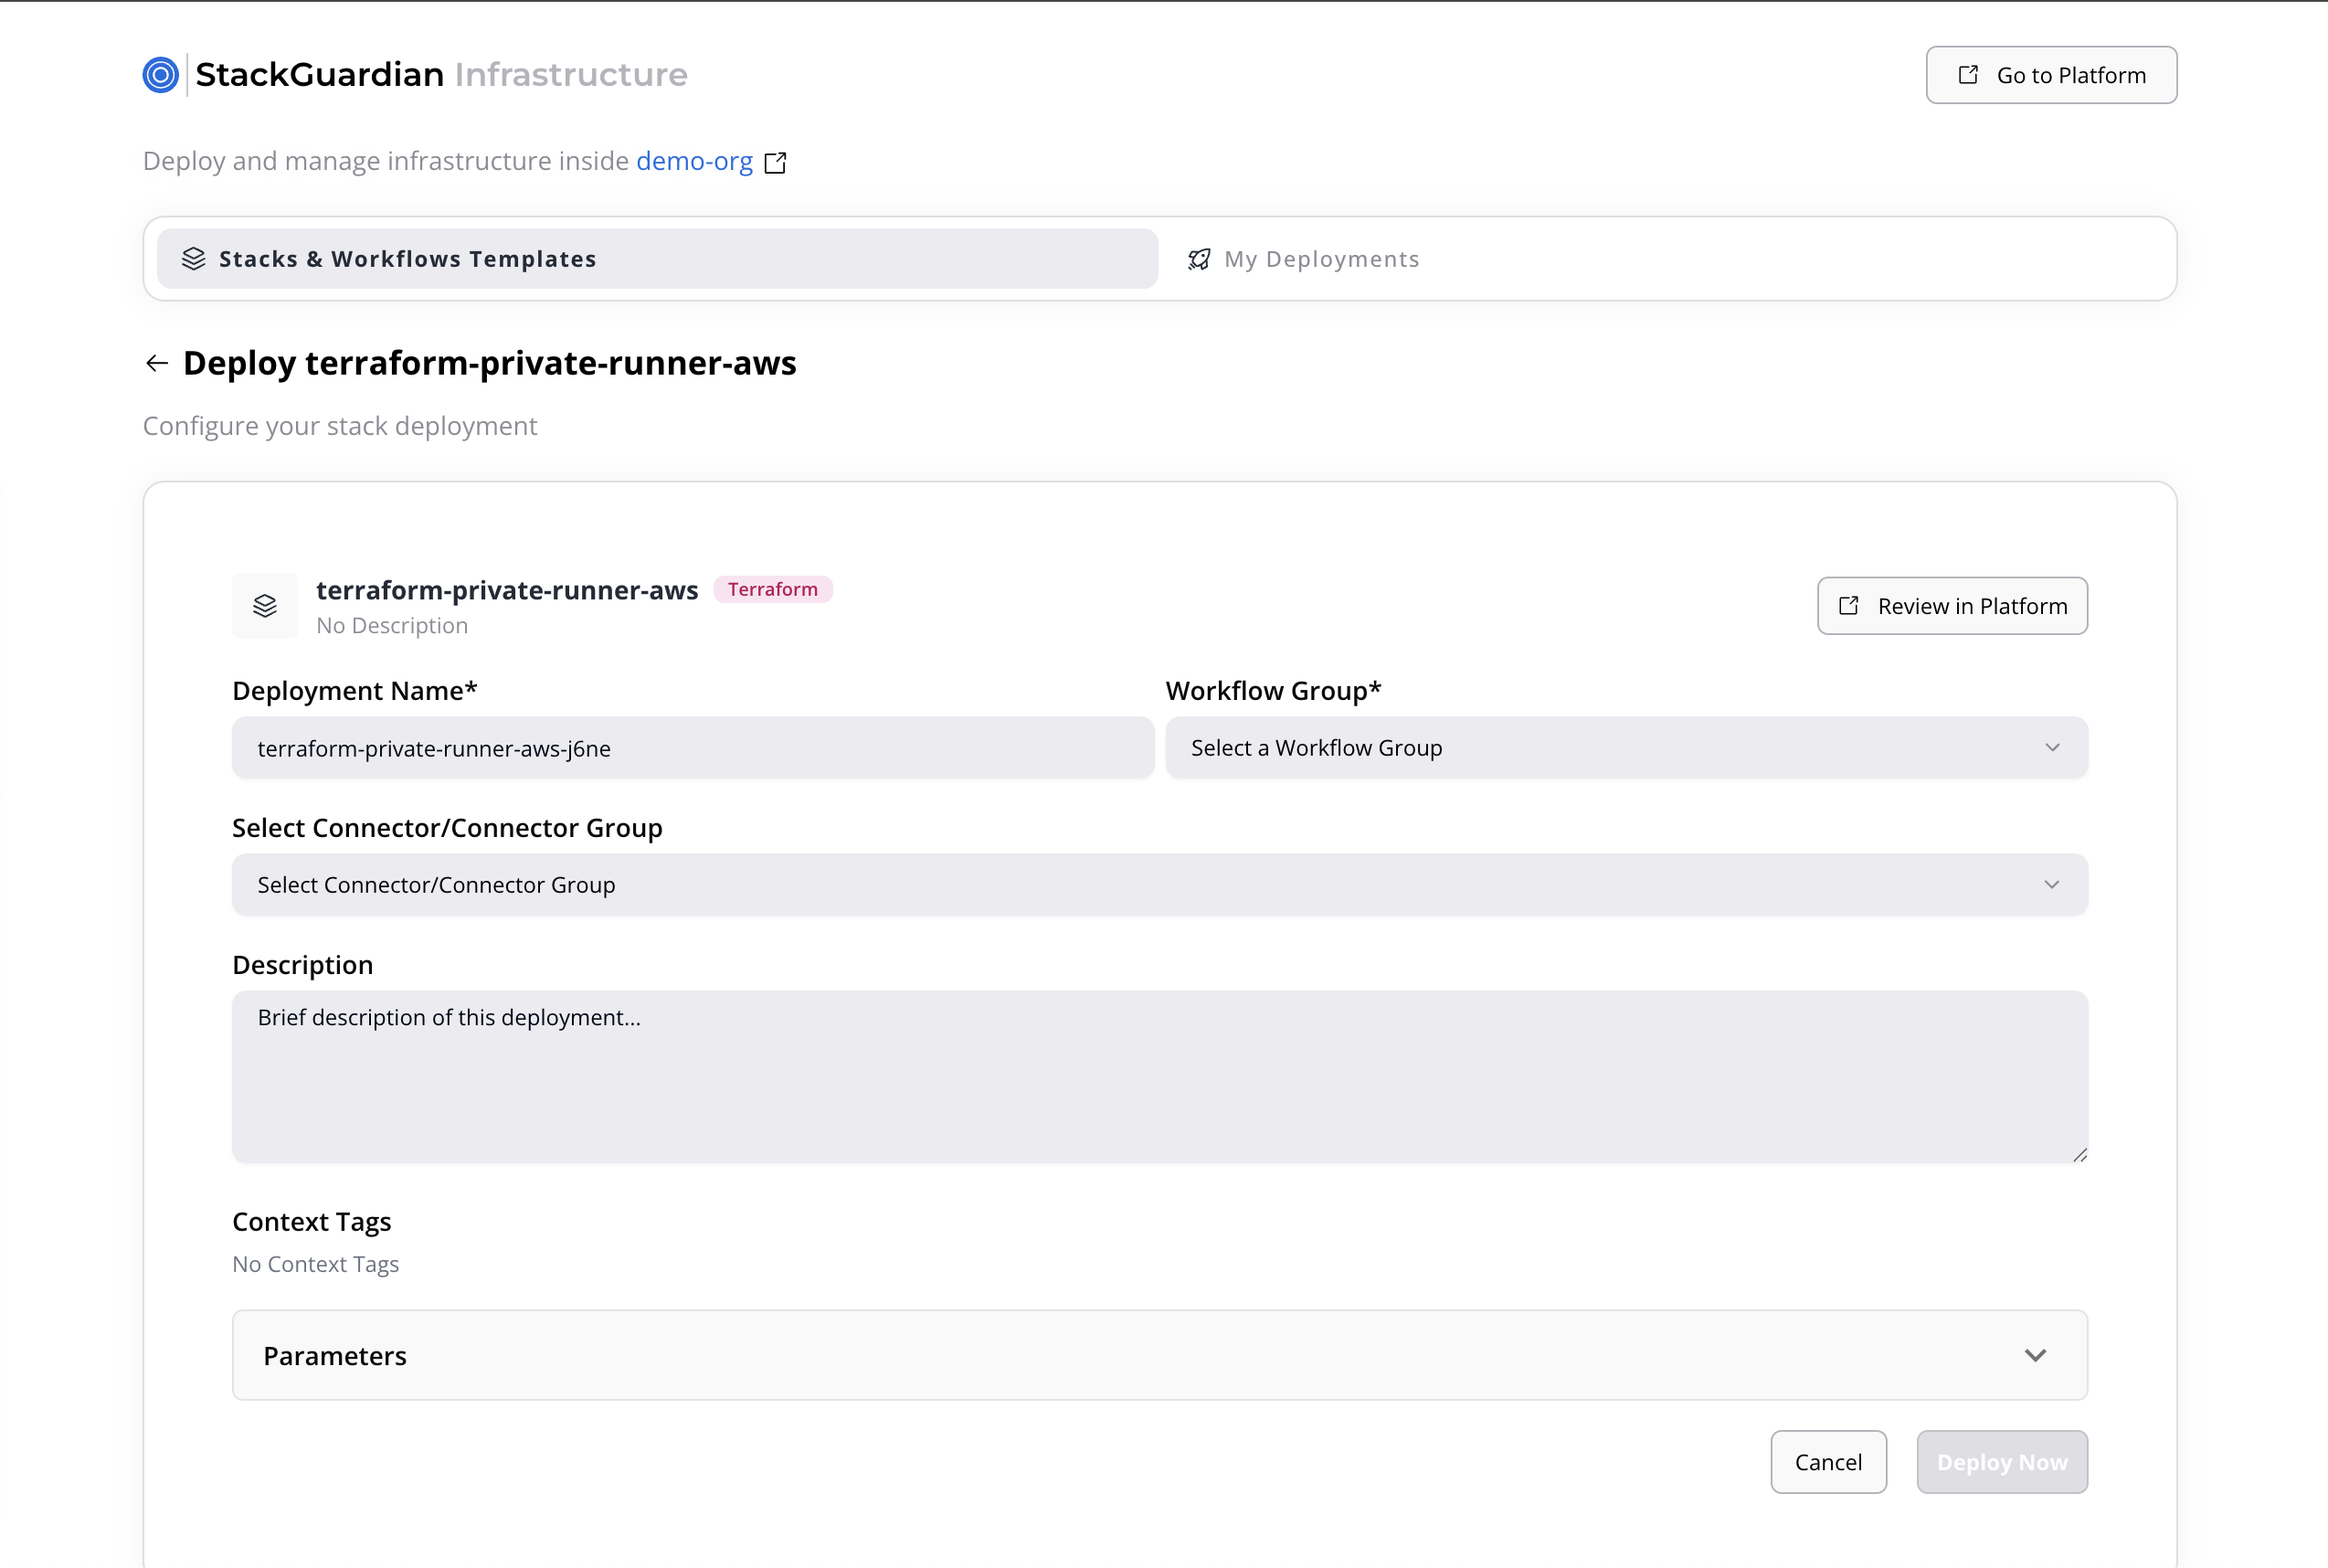
### 1. Stacks & Workflows Templates[](#1-stacks--workflows-templates "Direct link to 1. Stacks & Workflows Templates")
#### Purpose[](#purpose "Direct link to Purpose")
Provides users with a catalog of all available **deployment templates** in StackGuardian. Each template allows teams to deploy pre-defined infrastructure stacks or workflows directly from Backstage.
#### Interface[](#interface "Direct link to Interface")
#### Features[](#features "Direct link to Features")
* **Search & Filter:** Quickly find templates by name and type.
* **Template Details:** Clicking a template opens a form requiring:
* **Deployment Name**
* **Workflow Group** (from a predefined list)
* **Connector**
* **Description**
* **Tags** (read-only)
* **Parameters:**
* *Single-workflow template:* Simple list of parameters.
* *Stack template:* Multiple parameter sets, one per workflow.
* **Deploy Action:** Once completed, users can start a deployment via **“Deploy Now.”**
***
### 2. My Deployments[](#2-my-deployments "Direct link to 2. My Deployments")
Displays all deployments initiated by the user and their current execution status, allowing easy monitoring and review.
#### Interface[](#interface-1 "Direct link to Interface")
Each deployment entry includes:
* **Deployment Name**
* **Workflow Group**
* **Source Template**
* **Status** (*Completed*, *In Progress*, *Failed*, *Pending Approval*)
* **Deployment Timestamp**
#### Features[](#features-1 "Direct link to Features")
* **Real-time Status Updates:** Deployment statuses sync dynamically with the StackGuardian platform.
* **Expanded Details:** Expanding a deployment shows:
* Deployment Outputs
* A link to **“View in SG Platform”** for full details in StackGuardian.

---
# 1.30.0 🎉
### What's Changed[](#whats-changed "Direct link to What's Changed")
Release Date: Apr 17th, 2025
## Features 🚀[](#features- "Direct link to Features 🚀")
* **File Triggers for GitLab**: File-based triggers using glob patterns allowing workflows to run only when specific files or directories change.
* **Consolidated Workflow View**: Unified table to display and manage all workflows and stacks with filters from a single, centralized interface.
* **Notification Modal**: One-time view Modal to brief users about the latest features and enhancements on the platform.
## Enhancements 🔥 + 💪[](#enhancements--- "Direct link to Enhancements 🔥 + 💪")
* **Runner Group View UI**: Enhanced UI for managing runner groups.
* **PropertyFilter in WF Group Table**: Implemented `PropertyFilter` for a cleaner workflow group table experience.
* **Proxy Settings in Runner Group Modal**: Added ability to configure proxy inside runner group creation.
* **RBAC Dropdown Refactor**: Refined dropdown variant in RBAC view.
* **Support for Long Resource Values**: Increased limit for `ResourceValue` to 7096 characters.
## Bug Fixes 🐛[](#bug-fixes- "Direct link to Bug Fixes 🐛")
* **Monaco Editor Not Working**: Fixed Monaco editor rendering issue.
* **Output Reference Modal Issues**: Addressed loading and missing options in output reference modals.
* **Policy Enforcement Fixes**: Ensured policy enforcement logic is correctly applied.
* **TIRITH JSON Flow Fixes**: Fixed invalid `inputSchemas` and crashing issues in Tirith builder.
* **Repo Not Found Error**: Handled repo-not-found errors for multi-provider templates.
* **Role Bindings Load Timing**: Fixed when to fetch role bindings inside org settings.
* **VCSConfig Handling in Template Builder**: Corrected build and creation flow to respect `VCSConfig`.
* **Cancel Run Button State**: Addressed button state issues for cancel run feature.
* **NoCode Template Rendering**: Fixed NoCode config not rendering properly in template settings.
* **Overlapping Text in Consumptions**: Resolved text overlap in UI.
* **Flashbar Behavior**: Made workflow PATCH request errors inside flashbars dismissible.
* **Secrets Role ID Undefined**: Fixed undefined `resourceId` for secrets in roles view.
* **UI Widget Mapping for Password Field**: Corrected widget rendering for password inputs.
---
# 1.30.1 🎉
### What's Changed[](#whats-changed "Direct link to What's Changed")
Release Date: May 8th, 2025
## Features 🚀[](#features- "Direct link to Features 🚀")
* [**Template revision** ](/docs/develop/library/manage_template_revisions/): New UI introduced to simplify the management and handling of template revisions.
* [**Profile Dashboard** ](/docs/profile/api_keys/): Introduced a refreshed UI with a structured layout for managing user details, API keys, and MFA configurations.
## Enhancements 🔥 + 💪[](#enhancements--- "Direct link to Enhancements 🔥 + 💪")
* **Preferences for workflows and policies**: Users can now set and retain preferences (e.g., page size, filters) across workflows and policy tables.
* **Azure Storage backend improvements**: Introduced an authentication field for improved integration with Azure storage backends.
## Bug Fixes 🐛[](#bug-fixes- "Direct link to Bug Fixes 🐛")
* **Resource name validation issue resolved**: Fixed incorrect error text when resource name doesn’t align with the selected template type.
* **CSP error resolved**: Patched missing content security policy header handling that caused UI to fail silently.
* **Template name spacing issue**: Users can now create revisions even when the template name includes whitespace characters.
* **Notification type dropdown bug**: Corrected the logic preventing correct notification type selection inside the UI.
* **Runtime errors display in Errors tab**: Implemented logic to fetch and display runtime error details directly in the Errors tab. -**Template dropdown duplication removed**: Removed redundant entries from the template selection dropdown within roles view. **Notification modal removed**: Temporarily disabled the global notification modal to prevent interference with workflows.
* **Initial API call respects page size preference**: Page size setting now correctly triggers an API call with the specified limit on load.
* **Secrets patch logic optimized**: Connector group updates no longer resend secrets if they haven't changed.
* **No-code validator infinite loop fixed**: Fixed repeated triggering inside SG NoCode forms caused by schema validator loop.
* **User role shown in sidebar** Side navigation now correctly displays the user role for contextual access.
* **Safe payload lookups added**: All lookups for workflow payload attributes in DevPortal are now safely handled to avoid app crashes.
* **Redux state sync on delete**: UI now correctly reflects deletion events in redux-managed views.
* **Select component supports multi-variant mode**: Dropdown UI components now support multi-select when required.
* **Check Error button fix in logs**: “Check Error” action in logs is now visible only when actionable errors are available.
* **Stack create defaults respected**Fixed bug where default values weren’t auto-filled during stack creation.
* **Cloudscape support for NullField widget**: Introduced a cloudscape-native rendering of the `NullField` form component.
* **Redux issue in library view resolved**: Fixed stale or unsynced redux states causing incorrect data views in template library.
* **Github custom app option added**: Support added for selecting Github custom apps in IaC schema and policy definitions. -**Autosuggest widget made publicly usable**: Autosuggest form widget is now published for use across all compatible template forms. -**VCS config retained during stack upgrade**: Stack upgrade flow now correctly carries forward VCS configuration when present.
---
# 1.30.2 🎉
### What's Changed[](#whats-changed "Direct link to What's Changed")
Release Date: May 29th, 2025
## Features 🚀[](#features- "Direct link to Features 🚀")
* **You can now add policies to your Stacks!**: Just like you could enforce policies to Workflows, we have now added the same ability for Stacks.
* **Workflow View UI revamp in progress**: Design improvements are being rolled out incrementally to avoid disruption and allow for continuous feedback and iteration.
## Enhancements 🔥 + 💪[](#enhancements--- "Direct link to Enhancements 🔥 + 💪")
* **You can now create template from your Workflow with Source Type as VCS!**: Ever wanted to create template out of your workflow that used version control? Well, now you can! Simply head over to the workflow settings, source and parameters, source type and create template.
* **We have added breadcrumb trail to runner group view**: To stay consistent across our platform and help you navigate better, we have now added breadcrumb navigation to the runner group view.
* **Context tags in stack upgrade**: Added contextual tags for stack upgrade wizard.
* **We have improved our Tirith Policy Builder**: You are now able to add a different type of condition to your value. No more data type mismatches!
## Bug Fixes 🐛[](#bug-fixes- "Direct link to Bug Fixes 🐛")
* **UI crash in NoCode forms**: Resolved schema definition issues causing crashes.
* **Custom tool path rendering fixed**: Corrected display of custom tool paths in private runner workflows.
* **Preview eye icon fixed**: Corrected preview icon behavior in documentation tabs.
* **Fix for nested dropdowns in Git flow**: Resolved nested dropdown issues in developer portal.
* **SSO user check logic updated**: Improved logic for checking if the user is SSO authenticated.
* **Download run logs issue resolved**: Fixed download functionality for workflow execution logs.
* **Template revision management fixes**: Enhanced template revision handling for smoother updates.
* **Fix for API key tab visibility**: Ensured API key tab is hidden for SSO group users.
* **Multiselect widget rendering fix**: Improved rendering of multiselect widget in NoCode forms.
* **Workflow logs rendering issue resolved**:Fixed
log rendering issues in workflows.
---
# 1.30.3 🎉
### What's Changed[](#whats-changed "Direct link to What's Changed")
Release Date: June 19th, 2025
## Features 🚀[](#features- "Direct link to Features 🚀")
* **We have added default config steps for custom workflows**: To stay consistent across our platform, Workflows used with templates (except Terraform, Opentofu and KubeCTL) will now show default steps during creation.
* **Workflow View UI revamp in progress**: Design improvements are being rolled out incrementally to avoid disruption and allow for continuous feedback and iteration.
* **Side navigation hierarchy UI revamp**: We're gradually rolling out a redesigned UI for this page to improve usability and consistency. You may notice some areas updated ahead of others during this transition.
* **We have added OIDC Login support**: You can now log in using a secure OIDC provider such as Google or Microsoft. This brings enhanced security, easier access, and supports Single Sign-On (SSO) for enterprise users.
* **We have added a new widget to our NoCode Form Builder!**: You can now use a new CustomCodeFrontend Widget, which will execute your JavaScript code in your browser. Get ready to code like a pro!
## Bug Fixes 🐛[](#bug-fixes- "Direct link to Bug Fixes 🐛")
* **Miscellaneous Bug Fixes**.
---
# 1.30.4 🎉
### What's Changed[](#whats-changed "Direct link to What's Changed")
Release Date: July 10th, 2025
## Features 🚀[](#features- "Direct link to Features 🚀")
* **You can now view your Org's Infracost**: Want to view your infrastructure costs directly in your own Infracost account? Now you can—simply use your own API key to track all costs within your org's Infracost account.
* **Our RBAC has grown even more! You can now set Create permissions based on ReGex expressions**: It is now possible to configure a Regex pattern to govern resource creation across all 'Create' permissions.
## Enhancements 🔥 + 💪[](#enhancements--- "Direct link to Enhancements 🔥 + 💪")
* **We have improved the Workflow Overview Dashboard**: We've given the Workflow Overview Dashboard a fresh upgrade—now with enhanced visibility for deeper insights and a smoother experience.
* **We’ve added a new list view for Workflow Groups**: New list view, better workflow. Easily browse your Workflow Groups in a cleaner, more user-friendly format.
* **Library functions, now at a glance!**: We've introduced a new way to view Library functions at a glance—making it easier than ever to explore and navigate.
## Bug Fixes 🐛[](#bug-fixes- "Direct link to Bug Fixes 🐛")
* **Stack Revision defect resolved**: We’ve fixed a defect in Stack Revision where deleted and replaced templates could trigger bugs. Guardrails and better user feedback are now in place to ensure stability.
* **Stack bug fixed**: Removing a Workflow from a Stack now correctly updates the Stack object.
* **Other miscellaneous bug fixes**
---
# 1.30.5 🎉
### What's Changed[](#whats-changed "Direct link to What's Changed")
Release Date: July 31st, 2025
## Features 🚀[](#features- "Direct link to Features 🚀")
* **Introducing Kyro Bot**: We are excited to introduce Kyro, our very first fully-powered AI chatbot, ready to answer any StackGuardian-related questions you may have.
* **Context Tags for Workflows Runs**: You can now add context tags to both new and existing workflows runs, enhancing filtering and improving traceability.
## Enhancements 🔥 + 💪[](#enhancements--- "Direct link to Enhancements 🔥 + 💪")
* **Template Tags Are Back!**: Template tags have returned—now available in the redesigned Library List view for quicker, more organized template management.
* **Simplified Resource Output References**: We’ve reimagined how you create output references between resources across the platform. It’s now more intuitive, structured, and user-friendly.
* **Enhanced Workflow Overview**: Our updated Workflow Overview page delivers a cleaner, smoother experience as part of our broader design refresh.
* **Organizational Settings, Now with Tabs**: We’ve revamped the Organization Settings page with horizontal tabs, making it easier to navigate and manage your settings at a glance.
* **New Azure Storage Authentication Option**: We now support a new connector-based authentication method for Azure Storage—giving you more flexibility and integration power.
## Bug Fixes 🐛[](#bug-fixes- "Direct link to Bug Fixes 🐛")
* **Miscellaneous bug fixes**
---
# 1.30.6
### What's Changed[](#whats-changed "Direct link to What's Changed")
Release Date: August 21st, 2025
## Features 🚀[](#features- "Direct link to Features 🚀")
* **Context Tags for Stack Runs**: You can now add Context Tags directly to Stack Runs. This makes it easier to create, reference, and manage your Stacks or Workflows through the new referencing window.
* **Webhooks for Audit Logs**: Stay in control even outside of StackGuardian! You can now configure webhooks for your organization’s audit logs to monitor activities in real time, wherever you are.
## Enhancements 🔥 + 💪[](#enhancements--- "Direct link to Enhancements 🔥 + 💪")
* **Azure Blob Storage – Alternate Authentication**: We’ve added support for an alternate authentication method for azure\_blob\_storage through connector-based integration. A new dropdown (similar to aws\_s3) now lets you select available connectors for easier setup.
* **SSO Groups for Workflow Approvals**: You can now include SSO Groups in the workflow approval process, making it easier to manage access and streamline approvals across your organization.
## Bug Fixes 🐛[](#bug-fixes- "Direct link to Bug Fixes 🐛")
* **General stability improvements and miscellaneous bug fixes.**
---
# 1.30.7
### What's Changed[](#whats-changed "Direct link to What's Changed")
Release Date: September 4th, 2025
## Features 🚀[](#features- "Direct link to Features 🚀")
* **Organisation-Level API Keys**: Create API keys at the organization level, tied to roles for simpler, more secure programmatic access management.
* **Bitbucket API Key Authentication**: Bitbucket connectors now support API key authentication. This replaces the soon-to-be-deprecated App Passwords, providing a more secure and future-ready integration.
## Enhancements 🔥 + 💪[](#enhancements--- "Direct link to Enhancements 🔥 + 💪")
* **Improved Role Assignment UI**: The role assignment dropdowns in RBAC have been redesigned for better clarity and ease of use.
* **Customisable SSO Group Aliases**: Assign readable aliases to SSO groups, in place of system-generated strings, simplifying recognition and management.
## Bug Fixes 🐛[](#bug-fixes- "Direct link to Bug Fixes 🐛")
* **General stability improvements and miscellaneous bug fixes.**
---
# 1.30.8
### What's Changed[](#whats-changed "Direct link to What's Changed")
Release Date: September 30th, 2025
## Features 🚀[](#features- "Direct link to Features 🚀")
* **Stopping Workflow Runs**: Workflows can now be canceled at any stage before completion. Users see tailored warnings by workflow type, stack runs honor these cancellations, and the UI provides clear visibility into cancellation progress.
* **Policy Checks in Workflow Overview**: A new Policy Checks section has been added to the Workflow Overview tab, making it easier to monitor both runtime and configuration policies. Runtime Policies are evaluated during workflow execution and report results for each run: Pass, Fail, Warning, or Pending.
## Enhancements 🔥 + 💪[](#enhancements--- "Direct link to Enhancements 🔥 + 💪")
* **Detailed Workflow Statuses**: Terraform and OpenTofu workflows now display more granular statuses. These enhanced details are visible across the platform wherever workflow runs appear.
* **Custom Code Alerts in SG NoCode**: When adding custom code to a UI widget in SG NoCode, users must now acknowledge an alert before proceeding. This ensures transparency and safer use of JSON schema customizations.
* **RBAC Template Permissions Expanded**: Create Templates permissions now include Template Type, Owner Org, and Regex ID fields, giving users greater control and clarity in template management.
## Bug Fixes 🐛[](#bug-fixes- "Direct link to Bug Fixes 🐛")
* **General stability improvements and miscellaneous bug fixes.**
---
# 1.30.9
### What's Changed[](#whats-changed "Direct link to What's Changed")
Release Date: October 23rd, 2025
## Enhancements 🔥 + 💪[](#enhancements--- "Direct link to Enhancements 🔥 + 💪")
* **Improved Benchmark Checks**: We’ve upgraded our benchmarking engine with enhanced accuracy and GxP compliance checks to strengthen governance coverage.
* **Configuration Policies**: The latest evaluation results are now automatically stored on stacks and workflows during create, update, and run operations—improving traceability and compliance reporting.
## Bug Fixes 🐛[](#bug-fixes- "Direct link to Bug Fixes 🐛")
* **General stability improvements and miscellaneous bug fixes.**
---
# 1.31.0
### What's Changed[](#whats-changed "Direct link to What's Changed")
Release Date: November 13th, 2025
## Features 🚀[](#features- "Direct link to Features 🚀")
* **StackGuardian Backstage Plugin**: Browse **workflows** and **stack templates** from Backstage, deploy them, and then track the status and results of those deployments in one unified experience.
* **PR/MR Run Snapshots (GitHub/GitLab)**: PRs and MRs now show a **continuously updated snapshot** of what each trigger executed—reducing comment noise while keeping full traceability.
## Enhancements 🔥 + 💪[](#enhancements--- "Direct link to Enhancements 🔥 + 💪")
* **Configuration Policy Results in UI**: You can now see **Configuration Policy Rule** results and an overall status summary directly in the **Policy Checks** section, so outcomes are clear at a glance without reviewing workflow runs.
* **Storage Backend Configuration Improvements**: Improved the UX for configuring storage backends — **AWS S3 (via connectors only)** and **Azure Blob (via connectors or access keys)** — with validation applied to connector-based configurations, including during runner group creation.
* **Dev Portal Enhancements**: Improved browsing and filtering, along with a smoother experience when using Git repositories as sources for developing new workflows.
* **Audit Logs UI**: Logs are now presented in a clearer, table-based layout for **better and faster browsing**.
* **References to Workflow Values & Secrets**: Terraform workflows now show only the **value folder** when referencing outputs, making it faster to access usable values, while custom workflows retain the full structure.
* **Template Activation RBAC**: A new permission level allows controlled activation of templates within StackGuardian.
## Bug Fixes 🐛[](#bug-fixes- "Direct link to Bug Fixes 🐛")
* **General stability improvements and miscellaneous bug fixes.**
---
# 1.31.1
### What's Changed[](#whats-changed "Direct link to What's Changed")
Release Date: December 4th, 2025
## Features 🚀[](#features- "Direct link to Features 🚀")
* **🎛️ More Granular User Permissions**: We’ve introduced a more flexible and secure user permission model. Team owners can now delegate specific user-management tasks using fine-grained permissions:
* Invite User
* Update User
* Delete User
This enables better control, reduces admin bottlenecks, and allows for safer delegation.
**Important**: The **Update Role Binding** permission is being deprecated and will be fully removed in **April 2026**. Please migrate to the **Update User** permission to ensure uninterrupted functionality. 📘 [Migration guide available](https://docs.stackguardian.io/docs/organisation_settings/access_management/#migration-guide-update-role-binding--update-user).
## Enhancements 🔥 + 💪[](#enhancements--- "Direct link to Enhancements 🔥 + 💪")
* **🧱 Stack UI Improvements (Ongoing)**: Our UI modernization initiative is underway! The Information Header, Runs, and Outputs sections have been refreshed for improved clarity and usability.
⚡ Coming soon: Stack Actions and Stack Overview for even better management and visibility.
* **🧩 Templates UI Refresh & Upcoming Revision Management**: Templates now offer a cleaner layout and improved navigation.
⚡ Coming soon: **Template Revision Management** for smoother version control and updates.
* **📤 Export Audit Logs to JSON & CSV**: You can now export all or selected Audit Logs in **JSON or CSV** formats for easy reporting, analysis, and compliance.
* **🛟 Empty Plan Safeguard**: Terraform **apply** will no longer run on empty plans, improving operational safety.
## Bug Fixes 🐛[](#bug-fixes- "Direct link to Bug Fixes 🐛")
* **General stability improvements and miscellaneous bug fixes.**
---
# 1.31.2
### What's Changed[](#whats-changed "Direct link to What's Changed")
Release Date: December 18th, 2025
## New Features 🚀[](#new-features- "Direct link to New Features 🚀")
### File Upload & Execution Snapshot[](#file-upload--execution-snapshot "Direct link to File Upload & Execution Snapshot")
[File Upload](/docs/develop/library/nocode_template_builder/#9-fileupload-widget) enables you to upload required files directly to the platform, store them securely in your backend, and make them available to workflows and stacks at runtime. Execution Snapshot automatically captures and stores a compressed copy of the execution directory for each run, ensuring traceability and a reliable audit trail.
### Terraform CLI–Driven Workflows[](#terraform-clidriven-workflows "Direct link to Terraform CLI–Driven Workflows")
Run plans in [StackGuardian Terraform workflows using the CLI](/docs/deploy/workflows/cli-driven-workflow/), delivering an execution experience similar to running Terraform locally with code changes.
### Azure DevOps Service Principal Authentication[](#azure-devops-service-principal-authentication "Direct link to Azure DevOps Service Principal Authentication")
Azure DevOps VCS integrations now support [Service Principal authentication](/docs/connectors/vcs/azuredevops/), offering secure alternatives to Personal Access Tokens (PAT) using Client Secret or Workload Identity (OIDC).
### Workflow Settings UI[](#workflow-settings-ui "Direct link to Workflow Settings UI")
Workflow settings now feature a [refreshed and cleaner interface](/docs/deploy/workflows/workflow_components/settings/), making it easier to configure workflow source, Git triggers, steps, deployment environment, webhooks, schedules, execution environments, notifications, and meta information in one streamlined experience.
## Enhancements 🔥[](#enhancements- "Direct link to Enhancements 🔥")
### Template Revision Management[](#template-revision-management "Direct link to Template Revision Management")
Template Revision Management has been significantly enhanced with new support for revision aliases, notes, and clear indicators for the latest draft and published revisions. The experience also includes warnings during state transitions and the ability to test draft revisions, making revision management clearer and safer.
### Audit Logs Enhancements[](#audit-logs-enhancements "Direct link to Audit Logs Enhancements")
Audit Logs now include a detailed log view with improved access and permissions visibility, along with usability improvements such as copying full resource URLs and quick links to documentation.
### Stack Overview[](#stack-overview "Direct link to Stack Overview")
Stacks now include a redesigned overview that consolidates policy checks, Infracost estimates, resources, and drift information, providing better visibility into stack health.
## Bug Fixes 🐛[](#bug-fixes- "Direct link to Bug Fixes 🐛")
General stability improvements and miscellaneous bug fixes.
---
# 1.31.4
## What's Changed[](#whats-changed "Direct link to What's Changed")
Release Date: January 19th, 2026
## 🚀 New Features[](#-new-features "Direct link to 🚀 New Features")
### 🖥️ Redesigned Dev Portal[](#️-redesigned-dev-portal "Direct link to 🖥️ Redesigned Dev Portal")
The [Dev Portal](/docs/deploy/workflows/create_workflow/devportal/) has been redesigned to simplify the initial setup experience. You can get started quickly and adjust advanced settings later as needed. See a quick video of the [new Dev Portal in action](/videos/new-dev-portal.mp4)!!
### 🔍 Global search across your organization[](#-global-search-across-your-organization "Direct link to 🔍 Global search across your organization")
You can now search across your entire organization from a single place. [Global search](/docs/platform/search/) helps you quickly find resources using the names, with built-in quick actions and fast navigation.
### 🎛️ Introducing the new Actions management[](#️-introducing-the-new-actions-management "Direct link to 🎛️ Introducing the new Actions management")
[Actions management](/docs/deploy/stack/stack_components/settings/#2-actions) is now clearer and more centralized. You manage Actions from a new Settings tab, where workflow templates and their Actions are organized in one place. Stacks automatically inherit this structure, letting you browse workflows, view their Actions, or add new ones without extra setup.
## 🔥 Enhancements[](#-enhancements "Direct link to 🔥 Enhancements")
### 🕹️ Improved approval experience[](#️-improved-approval-experience "Direct link to 🕹️ Improved approval experience")
Approval logic now provides clearer visibility into resources that require approval. An enhanced modal makes reviewing and managing approvals easier.
### 🧾 Template revision permissions[](#-template-revision-permissions "Direct link to 🧾 Template revision permissions")
A new permission, [Manage Template Revision](/docs/organisation_settings/access_management/), lets you control who can create, publish, delete or deprecate template revisions.
### 🔏 External secrets support[](#-external-secrets-support "Direct link to 🔏 External secrets support")
You can now reference [external Azure Key Vault secrets](/docs/deploy/workflows/workflow_components/reference_variables/#external-secret) in IaC input data, workflow step input data, and user-provided environment variables. Secrets are resolved automatically at runtime using your Deployment and Environment connector.
### 💻 New context variable for custom code[](#-new-context-variable-for-custom-code "Direct link to 💻 New context variable for custom code")
The [custom code widget](/docs/develop/library/nocode_template_builder/#8-customcode-widget) now includes currentDeploymentPlatformConfig, which provides access to the active deployment platform configuration. You can use it to make API calls to AWS, Azure, or other cloud providers based on the workflow's selected or default configuration.
## 🐛 Bug Fixes[](#-bug-fixes "Direct link to 🐛 Bug Fixes")
General stability improvements and miscellaneous bug fixes.
---
# 1.31.5
## What's Changed[](#whats-changed "Direct link to What's Changed")
Release Date: February 5th, 2026
## 🚀 New Features[](#-new-features "Direct link to 🚀 New Features")
### MCP Server (Read-Only APIs)[](#mcp-server-read-only-apis "Direct link to MCP Server (Read-Only APIs)")
We’re introducing a hosted [MCP Server](/docs/mcp-server/) that lets you connect AI tools directly to the StackGuardian platform using our read-only APIs. This enables AI assistants to safely query your SG environment for context and insights.
### Queued workflow visibility for Private Runner Groups[](#queued-workflow-visibility-for-private-runner-groups "Direct link to Queued workflow visibility for Private Runner Groups")
You can now view and filter queued and running workflow executions, including drift runs, for a specific [Private Runner Group](/docs/organisation_settings/private_runner/overview/).
From the Usage tab of a runner group, filter workflows by status to quickly identify:
* Workflows currently running
* Workflows waiting in the queue
This makes it easier to understand runner utilization and troubleshoot execution delays.
## 🔥 Enhancements[](#-enhancements "Direct link to 🔥 Enhancements")
### External approvals[](#external-approvals "Direct link to External approvals")
Integrate [external approval](/docs/deploy/workflows/workflow_components/workflow_config/#external-approvals) systems to manage approval decisions outside StackGuardian while maintaining control and compliance.
## 🐛 Bug Fixes[](#-bug-fixes "Direct link to 🐛 Bug Fixes")
General stability improvements and miscellaneous bug fixes.
***
More improvements and new capabilities are on the way, and your feedback continues to shape what we build next. Thank you for being part of the StackGuardian journey—we're looking forward to what's ahead.
---
# 1.31.6
## What's Changed[](#whats-changed "Direct link to What's Changed")
Release Date: February 26th, 2026
## 🔥 Enhancements[](#-enhancements "Direct link to 🔥 Enhancements")
### Dev Portal experience[](#dev-portal-experience "Direct link to Dev Portal experience")
UX improvements in the the [Dev Portal](/docs/deploy/workflows/create_workflow/devportal/) to provide more clarity and control: We’ve streamlined the interface to reduce unnecessary options and minimize the risk of user errors. Connectors and environment variables can now be configured independently for more granular control, and Workflow parameters are easier to manage—giving users clearer visibility into which settings are displayed and applied.
### Approval identity handling[](#approval-identity-handling "Direct link to Approval identity handling")
[Approval logic](/docs/deploy/workflows/workflow_components/approvals_config/) now treats local and SSO identities as distinct entities, aligning with RBAC behavior. The configuration experience now clearly distinguishes local and SSO users, with additional context about SSO login types and group origins.
### Contextual search[](#contextual-search "Direct link to Contextual search")
Standardized search behavior is now available in Templates, Workflows list (Stack), API Access, and Audit Logs. More areas and case-insensitive search coming in future releases.
## 🐛 Bug Fixes[](#-bug-fixes "Direct link to 🐛 Bug Fixes")
General stability improvements and miscellaneous bug fixes.
***
More improvements and new capabilities are on the way, and your feedback continues to shape what we build next. Thank you for being part of the StackGuardian journey—we're looking forward to what's ahead.
---
# 1.31.8
## What's Changed[](#whats-changed "Direct link to What's Changed")
Release Date: March 19th, 2026
## 🚀 New Features[](#-new-features "Direct link to 🚀 New Features")
### Terraform Provider – Stack Templates (Beta)[](#terraform-provider--stack-templates-beta "Direct link to Terraform Provider – Stack Templates (Beta)")
The StackGuardian Terraform Provider adds support for [Stack Templates](https://registry.terraform.io/providers/StackGuardian/stackguardian/latest/docs/resources/stack_template), enabling you to define, version, and manage Stack Templates as code alongside your infrastructure.
### Managed Identity for Azure Connectors[](#managed-identity-for-azure-connectors "Direct link to Managed Identity for Azure Connectors")
Azure Connectors will support [Managed Identity](/docs/connectors/csp/azure/#using-managed-identity) authentication, removing the need to manage client secrets or credentials. Ideal for environments where managed identities are already configured.
### Workflow and Stack revision updates[](#workflow-and-stack-revision-updates "Direct link to Workflow and Stack revision updates")
Users will be notified when a different [Workflow](/docs/deploy/workflows/update-workflow/) or [Stack](/docs/deploy/stack/stack_upgrade/) revision is available and can update with one click. Updates support two options: use advanced settings from the new revision or keep current advanced settings. Changes to variables, custom steps, parameters, and Connectors can be reviewed before applying.
### Custom IDs for resources[](#custom-ids-for-resources "Direct link to Custom IDs for resources")
Define custom IDs for resources instead of relying on auto-generated IDs. Supported resources: Runner Groups, Workflow Groups, Stacks, Workflows, Stack Templates, Workflow Templates, Policy Templates, Runtime Container Templates, Policy Sets, Cloud Providers, Version Control Providers, Roles, and API Access. This gives you more control over naming consistency and integration with external systems.
## 🔥 Enhancements[](#-enhancements "Direct link to 🔥 Enhancements")
### SG noCode Form Builder (New design)[](#sg-nocode-form-builder-new-design "Direct link to SG noCode Form Builder (New design)")
[SG noCode](/docs/develop/library/nocode_template_builder/) enables you to create JSONSchema-based forms for Orchestrator Workflow inputs with a no-code experience. Build forms manually, import .tf files, or connect repositories, with simple tools to organize fields and configure settings. Advanced users can also edit the UI schema and JSON schema directly for deeper customization.
### Workflow run priority[](#workflow-run-priority "Direct link to Workflow run priority")
Drift runs will have lower priority than user-initiated Workflow runs, ensuring your deployments aren't delayed by background drift detection.
## 🔧 API Changes[](#-api-changes "Direct link to 🔧 API Changes")
### Template creation API[](#template-creation-api "Direct link to Template creation API")
To support templates in the Terraform Provider, the template creation API has changed.
**Before:** `POST /api/v1/templates/` created the template, first revision, and applied the configuration in one call.
**After:** `POST /api/v1/templates/` only creates the template. A separate `POST` to `/templatetypes/IAC/{org}/{template}/revisions/` is required to create its revision.
## 🐛 Bug Fixes[](#-bug-fixes "Direct link to 🐛 Bug Fixes")
General stability improvements and miscellaneous bug fixes.
***
More improvements and new capabilities are on the way, and your feedback continues to shape what we build next. Thank you for being part of the StackGuardian journey—we're looking forward to what's ahead.
---
# 1.31.9
## What's Changed[](#whats-changed "Direct link to What's Changed")
Release Date: April 9th, 2026
## 🔥 Enhancements[](#-enhancements "Direct link to 🔥 Enhancements")
### Terraform version selection redesigned[](#terraform-version-selection-redesigned "Direct link to Terraform version selection redesigned")
Workflow and Workflow Template settings offers three explicit [version options](/docs/deploy/workflows/workflow_components/terraform_config/#terraformopentofu-version): Managed Version, Pin Version, and Runner-Provided Version.
### Parallel Workflow runs[](#parallel-workflow-runs "Direct link to Parallel Workflow runs")
Custom workflows can [execute multiple runs in parallel](/docs/deploy/workflows/workflow_components/execution_environment/#concurrency). Previously, only one run could execute at a time while others remained queued.
### Terraform Provider – Template management[](#terraform-provider--template-management "Direct link to Terraform Provider – Template management")
The [Terraform Provider](https://registry.terraform.io/providers/StackGuardian/stackguardian/latest/docs/resources/workflow_template) now supports managing templates and template revisions for Workflow Templates, Stack Templates, and Runtime Containers.
## 🐛 Bug Fixes[](#-bug-fixes "Direct link to 🐛 Bug Fixes")
General stability improvements and miscellaneous bug fixes.
***
More improvements and new capabilities are on the way, and your feedback continues to shape what we build next. Thank you for being part of the StackGuardian journey—we're looking forward to what's ahead.
---
# 1.32.0
## What's Changed[](#whats-changed "Direct link to What's Changed")
Release Date: April 30th, 2026
## 🚀 New Features[](#-new-features "Direct link to 🚀 New Features")
### Terraform CLI state command support[](#terraform-cli-state-command-support "Direct link to Terraform CLI state command support")
Run [`terraform state` commands](/docs/deploy/workflows/cli-driven-workflow/#terraform-cli-state-commands) against StackGuardian-managed Workflows directly from your local machine. Supported operations include moving resources between modules, removing resources from Terraform management, and importing resources into an existing state file.
## 🔥 Enhancements[](#-enhancements "Direct link to 🔥 Enhancements")
### Workflow Chaining refresh[](#workflow-chaining-refresh "Direct link to Workflow Chaining refresh")
Added a refresh option to view the latest run statuses across chained Workflows.
### noCode Template Builder – Azure SDK[](#nocode-template-builder--azure-sdk "Direct link to noCode Template Builder – Azure SDK")
Added [`@azure/arm-subscriptions`](/docs/develop/library/nocode_template_builder/#accessible-variables-in-js-code) to access Azure subscription data within custom form logic.
## 🐛 Bug Fixes[](#-bug-fixes "Direct link to 🐛 Bug Fixes")
General stability improvements and miscellaneous bug fixes.
***
More improvements and new capabilities are on the way, and your feedback continues to shape what we build next. Thank you for being part of the StackGuardian journey—we're looking forward to what's ahead.
---
# 1.32.1
## What's Changed[](#whats-changed "Direct link to What's Changed")
Release Date: May 7th, 2026
## 🚀 New Features[](#-new-features "Direct link to 🚀 New Features")
### SGCode[](#sgcode "Direct link to SGCode")
[SGCode](/docs/sg-code/overview/) helps close the gap between the infrastructure running in your cloud accounts and the infrastructure you have code for. Connect your cloud accounts, discover every resource across your environment, and use AI to generate production-ready Terraform or OpenTofu code. Publish directly as a pull request to your existing repositories and track your IaC coverage as it grows.
### Workflow active/inactive status[](#workflow-activeinactive-status "Direct link to Workflow active/inactive status")
Workflows now support an [active/inactive status](/docs/deploy/workflows/active-inactive/). Active workflows count toward your plan limit and appear in default search results. Inactive workflows have reduced visibility — the Overview, Runs, and Outputs tabs are disabled, and state files and artifacts are inaccessible. Settings are preserved for easy reactivation.
Workflows transition automatically based on run outcomes, or admins can activate and deactivate them manually via Settings or API. Any automation that triggers a run (schedules, VCS triggers, drift detection) will reactivate an inactive Workflow automatically.
## 🔥 Enhancements[](#-enhancements "Direct link to 🔥 Enhancements")
### Runtime containers Usage tab[](#runtime-containers-usage-tab "Direct link to Runtime containers Usage tab")
See which workflows use a specific [Runtime container template](/docs/develop/library/workflow_step/#usage). Search by workflow name to find specific implementations.
## 🐛 Bug Fixes[](#-bug-fixes "Direct link to 🐛 Bug Fixes")
General stability improvements and miscellaneous bug fixes.
***
More improvements and new capabilities are on the way, and your feedback continues to shape what we build next. Thank you for being part of the StackGuardian journey—we're looking forward to what's ahead.
---
# 1.32.4
## What's Changed[](#whats-changed "Direct link to What's Changed")
Release Date: May 14th, 2026
## 🚀 New Features[](#-new-features "Direct link to 🚀 New Features")
### Org-wide presets[](#org-wide-presets "Direct link to Org-wide presets")
Apply [organization-wide presets](/docs/organisation_settings/private_runner/overview/#execution-presets) to ensure consistency and compliance when creating StackGuardian resources. Define settings once at the organization level and enforce them automatically across teams.
### Beta features[](#beta-features "Direct link to Beta features")
Organization admins can now enable or disable [beta features](/docs/organisation_settings/beta-features/) from organization settings, giving teams early access to new StackGuardian features before general availability.
## 🐛 Bug Fixes[](#-bug-fixes "Direct link to 🐛 Bug Fixes")
General stability improvements and miscellaneous bug fixes.
***
More improvements and new capabilities are on the way, and your feedback continues to shape what we build next. Thank you for being part of the StackGuardian journey—we're looking forward to what's ahead.
---
# 1.32.5
## What's changed[](#whats-changed "Direct link to What's changed")
Release Date: May 21st, 2026
## 🚀 New features[](#-new-features "Direct link to 🚀 New features")
### Move resources[](#move-resources "Direct link to Move resources")
The new [**Move Resources**](/docs/deploy/workflows/workflow_groups/#move-resources) feature lets you restructure workflow groups in bulk—up to 50 resources at a time—without breaking references. Move workflows, stacks, or entire workflow groups between teams and environments directly from the [Workflow Groups](/docs/deploy/workflows/workflow_groups/). Stack-aware moves ensure workflows automatically follow their parent stack, and affected resources are flagged for review.
### Git Webhooks[](#git-webhooks "Direct link to Git Webhooks")
Workflows created from [SGCode](/docs/sg-code/overview/) now update automatically to point to the target branch when the associated PR is merged.
## 🔥 Enhancements[](#-enhancements "Direct link to 🔥 Enhancements")
### Search updates[](#search-updates "Direct link to Search updates")
We expanded the [search](/docs/platform/search/) coverage and filtering to cover additional resource types and supports ID-based searches across all resources:
* **New searchable resources:** Roles and Templates (Workflow, Stack, Policy, Runtime Container)
* **ID-based search:** All resources now support search by ID (previously limited to Workflow Groups). Search Workflows, Stacks, Policies, Templates, Runner Groups, Connectors, and Roles by their unique identifiers.
* **New filters:** Workflow Type, Template & Revision, Cloud Provider, and Version Control Provider filters help you narrow results more precisely
* **Sorting options:** Sort results by last modified date (newest or oldest first), creation date (newest or oldest first), or name (A-Z or Z-A)
## 🐛 Bug Fixes[](#-bug-fixes "Direct link to 🐛 Bug Fixes")
General stability improvements and miscellaneous bug fixes.
***
More improvements and new capabilities are on the way, and your feedback continues to shape what we build next. Thank you for being part of the StackGuardian journey—we're looking forward to what's ahead.
---
# 1.32.6
## What's changed[](#whats-changed "Direct link to What's changed")
Release Date: May 28th, 2026
## 🚀 New Features[](#-new-features "Direct link to 🚀 New Features")
### SG noCode Form Builder — Conditional rules[](#sg-nocode-form-builder--conditional-rules "Direct link to SG noCode Form Builder — Conditional rules")
The **SG noCode Form Builder** now includes a [Conditions](/docs/develop/library/nocode_template_builder/#conditions) tab in **Form settings** where you can define if/then/else rules to show, hide, or constrain fields based on user input. Fields involved in a rule are marked with a Conditional badge in the canvas.
## 🔥 Enhancements[](#-enhancements "Direct link to 🔥 Enhancements")
### Cloud provider connector setup — Redesigned[](#cloud-provider-connector-setup--redesigned "Direct link to Cloud provider connector setup — Redesigned")
The cloud provider connector setup flow has been redesigned across [AWS](/docs/connectors/csp/aws/), [Azure](/docs/connectors/csp/azure/), and [GCP](/docs/connectors/csp/gcp/) with cleaner steps and a clearer path from configuration to deployment. The Multiple connectors experience is improved for onboarding entire cloud organizations in one go. Azure also adds support for service principal with federated credentials, using short-lived tokens instead of long-lived secrets.
## New design system (preview)[](#new-design-system-preview "Direct link to New design system (preview)")
A new design system is rolling out gradually — cleaner, faster, and built to scale. During the transition, switch between the new and classic layout anytime from your settings.
## 🐛 Bug Fixes[](#-bug-fixes "Direct link to 🐛 Bug Fixes")
General stability improvements and miscellaneous bug fixes.
***
More improvements and new capabilities are on the way, and your feedback continues to shape what we build next. Thank you for being part of the StackGuardian journey—we're looking forward to what's ahead.
---
# 1.32.8 🆕
## What's changed[](#whats-changed "Direct link to What's changed")
Release Date: June 11th, 2026
## 🚀 New feature[](#-new-feature "Direct link to 🚀 New feature")
### Workflow runs in SGCode[](#workflow-runs-in-sgcode "Direct link to Workflow runs in SGCode")
The [Code workbench](/docs/sg-code/cloud-inventory/#code-workbench) now shows the full run history for each project. Select any previous run to load its logs, toggle timestamps on or off, download raw logs, or open them in a new tab. Use Run test plan at any point during editing to validate your code and check policy results without pushing changes.
## 🔥 Enhancements[](#-enhancements "Direct link to 🔥 Enhancements")
### VCS triggers revamp for GitHub, GitLab, and Bitbucket[](#vcs-triggers-revamp-for-github-gitlab-and-bitbucket "Direct link to VCS triggers revamp for GitHub, GitLab, and Bitbucket")
[VCS triggers](/docs/deploy/workflows/workflow-triggers/) have been revamped for GitHub, GitLab, and Bitbucket, adding file filter support across all three providers. Workflows can now trigger only when specific files or directories change, reducing unnecessary runs.
## 🐛 Bug fixes[](#-bug-fixes "Direct link to 🐛 Bug fixes")
General stability improvements and miscellaneous bug fixes.
***
More improvements and new capabilities are on the way, and your feedback continues to shape what we build next. Thank you for being part of the StackGuardian journey—we're looking forward to what's ahead.
---
# 1.28.8 🎉
### What's Changed[](#whats-changed "Direct link to What's Changed")
Release Date: Sept 20th, 2024
## Features 🚀[](#features- "Direct link to Features 🚀")
* No **new features** were introduced in this release.
## Enhancements and Major Updates 🔥 + 💪[](#enhancements-and-major-updates--- "Direct link to Enhancements and Major Updates 🔥 + 💪")
* **Dev Portal V2**: Significant updates to the new Dev Portal, aligning it with the new design and improving user experience.
* **Nested Resource Dropdown in Roles View**: Added support for displaying nested resource dropdowns inside the roles view.
* **Org Settings Alignment**: UI updates to improve alert alignment in organizational settings.
## Bug Fixes 🐛[](#bug-fixes- "Direct link to Bug Fixes 🐛")
* **Untracked Status in Workflow View**: Resolved an issue with untracked statuses in the workflow view.
* **Dev Portal Fixes**: Fixed minor issues, including the Terraform state upload inside the dev portal and improved filter behavior for the Restart/Choose Template button.
* **Double Scrollbars in Workflow Runs Modal**: Further adjustments to resolve issues with double scrollbars.
---
# 1.28.9 🎉
### What's Changed[](#whats-changed "Direct link to What's Changed")
Release Date: Oct 4th, 2024
## Features 🚀[](#features- "Direct link to Features 🚀")
* [**Tabular View for Detail Checks**](/docs/discover/insights/cost_dashboard/#detail-checks): New Detail Checks tab provides a focused tabular view of failed checks, with key information such as severity, resource status, and actionable insights for quick resolution.
* **Hotjar Implementation**: Implemented Hotjar for enhanced user analytics and behavior tracking. docs/discover/insights/compliance\_dashboard/#detail-checks
## Enhancements and Major Updates 🔥 + 💪[](#enhancements-and-major-updates--- "Direct link to Enhancements and Major Updates 🔥 + 💪")
* **Support Drift Cron in Terraform Config**: Added support for drift cron inside the terraform configuration.
* **Dev Portal V2**: Significant updates to the new Dev Portal, aligning it with the new design and improving user experience.
* **Nested Resource Dropdown in Roles View**: Added support for displaying nested resource dropdowns inside the roles view.
* **Org Settings Alignment**: UI updates to improve alert alignment in organizational settings.
* **Secrets Input Fields**: Masking the secrets input fields for enhanced security.
## Bug Fixes 🐛[](#bug-fixes- "Direct link to Bug Fixes 🐛")
* **Untracked Status in Workflow View**: Resolved an issue where the status was untracked in the workflow view.
* **Roles View Fixes**: Corrected the issue where workflows (wfs) were not listing correctly in the roles view.
* **Preinit Hooks Validation**: Added validation for terraform preinit hooks in workflows.
* **Browser History Fix**: Fixed an issue where browser history was erased after re-login.
---
# 1.29.0 🎉
### What's Changed[](#whats-changed "Direct link to What's Changed")
Release Date: Nov 8th, 2024
## Features 🚀[](#features- "Direct link to Features 🚀")
* [**OIDC Integration for GCP**](/docs/connectors/csp/gcp/#using-workload-identity-federation): : Introduced support for GCP OIDC to enhance authentication mechanisms.
* **Run Stack with Parameters**: Enabled running stacks with user-defined parameters directly via the Dev Portal.
## Enhancements and Major Updates 🔥 + 💪[](#enhancements-and-major-updates--- "Direct link to Enhancements and Major Updates 🔥 + 💪")
* **Role View Enhancements**: Improved the layout and functionality of the role view page for better navigation and usability.
* **Discovery Settings Update**: Added advanced discovery settings to improve configurability.
* **Dial Widget Enhancements**: Updated the dial widget for better visual representation and interactivity.
* **IAC Group UI Improvements**: Refactored the IAC Group UI to ensure consistency and alignment with user expectations.
## Bug Fixes 🐛[](#bug-fixes- "Direct link to Bug Fixes 🐛")
* **Workflow View Status**: Fixed an issue where the status of workflows was incorrectly marked as untracked.
* **Logs Display Fixes**: Resolved errors with log screen size and auto-scrolling for better visibility.
* **Sanitize Input in Markdown Editor**: Addressed input sanitization issues in the markdown editor.
* **Drift Cron Validation**: Fixed inconsistencies in drift cron settings and ensured default values are correctly applied.
* **Cron Builder Validation**: Addressed issues with undefined cron builders in specific configurations.
* **Nested Resource Dropdown**: Resolved default name display issues in nested resource dropdowns within roles view.
* **Expandable Section State Preservation**: Added support for preserving the expanded state of sections across page reloads.
* **Runner Group Secret Reset**: Ensured the secret field resets correctly when the storage backend type changes.
* **Policy Builder Fix**: Corrected prop population for the policy builder in the detailed tabular view.
* **Usage Tab Fixes**: Resolved inconsistencies and added new functionalities in the usage tab of the IAC group.
* **Define Roles Bug**: Fixed an issue causing errors while defining roles in specific configurations.
---
# 1.29.1 🎉
### What's Changed[](#whats-changed "Direct link to What's Changed")
Release Date: Nov 24th, 2024
## Features 🚀[](#features- "Direct link to Features 🚀")
* **New Side Navbar**: Introduced a redesigned navbar for enhanced usability and aesthetics.
## Enhancements and Major Updates 🔥 + 💪[](#enhancements-and-major-updates--- "Direct link to Enhancements and Major Updates 🔥 + 💪")
* **Connector Groups Enhancements**: Improved the UI and usability of connector groups.
* **Search Bar in Secret List**: Added a search bar to the secret list view for easier filtering.
## Bug Fixes 🐛[](#bug-fixes- "Direct link to Bug Fixes 🐛")
* **Icon Render for Published Templates**: Fixed issues with rendering icons for published templates.
* **Template Revision Card Menu**: Addressed bugs in the template revision card menu to ensure proper functionality.
---
# 1.29.2 🎉
### What's Changed[](#whats-changed "Direct link to What's Changed")
Release Date: Dec 5th, 2024
## Features 🚀[](#features- "Direct link to Features 🚀")
* **Tirith Copilot**: AI-powered assistant to simplify and guide Tirith policy creation.
## Enhancements and Major Updates 🔥 + 💪[](#enhancements-and-major-updates--- "Direct link to Enhancements and Major Updates 🔥 + 💪")
* **New Side Navbar**: Redesigned the navbar for improved navigation and aesthetics.
* **Connector Groups Enhancements**: Enhanced the UI and functionality of connector groups.
* **Search Bar in Secret List**: Added a search bar for efficient filtering in the secret list view.
## Bug Fixes 🐛[](#bug-fixes- "Direct link to Bug Fixes 🐛")
* **Template UI Issues**: Fixed bugs in the template name display and UI elements.
* **Policy Save Flow**: Resolved issues where the policy save flow was not functioning properly.
* **Nested Workflow Navigation**: Addressed navigation issues in nested workflows.
* **Feedback Modal**: Fixed UI bugs in the feedback modal for a seamless experience.
* **Breadcrumbs Logic**: Improved breadcrumbs logic for better usability.
* **Filter Tags Dropdown**: Fixed issues with the filter tags dropdown to ensure proper functionality.
* **Safari Browser Overlay**: Resolved overlay issues specifically in Safari browser.
* **Stack Upgrade Bugs**: Fixed various bugs related to stack upgrades.
* **Unsaved Warning Pop-Up**: Implemented a warning pop-up for unsaved changes.
---
# 1.29.3 🎉
### What's Changed[](#whats-changed "Direct link to What's Changed")
Release Date: Dec 26th, 2024
## Features 🚀[](#features- "Direct link to Features 🚀")
* [**Roles View** ](/docs/organisation_settings/access_management/): Revamped interface for managing access levels, allowing admins to assign and define custom roles.
* [**CustomCodeWidget** ](/docs/develop/library/nocode_template_builder/#6-customcodewidget): Introduced widget that enables dynamic and context-aware customization of form fields in template creation, allowing users to fetch, process, and populate form data dynamically.
* **Context Tags in Workflow View**: Added key-value context tags for enhanced metadata management in workflows.
## Enhancements and Major Updates 🔥 + 💪[](#enhancements-and-major-updates--- "Direct link to Enhancements and Major Updates 🔥 + 💪")
* **New Side Navbar**: Redesigned the side navigation bar with auto-collapse functionality and improved user experience.
* **Improved Workflow Components**: Refactored multiple MUI components, including workflow overview and user schedules.
* **Enhancements to Connector Groups**: Improved connector groups' UI and functionality.
* **Improved Revision View**: Enhanced meta tab state preservation and default button resets in the revision view.
## Bug Fixes 🐛[](#bug-fixes- "Direct link to Bug Fixes 🐛")
* **Workflow Navigation**: Fixed navigation issues in stacks and workflows for a smoother user experience.
* **Policy Table Crash**: Resolved crashing issues in the policy table.
* **Textarea Widget State**: Removed unnecessary error states from textarea widgets, showing only informational messages.
* **Template UI Issues**: Fixed display issues with template names and associated UI elements.
* **Permission Modal Fixes**: Disabled the add button when no permissions are selected and hid unnecessary borders.
* **Feedback Modal Bugs**: Addressed visual and functional bugs in the feedback modal.
* **Filter Tags Dropdown**: Resolved issues with the dropdown for selecting filter tags.
* **Breadcrumbs Logic**: Improved the logic and display of breadcrumbs.
* **Safari Browser Fixes**: Resolved overlay and display issues specific to Safari browser.
* **Password Validation**: Fixed passcode send on mails for password validation while signing up.
* **State Management Fixes**: Fixed issues related to managing and preserving state across views.
* **Error Tolerance Defaults**: Adjusted default error tolerance values to ensure better reliability.
* **Workflow Step Improvements**: Fixed missing form data issues and improved Docker environment setup for workflows.
---
# 1.29.4 🎉
### What's Changed[](#whats-changed "Direct link to What's Changed")
Release Date: Jan 10th, 2025
## Features 🚀[](#features- "Direct link to Features 🚀")
* [**Exclusion Management System** ](/docs/discover/insights/settings/exclusion_management/): Ignore irrelevant findings from Insight reports to keep them clean and focused.
* [**OPENTOFU Workflow Type** ](/docs/deploy/workflows/workflows_types/opentofu/opentofu/): Added support for OPENTOFU workflows and new source configuration types.
## Enhancements and Major Updates 🔥 + 💪[](#enhancements-and-major-updates--- "Direct link to Enhancements and Major Updates 🔥 + 💪")
* **Breadcrumbs Icons Refactor**: Streamlined breadcrumbs icons for better navigation.
## Bug Fixes 🐛[](#bug-fixes- "Direct link to Bug Fixes 🐛")
* **Contextual Tags Validation**: Addressed validation issues with contextual tags.
* **Discovery Modal**: Fixed modal-related bugs for better resource discovery.
* **Long Email and Organization Name Display**: Fixed layout issues for long email IDs and organization names in the side navigation.
* **Stack Upgrade Input Data**: Fixed issues with empty IaC input data during stack upgrades.
* **Approval Request Columns**: Fixed display issues in approval request columns.
---
# 1.29.5 🎉
### What's Changed[](#whats-changed "Direct link to What's Changed")
Release Date: Jan 23rd, 2025
## Features 🚀[](#features- "Direct link to Features 🚀")
* No **new features** were introduced in this release.
## Enhancements and Major Updates 🔥 + 💪[](#enhancements-and-major-updates--- "Direct link to Enhancements and Major Updates 🔥 + 💪")
* **Breadcrumb Improvements**: Addressed user feedback and implemented refinements to breadcrumb navigation.
## Bug Fixes 🐛[](#bug-fixes- "Direct link to Bug Fixes 🐛")
* **Roles View Fixes**: Resolved bugs related to roles view, including handling special characters.
* **GitLab Connector Payload**: Addressed bugs in handling GitLab connector payloads.
* **Stacks Dev Portal**: Fixed bugs in the stacks dev portal for improved usability.
* **Email Notification Tab**: Addressed issues in the email notification tab for a smoother experience.
---
# 1.29.6 🎉
### What's Changed[](#whats-changed "Direct link to What's Changed")
Release Date: Feb 6th, 2025
## Features 🚀[](#features- "Direct link to Features 🚀")
* **Custom Benchmark Dashboard**: Centralized panel for displaying custom benchmark results, improving visibility and compliance analysis.
* **Workflow Step Template**: Enhanced workflow step creation, allowing users to select predefined infrastructure configurations or create custom workflows with an improved UI.
* **Template Policy OPA**: Added support for creating policy templates using Open Policy Agent (OPA) to enforce infrastructure compliance.
## Enhancements and Major Updates 🔥 + 💪[](#enhancements-and-major-updates--- "Direct link to Enhancements and Major Updates 🔥 + 💪")
* **Breadcrumb Improvements**: Refactored and fixed breadcrumb navigation.
* **Roles View Enhancements**: Implemented search functionality in roles view.
* **Tirith Policy Enhancements**: Revamped policy creation for better usability.
* **Dev Portal Enhancements**: Moved upgrade stack functionality to the developer portal.
* **Exclusion Rule Timing**: Adjusted active duration of exclusion rules.
* **Repository Viewer**: Added installation ID connector to repo viewer.
## Bug Fixes 🐛[](#bug-fixes- "Direct link to Bug Fixes 🐛")
* **Stacks Developer Portal**: Resolved bugs affecting the usability of stacks dev portal.
* **Bitbucket Credentials**: Fixed credential issues in Bitbucket integration.
* **Workflow Side Navigation**: Fixed issues with workflow side navigation display.
* **Regex and Validation Fixes**: Fixed timestamp-related, regex validation issues in multiple components.
* **Template Issues**: Fixed template creation and update bugs.
---
# 1.29.7 🎉
### What's Changed[](#whats-changed "Direct link to What's Changed")
Release Date: Feb 20th, 2025
## Features 🚀[](#features- "Direct link to Features 🚀")
* **AI Assistant**: Introduced an AI-powered assistant to provide intelligent suggestions for building various resources such as policies, workflows, and stacks within StackGuardian.
## Enhancements and Major Updates 🔥 + 💪[](#enhancements-and-major-updates--- "Direct link to Enhancements and Major Updates 🔥 + 💪")
* **MultiSelect Roles**: Enabled users to assign multiple roles in the organization settings, improving flexibility and role management.
* **Breadcrumb Improvements**: Refactored and fixed breadcrumb navigation.
* **Workflow Improvements**: Enhanced workflow-related functionalities, including:
* Increased max workflow name length
* Workflow group view updates
* Workflow instance variable migration
* Workflow group list view migration
* **Runner Groups Enhancements**: Implemented runner group updates.
## Bug Fixes 🐛[](#bug-fixes- "Direct link to Bug Fixes 🐛")
* **Stacks Developer Portal**: Resolved bugs affecting the usability of the stacks dev portal.
* **Resolved PostCSS Vulnerability**: Fixed security vulnerabilities related to PostCSS.
* **Fixed Scroll and Spacing Issues**: Addressed extra scrolling and spacing problems in the UI.
* **Clone Workflow Fix**: Addressed issues preventing custom workflows from being cloned.
* **Notification Settings Bug Fixes**: Fixed notification settings UI bugs.
* **Dashboard Performance Improvements**: Prevented unnecessary data fetching when the benchmark is empty.
---
# 1.29.8 🎉
### What's Changed[](#whats-changed "Direct link to What's Changed")
Release Date: Mar 6th, 2025
## Features 🚀[](#features- "Direct link to Features 🚀")
* No **new features** were introduced in this release.
## Enhancements 🔥 + 💪[](#enhancements--- "Direct link to Enhancements 🔥 + 💪")
* **Require MFA Before Disabling MFA**: Enforced multi-factor authentication before it can be disabled.
* **AI Assistant Link Handling**: Introduced `LinkRenderer` component to always open links in a new tab.
* **Workflow Chaining Stacks Selection**: Select stacks in workflow chaining settings for better automation.
* **Custom Roles Secret Access**: Added `GetSecret` permission to custom roles for better security management.
* **Resource Name Updates**: Enabled updating of resource names within the system.
* **Table Count Preservation**: Table count is now preserved using local storage for better user experience.
## Bug Fixes 🐛[](#bug-fixes- "Direct link to Bug Fixes 🐛")
* **VCS Form Repository Input Fix**: Users are now prompted to manually type repositories in VCS forms.
* **Header Compliance Fix**: Addressed compliance issues with header elements.
* **Preview Tag Removal**: Removed unnecessary preview tags from certain UI components.
* **Graph Detail View Warning**: Fixed an issue where an unnecessary unsaved warning appeared when inside detail graphs view.
* **Integration Popup Fix**: Resolved issue where the integration popup was not closing automatically.
* **Breadcrumb Navigation Fix**: Corrected breadcrumb navigation inconsistencies.
* **Lock File Fix**: Fixed issues related to package lock files causing installation inconsistencies.
---
# 1.29.9 🎉
### What's Changed[](#whats-changed "Direct link to What's Changed")
Release Date: Mar 21st, 2025
## Features 🚀[](#features- "Direct link to Features 🚀")
* No **new features** were introduced in this release.
## Enhancements 🔥 + 💪[](#enhancements--- "Direct link to Enhancements 🔥 + 💪")
* **Allow resource to be editable**: Introduced editing capability for individual resource name.
* **Refactor IAC\_GROUP payload**: Improved payload structure for Infrastructure as Code groups.
* **Login page UI refresh**: Redesigned the login page for a better UX.
* **Reset secret modal fields**: Ensures secret fields reset after update.
* **Safe lookup handling**: Added safe access methods to prevent runtime errors.
* **Add workflow template functionality**: Enabled creation and usage of reusable workflow templates.
* **Implement git flow in dev portal**: Added full Git flow support inside the development portal.
## Bug Fixes 🐛[](#bug-fixes- "Direct link to Bug Fixes 🐛")
* **GitLab icon missing in WF view**: Resolved UI issue with GitLab icon.
* **Resource name in roles view**: Resource name now displays correctly.
* **TIRITH policy links in view**: Corrected broken links in TIRITH policy view.
* **Nested workflow groups in dropdown**: Corrected visibility of nested groups.
* **Breadcrumbs in develop & main**: Breadcrumbs now show correct paths.
* **Payload for stack run and create**: Resolved issues in payload structure.
* **API key copying logic**: Ensured proper copying of generated keys.
* **Fix header rendering inconsistencies**: Fixed header alignment across views.
* **Fix integration popup auto-close**: Integration popups now close as expected.
* **Fix unsaved warning in detail graphs**: No longer triggers false warning.
---
# 1.25.0 🎉
### What's Changed,[](#whats-changed "Direct link to What's Changed,")
Release Date: May 23rd, 2023
### New Features 🚀[](#new-features- "Direct link to New Features 🚀")
* GCP Integration
### Bug Fixes 🐞[](#bug-fixes- "Direct link to Bug Fixes 🐞")
* Org wide checkbox state in Policies
* Policy Modal and Wrong params in integration GET req
* GET Req for artifacts inside discovery modal
* Minor bugs resolved
### Enhancements and Major Updates 🔥 + 💪[](#enhancements-and-major-updates--- "Direct link to Enhancements and Major Updates 🔥 + 💪")
* New query params to fetch Discovery Compliance Artifacts
* Updated compliance checks modal
* Enforce integration wide policy
* Updated UIs (Relative time, secret modal, stack status)
note
Earlier Release Information: Records of changes and updates prior to version ***1.25.0*** are archived.
---
# 1.25.1 🎉
### What's Changed,[](#whats-changed "Direct link to What's Changed,")
Release Date: May 29th, 2023
### New Features 🚀[](#new-features- "Direct link to New Features 🚀")
* Changed BETA to Preview
* GCP integration modal
### Bug Fixes 🐞[](#bug-fixes- "Direct link to Bug Fixes 🐞")
* Overflow issue in compliance check modal
* \[object object] in rjsf
* ViewVariable component crashing on save
* Logic to show Approval Req btn inside policy modal
### Enhancements and Major Updates 🔥 + 💪[](#enhancements-and-major-updates--- "Direct link to Enhancements and Major Updates 🔥 + 💪")
* Updated marketplace UI
---
# 1.25.2 🎉
### What's Changed,[](#whats-changed "Direct link to What's Changed,")
Release Date: May 31st, 2023
### New Features 🚀[](#new-features- "Direct link to New Features 🚀")
* Changed BETA to Preview
* GCP integration modal
### Bug Fixes 🐞[](#bug-fixes- "Direct link to Bug Fixes 🐞")
* Overflow issue in compliance check modal
* Resolved \[object object] in rjsf
* ViewVariable component crashing on save
### Enhancements and Major Updates 🔥 + 💪[](#enhancements-and-major-updates--- "Direct link to Enhancements and Major Updates 🔥 + 💪")
* Logic to show Approval Req button inside policy modal
---
# 1.25.3 🎉
### What's Changed,[](#whats-changed "Direct link to What's Changed,")
Release Date: June 8th, 2023
### New Features 🚀[](#new-features- "Direct link to New Features 🚀")
* Azure DevOps integration
* Remove workflow minutes
### Bug Fixes 🐞[](#bug-fixes- "Direct link to Bug Fixes 🐞")
* Overflow inside summary tab for discovery modal
* PCI check URL
* URL discovery reports
* Deprecated template revision and Error Tolerance Value
* Skip email field validation for SSO user
* Check names updated
### Enhancements and Major Updates 🔥 + 💪[](#enhancements-and-major-updates--- "Direct link to Enhancements and Major Updates 🔥 + 💪")
* Remove subscription details
* Updated awsredirectParams
* AWS marketplace flashbar
* Update OrganizationListView
---
# 1.25.4 🎉
### What's Changed,[](#whats-changed "Direct link to What's Changed,")
Release Date: July 7th, 2023
### New Features 🚀[](#new-features- "Direct link to New Features 🚀")
* Bulk/Group integration
* New Onboarding Flow
### Bug Fixes 🐞[](#bug-fixes- "Direct link to Bug Fixes 🐞")
* Add userSchedules and save just after creating new wf
* Wrong GCP integration icon
* Version update for rjsf related packages to support allOf functionality
* Enum fields in rjsf form
* COMPLETED status info button
* Terraform Action "i" button
* Approvers select field options & validation
* Minutes consumed today section hidden
* Minor Changes : Bulk integration
### Enhancements and Major Updates 🔥 + 💪[](#enhancements-and-major-updates--- "Direct link to Enhancements and Major Updates 🔥 + 💪")
* SVG Updated For OrgListAll Banner
* Infrastructure drift/Resources/Cost modal UIs
* Updated breadcrumbs
* TirithPolicyBuilder: Explain more about the error\_tolerance
---
# 1.25.5 🎉
### What's Changed,[](#whats-changed "Direct link to What's Changed,")
Release Date: July 13th, 2023
### New Features 🚀[](#new-features- "Direct link to New Features 🚀")
* Private Runners feature to support organizations with strict security/regulatory demands
* Notifications with Flashbar
* New Organization Report Format
* Information button added inside Organization overview
### Bug Fixes 🐞[](#bug-fixes- "Direct link to Bug Fixes 🐞")
* IntegrationId while running discovery through modal
* Discovery modal description and default tab on opening
* Marketplace UI alignment
* Notifications position made absolute
* Private Runner Logs (Timestamp)
### Enhancements and Major Updates 🔥 + 💪[](#enhancements-and-major-updates--- "Direct link to Enhancements and Major Updates 🔥 + 💪")
* Breadcrumb with absolute position
* Refactor Organization Overview
---
# 1.25.6 🎉
### What's Changed,[](#whats-changed "Direct link to What's Changed,")
Release Date: July 14th, 2023
### New Features 🚀[](#new-features- "Direct link to New Features 🚀")
* Azure blob storage option enabled
* Dismissible Notification
* Global settings inside Integration Group
### Bug Fixes 🐞[](#bug-fixes- "Direct link to Bug Fixes 🐞")
* Azure checks in bar chart for integrations
* Notification position fixed
### Enhancements and Major Updates 🔥 + 💪[](#enhancements-and-major-updates--- "Direct link to Enhancements and Major Updates 🔥 + 💪")
* Switch to New Marketplace view
---
# 1.25.7
### What's Changed,[](#whats-changed "Direct link to What's Changed,")
Release Date: July 17th, 2023
### New Features 🚀[](#new-features- "Direct link to New Features 🚀")
* Basic stacks
### Bug Fixes 🐞[](#bug-fixes- "Direct link to Bug Fixes 🐞")
* Sanitize resource names for integrations
### Enhancements and Major Updates 🔥 + 💪[](#enhancements-and-major-updates--- "Direct link to Enhancements and Major Updates 🔥 + 💪")
* No significant changes
---
# 1.25.8 🎉
### What's Changed,[](#whats-changed "Direct link to What's Changed,")
Release Date: July 17th, 2023
### New Features 🚀[](#new-features- "Direct link to New Features 🚀")
* Ansible, Helm, and Kubernetes added as sourceConfigKind
### Bug Fixes 🐞[](#bug-fixes- "Direct link to Bug Fixes 🐞")
* Include subscription Id while generating child integ payload
* Resolved bugs from Workshop-2 feedbacks
### Enhancements and Major Updates 🔥 + 💪[](#enhancements-and-major-updates--- "Direct link to Enhancements and Major Updates 🔥 + 💪")
* Show Notification inside New Group Modal
---
# 1.25.9 🎉
### What's Changed,[](#whats-changed "Direct link to What's Changed,")
Release Date: July 18th, 2023
### New Features 🚀[](#new-features- "Direct link to New Features 🚀")
* Ansible workflow step defaults
* Generate No Code button only for Terraform type
* New terraform version types
### Bug Fixes 🐞[](#bug-fixes- "Direct link to Bug Fixes 🐞")
* Issues resolved in "Discovery" result modal and WF minutes
* Manage terraform state "TRUE" by default
### Enhancements and Major Updates 🔥 + 💪[](#enhancements-and-major-updates--- "Direct link to Enhancements and Major Updates 🔥 + 💪")
* Refactor Integration view
---
# 1.26.0 🎉
### What's Changed,[](#whats-changed "Direct link to What's Changed,")
Release Date: July 23rd, 2023
### New Features 🚀[](#new-features- "Direct link to New Features 🚀")
* Dropdown in top Navbar
* New Workflow Groups, Workflows, Stacks Table View
### Bug Fixes 🐞[](#bug-fixes- "Direct link to Bug Fixes 🐞")
* QUEUED support issues resolved
* Fixed bugs from the Workshop
* Fixed "Run" Workflow button unclickable at some parts
### Enhancements and Major Updates 🔥 + 💪[](#enhancements-and-major-updates--- "Direct link to Enhancements and Major Updates 🔥 + 💪")
* Helm defaults
* Integration authentication & Integration view
---
# 1.26.1 🎉
### What's Changed,[](#whats-changed "Direct link to What's Changed,")
Release Date: July 25th, 2023
### New Features 🚀[](#new-features- "Direct link to New Features 🚀")
* Tirith JSON button to copy Policy JSON generated through No Code
### Bug Fixes 🐞[](#bug-fixes- "Direct link to Bug Fixes 🐞")
* Preserved Resource table view in the same session
* FORM (tfVars) option selected by default in Add template modal for IAC\_GROUP
* Create Resource Button text options updated
### Enhancements and Major Updates 🔥 + 💪[](#enhancements-and-major-updates--- "Direct link to Enhancements and Major Updates 🔥 + 💪")
* Refactored Stack Run Modal
---
# 1.26.2 🎉
### What's Changed,[](#whats-changed "Direct link to What's Changed,")
Release Date: July 27th, 2023
### New Features 🚀[](#new-features- "Direct link to New Features 🚀")
* Easily create and configure CRON expressions with Cron Builder Component
### Bug Fixes 🐞[](#bug-fixes- "Direct link to Bug Fixes 🐞")
* Minor changes related to Runner group
### Enhancements and Major Updates 🔥 + 💪[](#enhancements-and-major-updates--- "Direct link to Enhancements and Major Updates 🔥 + 💪")
* Live formData validation for Basic stack view & create stack run modal
* IAC Group refactoring
---
# 1.26.3 🎉
### What's Changed,[](#whats-changed "Direct link to What's Changed,")
Release Date: July 28th, 2023
### New Features 🚀[](#new-features- "Direct link to New Features 🚀")
* Integration detail modal
### Bug Fixes 🐞[](#bug-fixes- "Direct link to Bug Fixes 🐞")
* Support runner constraints inside create stack view
### Enhancements and Major Updates 🔥 + 💪[](#enhancements-and-major-updates--- "Direct link to Enhancements and Major Updates 🔥 + 💪")
* Enhancements runner group
---
# 1.26.4 🎉
### What's Changed,[](#whats-changed "Direct link to What's Changed,")
Release Date: Aug 3rd, 2023
### New Features 🚀[](#new-features- "Direct link to New Features 🚀")
* Upload artifacts
* Workflow group, Policy, Workflow, Stack Filters in Card/List View
### Bug Fixes 🐞[](#bug-fixes- "Direct link to Bug Fixes 🐞")
* Workflow Reference output fixes
* Double breadcrumbs issue resolved
* Integration detailed modal
* AJV Config Update
* Bar chart inside integrations
* User Role, WorkflowInfoCard
* Stack templates default
* Populate steps for ansible playbook and helm for normal wfs
* "Must match then schema" error
* Org fetching logic changed inside integration detailed modal
* Support - new report format for integration detail modal
* Subresourceid instead of ResourceName
* Timeline tab org overview
* Basic view validation
* setSourceConfigKindRev not defined, is undefined revision meta view
### Enhancements and Major Updates 🔥 + 💪[](#enhancements-and-major-updates--- "Direct link to Enhancements and Major Updates 🔥 + 💪")
* Enhancement/runner grp
* Create template modal Validation
* Policy approvers with Approval Required
* Safe check
* Loading state inside integration detailed modal
* createdAt and affectedResurces count added in integration detail modal
* Outputs Referencing Inside Environment Variables
---
# 1.26.5 🎉
### What's Changed,[](#whats-changed "Direct link to What's Changed,")
Release Date: Aug 14th, 2023
### New Features 🚀[](#new-features- "Direct link to New Features 🚀")
* Allow message from Workflow’s approvers during WF run execution
* Beautify the outputs of Workflow and Stack
* De-register runner instance
* New Date Component
* Workflow setting Highlights
* Orchestrator UI updated
* Policy List View
* Email option in Discovery settings
* Warn user if current deployment config integration not found inside integration list
### Bug Fixes 🐞[](#bug-fixes- "Direct link to Bug Fixes 🐞")
* Secret & Integration tabs loading issue resolved
* Download Button inside Discovery modal fixed
* Removed upload Artifacts button for private runner
* Integration details bug resolved
* Hotfixed Tag’s on blur
* Scroll orchestrator overview UI fixed
* Stack referencing issue resolved
* Call load Initial Workflow every time miniSteps changes
* Hide git enterprise
* Minor fix related to policies & Workflow Run card
* Rjsf custom widgets Form-Field errors logic updated
* Warning instead of pending for status indicator colour
* Output view crashing resolved
* Ansible release step revisions
* Fix “Next” button for custom workflows in basic view
* Schedules Link and badge updated
* Bug Fixes in Multi-factor authentication
* Fixed cron utc iterations
* Components Refactor for Date component
### Enhancements and Major Updates 🔥 + 💪[](#enhancements-and-major-updates--- "Direct link to Enhancements and Major Updates 🔥 + 💪")
* UI Enhancements in the General Settings and Workflow Stack View with CLI integration
* Terminated console.logs in PROD
* Usage tab inside Runner Group enhancements
---
# 1.26.6 🎉
### What's Changed,[](#whats-changed "Direct link to What's Changed,")
Release Date: Aug 25th, 2023
### New Features 🚀[](#new-features- "Direct link to New Features 🚀")
* List View for Vaults
* Enforced MFA at organization level
* Reference Output in secret modal, workflow outputs and workflow steps
* List workflows in discovery results modal
* Preserve page and filters in workflow groups, workflows, stack, policy
### Bug Fixes 🐞[](#bug-fixes- "Direct link to Bug Fixes 🐞")
* Stacks referencing & subscribe/unsubscribe templates
* Minor fix and beautify JSON printing
* Validate path name during update role permission
* Safe check schedules
* Bypass .\* validation in update role permission modal
* Fixed table crashing due to authors key
* Marketplace & Main Overview related changes
* Overflow inside charts and integration resourceName
* Redirect to app if Beta is used
* Preserved Form Data for 2 revisions
* Overflow inside charts and integration resourceName
* URL ID for Tabs Runs updated
* Workflow run crashing issue resolved
### Enhancements and Major Updates 🔥 + 💪[](#enhancements-and-major-updates--- "Direct link to Enhancements and Major Updates 🔥 + 💪")
* Refactor BeautifyCount component
* Refactor Referencing modal
* Refactor Date component
* Initial Testing Structure and DateComponent Testing Script
* Org overview reports & Stack table status
* Enhanced Discovery Modal
* Policy Approvers added inside rules tab
* Enhancement: Enforce mfa
* Enhance workflow runs card propagation
---
# 1.26.7 🎉
### What's Changed,[](#whats-changed "Direct link to What's Changed,")
Release Date: Sept 5th, 2023
### New Features 🚀[](#new-features- "Direct link to New Features 🚀")
* Custom Benchmarks support
* Gitlab Integration
* Custom Breadcrumbs
### Bug Fixes 🐞[](#bug-fixes- "Direct link to Bug Fixes 🐞")
* Workflow Run(WfRun) crashing when WfRun listall returns 204
* MarketPlace template view revamp
* Now showing template reference inside edit templates defaults
* Resolved activate loading issue
* Output reference builder fixed
* Build Tirith policy Terraform Resources
* Default terraform\_resource\_type
* Marketplace template view fixes
* Workflow steps crashing resolved
* Created New Revision button for Unsaved Data
* Added condition value field inside Tirith policy builder
* Auto-scroll, validation, login mobile view UI updated
* Stack output order resolved
### Enhancements and Major Updates 🔥 + 💪[](#enhancements-and-major-updates--- "Direct link to Enhancements and Major Updates 🔥 + 💪")
* Warning Message Implementation
* Azure Devops Group placeholder
* Refactor Aggregation logic
* Hide settings for integration detailed modal
* Refactor Workflow Run cards
* Enhancement of Custom checks
* Updated texts in Gitlab modal
---
# 1.26.8 🎉
### What's Changed,[](#whats-changed "Direct link to What's Changed,")
Release Date: Sept 25th, 2023
### New Features 🚀[](#new-features- "Direct link to New Features 🚀")
* New Terraform versions
### Bug Fixes 🐞[](#bug-fixes- "Direct link to Bug Fixes 🐞")
* Custom checks
* Type removed from auth field inside templates
* Wrong checks passed for custom checks
* Reports updated
* Write only field for secrets
* Tirith policy builder boolean value
* Allow Anyone Approval
* Hotfix in Resources
* Decline workflow run in ADMIN user
### Enhancements and Major Updates 🔥 + 💪[](#enhancements-and-major-updates--- "Direct link to Enhancements and Major Updates 🔥 + 💪")
* Build tirith policy button for custom checks
* Added loading state in overview cards
---
# 1.26.9 🎉
### What's Changed,[](#whats-changed "Direct link to What's Changed,")
Release Date: Oct 11th, 2023
### New Features 🚀[](#new-features- "Direct link to New Features 🚀")
* Horizontal stacked chart for Used Resources
* Kubernetes provider & direct refs/deps in Tirith Policy
* RuntimeParameter diff & Re-run workflow button
* Stacks discrepancies
* New org level workflows listall endpoint
* Internal referencing and edit template
* Implement search button in marketplace
* Stack creation from orchestrator
* Support gitSparseCheckout
### Bug Fixes 🐞[](#bug-fixes- "Direct link to Bug Fixes 🐞")
* Validate runner constraint
* Workflow run metrics in Organization settings
* Auto Generate external ID while connecting multiple accounts
* Wfsteps auto-populated for helm & Ansible type
* Write-only field for secrets
* Allow Anyone for the Approval
* Timestamp in approval detail view
* Hide marketplace and Tirith policy button for custom checks
* Tirith policy builder boolean value
* Added loading state for Org overview cards
* Decline workflow run in ADMIN user
* Show subscription status Active if expirationDate is not there
* RegisterView fixes
* Invalid date in SG\_INTERNAL type policies info section
* Cancel disable for scheduled workflow run
* Runner group page title
* Workflow status info icon Color based on Terraform action
* Audit logs filter
* Clean special chars from logs for downloadable files
* Value type changed from str to int for select component
* Layout incorrect inside Parameter WfRun
* Microsoft Clarify
* Forgot password logic
* Replace convertEOLToLF with gitCoreAutoCRLF
* Support for S3 Artifact upload with private runner
* Updated docs in integration views
* Pen icon scrolling
* Resource tables
### Enhancements and Major Updates 🔥 + 💪[](#enhancements-and-major-updates--- "Direct link to Enhancements and Major Updates 🔥 + 💪")
* Notify user to create a new IAC Group revision, if old is found
* Refactor adopt cloudscape for Delete item modal
* Merge drift card into resource card
* Workflow run date component
* Workflow Run Tabs updated
* Refactor cost modal
* Enable driftCheck by default
* Consistent information icon
* Added loading inside Workflow Status card
* Update query for Drifted workflow count
* Error boundaries for Stack Create & Update wizard
---
# 1.27.0 🎉
### What's Changed,[](#whats-changed "Direct link to What's Changed,")
Release Date: Nov 3rd, 2023
### New Features 🚀[](#new-features- "Direct link to New Features 🚀")
* Benchmark view
* Stack overview
* Insights Module (Sidebar) component
* Unsaved form-data warning hook
* Data type in SG Workflow Tirith provider
### Bug Fixes 🐞[](#bug-fixes- "Direct link to Bug Fixes 🐞")
* Stacks list all order
* Discovery settings inside integration groups
* Hide edit button in Stack
* Integration groups detailed modal & Secret viewer component
* Benchmark view detailed modal
* Loading state inside integration group view
* Enable Re-evaluate workflows (Preview) button on QA
* Info flashbar in terraform workflow artifacts
* Terraform version field converted into Auto-suggest
* Security questions doesn’t appear in Stacks
* Workflow Run Limit
* Role path validation
* Resource table refresh button & Runner Instance table
* Added Runner Group related permissions
* Terraform intelligence
* Bugs in provisioned Resources tab
* No Integration option in deployment platform config
* VCS Settings validation
* Scrolling container
* Invalid JSON errors for custom workflows
* Resources & terraform drift card
* Azure Marketplace
* Approvers Email Validation
* DiscoveryModal: Fix discovery not showing when S3 path is different
### Enhancements and Major Updates 🔥 + 💪[](#enhancements-and-major-updates--- "Direct link to Enhancements and Major Updates 🔥 + 💪")
* Stack enhancements
* Side Navigation UI fixes
* Added Usage tab in IAC, IAC\_GROUP, Runner Group
* Refactor resource table component
* Breadcrumbs
* Refactor Tirith builder
* Remove Preview label
* Template available as an option
* Flash bar side navigation
* Added warning for Private Runners & AWS\_RBAC
* Select all option for all the multi-select
* Dynamically show wfrunfact cards when runfactId exists for fetching
---
# 1.27.1 🎉
### What's Changed,[](#whats-changed "Direct link to What's Changed,")
Release Date: Nov 27th, 2023
### New Features 🚀[](#new-features- "Direct link to New Features 🚀")
* New VCS Form component
* New Terraform workflow steps component
* WebHook with Validation
* Container instance ID
* Customisable actions inside stack upgrade modal
* New workflow create form
* Editable workflow run
* Deployment Platform Config in workflow Run form
* Pre/Post Apply and Pre Plan Workflow Step Config
### Bug Fixes 🐞[](#bug-fixes- "Direct link to Bug Fixes 🐞")
* t.toLowerCase is not a function inside policies
* Integration keyword renamed to connector
* Infra card crashing due to early render of component
* Show Create integration buttons according to sidebar connectors
* Connect to cloud provider button not visible
* Fetch initial resources
* Loading state connectors
* GCP integration discovery settings
* Loading workflow settings
* Decline button state
* git\_other repo
* Add Terraform Config option inside workflow attribute field - Tirith Policy Builder
* Workflow creation during onboarding process
* Approval button not shown when anybody can approve it true in custom workflow
* Allow max 2 user schedules
* Workflow StepConfig delete cmdOverride field if empty string
* Infracost policy (Monthly) does not show the 'resource type'
* Fixed Marketplace Endpoint
* Integration Number Correction
### Enhancements and Major Updates 🔥 + 💪[](#enhancements-and-major-updates--- "Direct link to Enhancements and Major Updates 🔥 + 💪")
* Filtering auto for all multi-select
* Allow multi steps for custom
* Refactor text
* Clear create template form data on form close
* Allow maximum of 10 workflow steps for custom workflows
* Generate No Code Form
* Fetch all workflow Groups / workflows / stacks inside output reference builder
* Refresh button for workflow Steps templates
* Update payload for Save & Run button
* Referencing Modal
---
# 1.27.2 🎉
### What's Changed,[](#whats-changed "Direct link to What's Changed,")
Release Date: Dec 16th, 2023
### New Features 🚀[](#new-features- "Direct link to New Features 🚀")
* Pagination and filtering for connectors and child connectors
* Use cron-validate package to validate cron expression instead of regex
* Policy Overview
* Historic Stempipe Summary report
* Added description for Configure Order expandable section inside create stack wizard
* Fetch workflow list again to update status
### Bug Fixes 🐞[](#bug-fixes- "Direct link to Bug Fixes 🐞")
* Resolved missing url path for UpdateSubscription
* Fixes for User schedules delete button & New create workflow form
* Radio Button implementation for Marketplace
* UI logic updated use isPrivate from revision listall
* TfDrift if else block updated
* Workflow Group Pagination fixes
* Enable Edit stack button
* Create template form stop responding for IAC Policy
* Output referencing modal
* Added mountPoints, UserJobCPU & UserJobMemory fields
* MountPoints not passed in workflow run form
* Approval button appearance inside logs
* Validate tfVersion only for CUSTOM workflow
* Hide template referencing option inside orchestrator
* Page overflow in workflow run
* Benchmark view UI fixes
* Babel traverse version update
* Retry condition & version update for Axios & Axios-retry package
* Show warning when user checks JSON input inside workflow StepTemplate create form
* Template Name Validation
* Show user a warning to create new IAC Group revision if Actions key is not present
* Log window overflow
* Secrets not printing inside parameters tab
* Deployment platform config in workflow run form
* Show error msg instead of navigating to 404 page
* JSON option not selected inside workflowrun form
### Enhancements and Major Updates 🔥 + 💪[](#enhancements-and-major-updates--- "Direct link to Enhancements and Major Updates 🔥 + 💪")
* Refactor Enable workflow chaining
* Add integration groups permission
* Crypto upgrade and Cognito/auth
* Refactor Template Forms logic
* Added back button inside create stack wizard
* Show deprecation warning in stack create modal
* Update package-lock
---
# 1.27.3 🎉
### What's Changed,[](#whats-changed "Direct link to What's Changed,")
Release Date: Dec 22nd, 2023
### New Features 🚀[](#new-features- "Direct link to New Features 🚀")
* Discover "Cost Checks" Insights for effortless cloud spending monitoring
### Bug Fixes 🐞[](#bug-fixes- "Direct link to Bug Fixes 🐞")
* Resolved undefined variable in getWorkFlowDetail Workflow view
* Added auto-close feature for Resource Card view.
* Preserve open state when clicking subResource.
* Resolved 'idx' undefined issue in resource modal.
* Improved filter panel icon visibility and 'select all' feature in Insights module.
* Fixed Resource card sorting for better findings clarity.
* Updated frontend logic to send checks when any single check or discovery setting changes.
* Implemented appClientId with email for user deletion from Organization
* Enhanced Mount Points component with info icons for better source understanding.
### Enhancements and Major Updates 🔥 + 💪[](#enhancements-and-major-updates--- "Direct link to Enhancements and Major Updates 🔥 + 💪")
* Orchestrator's Benchmarks: Filter removed, UI enhanced for a better view
* Assigned Roles dropdown positioning fixed in Organization Settings
* Updated axios to 1.6.0 from 0.21.4
* Upgraded word-wrap to 1.2.4 from 1.2.3
* Development build: @adobe/css-tools bumped to 4.3.2 from 4.3.1
* Updated dependencies: Fast XML parser and AWS Amplify
* Removed React Microsoft Clarity
* Separate Benchmarks and Insights items in the Orchestrator's sidebar for enhanced clarity
---
# 1.27.4 🎉
### What's Changed,[](#whats-changed "Direct link to What's Changed,")
Release Date: Jan 5th, 2024
### New Features 🚀[](#new-features- "Direct link to New Features 🚀")
* Integrated React 18 in Cost Check dsshboard
* Added auth configuration selection via new Connector Dropdown component
* Implemented Add Template functionality in IAC Group form
### Bug Fixes 🐞[](#bug-fixes- "Direct link to Bug Fixes 🐞")
* Fixed drift logic in compliance checks.
* Patched Slack integration vulnerability.
* Unauthorized user in switch org
* Redirects updated to new documentation links
* Updated default filters for benchmark view
* Issue with Date select option in the org settings resolved
### Enhancements and Major Updates 🔥 + 💪[](#enhancements-and-major-updates--- "Direct link to Enhancements and Major Updates 🔥 + 💪")
* Upgraded AWS Amplify v6
* Streamlined VCS Configuration in Workflow Settings Tab
* Revamped Authentication, Profile and Signup views
---
# 1.27.5 🎉
### What's Changed,[](#whats-changed "Direct link to What's Changed,")
Release Date: Jan 13th, 2024
### New Features 🚀[](#new-features- "Direct link to New Features 🚀")
* Added constraints for workflow CPU and Memory utilization
* New Custom Tiles component under create workflow form
* New Resource Modal under orchestrator
### Enhancements and Major Updates 🔥 + 💪[](#enhancements-and-major-updates--- "Direct link to Enhancements and Major Updates 🔥 + 💪")
* Enable cost dashboard
* Enhancements in cost dashboard
* Update LoginUtils logic
* Connectors forms revamp
* Cost checks logics updated
* Drift modal inside main overview
### Bug Fixes 🐞[](#bug-fixes- "Direct link to Bug Fixes 🐞")
* Fixed typo in the link
* Auth related routes are directly accessible
* Resource card modal UI fixes
* Unsaved data in create stack modal and workflow dialog
* Demo-org hardcoded inside cost dashboard
---
# 1.27.6 🎉
### What's Changed,[](#whats-changed "Direct link to What's Changed,")
Release Date: Jan 19th, 2024
### New Features 🚀[](#new-features- "Direct link to New Features 🚀")
* New detailed breakdown table in cost check under Insights module
### Enhancements and Major Updates 🔥 + 💪[](#enhancements-and-major-updates--- "Direct link to Enhancements and Major Updates 🔥 + 💪")
* Resource modal logic and UI enhancements
* Added onToggle description in private runner settings
### Bug Fixes 🐞[](#bug-fixes- "Direct link to Bug Fixes 🐞")
* Resource card crashing resolved
* SSO option not present in Login method dropdown fixed
* Unsaved data alert when close create workflow run
* Removed alert while creating & running a workflow
* Prevent discovery runs for child connector during creation of group connectors
---
# 1.27.7 🎉
### What's Changed,[](#whats-changed "Direct link to What's Changed,")
Release Date: Feb 2nd, 2024
### New Features 🚀[](#new-features- "Direct link to New Features 🚀")
* Workflow Run Form
* CloudFormation facts card
* Organization dashboard
* Feedback component
### Enhancements and Major Updates 🔥 + 💪[](#enhancements-and-major-updates--- "Direct link to Enhancements and Major Updates 🔥 + 💪")
* Added dollar sign to Infracost summary in main overview
* Added 'New Stack' button & adjusted modal padding
* Enable accounts filter inside cost check view
* Move out library from the marketplace view
* Removed JSON tab from execution modal; added similar tabs to stacks
* Added temporary refresh button to workflow run list view
* Typescript implementation
* Hide Audit logs
* Load auth options on VCS Form auth dropdown click
* Extending repo dispatch to access testing repo
### Bug Fixes 🐞[](#bug-fixes- "Direct link to Bug Fixes 🐞")
* Github sync field crashing inside workflow settings
* Policy enforcement fails with 'select all' workflows checked
* Copy workflow not cloning schedules
* Email text wrapped to new line
* Codebase vulnerabilities & implement Joyride
* Remove Tags from wrong location
---
# 1.27.8 🎉
### What's Changed,[](#whats-changed "Direct link to What's Changed,")
Release Date: Feb 23rd, 2024
### New Features 🚀[](#new-features- "Direct link to New Features 🚀")
* [**RBAC **](/docs/organisation_settings/access_management/): Enhanced role definition and permission assignment
* **Mount Custom Terraform Binary**: Configure in VCS settings of your workflow.
* **Terraform & CloudFormation Plan Cards**: UI representations of infrastructure changes
### Enhancements and Major Updates 🔥 + 💪[](#enhancements-and-major-updates--- "Direct link to Enhancements and Major Updates 🔥 + 💪")
* **Sentry Integration**: Advanced error monitoring
* **Insights UI Update**: Improved table clarity, added ObservedAt column, and optimized filter query.
* **Template Revision Form Adjustments**: Restricted field edits for template versions.
* **VCS Triggers UI Enhancement**: Refined trigger setup and management interface.
### Bug Fixes 🐞[](#bug-fixes- "Direct link to Bug Fixes 🐞")
* **Terraform Config Removal**: Exclude from CUSTOM workflow PATCH/CREATE requests
* **Stack Upgrade Modal Update**: Form field adjustments and error resolution
* **Sign-in Redirection Fix**: Corrected post-login URL redirection issue
* **Vulnerability Mitigations**: Enhanced security by addressing multiple vulnerabilities
---
# 1.27.9 🎉
### What's Changed,[](#whats-changed "Direct link to What's Changed,")
Release Date: Mar 22nd, 2024
### New Features 🚀[](#new-features- "Direct link to New Features 🚀")
* [**Compliance Dashboard **](/docs/discover/insights/compliance_dashboard/): Track and manage infrastructure compliance
* [**Security Dashboard **](/docs/discover/insights/security_dashboard/): Improved security monitoring and alerts.
### Enhancements and Major Updates 🔥 + 💪[](#enhancements-and-major-updates--- "Direct link to Enhancements and Major Updates 🔥 + 💪")
* **Overview Dashboard**: New widgets added for enhanced security and compliance insights.
* **CloudFormation Support**: Added `sourceConfigKind` support for CloudFormation.
* **Logs Interface Overhaul**: Revamped logs window for improved user experience.
* **Log Window Controls**: Updated log window buttons for better functionality.
* **Insights Module**: Enhanced the Insights module for clearer and more actionable data.
### Bug Fixes 🐞[](#bug-fixes- "Direct link to Bug Fixes 🐞")
* **Workflow Search Issue**: Fixed pagination errors in workflow search.
* **Workflow Execution**: Resolved issues preventing workflow runs without secret permissions.
* **Workflow Parameters UI**: Adjustments made to the Parameters tab in workflow run views.
* **Cost Check Widget**: Resolved discrepancies in the Organization dashboard's cost check widget.
* **Environment Variables**: Removed unnecessary default region from environment variables.
* **Workflow Settings**: Fixed issues in `stacksServices.FIND` affecting workflow settings.
* **Workflow Payload**: Corrected `GithubComSync` and `VCSTriggers` errors in workflow save process.
---
# 1.28.0 🎉
### What's Changed,[](#whats-changed "Direct link to What's Changed,")
Release Date: Apr 2nd, 2024
### New Features 🚀[](#new-features- "Direct link to New Features 🚀")
* **Terraform Version Update**: Added 1.5.6 and 1.5.7 as new Terraform versions & made 1.5.7 the default.
### Enhancements and Major Updates 🔥 + 💪[](#enhancements-and-major-updates--- "Direct link to Enhancements and Major Updates 🔥 + 💪")
* **Insights Module**: Enhanced capabilities and new features added to the insights module for better data analysis.
### Bug Fixes 🐞[](#bug-fixes- "Direct link to Bug Fixes 🐞")
* **Destructuring Property Error**: Resolved JavaScript destructuring error.
* **Benchmark Visibility**: Ensured all benchmarks are visible in detailed view.
* **Null Account ID Display**: Corrected display of null account IDs in widgets.
* **Workflow Creation Modal Fix**: Addressed workflow creation issues in new modal.
* **Benchmark Filter Enhancements**: Improved benchmark filter options.
* **Overview Tab Flickering**: Fixed temporary visibility of overview tab during reloads.
* **Benchmark Filter Parameters**: Adjusted benchmark filter parameters.
* **Org Dashboard and WFRUN View Fixes**: Resolved default state and parameter issues.
* **AWS Sign-In Handler**: Fixed user sign-in event handling for AWS.
* **VCSTriggers Key Deletion**: Removed unnecessary data from copied payloads.
* **Insights Module Corrections**: Corrected typos and improved filter options.
* **Schwaebisch Hall Localization**: Addressed localization issues.
---
# 1.28.1 🎉
### What's Changed,[](#whats-changed "Direct link to What's Changed,")
Release Date: Apr 10th, 2024
### New Features 🚀[](#new-features- "Direct link to New Features 🚀")
* [**OIDC AWS Integration** ](/docs/connectors/csp/aws/#using-oidc-identity-provider): Enhance AWS security with OIDC integration, facilitating streamlined access and authentication management.
* [**New GitLab Triggers** ](/docs/connectors/vcs/gitlabcom/#gitlab-triggers): Enhance project automation with new GitLab triggers for streamlined operations and efficient deployment.
### Enhancements and Major Updates 🔥 + 💪[](#enhancements-and-major-updates--- "Direct link to Enhancements and Major Updates 🔥 + 💪")
* **Workflow IAC Input Data Logic**: Enhanced logic for Infrastructure as Code input data handling.
* **VCS Form Component**: Improved form components for version control settings.
* **Promote the Settings (Preview) to be the New Default**: Update and set new default settings across the platform.
* **Delete Old Steps.js and Remove Console Logs**: Cleaned up legacy code and debugging statements.
### Bug Fixes 🐛[](#bug-fixes- "Direct link to Bug Fixes 🐛")
* **IAC Template ID**: Issues with identifying IAC templates correctly.
* **Split VCS and Terraform/Workflow Steps Settings**: Refined settings separation for better workflow management.
* **Git Repository Issue with Payload on First Load**: Resolved loading issues with initial payload in Git repositories.
* **Unsaved Warning Inside Template View**: Addressed the unsaved changes warning within template views.
* **Workflow Create Modal Crashing When Choosing RAW\_JSON Option**: Corrected crash issues in workflow creation modal with RAW\_JSON.
* **Stack Modal Back and Next Button Not Scrolling to Top**: Improved scroll functionality in stack modal navigation.
* **Steps Should Be Selected for Custom Workflow (Ansible, CloudFormation, Helm)**: Ensured proper step selection in custom workflows.
* **RegionsMap is Not Defined Inside Azure & GCP Integration Modal**: Fixed undefined RegionsMap error in Azure and GCP modals.
* **Select Template Field Not Showing Selected Template**: Solved display issue in template selection field.
* **Repo field Not Mounting**: Resolved mounting problems in repositories.
* **Runner Route Not Accessible to Support User**: Repaired access issue for support user runner routes.
---
# 1.28.2 🎉
### What's Changed,[](#whats-changed "Direct link to What's Changed,")
Release Date: May 12th, 2024
### Features 🚀[](#features- "Direct link to Features 🚀")
* [**Benchmark Widget**](/docs/discover/insights/cost_dashboard/#g-cost-benchmark): New *Cost*, *Security*, and *Compliance* benchmark widgets track standards adherence, visualize cost performance, and categorize security checks for easy identification and remediation.
* [**Detail Graph Tabs**](/docs/discover/insights/cost_dashboard/#detail-graphs): New Cost, Security, and Compliance tabs provide in-depth analysis with customizable views by severity, cloud provider, account, benchmarks and check status.
* [**AWS RBAC Integration in Storage Backend Config**](/docs/organisation_settings/private_runner/setup_private_runner_aws/): Utilize AWS RBAC for enhanced security in S3 storage backend setups.
### Enhancements and Major Updates 🔥 + 💪[](#enhancements-and-major-updates--- "Direct link to Enhancements and Major Updates 🔥 + 💪")
* **Duplicate Resources Handling**: Improved management and detection of duplicate resources.
* **Password Widget Update**: Enhanced the password widget for better security and user experience.
* **Workflow Meta Component Upgrade**: Updated the workflow meta component for increased functionality.
* **Revamped Organization Overview**: Redesigned the organization overview for better clarity and usability.
* **Clean Error Messages**: Refined error messages by removing ASCII color codes for clearer communication.
### Bug Fixes 🐛[](#bug-fixes- "Direct link to Bug Fixes 🐛")
* **Duplicate Resources in Modal**: Resolved issues with duplicate listings in resources modal.
* **Workflow Execution on Faulty PATCH**: Ensured workflows only proceed if PATCH requests succeed.
* **Crash in IAC Group Template Modal**: Fixed crash for templates with default IAC input data.
* **Marketplace Create Stack Button**: Hidden create stack button in the marketplace to avoid confusion.
* **SSO Auto Sign-Out**: Addressed issue causing SSO users to sign out unexpectedly.
* **ResourcesCard Dropdown Glitch**: Fixed dropdown display problems on ResourcesCard.
* **Compliance and Infracost Card Updates**: Changed the UI to enhance the clarity of Compliance and Infracost cards.
* **Disabled Connector Field**: Fixed the connector field in the parameters tab to stay disabled as required.
* **Approval Details Navigation**: Corrected the redirection issue in approval details.
* **Template Reference in IAC Group**: Ensured accurate template referencing within the same IAC group.
* **Tooltip Visibility in WorkflowRun Form**: Made the tooltip for SG Managed Terraform Backend checkbox visible.
* **Approval Requirement Label**: Corrected the label for "Require Approval from" field to remove ambiguity.
* **Stringified IAC Input Data**: Fixed issue with frontend sending stringified data when not using marketplace templates.
* **Refactor Create Template Modal**: Enhanced handling of unsaved data in the create template modal.
* **Non-Clickable InfraCostOverviewCard**: Adjusted UI to prevent clicks on InfraCostOverviewCard when no data is available.
* **Workflow Group Link Obstruction**: Addressed the issue of the workflow group link being obscured by the Launch Workflow button in side navigation.
* **Visibility of AWS\_OIDC in Dropdown**: Ensured AWS\_OIDC type integrations appear in the integrations dropdown of roles.
* **Integration List Request in Storage Backend**: Streamlined the request process for listing all integrations in storage backend.
* **Spacing in GET Integration Request**: Removed unnecessary spaces in GET integration request's parameters.
* **Cloud Connector Heading in Workflow View**: Updated display value of Cloud Connector heading inside workflow view.
* **Multi Select in RJSF for Workflow Steps**: Enabled multi-select functionality for WORKFLOW\_STEP using rjsf library.
---
# 1.28.3 🎉
### What's Changed,[](#whats-changed "Direct link to What's Changed,")
Release Date: May 30th, 2024
### Features 🚀[](#features- "Direct link to Features 🚀")
* [**GitHub Triggers**](/docs/connectors/vcs/githubcom/#github-triggers): New setting for GitHub triggers, allowing workflows to initiate on pull requests, pushes, and tag creations.
* [**Async Select Widget for RJSF Form**](/docs/develop/library/nocode_template_builder/#4-asyncselectwidget): Allows users to add a select component that dynamically loads options via an API call.
* **Dynamic Documentation Inside Information Panel**: Introduced dynamic documentation within the information panel on the dashboard app.
### Enhancements and Major Updates 🔥 + 💪[](#enhancements-and-major-updates--- "Direct link to Enhancements and Major Updates 🔥 + 💪")
* **Overview Release Banner**: Added a banner in the dashboard overview for quick access to the latest change log.
* **Runner Group Enhancements**: Improved functionality and features for runner groups.
* **Duplicate Resources Handling**: Improved management and detection of duplicate resources.
* **Workflow Meta Component Upgrade**: Updated the workflow meta component for increased functionality.
* **Revamped Organization Overview**: Redesigned the organization overview for better clarity and usability.
* **Clean Error Messages**: Refined error messages by removing ASCII color codes for clearer communication.
* **Show Run Destroy Button**: Show run destroy button inside delete workflow wizard (Terraform workflow only).
### Bug Fixes 🐛[](#bug-fixes- "Direct link to Bug Fixes 🐛")
* **Integration Update Not Working**: Fixed an issue where the integration update was not working as currentItem was set to an empty string inside the integration wizard.
* **Template Referencing String Inconsistency**: Addressed a warning about template referencing string inconsistency.
* **Search Value Fix**: Corrected the search functionality to work with values.
* **RJSF JSON Data Validation**: Fixed an issue with RJSF JSON data validation.
* **Integration Input Component Default State**: Fixed the default state of the integration input component.
* **Onboarding Flow Template Field Crashing**: Fixed the crash issue with the select template field in the onboarding flow.
* **Workflow Run Table Search Bugs**: Fixed search bugs within the workflow run table.
* **URL Encoding on Repo of Workflow**: Fixed URL encoding issues on the repository of the workflow.
* **Role Doesn't Show When Logged in via SSO**: Fixed the issue where the role doesn't show when logged in via SSO.
* **Filters Options Undefined**: Fixed the undefined filter options issue inside detailed insights transposed table.
* **Latest Status Not Updating**: Fixed the issue where the latest status was not updating inside the resource table.
* **Insights Dashboard Height**: Fixed the height issue in the insights dashboard.
* **Remove Container Instance ARN Duplicate Box**: Removed the duplicate container instance ARN box from the parameters tab.
---
# 1.28.4 🎉
### What's Changed,[](#whats-changed "Direct link to What's Changed,")
Release Date: Jun 25th, 2024
### Features 🚀[](#features- "Direct link to Features 🚀")
* [**GitHub Custom App Integration**](/docs/connectors/vcs/github_enterprise/): Added connector for GitHub Enterprise custom apps.
### Enhancements and Major Updates 🔥 + 💪[](#enhancements-and-major-updates--- "Direct link to Enhancements and Major Updates 🔥 + 💪")
* **Allow Special Characters for Resource Name**: OrganizationSettings.js now allows .+\*/ characters for resource names.
* **Terraform CLI Options**: Changed label from “Terraform Plan Options” to “Terraform CLI Options”.
* **Pagination in Browse Templates**: Implemented pagination inside the browse template component for the subscription endpoint.
* **Approval Navigation from Workflow Overview**: Improved approval modal navigation from the workflow overview.
### Bug Fixes 🐛[](#bug-fixes- "Direct link to Bug Fixes 🐛")
* **Integration Update Not Working**: Fixed an issue where the integration update was not working as currentItem was set to an empty string inside the integration wizard.
* **View Details Button Not Working in Org Overview**: Fixed the issue where the view details button was not working in the organization overview.
* **Workflow Run List Pagination**: Fixed pagination issues in the workflow run list view.
* **Status Inside Workflow View**: Fixed the issue where the latest status was not updating inside the resource table.
* **Loading State of Templates Tab**: Fixed the loading state of the templates tab inside the IAC Group template view.
* **Error Redirect Fails**: Fixed the error redirect failure.
* **Browse Templates Pagination**: Fixed pagination issues in the browse templates view.
* **Report Params Not Set Correctly**: Fixed the issue where report parameters were not correctly set on clicking the view-d\*\*etails button.
---
# 1.28.5 🎉
### What's Changed,[](#whats-changed "Direct link to What's Changed,")
Release Date: July 25th, 2024
### Features 🚀[](#features- "Direct link to Features 🚀")
* **Detailed Terraform Workflow Statuses**: - Display precise statuses for each step in Terraform workflows for enhanced visibility.
* **Notification settings layout**: Manage email notifications for compliance, cost, and security dashboards.
### Enhancements and Major Updates 🔥 + 💪[](#enhancements-and-major-updates--- "Direct link to Enhancements and Major Updates 🔥 + 💪")
* **Updated Scheduled workflow type statuses**: Improved visibility and tracking of different statuses in scheduled workflows
### Bug Fixes 🐛[](#bug-fixes- "Direct link to Bug Fixes 🐛")
* **Resources not showing up for CUSTOM workflows**: Fixed issue where resources were not displayed for custom workflows.
* **FixedLatest status inside workflow run table**: Ensured accurate status display in the workflow run table.
* **Fixed bug when status is untracked**: Addressed issue where untracked statuses were not handled properly.
---
# 1.28.6 🎉
### What's Changed,[](#whats-changed "Direct link to What's Changed,")
Release Date: Aug 8th, 2024
### Features 🚀[](#features- "Direct link to Features 🚀")
* No **new features** were introduced in this release.
### Enhancements and Major Updates 🔥 + 💪[](#enhancements-and-major-updates--- "Direct link to Enhancements and Major Updates 🔥 + 💪")
* **Revamped VCS Triggers**: Improved automation by adding support for new hooks that trigger actions based on VCS events.
### Bug Fixes 🐛[](#bug-fixes- "Direct link to Bug Fixes 🐛")
* **Notification Settings Page**: Addressed a bug related to the notification settings page.
* **Terraform Workflow Chaining Plan**: Corrected the workflow chaining plan in Terraform.
* **Nested Hierarchy Parameters**: Resolved issues with nested hierarchy parameters in artifact view.
* **Email Input in Org Settings**: Prevented the `/` character from being used in the email input field within organization settings.
* **Template Type Options**: Ensured template type options now appear inside the update permission wizard of the role view.
---
# 1.28.7 🎉
### What's Changed[](#whats-changed "Direct link to What's Changed")
Release Date: Aug 30th, 2024
### Features 🚀[](#features- "Direct link to Features 🚀")
* [**Dial Widgets**](/docs/discover/insights/overview/): New interface to track passes-fails percentages for cost, compliance, and security checks across cloud connectors.
### Enhancements and Major Updates 🔥 + 💪[](#enhancements-and-major-updates--- "Direct link to Enhancements and Major Updates 🔥 + 💪")
* **Custom Binary Terraform Option**: Added support for specifying a custom binary for Terraform.
* **Paused Status Indicator**: Added an indicator for paused workflows to better track progress.
* **Onboarding Flow enhancements**: Addressed several issues in the onboarding process to streamline user experience.
* **Support for pre/post ApplyHooks**: Introduced support for postApplyHooks, preApplyHooks, and prePlanHooks inside the Terraform configuration.
### Bug Fixes 🐛[](#bug-fixes- "Direct link to Bug Fixes 🐛")
* **Nested Parameter Parsing**: Fixed a bug where nested hierarchy parameters were incorrectly parsed.
* **Workflow Group Sidebar Issue**: Resolved an issue where workflow groups were not picked correctly in the sidebar.
* **Double Scrollbars in Workflow Runs**: Fixed a UI issue causing double scrollbars in workflow runs.
---
# Community
Give us feedback, get involved with the community or request features on [GitHub Discussions](https://github.com/StackGuardian/feedback/discussions).
We are continuously bringing new features to our platform and are always keen on hearing from current and potential users and their use cases. Please connect with us over email or over [Slack](https://join.slack.com/t/stackguardian-ol78820/shared_invite/zt-2ksag36j9-OjmXqQmyXudgYrV6FmesIQ).
---
# Connect AWS to StackGuardian
## Overview[](#overview "Direct link to Overview")
StackGuardian provides three main approaches for authenticating your workloads or running discovery against an AWS account:
* [RBAC](#rbac)
* [OIDC](#oidc-recommended) *(recommended)*
## RBAC[](#rbac "Direct link to RBAC")
This method uses cross-account IAM role assumption with an External ID. It is the recommended approach for securely granting StackGuardian access to your AWS account without storing long-lived credentials.
### 1. Create an IAM Role in AWS[](#1-create-an-iam-role-in-aws "Direct link to 1. Create an IAM Role in AWS")
1. Sign in to the [AWS Management Console](https://aws.amazon.com/console/) and navigate to **IAM → Roles → Create role**.
2. Select **Custom trust policy** as the trusted entity type.
3. Replace the contents of the trust policy editor with the following, substituting your own External ID:
```
{
"Version": "2012-10-17",
"Statement": [
{
"Effect": "Allow",
"Principal": {
"AWS": [
"arn:aws:iam::476299211833:root",
"arn:aws:iam::163602625436:root"
]
},
"Action": "sts:AssumeRole",
"Condition": {
"StringEquals": {
"sts:ExternalId": ":"
}
}
}
]
}
```
The External ID must follow the format `:` — for example, `myorg:abc12345`.
4. Click **Next** and assign the required permissions policy:
* For **discovery/read-only** access: attach `ReadOnlyAccess`
* For **deployment** access: attach permissions tailored to the resources StackGuardian will manage
5. Give the role a descriptive name such as `StackGuardianIntegrationRole`, then click **Create Role**.
6. **Copy the Role ARN** — you will need it in the next step.
### 2. Create the Connector in StackGuardian[](#2-create-the-connector-in-stackguardian "Direct link to 2. Create the Connector in StackGuardian")
1. In StackGuardian, navigate to **Organization settings → Connectors → Cloud providers**.
2. Click **Connect with Cloud Provider**.
3. Add a **Connector name**.
4. Input the **AWS role ARN** and **External ID** from Step 1.
5. Select the **Active regions**.
6. Click **Connect & scan** to finalize the connector.
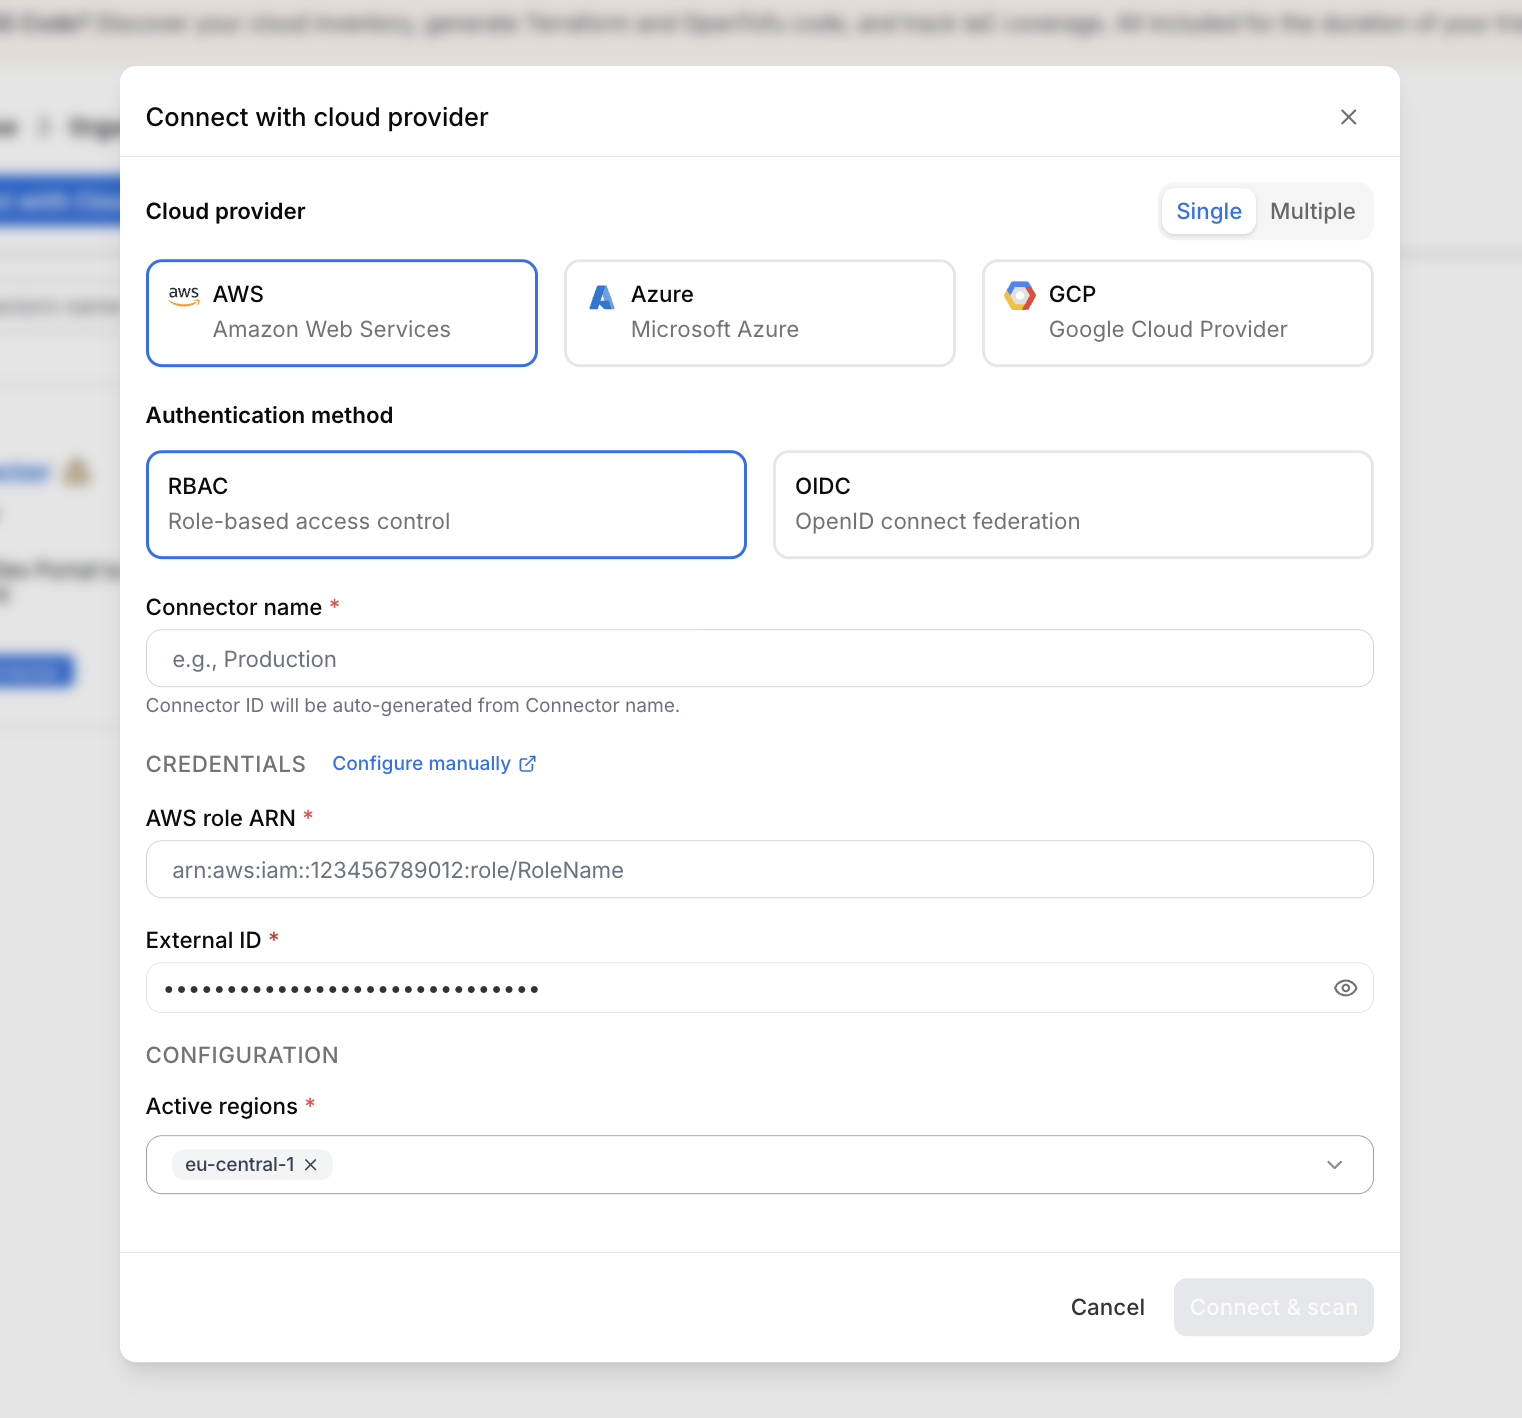
*Create RBAC connector*
## OIDC (recommended)[](#oidc-recommended "Direct link to OIDC (recommended)")
This method uses OpenID Connect (OIDC) federation to allow StackGuardian to authenticate to AWS using temporary credentials — no long-lived secrets required.
important
For US Region, use `https://api.us.stackguardian.io` as **Provider URL** and **Audience**.
### 1. Create an OIDC Identity Provider in AWS[](#1-create-an-oidc-identity-provider-in-aws "Direct link to 1. Create an OIDC Identity Provider in AWS")
1. In the [AWS Management Console](https://aws.amazon.com/console/), go to **IAM → Identity Providers → Add provider**.
2. Select **OpenID Connect** as the provider type.
3. Enter the **Provider URL** and **Audience** based on your region:
* For EU Region: `https://api.app.stackguardian.io`
* For US Region: `https://api.us.stackguardian.io`
4. Click **Add provider**.
### 2. Create an IAM Role for the OIDC Provider[](#2-create-an-iam-role-for-the-oidc-provider "Direct link to 2. Create an IAM Role for the OIDC Provider")
1. In **IAM → Roles → Create role**, select **Web Identity** as the trusted entity type.
2. Choose the identity provider you just created
* For EU Region: `https://api.app.stackguardian.io`
* For US Region: `https://api.us.stackguardian.io`
3. Select the audience:
* For EU Region: `https://api.app.stackguardian.io`
* For US Region: `https://api.us.stackguardian.io`
4. Assign the required permissions:
* For **discovery/read-only** access: attach `ReadOnlyAccess`
* For **deployment** access: attach the least permissions required for your use case
5. Name the role and click **Create Role**.
6. **Copy the Role ARN** — you will need it for the final step.
### 3. Update the Trust Policy[](#3-update-the-trust-policy "Direct link to 3. Update the Trust Policy")
Navigate to your newly created role → **Trust relationships** → **Edit trust policy** and apply the following, replacing the placeholder values:
* EU Region
* US Region
```
{
"Version": "2012-10-17",
"Statement": [
{
"Effect": "Allow",
"Principal": {
"Federated": "arn:aws:iam:::oidc-provider/api.app.stackguardian.io"
},
"Action": "sts:AssumeRoleWithWebIdentity",
"Condition": {
"StringEquals": {
"api.app.stackguardian.io:aud": "https://api.app.stackguardian.io"
},
"StringLike": {
"api.app.stackguardian.io:sub": "/orgs/"
}
}
}
]
}
```
```
{
"Version": "2012-10-17",
"Statement": [
{
"Effect": "Allow",
"Principal": {
"Federated": "arn:aws:iam:::oidc-provider/api.us.stackguardian.io"
},
"Action": "sts:AssumeRoleWithWebIdentity",
"Condition": {
"StringEquals": {
"api.us.stackguardian.io:aud": "https://api.us.stackguardian.io"
},
"StringLike": {
"api.us.stackguardian.io:sub": "/orgs/"
}
}
}
]
}
```
* Replace `` with your AWS account ID.
* Replace `` with your StackGuardian organization name.
### 4. Create the Connector in StackGuardian[](#4-create-the-connector-in-stackguardian "Direct link to 4. Create the Connector in StackGuardian")
1. In StackGuardian, navigate to **Organization settings → Connectors → Cloud providers**.
2. Click **Connect with Cloud Provider**.
3. Add a **Connector name**.
4. Input the **AWS role ARN** from Step 2.
5. Click **Connect & scan** to finalize the connector.
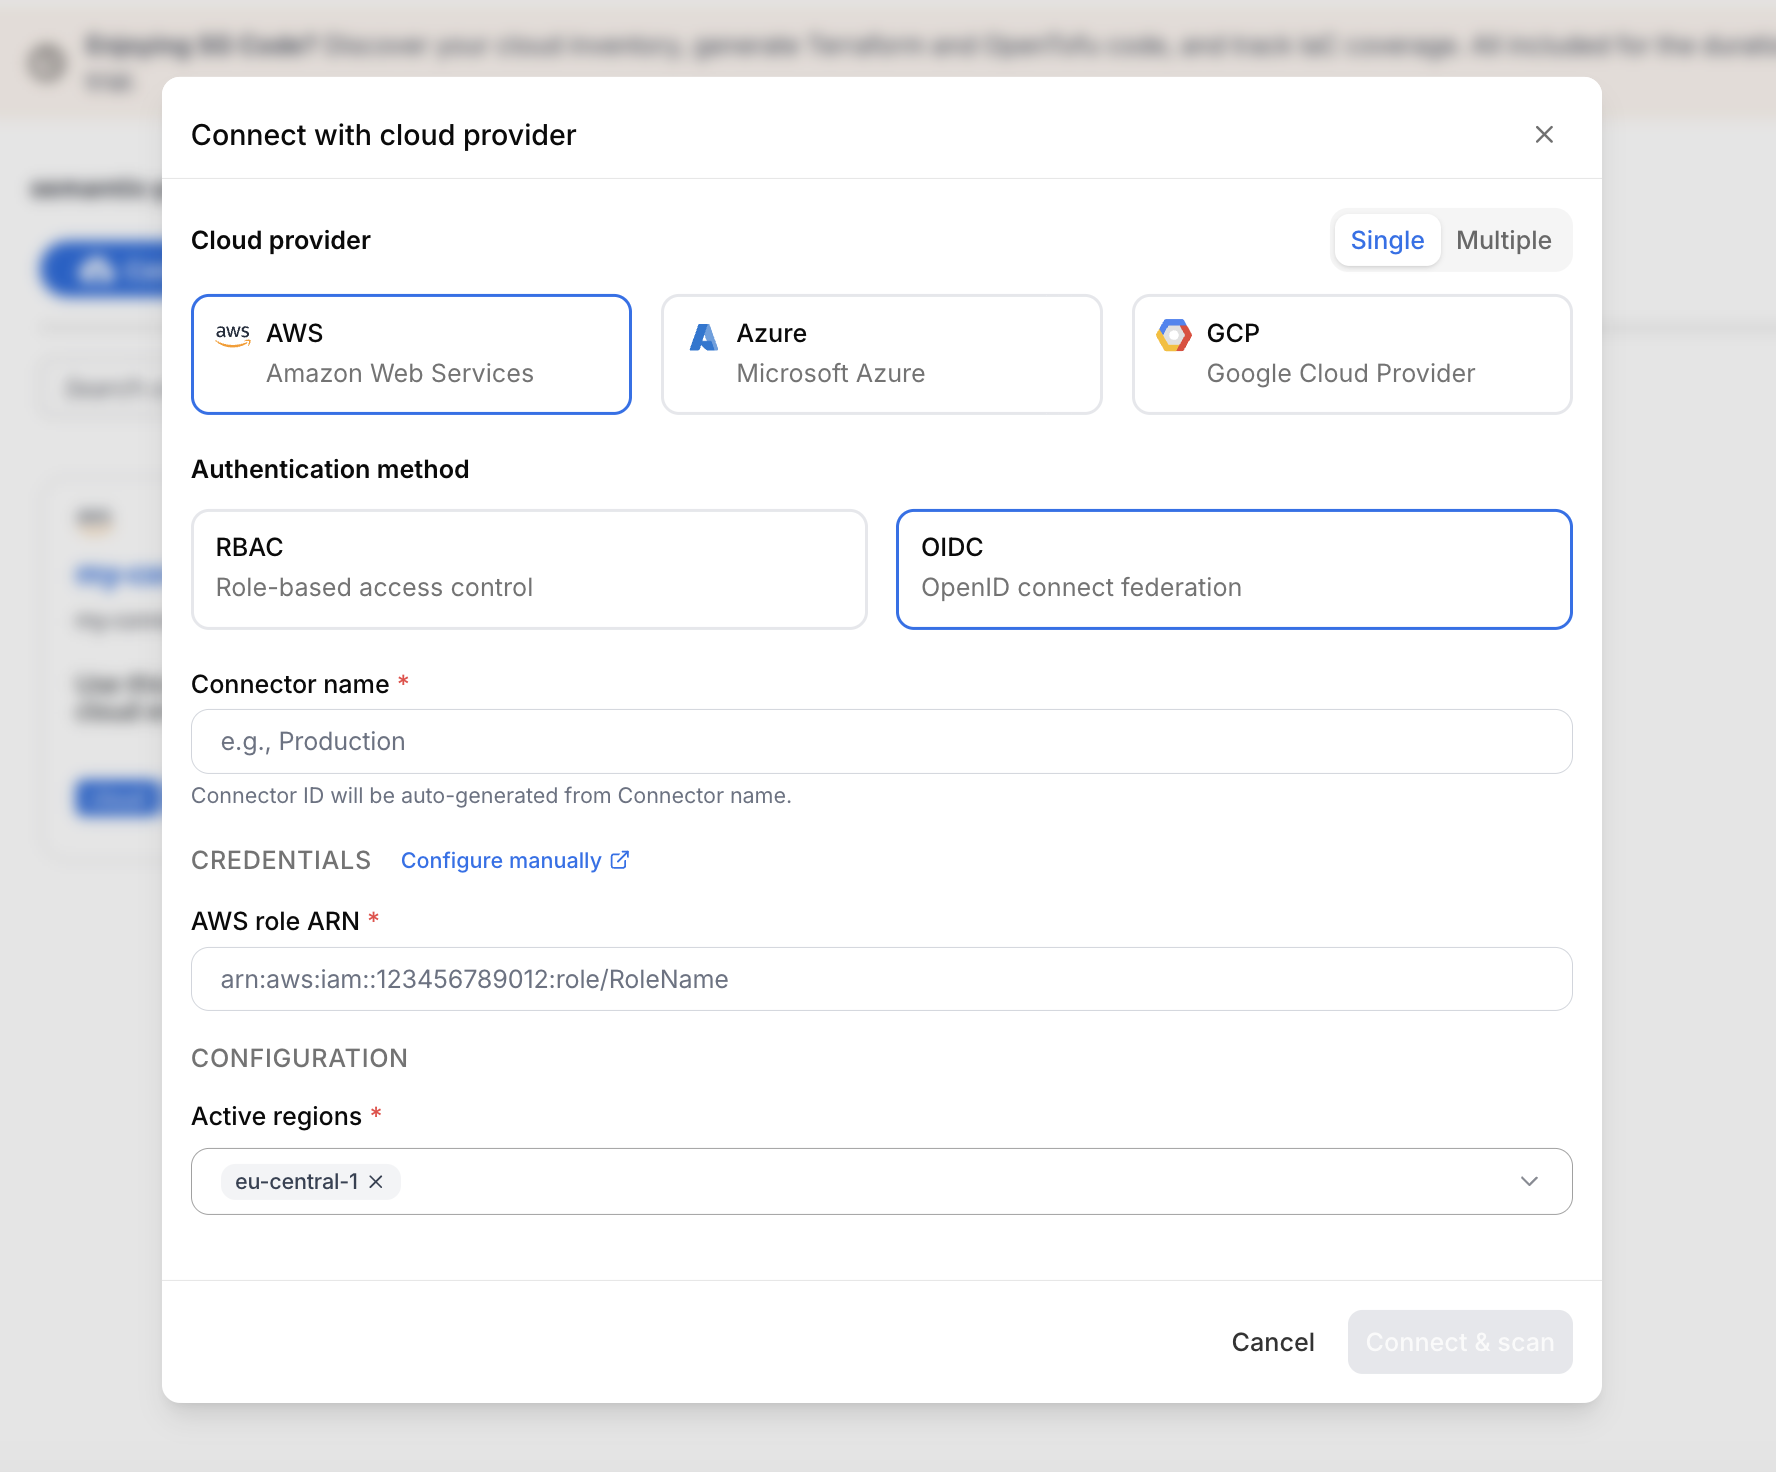
*Create OIDC connector*
## Multiple connectors[](#multiple-connectors "Direct link to Multiple connectors")
You can connect multiple AWS accounts at once instead of creating individual connectors — ideal for organizations managing large numbers of accounts.
### 1. Begin multiple connectors setup[](#1-begin-multiple-connectors-setup "Direct link to 1. Begin multiple connectors setup")
1. Log in to the StackGuardian Platform and navigate to **Organization settings → Connectors → Cloud providers**.
2. Click **Connect with Cloud Provider**.
3. In the connectors modal, select **Multiple**.
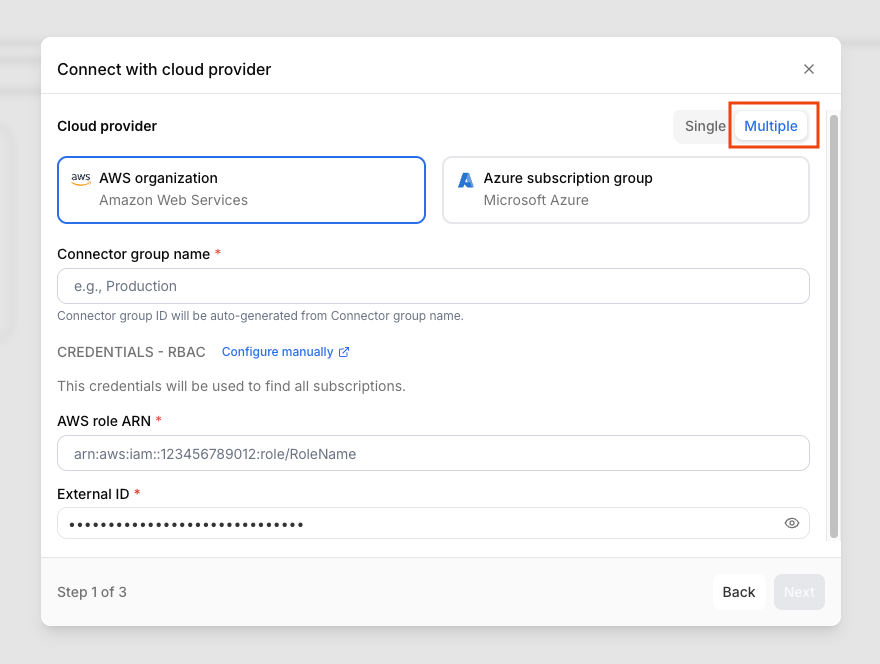
*Create multiple connectors*
4. Enter a **Connector group name**.
5. Provide the **AWS role ARN** and **External ID** for the management role. Ensure the External ID matches the format `:` or `-`
6. Click **Next**.
### 2. Select AWS accounts[](#2-select-aws-accounts "Direct link to 2. Select AWS accounts")
1. Use the **Select accounts** dropdown to select individual accounts or **All accounts**. The list will include each account's Email and Account ID.
2. Click **Next**.
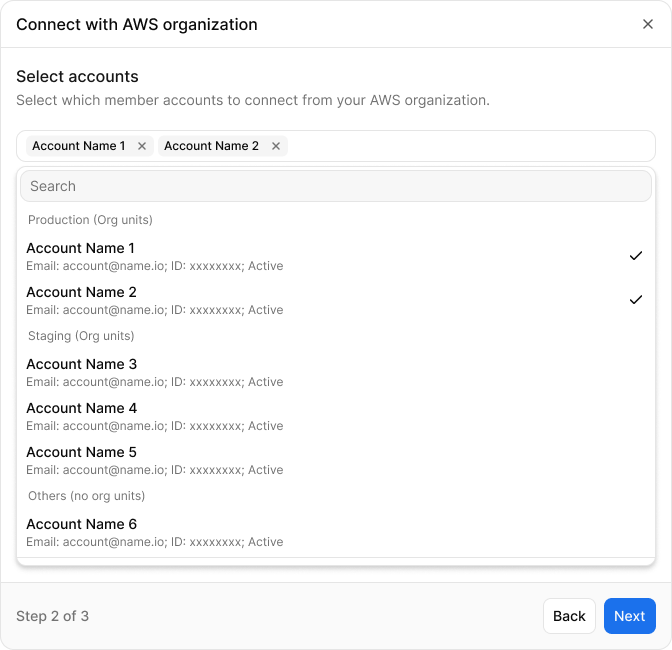
*Select AWS accounts*
### 3. Configure default settings and individual accounts[](#3-configure-default-settings-and-individual-accounts "Direct link to 3. Configure default settings and individual accounts")
1. Under **Default settings**, set the **IAM role name**, **External ID**, and the **Active regions** — these apply to all connected accounts.
2. Under **Accounts settings**, fill in the following for each account:
* **AWS role ARN** — the role ARN for that account
* **External ID** — the external ID associated with the role
* **Active regions**
3. Click **Connect & scan** to complete the setup.
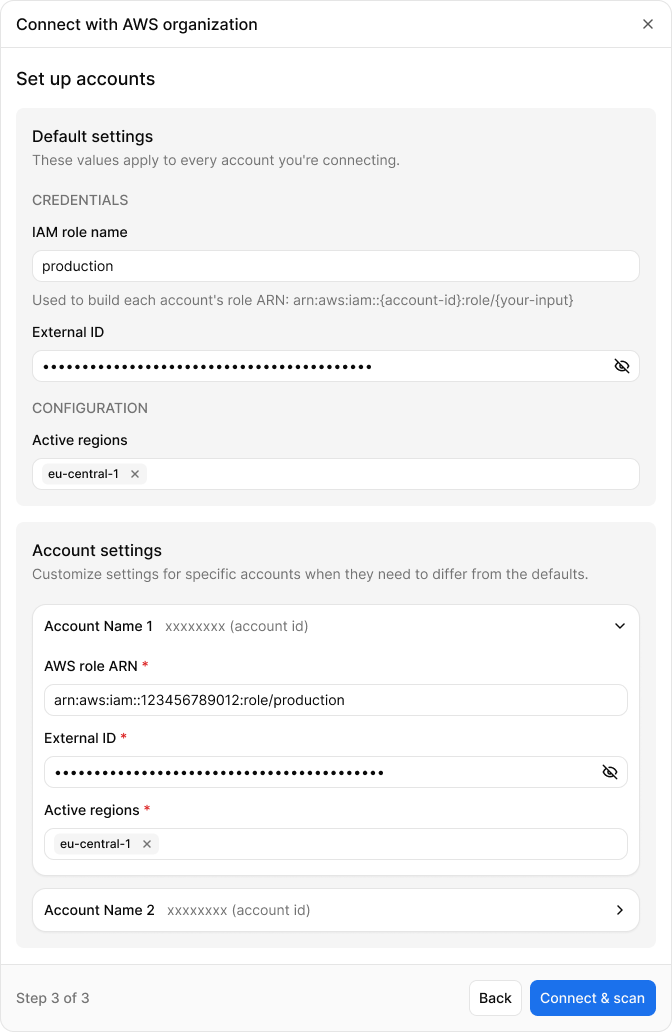
*Configure default settings and individual accounts*
---
# Connect Azure to StackGuardian
## Overview[](#overview "Direct link to Overview")
Azure Connectors in StackGuardian allow you to securely link your Azure subscriptions so that StackGuardian can discover, monitor, and orchestrate cloud resources on your behalf. Once connected, StackGuardian can enforce compliance policies, manage infrastructure workflows, and provide continuous visibility across your cloud estate.
StackGuardian supports the following connection methods:
* **[Single Connectors](#single-connectors)** — Connect one Azure subscription at a time:
* [Service principal with federated credentials](#service-principal-with-federated-credentials) — Authenticates using short-lived tokens without storing long-lived secrets.
* [Service principal with client secret](#service-principal-with-client-secret) — Authenticates using a client secret tied to an app registration.
* [Managed identity](#managed-identity) — Authenticates using an identity already configured in your Azure environment, without managing secrets.
* **[Multiple Connectors](#multiple-connectors)** — Connect multiple Azure subscriptions at once:
* [Service principal with client secret](#multiple-connectors) — Uses a single service principal with cross-subscription permissions to authenticate across multiple subscriptions.
## Single Connectors[](#single-connectors "Direct link to Single Connectors")
### Service principal with federated credentials[](#service-principal-with-federated-credentials "Direct link to Service principal with federated credentials")
Service principal with federated credentials lets you authenticate without storing long-lived secrets — using short-lived tokens instead, so your credentials can't expire or be compromised in transit.
#### 1. Create the app registration[](#1-create-the-app-registration "Direct link to 1. Create the app registration")
1. Under **Microsoft Entra ID**, navigate to **App Registrations** and click **New registration**.
2. Enter the following and click **Register**:
* **Name**: `StackGuardianConnector`
* **Supported Account Types**: Accounts in this organizational directory only
#### 2. Configure federated credentials[](#2-configure-federated-credentials "Direct link to 2. Configure federated credentials")
* In your App Registration, go to **Certificates & secrets** > **Federated credentials** and click **Add credential**.
* In the **Federated credential scenario** dropdown, select **Other issuer**.
* Fill in the following fields based on your StackGuardian region:
| Field | EU region | US region |
| ------------------ | ---------------------------------- | --------------------------------- |
| Issuer | `https://api.app.stackguardian.io` | `https://api.us.stackguardian.io` |
| Subject identifier | `/orgs/` | `/orgs/` |
| Audience | `https://api.app.stackguardian.io` | `https://api.us.stackguardian.io` |
| Name | `StackGuardian-Trust` | `StackGuardian-Trust` |
important
Replace `` with your StackGuardian organization ID.
* Click **Add**.
#### 3. Grant permissions to the application[](#3-grant-permissions-to-the-application "Direct link to 3. Grant permissions to the application")
Always assign the minimum permissions required. Follow the principle of least privilege:
* **SGCode** (compliance scanning and resource discovery) requires only **read-only** access — assign the **Reader** role.
* **SGOrchestrator** (infrastructure provisioning and management) requires minimal write access — assign the **Contributor** role, or a custom role scoped to only the resource types it needs to manage.
Steps:
1. Navigate to **Subscriptions** and click on the target subscription.
2. Select **Access control (IAM)** and click **Add > Add role assignment**.
3. Under **Role**, select the appropriate role:
* **Reader** — read-only access, recommended for SGCode.
* **Contributor** — read and write access, minimum required for SGOrchestrator. Prefer a custom role with narrower scope where possible.
4. Under **Select**, choose the app registration created above (e.g., `StackGuardianConnector`) and click **Review + assign**.
5. Repeat for any additional subscriptions StackGuardian should have access to.
#### 4. Finalize the connector in StackGuardian[](#4-finalize-the-connector-in-stackguardian "Direct link to 4. Finalize the connector in StackGuardian")
* Navigate to **Organization settings** > **Connectors** > **Cloud providers** in **StackGuardian**.
* Click **Connect with Cloud Provider** and select **Azure**.
* Select **Service principal with federated credentials** and provide:
* **Connector name**
* **Tenant ID**
* **Subscription ID**
* **Client ID**
* Click **Connect & scan** to finalize.
### Service principal with client secret[](#service-principal-with-client-secret "Direct link to Service principal with client secret")
Service principal with client secret authenticates using a secret key tied to an app registration. Use this method when federated credentials or managed identity are not available in your environment.
#### 1. Create the app registration[](#1-create-the-app-registration-1 "Direct link to 1. Create the app registration")
1. Under **Microsoft Entra ID**, navigate to **App Registrations** and click **New registration**.
2. Enter the following and click **Register**:
* **Name**: `StackGuardianConnector`
* **Supported Account Types**: Accounts in this organizational directory only
#### 2. Create a client secret[](#2-create-a-client-secret "Direct link to 2. Create a client secret")
1. In your App Registration (e.g., `StackGuardianConnector`), navigate to **Manage > Certificates & Secrets**.
2. Click **New client secret**.
3. Provide a **Description**, select an expiration period, and click **Add**.
4. **Copy** the client secret value immediately — it will not be shown again.
#### 3. Grant permissions to the application[](#3-grant-permissions-to-the-application-1 "Direct link to 3. Grant permissions to the application")
Always assign the minimum permissions required. Follow the principle of least privilege:
* **SGCode** (compliance scanning and resource discovery) requires only **read-only** access — assign the **Reader** role.
* **SGOrchestrator** (infrastructure provisioning and management) requires minimal write access — assign the **Contributor** role, or a custom role scoped to only the resource types it needs to manage.
Steps:
1. Navigate to **Subscriptions** and click on the target subscription.
2. Select **Access control (IAM)** and click **Add > Add role assignment**.
3. Under **Role**, select the appropriate role:
* **Reader** — read-only access, recommended for SGCode.
* **Contributor** — read and write access, minimum required for SGOrchestrator. Prefer a custom role with narrower scope where possible.
4. Under **Select**, choose the app registration created above (e.g., `StackGuardianConnector`) and click **Review + assign**.
5. Repeat for any additional subscriptions StackGuardian should have access to.
#### 4. Finalize the connector in StackGuardian[](#4-finalize-the-connector-in-stackguardian-1 "Direct link to 4. Finalize the connector in StackGuardian")
* Navigate to **Organization settings** > **Connectors** > **Cloud providers** in **StackGuardian**.
* Click **Connect with Cloud Provider** and select **Azure**.
* Select **Service principal with client secret** and provide:
* **Connector name**
* **Tenant ID**
* **Subscription ID**
* **Client ID**
* **Client secret value**
* Click **Connect & scan** to finalize.
### Managed identity[](#managed-identity "Direct link to Managed identity")
**Managed identity** allows **StackGuardian** to authenticate with Azure using an identity already configured in your Azure environment. No client secret is required, reducing credential management overhead.
1. Create the managed identity in Azure
* Sign in to the [Azure Portal](https://portal.azure.com).
* Search for **Managed Identities** in the search bar and select it.
* Click **+ Create**.
* Select your **Subscription** and **Resource Group**.
* Provide a **Name** (e.g., `sg-workload-identity`) and select your **Region**.
* Click **Review + Create**, then **Create**.
2. Assign permissions
Always assign the minimum permissions required. Follow the principle of least privilege:
* **SGCode** (compliance scanning and resource discovery) requires only **read-only** access — assign the **Reader** role.
* **SGOrchestrator** (infrastructure provisioning and management) requires minimal write access — assign the **Contributor** role, or a custom role scoped to only the resource types it needs to manage.
Steps:
* Navigate to your new managed identity resource.
* In the left-hand menu, select **Azure role assignments**.
* Click **+ Add role assignment**.
* Configure the following:
* **Scope**: Select **Subscription** (or **Resource group**)
* **Subscription**: Select the target subscription
* **Role**: Select **Reader** for SGCode, or **Contributor** (or a more restrictive custom role) for SGOrchestrator.
* Click **Save**.
3. Configure federated identity credentials
This step establishes the trust relationship between Azure and StackGuardian.
* Within the managed identity resource, select **Federated credentials**.
* Click **+ Add credential**.
* In the **Federation scenario** dropdown, select **Other issuer**.
* Fill in the following fields based on your StackGuardian region:
| Field | EU region | US region |
| ------------------ | ---------------------------------- | --------------------------------- |
| Issuer | `https://api.app.stackguardian.io` | `https://api.us.stackguardian.io` |
| Subject identifier | `/orgs/` | `/orgs/` |
| Audience | `https://api.app.stackguardian.io` | `https://api.us.stackguardian.io` |
| Name | `StackGuardian-Trust` | `StackGuardian-Trust` |
important
Replace `` with your StackGuardian organization ID.
* Click **Add**.
4. Configure the connector in StackGuardian
* Navigate to **Organization settings** > **Connectors** > **Cloud providers** in **StackGuardian**.
* Click on **Connect with Cloud Provider** and select **Azure**.
* Select **Managed identity** and provide:
* **Connector name**
* **Tenant ID**
* **Subscription ID**
* **Client ID**
* Click **Connect & scan** to finalize.
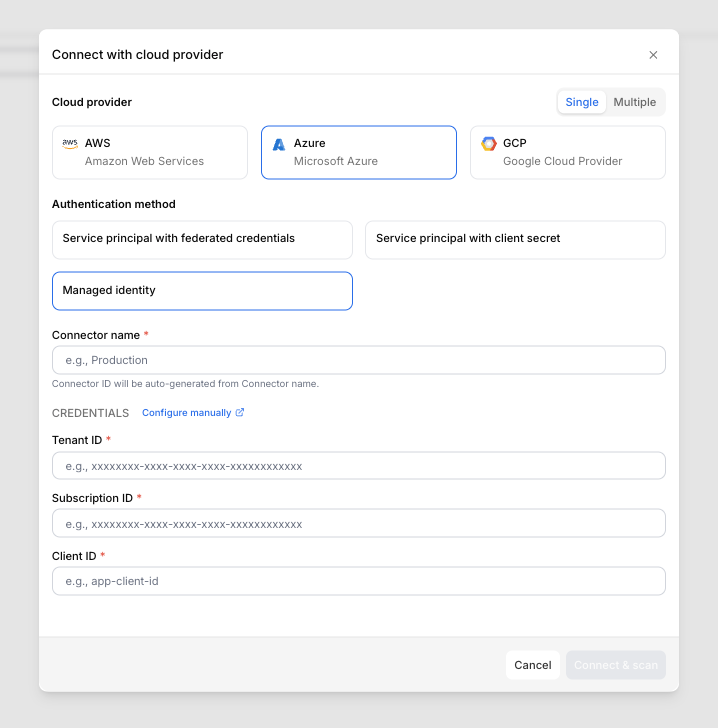
*Managed identity*
## Multiple Connectors[](#multiple-connectors "Direct link to Multiple Connectors")
You can connect multiple Azure subscriptions at once instead of creating individual connectors — ideal for organizations managing large numbers of subscriptions.
Cross-subscription permissions
The service principal used for multiple connectors must have permissions across all target subscriptions. The recommended best practice is to assign the service principal a role at the **Management Group** level — permissions are then automatically inherited by all subscriptions within that management group, avoiding the need to grant access per subscription individually.
Always follow the principle of least privilege:
* **SGCode** requires only **Reader** access assigned at the management group scope.
* **SGOrchestrator** requires minimal write access — assign **Contributor** or a custom role at the management group scope.
### Service principal with client secret[](#service-principal-with-client-secret-1 "Direct link to Service principal with client secret")
#### 1. Begin multiple connectors setup[](#1-begin-multiple-connectors-setup "Direct link to 1. Begin multiple connectors setup")
1. Log in to the StackGuardian Platform and navigate to **Organization settings → Connectors → Cloud providers**.
2. Click **Connect with Cloud Provider**.
3. In the connectors modal, select **Multiple**.
4. Enter a **Connector group name**.
5. Provide the **Tenant ID**, **Subscription ID**, **Client ID**, and **Client secret value**. Ensure the External ID matches the format `:` or `-`
6. Click **Next**.
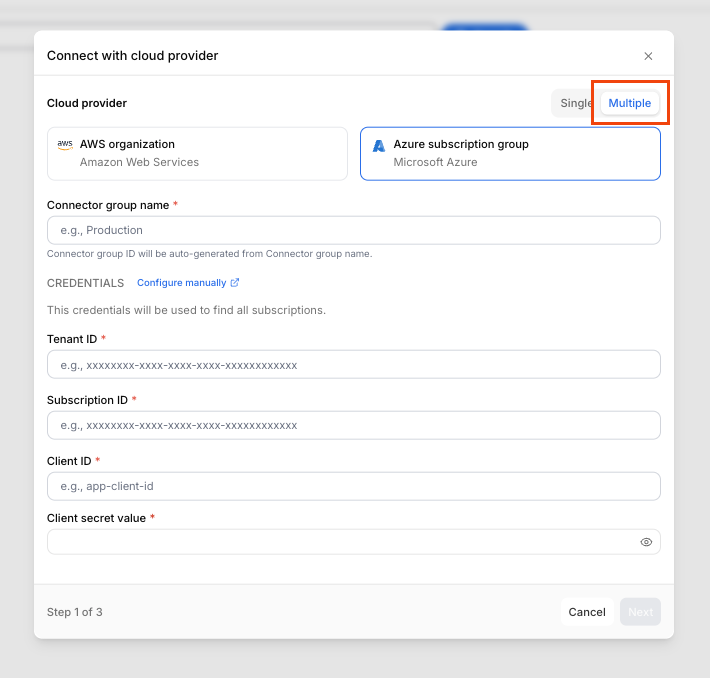
*Create multiple connectors*
#### 2. Select Azure accounts[](#2-select-azure-accounts "Direct link to 2. Select Azure accounts")
1. Use the **Select accounts** dropdown to select individual accounts or **All accounts**. The list will include each account's Email and Account ID.
2. Click **Next**.
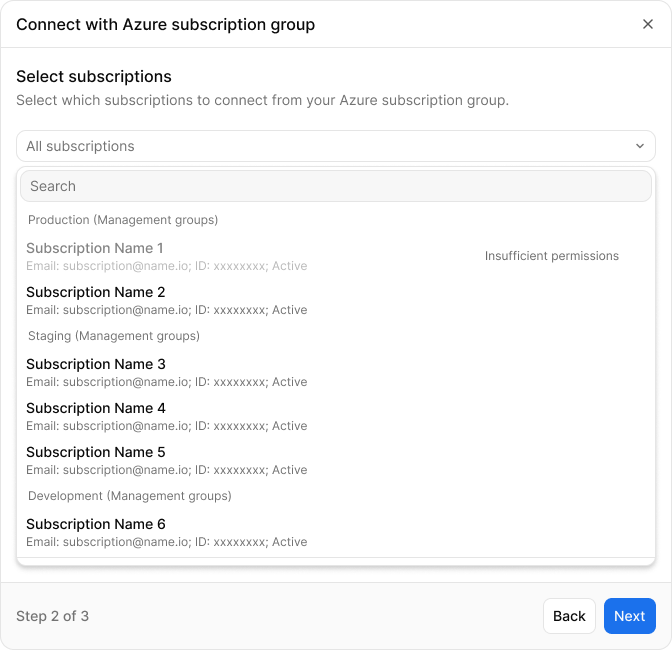
*Select Azure accounts*
#### 3. Configure the subscription settings[](#3-configure-the-subscription-settings "Direct link to 3. Configure the subscription settings")
1. Under **Subscription settings**, fill in the **Client ID** for each account.
2. Click **Connect & scan** to complete the setup.
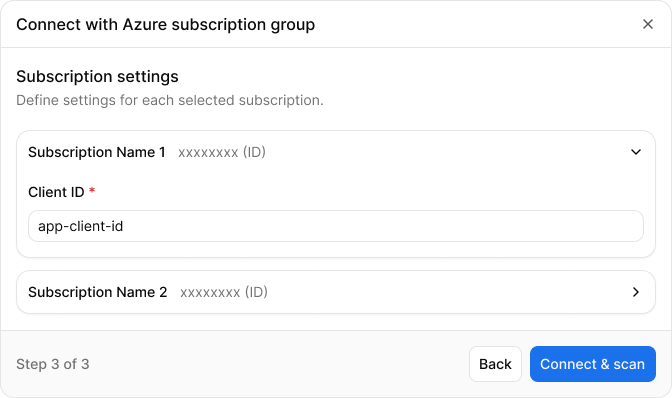
*Configure default settings and individual accounts*
## Compliance and security best practices[](#compliance-and-security-best-practices "Direct link to Compliance and security best practices")
* **Use Role-Based Access Control (RBAC)**: Ensure roles and permissions are minimal and precise.
* **Monitor Resources**: Enable continuous discovery checks for real-time monitoring of resources.
* **Use Workload Identity**: Prefer this method for higher security, avoiding secret management.
## Additional information[](#additional-information "Direct link to Additional information")
For further details, visit:
* [How to get subscription and tenant IDs in Azure portal](https://learn.microsoft.com/en-us/azure/azure-portal/get-subscription-tenant-id#find-your-azure-subscription)
* [Azure AD Managed Identities Documentation](https://learn.microsoft.com/en-us/azure/active-directory/managed-identities-azure-resources/overview)
---
# Connect GCP to StackGuardian
## Overview[](#overview "Direct link to Overview")
**StackGuardian** offers the following options for configuring a GCP account:
* [Workload identity federation](#workload-identity-federation) *(recommended)*
* [Service sccount](#service-account)
## Workload identity federation[](#workload-identity-federation "Direct link to Workload identity federation")
To create a connector in **StackGuardian** using **Workload identity federation**, which allows secure authentication without managing **service account keys**, configure the steps below on the [GCP console](https://console.cloud.google.com).
1. **Add a New Pool**
* Go to **"IAM and Admin"** > **"Workload Identity Federation"** and click on **"Create Pool"**. This helps group related identities together, making it easier to manage permissions and access.

2. **Create an Identity Pool**
* **Pool Name**: Enter a name for your identity pool that will contain the identity provider configurations. Click on **"Continue"** to proceed.
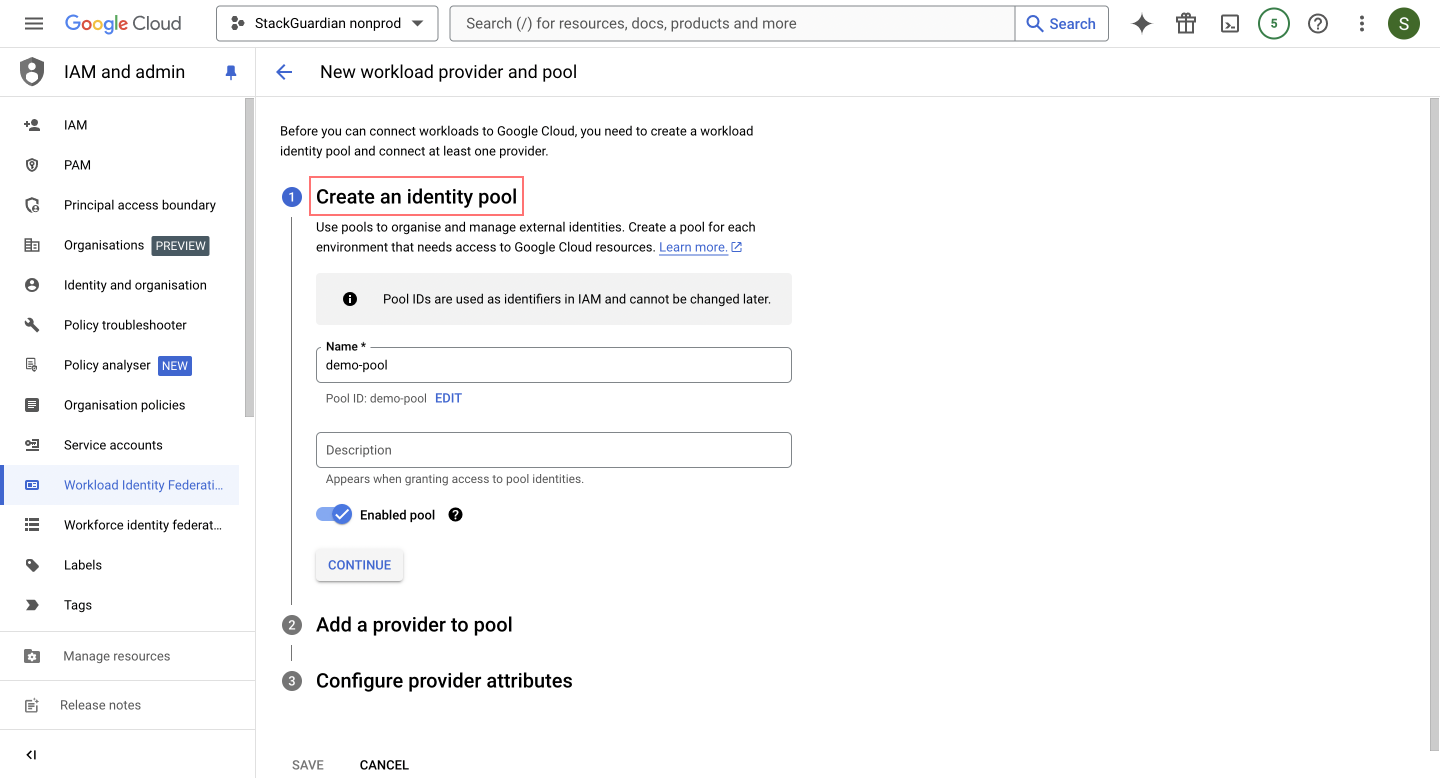
3. **Add a Provider to the Pool**
This step links your identity provider with GCP, allowing GCP to trust the identities verified by your provider.
* **Select Provider**: Choose **"OpenID Connect (OIDC)"** from the dropdown menu.
* **Provider Name**: Enter a provider name, for example, `sg-test`.
* **Issuer URL**:
* **For EU Region:** `https://api.app.stackguardian.io`
* **For US Region:** `https://api.us.stackguardian.io`
* **Allowed Audience**: This specifies acceptable values for the `audience` field in the OIDC token, ensuring that only tokens meant for this audience are accepted.
* **For EU Region:** `https://api.app.stackguardian.io`
* **For US Region:** `https://api.us.stackguardian.io`
* Click on **"Continue"**.
4. **Configure Provider Attributes**
* This configuration ensures that the subject in the authentication token maps to `google.subject`, enabling seamless identity verification by aligning it with `assertion.sub`.
* Click on "**Save**".
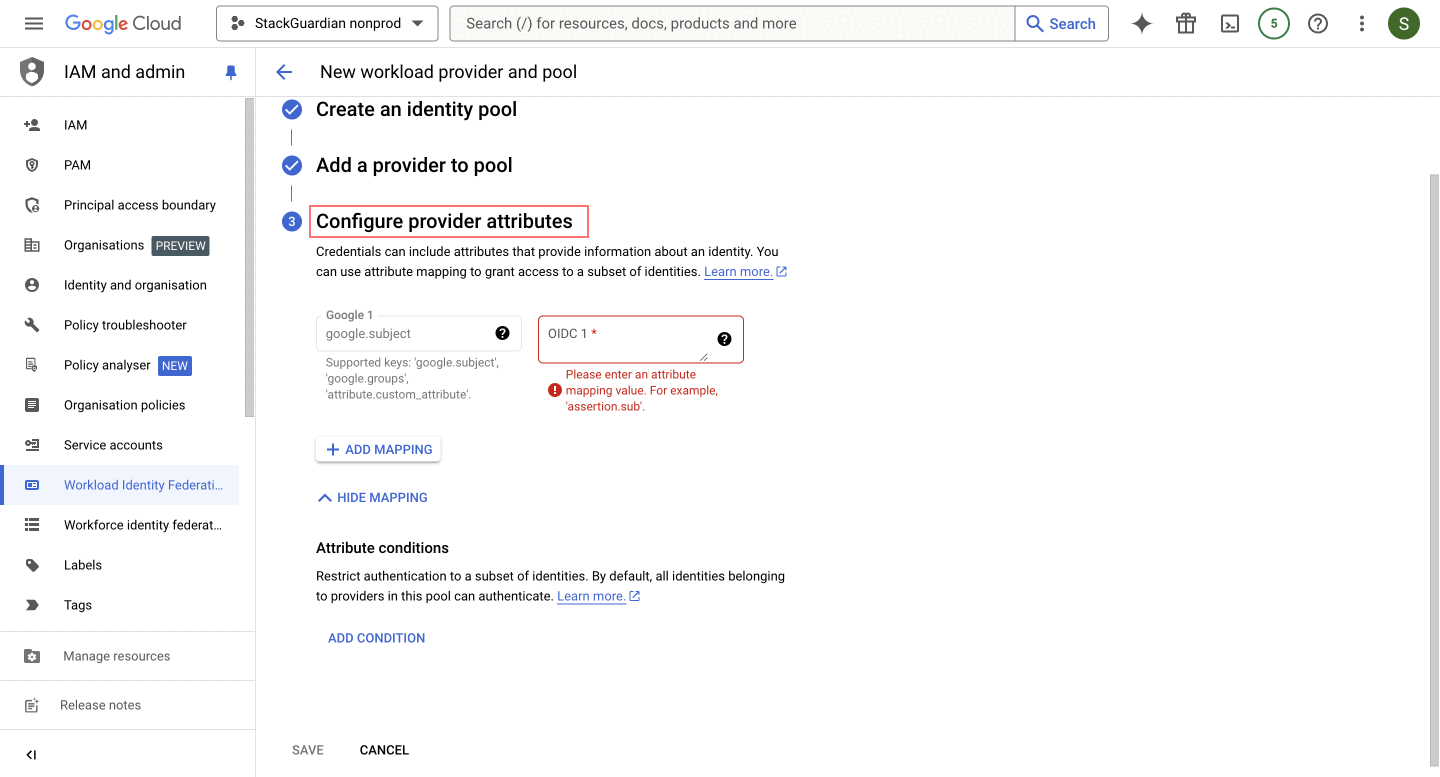
5. **Grant Access to Service Account**
* Navigate to the newly created pool and click on "**Grant Access**".
* Select "**Grant access using service account impersonation**", allowing your workload to impersonate a service account. This gives the workload the same permissions as the service account, enhancing security by avoiding key management.
* Choose the "**service account**" for which principals will have the same resource permissions (e.g., `sg-test-gcp-clara`).
* Select "**Principals**", which are identities that can access the service account. Map the subject attribute to `/orgs/`, for example, `/orgs/demo-org`.
* Click on **"Save"**.
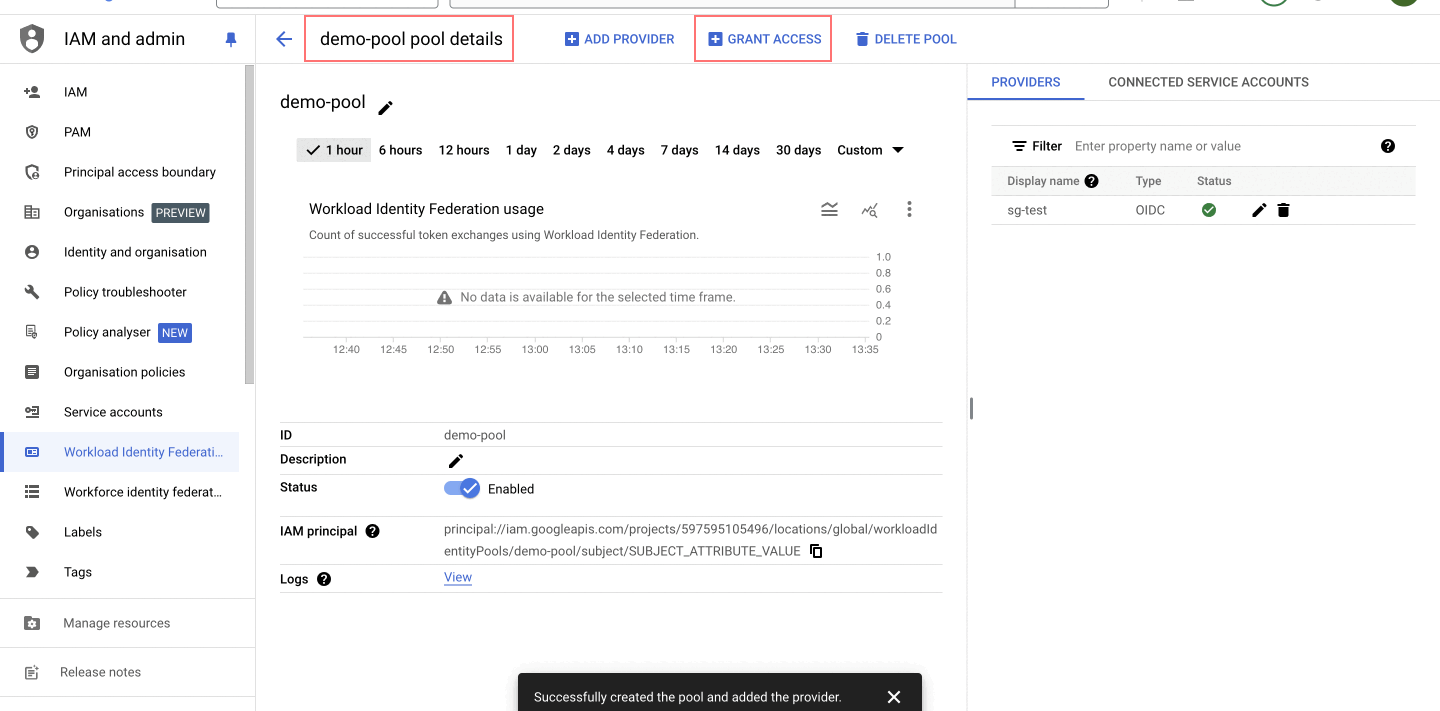
6. **Download Client Library Configuration File**
* After saving the grant access, a prompt will appear for you to select the following options:
* Configure your application, select the provider created in the previous step (e.g., `sg-test`).
* Specify the **"OIDC ID token path"** as `/mnt/sg_workspace/user/stackguardian.oidc`, file essential for ensuring that the application can communicate with the identity provider.
* Click on **"DOWNLOAD CONFIG"** and **"Save"** the file, as it will be used in the next step.
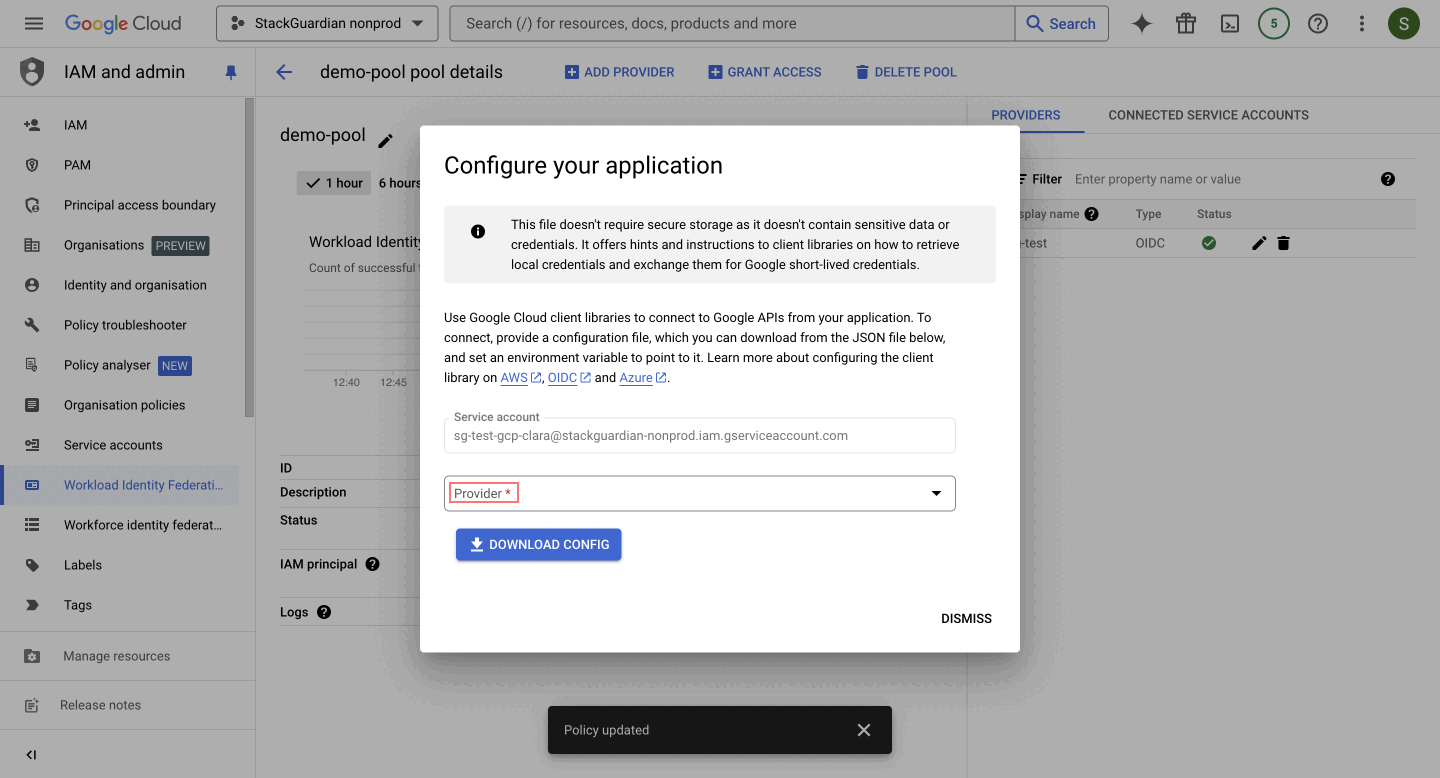
This completes the initial setup. Next, finalize the configuration on the StackGuardian platform.
### Finish the connector in StackGuardian[](#finish-the-connector-in-stackguardian "Direct link to Finish the connector in StackGuardian")
Return to the **StackGuardian** to finalize the connector setup:
1. Navigate to **Organization settings > Connectors > Cloud providers**.
2. Click on **Connect with Cloud Providers**.
3. Select **GCP** > **Workload identity federation**.
4. Enter the **Connector name**.
5. In the **Configuration file content** field, paste the contents of the **CONFIG file** that was downloaded earlier.
```
{
"universe_domain": "googleapis.com",
"type": "external_account",
"audience": "//iam.googleapis.com/projects//locations/global/workloadIdentityPools//providers/",
"subject_token_type": "urn:ietf:params:oauth:token-type:jwt",
"token_url": "https://sts.googleapis.com/v1/token",
"service_account_impersonation_url": "https://iamcredentials.googleapis.com/v1/projects/-/serviceAccounts/:generateAccessToken",
"credential_source": {
"file": "/mnt/sg_workspace/user/stackguardian.oidc",
"format": {
"type": "text"
}
}
}
```
note
The downloaded configuration file will look similar to the example above, but the placeholders **\**, **\**, **\**, and **\** will already contain values specific to your setup.
6. Once all information is entered, click on **Connect & scan** to finalize the connector setup.
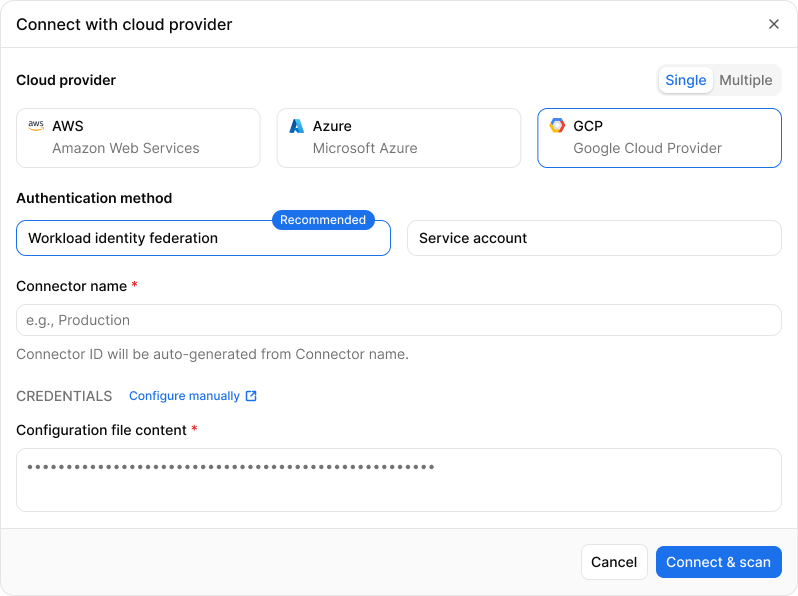
*Workload identity federation*
## Service account[](#service-account "Direct link to Service account")
Follow the steps below on the [GCP console](https://console.cloud.google.com):
1. **Select** the desired *project* from the GCP portal.
2. In the side menu, go to "**IAM & Admin**" and *navigate* to "**Service Accounts**".
3. **Click** on *"Create Service Account"* to create a new service account.
4. **Enter** a name for the service account (e.g *myapp-service-account or operations-dept-account*). The service **account ID** will be generated automatically. **Click** "*Create and Continue*".
5. In the next step, assign the desired **role** to the service account under "*Grant service account access to the project*". To grant full access, select the '**Owner**' role.
6. Grant **user access** to the service account if needed.
7. **Click** "*Done*" to complete the service account creation.
8. The newly created service account will initially have no **key** assigned to it. **Click** on "*Actions*" and then "*Manage keys*".
9. Upload an **existing** key or **create** a new key.
10. If creating a new key, **select** the key type in *JSON* format, and it will be **automatically** downloaded.
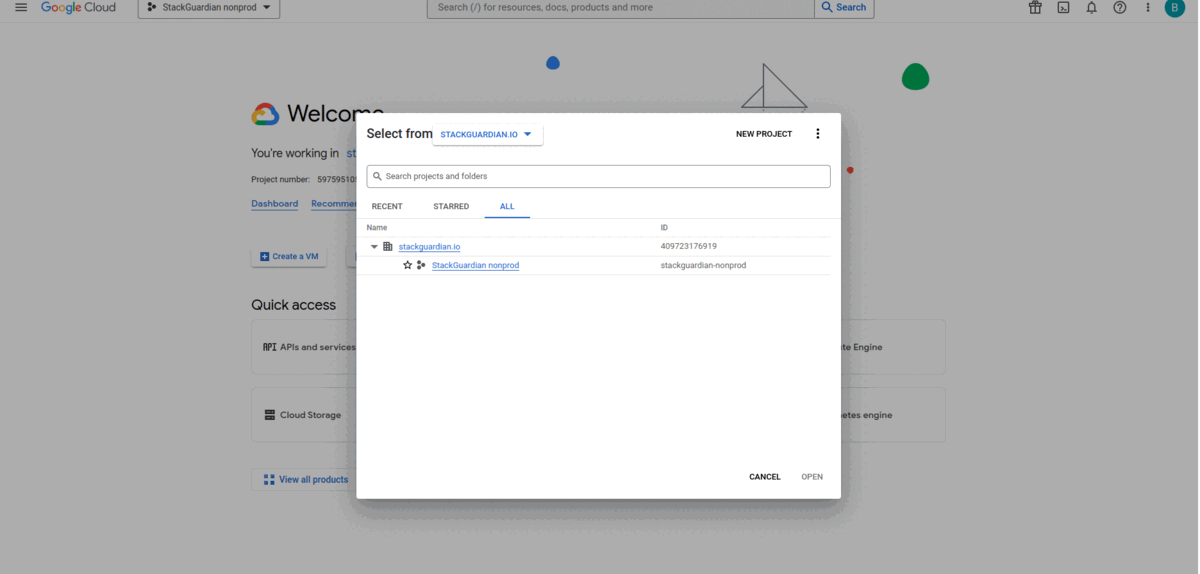
**Google cloud platform** Connector
### Finish the connector in StackGuardian[](#finish-the-connector-in-stackguardian-1 "Direct link to Finish the connector in StackGuardian")
To finish the connector on **StackGuardian** platform:
1. Go to the **Organization settings** > **Connectors** > **Cloud Providers**.
2. Click on **Connect with Cloud Providers** and select **GCP**.
3. Select **Service account**.
4. Provide the **Connector name**.
5. In the **Configuration file content** field, paste the contents of the **JSON key file** that was downloaded earlier.
6. Click **Connect & scan** to finish the connector.
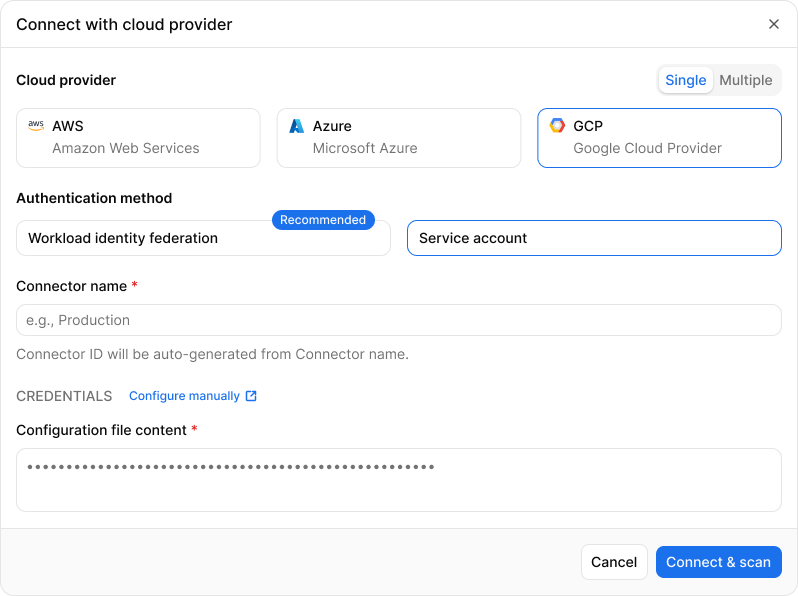
*Service account*
---
# Overview
The **Connectors** section in StackGuardian acts as a secure bridge, integrating your cloud infrastructure with essential services like cloud service providers, version control systems, and secret management vaults. Find the **Connectors** tab under **Organization settings**.
The **Connectors** tab facilitates:
* **Cloud providers**: Easily integrate with major cloud providers such as [AWS](/docs/connectors/csp/aws/), [Azure](/docs/connectors/csp/azure/), and [GCP](/docs/connectors/csp/gcp/). Establishing these connections enables enhanced cloud resource management.
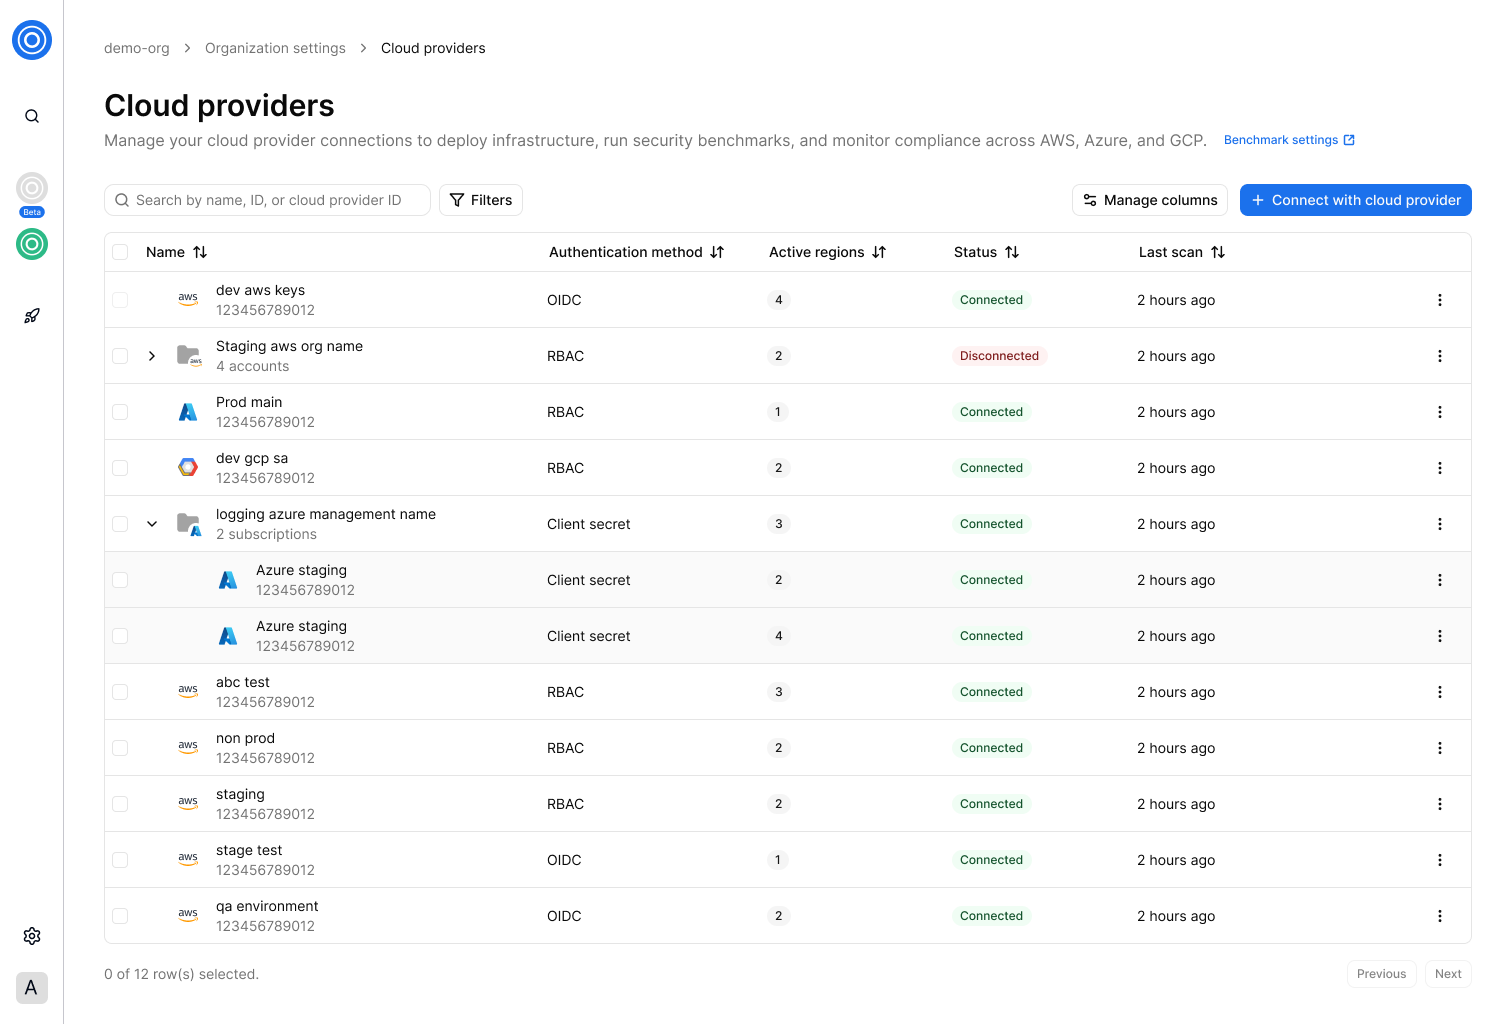
*Cloud providers overview*
* **Version control providers**: Connect your StackGuardian projects with Version control providers like [AWS CodeCommit](/docs/connectors/vcs/awscodecommit/), [Azure DevOps](/docs/connectors/vcs/azuredevops/), [Bitbucket](/docs/connectors/vcs/bitbucket/), [GitLab](/docs/connectors/vcs/gitlabcom/), and [GitHub](/docs/connectors/vcs/githubcom/) for streamlined code management and collaboration.
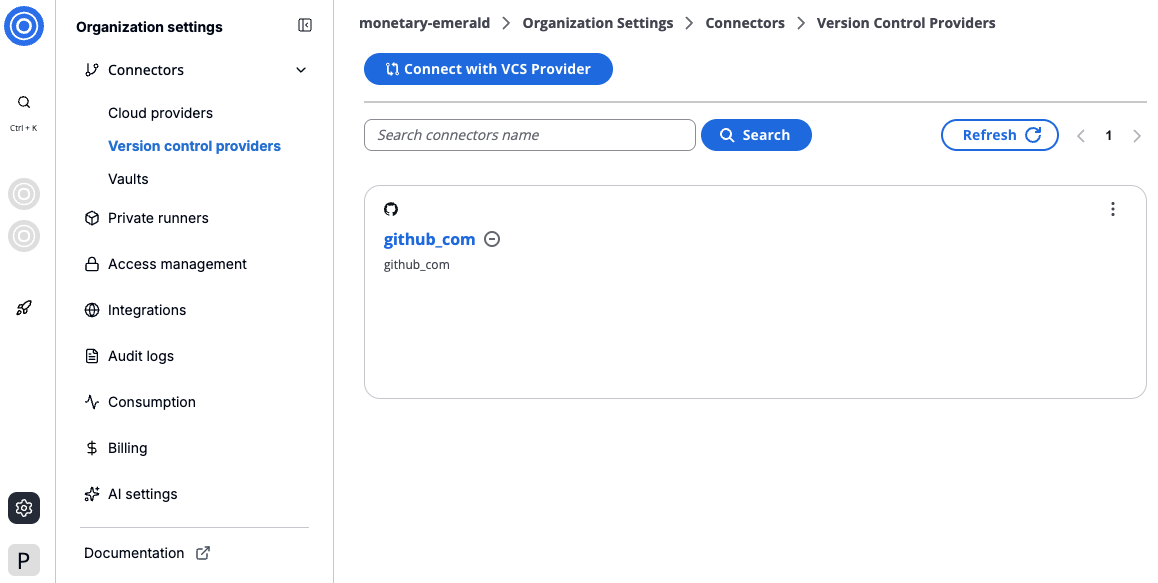
*Version control providers overview*
* **Vaults**: With Vaults, securely store and manage sensitive information such as credentials and API keys. The focus on security ensures encryption and ease of access. To understand how to use Vaults, refer to the [Vaults guide](/docs/connectors/vaults/).
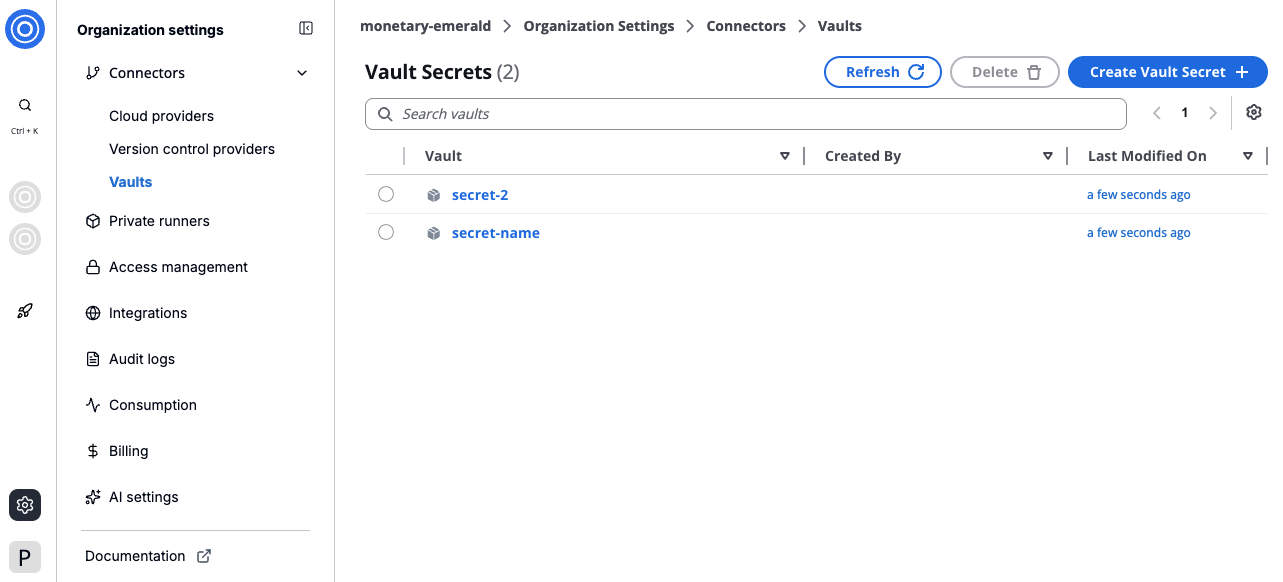
*Vaults overview*
---
# Vaults
Vaults provide a secured solution for storing sensitive data like credentials and API keys. Designed with an emphasis on security and convenience, Vaults ensure your secrets are both encrypted and easily managed.
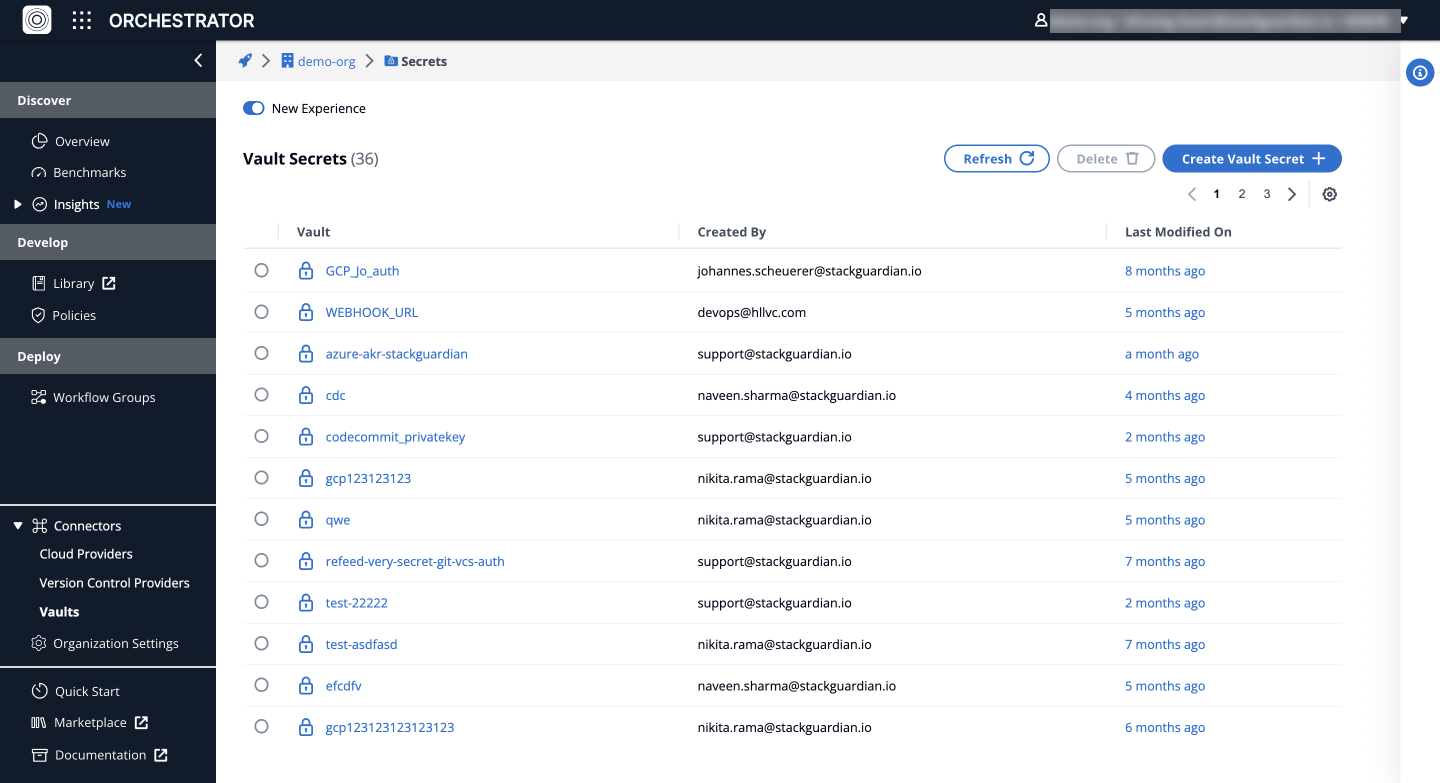
**Vaults**
### Create a New Secret[](#create-a-new-secret "Direct link to Create a New Secret")
To set up a new secret, navigate to the ***Connectors*** > ***Vaults***. Find the **Create Secret Vault** button and input the following fields:
* **Secret Name**: The unique identifier for your secret.
* **Secret Value**: The sensitive data the secret will protect.
note
When entering a private SSH key as the secret value, ensure to press "**Enter**" at the end of the key to add a newline before saving.
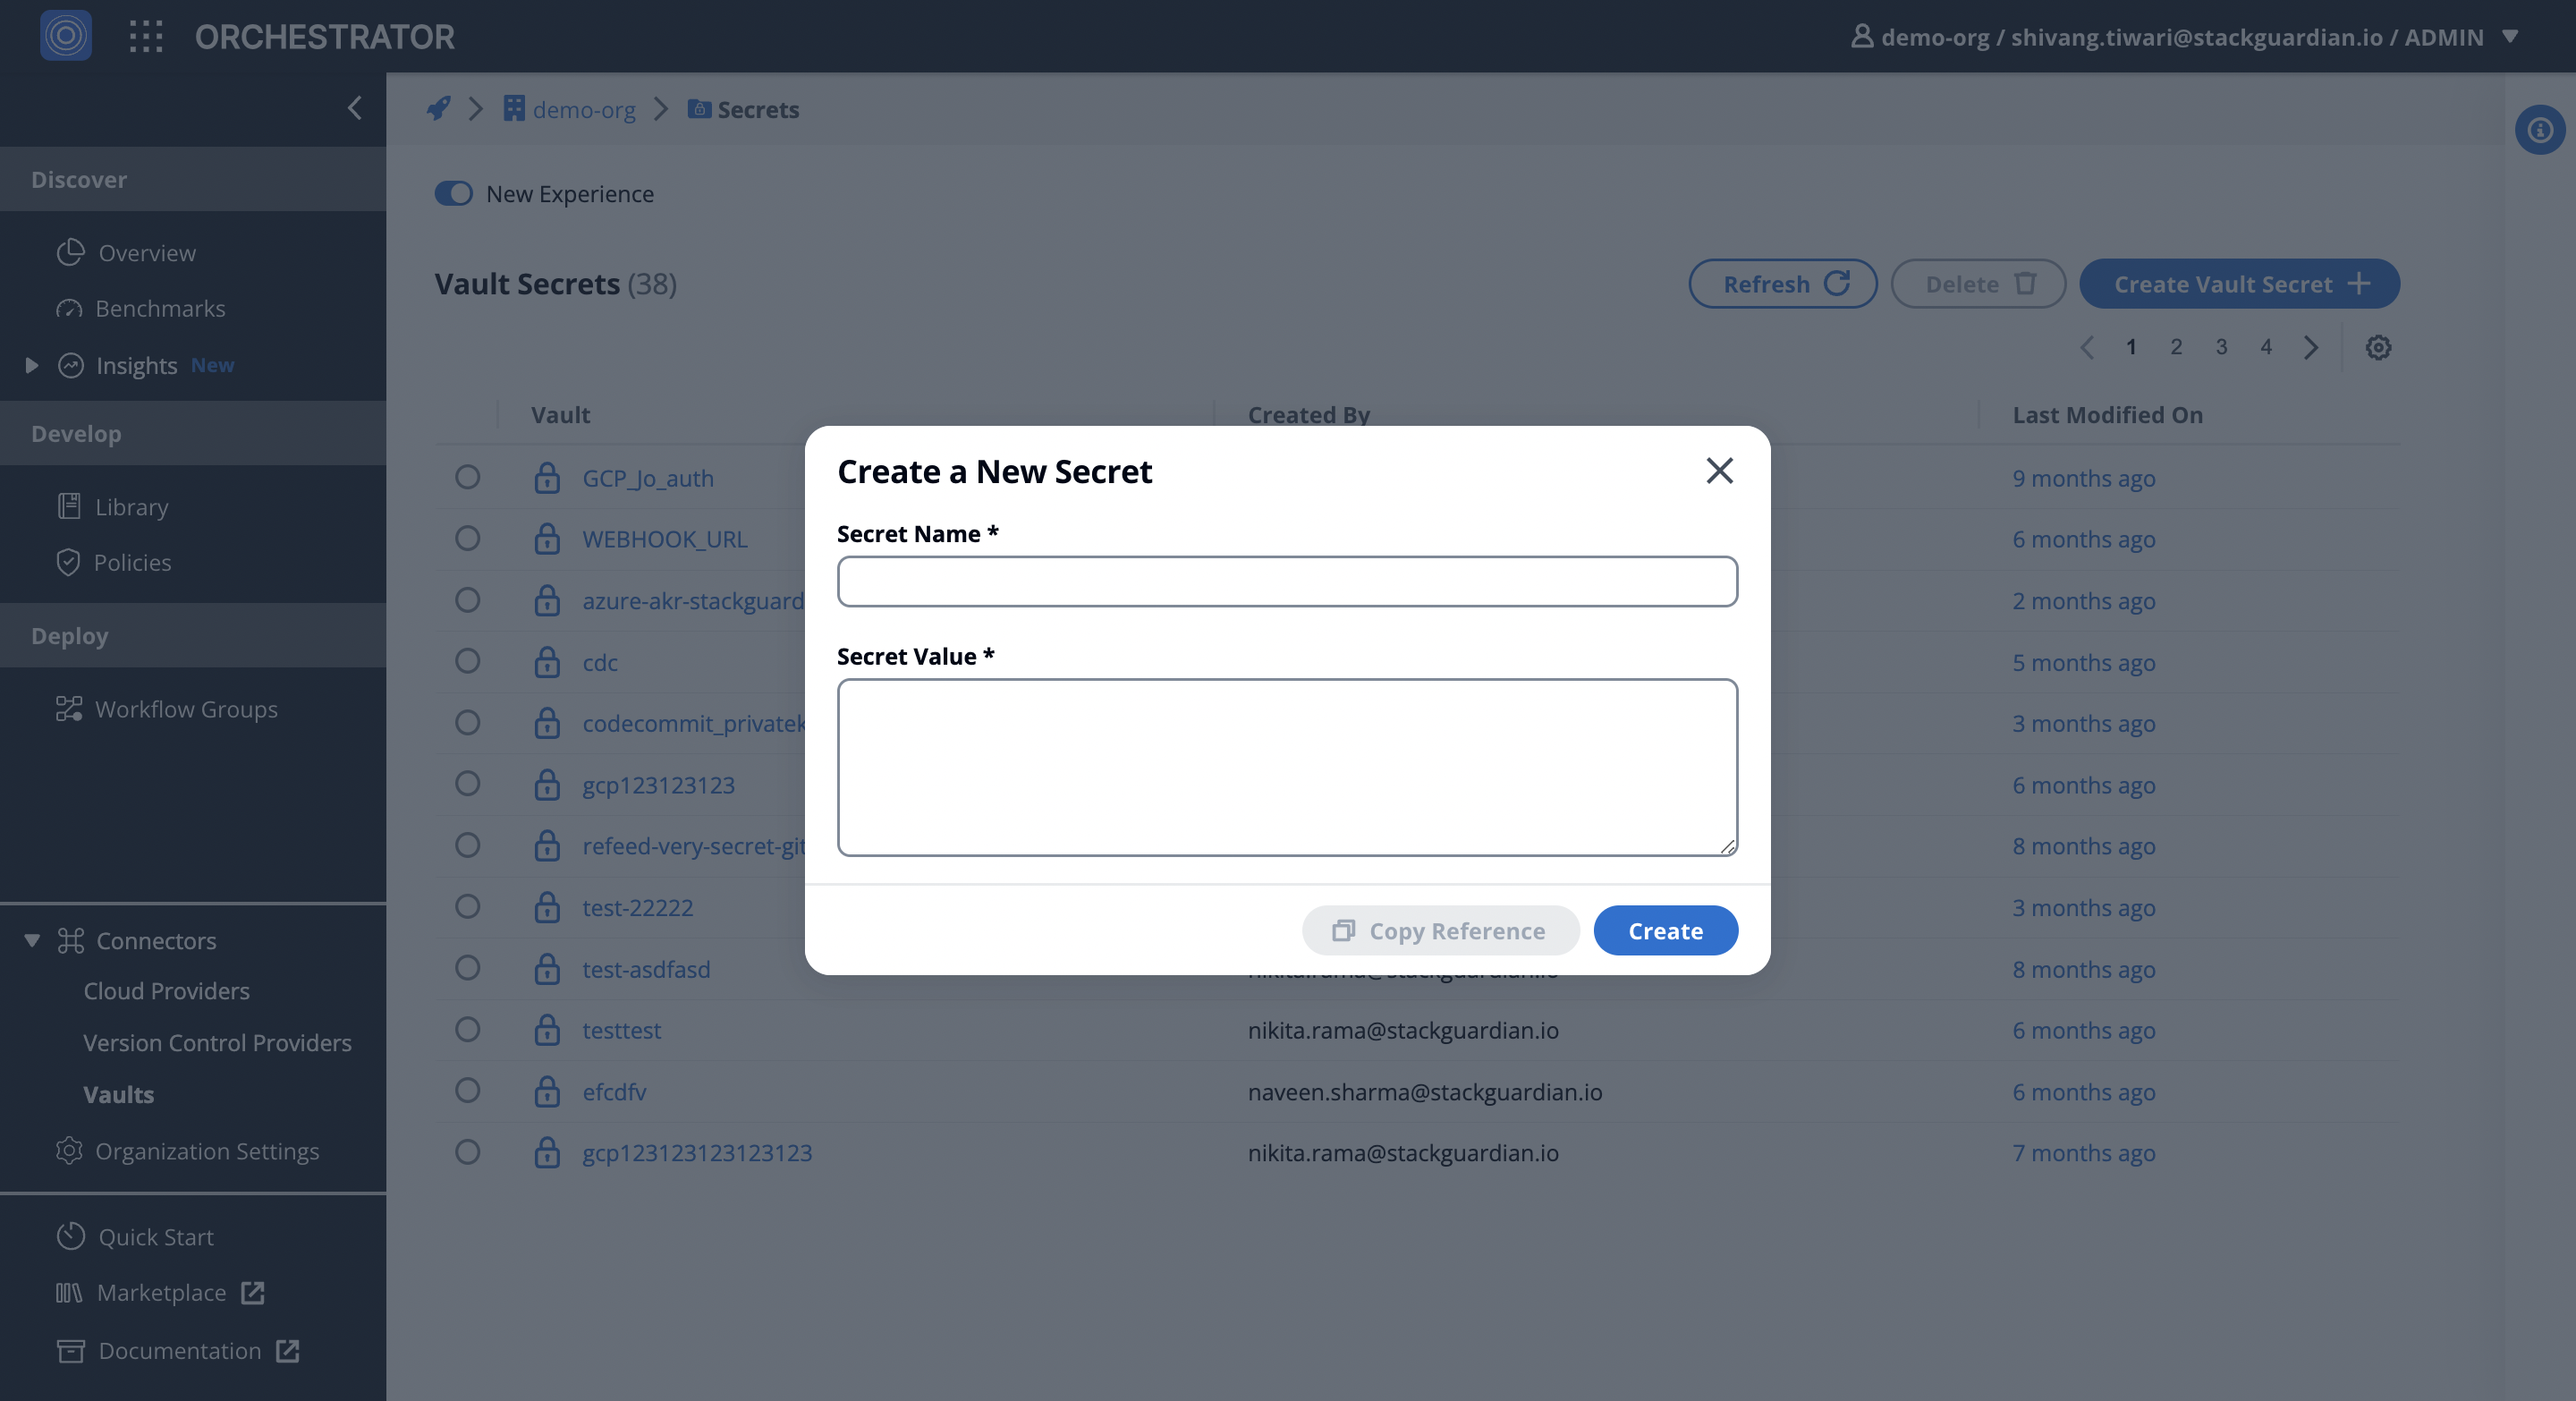
Create a **Secret**
### Source Secrets from Third-Party Secret Stores[](#source-secrets-from-third-party-secret-stores "Direct link to Source Secrets from Third-Party Secret Stores")
Integrate third-party secrets (e.g., HashiCorp, Azure) with StackGuardian for better security and simpler management.
#### Best Practices[](#best-practices "Direct link to Best Practices")
* Grant minimal necessary permissions for secret access.
* Centralize management of secrets, whether using StackGuardian or other secret stores.
* Access secrets directly through Infrastructure as Code (IaC) tools (e.g., Terraform) to avoid hardcoding.
note
Source secrets from third-party secret stores like HashiCorp Vault, Azure Vault, and others by configuring your Terraform code. Use deployment platform configuration or specific secrets to authenticate against your secret provider and utilize them in your workflow.
---
# AWS CodeCommit
## Configure Connector[](#configure-connector "Direct link to Configure Connector")
AWS CodeCommit is a fully-managed source control service that hosts secure Git-based repositories. It **allows** teams to *collaborate* on code in a **secure** and highly **scalable** ecosystem. It *eliminates* the need to operate your own source control system or worry about scaling its infrastructure.
### Integrating AWS CodeCommit on StackGuardian[](#integrating-aws-codecommit-on-stackguardian "Direct link to Integrating AWS CodeCommit on StackGuardian")
Follow the detailed steps below to integrate AWS CodeCommit with the StackGuardian platform, ensuring a secure and efficient collaboration environment for your development team. This guide will walk you through the process to configure your StackGuardian environment to work seamlessly with CodeCommit repositories.
#### Step 1: On AWS Console[](#step-1-on-aws-console "Direct link to Step 1: On AWS Console")
1. **Log into the AWS Console**: Start by signing into your AWS account.
2. **Navigate to IAM Dashboard**:
* Go to your IAM dashboard.
* Click on "*Users*" followed by "**Create User**."
3. **Create a New User**:
* **Specify User Details**: Enter a username (e.g., "*CodeCommit\_Username*") and click '**Next**.'
* **Set Permissions**: Choose "**Attach Policies directly**." In the permission policies search bar, type "codecommit" and select "*awsCodeCommitReadOnly*." Click '**Next**.'
* **Review and Create User**: Check the details you've entered, optionally add tags, and then click on "**Create User**."
Create user on **AWS**
#### Step 2: Create a Public and Private SSH Key[](#step-2-create-a-public-and-private-ssh-key "Direct link to Step 2: Create a Public and Private SSH Key")
1. **Generate SSH Key Pair**:
* Open a terminal.
* Type `ssh-keygen` to generate a *public/private* RSA key pair.
* Follow the prompts to **save** the key pair in the desired location.
note
No *passphrase* should be used.
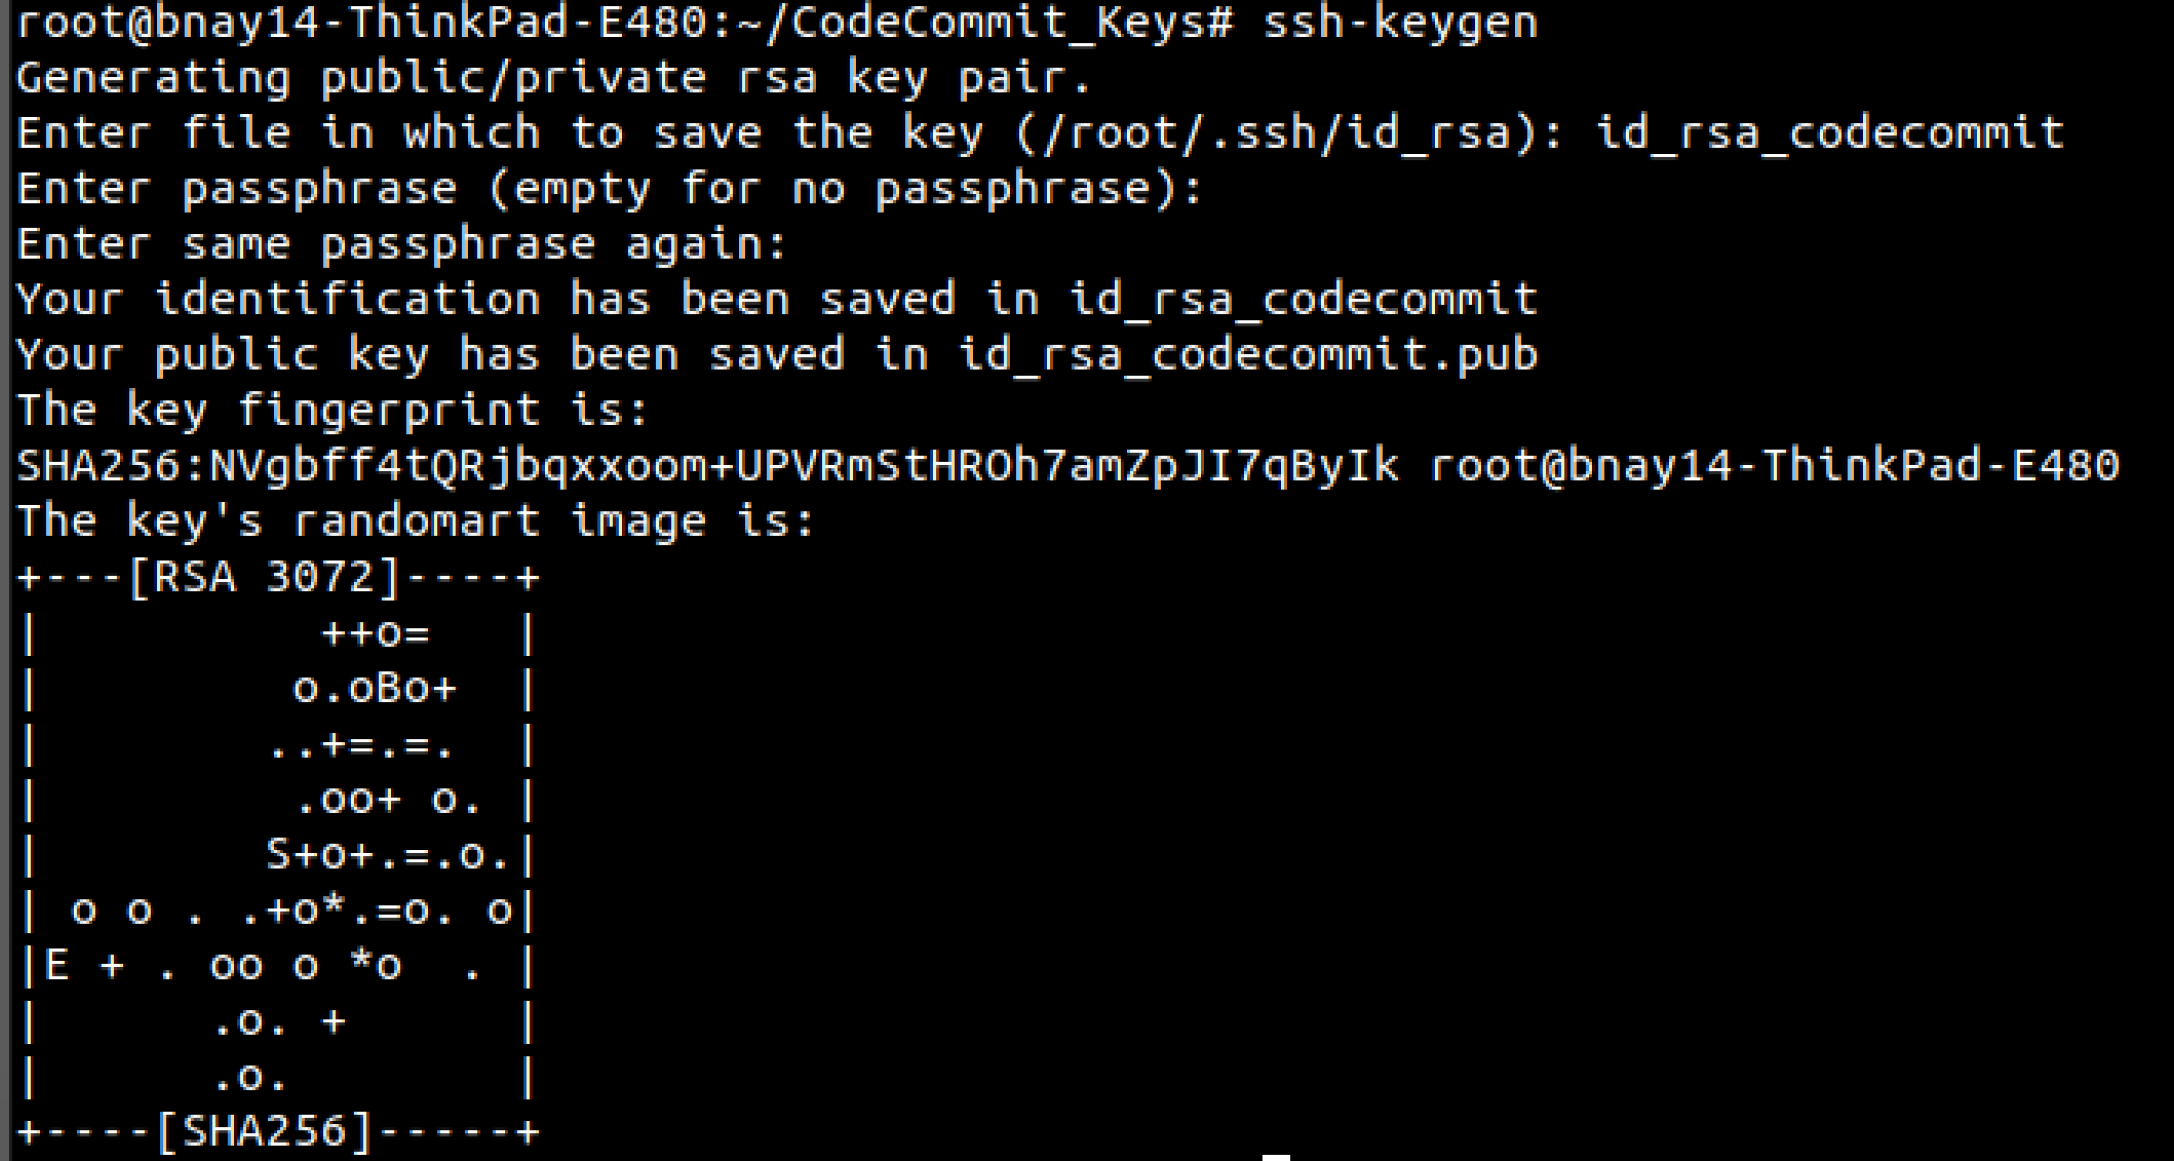
SSH **Public/Private** keys
2. **Upload Public SSH Key to AWS IAM**:
* Return to the AWS IAM console, go to '**Users**,' and select the user you created.
* Under the "**Security Credentials**" tab, find "SSH public keys for AWS CodeCommit" and click on "*Upload SSH Public Key*." **Note:** *Public Key ends with .pub*.
* Copy and paste the public SSH key you generated earlier into the modal and click on "**Upload SSH Public Key**."
* Note down the “**SSH Key ID**” = *\*, you will need it later for the repository URL.
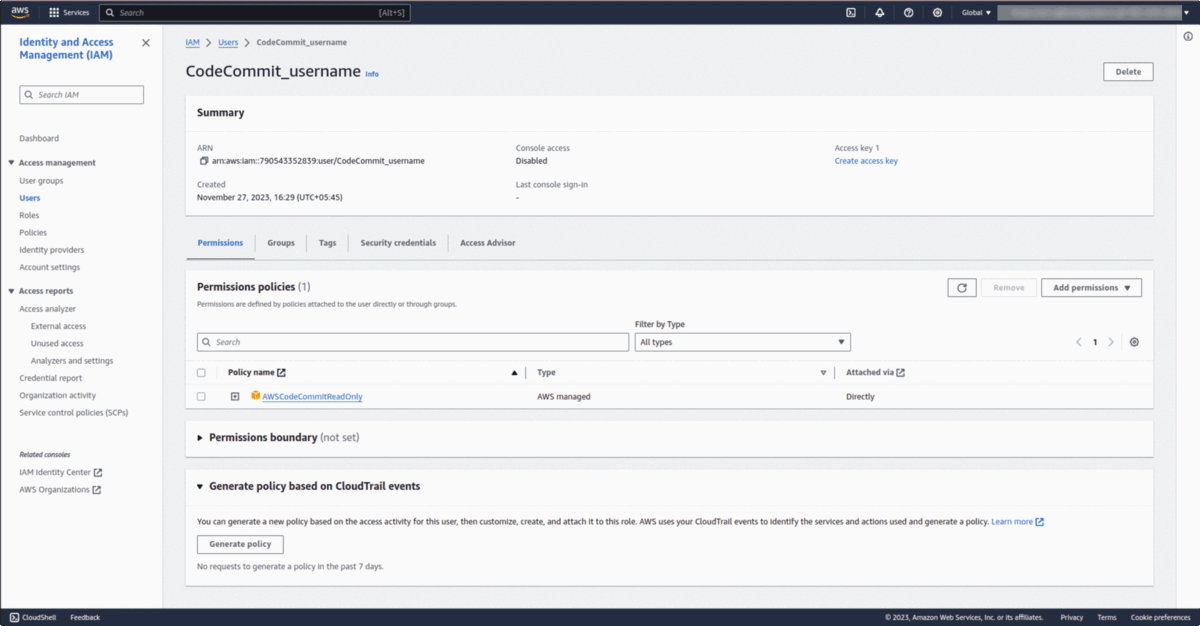
Upload and Store **SSH Public** Key
#### Step 3: Store private SSH key in StackGuardian[](#step-3-store-private-ssh-key-in-stackguardian "Direct link to Step 3: Store private SSH key in StackGuardian")
1. **Configure Connectors**:
* In StackGuardian’s orchestrator, find **Connectors** > **Vaults**, Click on **Create Vault Secret**.
* Add a *Secret name* like "*codecommit\_privatekey*." In the *Secret Value* field, paste the **private SSH key** from *Step 2* and click '**Create**.'
Store **Private** key in Vaults
### Create Workflow on StackGuardian Platform[](#create-workflow-on-stackguardian-platform "Direct link to Create Workflow on StackGuardian Platform")
#### Step 1: Choose a Template or Repository[](#step-1-choose-a-template-or-repository "Direct link to Step 1: Choose a Template or Repository")
1. Navigate to `Orchestrator > Workflow Groups`, click "**Create Workflow**," and select the `terraform` type with **Use Wizard (Preview)**.
2. Choose source type **Git Repository** and select "*Git Others (SSH, Secrets or Public Repo)*"
3. Visit AWS's CodeCommit in the developer tools section. Under "source: **Code Commit** > **Repositories**," create a repository if not already done and copy the **SSH URL =\**.
4. In the **Git Repository**, paste the **Repository URL** in the format: `ssh://@`, where `` is the key generated after uploading the public SSH key, and `` is your repository name.
**Examples:**
* EU Region: `ssh://APKA4V36KLB7H52IMNPE@git-codecommit.eu-central-1.amazonaws.com/v1/repos/aws-vpc`
* US Region: `ssh://APKA4V36KLB7H52IMNPE@git-codecommit.us-east-2.amazonaws.com/v1/repos/aws-vpc`
Replace the region and SSH key ID with your specific values.
5. Under the *Authentication Method*, select the **private-key** connector created in the vault before.
6. Explore the fields under **Advanced Options** dropdown and and click **"Next"**.
#### Step 2: Runtime Environment[](#step-2-runtime-environment "Direct link to Step 2: Runtime Environment")
* Select a connector in the "**Deployment Environment**" and configure **environment variables** as needed.
* **Runner Type**: Choose the appropriate runner for flexibility and visibility.
* Under **Terraform Configurations**, enable options like `Automated Drift Check`, `Terraform Plan Approval`, and `SG Managed Backend` for efficient workflow management.
* Click **"Next"** to proceed.
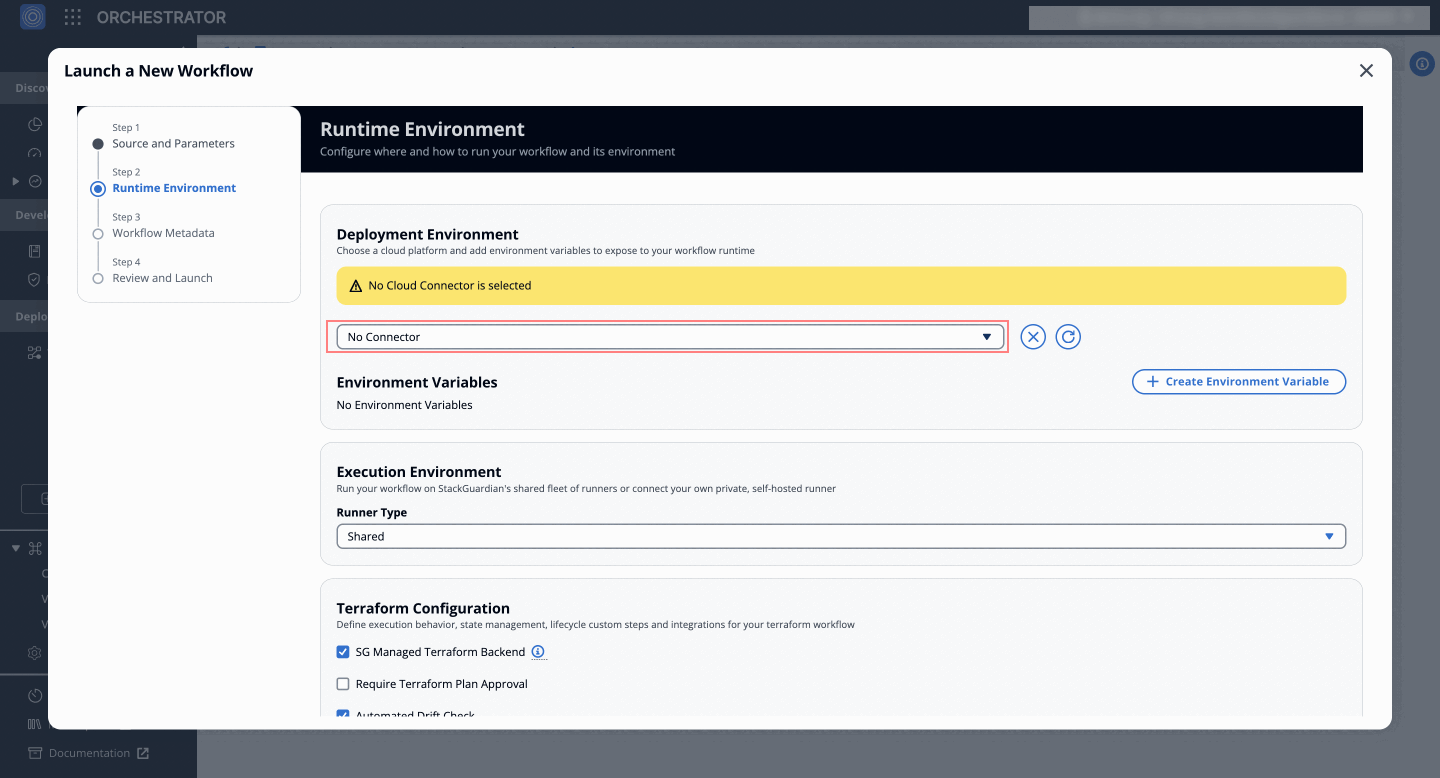
#### Step 3: Workflow Metadata[](#step-3-workflow-metadata "Direct link to Step 3: Workflow Metadata")
* **Workflow Name**: Provide a name for the workflow.
* **Description and Tags**: Add a description and tags for better identification and searchability, then click **"Next"**.
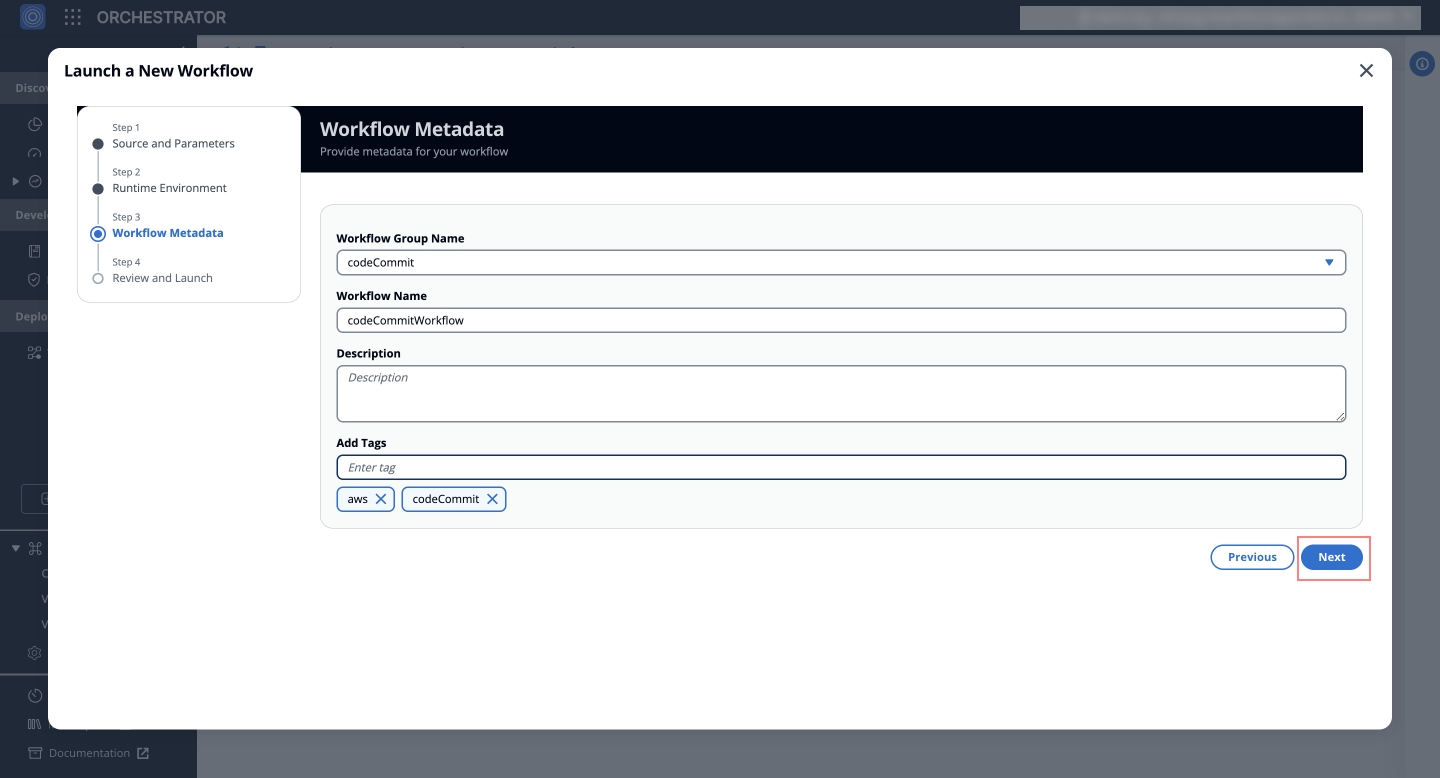
#### Step 4: Review & Launch[](#step-4-review--launch "Direct link to Step 4: Review & Launch")
Review your settings carefully. If everything is correct, click **"Launch"** to create your workflow.
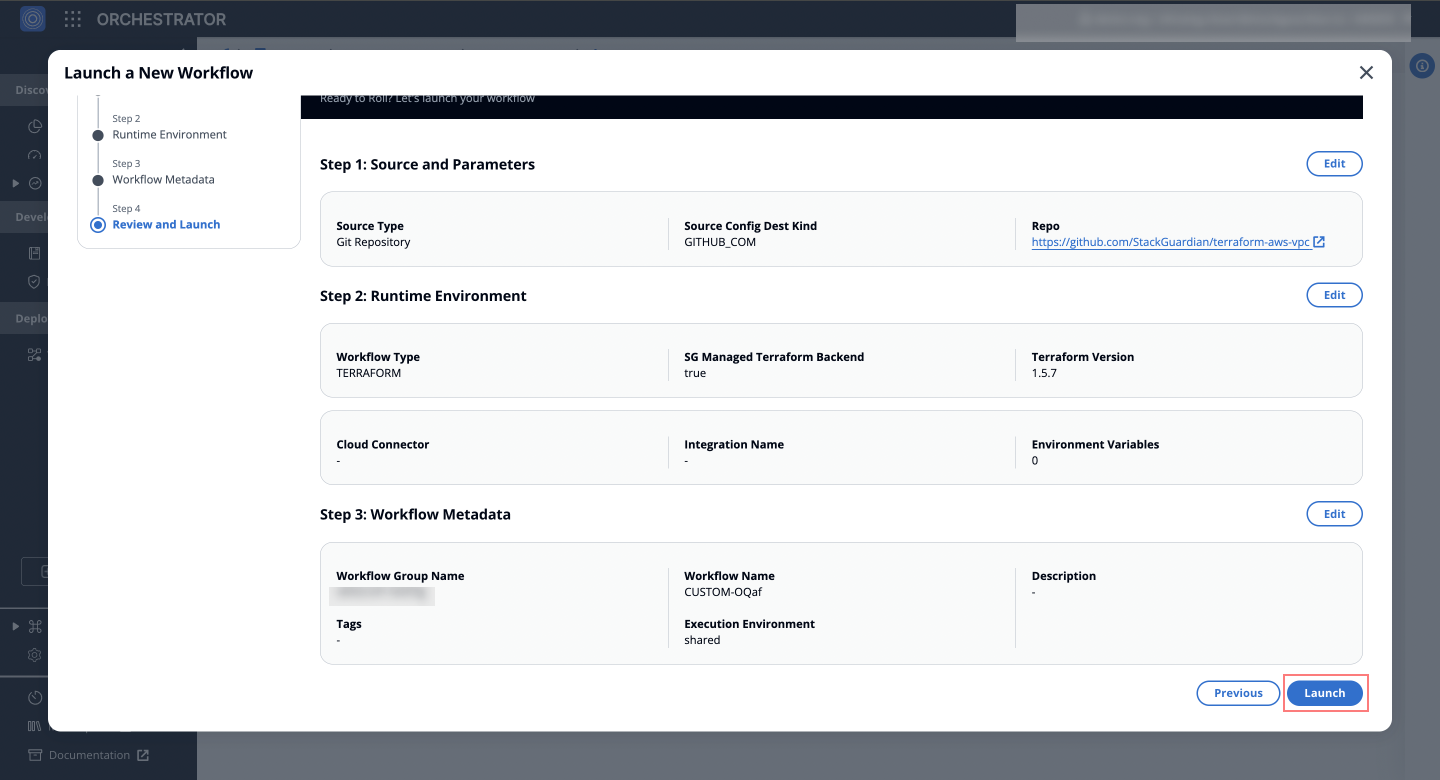
---
# Azure DevOps
## Overview[](#overview "Direct link to Overview")
StackGuardian offers three secure methods for connecting to Azure DevOps, each tailored for different security and operational needs:
* [Client Secret](#client-secret-service-principal) - Employs a secret key with an Azure AD application for authentication.
* [Workload Identity](#workload-identity-service-principal) - Leverages Azure’s identity federation for enhanced security without managing secrets.
* [Personal Access Token](#personal-access-token) - Uses a token tied to a user account for authentication.
Choose the method that best fits your organization’s security requirements and operational preferences.
## Prerequisites[](#prerequisites "Direct link to Prerequisites")
For **Client Secret** and **Workload Identity** methods, you must:
1. Create and [configure an Azure AD application](/docs/connectors/csp/azure/#create-stackguardian-app-in-azure) with appropriate permissions
2. Add the Service Principal as a user in your Azure DevOps organization
3. Grant it **Basic** access level (required for API access)
4. Assign it to projects with at least **Reader** permissions
*Service Principal configuration in Azure DevOps*
Once configured, you can use the application credentials in StackGuardian.
## Client Secret (Service Principal)[](#client-secret-service-principal "Direct link to Client Secret (Service Principal)")
To connect Azure DevOps using a Client Secret, you need an Azure AD application registered with:
* Tenant ID (Directory ID)
* Client ID (Application ID)
* Client Secret from Azure AD
* Permissions to access Azure DevOps
### Configure Connector in StackGuardian[](#configure-connector-in-stackguardian "Direct link to Configure Connector in StackGuardian")
1. Go to the **Connectors** tab in the StackGuardian Orchestrator.
2. Click on **Version Control Providers > Connect with VCS Provider**.
3. Click on **Connect to Azure DevOps**.
4. Enter a **Connector Name**.
5. Select **Client Secret** as the Access Type.
6. Enter the following information:
* Tenant ID (Directory ID)
* Subscription ID
* Client ID (Application ID)
* Client Secret Value
7. Click **Create** to finalize the configuration of the Connector.

*Client Secret connector creation*
## Workload Identity (Service Principal)[](#workload-identity-service-principal "Direct link to Workload Identity (Service Principal)")
Using Workload Identity via OpenID Connect (OIDC) avoids managing client secrets. It allows StackGuardian to authenticate with Azure DevOps using a trusted identity provider.
For this, you must have an Azure AD application registered with:
* Tenant ID (Directory ID)
* Client ID (Application ID)
* Federated credentials configured for StackGuardian
* Permissions to access Azure DevOps
### Configure Connector in StackGuardian[](#configure-connector-in-stackguardian-1 "Direct link to Configure Connector in StackGuardian")
1. Go to the **Connectors** tab in the StackGuardian Orchestrator.
2. Click on **Version Control Providers > Connect with VCS Provider**.
3. Click on **Connect to Azure DevOps**.
4. Enter a **Connector Name**.
5. Select **Workload Identity** as the Access Type.
6. Enter the following information:
* Tenant ID (Directory ID)
* Subscription ID
* Client ID (Application ID)
7. Click **Create** to finalize the configuration of the Connector.

*Workload Identity connector creation*
## Personal Access Token[](#personal-access-token "Direct link to Personal Access Token")
To connect Azure DevOps using a **Personal Access Token**, you need to create a token in Azure DevOps with limited permissions:
1. On the [Azure DevOps platform](https://dev.azure.com/), go to the target repository for the Access Token.
2. Select **User Settings** on the top navbar, beside your profile name.
3. Under the dropdown select **Personal Access Tokens**.
4. Click on **New Token**.
5. Provide a name for the token that relates to the app or task using it.
6. Select the required **Scopes** for the token.
7. Click **Create** to generate the token.
8. Copy the generated token and securely store it for later use.
*Azure DevOps token creation*
### Configure Connector in StackGuardian[](#configure-connector-in-stackguardian-2 "Direct link to Configure Connector in StackGuardian")
To complete the connection, visit the [StackGuardian platform](https://app.stackguardian.io/orchestrator/orgs) and follow these steps:
1. Go to the **Connectors** tab in the StackGuardian Orchestrator.
2. Click on **Version Control Providers > Connect with VCS Provider**.
3. Click on **Connect to Azure DevOps**.
4. Enter a **Connector Name**.
5. Select **Personal Access Token** as the Access Type.
6. In the **Azure DevOps Personal Access Token** field, paste the **Access Token** created earlier.
7. Click **Create** to finalize the configuration of the Connector.
*Personal Access Token connector creation*
---
# Bitbucket
## Overview[](#overview "Direct link to Overview")
Integrating StackGuardian with Bitbucket allows you to leverage Infrastructure and Policy as Code from your Bitbucket repositories. To set up the integration, you will need to authenticate StackGuardian Bitbucket connector using one of the following methods:
* **API Token**
* **Access Token**
* **App Password** (Legacy support – soon to be deprecated by Bitbucket)
This document explains all three authentication methods and how to configure the Bitbucket connector in StackGuardian.
## Create API Token[](#create-api-token "Direct link to Create API Token")
To integrate Bitbucket, you first need to create an **API Token** in Bitbucket with limited permissions. Follow these steps to create an API Token in Bitbucket:
1. Login to **Bitbucket**
2. Navigate to **Settings** (upper-right corner of the top navigation bar).
3. Under **Personal Settings**, go to **Atlassian account settings**.
4. Select **Security** from the top navigation bar.
5. Under **API tokens**, click on **Create and manage API tokens**.
6. Click on **Create API token with scopes**.
7. Provide a **Name** for the API token.
8. Set an **Expires on** date (this is the date when the API Token will expire. Choose a long validity period so that StackGuardian integration continues to work).
9. Click on **Next**.
10. On the **Select the app** page, under **Select API token app**, select **Bitbucket**.
11. Click on **Next**.
12. Under **Select bitbucket scopes**, Select all of the following scopes (these scopes are required to get read access to the Bitbucket repositories):
* **Account:** `Read`
* **Me:** `Read`
* **Project:bitbucket:** `Read`
* **Pullrequest:bitbucket:** `Read`
* **Repository:bitbucket:** `Read`
* **User:bitbucket:** `Read`
* **Workspace:bitbucket:** `Read`

13. Click on **Next**.
14. Review the details of your API Token and click **Create token** if it all looks good.
15. **Copy the generated API Token and securely store it**. The API Token is displayed only once and cannot be retrieved later.

## Create Access Token[](#create-access-token "Direct link to Create Access Token")
To integrate Bitbucket, you first need to create an **Access Token** in Bitbucket with limited permissions (it’s possible to create an Access Token for a **project**, a **repository** or a **workspace**).
### 1. Access Token for Repository[](#1-access-token-for-repository "Direct link to 1. Access Token for Repository")
Follow these steps to create an [**Access Token for a repository**](https://support.atlassian.com/bitbucket-cloud/docs/create-a-repository-access-token/) in Bitbucket:
1. Login to **Bitbucket.**
2. Navigate to **target repository** for the Access Token (this repository is the only one that the Access Token can access).
3. On the sidebar, select **Repository Settings**.
4. Under **Security**, select **Access Tokens**.
5. Click on **Create Access Token**.
6. **Provide a Name** for the Access Token.
7. Under **Expiry**, set an **Expires on** date (select the date which your Access Token will expire. Choose a long validity period, so that StackGuardian integration continues to work).
8. Select the **permissions the Access Token needs** (for detailed descriptions of each permission, see [Repository-level access token permissions](https://support.atlassian.com/bitbucket-cloud/docs/repository-access-token-permissions/)):
* **Repositories:** `Read`
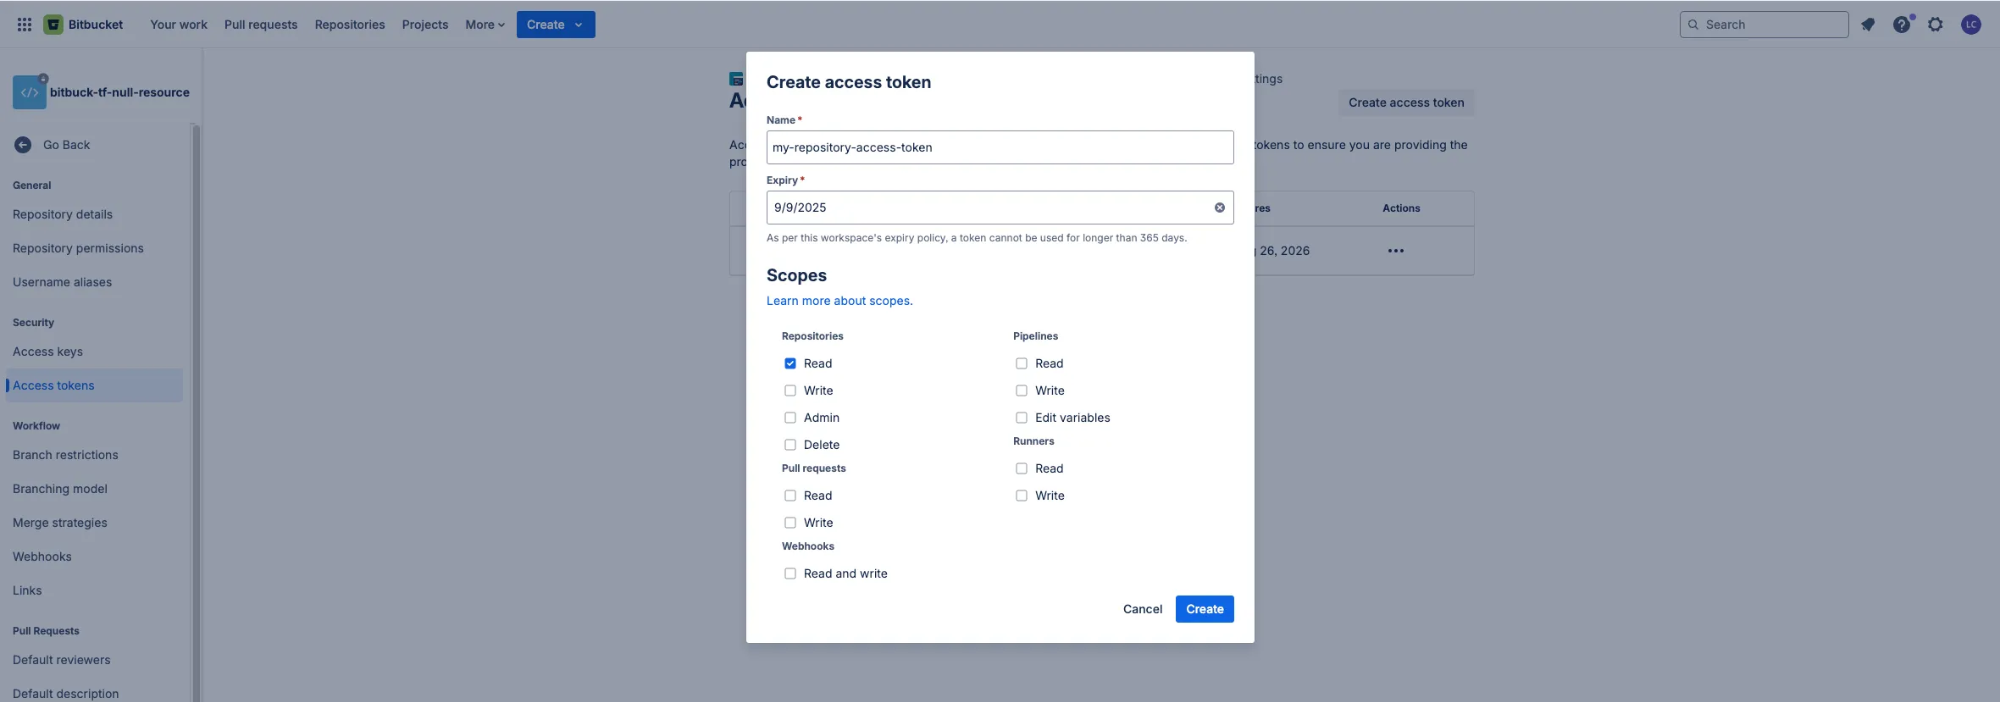
9. Click on **Create** to generate the new Access Token.
10. **Copy the generated Access Token and securely store it**. The Access Token is displayed only once and cannot be retrieved later.

### 2. Access Token for Project[](#2-access-token-for-project "Direct link to 2. Access Token for Project")
Follow these steps to create an [**Access Token for a project**](https://support.atlassian.com/bitbucket-cloud/docs/create-a-project-access-token/) in Bitbucket:
1. Login to **Bitbucket.**
2. Navigate to **target project** for the Access Token (this project is the only one that the access token can access).
3. On the sidebar, select **Project Settings**.
4. Under **Security**, select **Access Tokens**.
5. Click on **Create Access Token**.
6. **Provide a Name** for the Access Token.
7. Under **Expiry**, set an **Expires on** date (select the date which your Access Token will expire. Choose a long validity period, so that StackGuardian integration continues to work).
8. Select the **permissions the Access Token needs**. (for detailed descriptions of each permission, see [Repository-level access token permissions](https://support.atlassian.com/bitbucket-cloud/docs/repository-access-token-permissions/)):
* **Projects:** `Read`
* **Repositories:** `Read`
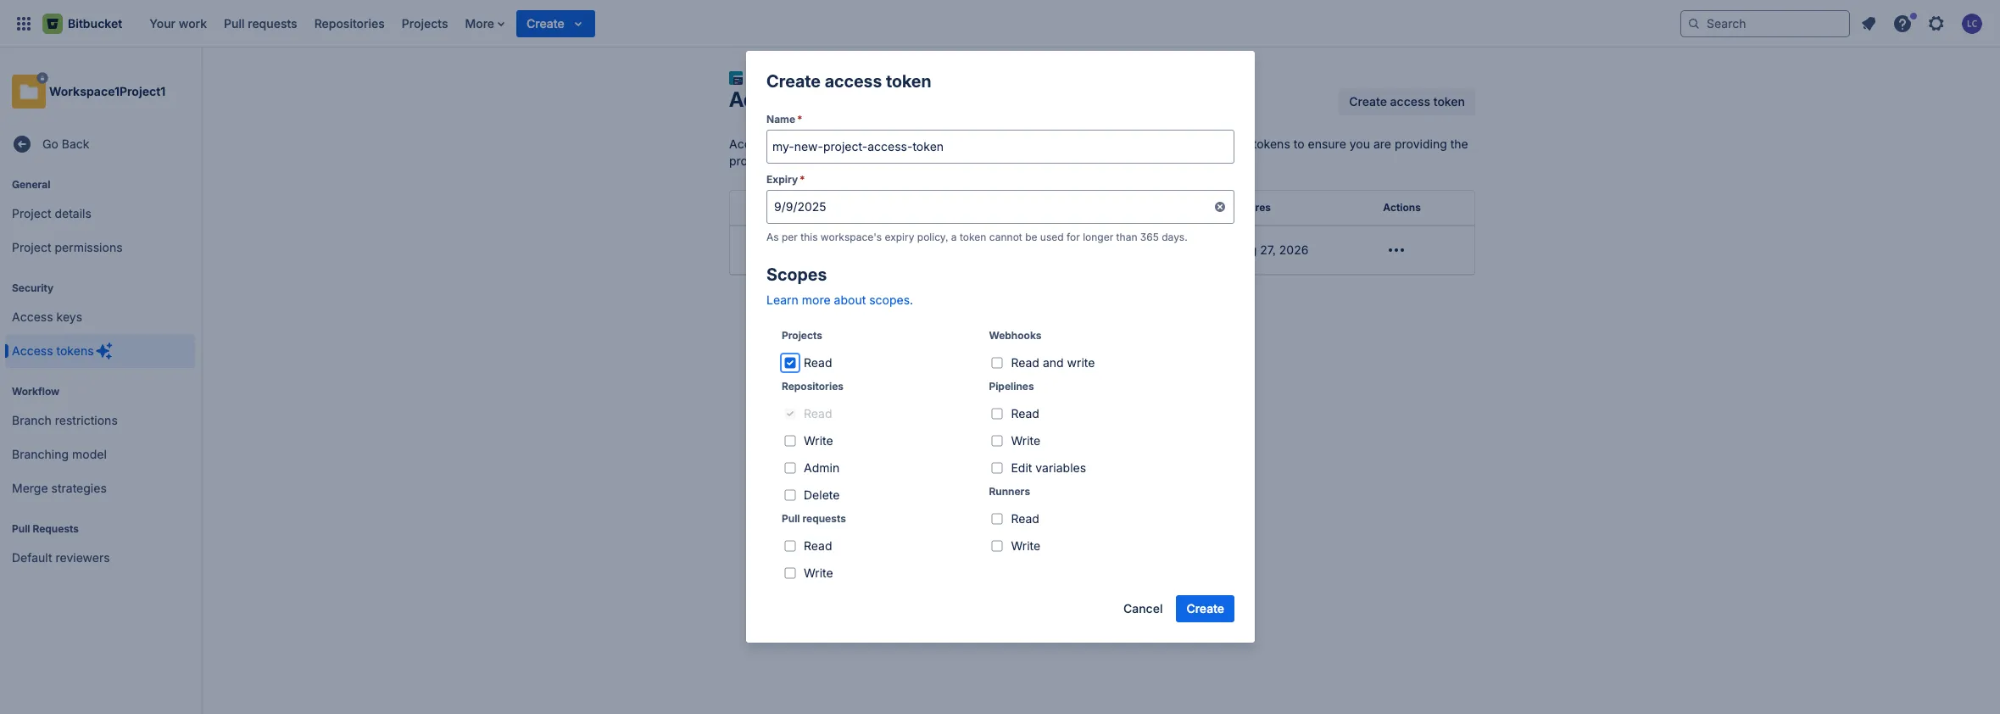
9. Click on **Create** to generate the new Access Token.
10. **Copy the generated Access Token and securely store it**. The Access Token is displayed only once and cannot be retrieved later.
### 3. Access Token for Workspace[](#3-access-token-for-workspace "Direct link to 3. Access Token for Workspace")
Follow these steps to create an [**Access Token for a workspace**](https://support.atlassian.com/bitbucket-cloud/docs/create-a-workspace-access-token/) in Bitbucket:
1. Login to **Bitbucket.**
2. Navigate to **target workspace** for the Access Token (this workspace is the only one that the Workspace Access Token can access).
3. On top bar navigation, Select **Settings**.
4. On dropdown menu, select **Workspace Settings**.
5. Under **Security**, select **Access Tokens**.
6. Click on **Create Access Token**.
7. **Provide a Name** for the Access Token.
8. Under **Expiry**, set an **Expires on** date (select the date which your Access Token will expire. Choose a long validity period, so that StackGuardian integration continues to work).
9. Select the **permissions the Access Token needs** (for detailed descriptions of each permission, see [Repository-level access token permissions](https://support.atlassian.com/bitbucket-cloud/docs/repository-access-token-permissions/)):
* **Account:** `Read`
* **Projects:** `Read`
* **Repositories:** `Read`

10. Click on **Create** to generate the new Access Token.
11. **Copy the generated Access Token and securely store it**. The Access Token is displayed only once and cannot be retrieved later.

## Create a Bitbucket connector on StackGuardian[](#create-a-bitbucket-connector-on-stackguardian "Direct link to Create a Bitbucket connector on StackGuardian")
To create a Connector, open the [**StackGuardian Platform**](https://app.stackguardian.io/orchestrator/orgs) and follow these steps:
1. Go to the **"Connectors** > **Version Control Providers"** tab in the StackGuardian *Orchestrator*.
2. Select "**Connect to Bitbucket**."
3. Enter a **Connector name, Description, Tag**.
4. Select one **Bitbucket authentication type**.
5. **Provide the required authentication** **information** based on your chosen method:
* **API Token:** Enter Bitbucket User Name, Bitbucket Email, and paste the API Token that was created earlier in Bitbucket.
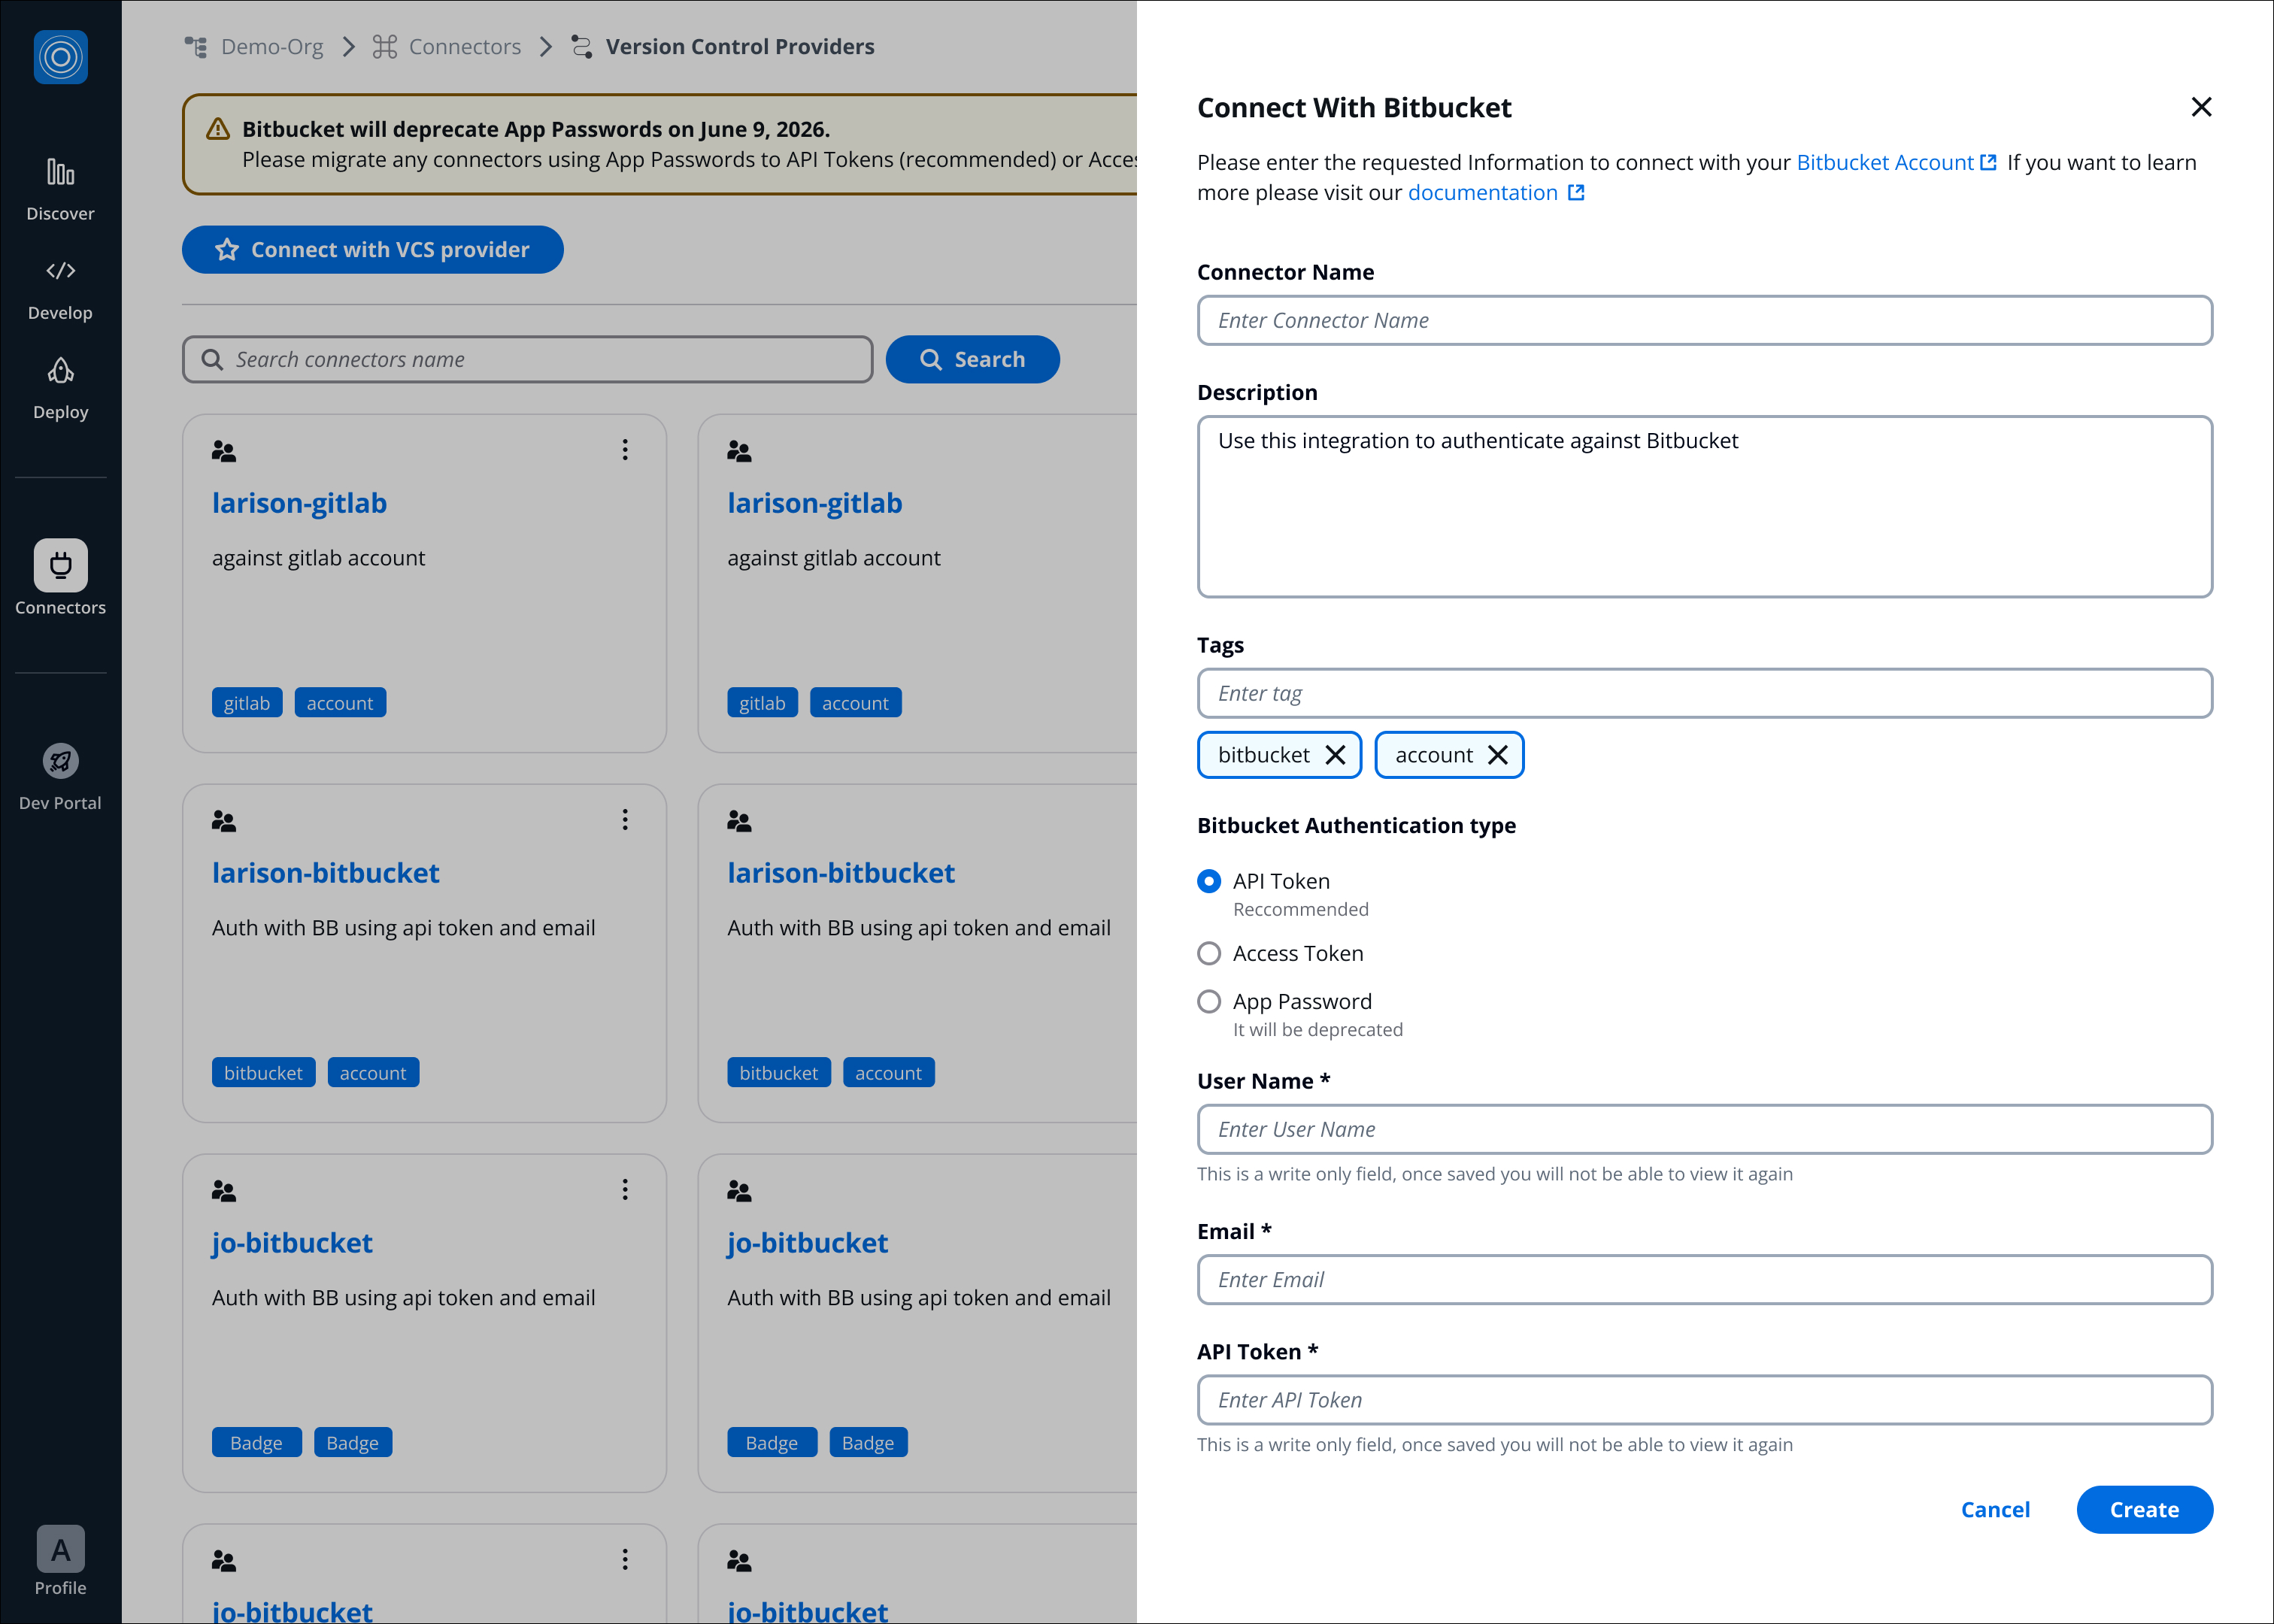
* **Access Token:** paste the **Access Token** that was created earlier in Bitbucket (only Access Token is required).
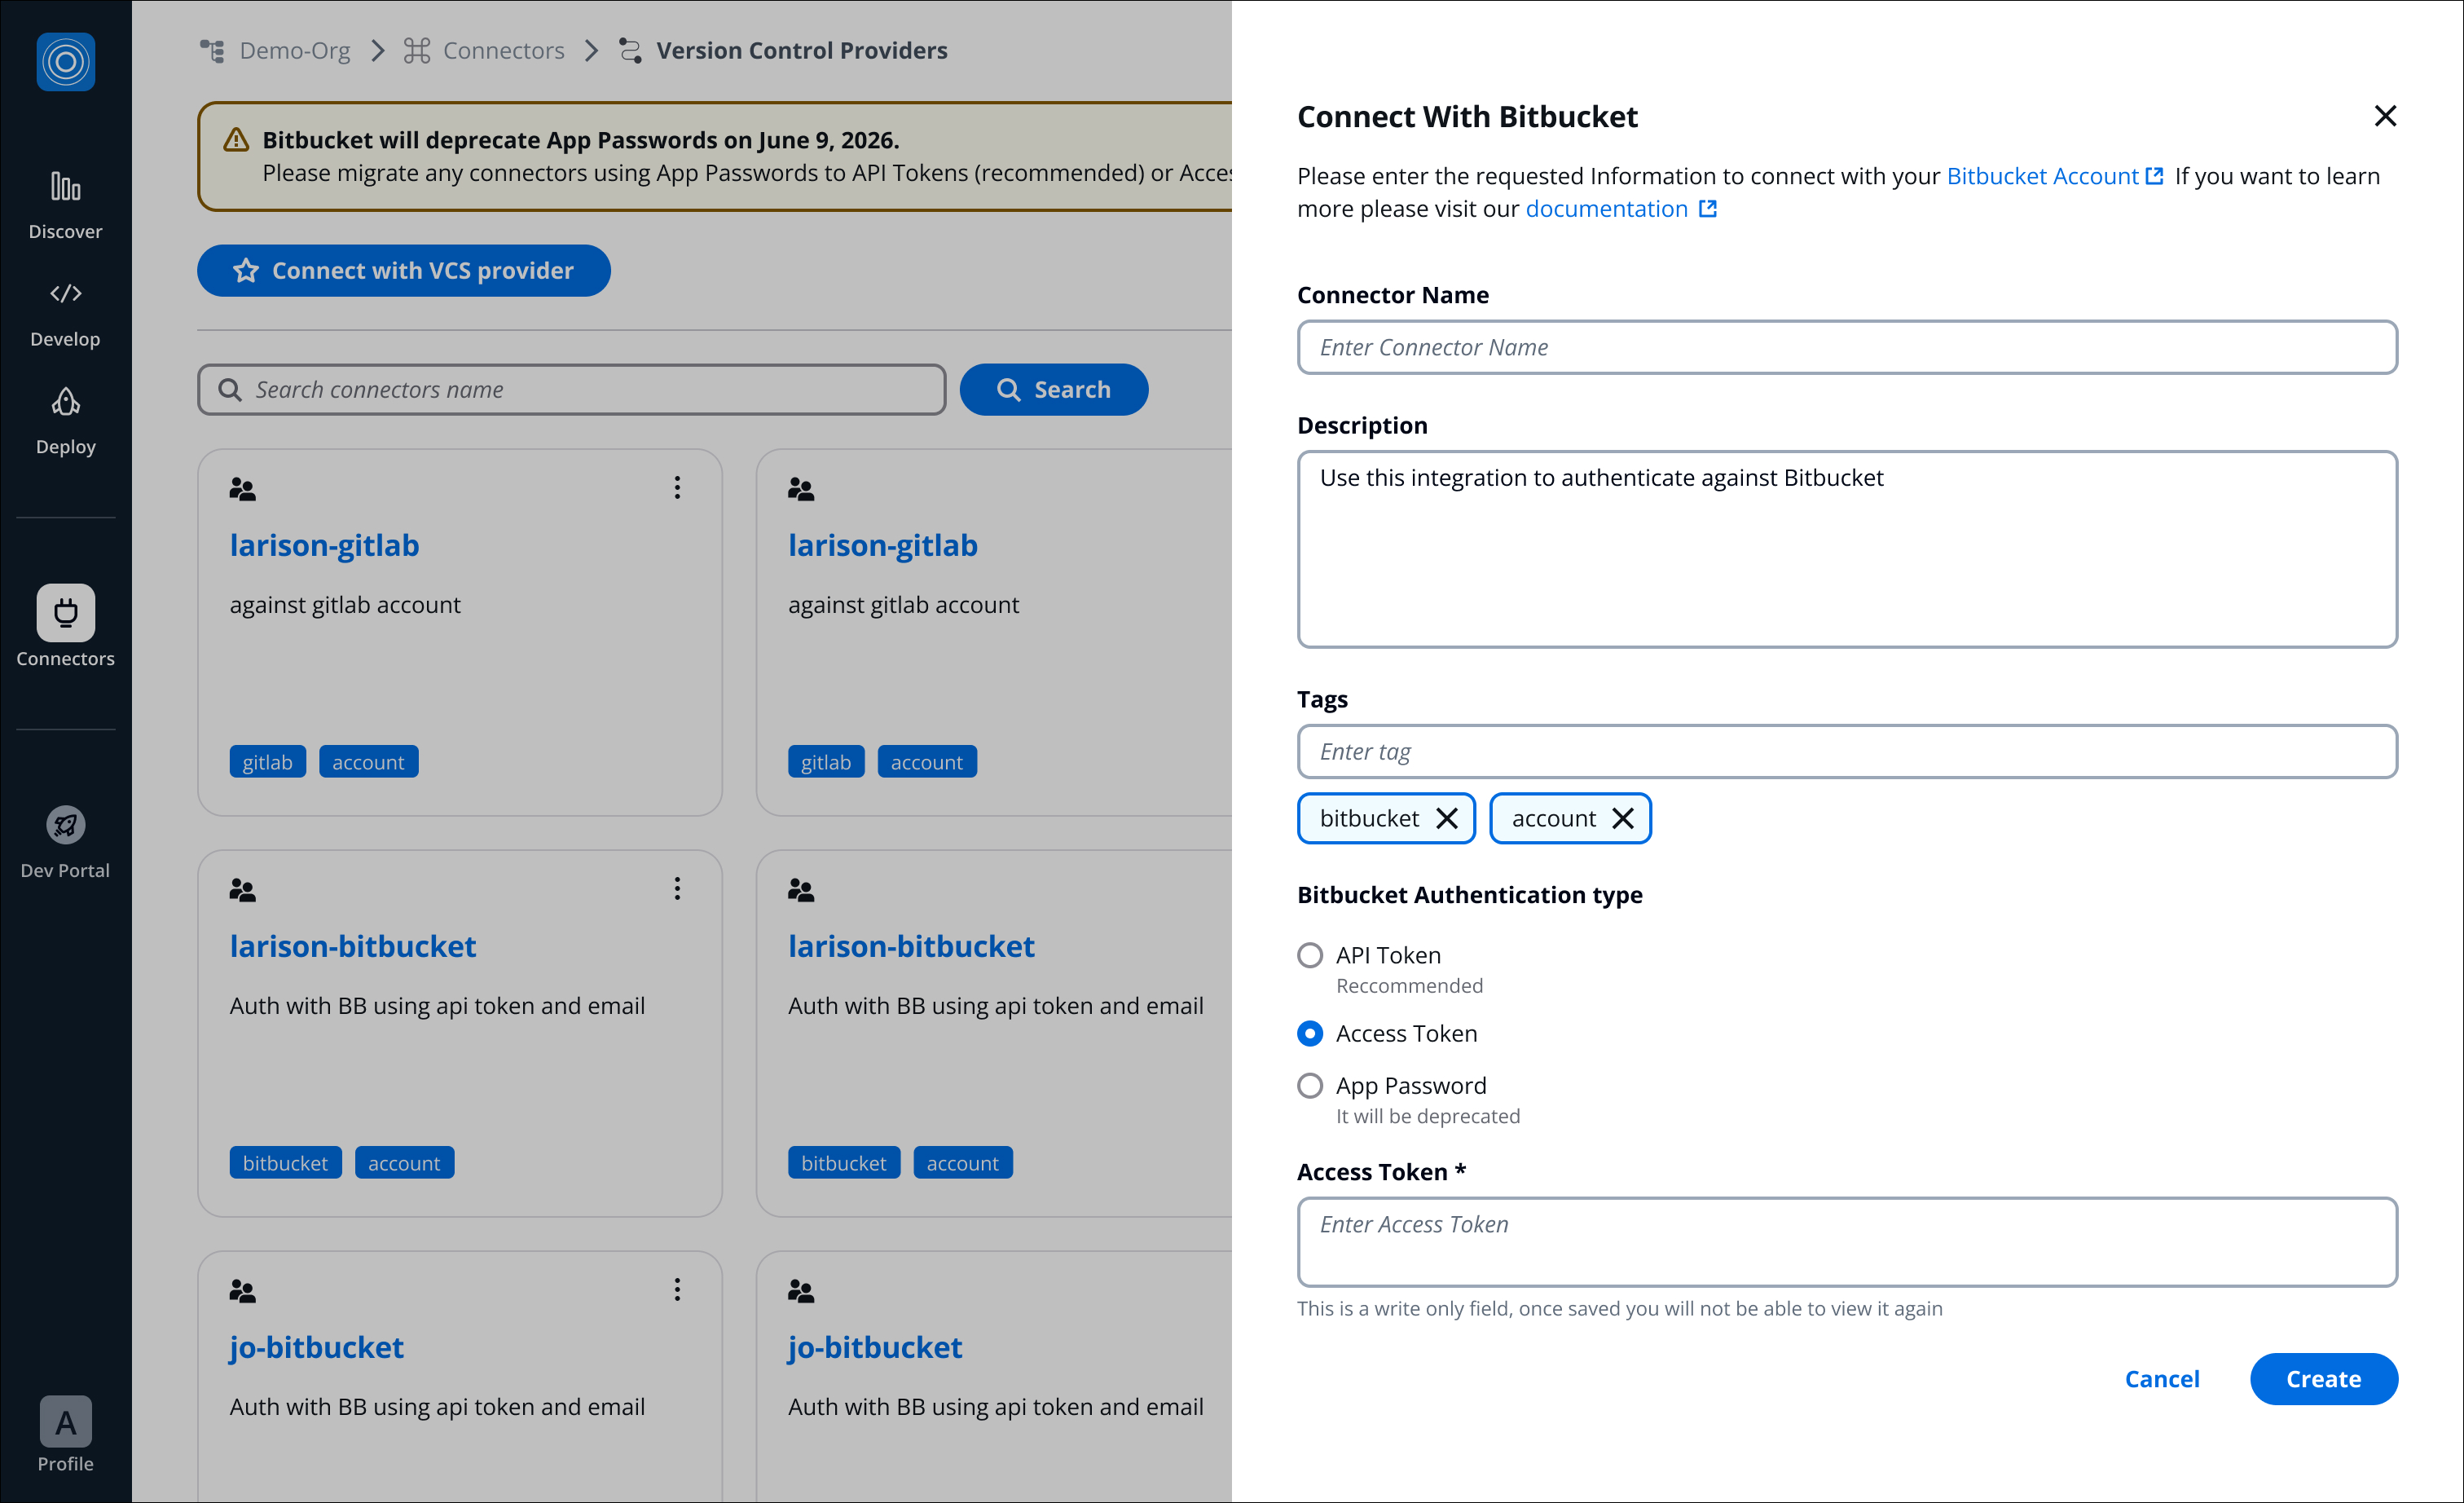
* **App Password:** Enter **Bitbucket User Name**, and paste the **App Password** that was created earlier in Bitbucket.
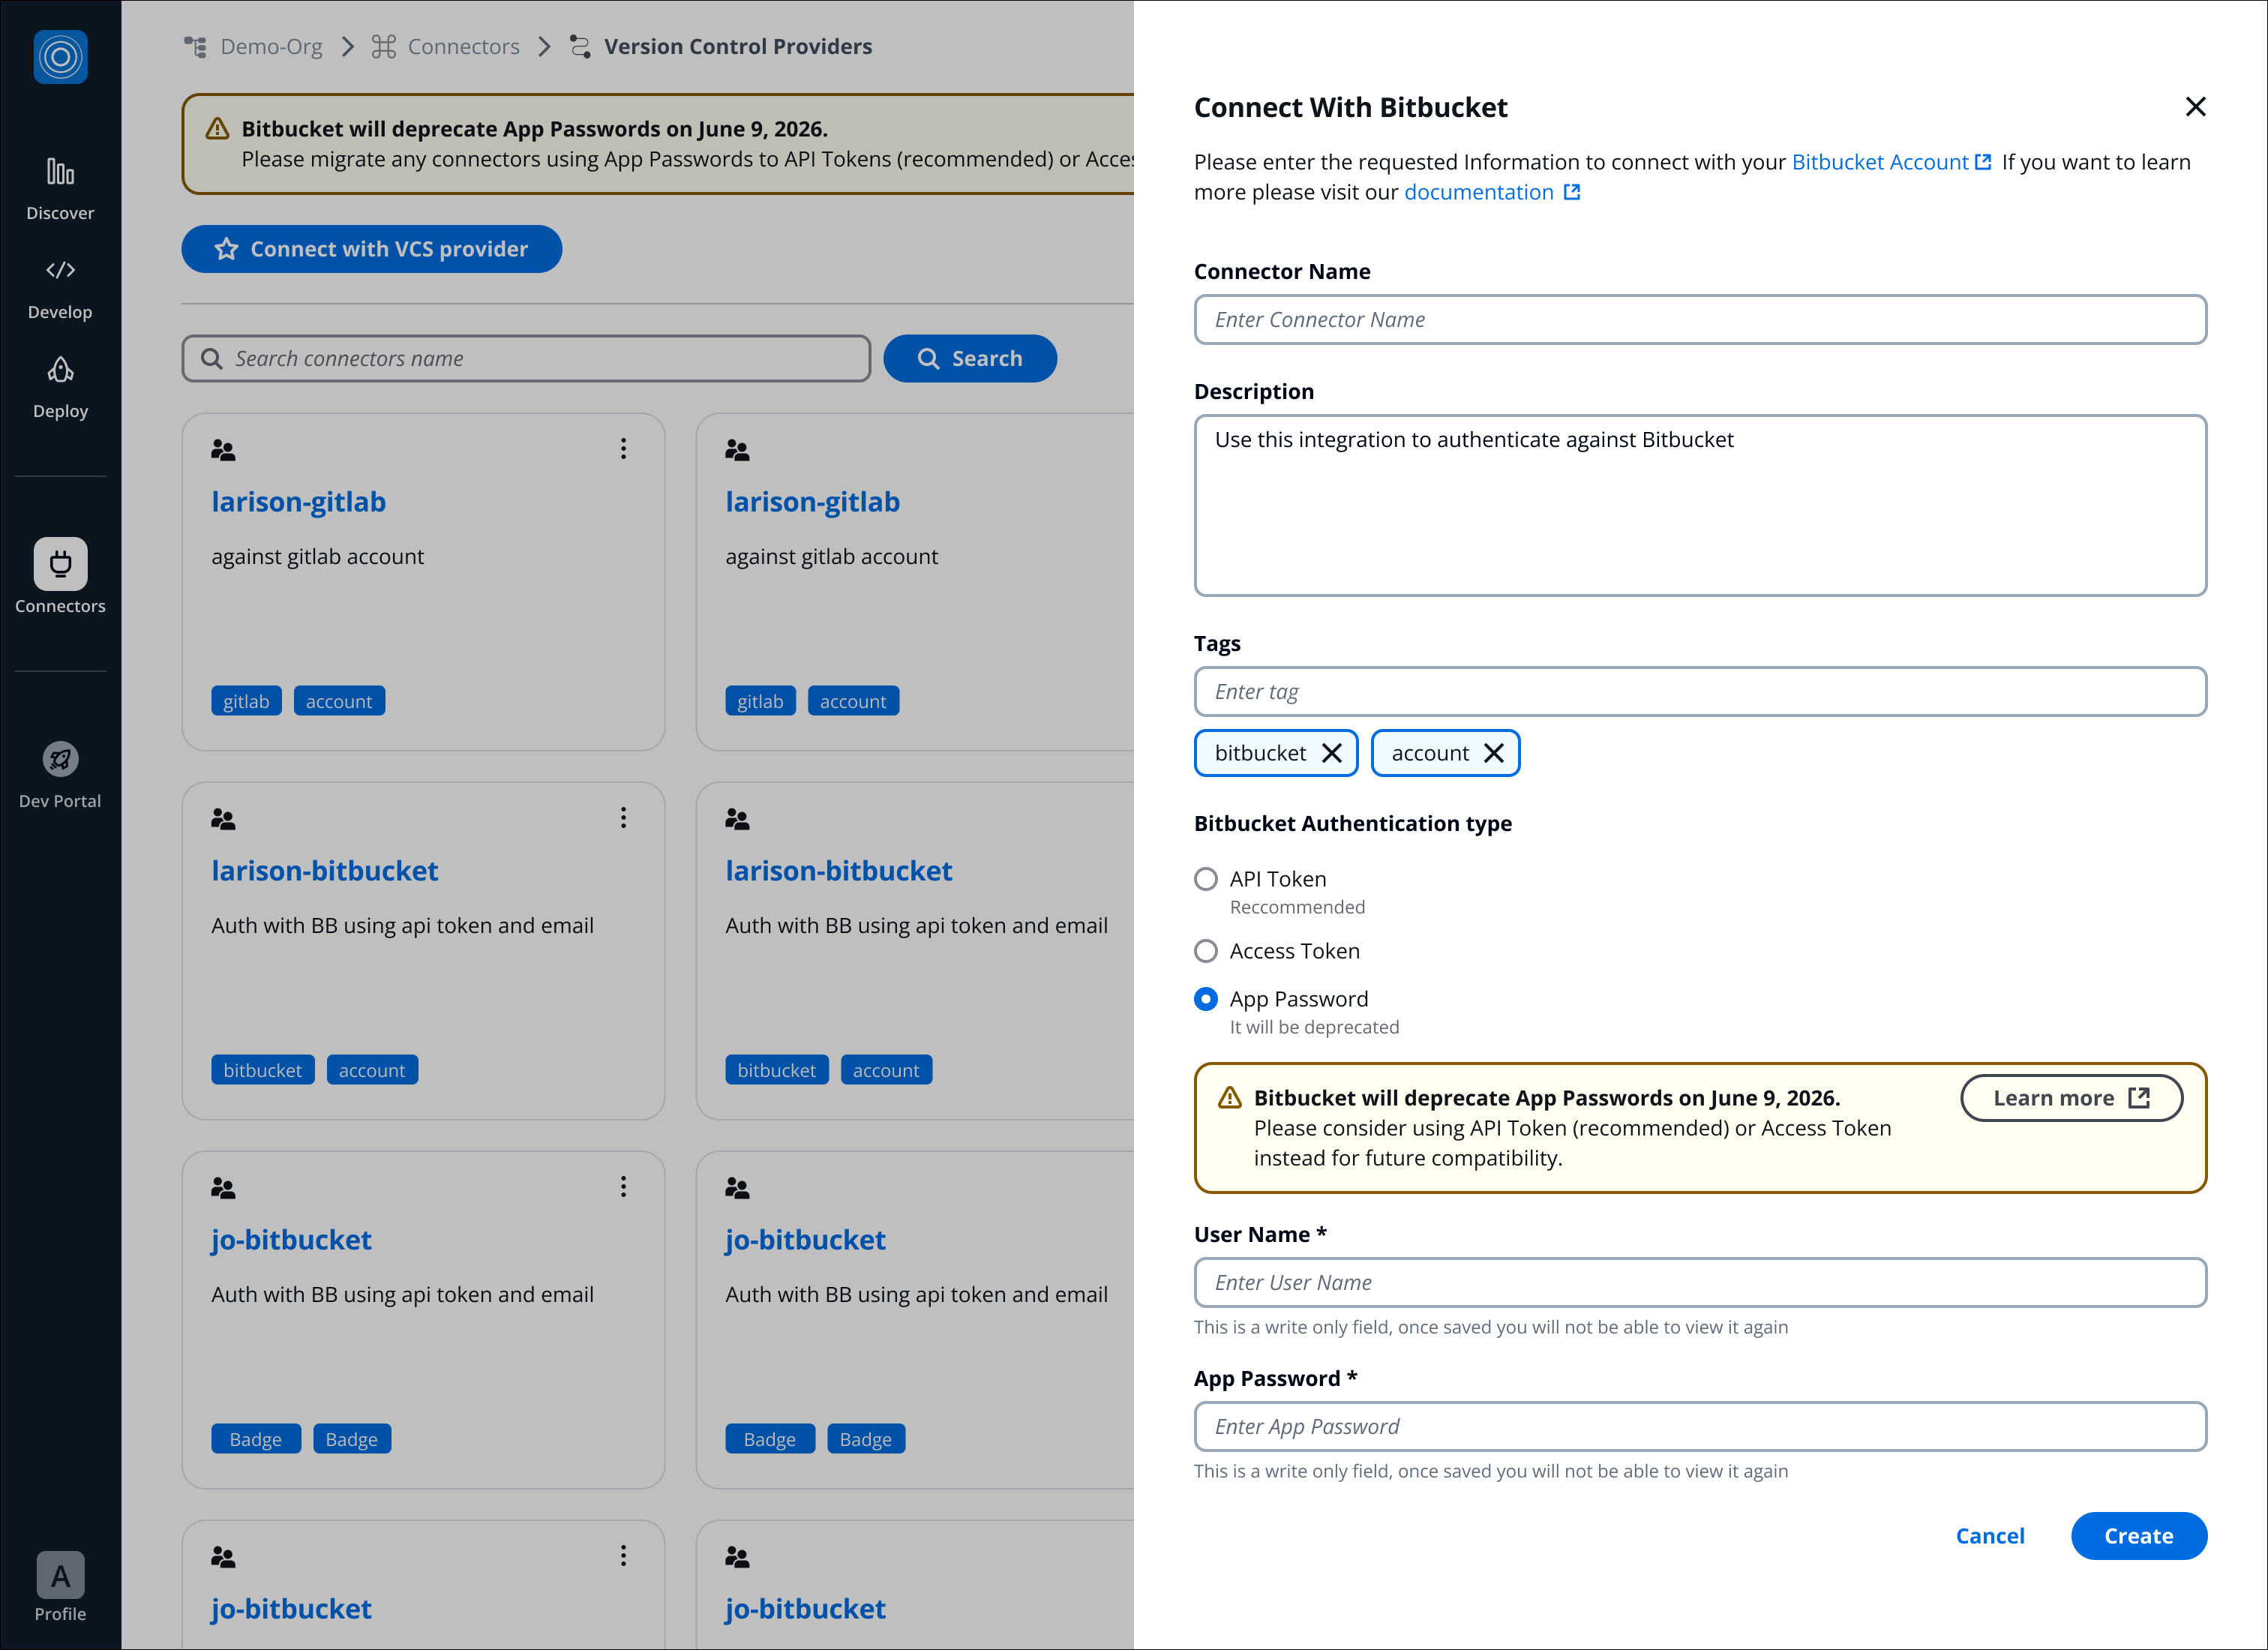
6. Click on **Create.**
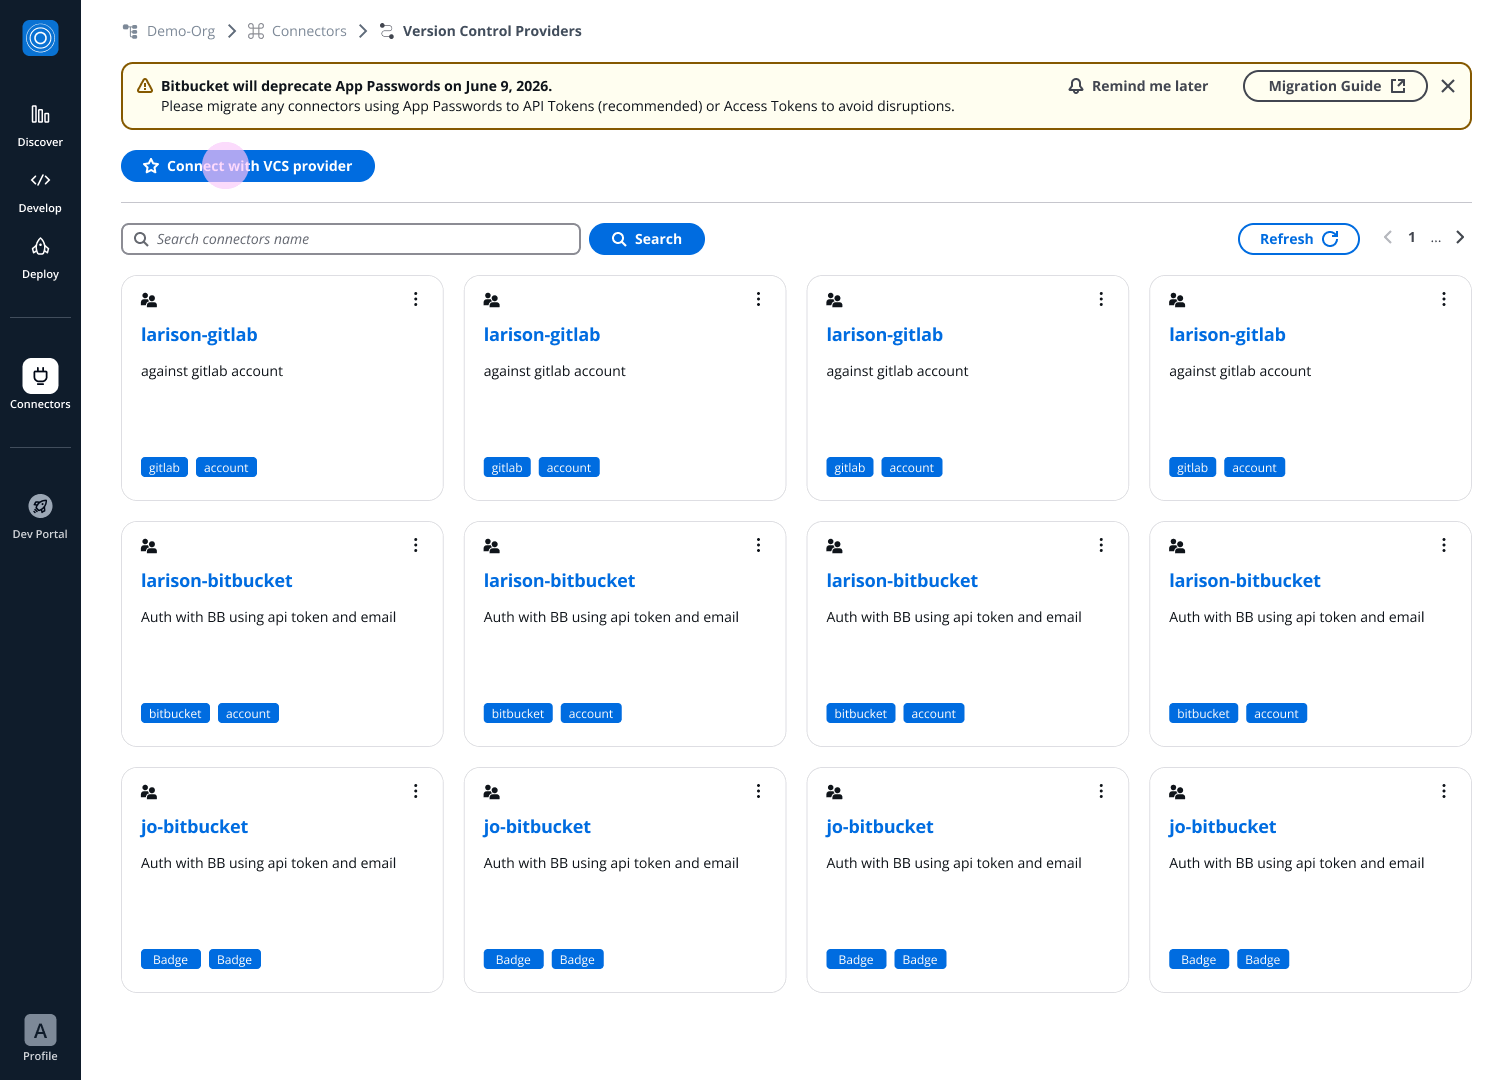
You can configure VCS triggers to automatically run workflows in response to Bitbucket events such as pushes, pull requests, and tag creation. See [Workflow triggers](/docs/deploy/workflows/workflow-triggers/).
---
# GitHub Enterprise
## Configure Connector[](#configure-connector "Direct link to Configure Connector")
**GitHub Enterprise (GH EE)** is a robust version of GitHub tailored for larger organizations. It supports advanced features and deployment options to cater to enterprise needs, ensuring seamless integration and enhanced security. GH EE also offers comprehensive support and compliance tools to meet stringent organizational requirements.
### Basics: GitHub vs. GitHub Enterprise (GH EE)[](#basics-github-vs-github-enterprise-gh-ee "Direct link to Basics: GitHub vs. GitHub Enterprise (GH EE)")
**GitHub** is a public cloud service ideal for *open-source* projects, *small* to *medium-sized* teams, and *individual* developers. It offers free and paid plans with features like **GitHub Actions** for CI/CD, **GitHub Pages** for static site hosting, and various integrations.
**GitHub Enterprise** (GH EE) is designed for *larger organizations* needing advanced security, compliance, and administrative features. It offers both cloud and on-premises deployment options. GH EE also provides premium support and service level agreements (SLAs).
## Setting up GitHub EE Connector[](#setting-up-github-ee-connector "Direct link to Setting up GitHub EE Connector")
To set up a **GitHub Enterprise Edition (EE)** connector with StackGuardian, follow these steps carefully. You will need to switch between your *GitHub Enterprise portal* and *StackGuardian's connector* form frequently. For convenience, it is recommended to open these in two separate tabs of your browser.
### Step 1: Open Connector Form in StackGuardian[](#step-1-open-connector-form-in-stackguardian "Direct link to Step 1: Open Connector Form in StackGuardian")
1. Go to the **Orchestrator** > **Connectors** tab.
2. Select **Connect With GitHub App (Custom)**.
3. Fill in the details as follows:
* **Connector Name**: Enter a descriptive name, *example*, `test-account1-gh-ee`.
### Step 2: Create a GitHub App in GitHub Enterprise[](#step-2-create-a-github-app-in-github-enterprise "Direct link to Step 2: Create a GitHub App in GitHub Enterprise")
1. Go to your **GitHub organization** settings:
* Navigate to **Settings** > **Developer Settings** > [**GitHub Apps**](https://github.com/settings/apps).
* Click on **New GitHub App** and fill in the details:
* **GitHub App Name**: Provide a unique name, *For example*, `stackguardian-gh-app`.
* **Homepage URL**: This is the URL to the GitHub app's website, which provides users with more information about the app. *For example*, `https://stackguardian.io`.
* **Webhook URL**: Use the URL generated in the StackGuardian GitHub EE connector form, after entering the connector name. This URL is where events will be posted.
* **Webhook Secret**: Use the value from the StackGuardian GitHub EE connector form.
* Click **Create GitHub App**.
### Step 3: Configure Permissions Before Installing the App[](#step-3-configure-permissions-before-installing-the-app "Direct link to Step 3: Configure Permissions Before Installing the App")
Before installing the app, configure the required permissions:
1. Click on "**Permissions & events**" under the *General* settings of the newly created app.
2. Set the following permissions:
* **Repository permissions**:
* *Read access* to contents, metadata, and webhooks.
* *Read and write access* to checks, code scanning alerts, commit statuses, and pull requests.
* **Organization permissions**: *Read access* to webhooks.
After saving changes in permissions, you will see the events that you can subscribe to. **For example**, push event, pull request event. You need to enable these events to process webhooks.
* **Subscribe to events**:
* **Installation target**: A GitHub App installation target is renamed.
* **Meta**: When this App is deleted and the associated hook is removed.
* **Code scanning alert**: Code scanning alert created, fixed in branch, or closed.
* **Check run**: Check run is created, requested, rerequested, or completed.
* **Check suite**: Check suite is requested, rerequested, or completed.
* **Commit comment**: Commit or diff comment commented on.
* **Create**: Branch or tag created.
* **Delete**: Branch or tag deleted.
* **Pull request**: Pull request assigned, auto merge disabled, auto merge enabled, closed, converted to draft, demilestoned, dequeued, edited, enqueued, labeled, locked, milestoned, opened, ready for review, reopened, review request removed, review requested, synchronized, unassigned, unlabeled, or unlocked.
* **Pull request review**: Pull request review submitted, edited, or dismissed.
* **Pull request review comment**: Pull request diff comment created, edited, or deleted.
* **Pull request review thread**: Pull request review thread was resolved or unresolved.
* **Push**: Triggered when a push is made to the repository.
* **Repository**: Triggered when a repository is created, deleted, archived, unarchived, publicized, privatized, edited, renamed, or transferred.
* **Status**: Triggered when the commit status is updated from the API.
* Scroll to the bottom and click "**Save Changes**".
### Step 4: Configure GitHub App Connector in StackGuardian[](#step-4-configure-github-app-connector-in-stackguardian "Direct link to Step 4: Configure GitHub App Connector in StackGuardian")
1. Navigate back to StackGuardian's **Connect With GitHub Custom App** and enter the following details:
* **GitHub App ID**: Find this in the GitHub App’s settings under the "About" section. Example: `124635`.
* **GitHub App Client ID**: Copy from the same section. Example: `Iv1.1234567890abcdef`.
* **GitHub App Client Secret**: Click "Generate a new client secret" in the GitHub App settings and copy the value.
* **GitHub App Installation ID**:
* Go to the "**Install App**" tab under "*Permissions & Events*".
* Install the app to the specific repository and copy the unique digits from the URL after installation. Example: `52140576`.
* **GitHub App Pem File Content**:
* Go to the [**GitHub Apps**](https://github.com/settings/apps) settings and select the app you created.
* Scroll down to "*Private keys*" and click "**Generate a private key**". Copy the content of the generated PEM file and paste it here.
* **GitHub App Http URL**: The web address for GitHub access. For GitHub, use or your custom GitHub Enterprise domain. *Example*: `https://github.yourcompany.com`.
* **GitHub App API URL**: The endpoint for API calls. For GitHub, use or your custom API endpoint. *Example*: `https://api.github.yourcompany.com`.
* ***Finally***, click **Create** to the setup of your GitHub EE connector.
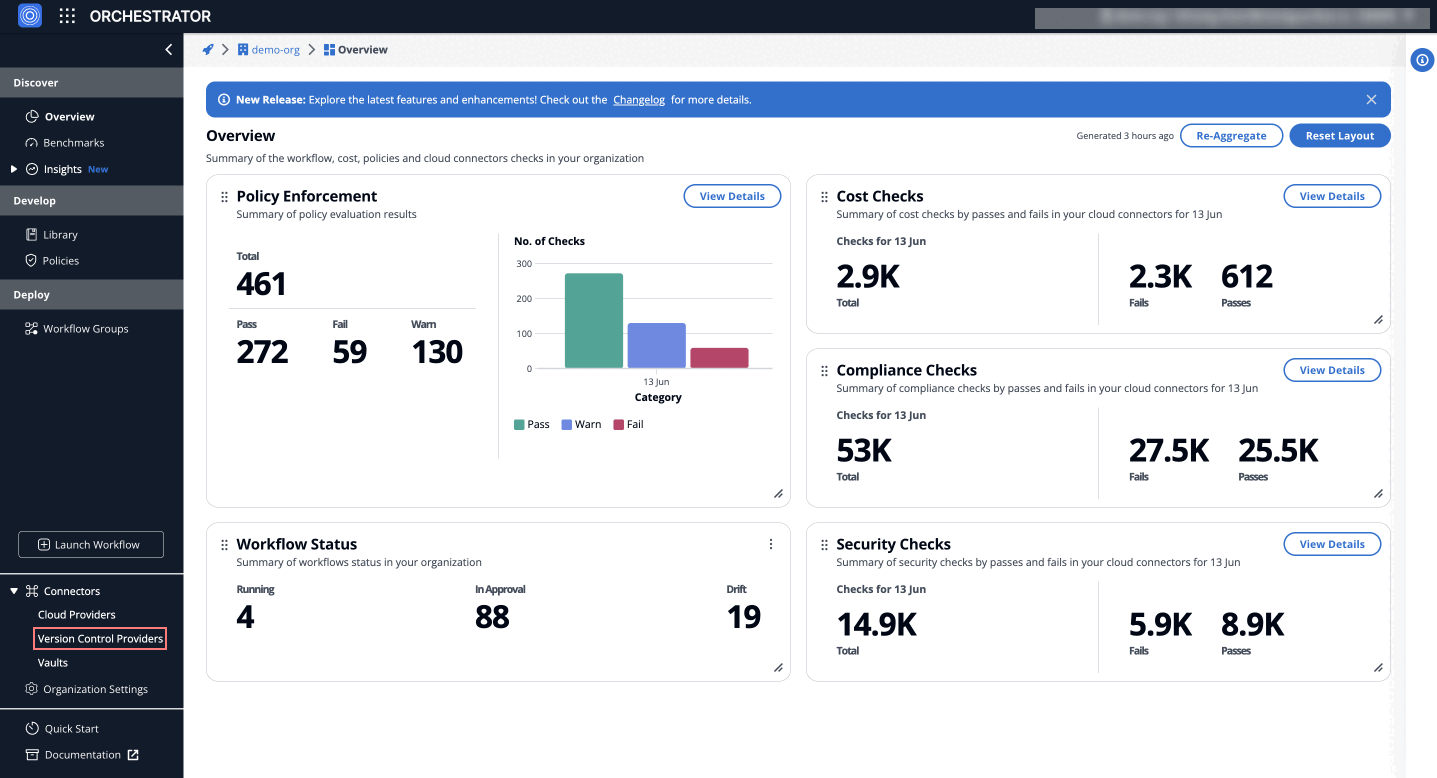
Successful **GitHub EE** Connector
---
# GitHub
## Overview[](#overview "Direct link to Overview")
Integrating StackGuardian with GitHub allows you to leverage *Infrastructure* and *Policy as Code* from your private repositories. By configuring a VCS (Version Control System), you can fetch the latest IaC (Infrastructure as Code) or Policy code during your workflow runtime. This document provides step-by-step instructions on how to set up the GitHub integration.
### Setting up GitHub Connector[](#setting-up-github-connector "Direct link to Setting up GitHub Connector")
1. **Navigate to the Connectors Tab**: Log in to the StackGuardian Platform and navigate to the "Connectors" tab.
2. **Connect to GitHub**: Click on "*Connect to GitHub*" You will be redirected to [github.com](https://github.com/)
3. **Install the StackGuardian GitHub App**: On GitHub, you will see a screen with an **Install** button. Click on it to start the installation process.
4. **Select Repositories**: Follow the instructions to allow access to selected repositories or all repositories within your GitHub organization or user account.
5. **Complete Installation**: After granting permissions, you will be redirected back to the StackGuardian Platform. You should now see a VCS Connector named "github\_com" in the **Connectors** tab.
When installation is complete you will be redirected back to StackGuardian Platform and you should see a VCS Connector named "github\_com" in **Connectors** tab.

*Successful GitHub Connector*
You can configure VCS triggers to automatically run workflows in response to GitHub events such as pushes, pull requests, and tag creation. See [Workflow triggers](/docs/deploy/workflows/workflow-triggers/).
---
# GitLab
## Configure Connector[](#configure-connector "Direct link to Configure Connector")
StackGuardian supports integration with both GitLab Cloud and GitLab Self-Managed, enabling you to deploy directly from your source code repositories. You have the freedom to use connectors for single repositories, groups of repositories but also multiple GitLab instances.
To integrate GitLab with StackGuardian, proceed with one of the following options:
* [Personal Access Token (user-level access)](#option-1-use-a-personal-access-token)
* [Project Access Token (project-specific access)](#option-2-use-a-project-access-token)
* [Setup Connector in SG](#set-up-the-connector-in-stackguardian)
### Option 1: Use a Personal Access Token[](#option-1-use-a-personal-access-token "Direct link to Option 1: Use a Personal Access Token")
This method grants StackGuardian access to your GitLab account and all accessible projects.
##### Steps to Create a Personal Access Token:[](#steps-to-create-a-personal-access-token "Direct link to Steps to Create a Personal Access Token:")
1. Log in to [GitLab](https://gitlab.com/users/sign_in).
2. Click on your **avatar** and select **Edit profile**.
3. Go to **Access Tokens** in the sidebar.
4. Click **Add New Token**.
5. Provide a **name** for the token.
6. Optionally, set an **expiry date** (default is 365 days).
7. Select the **api** scope.
8. Click **Create Personal Access Token**.
9. **Copy and store** the token securely. It will not be shown again.
**GitLab Token** Creation
***
### Option 2: Use a Project Access Token[](#option-2-use-a-project-access-token "Direct link to Option 2: Use a Project Access Token")
This method limits StackGuardian’s access to a specific GitLab project.
##### Steps to Create a Project Access Token:[](#steps-to-create-a-project-access-token "Direct link to Steps to Create a Project Access Token:")
1. Log in to [GitLab](https://gitlab.com/users/sign_in).
2. Open the desired **project**.
3. Go to **Settings** > **Access Tokens**.
4. Click **Add new token**.
5. Enter a **token name**.
6. Set an **expiry date** (up to 365 days).
7. Choose a **role**: Reporter or higher.
8. Select scopes:
* `read_repository`: Allows reading the repository.
* `api`: Permits API access that includes various read and write actions.
9. Click **Create project access token**.
10. **Save the token securely**. It won't be shown again.
note
Handle the Project Access Token with care, as it grants repository access. 
## Set Up the Connector in StackGuardian[](#set-up-the-connector-in-stackguardian "Direct link to Set Up the Connector in StackGuardian")
Once you have the token, follow these steps:
1. Go to the **Orchestrator** > **Connectors** tab.
2. Select **Connect to GitLab**.
3. Fill in the details:
* **Connector Name**: Enter a descriptive name, like *MyCompanyGitLabConnector*.
* **GitLab Username**: GitLab username
* **Access Token** Paste your previously generated Access Token here.
* **GitLab HTTP URL**The web address for GitLab access, typically `https://gitlab.com` for GitLab's cloud service or a custom domain for self-hosted instances.
* **GitLab API URL** The endpoint for API calls, generally `https://gitlab.com/api/v4` for GitLab's cloud-hosted users.
4. Click **Create**.
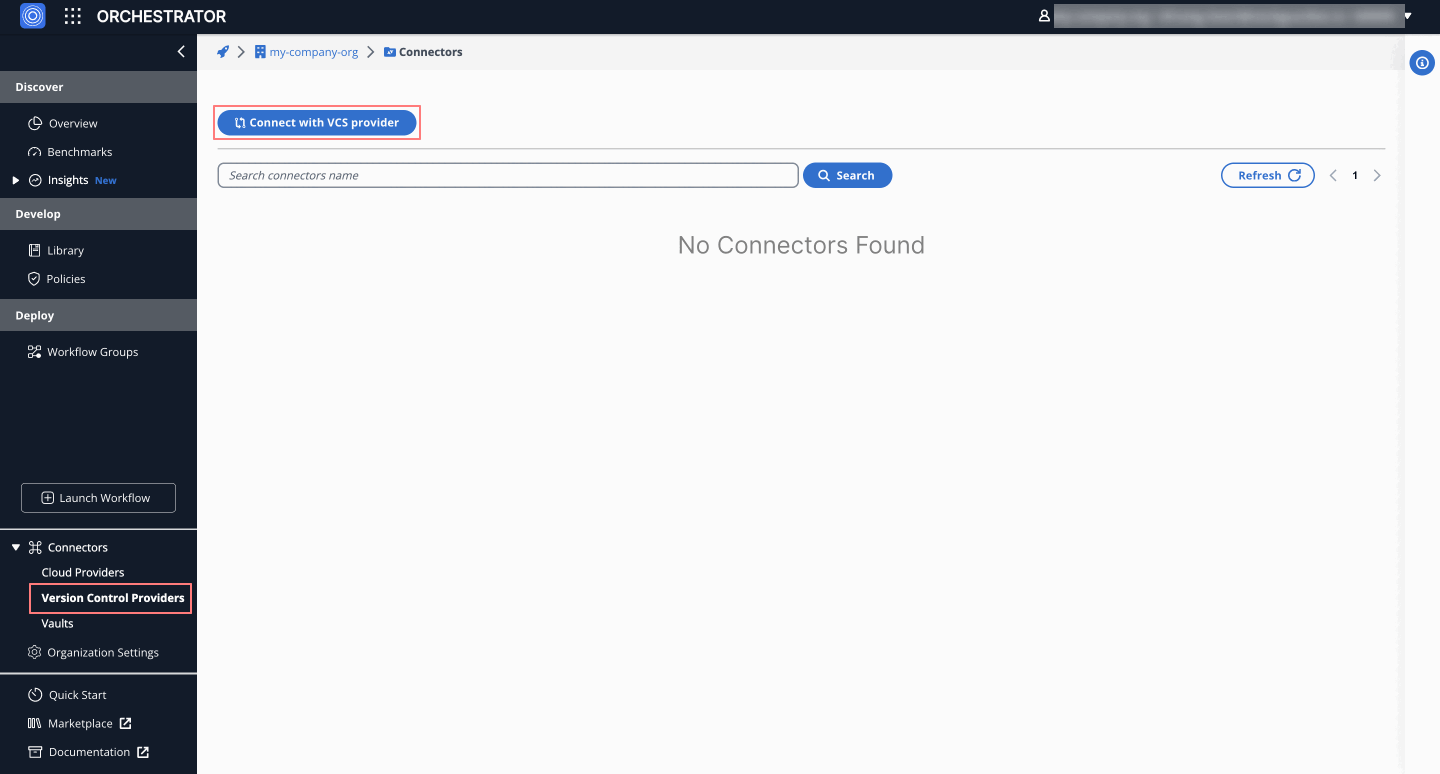
You can configure VCS triggers to automatically run workflows in response to GitLab events such as pushes, pull requests, and tag creation. See [Workflow triggers](/docs/deploy/workflows/workflow-triggers/).
---
# Overview
The **Deploy > Overview** tab in StackGuardian streamlines the deployment of cloud resources, providing a centralized dashboard for managing workflows and stacks efficiently.
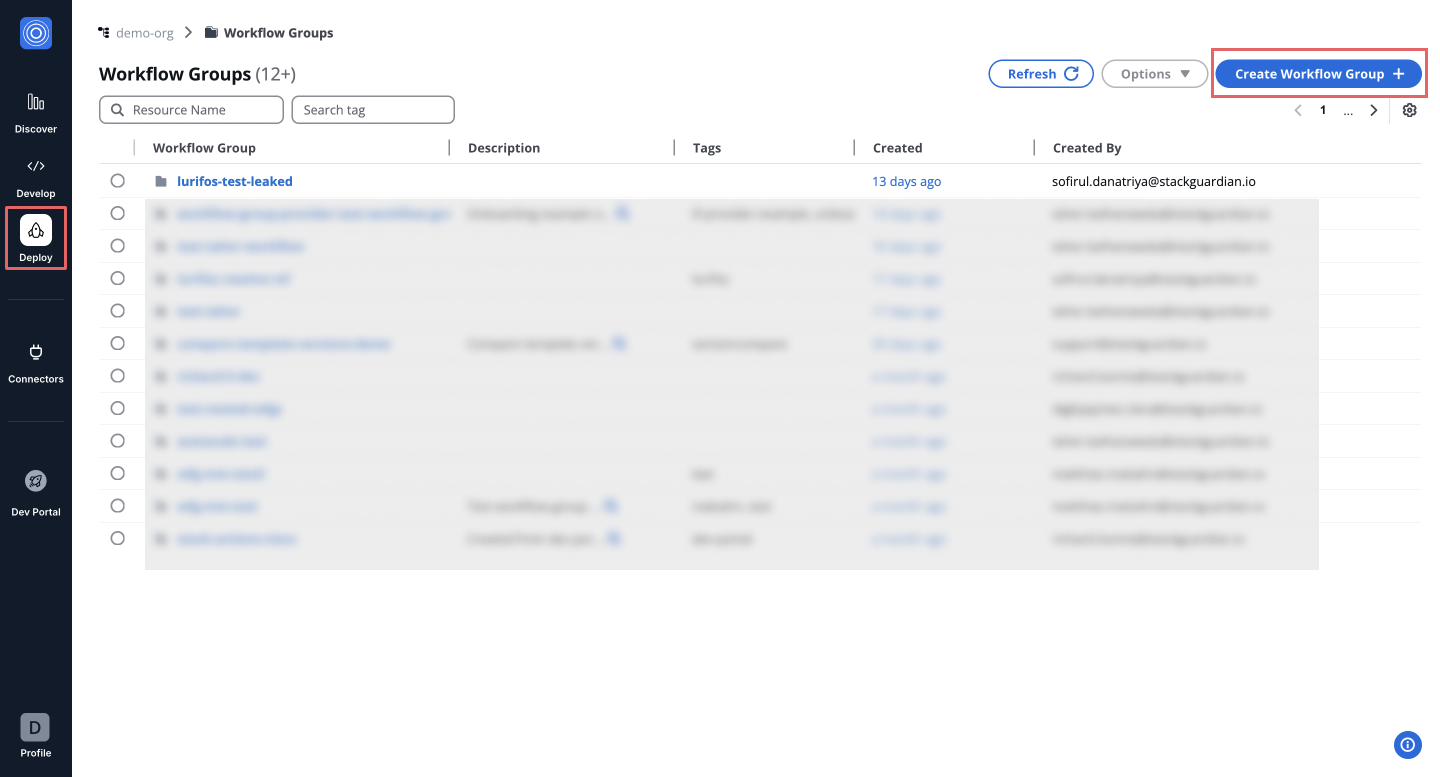
The **Deploy** tab features:
* **Workflow Groups and Workflows**: Centralize your workflows into groups for better organization and access control, ensuring teams and divisions can manage their workflows effectively. Learn more about setting up workflow groups in the [**Workflow Groups Guide**](/docs/deploy/workflows/workflow_groups/).
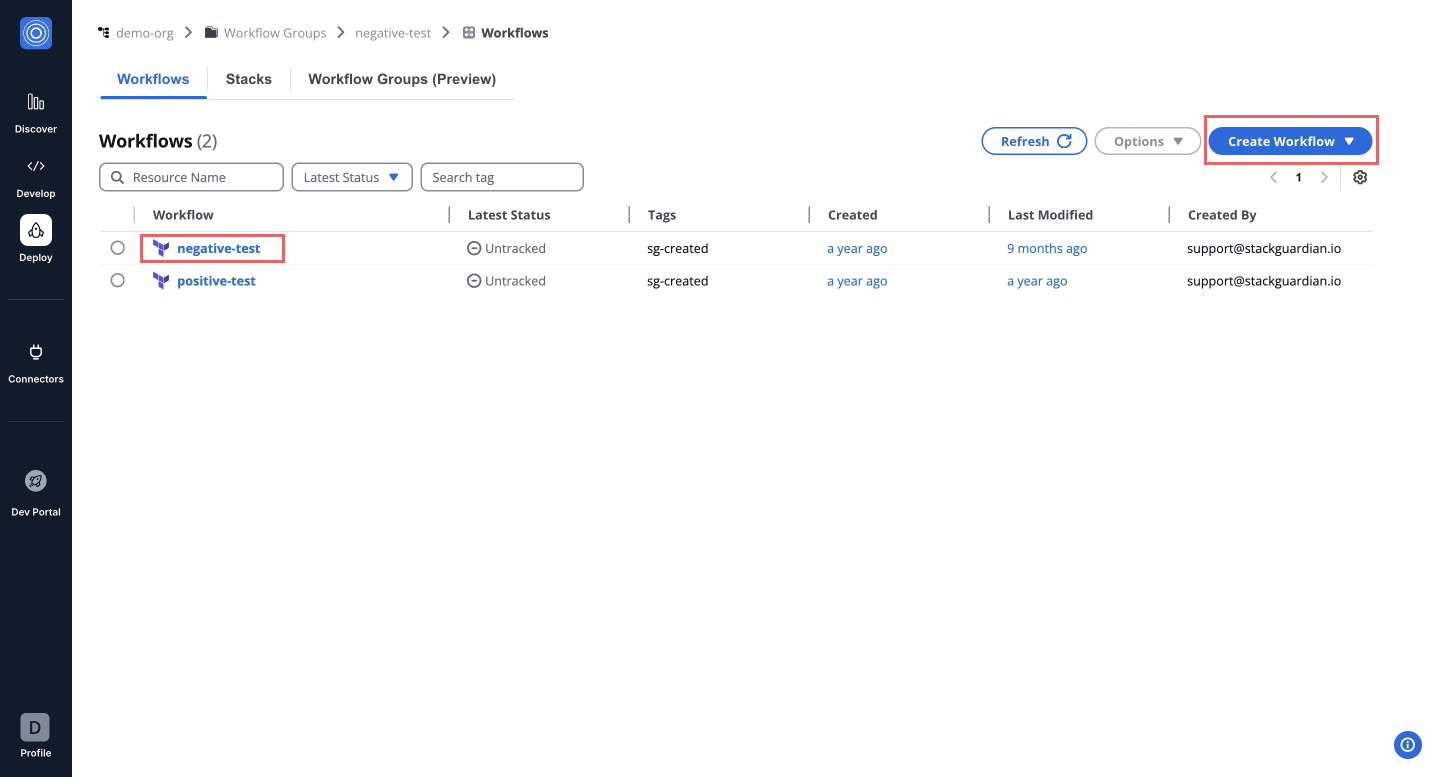
* **Stacks**: Define and manage stacks that bundle workflows into executable sets, promoting reuse and enabling sequential execution where each workflow's output feeds into the next. For comprehensive stack management, see the [**Stacks Guide**](/docs/deploy/stack/overview/).
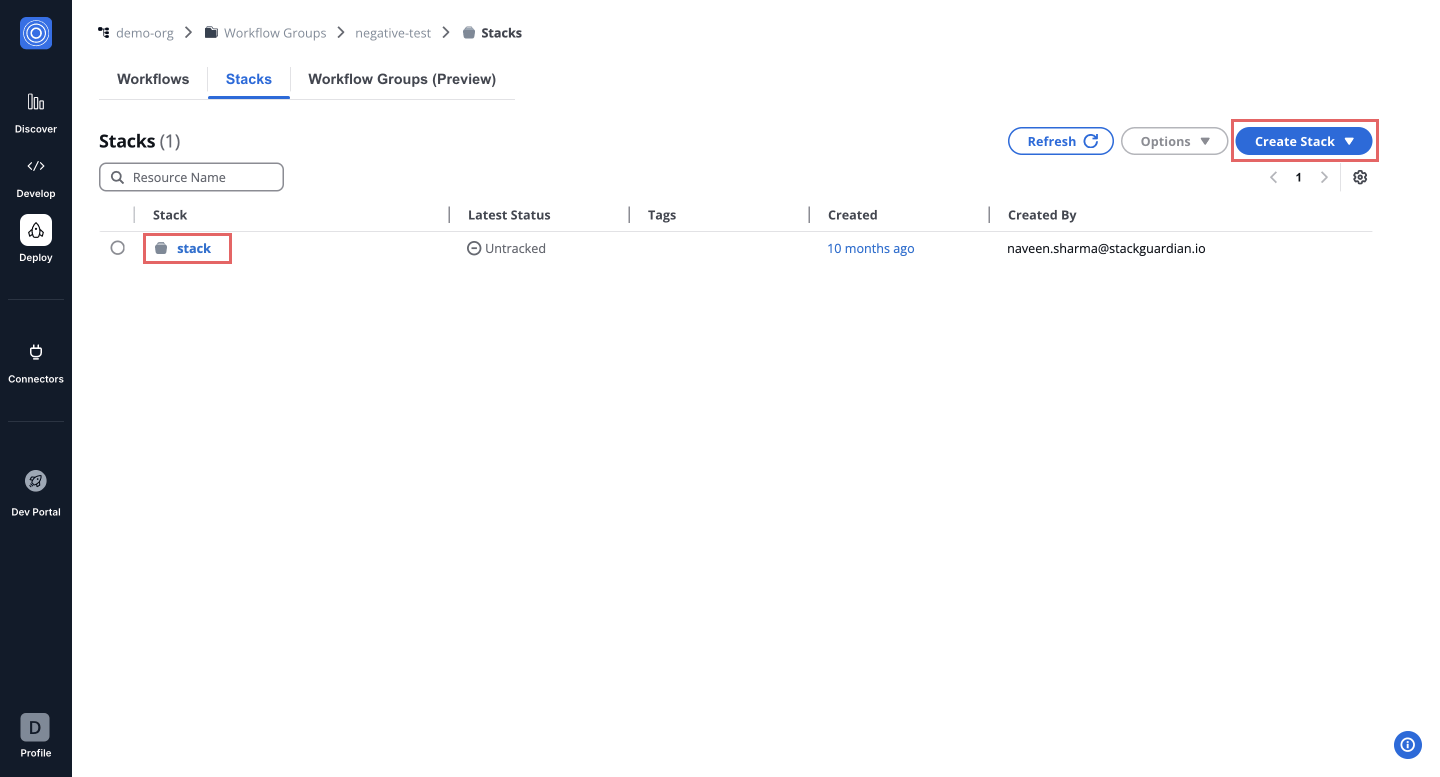
* **Reference Variables**: Facilitate data flow between IaC components by using reference variables to pass outputs as inputs across workflows and stacks, ensuring cohesion and modularity. Details are available in the [**Reference Variables Guide**](/docs/deploy/workflows/workflow_components/reference_variables/).
---
# Stack
Stacks enable you to organize and execute multiple related workflows in a defined sequence. These workflows are designed to work together, where the **output** of one workflow is automatically passed as the **input** for the next. This structure ensures efficient, automated, and interconnected deployment processes across various projects and environments.
### How Stacks Work[](#how-stacks-work "Direct link to How Stacks Work")
Stacks run workflows in a specific, step-by-step order to achieve seamless integration. Here’s how they operate:
1. **Sequential Execution**: Workflows are executed one after another in a predefined order, ensuring smooth transitions between tasks.
2. **Default Actions**: Each stack includes default **Create** and **Destroy** actions for deployment and cleanup, which you can customize as needed.
3. **Output Chaining**: The output from one workflow is automatically used as input for the next workflow, eliminating manual intervention and ensuring continuity.
### Stacks vs. Workflow Groups[](#stacks-vs-workflow-groups "Direct link to Stacks vs. Workflow Groups")
While both stacks and workflow groups help manage workflows, they serve different purposes:
* **Stacks**:
* Designed for workflows that depend on each other.
* Maintain a specific order of execution.
* Ideal for scenarios requiring interdependent resources (e.g., deploying a VPC, EKS cluster, and managed nodes sequentially).
* **Workflow Groups**:
* Collections of independent workflows that do not rely on each other.
* No predefined execution order.
* Useful for managing workflows without dependencies, like testing different infrastructure setups.
### Example Scenarios[](#example-scenarios "Direct link to Example Scenarios")
* **Stack**: Deploying a web application in a sequence:
1. Create a Virtual Private Cloud (VPC).
2. Deploy a Kubernetes cluster in the VPC.
3. Add managed node groups to the cluster.
4. Deploy an Nginx service on the cluster.
* **Workflow Group**: Independently managing resources:
1. Deploying a database in one workflow.
2. Testing a web server in another workflow.
3. Each workflow runs separately, without dependency on the others.
---
# Meta
The **Meta** tab displays key metadata associated with the stack.
This information helps users understand how the stack was created, configured, and tagged, and provides traceability across teams and environments.
***

### **1. Metadata Fields**[](#1-metadata-fields "Direct link to 1-metadata-fields")
The following fields are shown:
| Field | Description |
| ------------------------------ | ------------------------------------------------------------------------------------------- |
| **Creator** | The user who originally created the stack |
| **Created On** | The date the stack was created |
| **Resource Type** | Identifies the type of resource represented by the stack (e.g., `IAC_GROUP`) |
| **Source Config Kind** | Indicates the configuration source (e.g., `MIXED`, repository-based, uploaded schema, etc.) |
| **Git Sparse Checkout Config** | Path configuration used when working with partial Git repository checkouts |
| **Stack Tags** | User-defined tags applied to the stack for organization and search |
| **Context Tags** | Tags used to define or override context values during stack execution |
All read-only fields appear disabled. Editable fields allow modification depending on user permissions.
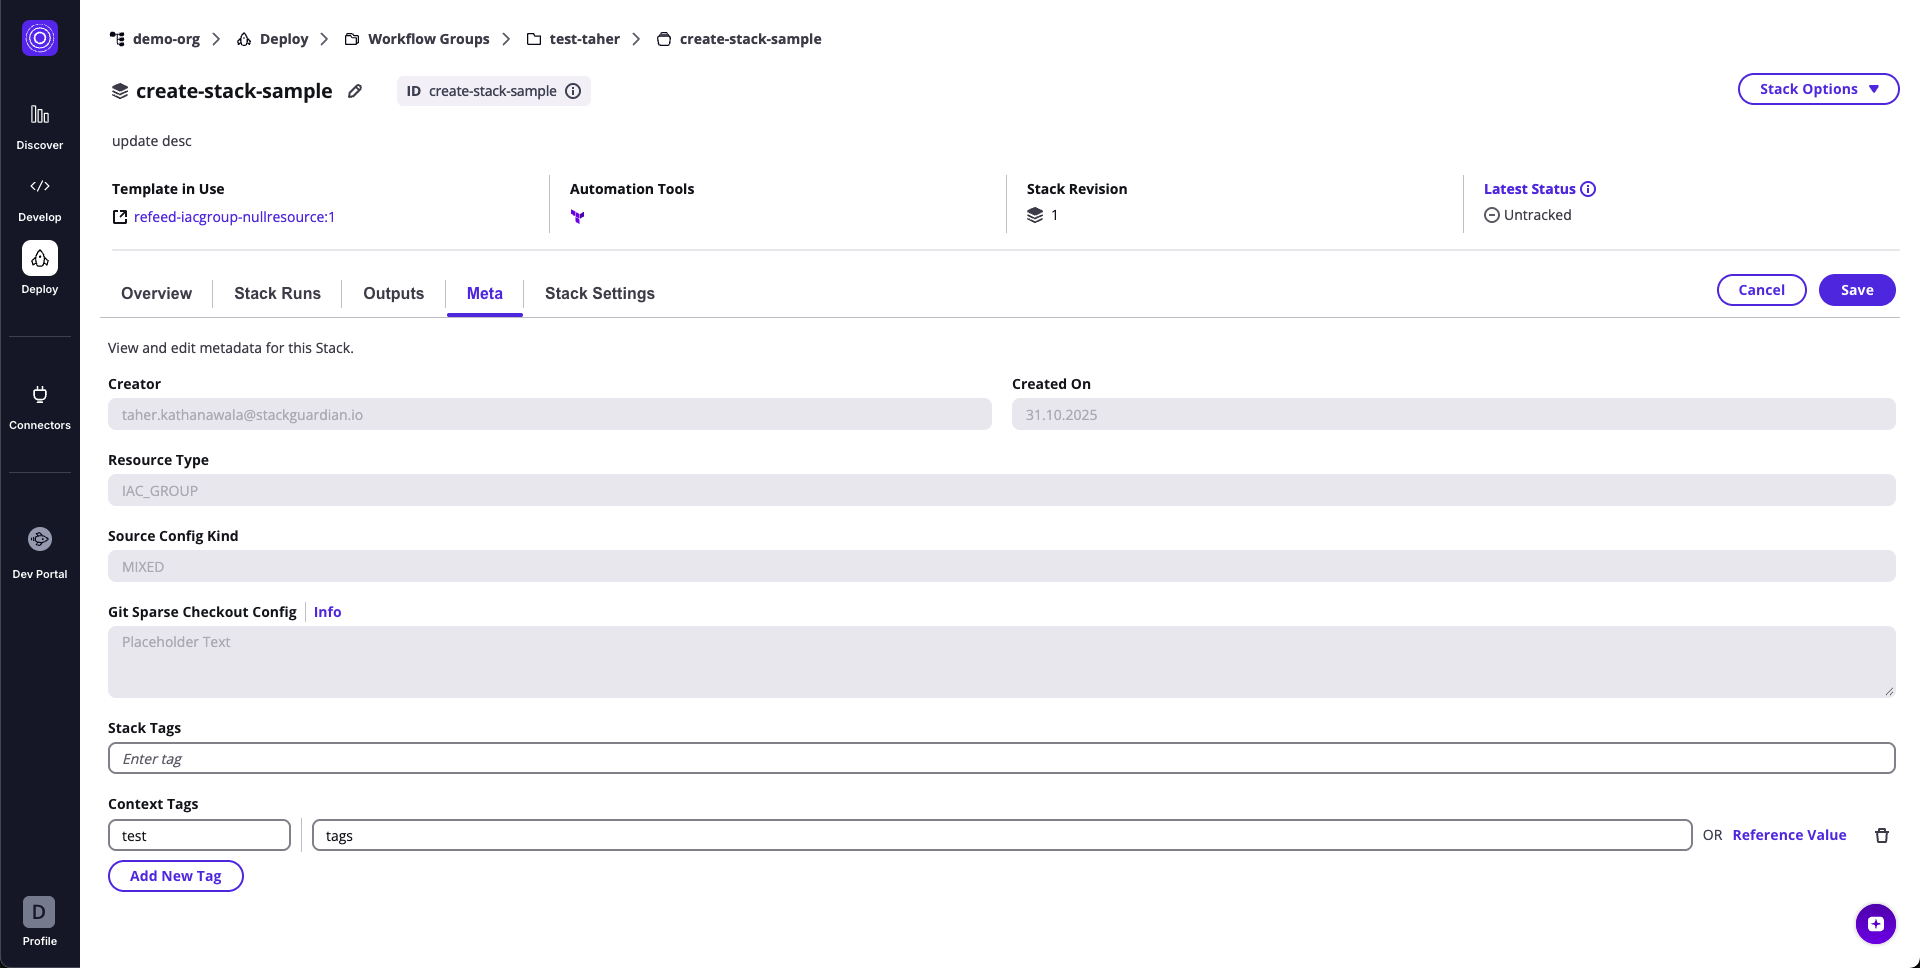
---
# Outputs
The **Outputs** tab provides visibility into all output variables generated by the workflows inside a stack. Because a stack may contain multiple workflows, outputs are grouped by workflow, allowing users to easily browse, filter, and consume results across interconnected automations.
Stack outputs are commonly used to pass data between workflows inside the stack, link multiple automation stages together, or expose deployment results to external systems.
***
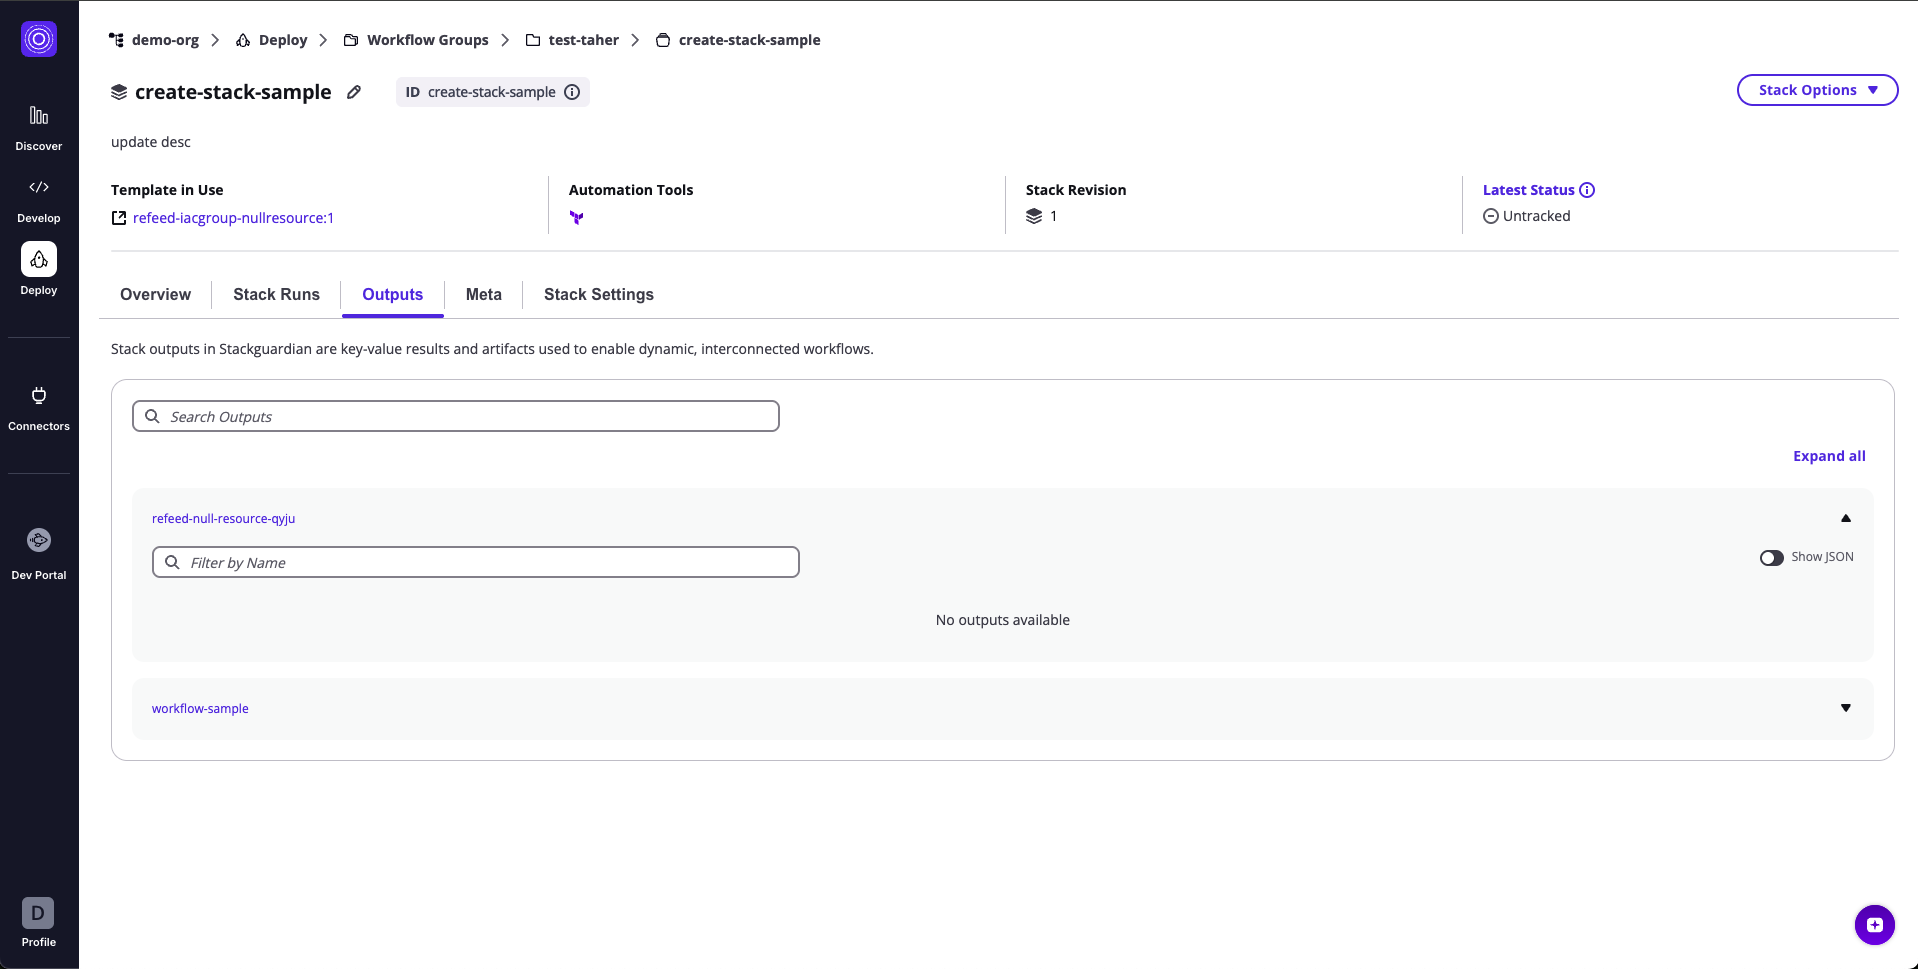
### **1. Output Groups & Variables**[](#1-output-groups--variables "Direct link to 1-output-groups--variables")
All stack outputs are displayed as **grouped sections**, where each group corresponds to a workflow that produced outputs.
Each group can be expanded to view its individual output variables.
### **Each output variable shows:**[](#each-output-variable-shows "Direct link to each-output-variable-shows")
| Field | Description |
| --------- | ------------------------------------------------------------------------------------ |
| **Name** | The output variable name defined within the workflow or underlying IaC configuration |
| **Value** | The actual returned value from the workflow run |
Additional actions:
* **Expand/Collapse arrow** – Open or hide a workflow's output group
* **Search bar** – Filter output groups by name
* **Filter by Name** (inside a group) – Quickly filter variables within a workflow's outputs
* **Show JSON toggle** – View raw JSON for the selected workflow's outputs
Output groups make it easy to understand which workflow produced which values and how they can be chained across automation steps.
***
### **2. JSON View**[](#2-json-view "Direct link to 2-json-view")
When **Show JSON** is enabled inside an output group:
* The workflow outputs are shown in their full raw JSON structure
* Nested objects and complex output types are displayed exactly as generated
* Sensitive values remain masked according to platform rules
The JSON view is ideal for programmatic integrations or copying structured data directly into other workflows or systems.
---
# Overview
The **Overview** tab provides insight into the **Workflow or Stack**'s compliance, cost estimation and managed resources.
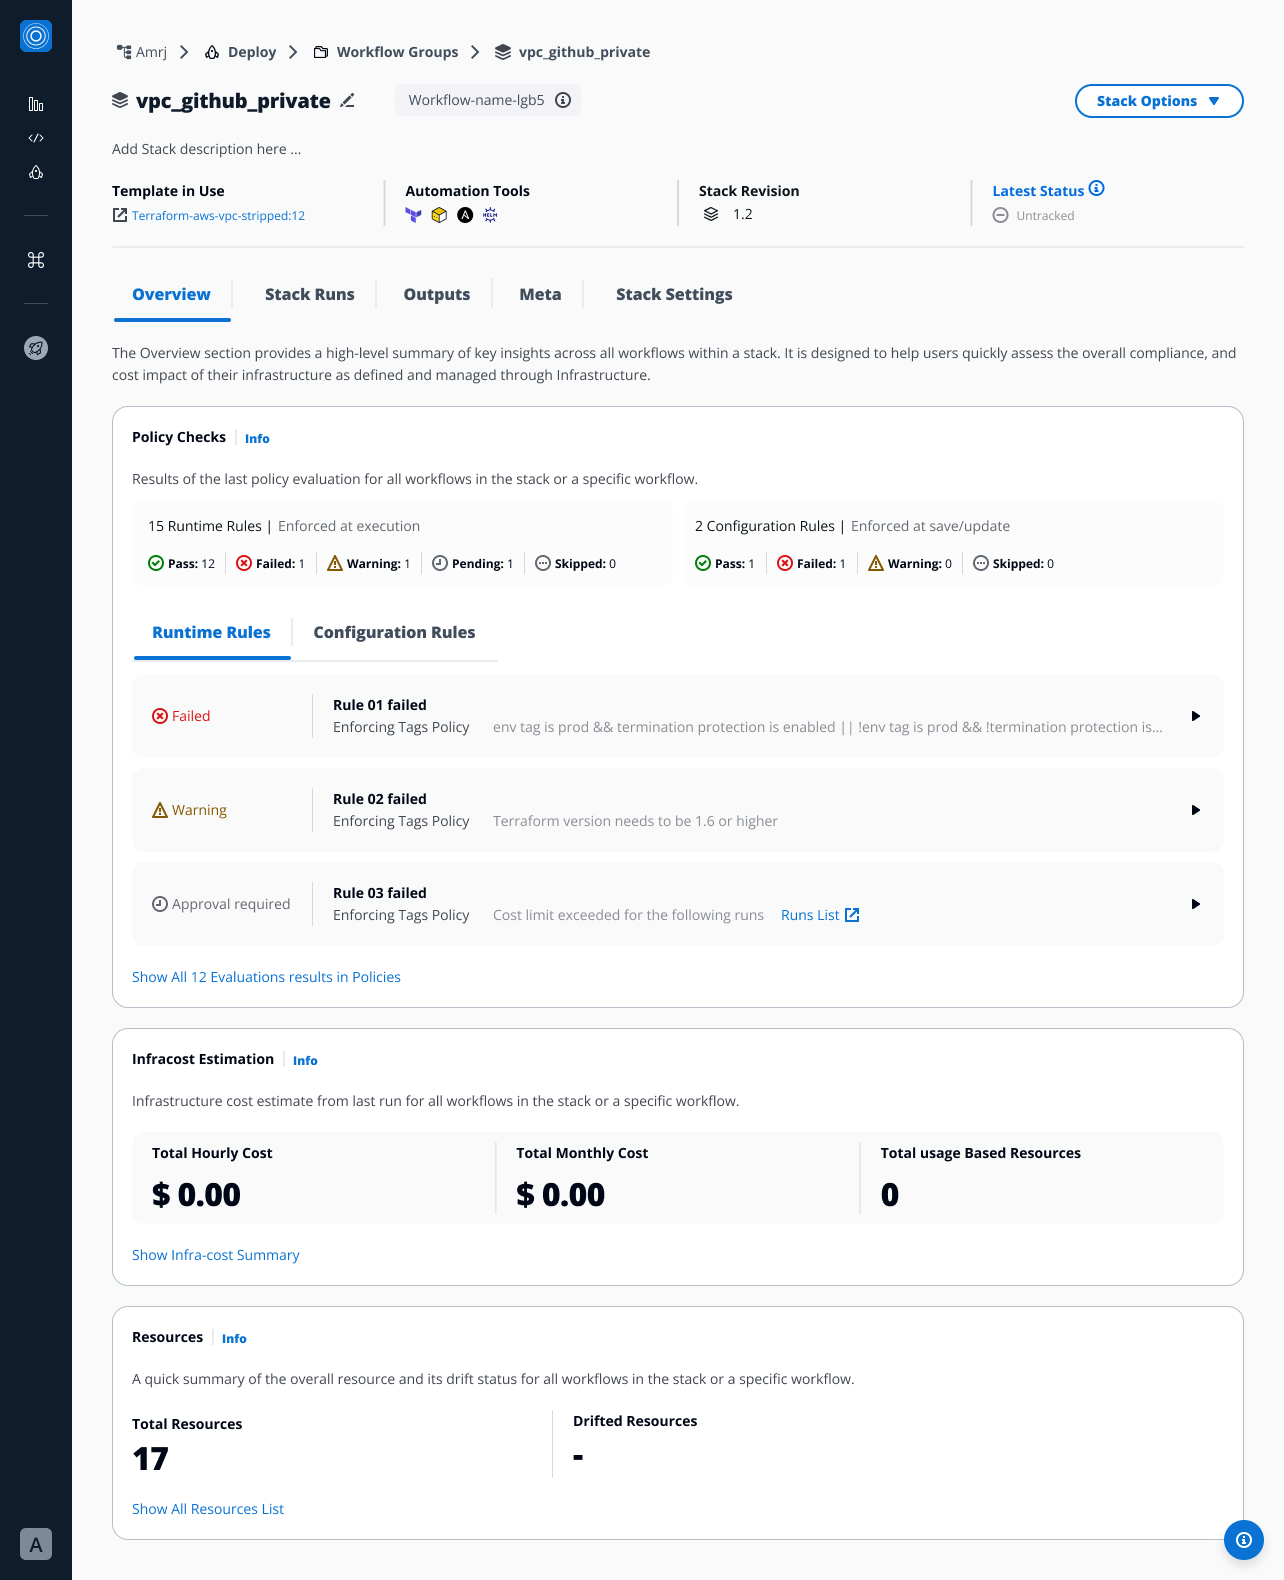
***
## 1. Policy Checks[](#1-policy-checks "Direct link to 1. Policy Checks")
### Overview[](#overview "Direct link to Overview")
The **Policy Checks** feature provides organizations with a centralized, transparent way to **enforce compliance and governance controls** across **Workflows and Stacks**.
Each **Policy Checks** are located inside the Overview tab, this feature helps teams validate actions, configurations, and runtime executions against predefined **policy rules**.
The design emphasizes **clarity, automation, and traceability**, ensuring that both configuration-time and runtime evaluations are easy to understand, monitor, and manage.
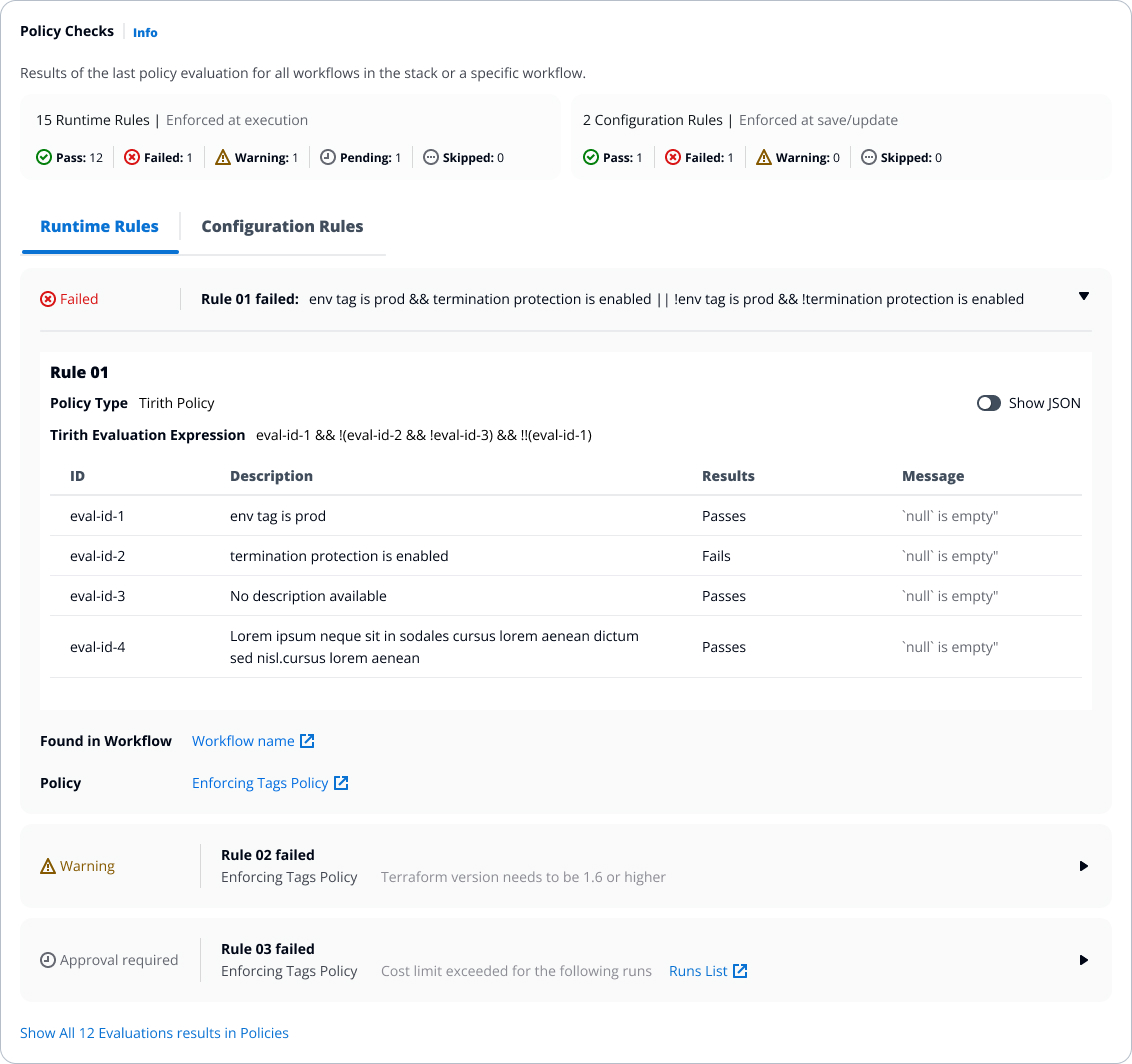
***
### Key Features[](#key-features "Direct link to Key Features")
### **Policy Rule Types**[](#policy-rule-types "Direct link to policy-rule-types")
Policy Checks are divided into two categories:
* **Runtime Rules** – Enforced **during Workflow or Stack execution**.
These validations run when a **Workflow or Stack** is executed, ensuring security and compliance in real time.
* **Configuration Rules** – Enforced **at configuration level**, when a **Workflow or Stack** is **created, saved, or updated**.
Defined when the policy provider references a **SG Workflow/Stack(JSON)** provider.
If both types of rules exist, they are displayed under two separate tabs — **Runtime Rules** and **Configuration Rules**.
If only one type is available, the interface automatically adjusts to show just that set.
### Rule Cards and Status[](#rule-cards-and-status "Direct link to Rule Cards and Status")
Each rule appears as a **collapsible card**, showing:
* **Policy Rule name**
* **Associated Policy**
* **Policy description**
* **Status**
Expanding a card reveals more details about evaluation results once the policy has run.
If the rule applies to a **Stack**, the evaluation may include results across **multiple workflows** contained within that Stack.
Statuses include:
* **Pass** – The policy rule was successfully validated and met all defined conditions. No further action is required.
* **Fail** – The policy rule did not meet the defined conditions and was rejected. Depending on the setup, the **workflow, stack, or configuration** may be blocked.
* **Warning** – The rule triggered a cautionary condition but did not block execution or save. It highlights potential issues that should be reviewed.
* **Pending** – The rule requires explicit approval before proceeding. This occurs when a policy action is set to *Approval Required*. Approvals can only be made during **Workflow or Stack Runs**.
* **Skipped** – Intentionally marked to be bypassed during evaluation. It exists and was processed, but its results are not enforced or counted.
* **Unevaluated** - The policy rule has not yet been checked. This state appears when no configuration change or execution has occurred since the rule was added.
> **Note:**
>
> * **Runtime Rule results** appear *only after the Workflow or Stack has been executed*.
>
> * **Configuration Rules** are evaluated upon saving, and their results are displayed right after the configuration is saved.
### Approval Behavior[](#approval-behavior "Direct link to Approval Behavior")
When a rule action is set to **Approval Required**, approvals can only be granted **during Workflow or Stack Runs**.
Configuration updates cannot be approved directly, even if a Configuration Rule requests approval, it will only apply during **Workflow/Stack** runs.
***
### Notes from Developers[](#notes-from-developers "Direct link to Notes from Developers")
* **Runtime Rules** → evaluated dynamically during **Workflow or Stack** run execution.
* **Configuration Rules** → evaluated immediately at save or update time.
* **Approvals** → only available during **Workflow or Stack** Runs; not supported during settings or metadata edits.
* **Status visibility** → updated only after at least one execution.
* **Tabs** → displayed dynamically based on rule presence (both or single type).
* **Actions supported:** `Pass`, `Fail`, `Warn`, `Approval Required`, `Unevaluated`.
***
## 2. Infracost Estimation[](#2-infracost-estimation "Direct link to 2. Infracost Estimation")
Estimates the cost of infrastructure changes before deployment.
For **Stacks**, this reflects the **aggregated cost estimation across all workflows** included in the Stack.
* Displays **estimated hourly and monthly cost** based on detected resources.
* Highlights **differences** between the current and previous runs.
* Shows:
* Total Estimated Cost
* Cost change compared to last run
* Breakdown by resource or service
* By default the on-demand cost per resource is shown
* When linking the infracost.io account to StackGuardian a custom discount or pricebook will be applied
This helps ensure cost visibility and control before applying infrastructure changes for both **Workflows and Stacks**.
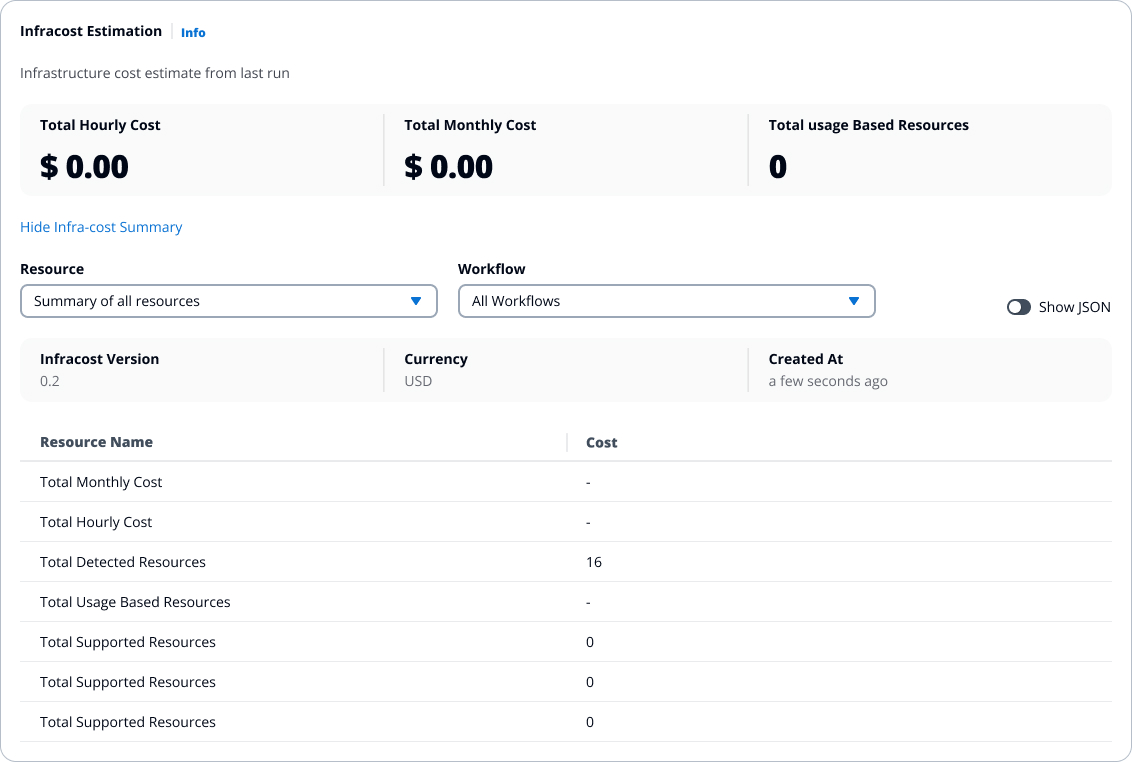
***
## 3. Resources[](#3-resources "Direct link to 3. Resources")
Lists all resources managed or created by the **Workflow or Stack**.
For a **Stack**, resources managed by any of the workflows inside it are included.
* Displays **name**, **type**, **status**, and **cloud provider details**.
* Supports **search**, **filter**, and **sort** functions.
* Clicking a resource reveals details such as:
* Resource ID and type
* Provider
* Lifecycle state (created, updated, deleted)
* Cloud console link (if available)
This section provides an instant view of what infrastructure the **Workflow or Stack** manages.

---
# Runs
The **Runs** tab lists all **stack executions (runs)** and their statuses.
In the collapsed view, each row represents a **single Stack Run**.
Expanding a Stack Run reveals the **workflow runs** that were executed inside that stack.
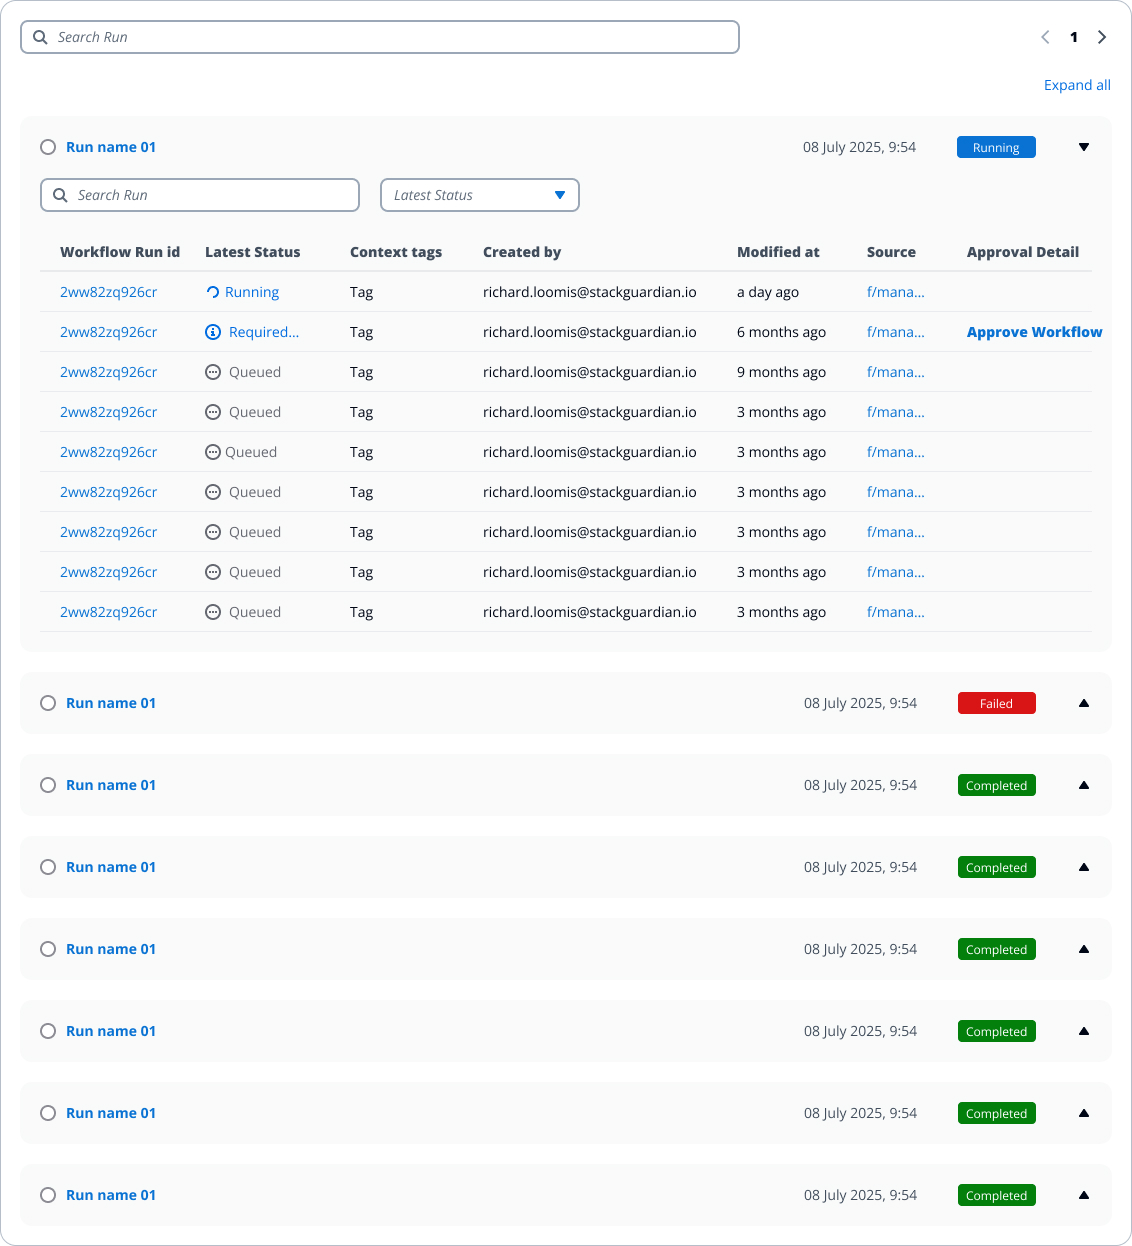
***
### **1. Runs List**[](#1-runs-list "Direct link to 1-runs-list")
Displays a list of all **stack runs**.
Each run entry shows:
* Run ID and trigger source (manual, scheduled, API)
* Latest status (Queued, Pending, In Progress, Running, Succeeded, Failed)
* Context tags
* Created by
* Modified at
* Source
* Approval detail
You can search by name and **filter** or **sort** runs by actions, status and context tags.
When the Stack Run is **collapsed**, only the Stack Run ID, status, and timestamps are shown (as in the screenshot).
When the Stack Run is **expanded**, the list displays the **Workflow Run Id**, **Latest Status**, **Context tags**, **Created by**, **Modified at**, and **Approval Detail** for each workflow run included in that Stack Run.

***
### **2. Run Details View**[](#2-run-details-view "Direct link to 2-run-details-view")
Clicking a run opens a detailed execution view that includes:
* **Logs**
* **Errors**
* **Compare parameters**
* **Parameters**
* **Compliance Checks**
* **Infracost Estimation**
* **Plan**
* **Provisioned Resources**
* **Comments**
For Stack runs, this detailed view also includes all associated **workflow runs** and their execution details.
This section helps users analyze executions, review outcomes and troubleshoot issues effectively.
---
# Settings
## Overview[](#overview "Direct link to Overview")
The **Stack Settings** tab provides configuration and management options related to the workflows contained in the stack.
It lists all workflows included in the stack and provides insight into their status and metadata.
This section will evolve to include additional configuration categories such as **Actions**, **Permissions**, or **Execution Rules**.
## **1. Workflows**[](#1-workflows "Direct link to 1-workflows")
The **Workflows** section displays all workflows associated with the stack. These workflows are the building blocks of the stack's execution logic.
Each row shows:
| Column | Description |
| -------------------- | ----------------------------------------------------------------------------------------- |
| **Workflow** | Name of the workflow included in the stack |
| **Latest Status** | Latest run status for that workflow (e.g., `Untracked`, `Running`, `Failed`, `Succeeded`) |
| **Tags** | Workflow-level tags, if defined |
| **Added at** | When the workflow was added to the stack |
| **Last modified at** | Timestamp for the workflow's last update |
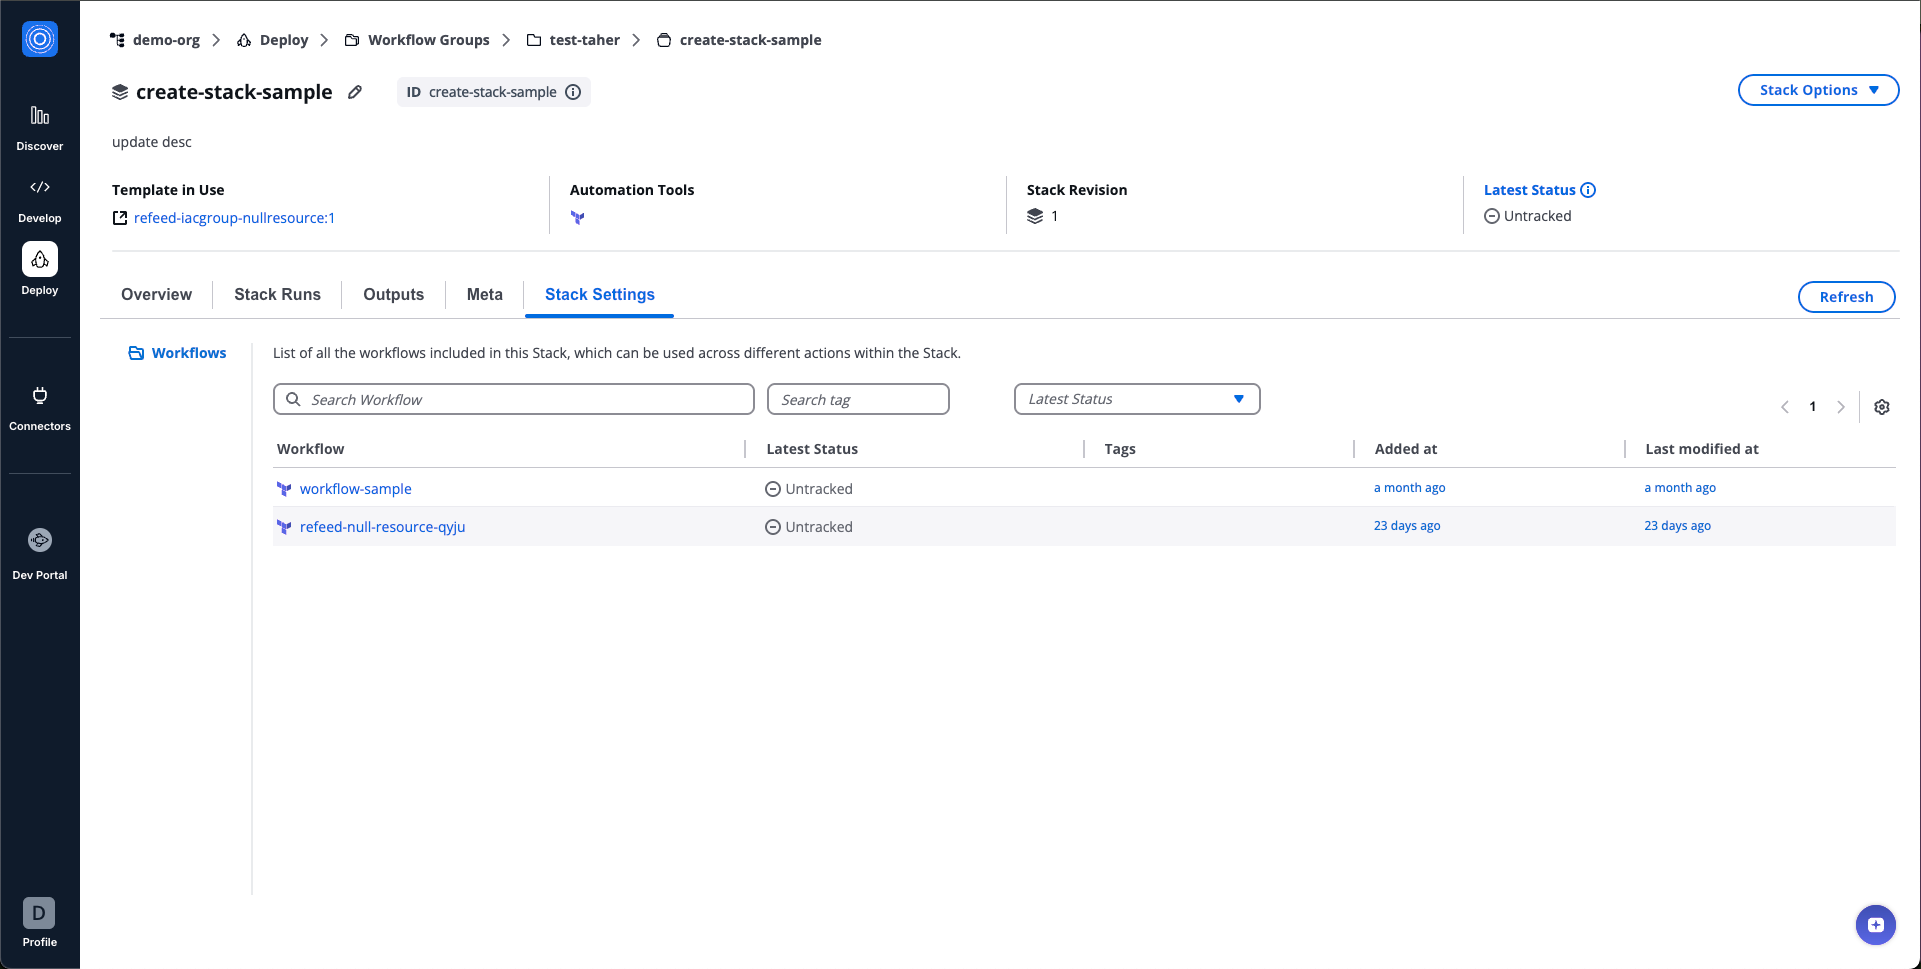
*Stack Settings Workflows*
## **2. Actions**[](#2-actions "Direct link to 2-actions")
Actions define how StackGuardian executes operations on your Stack. Each action represents a specific task, such as planning changes, creating resources, or running maintenance operations, and determines which Workflows run and in what order.
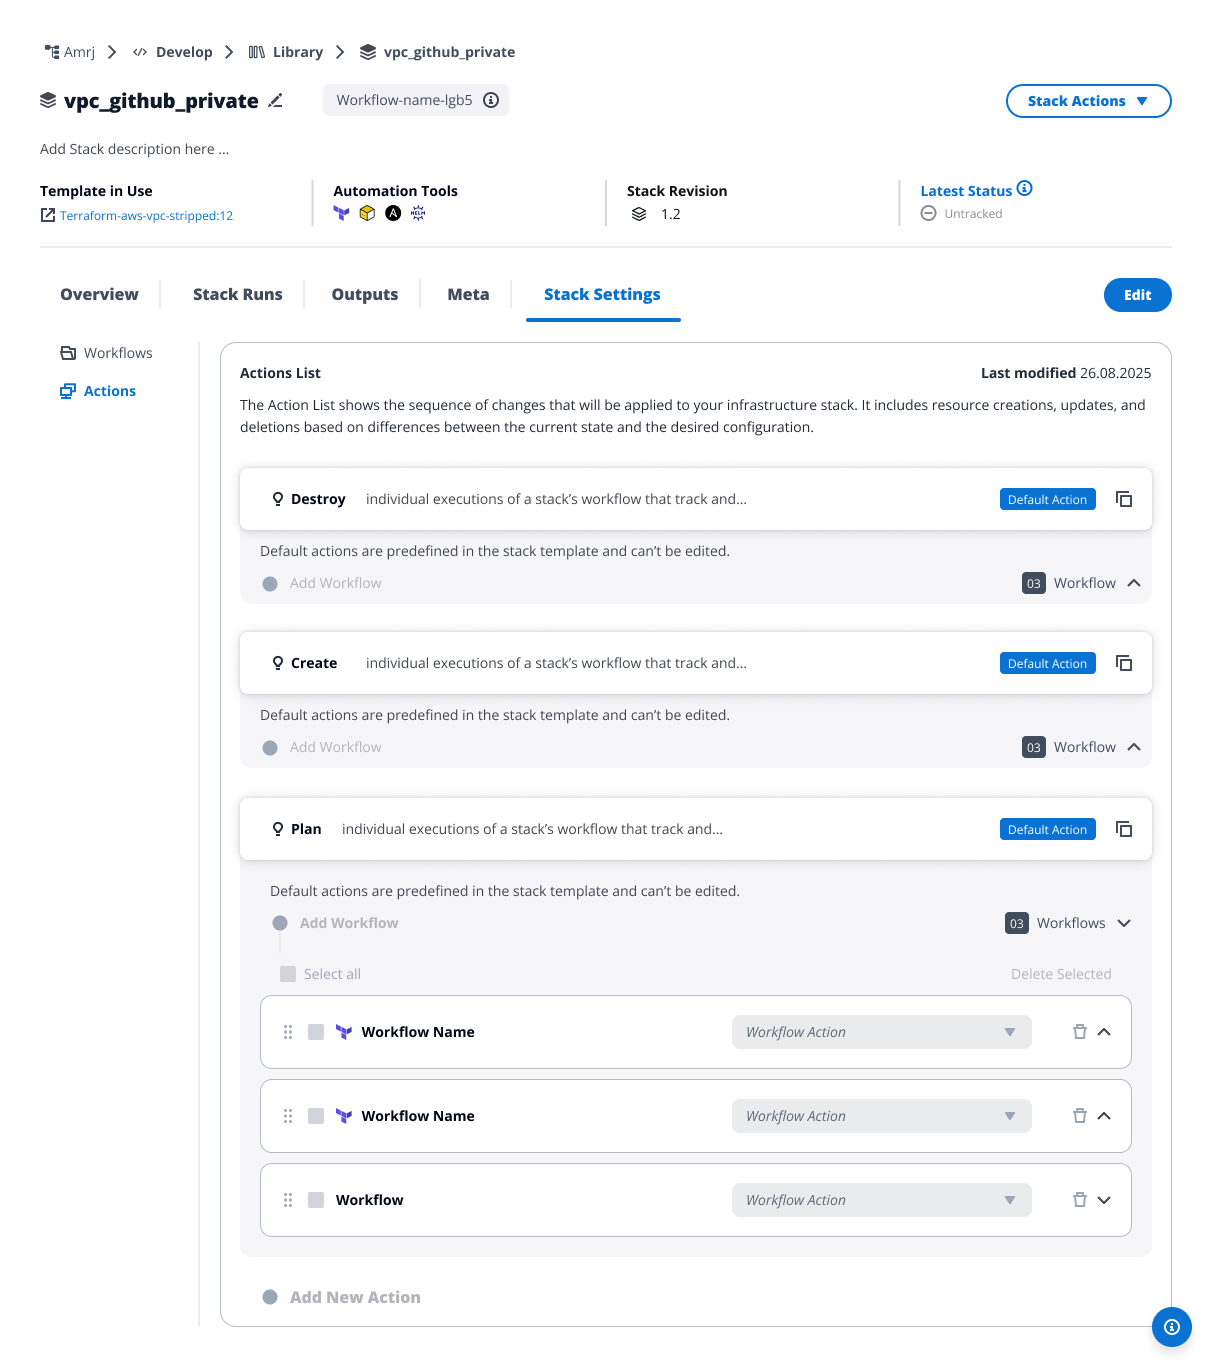
*Stack Actions*
### How Actions work[](#how-actions-work "Direct link to How Actions work")
When you run an action, StackGuardian executes the associated Workflows in the order you've defined. Each Workflow in the action can run with specific configuration overrides, allowing you to use the same Workflow for different purposes (like planning vs. deploying infrastructure).
Actions exist at two levels:
### **Template level**[](#template-level "Direct link to template-level")
Platform engineers define actions in Stack templates. This is where you:
* Select and configure all available Workflows
* Define default actions (Plan, Create, Destroy) for Terraform/OpenTofu workflows
* Add custom actions for Custom workflows
* Set baseline configurations for all Stacks created from this template
### **Stack level**[](#stack-level "Direct link to stack-level")
End users work with Stacks created from templates. At this level you can:
* Run actions defined in the template
* Add custom actions using existing Workflows
* Override deployment environment settings for Workflows
* Copy default actions to create customized versions
The template establishes what's possible; the Stack implements it for specific infrastructure instances.
### Default and Custom Actions[](#default-and-custom-actions "Direct link to Default and Custom Actions")
Stacks include two types of actions:
#### Default Actions[](#default-actions "Direct link to Default Actions")
Default Actions appear with a "Default Action" badge and come from your Stack template configuration.
**For Terraform and OpenTofu templates:**
* **Plan** - Preview infrastructure changes before applying them
* **Create** - Deploy or update your infrastructure
* **Destroy** - Remove infrastructure resources
These three actions are standard for Terraform/OpenTofu and match their conventions.
**For custom workflow types:** The platform provides Plan, Create, and Destroy actions by default, but at the template level you can remove any or all of them and create actions that match your infrastructure needs. For example, you might replace "Destroy" with "Delete" or "Uninstall."
**Default actions at the Stack level:**
* Cannot be edited directly
* Cannot be removed
* Can be copied to create editable versions
* Automatically reflect the template configuration
To modify default actions permanently, update the Stack template and publish a new revision.
#### Custom Actions[](#custom-actions "Direct link to Custom Actions")
**Custom Actions** are actions you create to handle specialized tasks. At the template level, platform engineers can create any custom action. At the Stack level, you can create custom actions but only using Workflows already defined in the template.
### Working with actions in templates[](#working-with-actions-in-templates "Direct link to Working with actions in templates")
At the template level, platform engineers have full control over action configuration.
#### Create actions in templates[](#create-actions-in-templates "Direct link to Create actions in templates")
To create actions at the template level:
1. Navigate to **Settings > Actions** in your stack template
2. For Terraform/OpenTofu templates, three default actions (Plan, Create, Destroy) appear automatically
3. For custom workflow types, remove unnecessary default actions and define your own
4. Select **Add New Action** to create custom actions
5. Configure the **Action Name** and **Description**
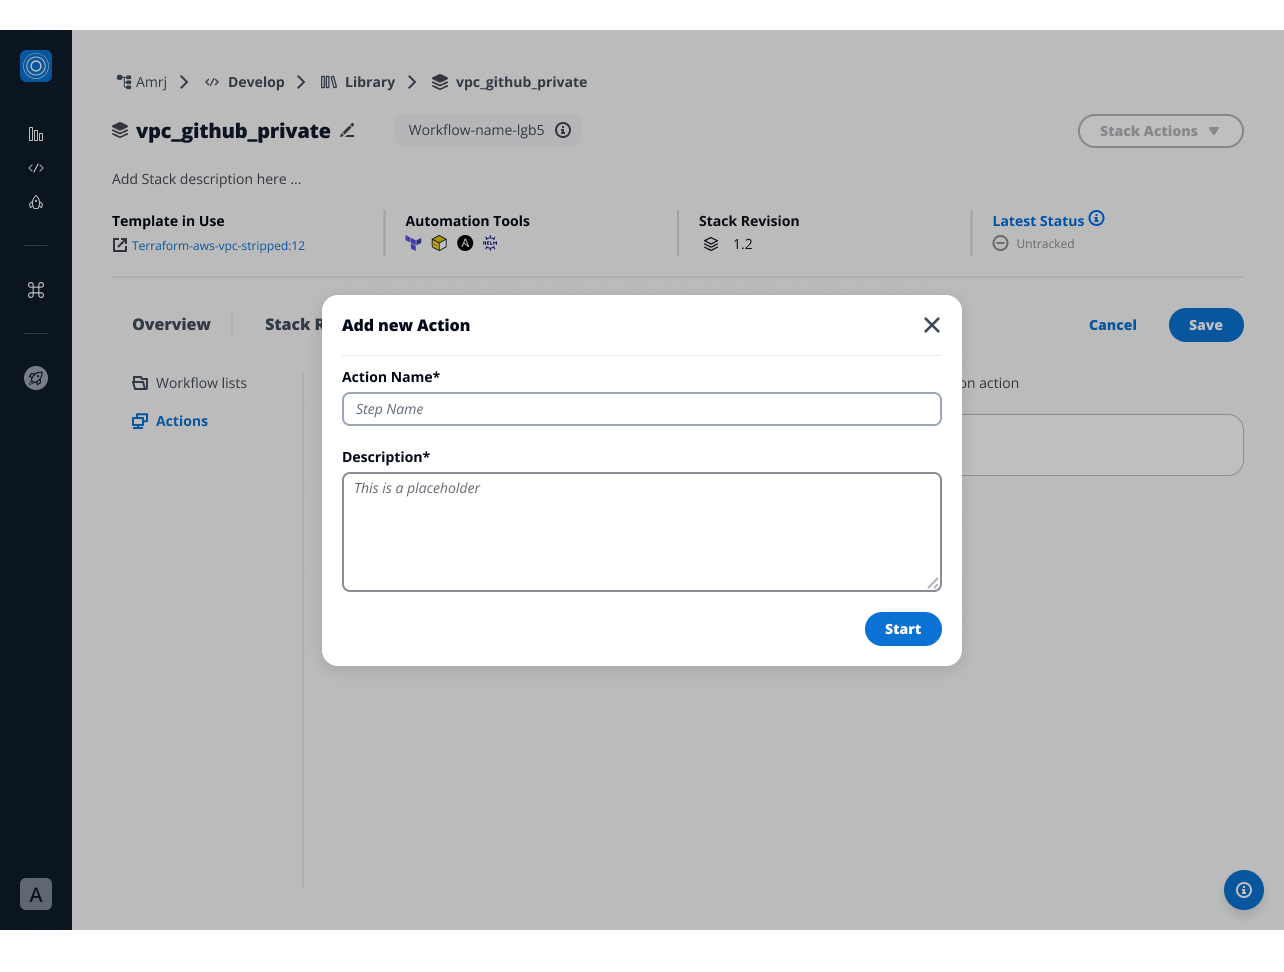
*Add new Stack Action*
6. Click **Add Workflow** to add workflows to the action
7. Set the execution order by dragging and dropping the workflows
8. For each Workflow in an action, you can configure:
* **Connector** - Select which cloud platform connector to use for this Workflow execution
* **Environment Variables** - Add or override environment variables exposed to the Workflow runtime. These variables:
* Supplement or replace the default environment variables
* Appear as key-value pairs
* Apply only when running this Workflow through this action
To configure deployment environment:
1. Expand the Workflow within your action
2. Under **Deployment Environment**, select a connector from the dropdown
3. To add environment variables:
1. Select **Add Environment Variable**
2. Enter the variable name and value
3. Repeat for additional variables
9. Save your changes
Template-level actions become the foundation for all Stacks created from this template revision.
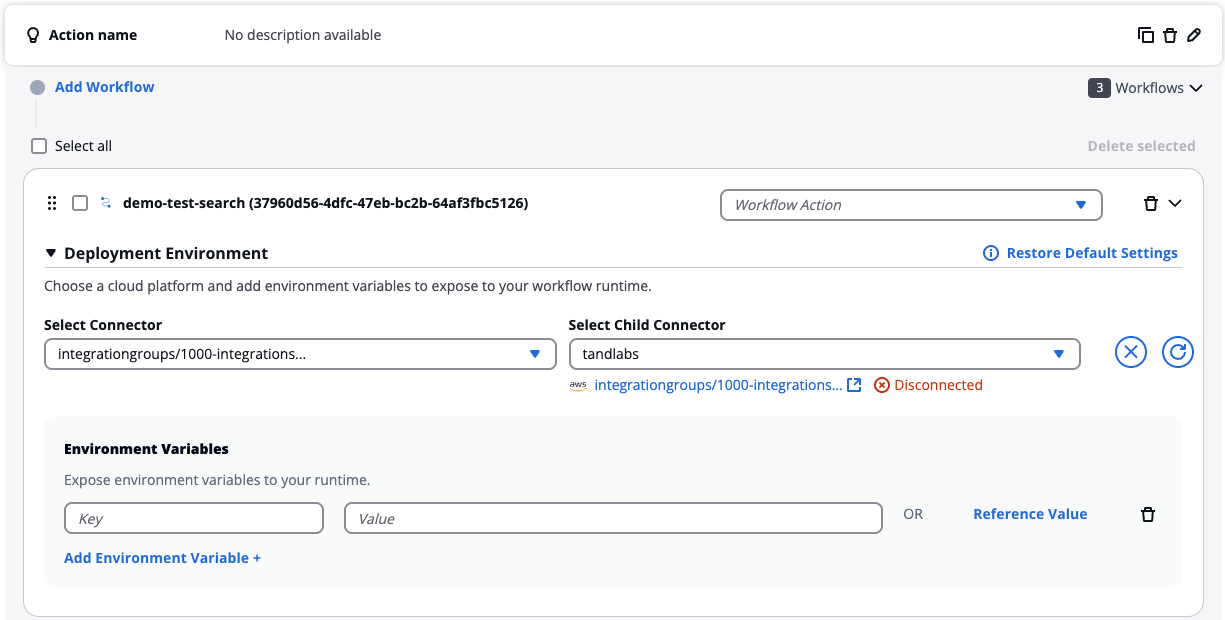
*Add Environment Variables*
### Add new action at Stack level[](#add-new-action-at-stack-level "Direct link to Add new action at Stack level")
You can create custom actions at the Stack level to extend capabilities beyond template-defined actions. However, you can only use Workflows that already exist in your Stack template.
After creating the action, add Workflows to define the specific operations to perform. Each action can include multiple Workflows that run sequentially. Use the drag handles to reorder them.
You cannot add new Workflows at the Stack level. If you need a Workflow that doesn't exist in your template, request that your platform team add it to the template and publish a new revision.
Custom actions appear in the Actions List alongside default actions. You can configure, edit, or remove custom actions at any time from the Stack Settings page.
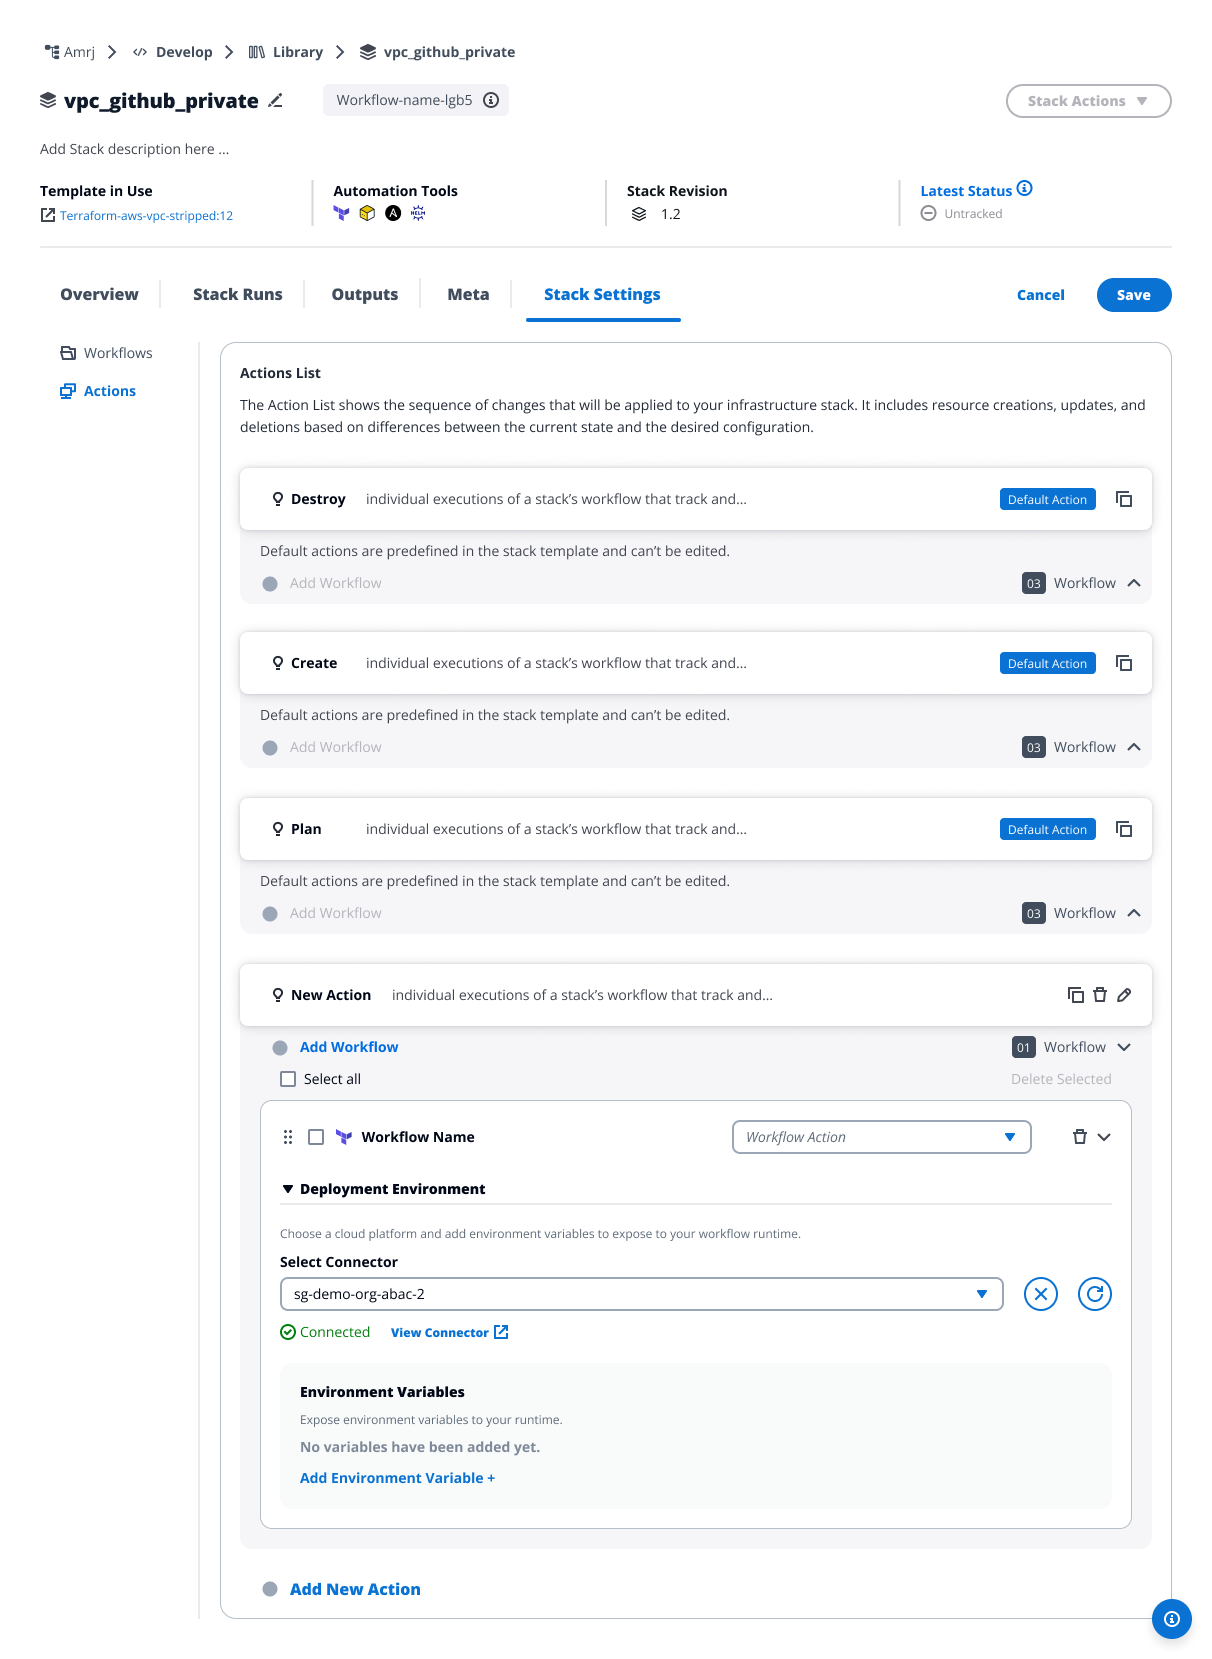
*New Stack Action with workflow*
info
You cannot add new Workflows at the Stack level. If you need a Workflow that doesn't exist in your template, request that your platform team add it to the template and publish a new revision.
#### Configure Deployment Environment[](#configure-deployment-environment "Direct link to Configure Deployment Environment")
At the Stack level, you can override **Deployment Environment** settings for Workflows within actions. This is the primary way to customize how Workflows run without editing the template.
Overridden settings show **Restore to default settings** option. Select this to revert to template-defined configurations.
#### Custom workflow step settings[](#custom-workflow-step-settings "Direct link to Custom workflow step settings")
For custom workflow types, you can also configure individual step settings beyond deployment environment variables.
These settings include:
* Command overrides for specific steps
* Step-specific parameters
* Execution options
Step settings appear when you expand a custom workflow that includes multiple steps.
warning
Changes to deployment environment settings affect only this Stack and only this specific action. The Workflow's default configuration in the template remains unchanged.
### Work with default actions[](#work-with-default-actions "Direct link to Work with default actions")
Default actions appear with a "Default Action" badge and have special restrictions at the Stack level.
#### View default action configuration[](#view-default-action-configuration "Direct link to View default action configuration")
To view a default action:
1. Navigate to **Stack Settings** > **Actions**
2. Locate the action marked "Default Action"
3. Expand the action to see included Workflows
At the Stack level, you cannot expand individual Workflows within default actions. To view detailed Workflow configuration, check the Stack template.
You can browse all settings but cannot modify default actions directly.
#### Copy default actions[](#copy-default-actions "Direct link to Copy default actions")
To create a customizable version of a default action:
1. Locate the default action you want to copy
2. Select the copy icon
3. A new action appears named "\[Original Name] (Copy)"
4. This copied action is fully editable
5. Modify the name, Workflows, and settings as needed
The copy is a custom action with no connection to the original default action. Changes to the template won't affect your copied version.
#### Template revision changes[](#template-revision-changes "Direct link to Template revision changes")
When you update a Stack to a new template revision:
* Default actions reflect the new template configuration
* Custom actions remain unchanged
* Workflow configurations may change if the template changed them
info
When working with draft template revisions, you'll see a warning: "Stack using draft revision - for testing only." Draft revisions can change at any time, so avoid using them for production Stacks.
### Modify or remove actions[](#modify-or-remove-actions "Direct link to Modify or remove actions")
You can fully manage custom actions at the Stack level.
#### Edit custom actions[](#edit-custom-actions "Direct link to Edit custom actions")
To edit a custom action:
1. Navigate to **Stack Settings** > **Actions**
2. Locate your custom action (actions without "Default Action" badge)
3. Select the edit icon to modify the action name or description
4. Or expand the action to:
* Add new Workflows
* Remove existing Workflows
* Reorder Workflows
* Configure deployment environment settings
5. Select **Save** to apply changes
#### Delete custom actions[](#delete-custom-actions "Direct link to Delete custom actions")
To remove a custom action:
1. Select the delete icon next to the custom action
2. Confirm the deletion in the dialog
You cannot delete default actions. To remove a default action, update the Stack template.
warning
You can only modify or remove custom actions created at the Stack level. Default actions from the template cannot be edited or removed.
Changes to custom actions affect only this Stack. To change default actions, update the Stack template and publish a new revision.
### Common questions[](#common-questions "Direct link to Common questions")
Why can't I edit this action?
If you see a "Default Action" badge, the action comes from your Stack template and cannot be edited at the Stack level. You have two options:
* Copy the action to create an editable version for this Stack
* Ask your platform team to update the template and publish a new revision
Why can't I add the Workflow I need?
Workflows must be defined in the Stack template first. You can only use Workflows that already exist in your template. Contact your platform team to add the Workflow to the template and publish a new revision.
I updated my template action. Why didn't my Stack change?
Stacks don't automatically update when templates change. To see the changes:
1. Navigate to your Stack
2. Update the Stack to use the new template revision
3. Default actions will reflect the new template configuration
Can I delete a custom action I created?
Yes, you can delete any custom action you created at the Stack level. Default actions from the template cannot be deleted.
---
# Global Section
These sections appear at the top of the stack page and remain consistent across all tabs.
***

### **1. Stack Header**[](#1-stack-header "Direct link to 1-stack-header")
Displays identifying information about the stack.
* **Stack Display Name & ID:**
* The display name can be edited inline.
* The ID is system-generated and cannot be changed.
* **Stack Description:**
* Editable text field used to describe the purpose, use case, or context of the stack and can be edited with the display name.
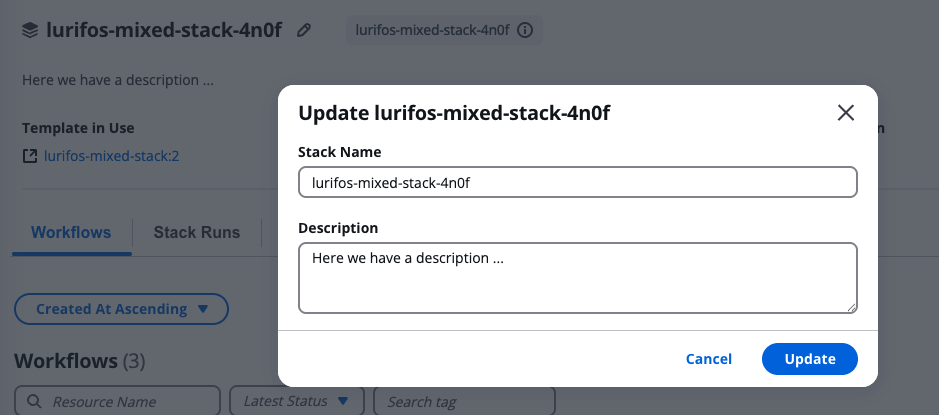
***
### **2. Stack Options**[](#2-stack-options "Direct link to 2-stack-options")
Located at the top-right corner of the Stack page, this menu provides key operational actions for managing and executing a Stack.

1. **Run Stack** – Manually execute the Stack with the current configuration.
Selecting **Run Stack** opens a modal that allows you to configure and initiate an execution.
| Field | Description |
| --------------------------------- | ------------------------------------------------------------------------------- |
| **Action** | Choose the desired action to perform, such as `Create`, `Update`, or `Destroy`. |
| **Add Context Tags to This Run** | Attach context tags to the specific Stack run for tracking and filtering. |
| **Run with Different Parameters** | Opens an advanced configuration panel to customize variables before running. |
| **Run** | Executes the Stack immediately using the selected action and parameters. |
This option is ideal for triggering Stack executions directly through the UI.
2. **Use Programmatically** – View API, CLI, or SDK commands to automate Stack executions externally.
This section provides ready-to-use code snippets (e.g., cURL, JavaScript, Python, or SG CLI) to integrate Stack runs into CI/CD pipelines or other automation tools.
3. **Modify & Run** – Launches the Stack modification process, guiding you through configuration steps before execution.
You can update Stack and Workflow settings, input variables, connector environments, and runtime parameters before running the updated version.
4. **Use Wizard** – Opens an intuitive guided interface for editing key Stack configurations.
This includes:
* Basic Stack metadata (name, description, tags).
* The ability to **reorder workflows** within the Stack's execution sequence.
* Adjusting context or template parameters with more granular control.
The wizard provides a structured way to fine-tune Stack details before deployment.
5. **Delete** – Permanently removes the Stack.
Deletion is protected by a safety confirmation.
| Warning | Description |
| ------------------------------- | ---------------------------------------------------------------------------------------------------------------------------------------------------------------------- |
| ⚠️ **Destroy First** | To delete a Stack, it must first be **destroyed** — removing all associated resources. |
| **Deleting Without Destroying** | Optionally, you may delete without destruction, leaving underlying resources active. However, all associated workflows will be permanently deleted "but not destroyed" |
This ensures you do not unintentionally leave orphaned resources or lose active workflow configurations.
***
### **3. Stack Information Widgets**[](#3-stack-information-widgets "Direct link to 3-stack-information-widgets")
Located directly below the header, the Stack summary provides at-a-glance insights:

| Widget | Description |
| -------------------- | ------------------------------------------------------------------------------------------ |
| **Template in Use** | Displays the IaC template currently applied to the Stack. |
| **Automation Tools** | Shows the automation tools or frameworks (e.g., Terraform, Ansible) included in the Stack. |
| **Stack Revision** | Indicates the current revision or version number of the Stack configuration. |
| **Latest Status** | Displays the outcome of the most recent Stack run (e.g., Running, Completed, Failed). |
These widgets give users an instant overview of the Stack's structure, tools, and operational health.
***
---
# Create Stacks
Stacks in StackGuardian enable the automation and sequencing of related workflows, with each workflow seamlessly passing its outputs as inputs to the next. The **aws-full-stack** example template streamlines the provisioning of an *AWS Elastic Kubernetes Service* (EKS) environment by orchestrating workflows to create a *Virtual Private Cloud* (VPC), deploy an *EKS cluster*, configure *managed node groups*, and set up an *Nginx service using Helm*.
***
### Steps to Create Stack[](#steps-to-create-stack "Direct link to Steps to Create Stack")
#### Step 1: Navigate to the Workflow Groups[](#step-1-navigate-to-the-workflow-groups "Direct link to Step 1: Navigate to the Workflow Groups")
1. Go to **Orchestrator** > **Workflow Groups** in the sidebar.
2. Click the "**Stacks**" tab, then "**Create Stack**" > "**Use Dev Portal (Preview)**" to begin.
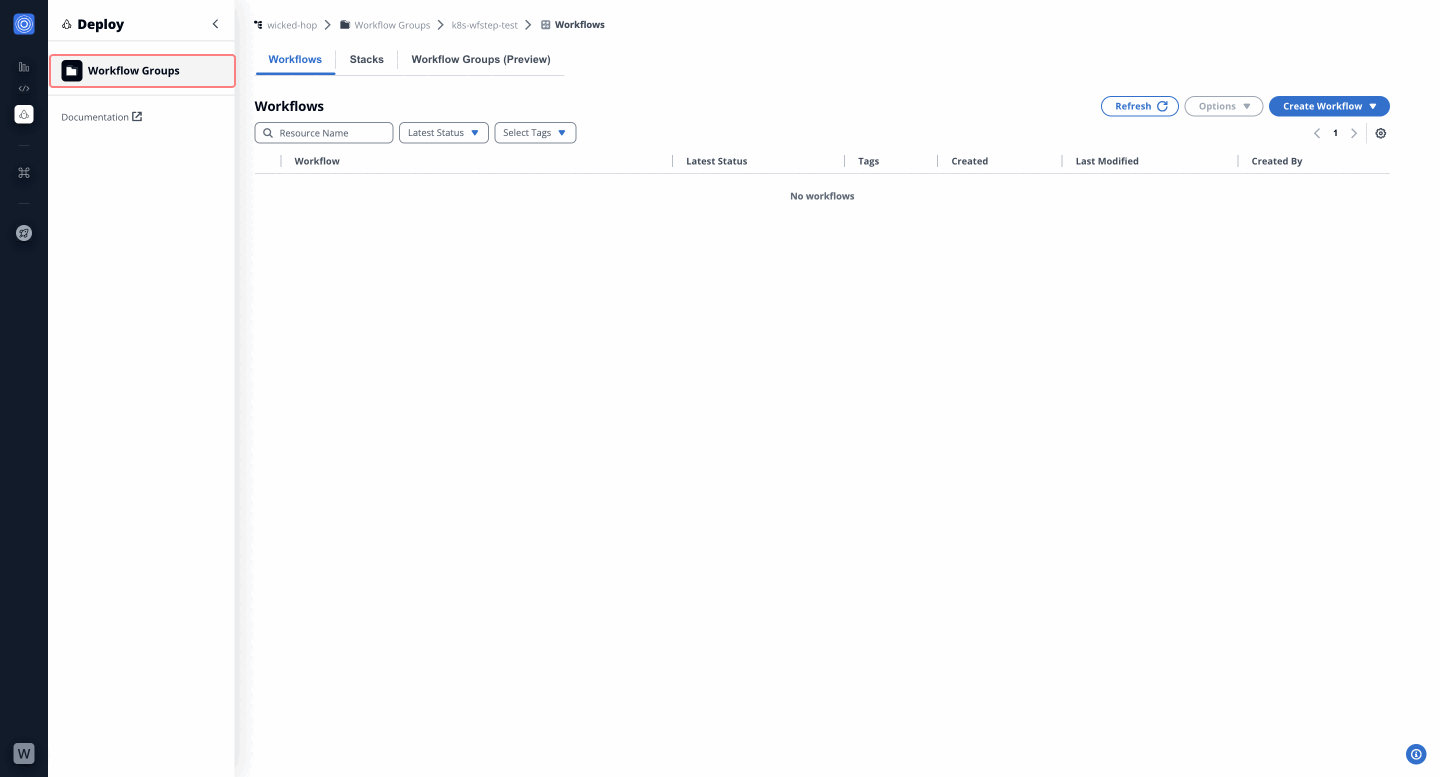
***
#### Step 2: Search and Select the Template[](#step-2-search-and-select-the-template "Direct link to Step 2: Search and Select the Template")
1. In the Dev Portal preview, **choose Template** and search for `aws-full-stack` in the **Search** bar.
2. Click "**Use**" to select the `aws-full-stack` template.
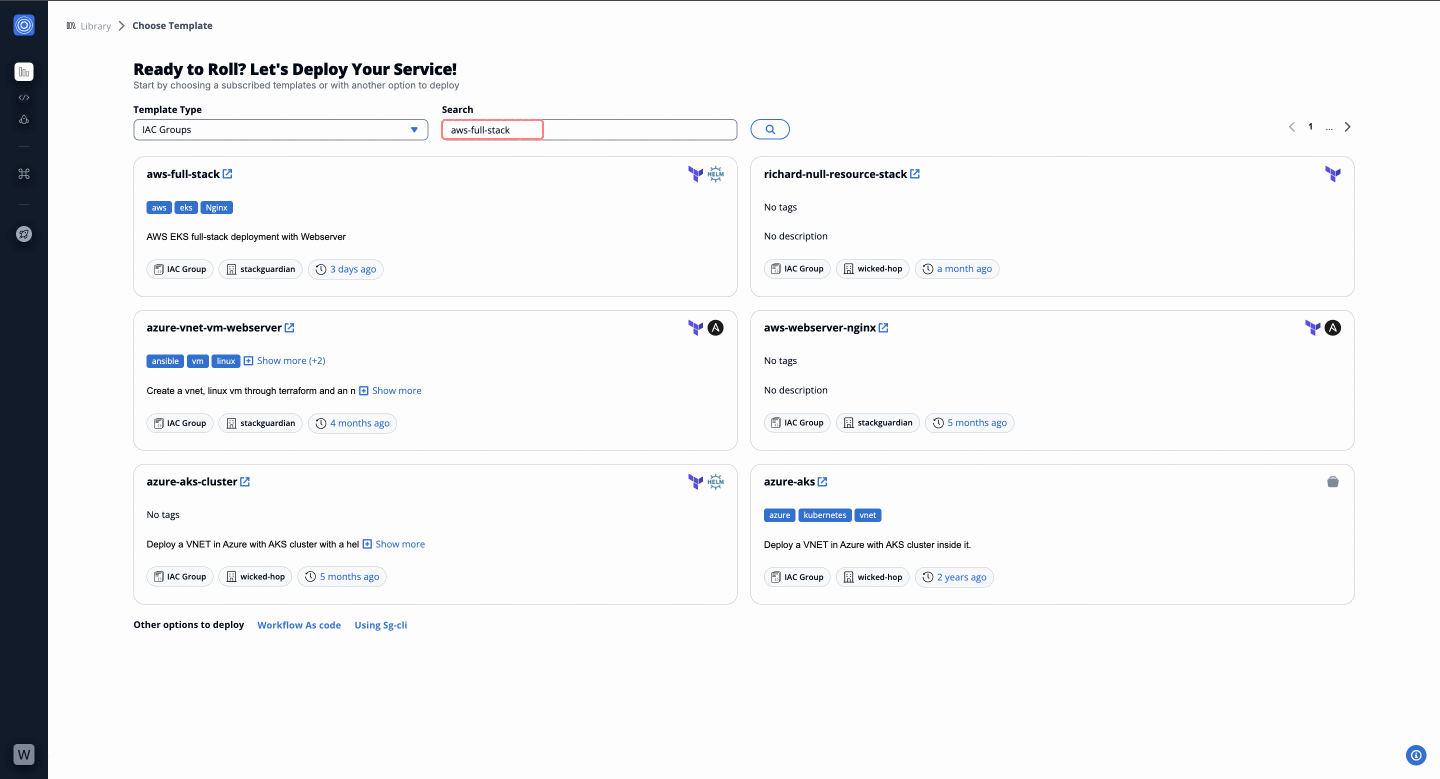
***
#### Step 3: Configure Stack Meta Details[](#step-3-configure-stack-meta-details "Direct link to Step 3: Configure Stack Meta Details")
1. Fill in the following fields:
* **Workflow Group Name**: Select a workflow group from the dropdown.
* **Stack Name\***: Provide a unique name for your stack.
* **Description**: Add a brief description (e.g., AWS EKS full-stack deployment).
* **Add Tags**: Enter tags to categorize the stack.
2. (Optional) Enable **Advanced Configuration** to specify:
* **Runtime Environment**: Set execution details and allocate resources.
* **Resources and Events**: Configure deployment triggers.
3. Click "**Next: Variables**".

***
#### Step 4: Configure Workflows[](#step-4-configure-workflows "Direct link to Step 4: Configure Workflows")
The `aws-full-stack` template includes the following workflows:
1. **terraform-aws-vpc-stripped**: Provisions a Virtual Private Cloud (VPC) with subnets, route tables, and internet gateways.
* **Fields to Fill**:
* **VPC Name**: Enter a name for the VPC (e.g., `aws-eks-vpc-demo`).
* **Region**: Select an AWS region based on your deployment:
* For EU: `Ireland` (eu-west-1) or `Frankfurt` (eu-central-1)
* For US: `Ohio` (us-east-2) or `Oregon` (us-west-2)
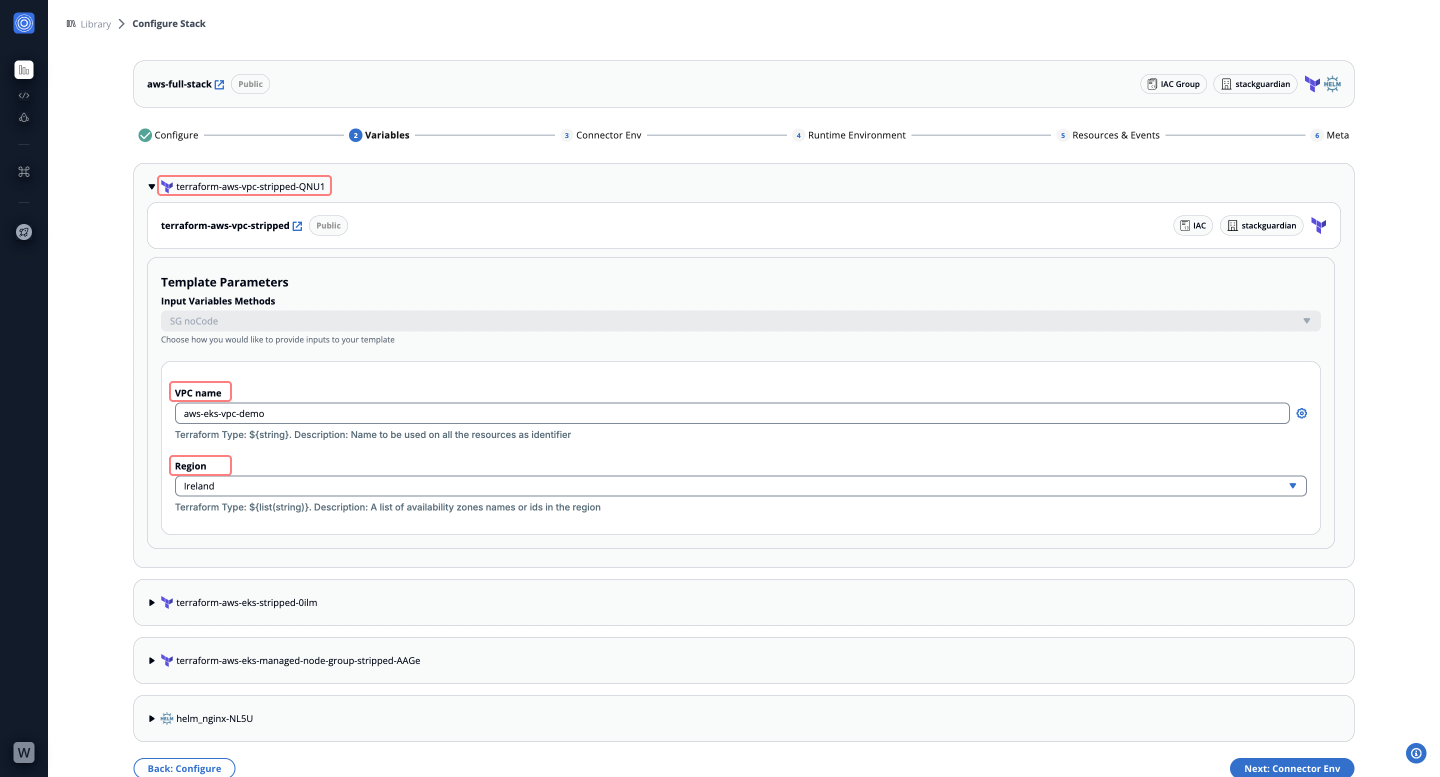
2. **terraform-aws-eks-stripped**: Deploys an Elastic Kubernetes Service (EKS) cluster in AWS.
* **Fields to Fill**:
* **Cluster Name**: Provide a name for the EKS cluster (e.g., `eks-cluster-demo`).
* **Cluster Version**: Select the Kubernetes version (e.g., `1.29`).
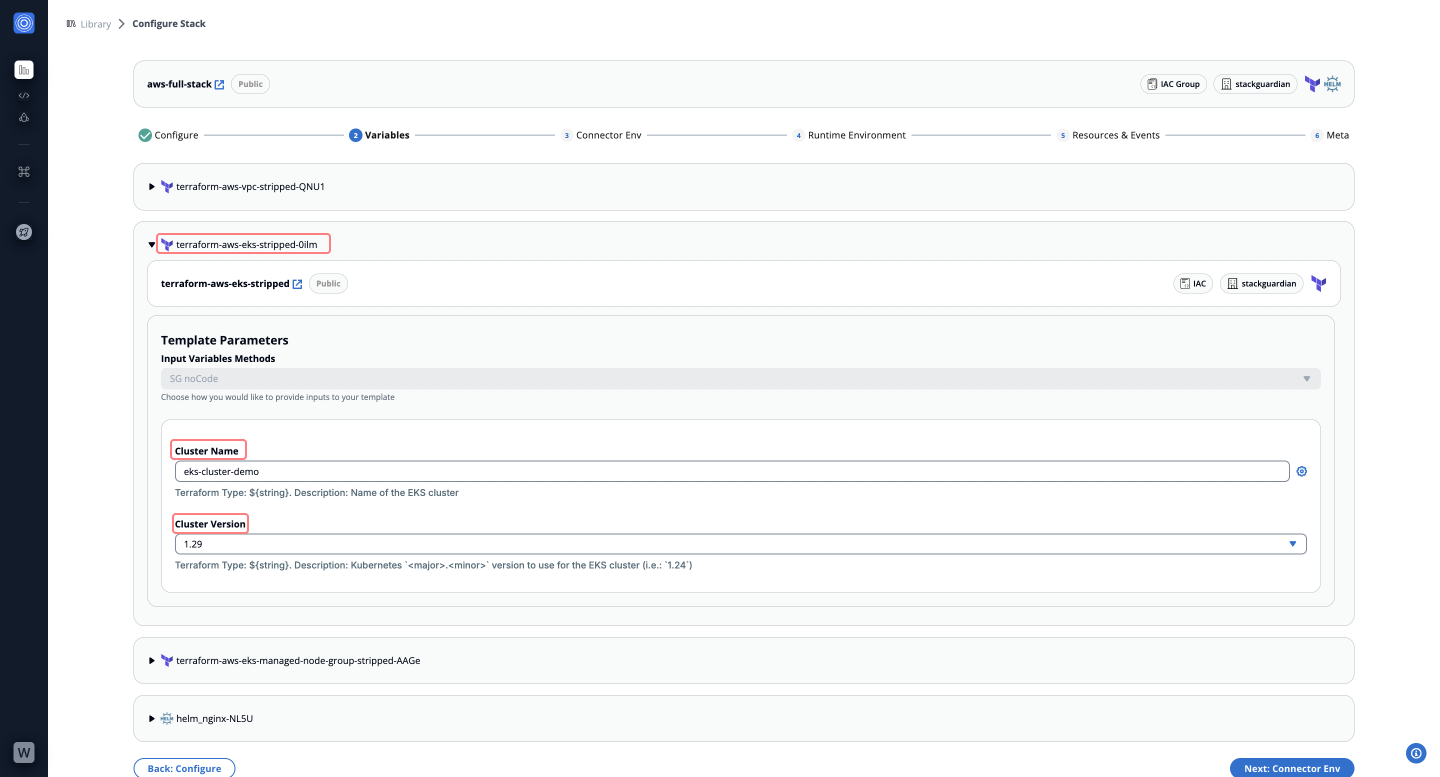
3. **terraform-aws-eks-managed-node-group-stripped**: Configures managed node groups for worker nodes in the EKS cluster. Use **default values** for all fields.
4. **helm\_nginx**: Deploys an Nginx service using Helm on the EKS cluster. Use **default values** for all fields.
Click "**Next: Connector Env**" after completing these configurations.
***
#### Step 5: Connect Your Deployment Environment[](#step-5-connect-your-deployment-environment "Direct link to Step 5: Connect Your Deployment Environment")
1. Select a pre-configured connector (e.g., `aws-demo`) or create a new one.
2. Optionally, assign individual connectors to each workflow in the stack. Click "**Next: Runtime Environment**".
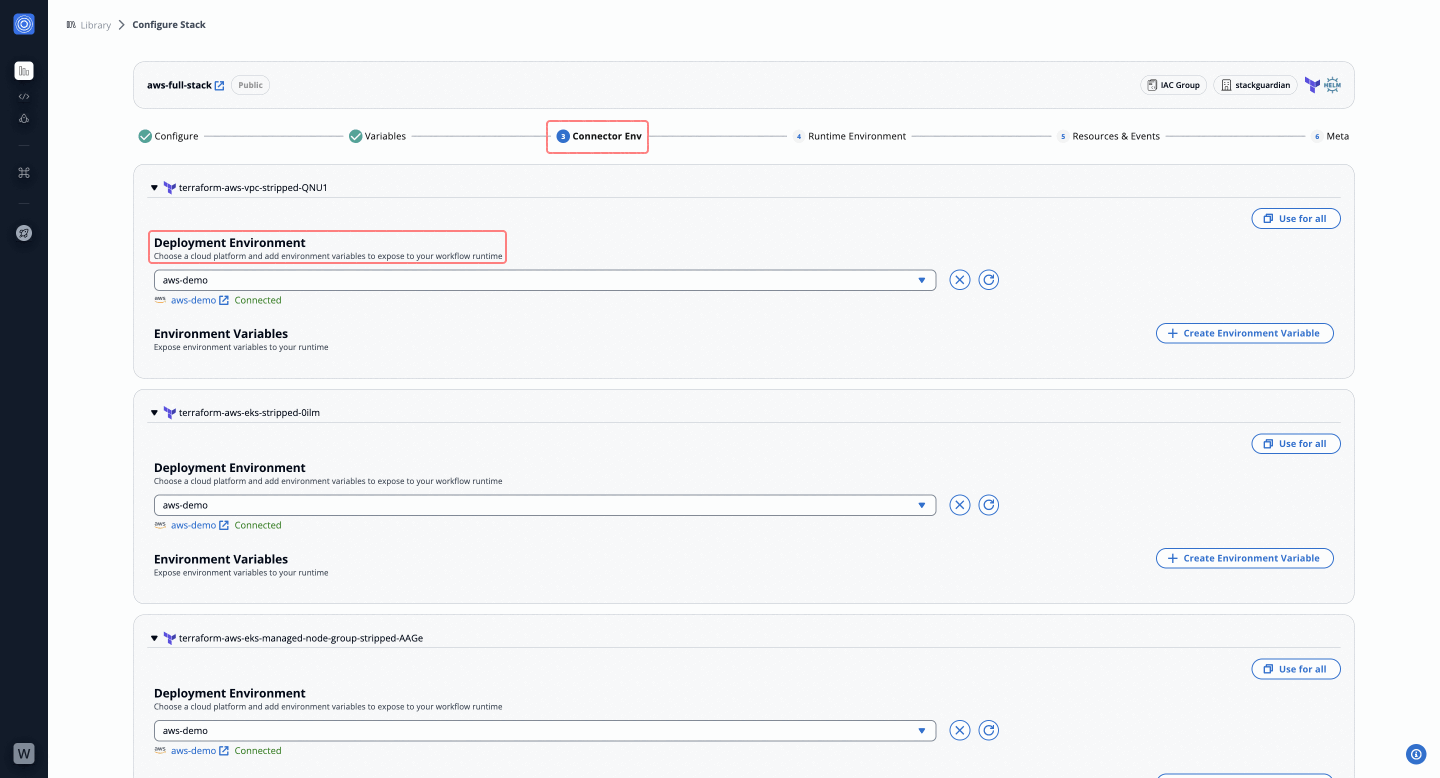
***
#### Step 6: Define the Runtime Environment[](#step-6-define-the-runtime-environment "Direct link to Step 6: Define the Runtime Environment")
1. Configure execution behaviors, state management, lifecycle steps, and private runner integrations.
2. Use pre-configured connectors or define new runtime variables as needed. Click "**Next: Resources & Events**".
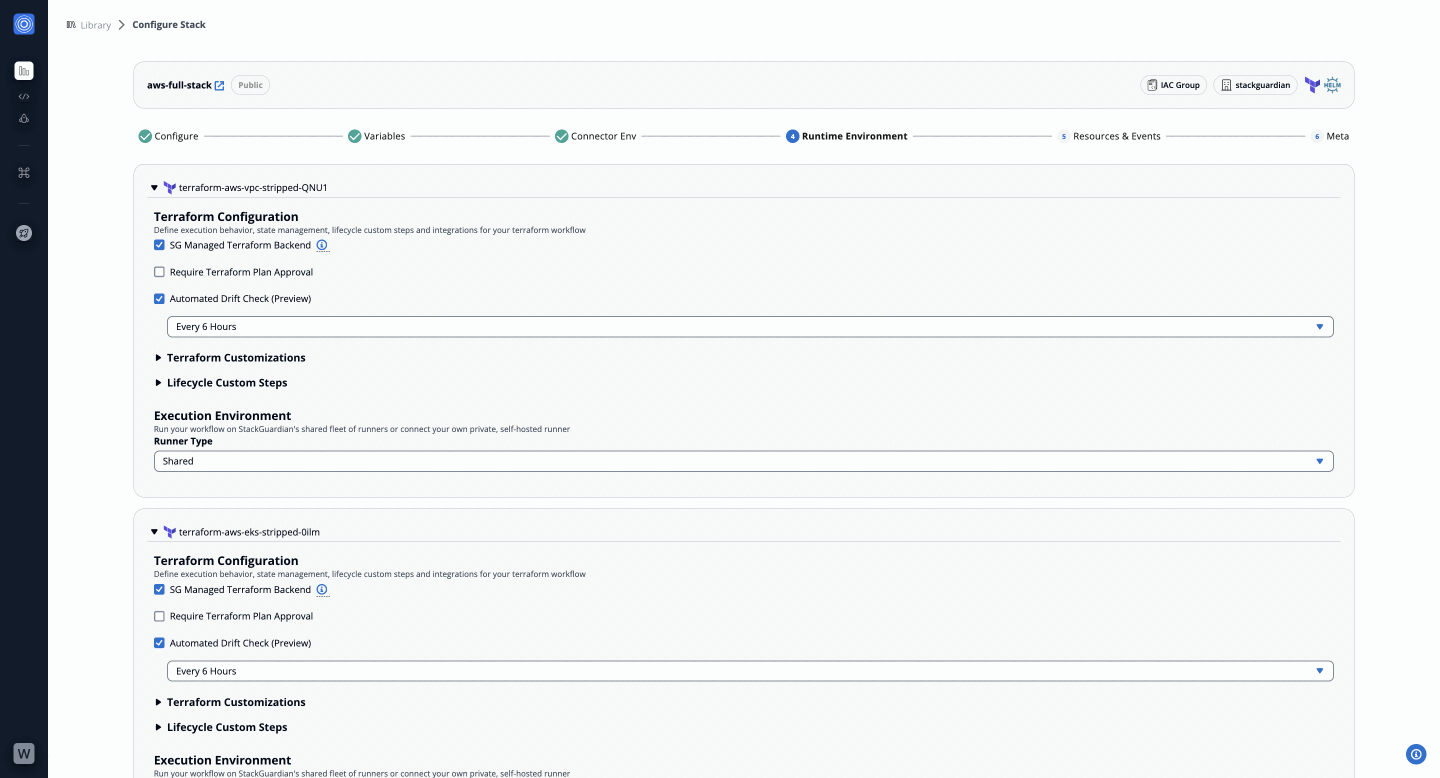
***
#### Step 7: Configure Resources & Events[](#step-7-configure-resources--events "Direct link to Step 7: Configure Resources & Events")
1. Add resources, execution schedules, and workflow chaining.
tip
For guidance on generating a Cron expression for your execution schedule, refer to this documentation:
[Creating Cron Expressions for Scheduled Events](https://docs.aws.amazon.com/eventbridge/latest/userguide/eb-scheduled-rule-pattern.html#eb-cron-expressions)
2. Set webhook integrations for automated triggers. Click "**Next: Meta**".
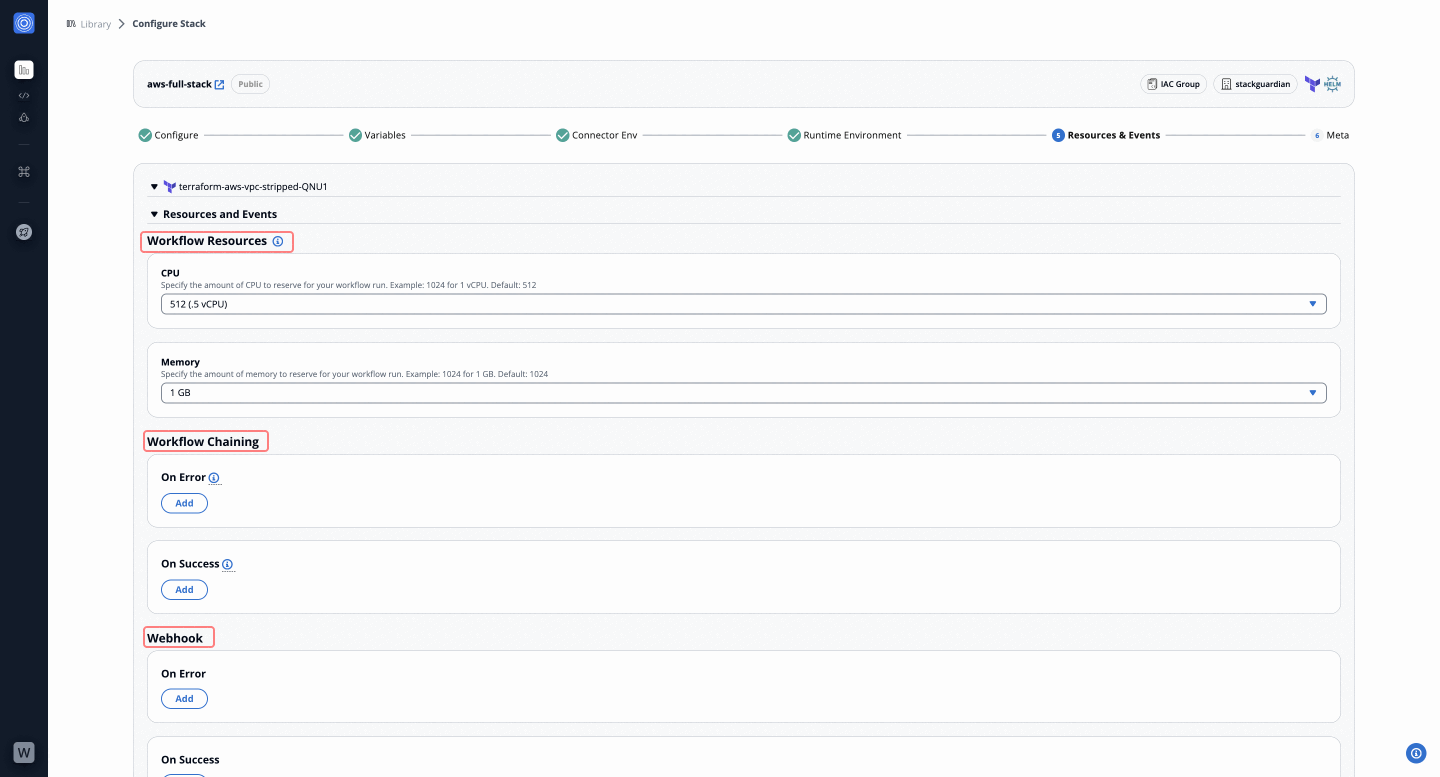
***
#### Step 8: Finalize Workflow Meta Details[](#step-8-finalize-workflow-meta-details "Direct link to Step 8: Finalize Workflow Meta Details")
1. Fill in the following fields:
* **Workflow Name**: Provide a unique name for the workflow.
* **Description**: Add a brief description (e.g., AWS EKS full-stack deployment).
* **Add Tags**: Categorize the workflow with tags.
2. Click "**Launch**" to create and execute the stack.
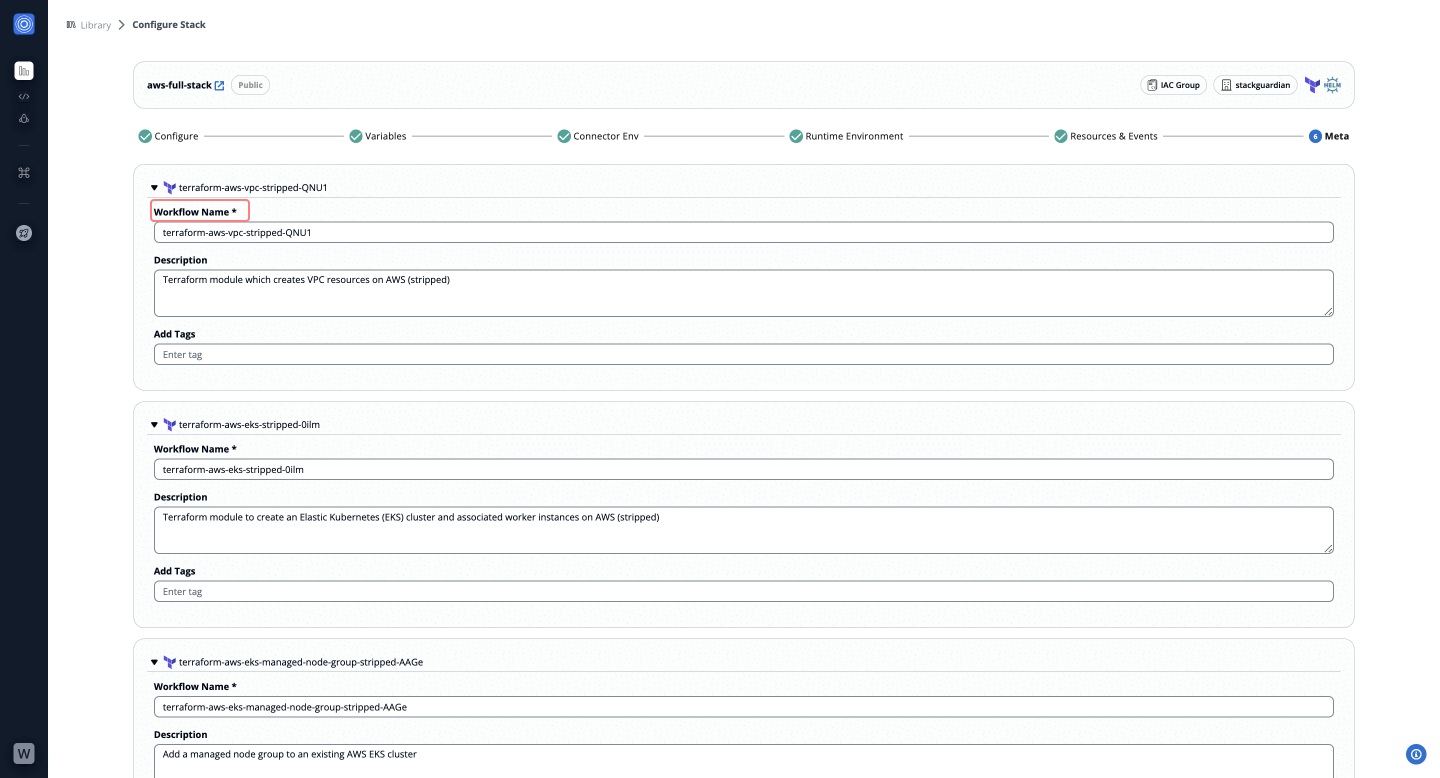
***
### Steps to Deploy Stack[](#steps-to-deploy-stack "Direct link to Steps to Deploy Stack")
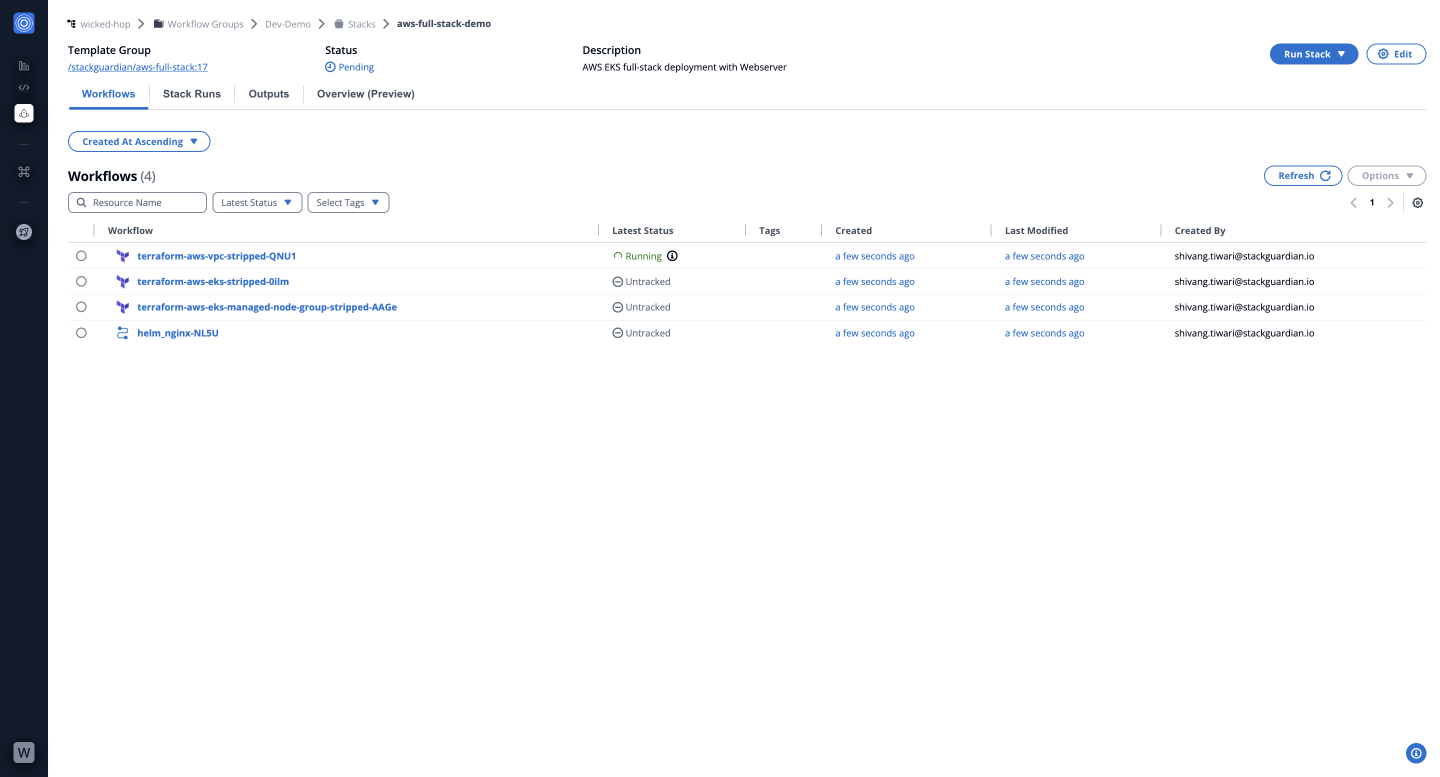
You have successfully created and deployed a stack using the `aws-full-stack` template. To learn how to update an existing stack, check out our guide on [**Updating Stacks**](/docs/deploy/stack/stack_upgrade/).
---
# Update Stacks
## Overview[](#overview "Direct link to Overview")
When a new template revision is available, you can update your stack to use it. A notification appears in the Stack Settings tab when newer revisions are available.
## Check for available revisions[](#check-for-available-revisions "Direct link to Check for available revisions")
StackGuardian notifies you when a new revision of your stack is available:
1. Navigate to your stack's **Stack Settings** tab
2. Look for the **Stack Revision** indicator in the top-right corner
3. If a newer revision exists, you'll see "New Revision Available"
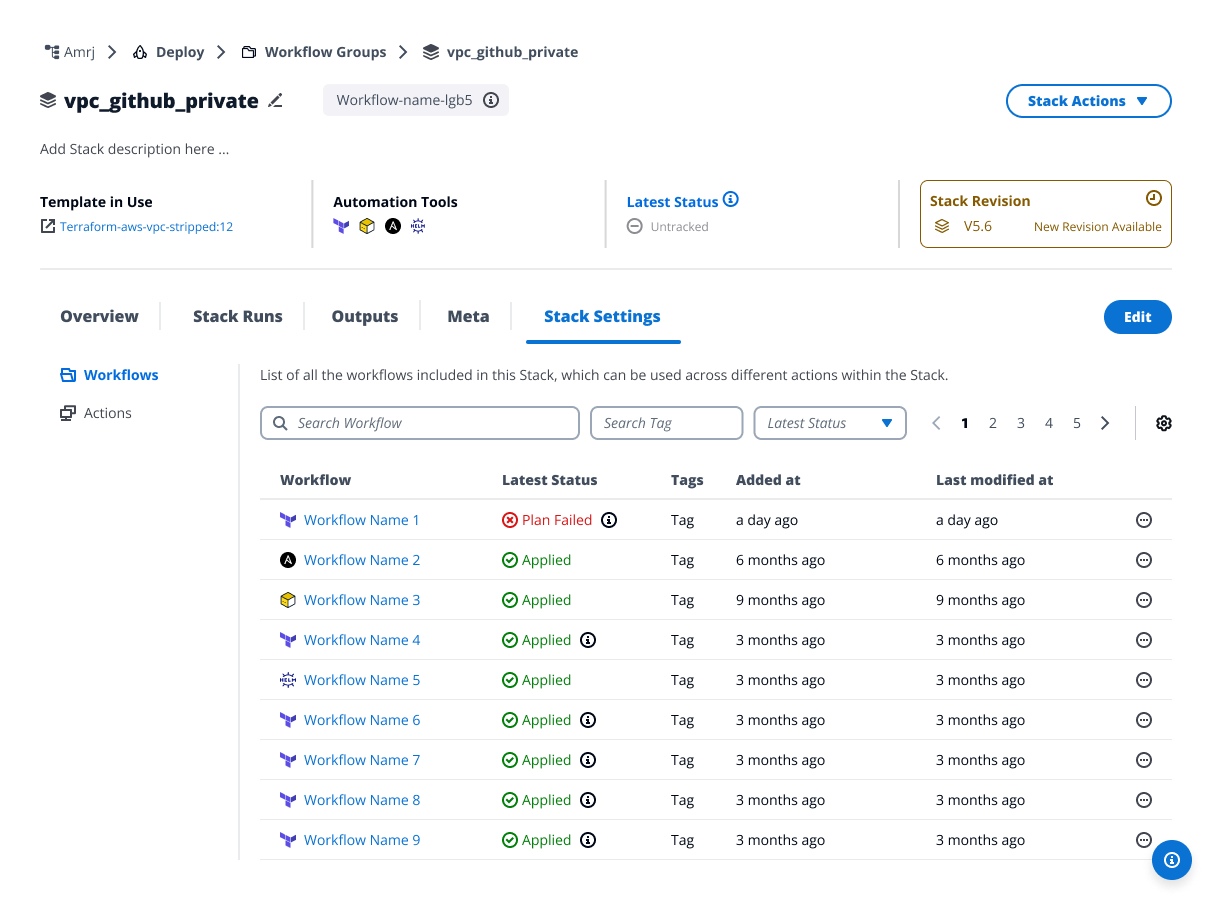
*Check for available revisions*
## Update a stack revision[](#update-a-stack-revision "Direct link to Update a stack revision")
### Step 1: Revision[](#step-1-revision "Direct link to Step 1: Revision")
1. Click **New Revision Available** in the Stack Revision indicator
2. Review the available revisions:
* **Alias Name** - The revision identifier
* **Revision Notes** - Changes included in this revision
* **Published Revision** - Status badge
* **Current Revision** - Your current version
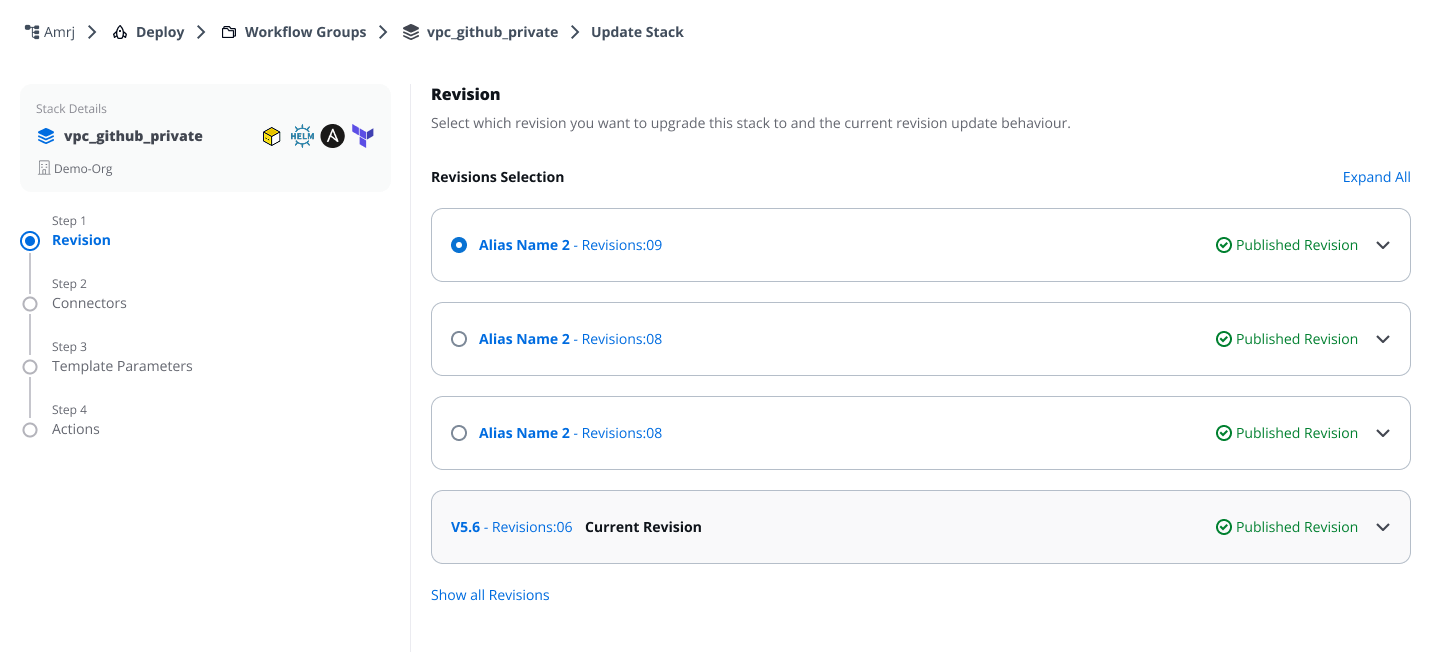
*New Revision Available*
3. To view all available revisions including previous versions, click **Show all Revisions**
4. Select the revision you want to use
5. Expand the revision to view details:
* Configuration changes
* Dependency updates
* Breaking changes
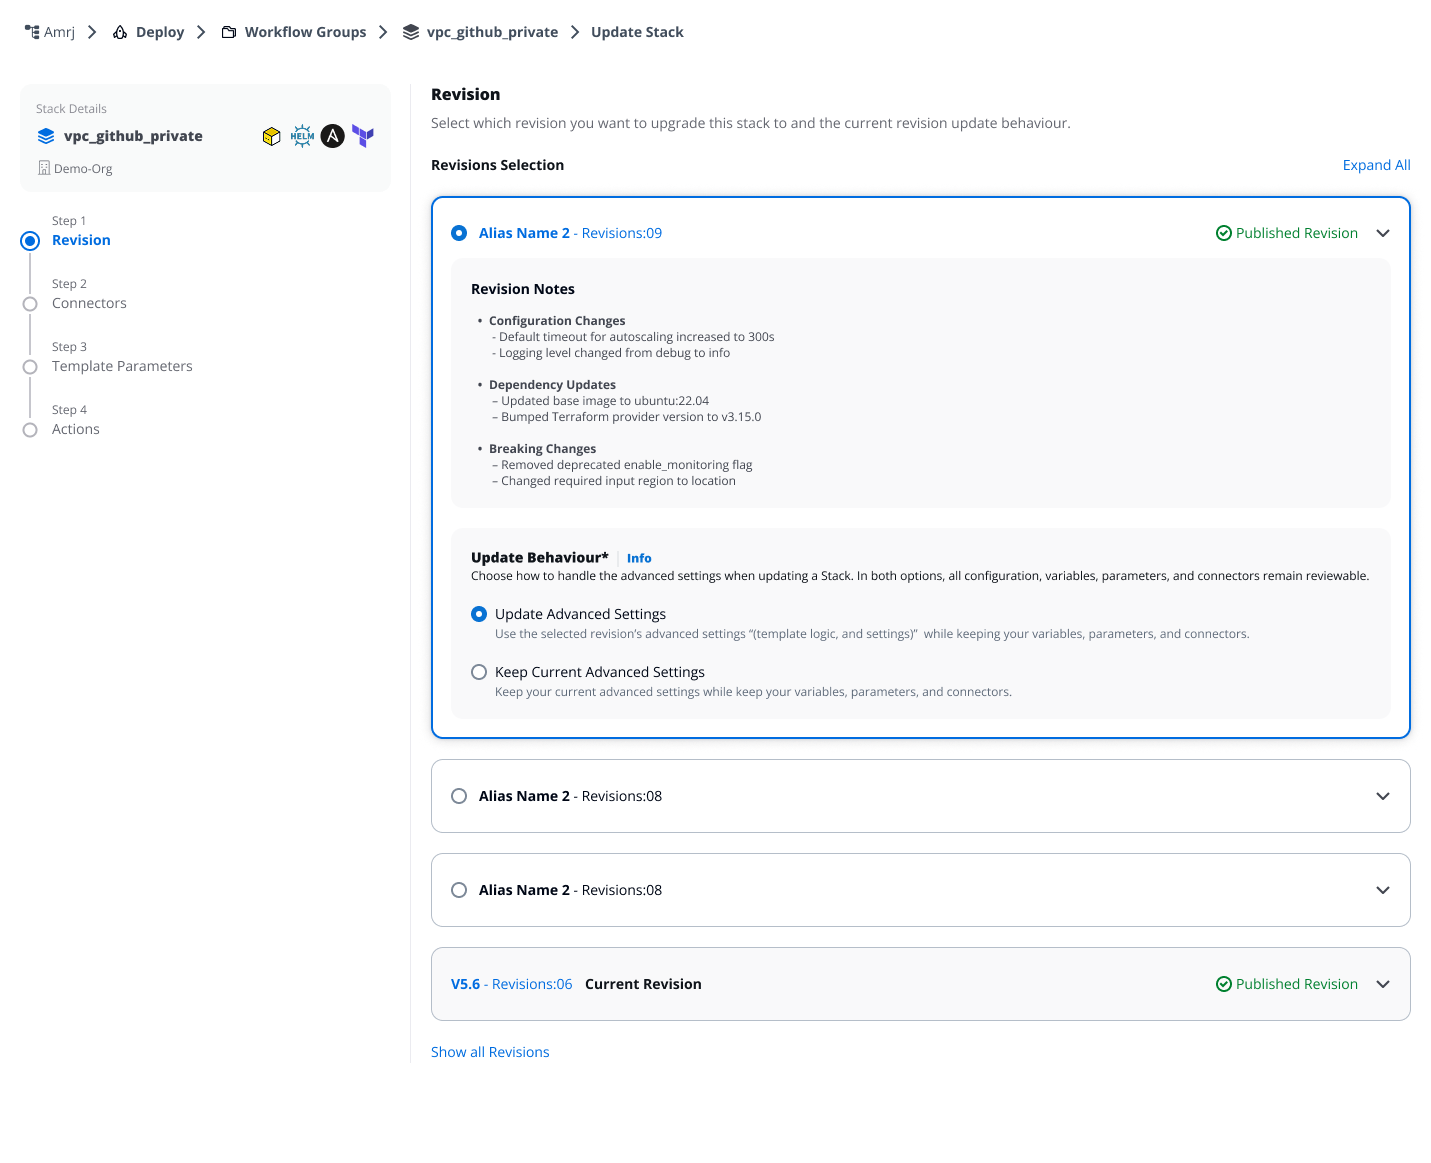
*Revision details*
#### Choose update behavior[](#choose-update-behavior "Direct link to Choose update behavior")
Select how to handle advanced settings when updating. Advanced settings include template logic and workflow configuration but do not include variables, parameters, connectors, or environment variables (which you'll configure in the following steps).
**Update Advanced Settings**
* Uses the selected revision's advanced settings (template logic and workflow configuration)
* Your current variables, parameters, connectors, and environment variables remain reviewable in the following steps
**Keep Current Advanced Settings**
* Keeps your current advanced settings from your existing stack
* Variables, parameters, connectors, and environment variables remain reviewable in the following steps
info
Advanced settings details are not shown during the update process. Navigate to the template revision to review specific advanced settings before making your selection.
### Step 2: Connectors[](#step-2-connectors "Direct link to Step 2: Connectors")
Review and update connectors for each workflow. The system detects changes automatically by comparing your current stack with the selected revision.
1. Select a workflow tab to view its deployment environment
2. Review detected changes indicated by status badges:
* **Unmodified** - No changes required
* **Updated** - Connector configuration modified in selected revision
* **Added** - New workflow added in selected revision
* **Removed** - Workflow removed in selected revision (appears disabled)
3. For each workflow:
* Select or update the **Connector**
* Configure **Child Integrations** if required
* Add or modify **Environment Variables**
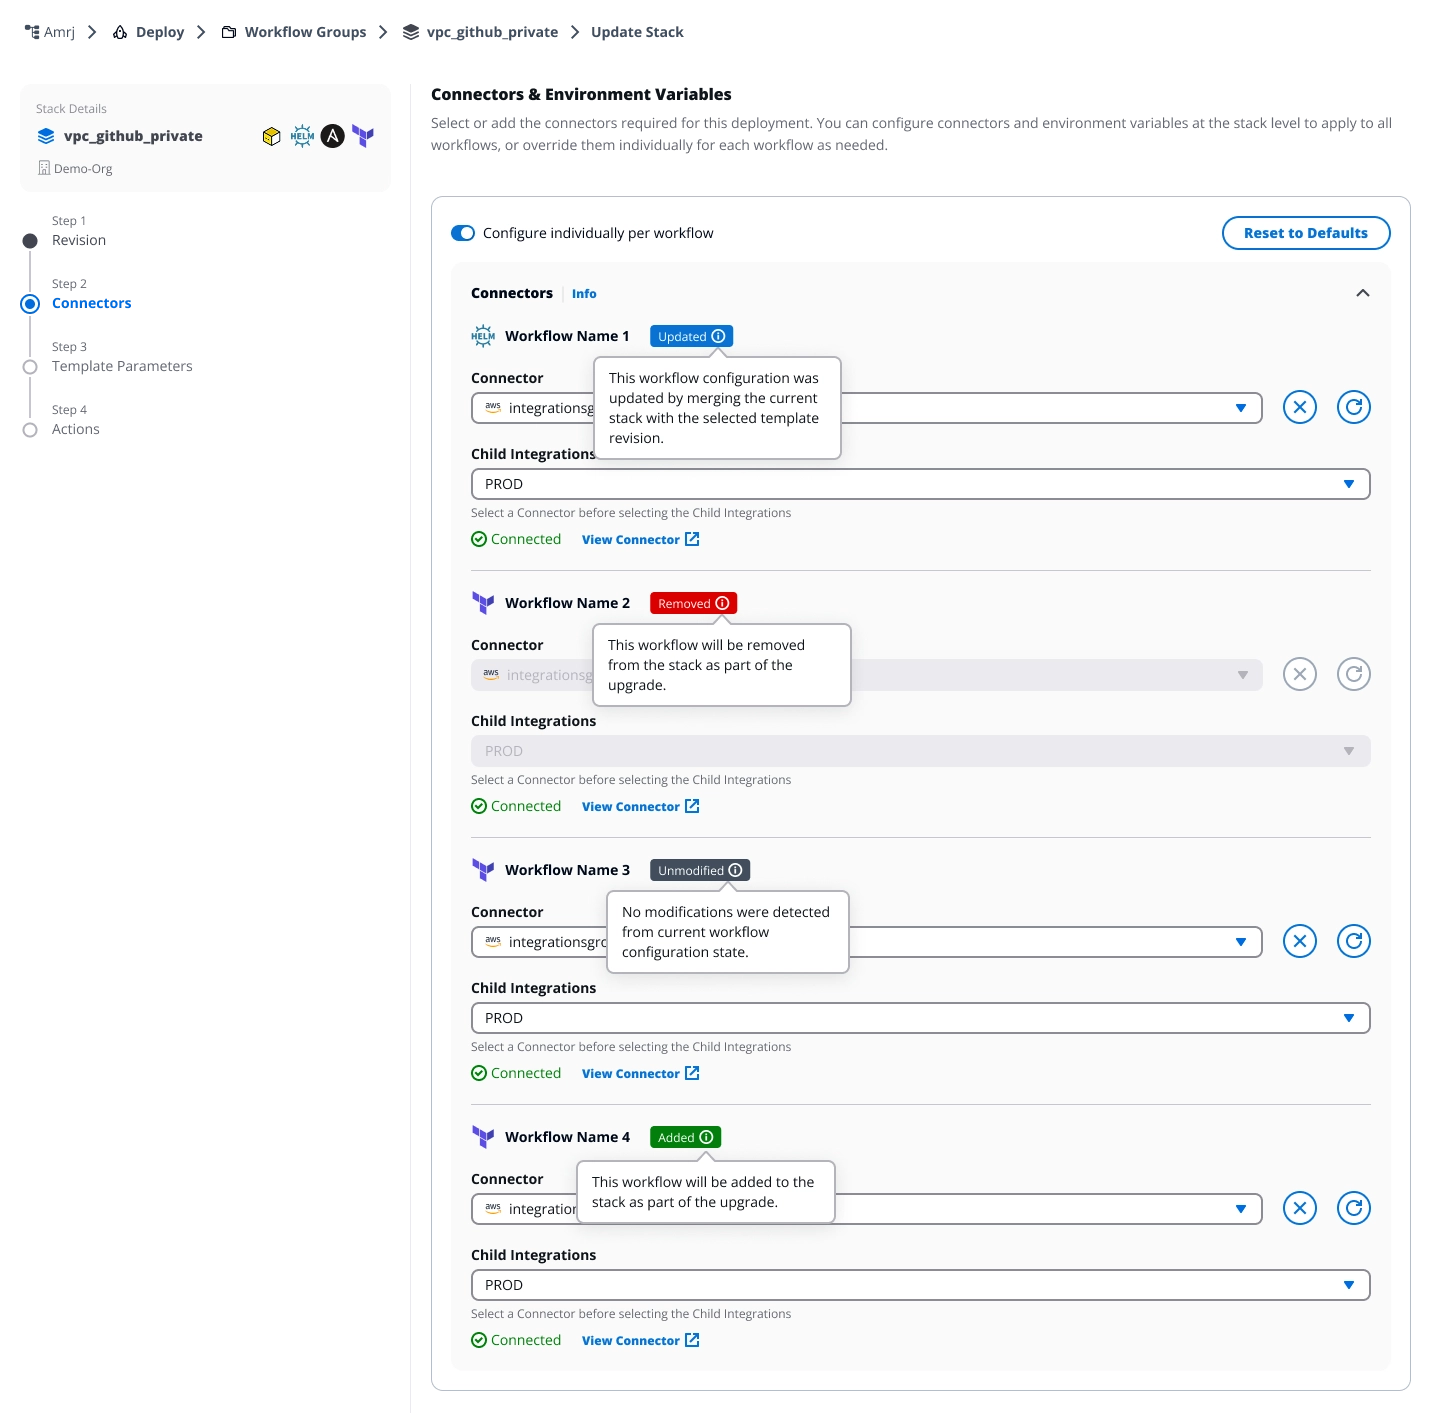
*Review and update connectors*
#### How values are updated[](#how-values-are-updated "Direct link to How values are updated")
When updating connectors and environment variables:
* **Existing variables** - Your current values are preserved
* **New variables** - Added with default values from the selected revision
* **Deleted variables** - Automatically removed from your stack
### Step 3: Template Parameters[](#step-3-template-parameters "Direct link to Step 3: Template Parameters")
Configure parameters for workflows with detected changes. The system automatically merges your existing configuration with any new parameters from the selected revision.
1. Review workflows marked with status badges
2. Fill in required template parameters for each workflow
3. Use **Reset to Defaults** to replace all values with defaults from the selected revision
4. Reference existing values using **Update Reference** when available
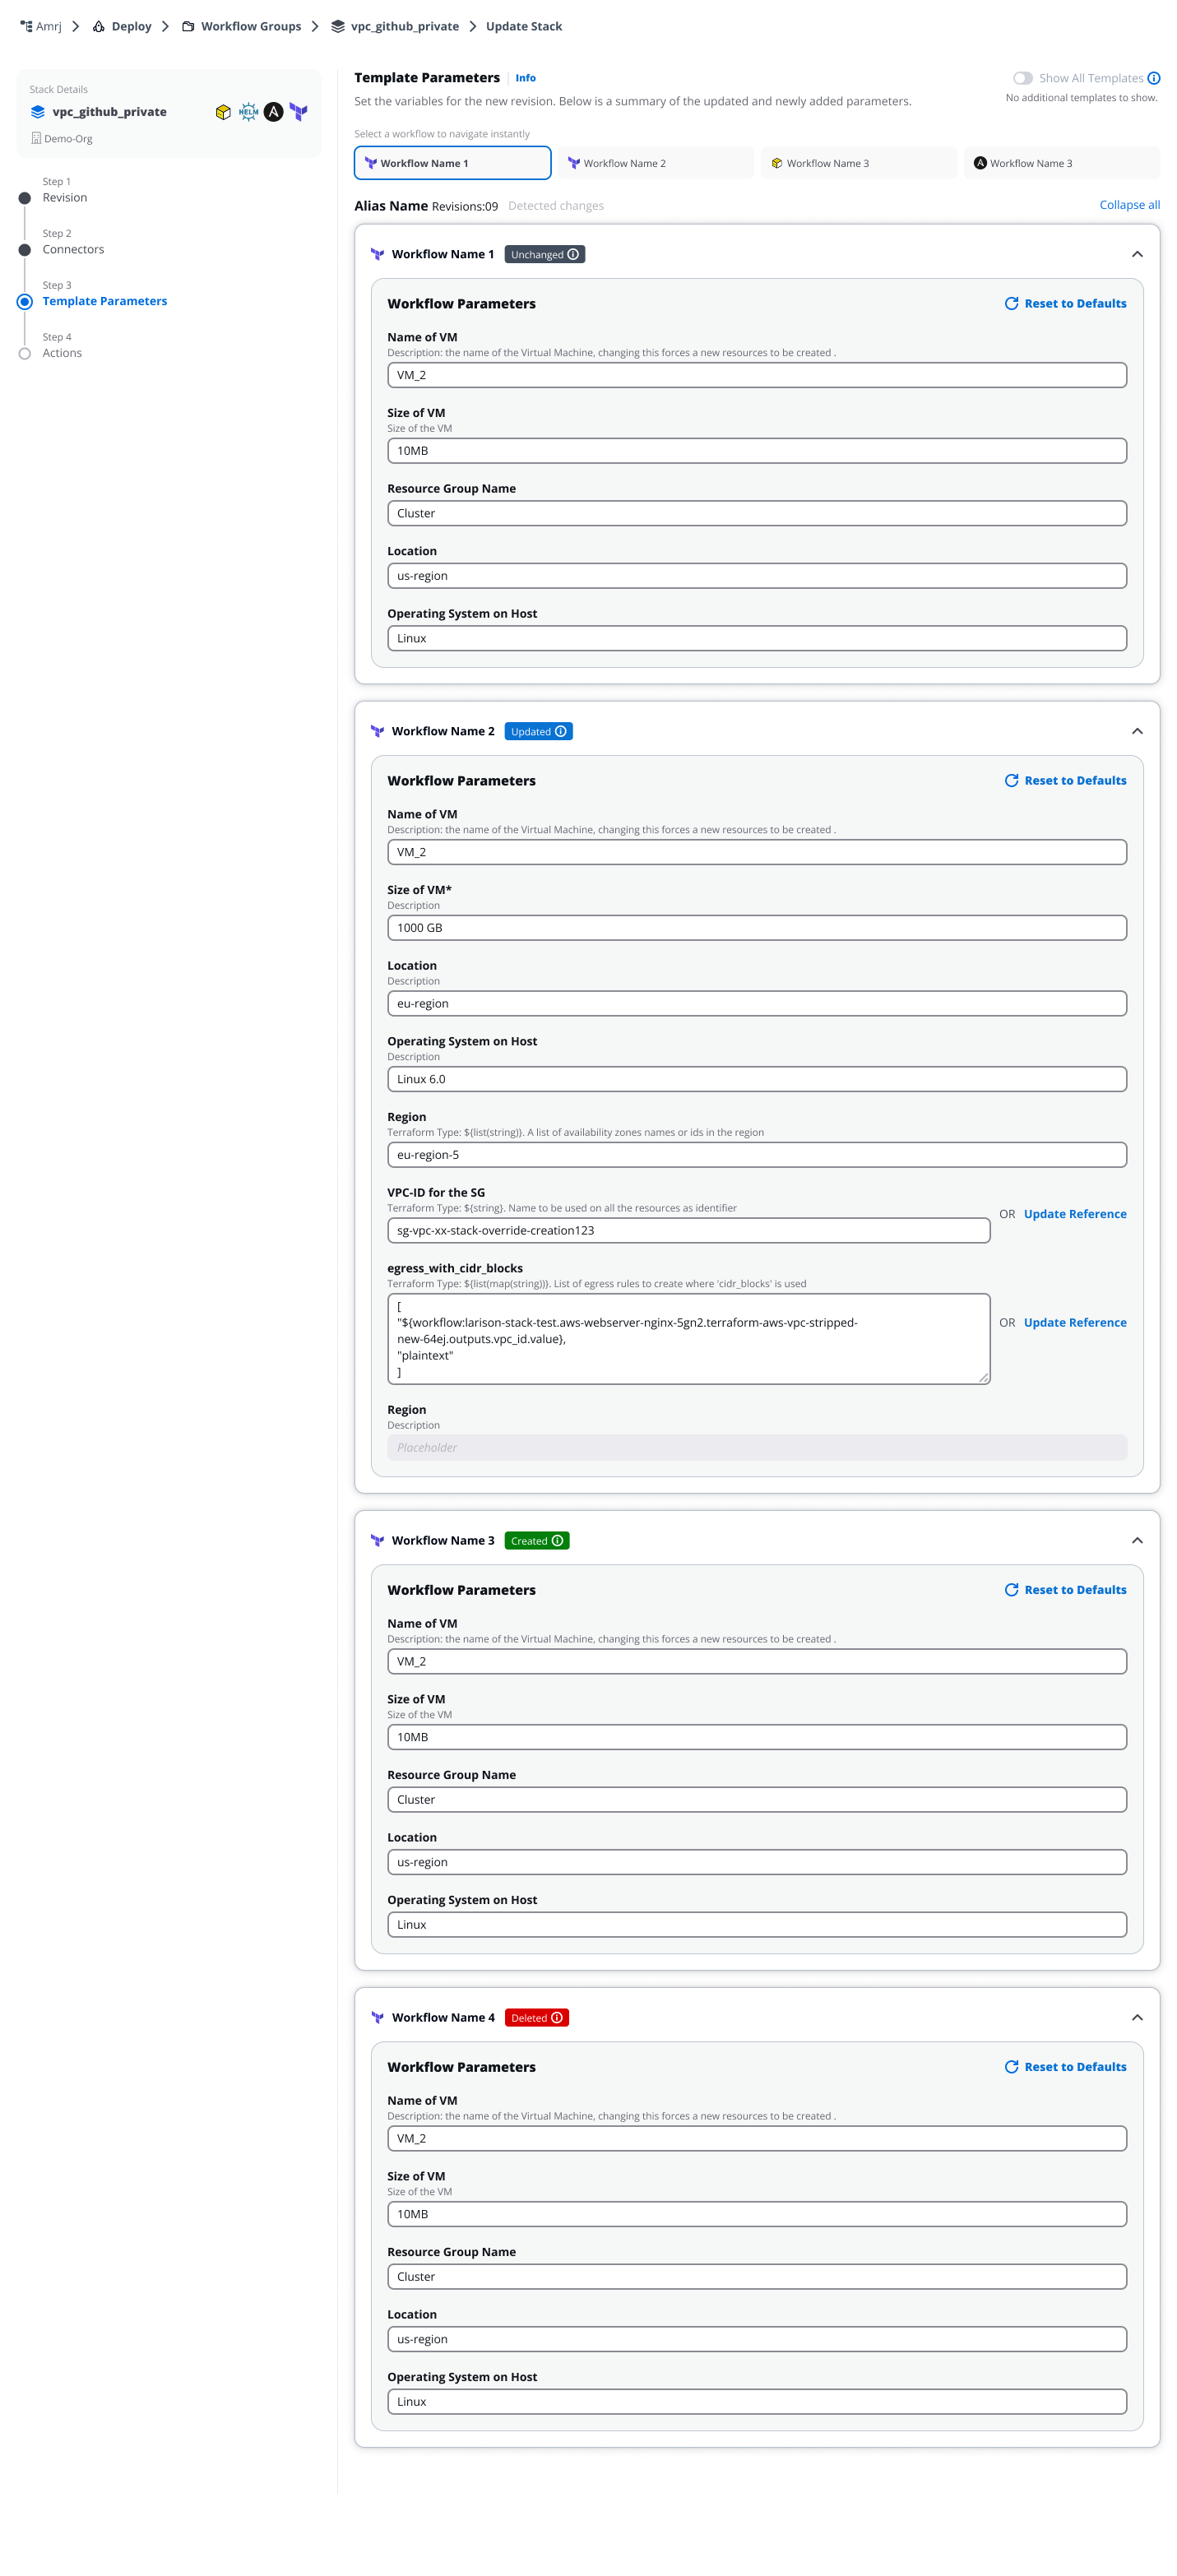
*Configure parameters for workflows*
#### How values are updated[](#how-values-are-updated-1 "Direct link to How values are updated")
When updating template parameters:
* **Existing parameters** – Your current values are preserved
* **New parameters** – Added from the selected revision
* **Deleted parameters** – Retained in your stack even if removed from the selected revision
The **Reset to Defaults** button replaces all parameter values with the defaults defined in the selected revision's template.
### Step 4: Actions[](#step-4-actions "Direct link to Step 4: Actions")
Review and manage the actions that will be applied to your stack. Actions define how workflows are executed.
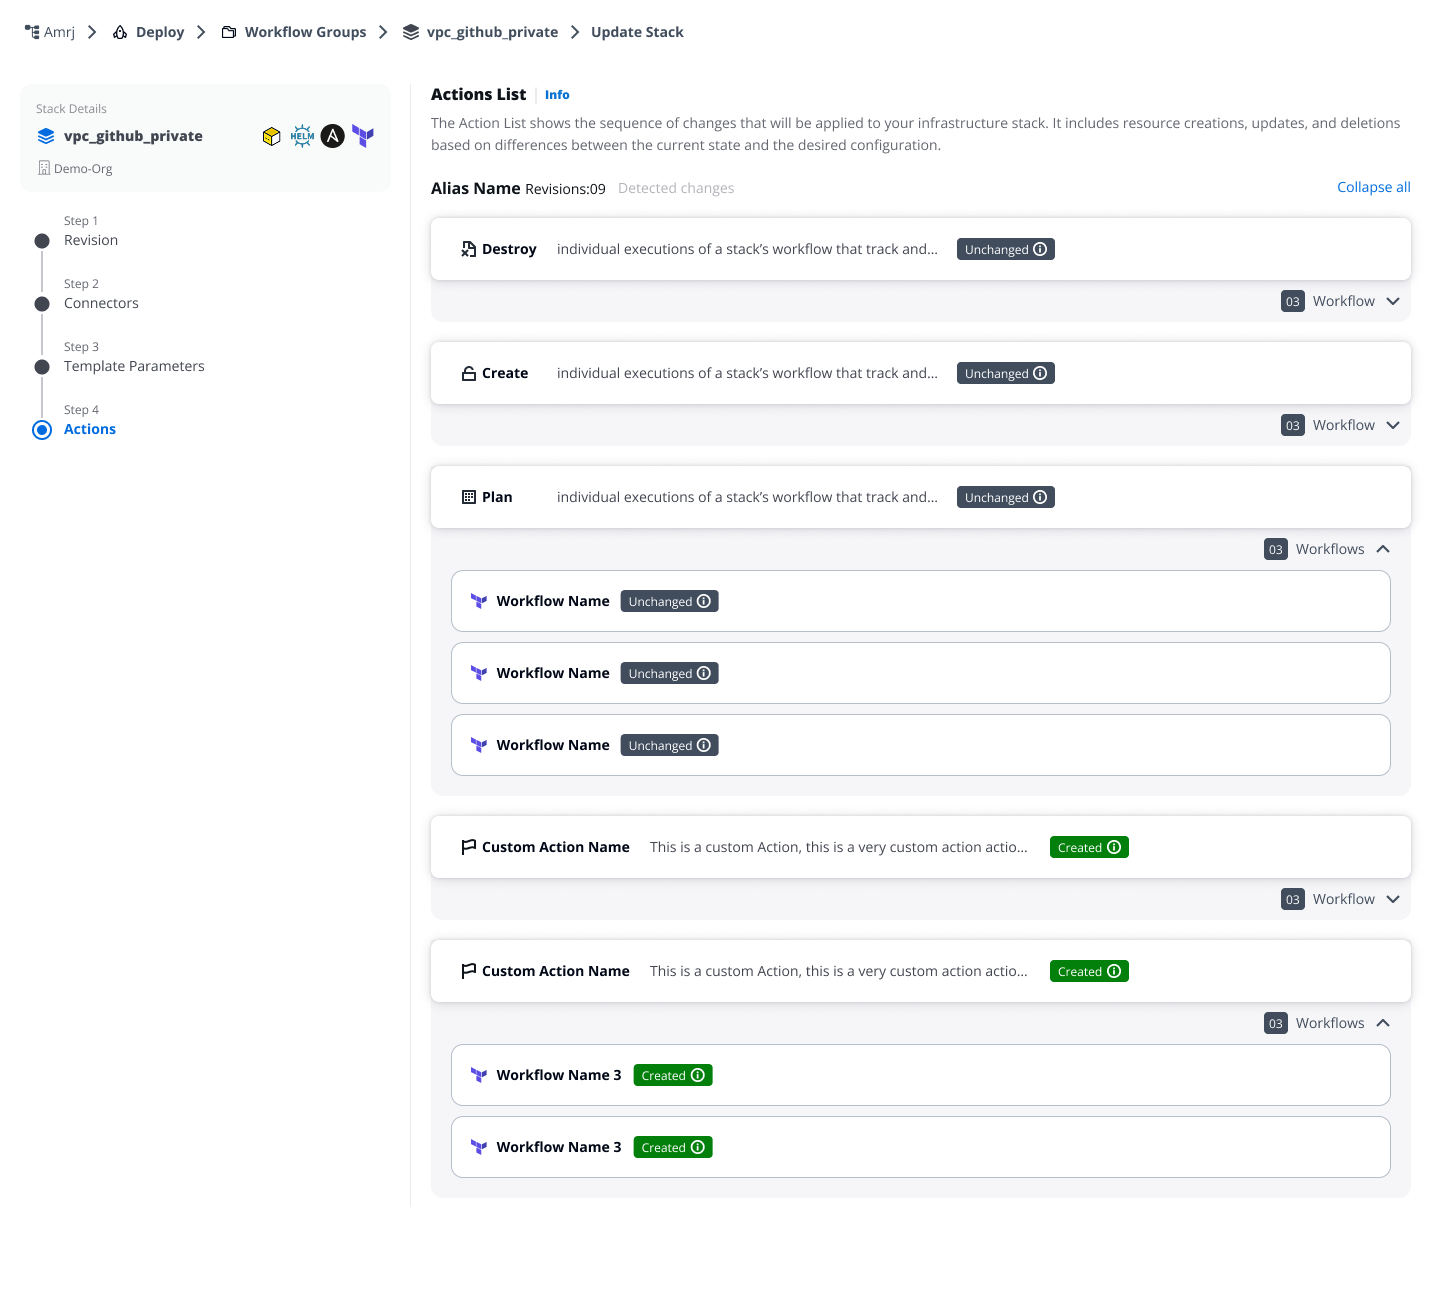
*Review and manage the actions*
#### Action types[](#action-types "Direct link to Action types")
**Default actions** (provided by template)
* **Destroy** - Remove infrastructure resources
* **Create** - Deploy infrastructure resources
* **Plan** - Preview infrastructure changes
These actions are defined by the underlying infrastructure tool (Terraform/OpenTofu) and cannot be edited or deleted.
**Template-defined custom actions**
* Created by the template owner
* Cannot be edited or deleted by the users
* Changes are controlled through template revisions
**User-defined custom actions**
* Actions you previously created in your stack
* Fully editable during the update process
#### Review changes[](#review-changes "Direct link to Review changes")
Each action displays:
* Associated workflows
* Status badge indicating changes:
* **Unchanged** - No modifications to this action
* **Updated** - Action configuration modified
* **Created** - New action added in selected revision
* Expandable workflow details
#### Edit user-defined custom actions[](#edit-user-defined-custom-actions "Direct link to Edit user-defined custom actions")
For custom actions you created, you can:
* Reorder workflows within the action
* Add workflows to the action
* Remove workflows from the action
* Clone the action to create variations
* Delete the action entirely
Default actions and template-defined actions are read-only and cannot be modified.
#### Automatic workflow cleanup[](#automatic-workflow-cleanup "Direct link to Automatic workflow cleanup")
If a workflow is deleted in the selected revision:
* The system automatically removes it from all your custom actions
* Custom actions that become empty after workflow removal are automatically deleted
* This cleanup ensures your actions remain valid after the update and cannot be undone
## What happens after updating[](#what-happens-after-updating "Direct link to What happens after updating")
After completing the update:
1. Your stack updates to the selected revision
2. Advanced settings update based on your chosen behavior
3. Configuration values are merged:
* Existing values are preserved
* New parameters use defaults from the selected revision
* Deleted parameters are removed
4. Workflows deleted in the selected revision are removed from your stack and custom actions
5. A success notification confirms the update
6. You can run the stack to apply changes
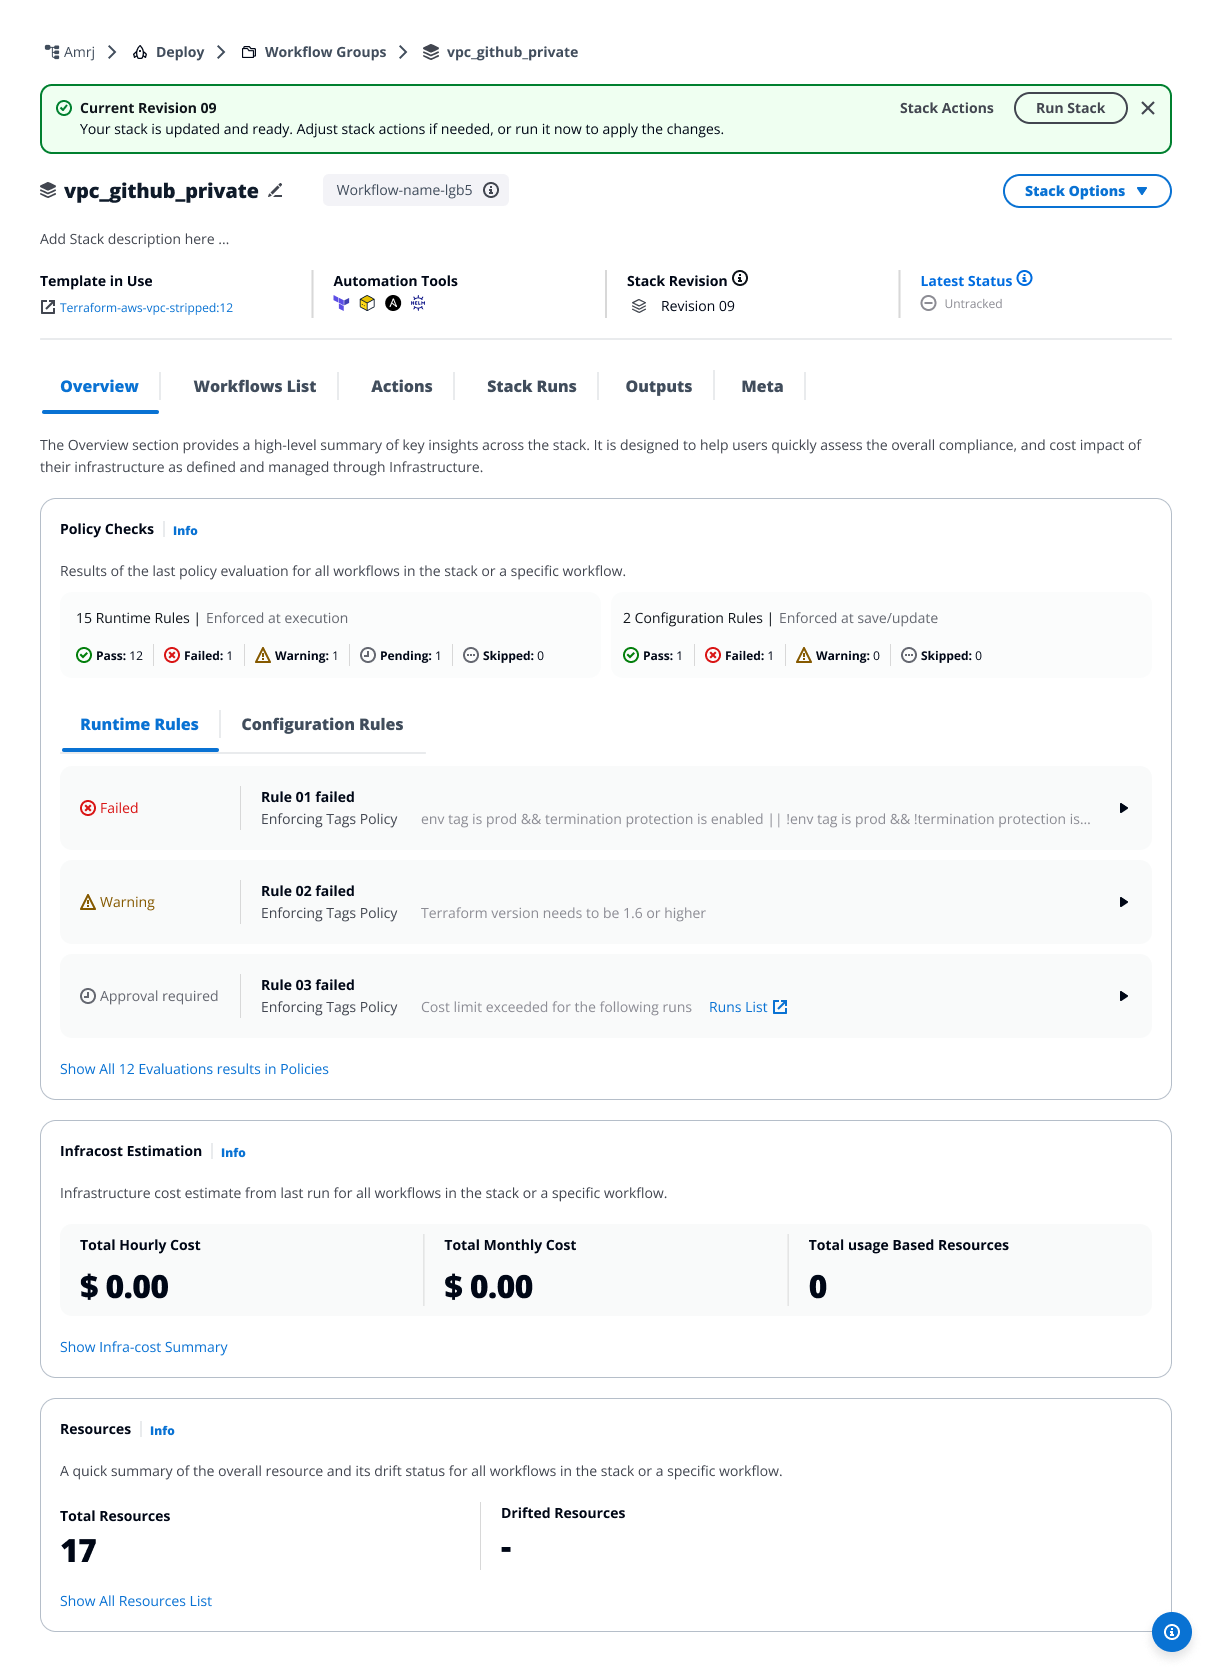
*After completing the update*
---
# Activate and deactivate workflows
## Overview[](#overview "Direct link to Overview")
Workflows in StackGuardian have two statuses: active and inactive. All new workflows start as inactive. Active workflows count toward your plan's billing limit and appear in default search results. When a workflow is inactive, the Overview, Runs, and Outputs tabs are disabled, state files and artifacts are inaccessible, and any workflows that depend on them will fail to resolve their references — but any automation that triggers a run will reactivate it automatically.
| | Active | Inactive |
| ------------------------ | ---------------------------------------- | --------------------------------------------------------------- |
| **New runs** | Allowed | Allowed — running an inactive workflow reactivates it |
| **Schedules** | Run normally | Run normally — workflow reactivates if a scheduled run executes |
| **VCS triggers** | Run normally | Run normally — workflow reactivates if a trigger fires |
| **Drift detection** | Runs normally | Runs normally — workflow reactivates if drift is detected |
| **Overview tab** | Accessible | Disabled |
| **Runs tab** | Accessible | Disabled |
| **Outputs tab** | Accessible | Disabled |
| **State file downloads** | Allowed | Blocked |
| **Artifacts** | Accessible | Blocked |
| **Settings changes** | Allowed | Allowed |
| **Billing** | Counts toward your active workflow limit | Does not count |
| **Search results** | Included | Excluded |
## Automatic transitions[](#automatic-transitions "Direct link to Automatic transitions")
Workflows transition between active and inactive automatically based on run outcomes.
### Terraform and OpenTofu[](#terraform-and-opentofu "Direct link to Terraform and OpenTofu")
| Event | Result |
| --------------------------------------------------------------------- | ------------------------- |
| Any run (normal, drift, schedule, or VCS trigger) | Workflow becomes active |
| Successful destroy with **Deactivate Workflow after Destroy** enabled | Workflow becomes inactive |
### Custom and Ansible[](#custom-and-ansible "Direct link to Custom and Ansible")
| Event | Result |
| ------------------------------------------------- | ----------------------- |
| Any run (normal, drift, schedule, or VCS trigger) | Workflow becomes active |
Custom and Ansible workflows can only be deactivated manually by an organization admin.
## Manual activation and deactivation[](#manual-activation-and-deactivation "Direct link to Manual activation and deactivation")
Activation and deactivation permissions differ:
* **Deactivation** — organization admins only
* **Activation** — any user with modify permissions on the workflow
To activate or deactivate a workflow:
1. Navigate to **Settings > Meta** and select the **Activate workflow** / **Deactivate workflow** button
2. Select **Save** to apply the change.
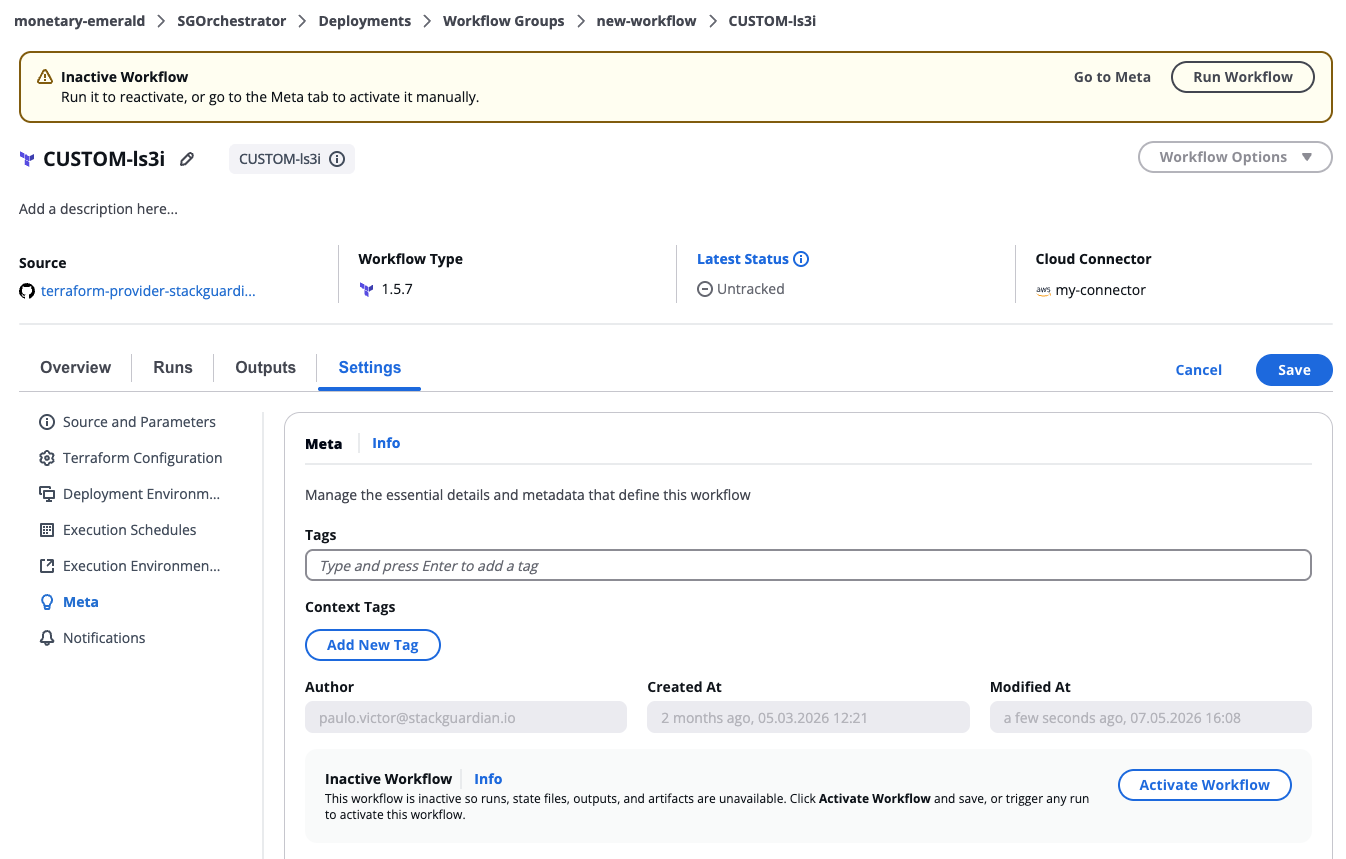
*Activate or deactivate a workflow*
Manual activation and deactivation is also available via the StackGuardian API.
Deactivating a workflow does not destroy its resources. To remove provisioned infrastructure, run a destroy separately.
If other workflows reference the outputs of a workflow you are deactivating, those workflows will fail when they attempt to resolve the reference. Review dependencies before deactivating.
Settings are preserved when a workflow is inactive. You don't need to reconfigure anything when reactivating.
## Billing and active workflow limits[](#billing-and-active-workflow-limits "Direct link to Billing and active workflow limits")
Only active workflows count toward your plan's active workflow limit. Inactive workflows are not billed.
If running a workflow would exceed your active workflow limit, the run is blocked with the following error:
```
Maximum active workflow threshold reached.
```
To run the workflow, deactivate an existing active workflow first.
## Workflows in stacks[](#workflows-in-stacks "Direct link to Workflows in stacks")
Deactivating a stack deactivates all workflows within it. Outputs, artifacts, state files, and run logs become inaccessible for every workflow. Individual workflow-level control within stacks is not currently supported.
---
# CLI-driven Workflow
## Overview[](#overview "Direct link to Overview")
The CLI-driven Workflow integration brings remote workflow execution into the familiar Terraform CLI workflow on StackGuardian.
You can start runs with the standard `terraform plan` and then watch the progress of the run from your terminal. These runs execute remotely on StackGuardian platform using configuration files from a local directory.
Currently, only `terraform init` and `terraform plan` are supported for CLI-driven Workflows. To run an apply, trigger it from the StackGuardian platform or use VCS triggers.
Version compatibility
This CLI-driven workflow functionality requires:
* **Terraform**: Version 1.9.x or later
* **OpenTofu**: Version 1.11.x or later
**Prerequisites:**
* User needs to have `Run Workflow Terraform CLI` permission:
*Run Workflow Terraform CLI permission configuration*
* Workflows need to have `SG Managed Terraform Backend` check under **Settings** → **Terraform Configuration**:
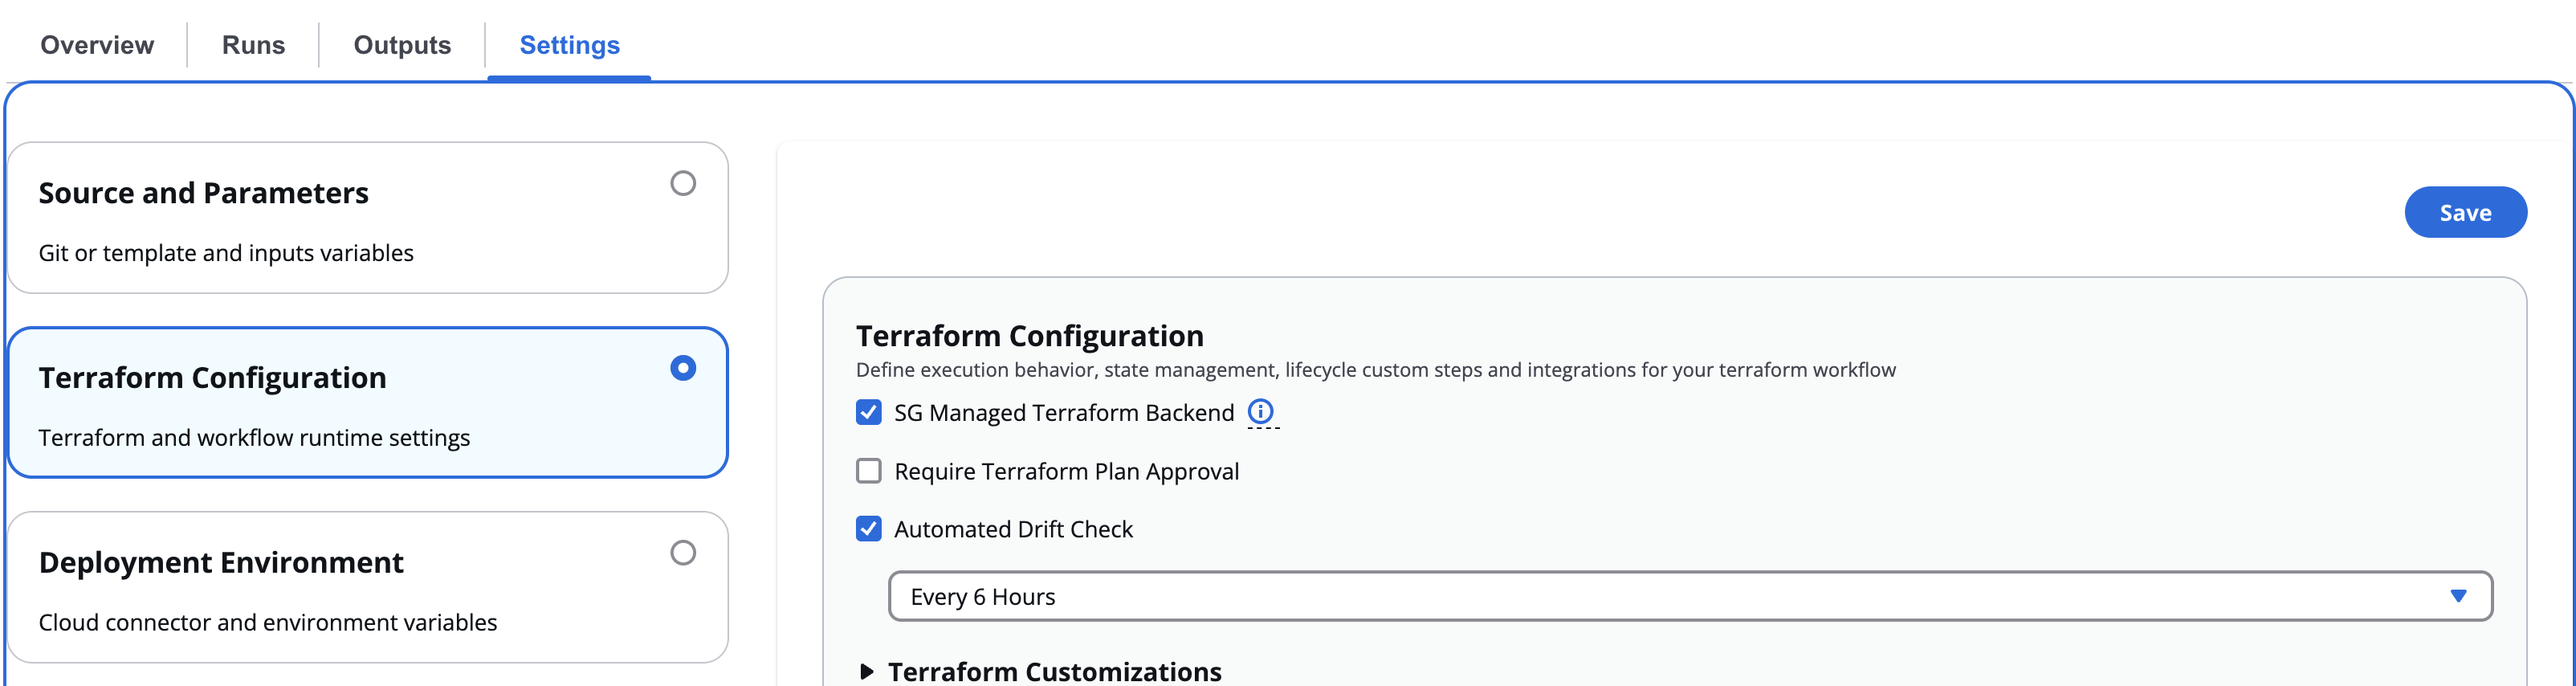
*SG Managed Terraform Backend configuration*
Only Terraform plans are supported using the CLI. To run the apply, the user is required to trigger it from the platform or use VCS (Version Control System) Triggers.
## Configuration[](#configuration "Direct link to Configuration")
Before you can use the CLI-driven workflow, complete these steps:
1. Sign in to your StackGuardian organization. If you don't have one yet, create a new organization.
2. Run `terraform login` to authenticate:
* EU Region
* US Region
```
$ terraform login api.app.stackguardian.io
```
```
$ terraform login api.us.stackguardian.io
```
If you prefer, you can set up credentials manually through the CLI config file or environment variables. Check the [CLI Configuration](https://developer.hashicorp.com/terraform/cli/config/config-file#environment-variable-credentials) for the complete process.
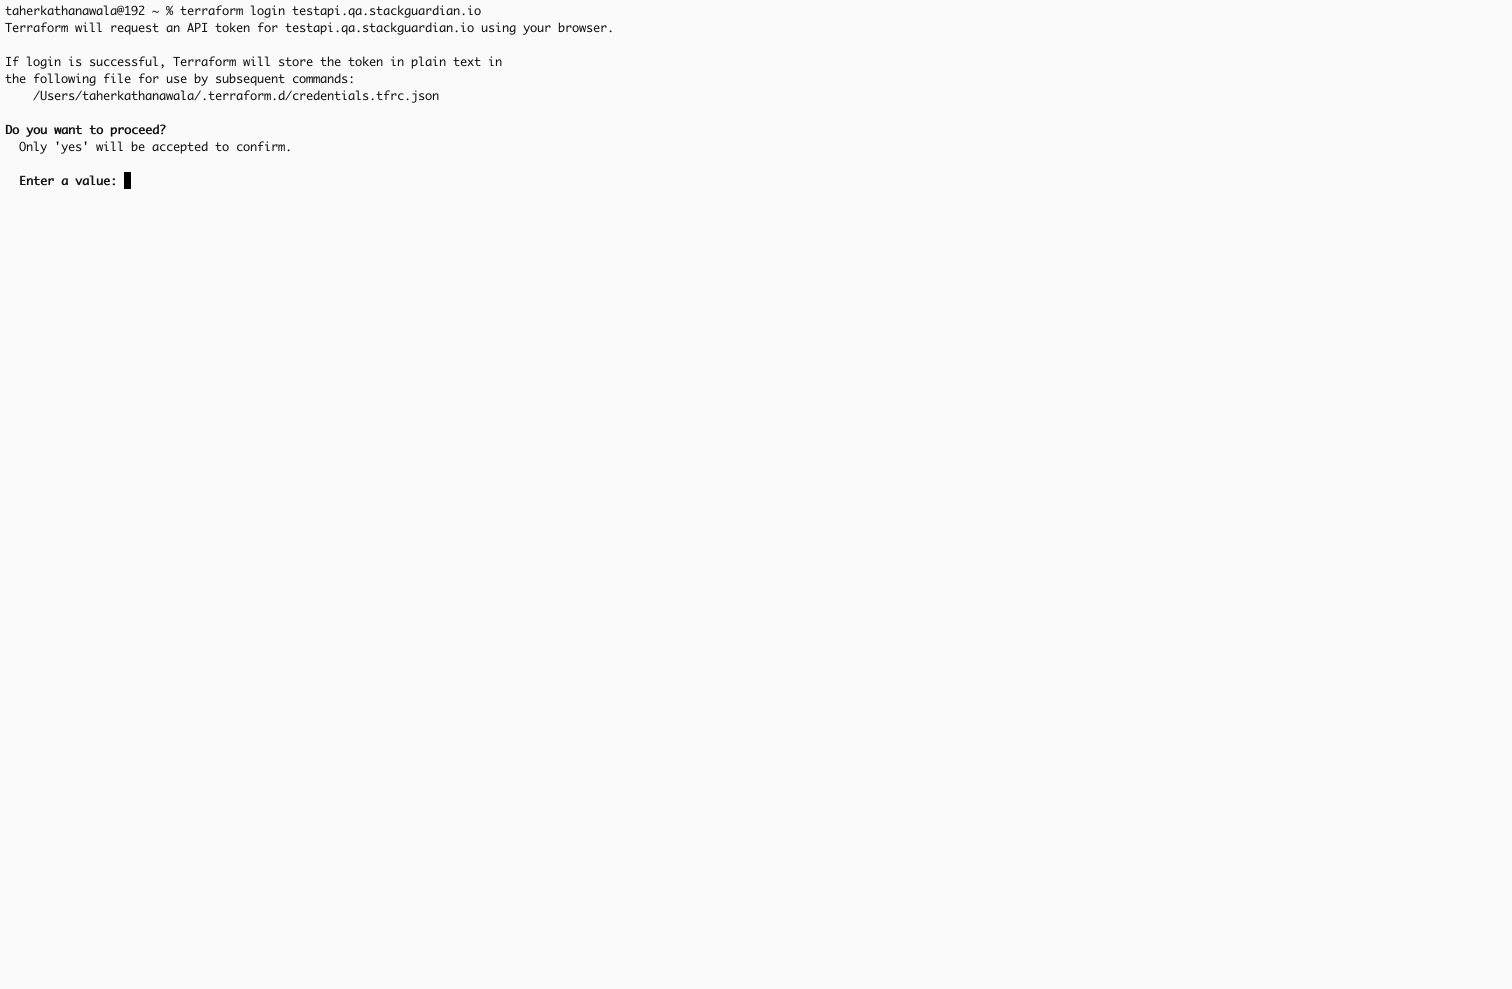
*Authenticating Terraform CLI with StackGuardian*
3. Add the `cloud` block to your Terraform configuration. See the [Workspace Name](#workspace-name) section below for instructions on constructing your workspace name.
* EU Region
* US Region
```
terraform {
cloud {
hostname = "api.app.stackguardian.io"
organization = ""
workspaces {
name = "wfgrps:::wfs:"
}
}
}
```
```
terraform {
cloud {
hostname = "api.us.stackguardian.io"
organization = ""
workspaces {
name = "wfgrps:::wfs:"
}
}
}
```
note
Terraform v1.1 or later is required to use the `cloud` block.
4. Run `terraform init`:
```
$ terraform init
Initializing HCP Terraform...
Initializing provider plugins...
- Reusing previous version of hashicorp/random from the dependency lock file
- Using previously-installed hashicorp/random v3.0.1
HCP Terraform has been successfully initialized!
You may now begin working with HCP Terraform. Try running "terraform plan"
to see any changes that are required for your infrastructure.
If you ever set or change modules or Terraform Settings,
run "terraform init" again to reinitialize your working directory.
```
## Workspace Name[](#workspace-name "Direct link to Workspace Name")
### Default[](#default "Direct link to Default")
1. Get Workflow Group ID and the Workflow ID from the StackGuardian platform.
2. Add `wfgrps:` prefix to your Workflow Group ID.
3. Add `wfs:` prefix to your Workflow ID.
4. Join both to form one single string with workflow group followed by the workflow. For example:
```
Workflow Group ID: `terraform-wfgrp`
Workflow ID: `terraform-wf`
Workspace Name: `wfgrps:terraform-wfgrp:wfs:terraform-wf`
```
## Nested workflow groups[](#nested-workflow-groups "Direct link to Nested workflow groups")
Consider you have a workflow in a nested Workflow Group. In this case you would add the child workflow group ID after the parent separated by a `:`. Similarly, you can add Workflow Groups according to how deeply it is nested. For example:
```
Parent Workflow Group ID: `terraform-parent-wfgrp`
Workflow Group ID: `terraform-child-wfgrp`
Workflow ID: `terraform-wf`
Workspace Name: `wfgrps:terraform-parent-wfgrp:terraform-child-wfgrp:wfs:terraform-wf`
```
## Remote plans[](#remote-plans "Direct link to Remote plans")
You can run plans in any StackGuardian Terraform Workflows where you have the `Run Workflow Terraform CLI` permission. Plans use the configuration code from the local working directory and the variable values from the specified workflow.
To run a plan on your configuration, use the `terraform plan` command. The plan will run in StackGuardian, and the logs will stream back to the command line:
```
Running plan in StackGuardian. Output will stream here. Pressing Ctrl-C
will stop streaming the logs, but will not stop the plan running remotely.
Preparing the remote plan...
To view this run in a browser, visit:
https://api.app.stackguardian.io/app/acme-corp/production-infra/runs/orgs:acme-corp:wfgrps:production-infra:networking:wfs:deploy-vpc:wfruns:a1b2c3d4e5f6
Waiting for the plan to start...
Running on private runner group
Runner Group: production-runners
Organization: "/orgs/acme-corp"
Workflow Run: "/wfgrps/production-infra/networking/wfs/deploy-vpc/wfruns/a1b2c3d4e5f6"
Using Deployment Platform Cloud: AWS
Using Cloud Connector: aws-connector
[...]
Plan: 1 to add, 0 to change, 0 to destroy.
Changes to Outputs:
+ message_lengths = [
+ 13,
]
```
## Terraform CLI state commands[](#terraform-cli-state-commands "Direct link to Terraform CLI state commands")
important
This feature is in Preview. Functionality may change before general availability.
The state file is a record of the infrastructure Terraform has provisioned. Using Terraform CLI state commands, you can inspect and manipulate the state file directly from your terminal. StackGuardian executes these commands against the managed backend configured for your Workflow.
warning
Terraform state commands directly modify the state file, not your infrastructure. Incorrect changes can cause Terraform to misrepresent what is deployed in your cloud account, leading to failed runs or unintended changes on the next apply. Only platform engineers with a clear understanding of the state file structure should use these commands.
### Supported commands[](#supported-commands "Direct link to Supported commands")
| Command | Description |
| ---------------------------------- | ------------------------------------------------------------ |
| `terraform state show` | Shows the attributes of a single resource |
| `terraform state list` | Lists all resources tracked in the state file |
| `terraform state mv` | Moves a resource from one Terraform resource name to another |
| `terraform state rm` | Removes a resource from Terraform management |
| `terraform state pull` | Displays the outputs and resources in the state file |
| `terraform state identities -json` | Lists the identities of resources in the state |
| `terraform state replace-provider` | Replaces the provider for a resource in the state |
| `terraform import` | Imports a resource into the Terraform state |
| `terraform taint` | Marks a resource for replacement on the next run |
| `terraform untaint` | Removes the replacement mark from a resource |
### Workspace locking[](#workspace-locking "Direct link to Workspace locking")
Some state operations require an exclusive lock on the Workflow. When the Terraform CLI acquires a lock, StackGuardian queues any pending runs and prevents them from executing until the lock is released. New runs can still be created and queued during this time.
The lock is released automatically when the operation completes.
### Required permissions[](#required-permissions "Direct link to Required permissions")
All Terraform CLI operations, including running a plan, require the following base permissions:
* **Get Workflow Artifact** — required to access the state file (`tfstate.json`)
* **Get Workflow** — required to access the Workflow
Some commands require additional permissions:
| Command | Additional permissions required |
| ------------------------------------------------------------------------------------------------------------------------------------------ | --------------------------------------------------------------- |
| `terraform state mv`, `terraform state rm`, `terraform taint`, `terraform untaint`, `terraform import`, `terraform state replace-provider` | **Update Workflow**, **Create Update Delete Workflow Artifact** |
| `terraform state show`, `terraform state list`, `terraform state pull`, `terraform state identities` | None |
Contact your StackGuardian administrator if you receive a permission error when running state commands.
---
# Dev Portal
## Overview[](#overview "Direct link to Overview")
The **Dev Portal** provides a streamlined interface for developers to deploy cloud resources using subscribed templates. Select a template from those available to you, configure the parameters your platform team has exposed, and run the Workflow, all in a controlled environment. This ensures consistency and security while platform teams maintain governance over infrastructure.
To get started, open the **Orchestrator** and select **Dev Portal** from the sidebar. Here's a quick overview of the Dev Portal in action:
[](/videos/new-dev-portal.mp4)
***
## How to create a Workflow/Stack[](#how-to-create-a-workflowstack "Direct link to How to create a Workflow/Stack")
To create a Workflow/Stack via the Dev Portal:
1. Search for a template in the **Search bar**.
2. On the template card, click **Select**.
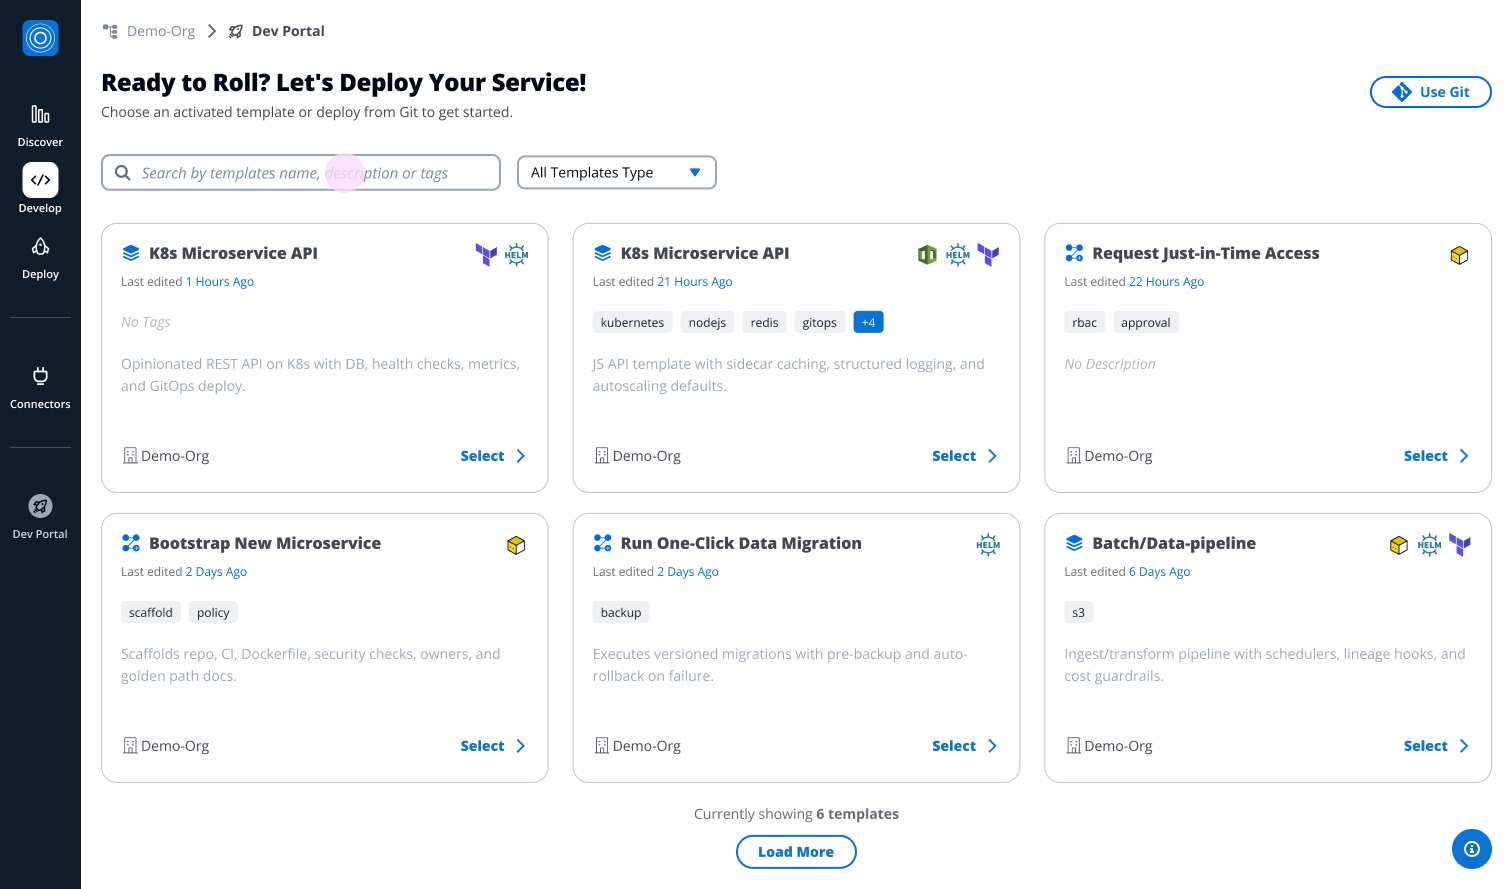
*How to select a Template*
The Workflow/Stack will be configured in three steps:
### Step 1: Configure Workflow/Stack meta details[](#step-1-configure-workflowstack-meta-details "Direct link to Step 1: Configure Workflow/Stack meta details")
1. Fill in the following fields:
* **Revision**: Each template version is tracked as a revision. The **Revision notes** contains information about the latest revision, which is selected by default. Click **Change Revision** to select a different revision.
* **Workflow Group Name**: Select an existing Workflow Group or create a new one (the most recently created is selected by default).
* **Workflow Group ID**: Auto-generated from the Workflow Group Name. You can customize it using only letters, numbers, underscores (\_), or dashes (-). This cannot be changed after creation.
* **Workflow Name**
* **Workflow ID**: Auto-generated from the Workflow/Stack Name. You can customize it using only letters, numbers, underscores (\_), or dashes (-). This cannot be changed after creation.
* **Description**: Add a short description (e.g., Creates EC2 key pairs on AWS).
* **Tags**
* **Context Tags**
2. Click **Next Step: Cloud Connection**.
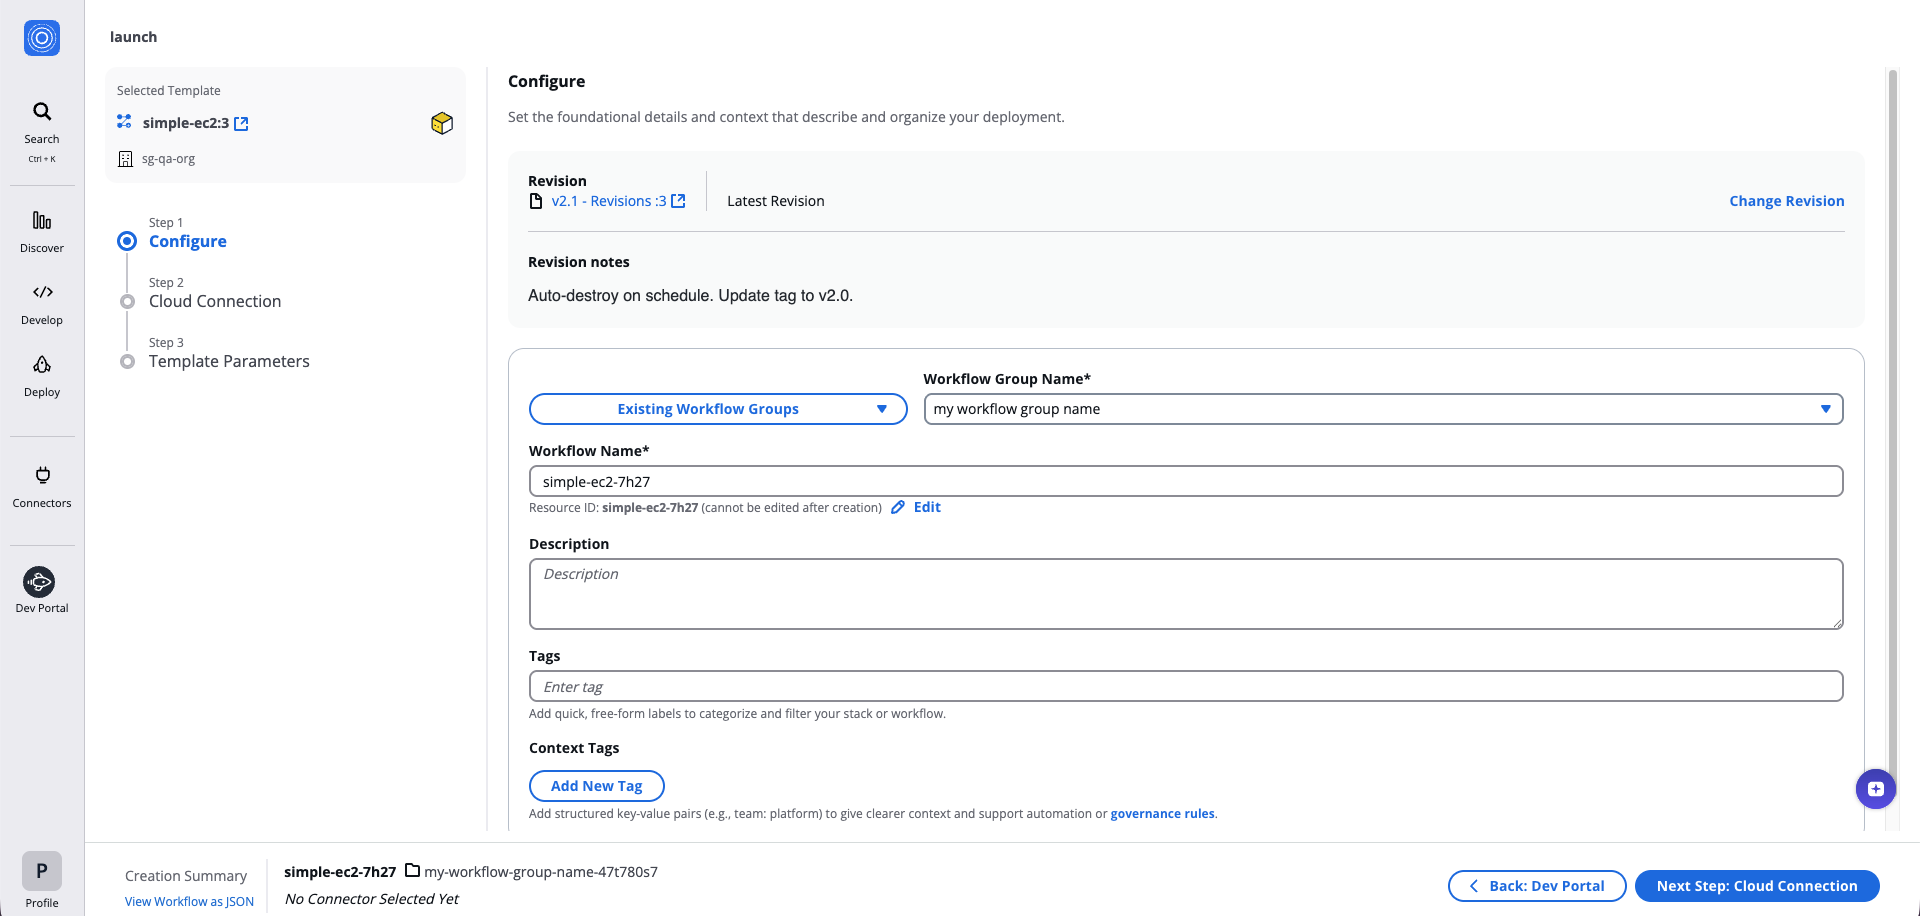
*How to configure Workflow meta details*
### Step 2: Cloud Connection[](#step-2-cloud-connection "Direct link to Step 2: Cloud Connection")
1. Select a pre-configured **Connector**.
2. Select a **Child Connector**.
3. Configure your runtime environment:
* Add **Environment Variables**, or
* Select **Reference value** to use outputs or Vault Secrets from another Workflow or Template.
4. Click **Next Step: Template Parameters**.
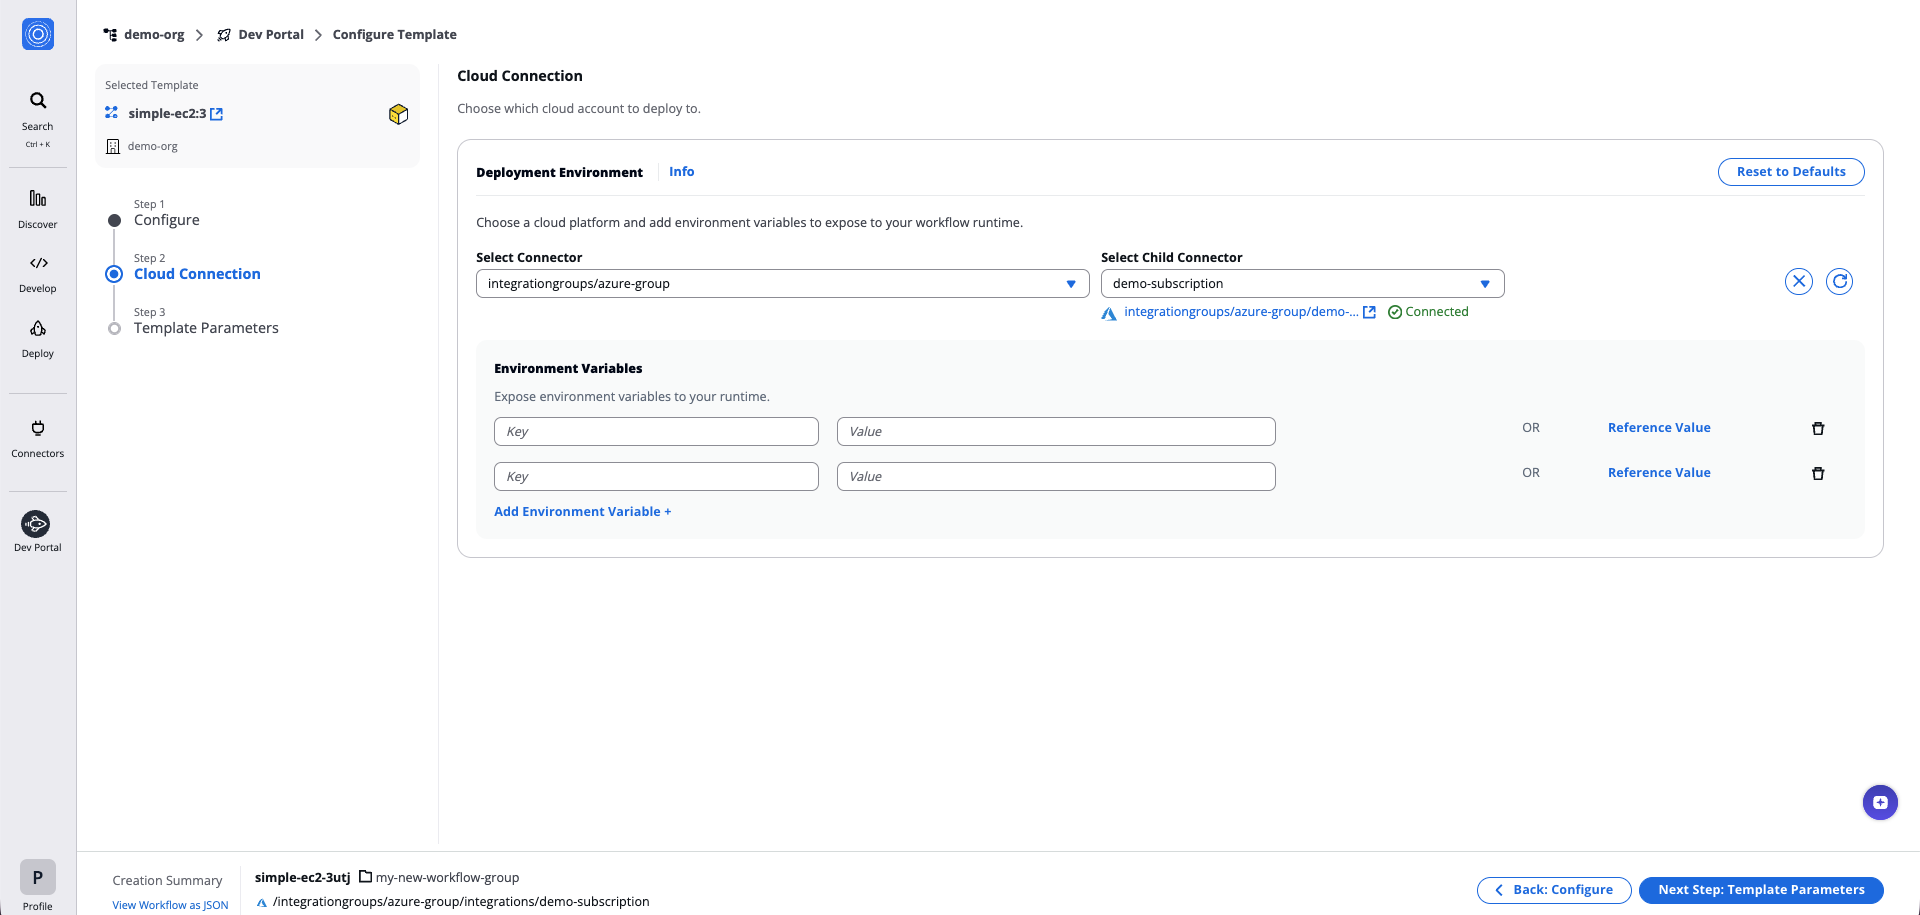
*Connectors details*
tip
When creating a Stack, you can enable **Configure connectors individually** to set different connectors for each Workflow in the Stack. You can also enable **Configure environment variables individually** to set different environment variables for each Workflow. When disabled, all Workflows share the same configuration.

*Individual configuration per Workflow*
### Step 3: Template Parameters[](#step-3-template-parameters "Direct link to Step 3: Template Parameters")
1. Fill in the main parameters and [step-specific parameters](/docs/deploy/workflows/workflow_components/workflow_config/#22-lifecycle-custom-steps) for your selected Template.
2. Click **Next Step: Create**.
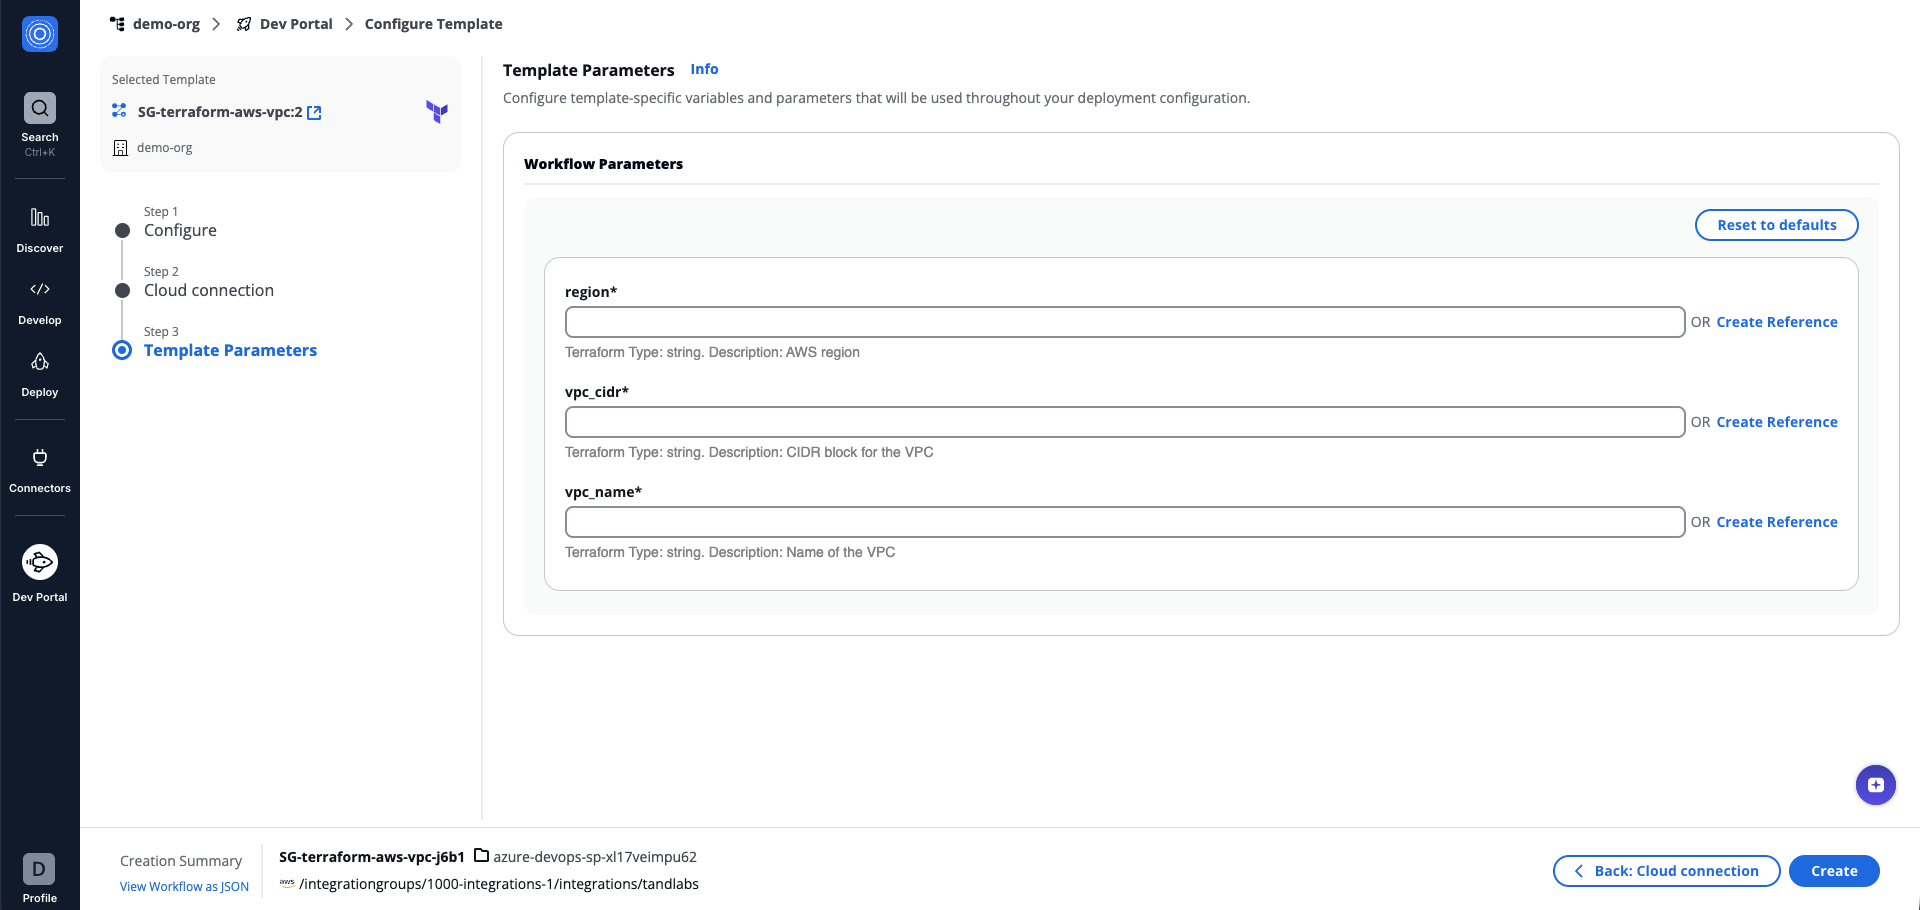
*Template Parameters details*
tip
When creating a Stack, you can enable **Show All Parameters** to display all Workflows in the Stack, including those with non-configurable parameters to configure.
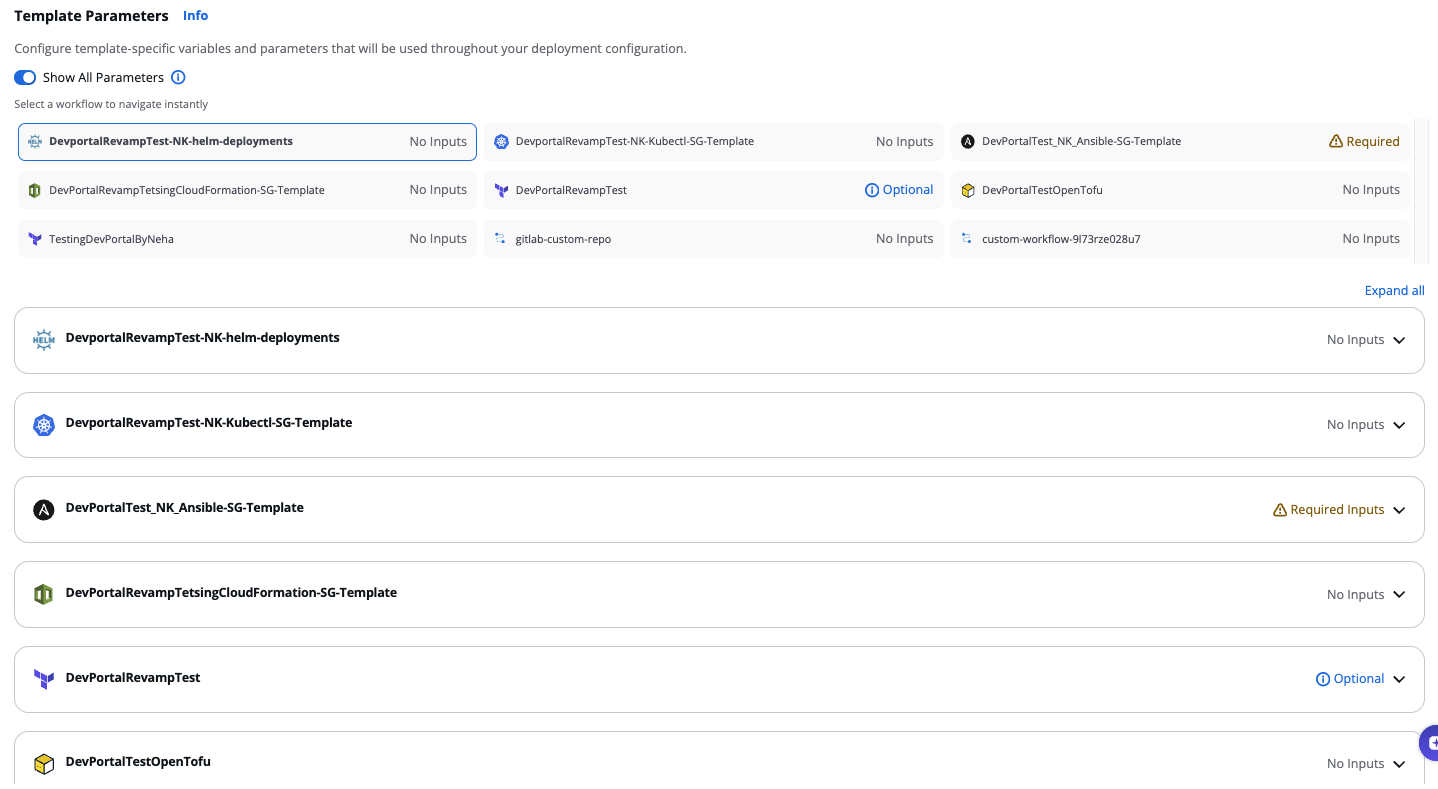
*Show All Parameters*
3. The Workflow/Stack will be created. Click [Go to Settings](/docs/deploy/workflows/workflow_components/settings/) for additional configuration, or **Run Workflow** to run it straight away.
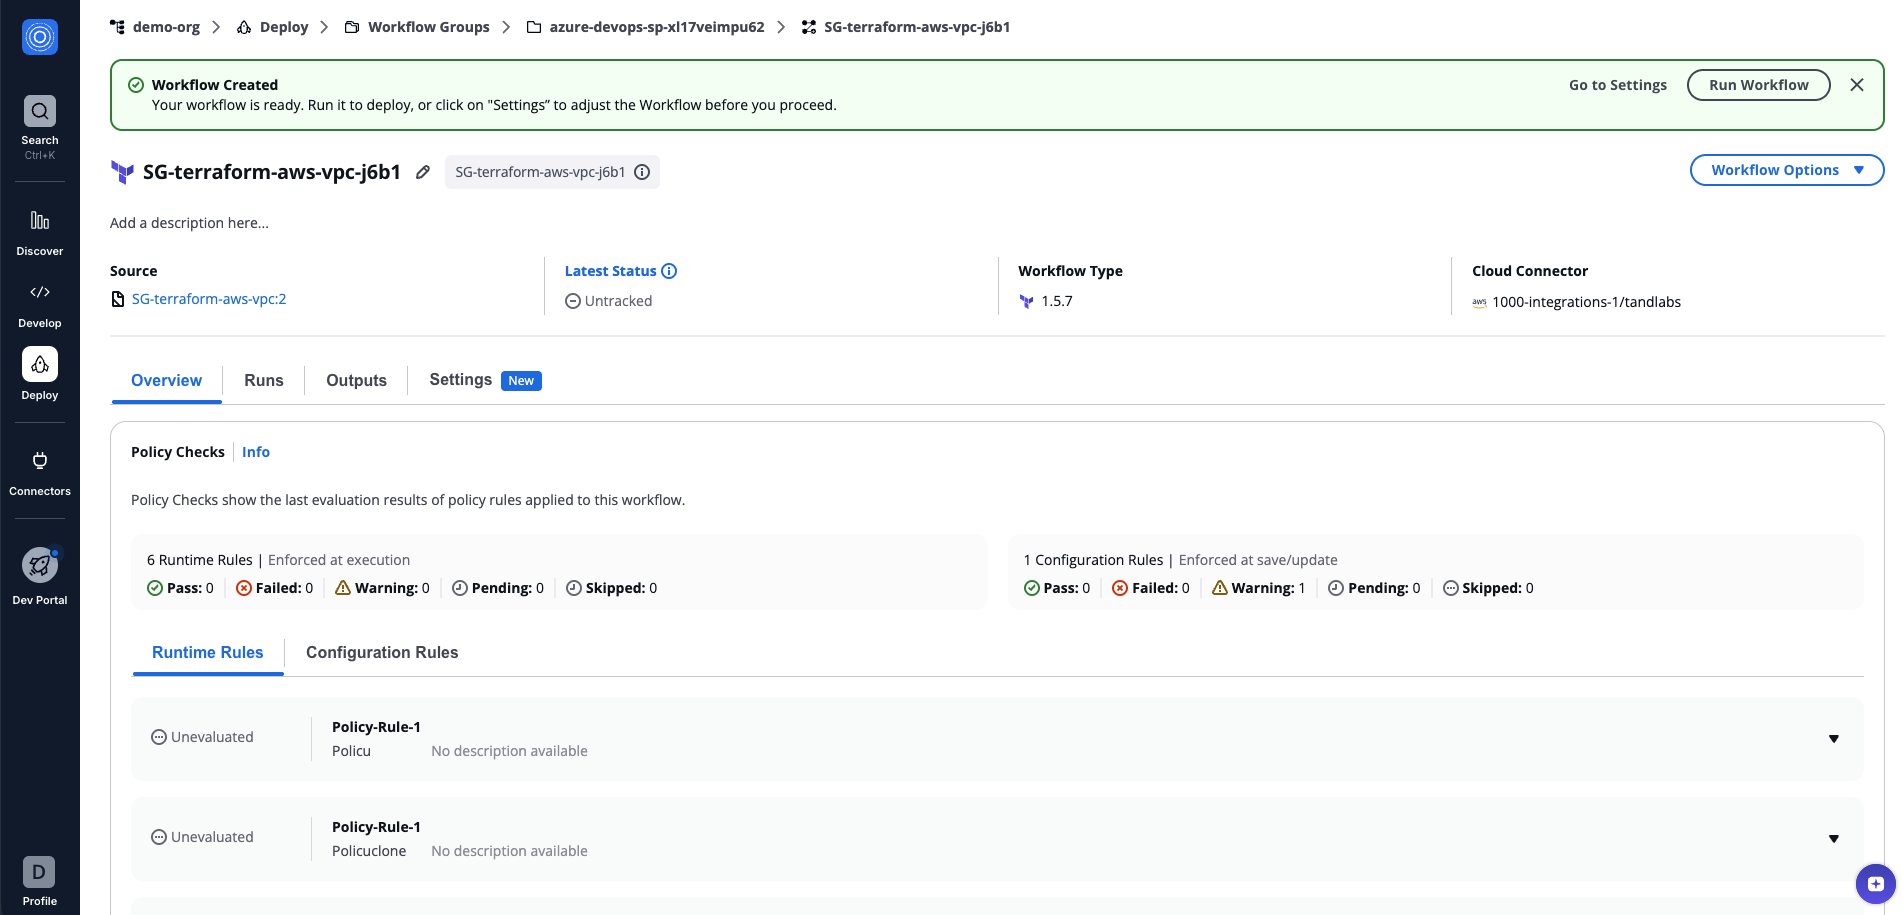
*Workflow Run created*
Once the Workflow is created, you can continue configuring it through [**Workflow Settings**](/docs/deploy/workflows/workflow_components/settings/) or run it straight away.
#### View Workflow as JSON[](#view-workflow-as-json "Direct link to View Workflow as JSON")
During the creation process, you can view the JSON representation of your Workflow/Stack configuration. This is useful for creating or managing Workflows/Stacks with external systems and automation tools such as the StackGuardian API, ServiceNow, and others.
Click on **View Workflow/Stack as JSON** in the bottom-left corner of the screen, inside the **Creation Summary**.
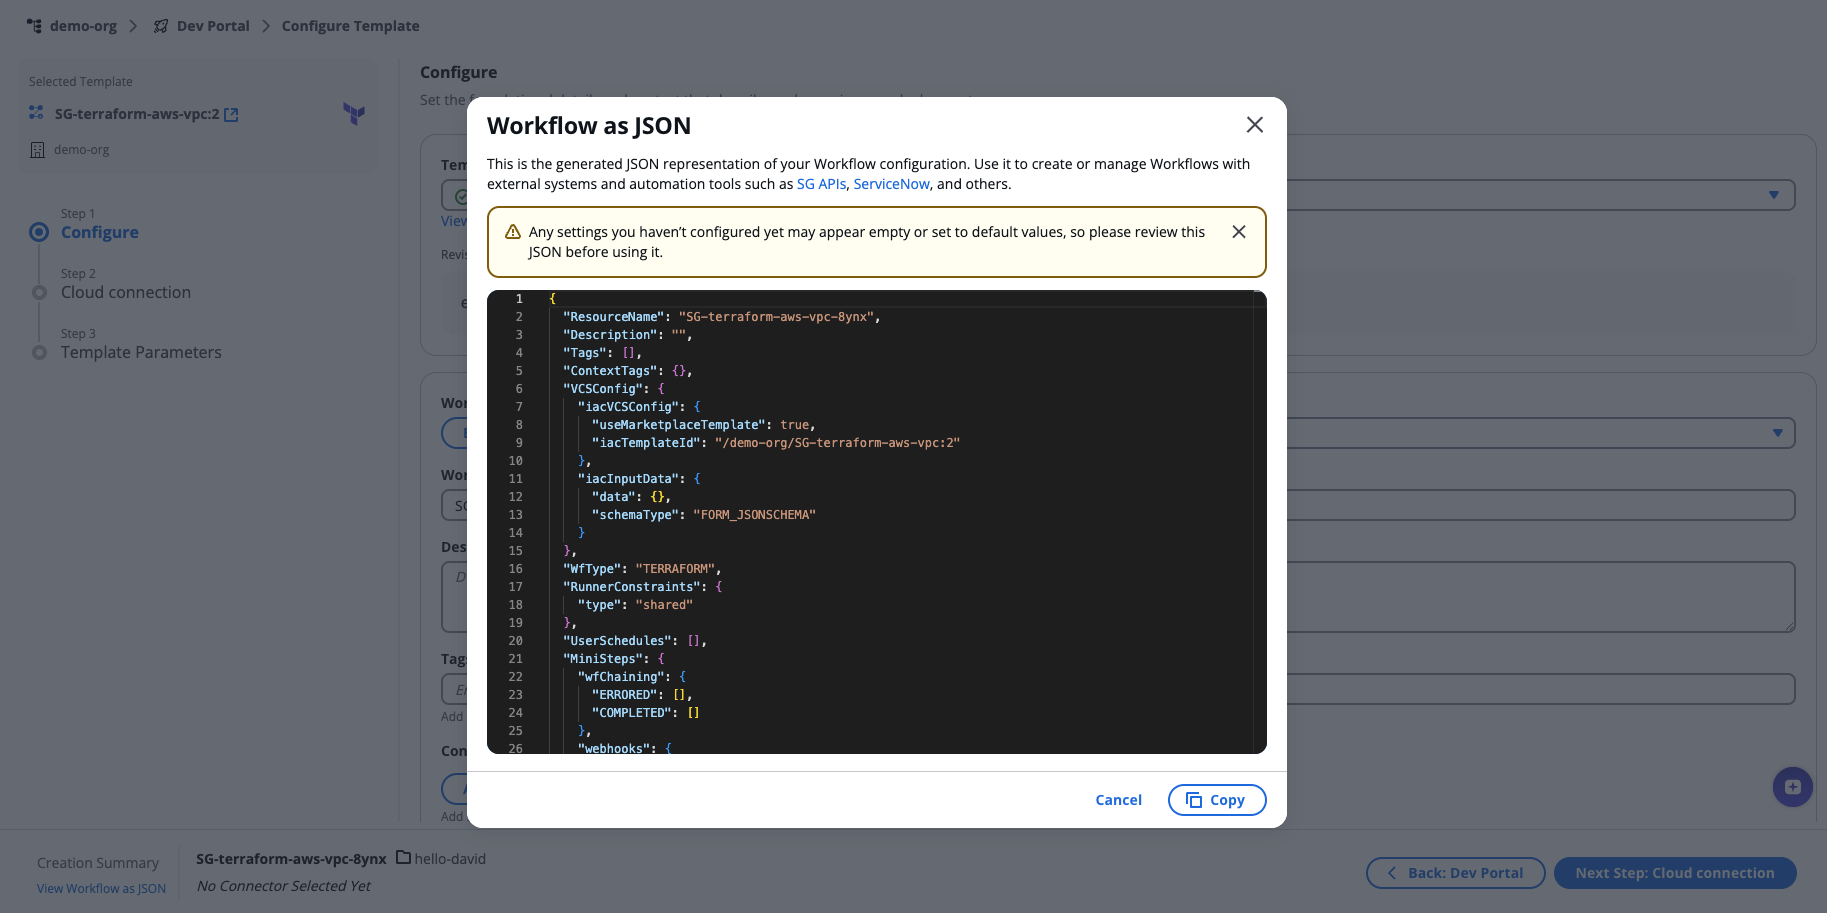
*Workflow as JSON*
info
Settings you haven't configured yet may appear empty or set to default values. Review the JSON before using it.
## Create from Git[](#create-from-git "Direct link to Create from Git")
The Dev Portal allows you to deploy directly from a Git repository instead of using a pre-configured template. This option is ideal when you want to deploy your own infrastructure code.
To get started, open **Orchestrator**, select **Dev Portal** from the sidebar, and click **Use Git**.
*Use Git*
After you click **Select** on your chosen infrastructure type, the Workflow will be created in three steps:
### Step 1: Configure[](#step-1-configure "Direct link to Step 1: Configure")
Name your deployment and choose where to save it.
1. Fill in the following fields:
* **Workflow Group Name**: Select an existing Workflow Group or create a new one (the most recently created is selected by default).
* **Workflow Name**
* **Description** (optional): Add a short description.
* **Tags** (optional): Add labels to help find this deployment later.
* **Context Tags** (optional): Add structured key-value pairs for automation or governance rules.
2. Click **Next Step: Git Repository**.
### Step 2: Git Repository[](#step-2-git-repository "Direct link to Step 2: Git Repository")
Connect your repository and choose the code to deploy.
1. Select a **Version Control** provider (GitHub, GitLab, etc.).
2. Enter or search for the **Repository** URL.
3. Optionally, expand **Advanced Options** to configure:
* **Branch, Tag or Commit**: Specify the branch, tag, or commit to deploy (default: `main`).
* **Working Dir**: The folder in your repository containing the code to deploy.
* **Git Sparse Checkout Config**: Download only specific folders from your repository.
* **Enable git core.autocrlf**: Enable automatic line ending conversion.
4. Configure **Template Parameters** if your deployment requires input variables:
* Select an **Input Variables Methods** option to define how values are passed to your deployment.
5. Click **Next Step: Connectors**.
### Step 3: Connectors[](#step-3-connectors "Direct link to Step 3: Connectors")
Choose which cloud account to deploy to.
1. Select a pre-configured **Connector**.
2. Select a **Child Connector**.
3. Configure your runtime environment:
* Add **Environment Variables**, or
* Select **Reference Value** to use outputs or Vault Secrets from another Workflow or Template.
4. Click **Create**.
---
# JSON
## Using Workflow as Code[](#using-workflow-as-code "Direct link to Using Workflow as Code")
The **Workflow as Code** feature allows users to create workflows by importing or pasting JSON definitions, enabling flexibility and efficiency in workflow creation.
### Step 1: Initiate a New Workflow[](#step-1-initiate-a-new-workflow "Direct link to Step 1: Initiate a New Workflow")
1. Navigate inside the desired **Workflow Group** and click **Create Workflow**.
2. Select **Workflow as Code** from the creation options.
### Step 2: Provide Workflow Configuration[](#step-2-provide-workflow-configuration "Direct link to Step 2: Provide Workflow Configuration")
1. Import a JSON file or paste the workflow configuration directly in key-value pairs.
### Step 3: Launch the Workflow[](#step-3-launch-the-workflow "Direct link to Step 3: Launch the Workflow")
1. Once the configuration is complete, click **Create & Run Workflow** to execute the workflow.
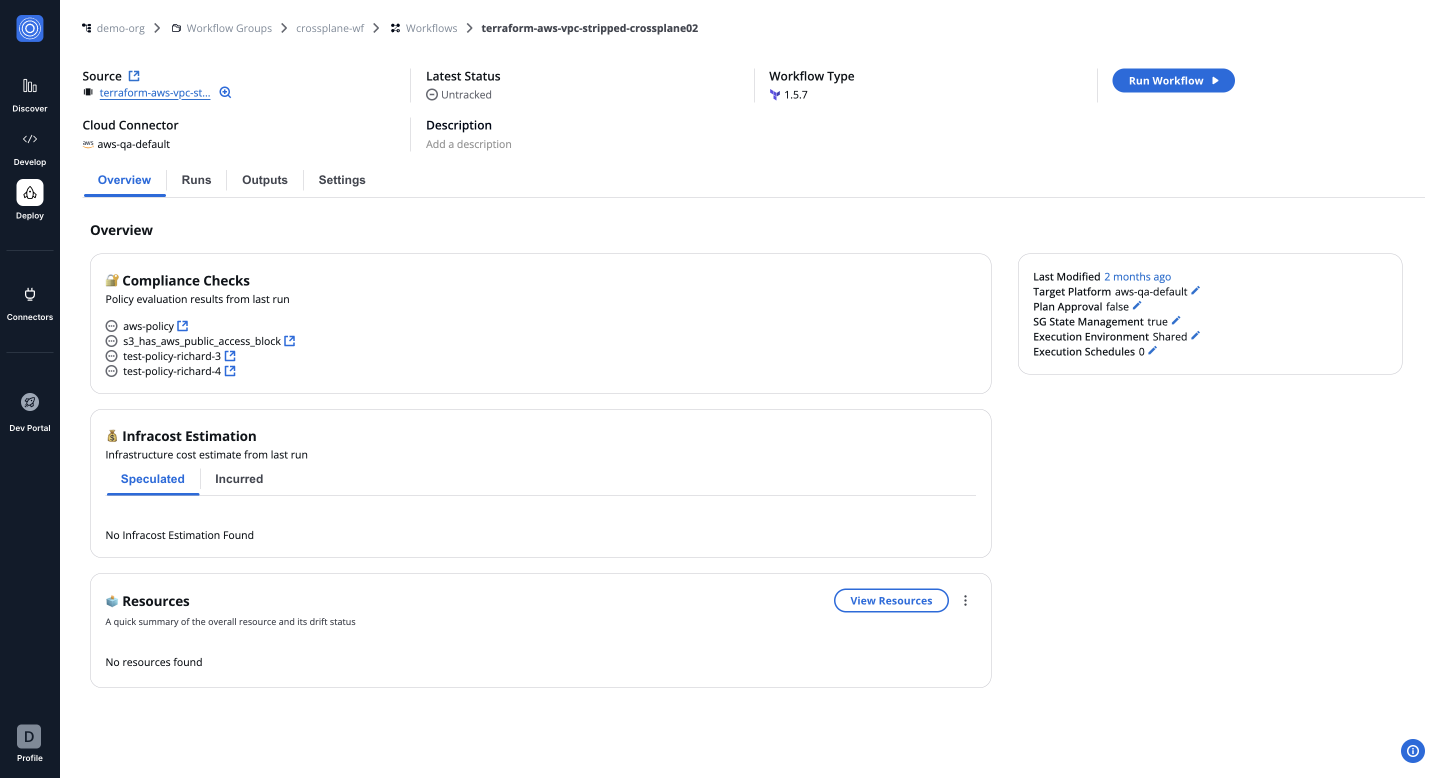
---
# Overview
Workflows in StackGuardian are organized within **Workflow Groups**, which help group workflows by teams, divisions, or environments. These groups also enable fine control over who can access and manage your workflows.
The primary goal of StackGuardian's deployment interface is to simplify complex deployment processes and enhance operational efficiency. It offers intuitive management of workflow configurations, supporting various workflows such as Terraform, Ansible, Kubernetes, Helm, and more.
## Ways to create workflows[](#ways-to-create-workflows "Direct link to Ways to create workflows")
There are three guides that explains two methods for creating workflows on StackGuardian:
* [**Using Dev Portal**](/docs/deploy/workflows/create_workflow/devportal/): Quickly deploy cloud resources and create workflows using subscribed templates with the newly introduced **Dev Portal**.
* [**Using Wizard**](/docs/deploy/workflows/create_workflow/wizard/): Build workflows either by using **subscribed templates** or by pulling configurations from a **Git repository**.
* [**Using Workflow as Code**](/docs/deploy/workflows/create_workflow/json/): Define workflows by importing **JSON** files or directly inputting key-value pairs.
---
# Wizard
Build workflows either by using **subscribed templates** or by pulling configurations from a **Git repository**.
### Step 1: Create a Workflow Group[](#step-1-create-a-workflow-group "Direct link to Step 1: Create a Workflow Group")
1. Navigate to **Deployments** > **Workflow Groups** and click **Create Workflow Group**.
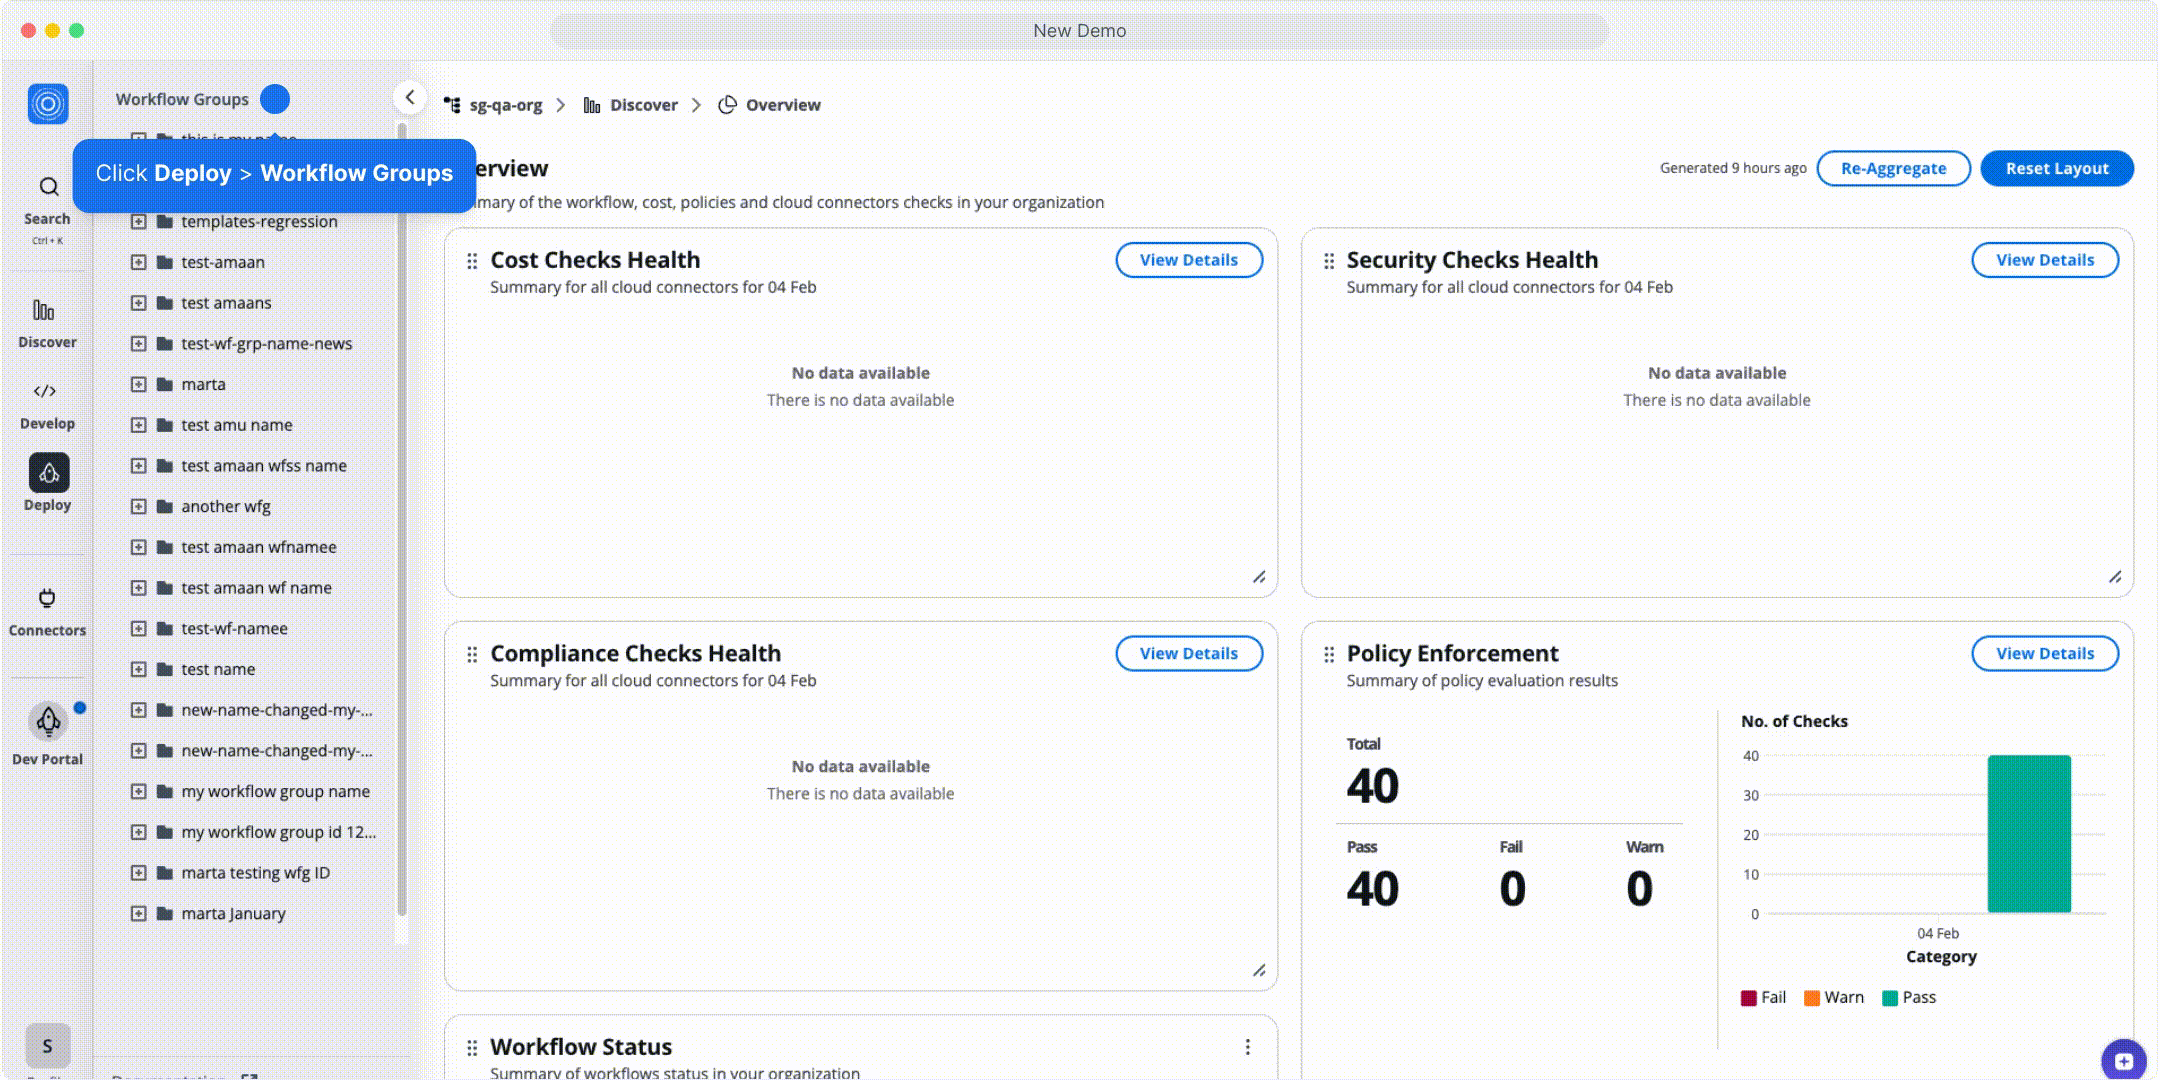
*Creating a Workflow Group*
***
### Step 2: Initiate a New Workflow[](#step-2-initiate-a-new-workflow "Direct link to Step 2: Initiate a New Workflow")
1. Open the **Workflow Group** you just created.
2. Click **Create Workflow**, and select **Use Wizard** > **Terraform**.
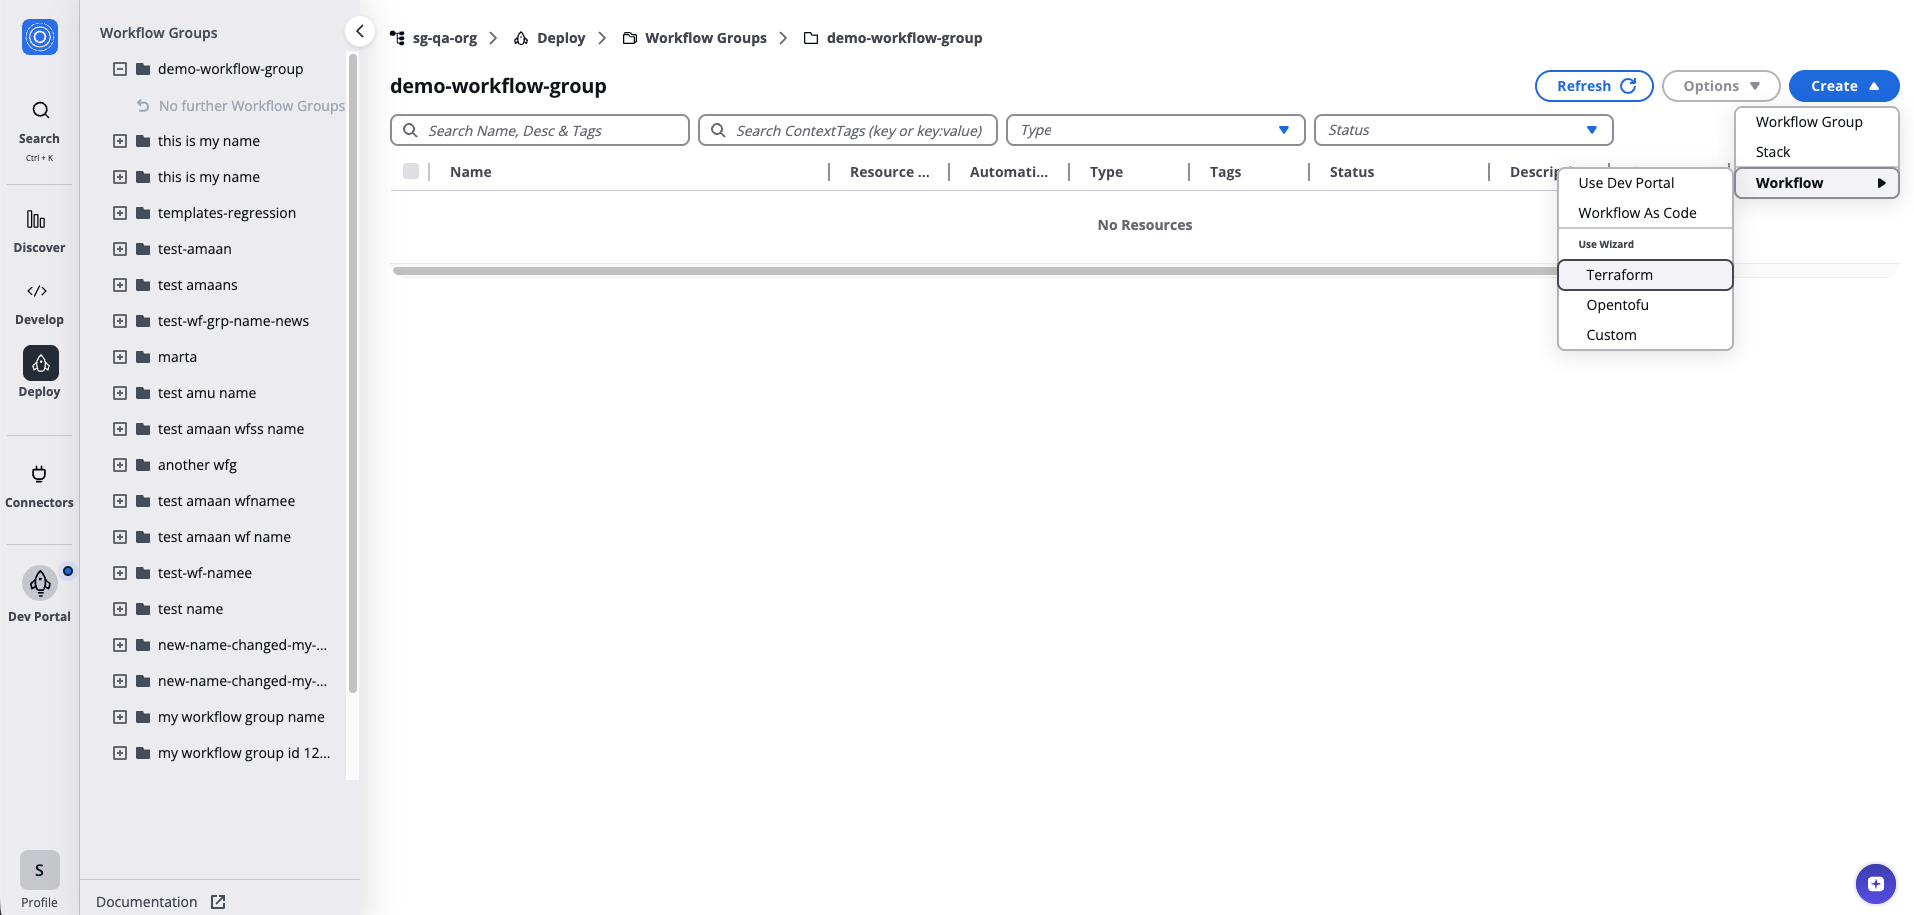
*Initiating a New Workflow*
***
### Step 3: Choose the Source[](#step-3-choose-the-source "Direct link to Step 3: Choose the Source")
#### Using an Activated Templates[](#using-an-activated-templates "Direct link to Using an Activated Templates")
1. Search for and select the template.
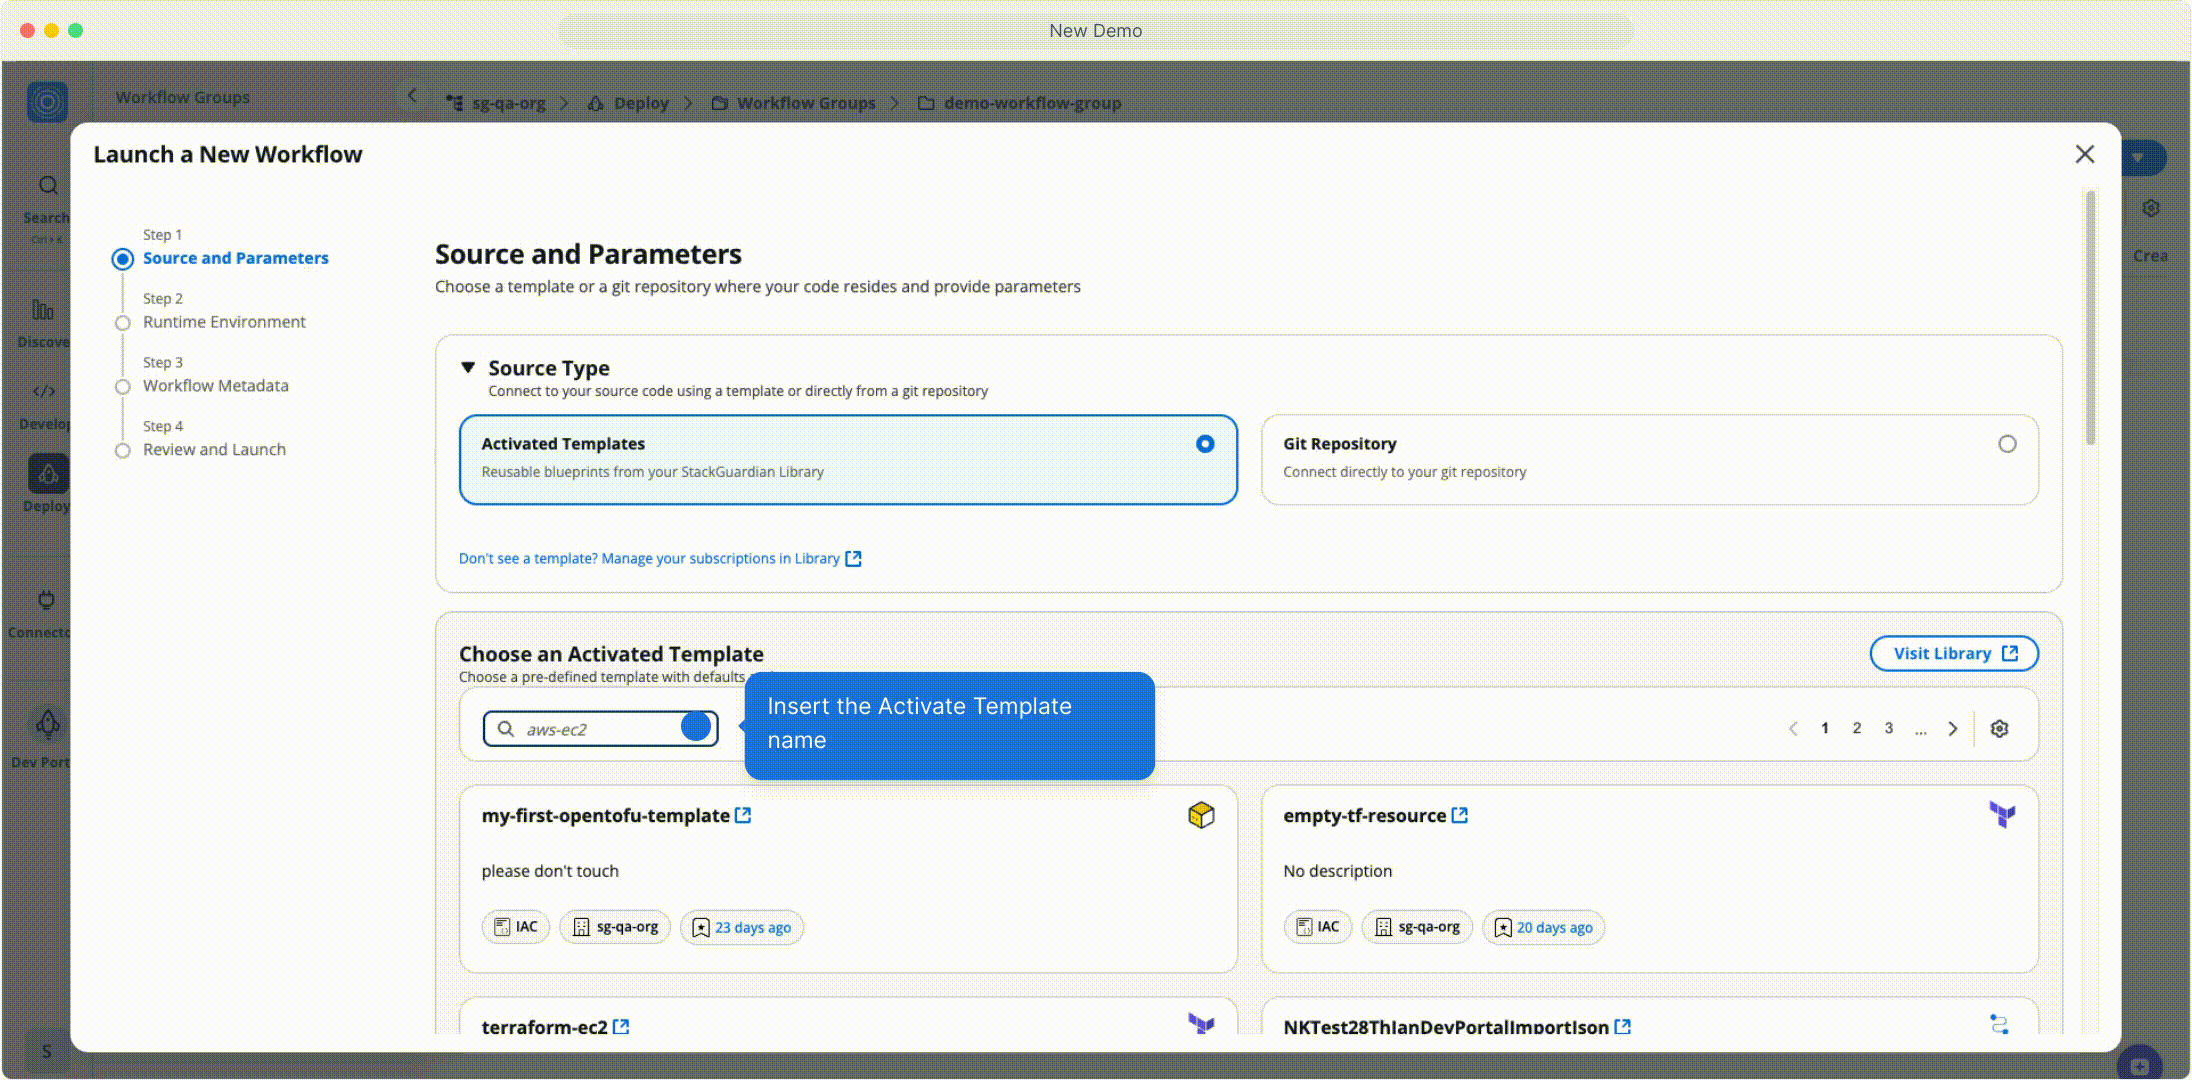
*Using an Activated Templates*
#### Template Parameters[](#template-parameters "Direct link to Template Parameters")
After selecting the template, configure the required parameters:
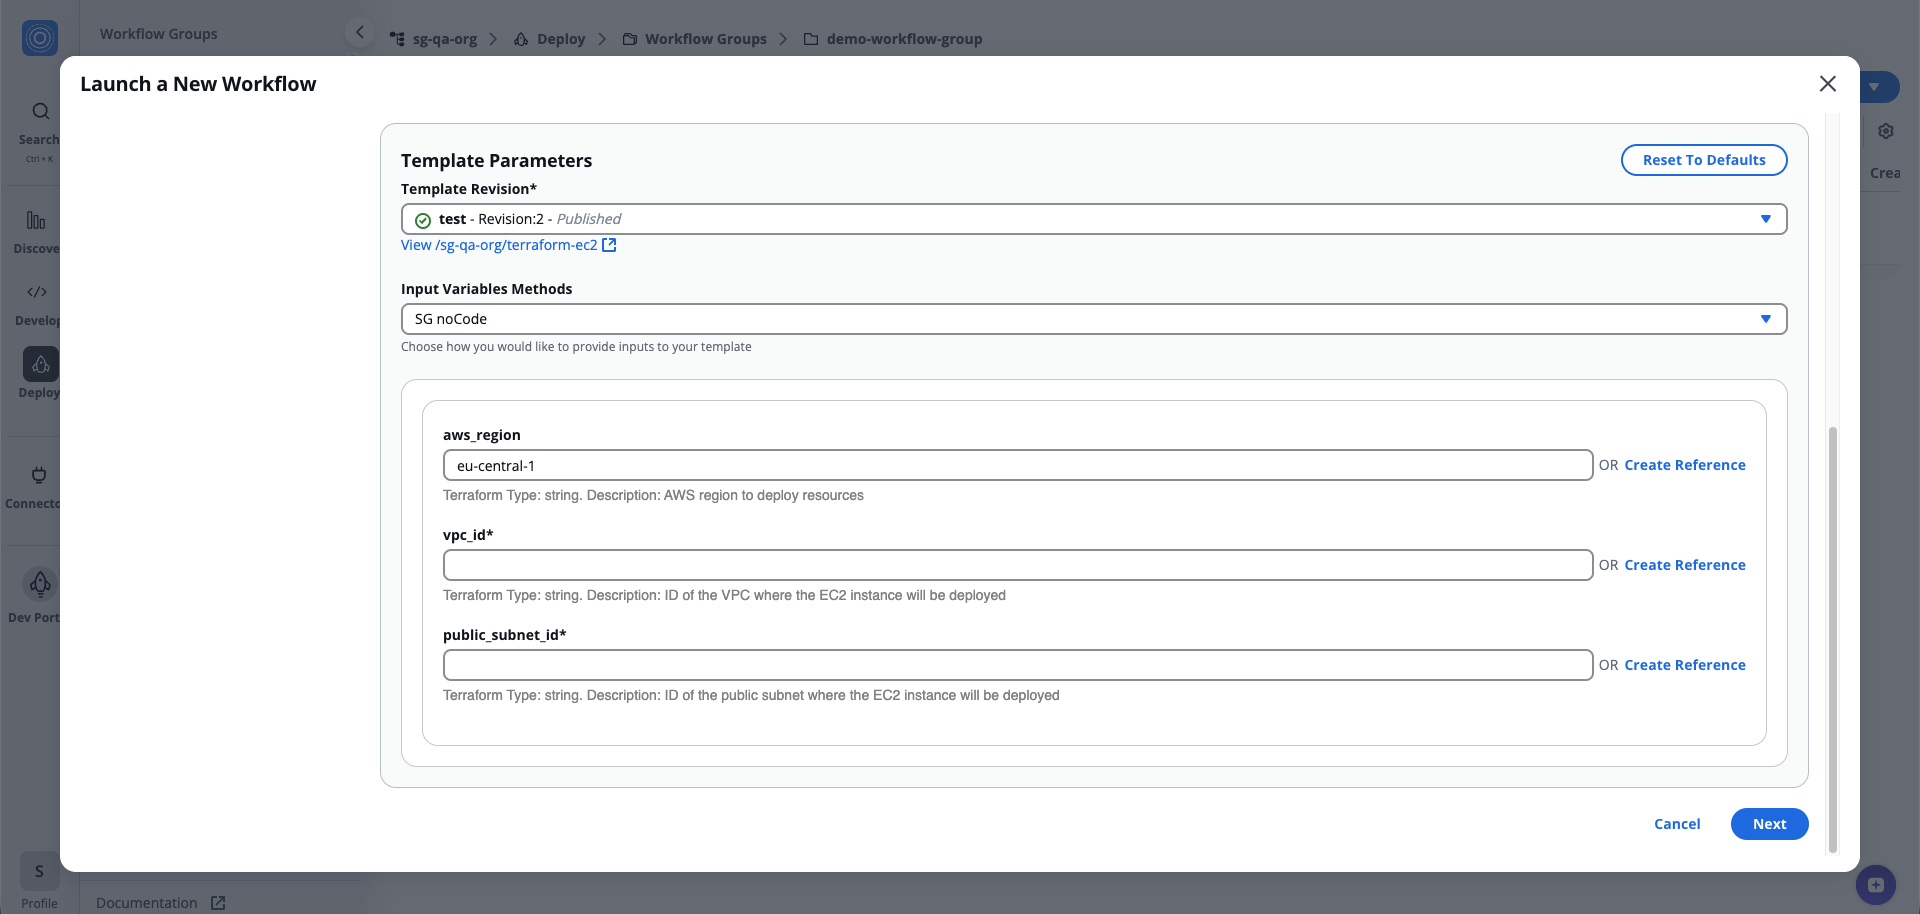
*Template Parameters*
* **Key Name**: Enter a name for the key pair (e.g., `nginx-key`).
* **Public Key**: Provide the public key needed for the key pair. You can generate this key using tools like *ssh-keygen*. To configure, click the **settings** icon, create a **reference** for the public key using the **secret** option. "**Select**" the secret name stored in your [**Vault**](/docs/connectors/vaults/) and click "**Use**".
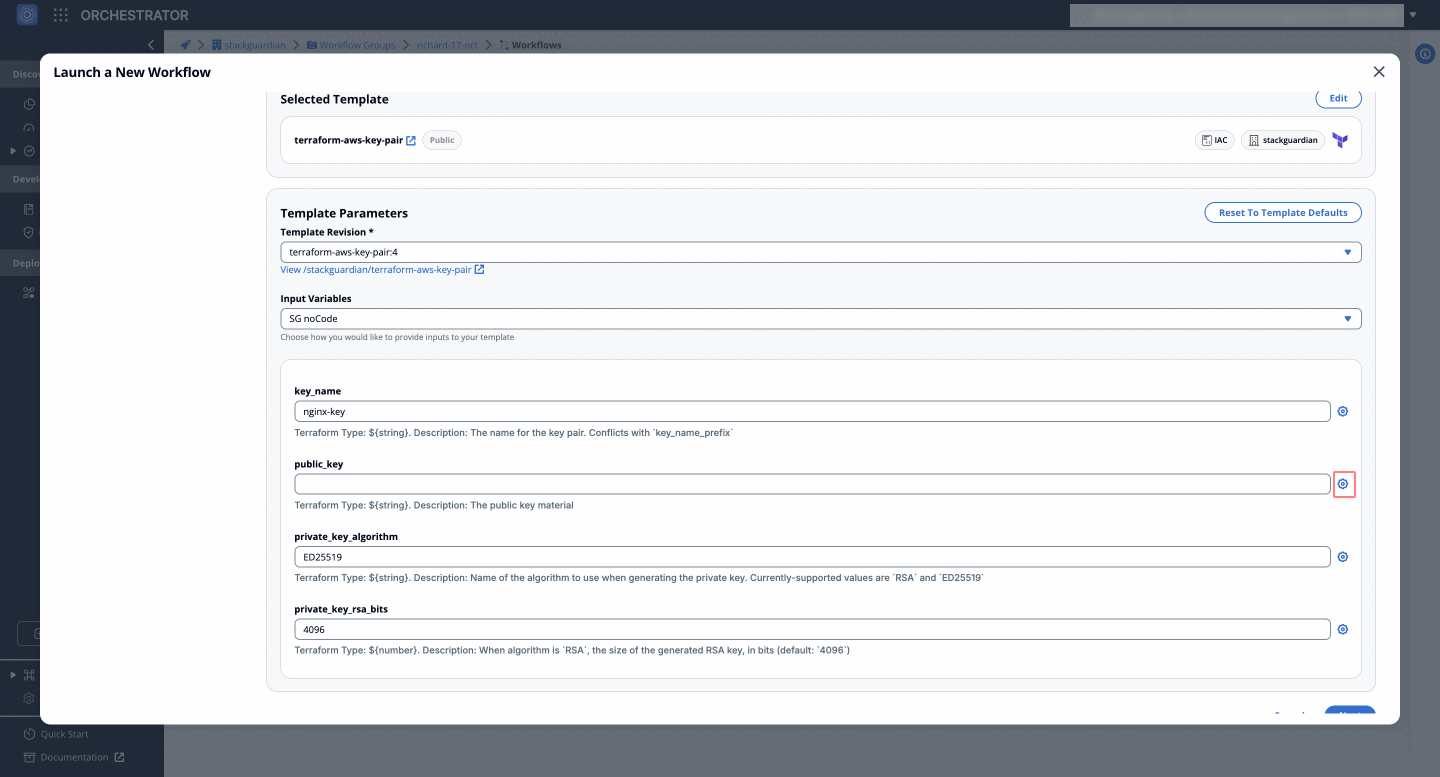
* **Private Key Algorithm**: Choose an algorithm for generating the private key, such as `RSA` or `ED25519`.
* **Private Key RSA Bits**: Specify the size of the RSA key if using the `RSA` algorithm (default: `4096`). Click **Next** to proceed.
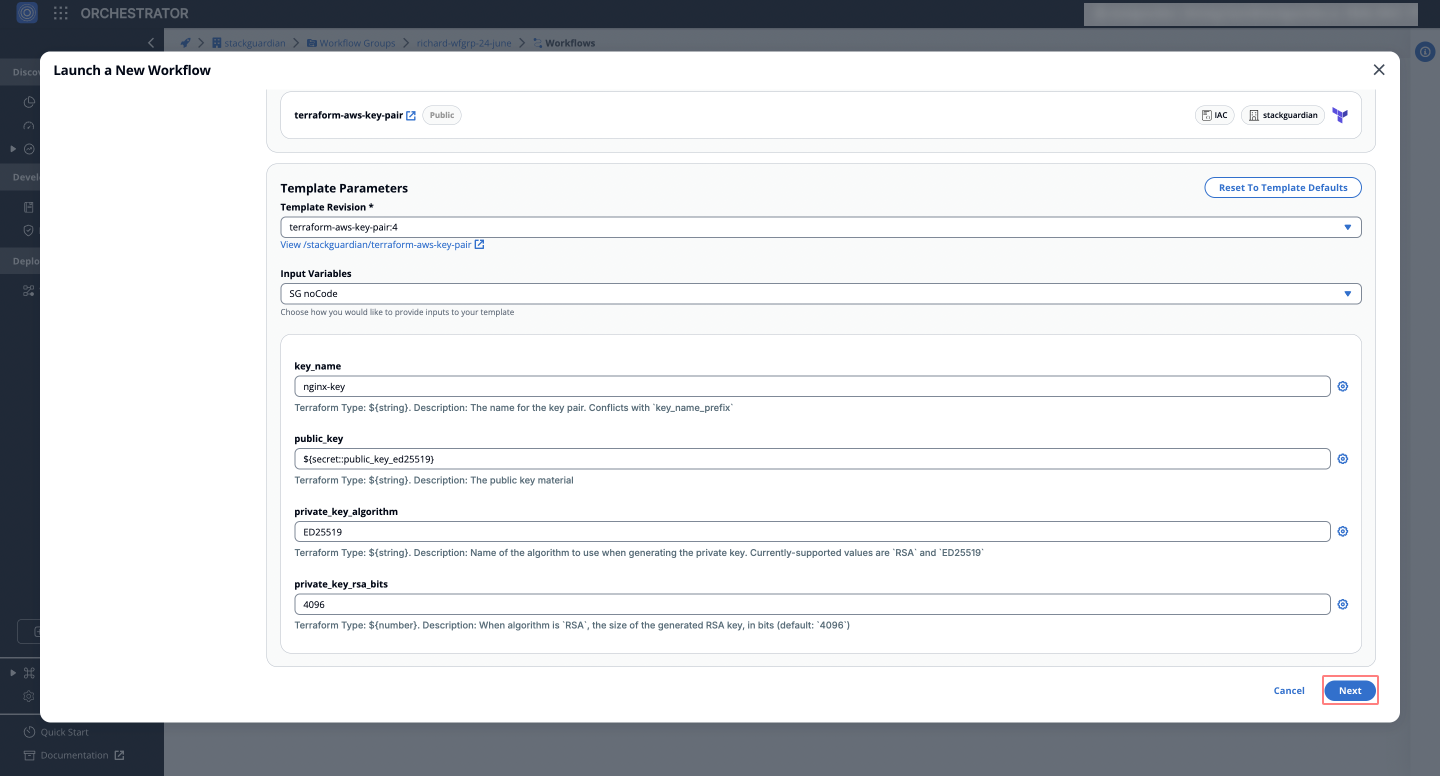
***
#### Using a Git Repository[](#using-a-git-repository "Direct link to Using a Git Repository")
1. Select **Git Repository** as the source type.
2. Enter the **Git Repository URL**, e.g., `https://github.com/StackGuardian/terraform-aws-vpc`.
3. Configure the following under **Advanced Options**:
* **Working Dir**: Specify the directory containing your Terraform configurations (e.g., *infra/aws*).
* **Reference**: Input a Git reference like a branch, tag, or commit (e.g., *main* or *v1.0.0*).
* **Git Sparse Checkout Config**: Include/exclude specific paths during checkout.
* **Enable git core.autocrlf**: Check if consistent line endings are required across operating systems.
4. Provide **Template Parameters** (if needed) and click **Next**.
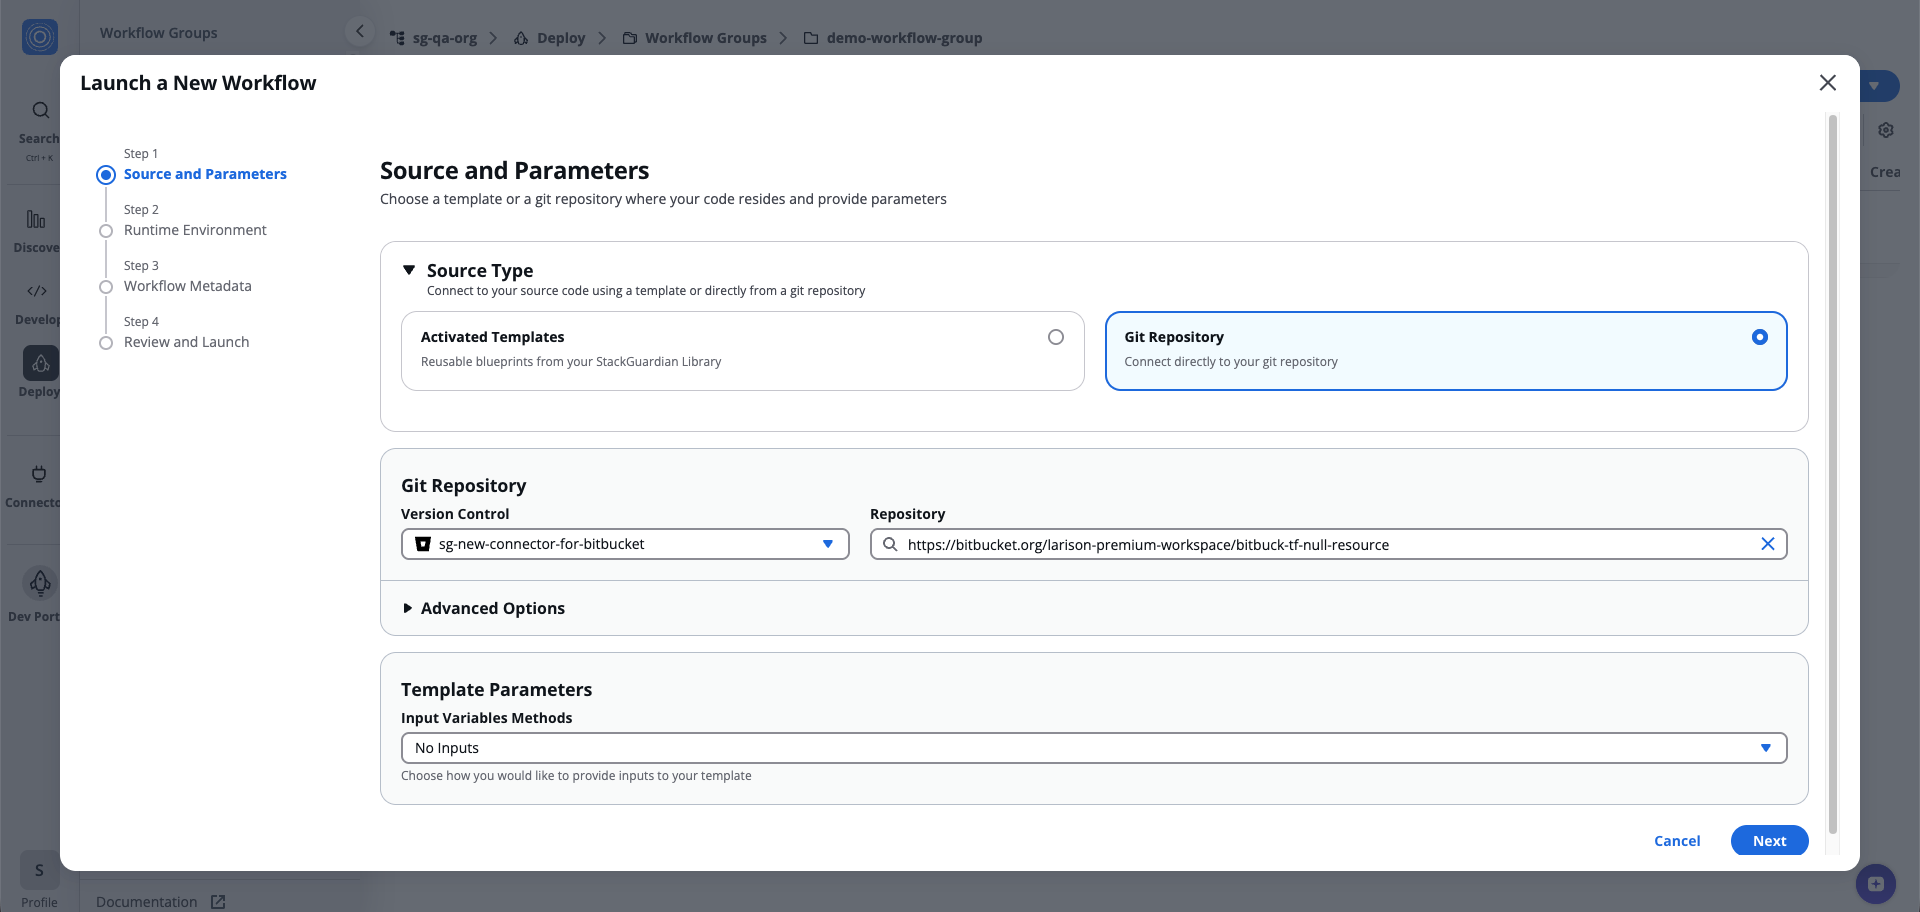
*Using a Git Repository*
***
### Step 4: Configure Runtime Environment[](#step-4-configure-runtime-environment "Direct link to Step 4: Configure Runtime Environment")
1. Select a **Deployment Environment** and set up the necessary environment variables.
note
Refer to [**Environment Variables**](/docs/deploy/workflows/workflow_components/deployment_environment/) for a complete list.
2. Choose the "**Runner Type**" (e.g., shared or dedicated) for flexibility and visibility.
3. Enable additional "**Terraform customizations**" as per your requirements.
4. Use "**Advanced Options**" for specifying *Terraform versions*, *allocating resources* for the workflow and setting *schedules* for automated runs.
tip
For guidance on generating a Cron expression for your execution schedule, refer to this documentation:
[Creating Cron Expressions for Scheduled Events](https://docs.aws.amazon.com/eventbridge/latest/userguide/eb-scheduled-rule-pattern.html#eb-cron-expressions)
note
Optionally, customize lifecycle steps using "**Lifecycle Custom Steps**" for advanced workflows. For more details, see [**Lifecycle Custom Steps**](/docs/deploy/workflows/workflow_components/lifecycle_custom_steps/).
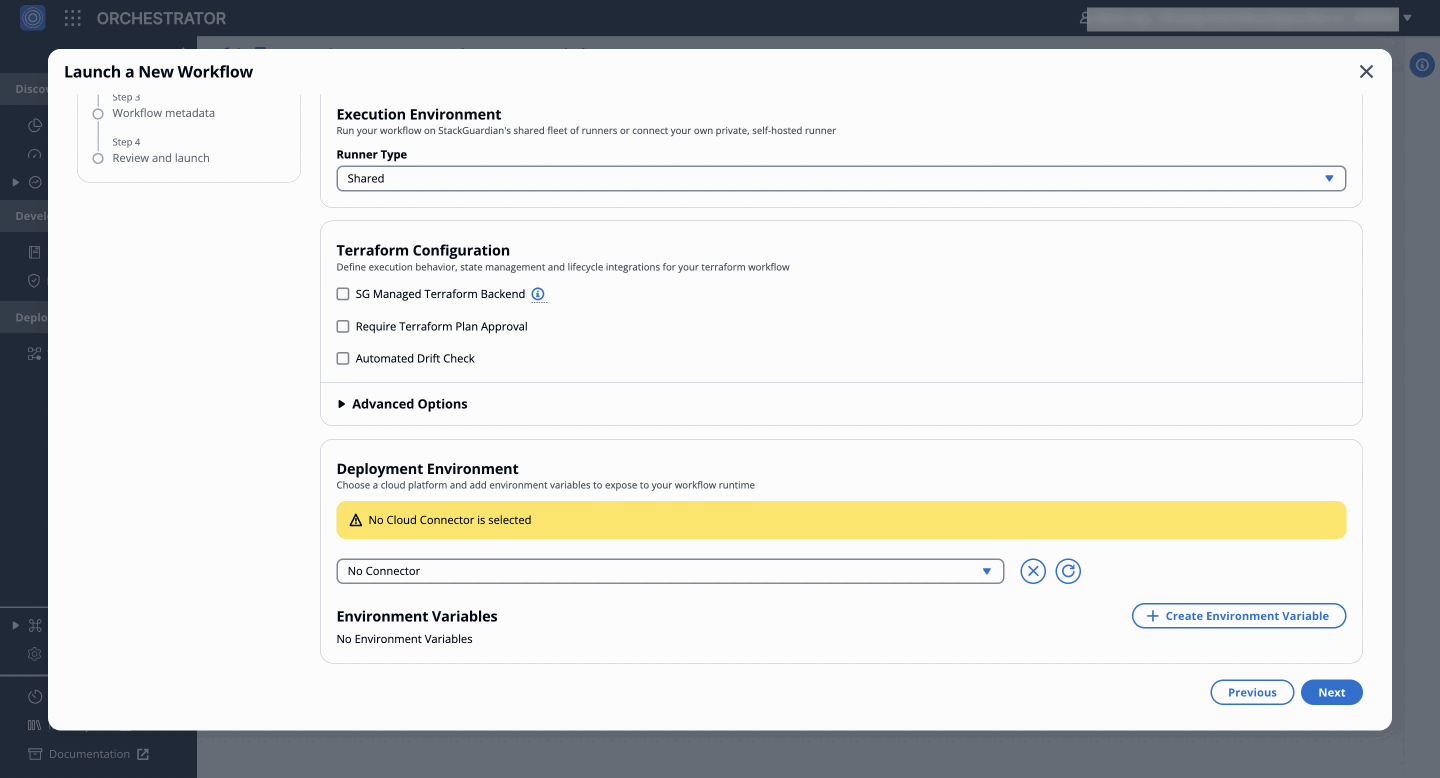
***
### Metadata, Review, and Launch[](#metadata-review-and-launch "Direct link to Metadata, Review, and Launch")
Update the workflow metadata and click **Launch** to execute the workflow.
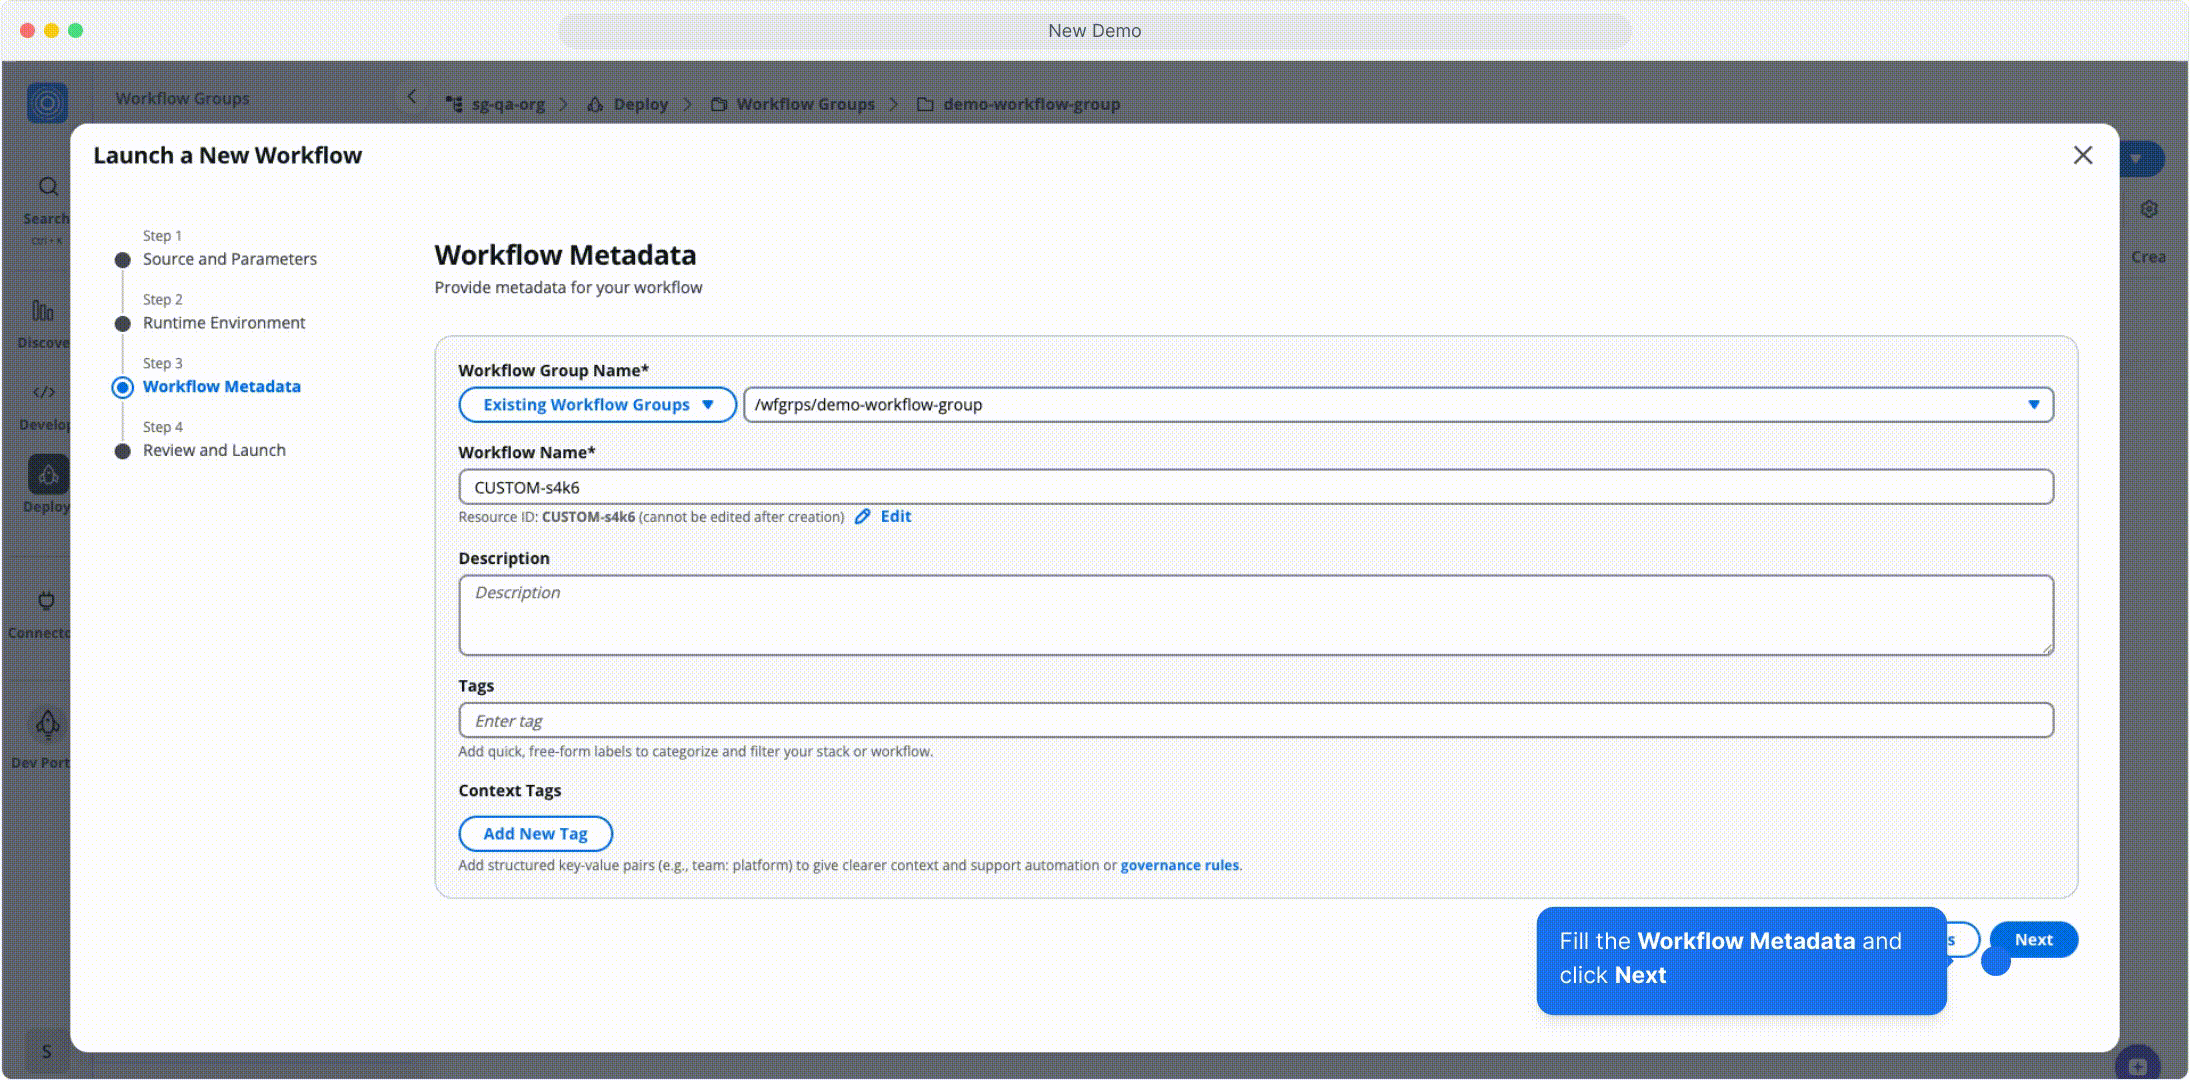
*Metadata, Review, and Launch*
---
# Overview
This document provides a brief introduction to the various features and components available under workflows.
* [**Create Workflow**](#create-workflow)
* [**Workflow Components**](#workflow-components)
* [**Workflow Types**](#workflow-types)
## Create workflow[](#create-workflow "Direct link to Create workflow")
Learn how to create workflows using different methods
* **Dev Portal** Instructions for creating workflows via the developer portal.
* **JSON** Guide to defining workflows using JSON.
* **Wizard** Step-by-step process using the wizard.
## Workflow types[](#workflow-types "Direct link to Workflow types")
Explore various types of workflows supported:
* **OpenTofu** Overview of OpenTofu workflows.
* **Terraform** Terraform-based workflows.
* **Ansible** Using Ansible for automation.
* **CloudFormation** CloudFormation templates.
* **Custom** Designing custom workflows.
* **Helm** Deploying with Helm.
## Workflow components[](#workflow-components "Direct link to Workflow components")
Understand the building blocks of workflows
* **Custom workflow steps** Tailoring steps to your needs.
* **Deployment environment** Configuring deployment environments.
* **Outputs** Managing outputs from workflows.
* **Reference variables** Leveraging variables for customization.
* **Schedules** Automating workflows with schedules.
* **Settings** Adjusting workflow-specific settings.
* **Source parameters** Defining source parameters for workflows.
* **VCS settings** Integration with version control systems.
* **Webhook** Setting up webhooks for triggers.
* **Workflow run** Running and managing workflows.
---
# Update Workflows
## Overview[](#overview "Direct link to Overview")
When a new template revision is available, you can update your workflow to use it. A notification appears in the Workflow Settings tab when newer revisions are available.
## Check for available revisions[](#check-for-available-revisions "Direct link to Check for available revisions")
StackGuardian notifies you when a new revision of your workflow is available:
1. Navigate to your workflow's **Workflow Settings** tab
2. Look for the **Workflow Revision** indicator in the top-right corner
3. If a newer revision exists, you'll see "New Revision Available"
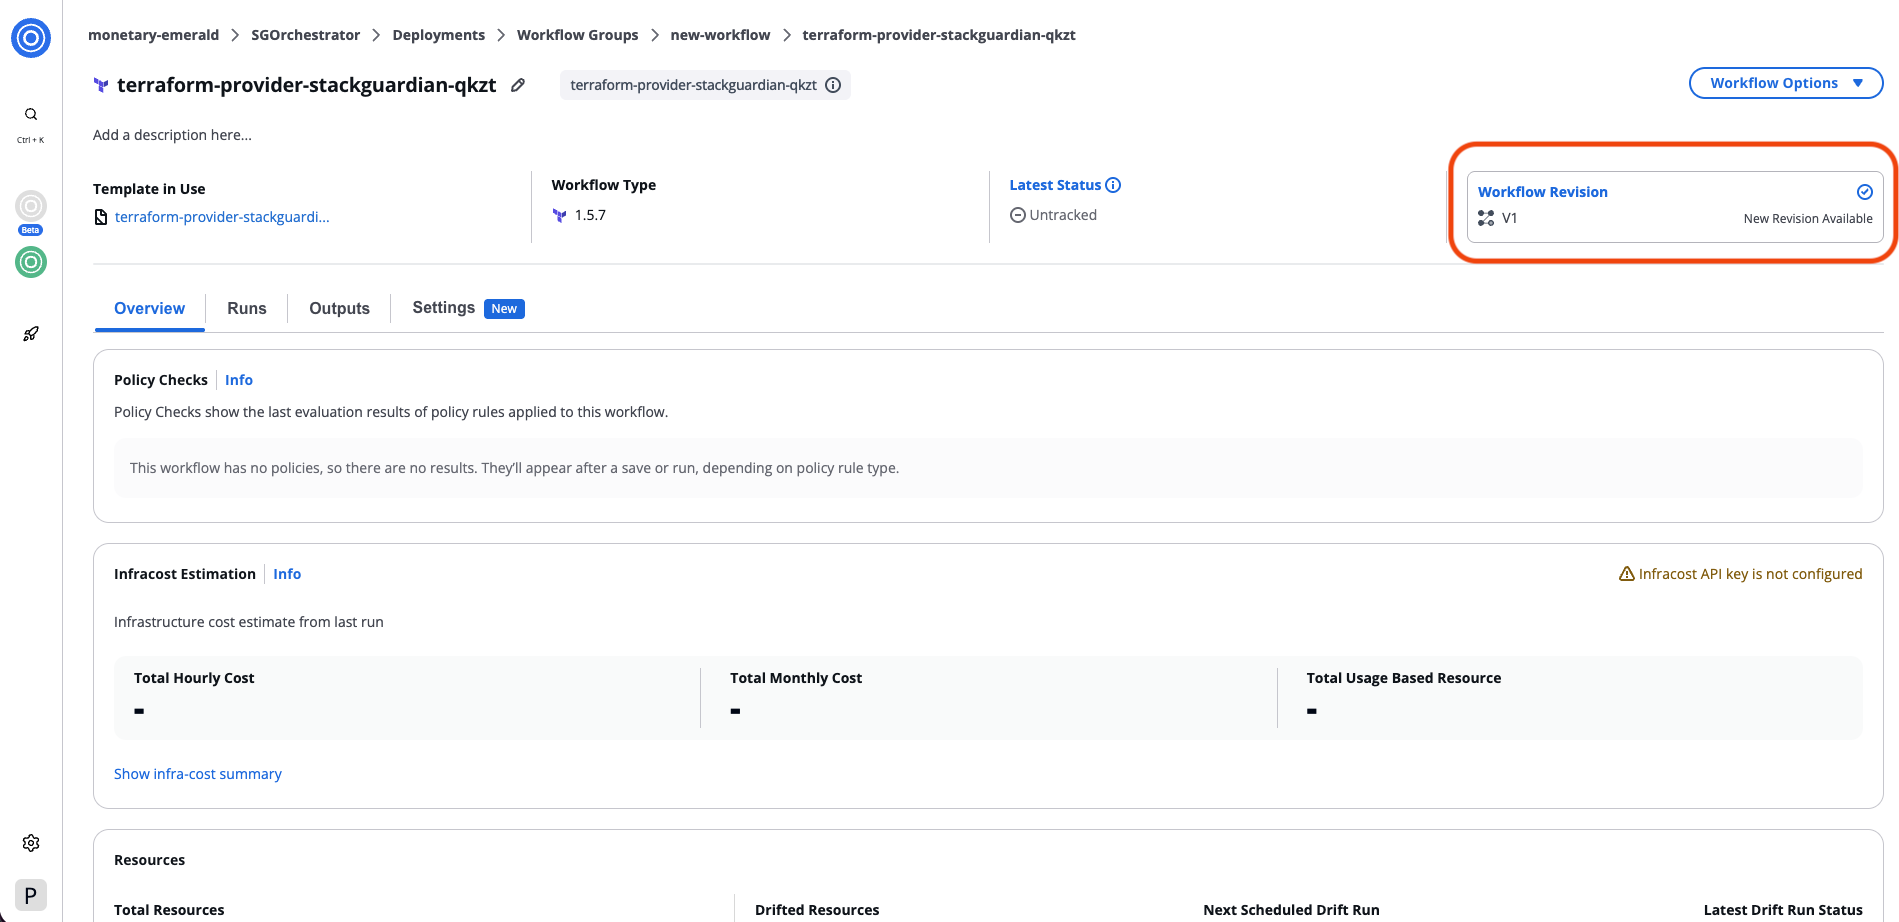
*Check for available revisions*
## Update a workflow revision[](#update-a-workflow-revision "Direct link to Update a workflow revision")
### Step 1: Revision[](#step-1-revision "Direct link to Step 1: Revision")
1. Click New Revision Available in the Workflow Revision indicator
2. Review the available revisions:
* **Alias Name** - The revision identifier
* **Revision Notes** - Changes included in this revision
* **Published Revision** - Status badge
* **Current Revision** - Your current version
3. To view all available revisions including previous versions, click Show all Revisions
4. Select the revision you want to use
5. Expand the revision to view details:
* Configuration changes
* Dependency updates
* Breaking changes
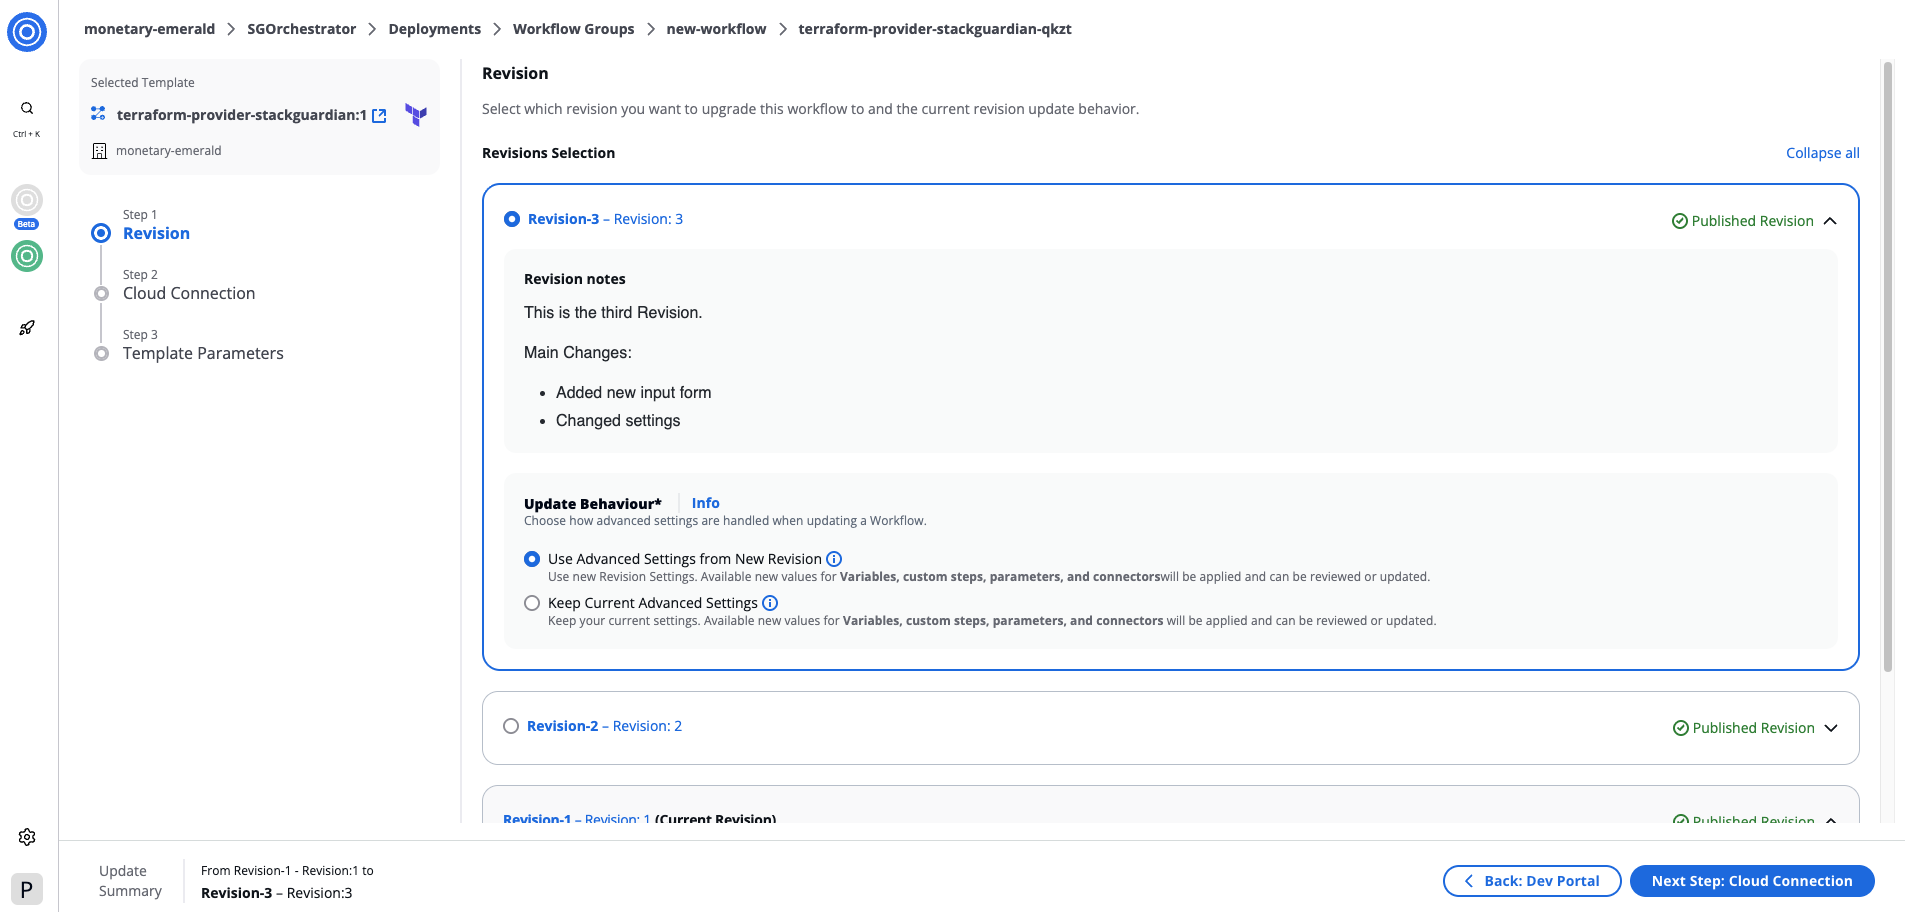
*Revision details*
### Choose update behavior[](#choose-update-behavior "Direct link to Choose update behavior")
Select how to handle advanced settings when updating. Advanced settings include template logic and workflow configuration but do not include variables, parameters, connectors, or environment variables (which you'll configure in the following steps).
**Update Advanced Settings**
* Uses the selected revision's advanced settings (template logic and workflow configuration)
* Your current variables, parameters, connectors, and environment variables remain reviewable in the following steps
**Keep Current Advanced Settings**
* Keeps your current advanced settings from your existing workflow
* Variables, parameters, connectors, and environment variables remain reviewable in the following steps
info
Advanced settings details are not shown during the update process. Navigate to the template revision to review specific advanced settings before making your selection.
### Step 2: Connectors[](#step-2-connectors "Direct link to Step 2: Connectors")
Review and update connectors for the workflow. The system detects changes automatically by comparing your current workflow with the selected revision.
1. Select a workflow tab to view its deployment environment
2. Review detected changes indicated by status badges:
* **Unmodified** - No changes were made
* **Updated** - Connector configuration modified in selected revision
* **Added** - New workflow added in selected revision
* **Removed** - Workflow removed in selected revision (appears disabled)
3. For the workflow:
* Select or update the **Connector**
* Configure **Child Integrations** if required
* Add or modify **Environment Variables**
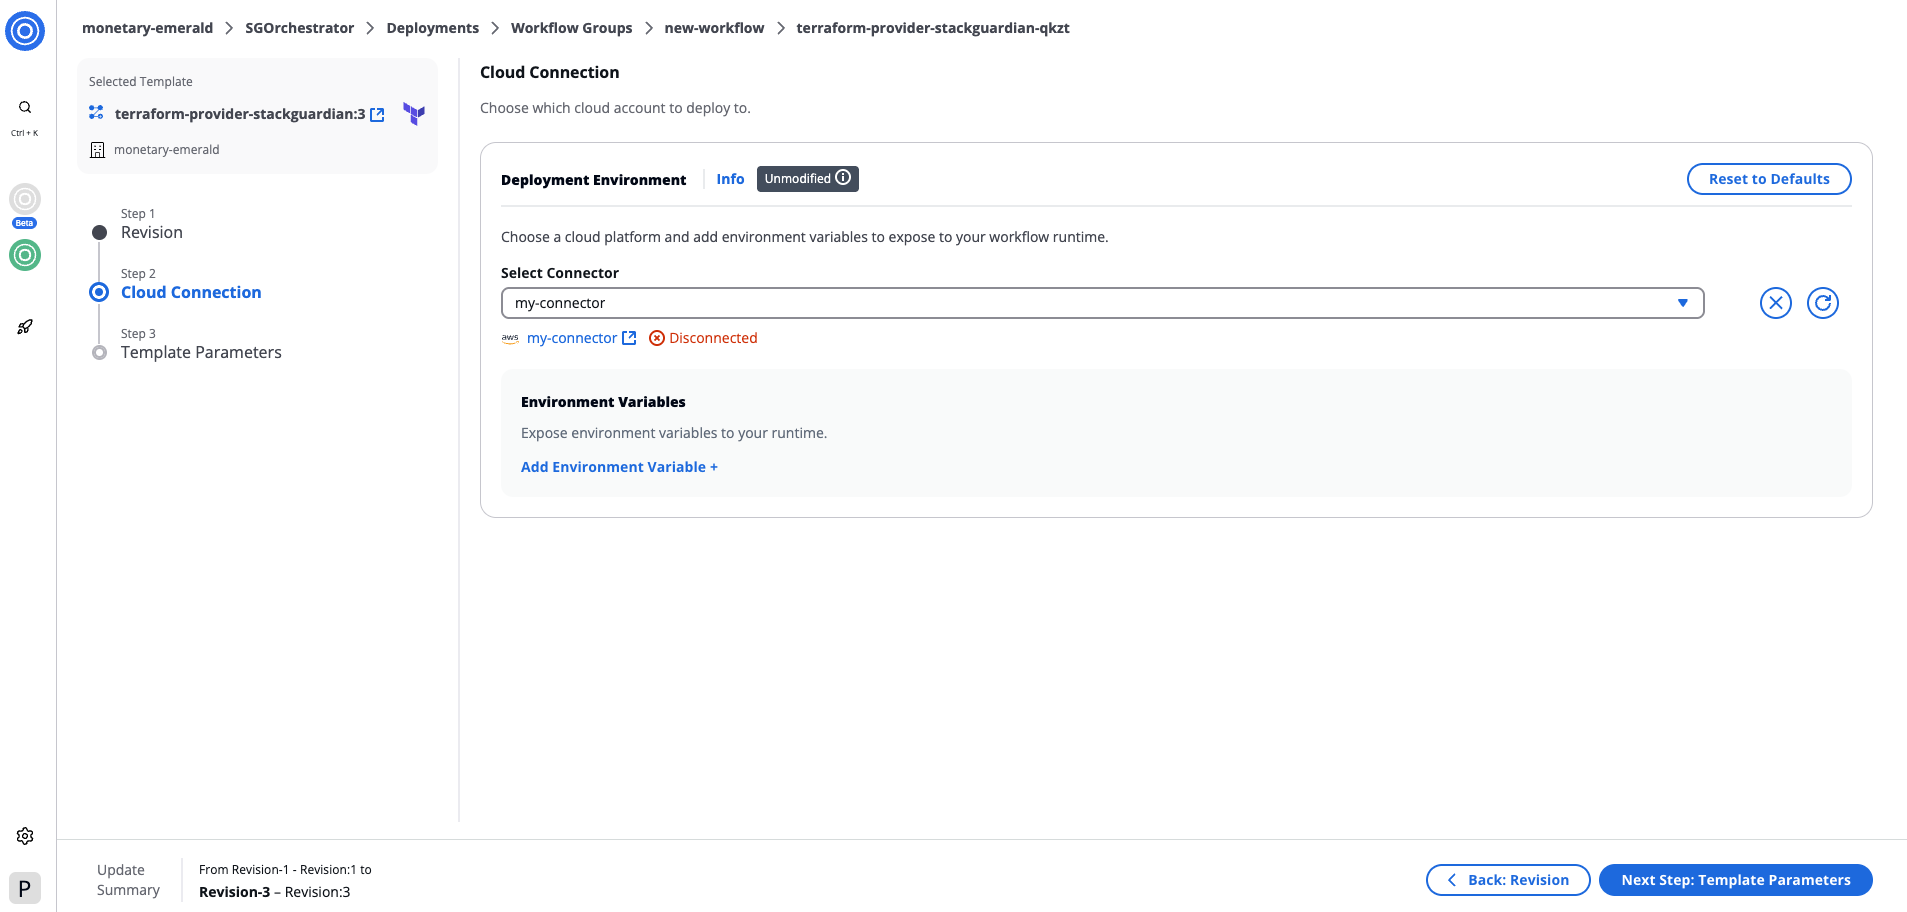
*Review and update connectors*
### How values are updated[](#how-values-are-updated "Direct link to How values are updated")
When updating connectors and environment variables:
* **Existing variables** - Your current values are preserved
* **New variables** - Added from the selected revision
* **Deleted variables** - Retained in your workflow even if removed from the selected revision
### Step 3: Template parameters[](#step-3-template-parameters "Direct link to Step 3: Template parameters")
Configure parameters for the workflow if changes are detected. The system automatically merges your existing configuration with any new parameters from the selected revision.
1. Review workflows marked with status badges
2. Fill in required template parameters for the workflow
3. Use **Reset to Defaults** to replace all values with defaults from the selected revision
4. Reference existing values using **Update Reference** when available
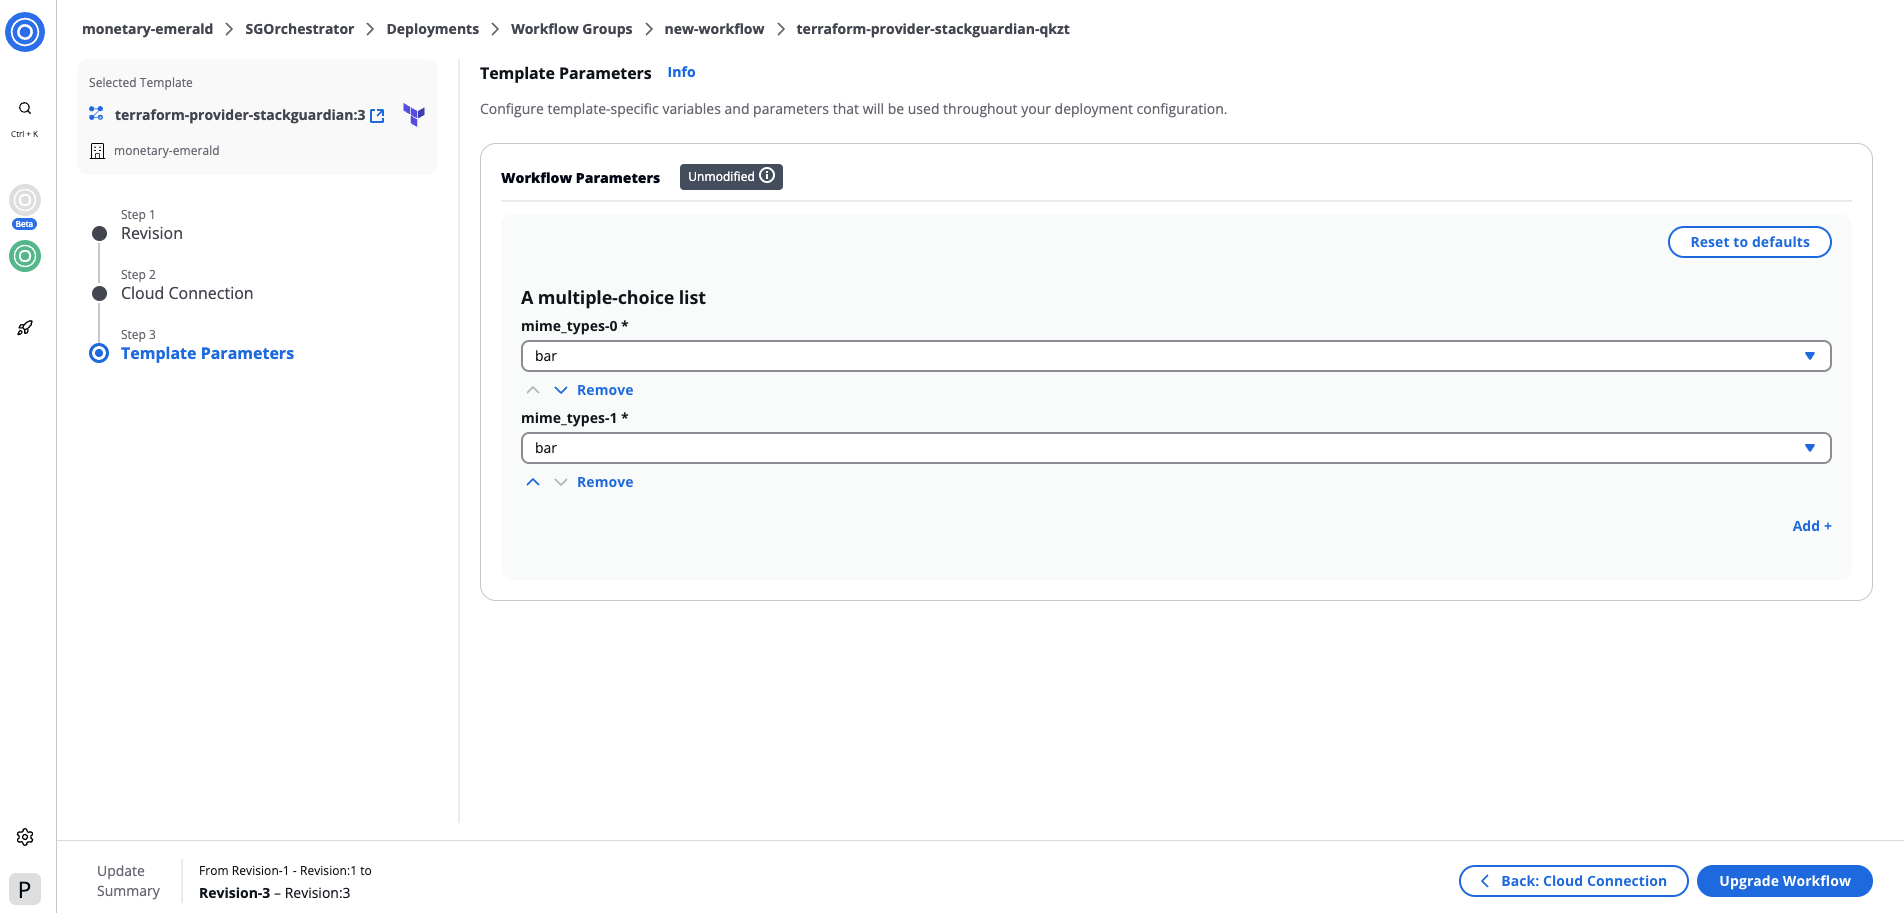
*Configure parameters for workflows*
### How values are updated[](#how-values-are-updated-1 "Direct link to How values are updated")
When updating template parameters:
* **Existing parameters** – Your current values are preserved
* **New parameters** – Added from the selected revision
* **Deleted parameters** – Retained in your workflow even if removed from the selected revision
The **Reset to Defaults** button replaces all parameter values with the defaults defined in the selected revision's template.
## What happens after updating[](#what-happens-after-updating "Direct link to What happens after updating")
After completing the update:
1. Your workflow updates to the selected revision
2. Advanced settings update based on your chosen behavior
3. Configuration values are merged: Existing values are preserved New parameters use defaults from the selected revision Deleted parameters are retained
4. A success notification confirms the update
5. You can run the workflow to apply changes
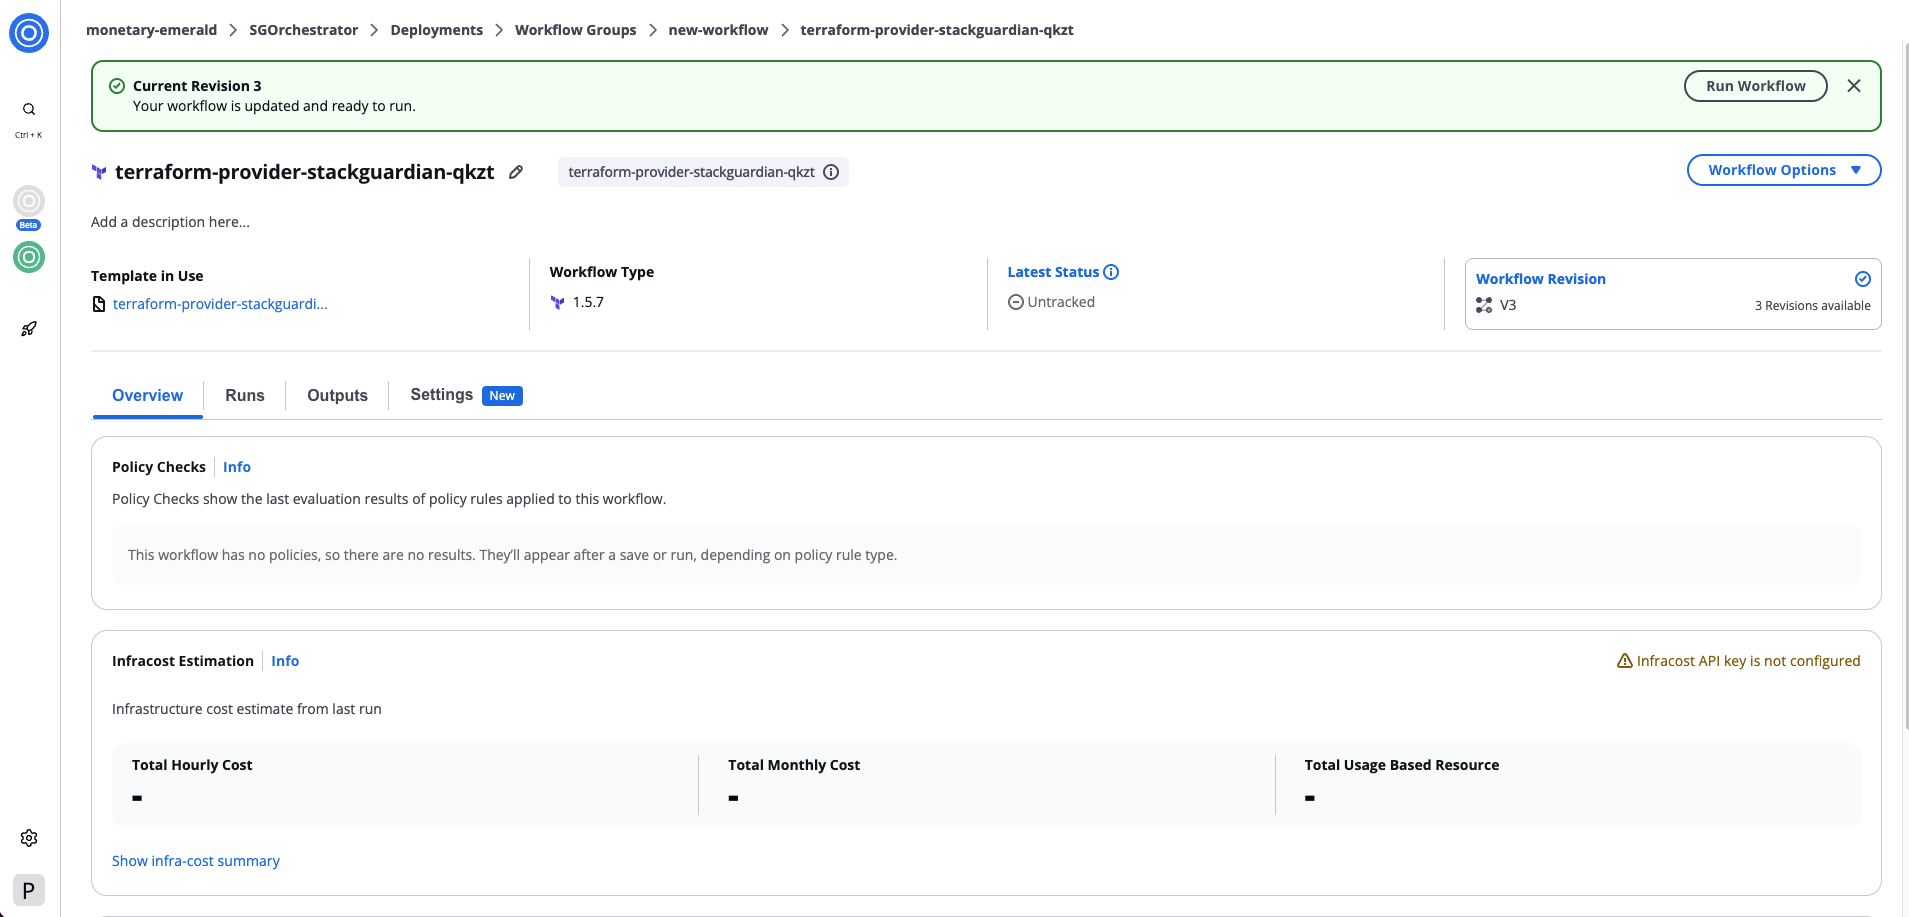
*After completing the update*
---
# Workflow
The **Workflow** feature in StackGuardian allows users to define, manage, and automate Infrastructure-as-Code (IaC) executions.
It provides a comprehensive view of your workflow’s configuration, lifecycle, and results through global information and four dedicated tabs:
1. [**Overview**](/docs/deploy/workflows/workflow_components/overview/)
2. [**Runs**](/docs/deploy/workflows/workflow_components/run/)
3. [**Outputs**](/docs/deploy/workflows/workflow_components/outputs/)
4. [**Settings**](/docs/deploy/workflows/workflow_components/settings/)
***
## Global Workflow Sections[](#global-workflow-sections "Direct link to Global Workflow Sections")
These sections appear at the top of the workflow page and remain consistent across all tabs.
### 1. Workflow Header[](#1-workflow-header "Direct link to 1. Workflow Header")
Displays identifying information about the workflow.
* **Workflow Display Name & ID:**
* The display name can be edited inline.
* The ID is system-generated and cannot be changed.
* **Workflow Description:**
* Editable text field used to describe the purpose, use case, or context of the workflow and can be edited with the display name.
### 2. Workflow Actions[](#2-workflow-actions "Direct link to 2. Workflow Actions")
Located at the top-right corner, this menu provides key actions:
1. **Run Workflow** – Manually trigger workflow execution using the current configuration.
Selecting **Run Workflow** opens a modal that allows you to configure execution parameters before starting a run.
| Field | Description |
| -------------------------------- | ------------------------------------------------------------------------------------------------------------------------------------ |
| **Terraform Action** | Choose the type of Terraform action: `Create`, `Plan`, `Refresh`or `Destroy`. |
| **Destroy in (TTL)** | Optionally define a Time-to-Live (TTL) for temporary environments. When the TTL expires, the environment is automatically destroyed. |
| **Enable Chaining** | Toggles workflow chaining — allowing linked workflows to trigger sequentially. |
| **Add Context Tags to this run** | Attach tags to the specific run for filtering or tracking. |
| **Run With Parameters** | Opens an advanced configuration in DevPortal |
| **Run** | Executes the workflow immediately with the selected parameters. |
2. **Use Programmatically** – View API or automation options for invoking the workflow externally (e.g., via CI/CD).
3. **Run Drift Check** – Detect configuration drift by comparing the actual infrastructure state against the defined IaC configuration.
These options make it easy to operate, automate, or validate the workflow from one place.
### 3. Workflow Information Widgets[](#3-workflow-information-widgets "Direct link to 3. Workflow Information Widgets")
Located directly below the header, four summary widgets provide at-a-glance insights:
| Widget | Description |
| ------------------- | ----------------------------------------------------------------------------------- |
| **Source** | The repository or IaC module linked to the workflow. |
| **Latest Status** | Status of the most recent workflow run (e.g., Success, Failed, In Progress etc). |
| **Workflow Type** | Indicates the workflow’s type — e.g., Terraform, Custom etc |
| **Cloud Connector** | Displays the cloud provider connection used for deployment (AWS, Azure, GCP, etc.). |
These widgets provide a quick overview of the workflow’s origin, state, and context.

---
# Review and approve Workflow Runs
## Overview[](#overview "Direct link to Overview")
When a Workflow Run requires approval, it pauses and displays an **Approval Required** status. Eligible approvers can review the run details and approve or cancel the run.
Configure approvals
To set up approval requirements for your workflows, see [Terraform/OpenTofu workflow](/docs/deploy/workflows/workflow_components/terraform_config/#require-approval-workflow-run) configuration or [Custom workflow](/docs/deploy/workflows/workflow_components/custom_config/#configure-approval) configuration.
You can identify runs that need approval in two places:
* **Workflow header**: The Latest Status shows **Approval Required**. Select it to open the Approval Details modal.
* **Runs tab**: The Latest Status column shows **Approval Required** and the Approval Detail column displays a **Review & Approve** link
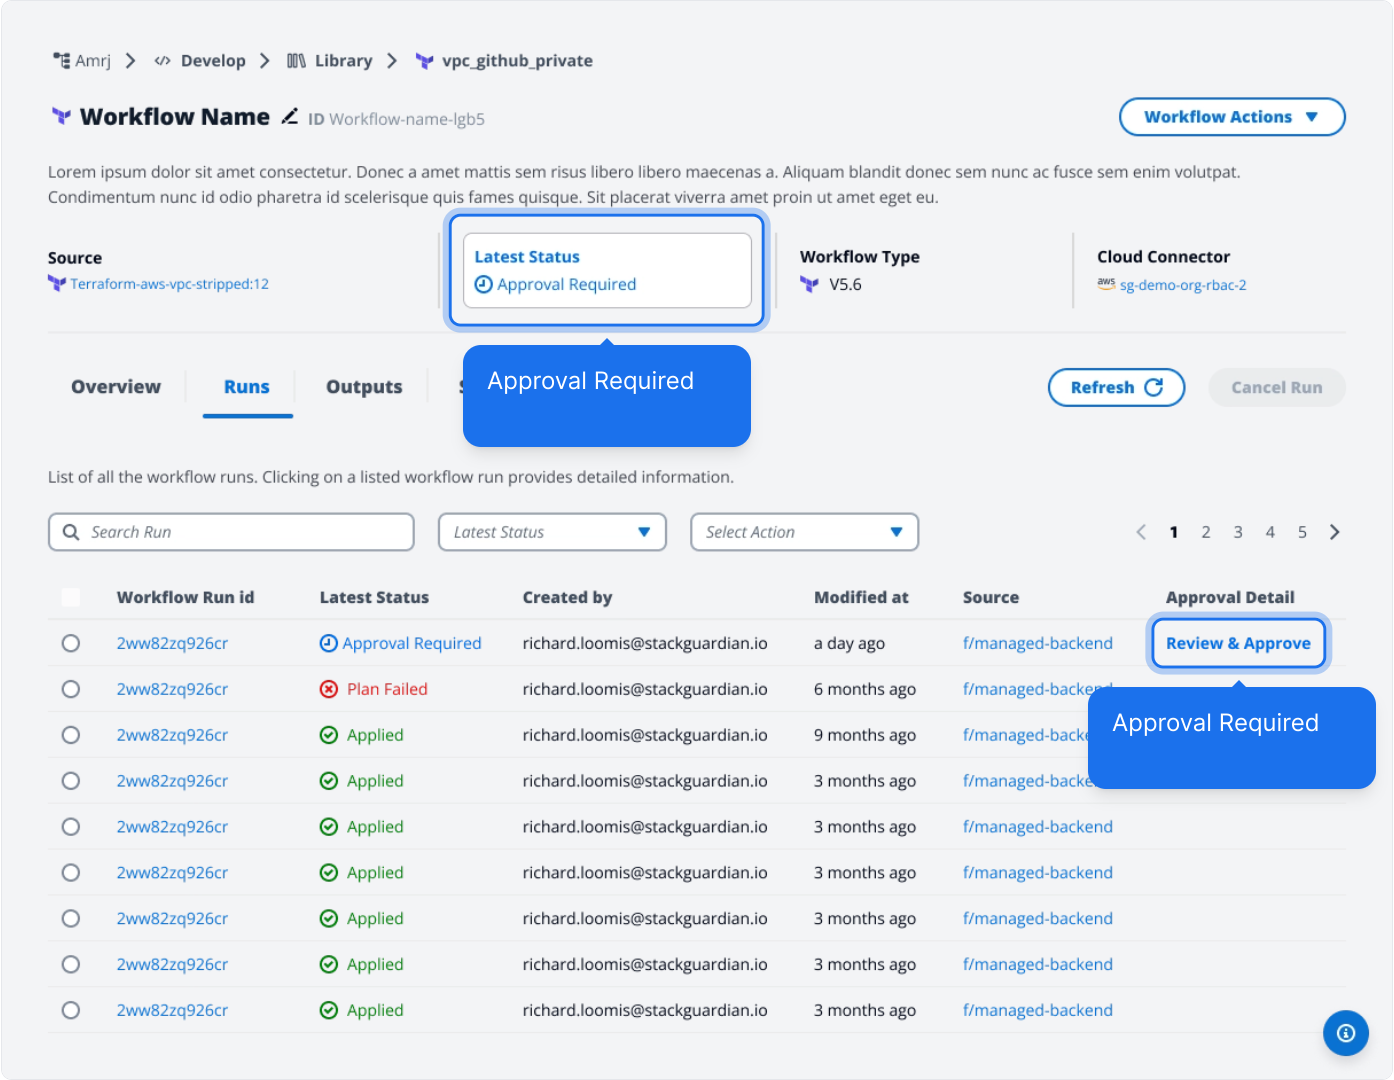
*Approval Required*
All users can view approval details, but only eligible approvers and admins can take action.
| Role | Can approve | Can cancel |
| -------------------------------- | ----------- | ---------- |
| Eligible approver | Yes | Yes |
| Admin (not an eligible approver) | No | Yes |
| Other users | No | No |
Understanding identity types
StackGuardian supports two identity types:
* **SSO identities**: Users and groups authenticated through your organization's identity provider (Okta, Azure AD, Google Workspace)
* **Local identities**: Users created directly in StackGuardian
These identity types are treated as distinct entities in approvals and role-based access control (RBAC).
#### Approval logic for mixed identity types[](#approval-logic-for-mixed-identity-types "Direct link to Approval logic for mixed identity types")
StackGuardian treats SSO identities and local identities as distinct entities. This affects how approvals are counted when you mix different identity types as eligible approvers.
Approval counting rules:
* **SSO User + SSO Group**: Counts as one approval entity. If the same person is listed as an SSO user and also belongs to an eligible SSO group, they can only approve once.
* **SSO User + Local User**: Counts as two distinct approval entities. The same person with both identity types can approve separately with each login method.
* **SSO Group + Local User**: Counts as two distinct approval entities. A person in the SSO group who also has a local account can approve separately with each login method.
Examples:
Eligible approvers: "SSO Group: DevOps" + "SSO User: " (Jane is in DevOps)
* Jane can only approve once, even though she appears in both
* Required approvals: "From at least 2 approvers"
Eligible approvers: "SSO User: " + "Local User: jane"
* Jane can approve with her SSO login, then approve again with her local login
* Required approvals: "From at least 2 approvers"
Eligible approvers: "SSO Group: DevOps" + "Local User: jane"
* Jane (in DevOps) can approve with her SSO login, then approve again with her local login
* Required approvals: "From at least 2 approvers"
### Approval Details[](#approval-details "Direct link to Approval Details")
The Approval Details screen displays:
**Run details:**
* Workflow name
* Run ID
* Who triggered the run
* Number of approval reasons
* Run status
**Approval Reasons & Configurations:**
For each approval reason (Workflow run, Lifecycle Custom Step, Workflow Step, or Policy), the modal displays:
* **Eligible Approvers**: Number or list of users and user groups who can approve
* **Required approvals**: Minimum number of approvals needed (e.g., "At least 2 approvers")
* **Current Approval Count**: How many approvals have been received, shown as a progress badge (e.g., "Progress: 2/2")
* **Eligible approvers list**: Table showing each approver's status (Pending, Approved, or Canceled), timestamp, and approval message
Select the context link to view the Workflow run details. This helps you make an informed decision before approving.
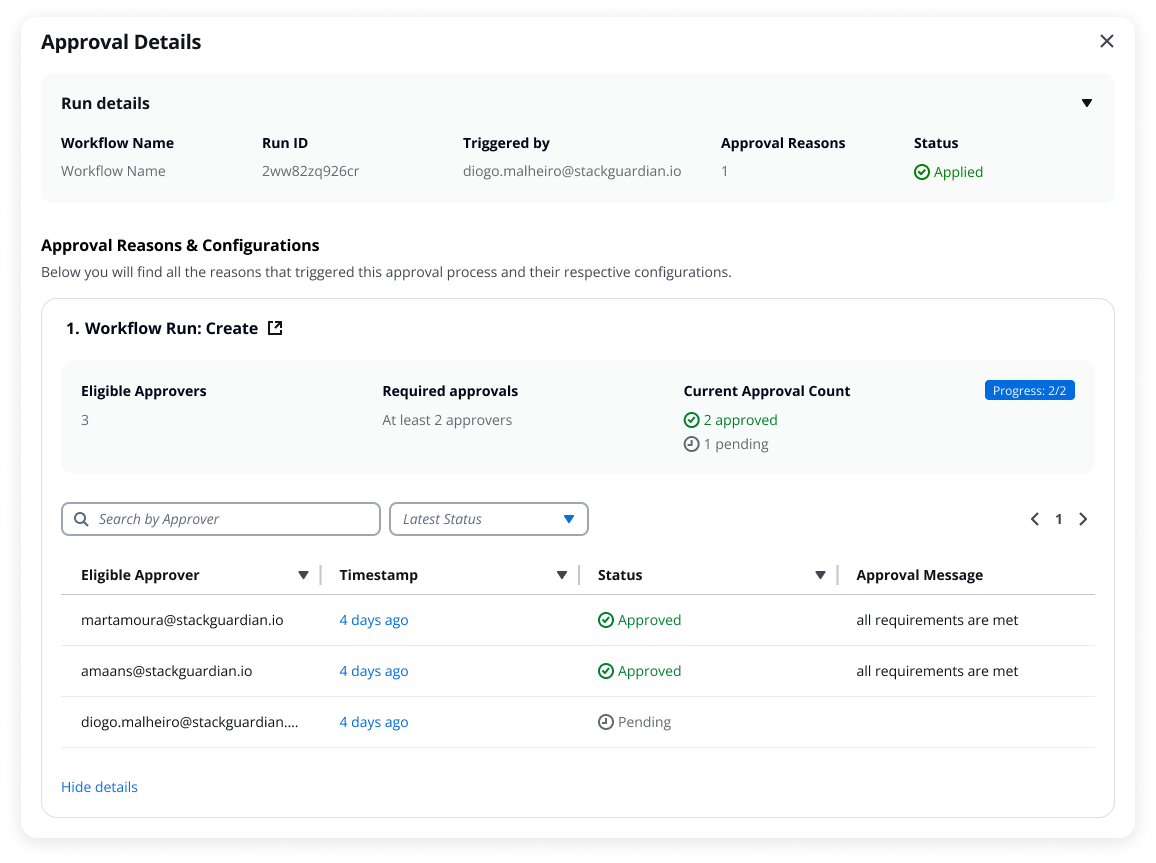
*Approval Details*
### Approve a run[](#approve-a-run "Direct link to Approve a run")
If you are an eligible approver:
1. Select **Review & Approve** from the Runs tab or Workflow header.
2. Review the run details and context.
3. Add a message (optional).
4. Select **Approve**.
When the required number of approvals is met, the run proceeds automatically. For example, if 2 approvals are required and 3 approvers are eligible, the run continues after any 2 approvers approve.
#### Multiple approval reasons[](#multiple-approval-reasons "Direct link to Multiple approval reasons")
If the Workflow has multiple approval reasons (for example, a Workflow run and a Lifecycle Step), you approve each one individually:
* Workflow run approval
* Workflow Step approval (Lifecycle Custom Steps)
* Policy approval
Each reason may have different approval configurations. For example, the Workflow run might require 2 approvers while a Policy requires approval from all approvers.
When multiple reasons exist:
* Approve each reason individually
* Canceling any reason cancels the entire run
* The run only proceeds when all reasons are approved
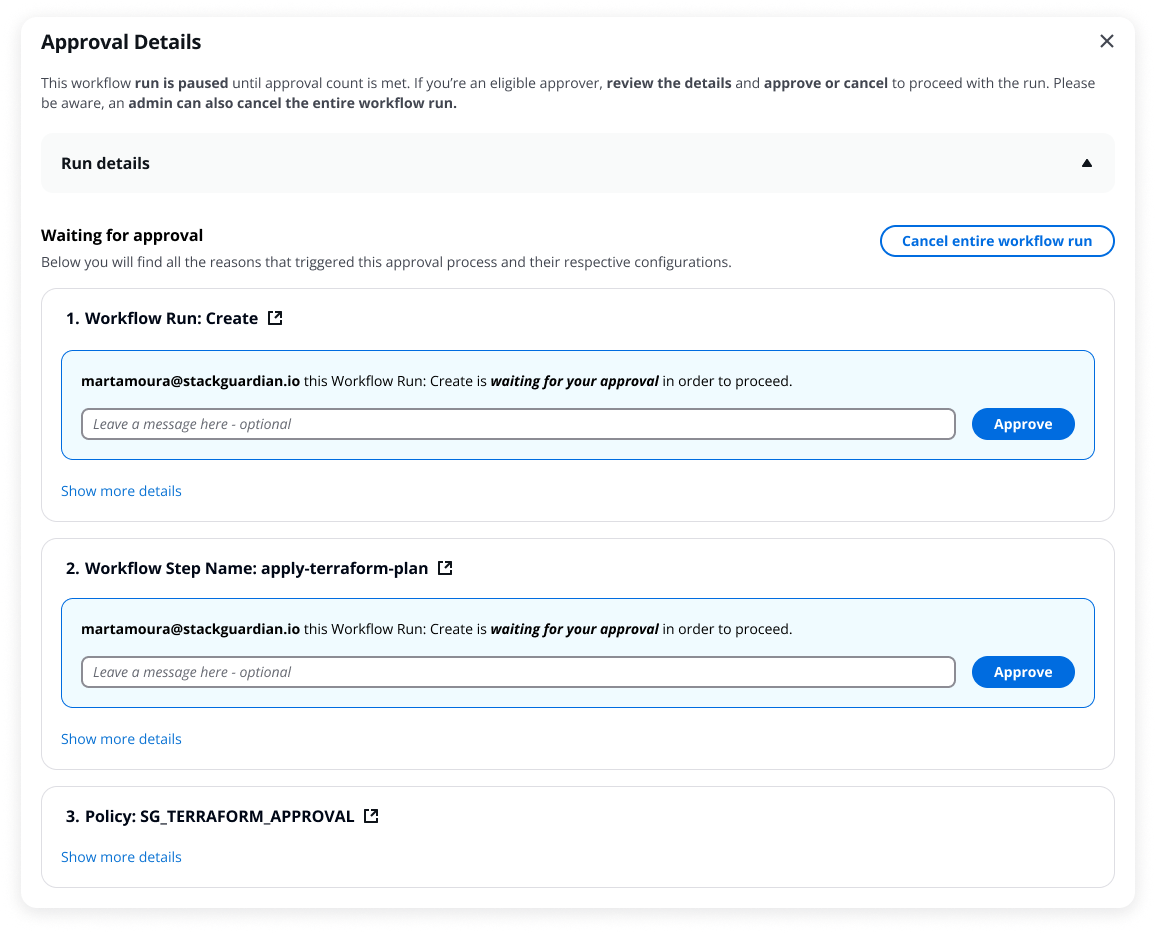
*Multiple approval reasons*
Approval sequence logic
Approval reasons appear based on the workflow execution stage. The sequence depends on which lifecycle stages have approval enabled:
* **Pre-plan + Workflow level**: Pre-plan approval first, then workflow level approval
* **Post-plan + Workflow level**: Plan executes, then post-plan approval, then workflow level approval at apply stage
* **Pre-apply + Workflow level**: Plan executes, then pre-apply approval, then workflow level approval at apply stage
* **Post-apply + Workflow level**: Workflow level approval first, then post-apply approval after apply completes
* **Workflow level + Policy**: Policy approval (evaluated after plan) appears before workflow level approval
### Cancel a run[](#cancel-a-run "Direct link to Cancel a run")
Any eligible approver or admin can cancel a run awaiting approval.
1. Select **Review Approval** from the Runs tab or Workflow header.
2. Select **Cancel entire workflow**.
3. Add a message (required).
4. Confirm the cancellation.
Canceling stops the entire Workflow run. If multiple approval reasons exist, canceling one cancels all of them—even those already approved.

*How to cancel the workflow run*
### Revoke your approval[](#revoke-your-approval "Direct link to Revoke your approval")
If the required approval count hasn't been reached yet, you can revoke your approval:
1. Select **Review Approval** from the Runs tab.
2. Select **Revoke**.
Your approval is removed and the run returns to pending status. The revoke option is only available while other approvals are still pending.
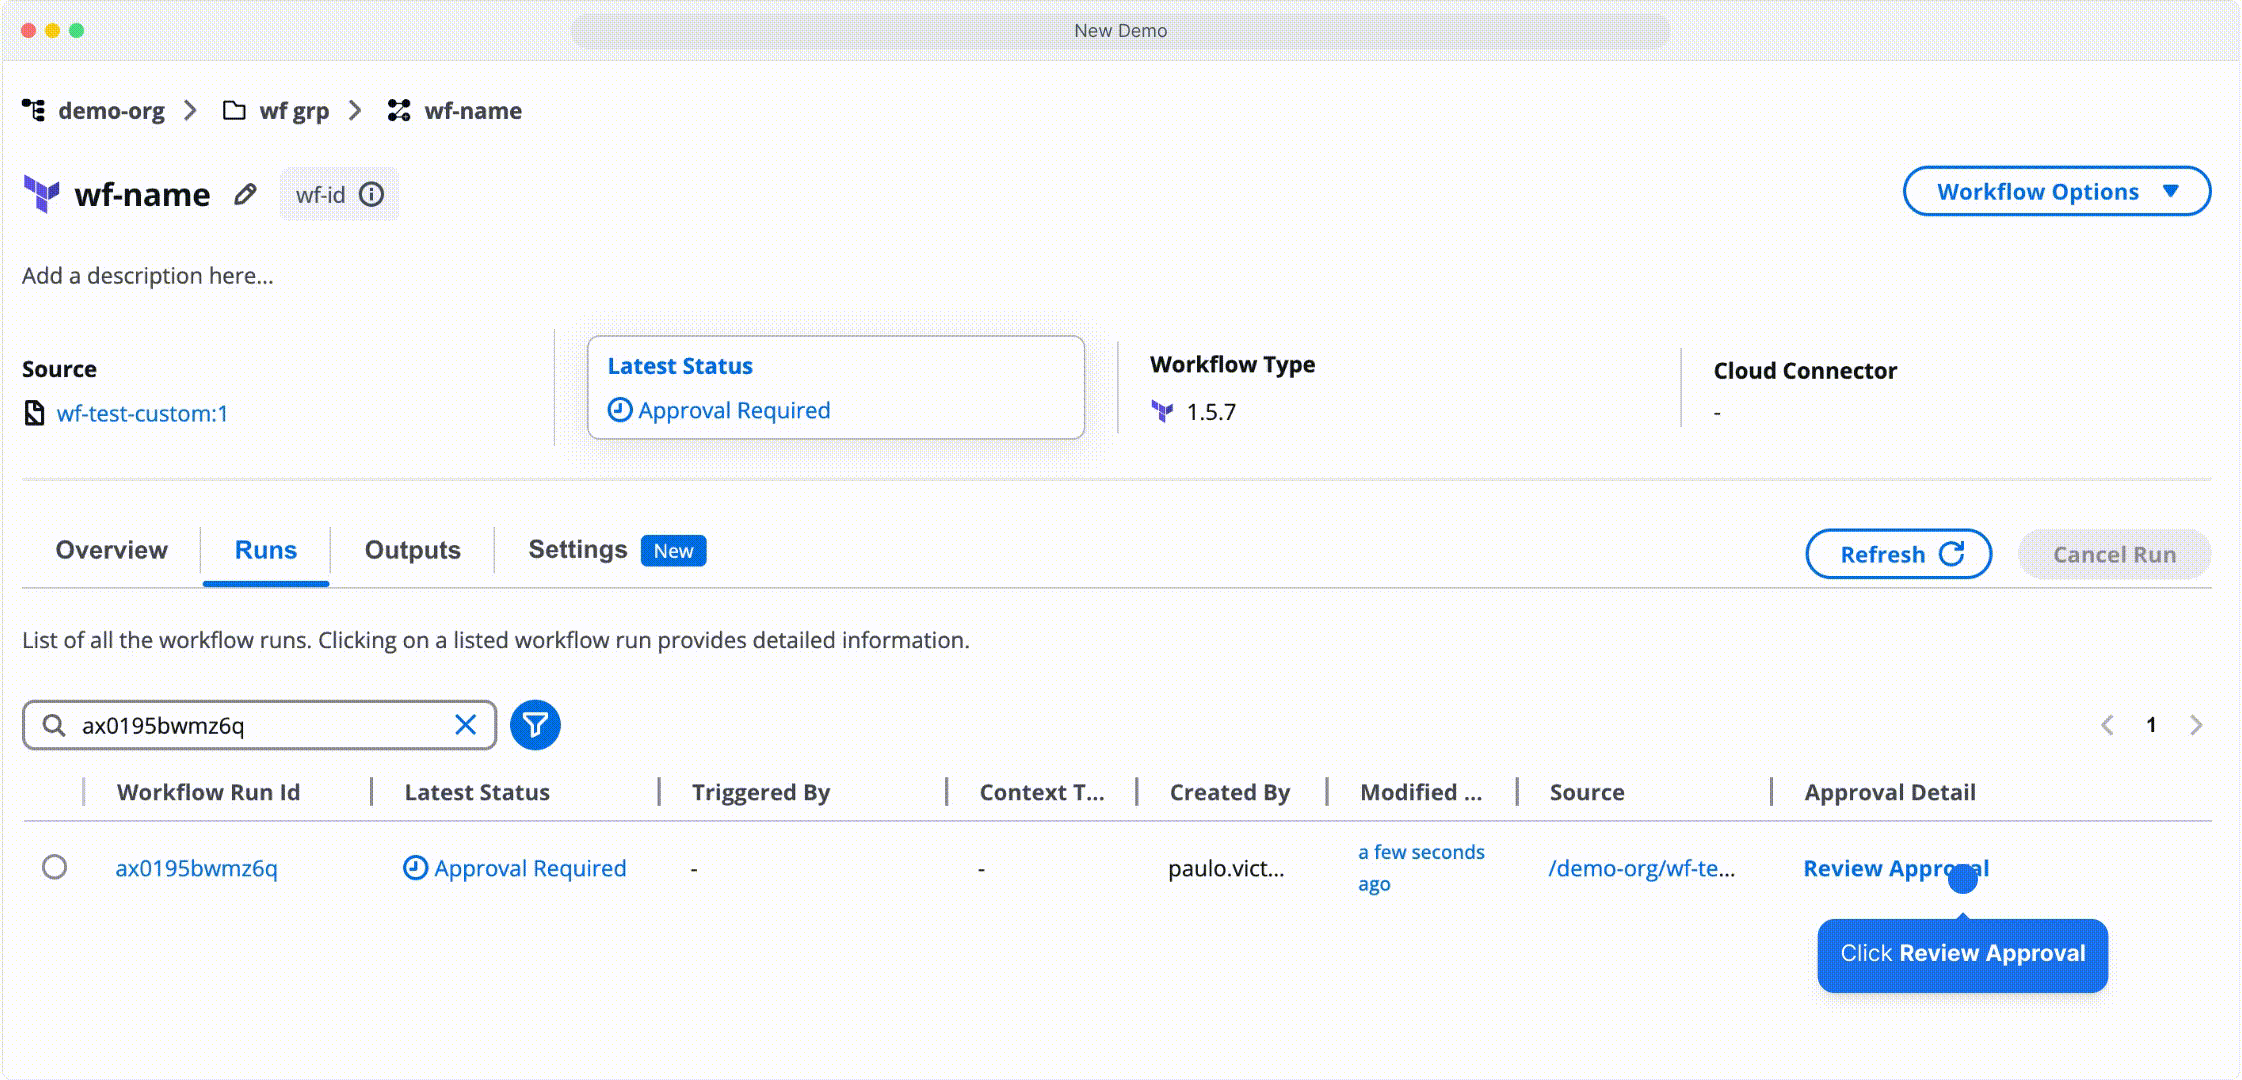
*How to revoke an approval*
### External Approvals[](#external-approvals "Direct link to External Approvals")
External approvals let you use external systems like ServiceNow or Jira to manage workflow approvals instead of StackGuardian's internal approval system.
#### How it works[](#how-it-works "Direct link to How it works")
1. Enable external approvals in your runner group (Settings > Runner Groups)
2. Configure the external approval system in your external service (outside StackGuardian)
3. Assign the runner group to your workflow (Settings > Execution Environment)
4. When the workflow runs, StackGuardian sends an API call to the external service
5. The workflow pauses with "Approval Required" status until the external system responds
6. Once approved externally, the workflow continues normally
#### Configure external approvals[](#configure-external-approvals "Direct link to Configure external approvals")
**Step 1: Enable external approvals in runner group**
Navigate to Settings > Runner Groups and configure:
| Field | Description |
| ----------------------- | ---------------------------------------------------- |
| Approval Type | Select "External" |
| Approval Webhook URL | Endpoint where StackGuardian sends approval requests |
| Approval Webhook Secret | Optional token for securing webhook payloads |
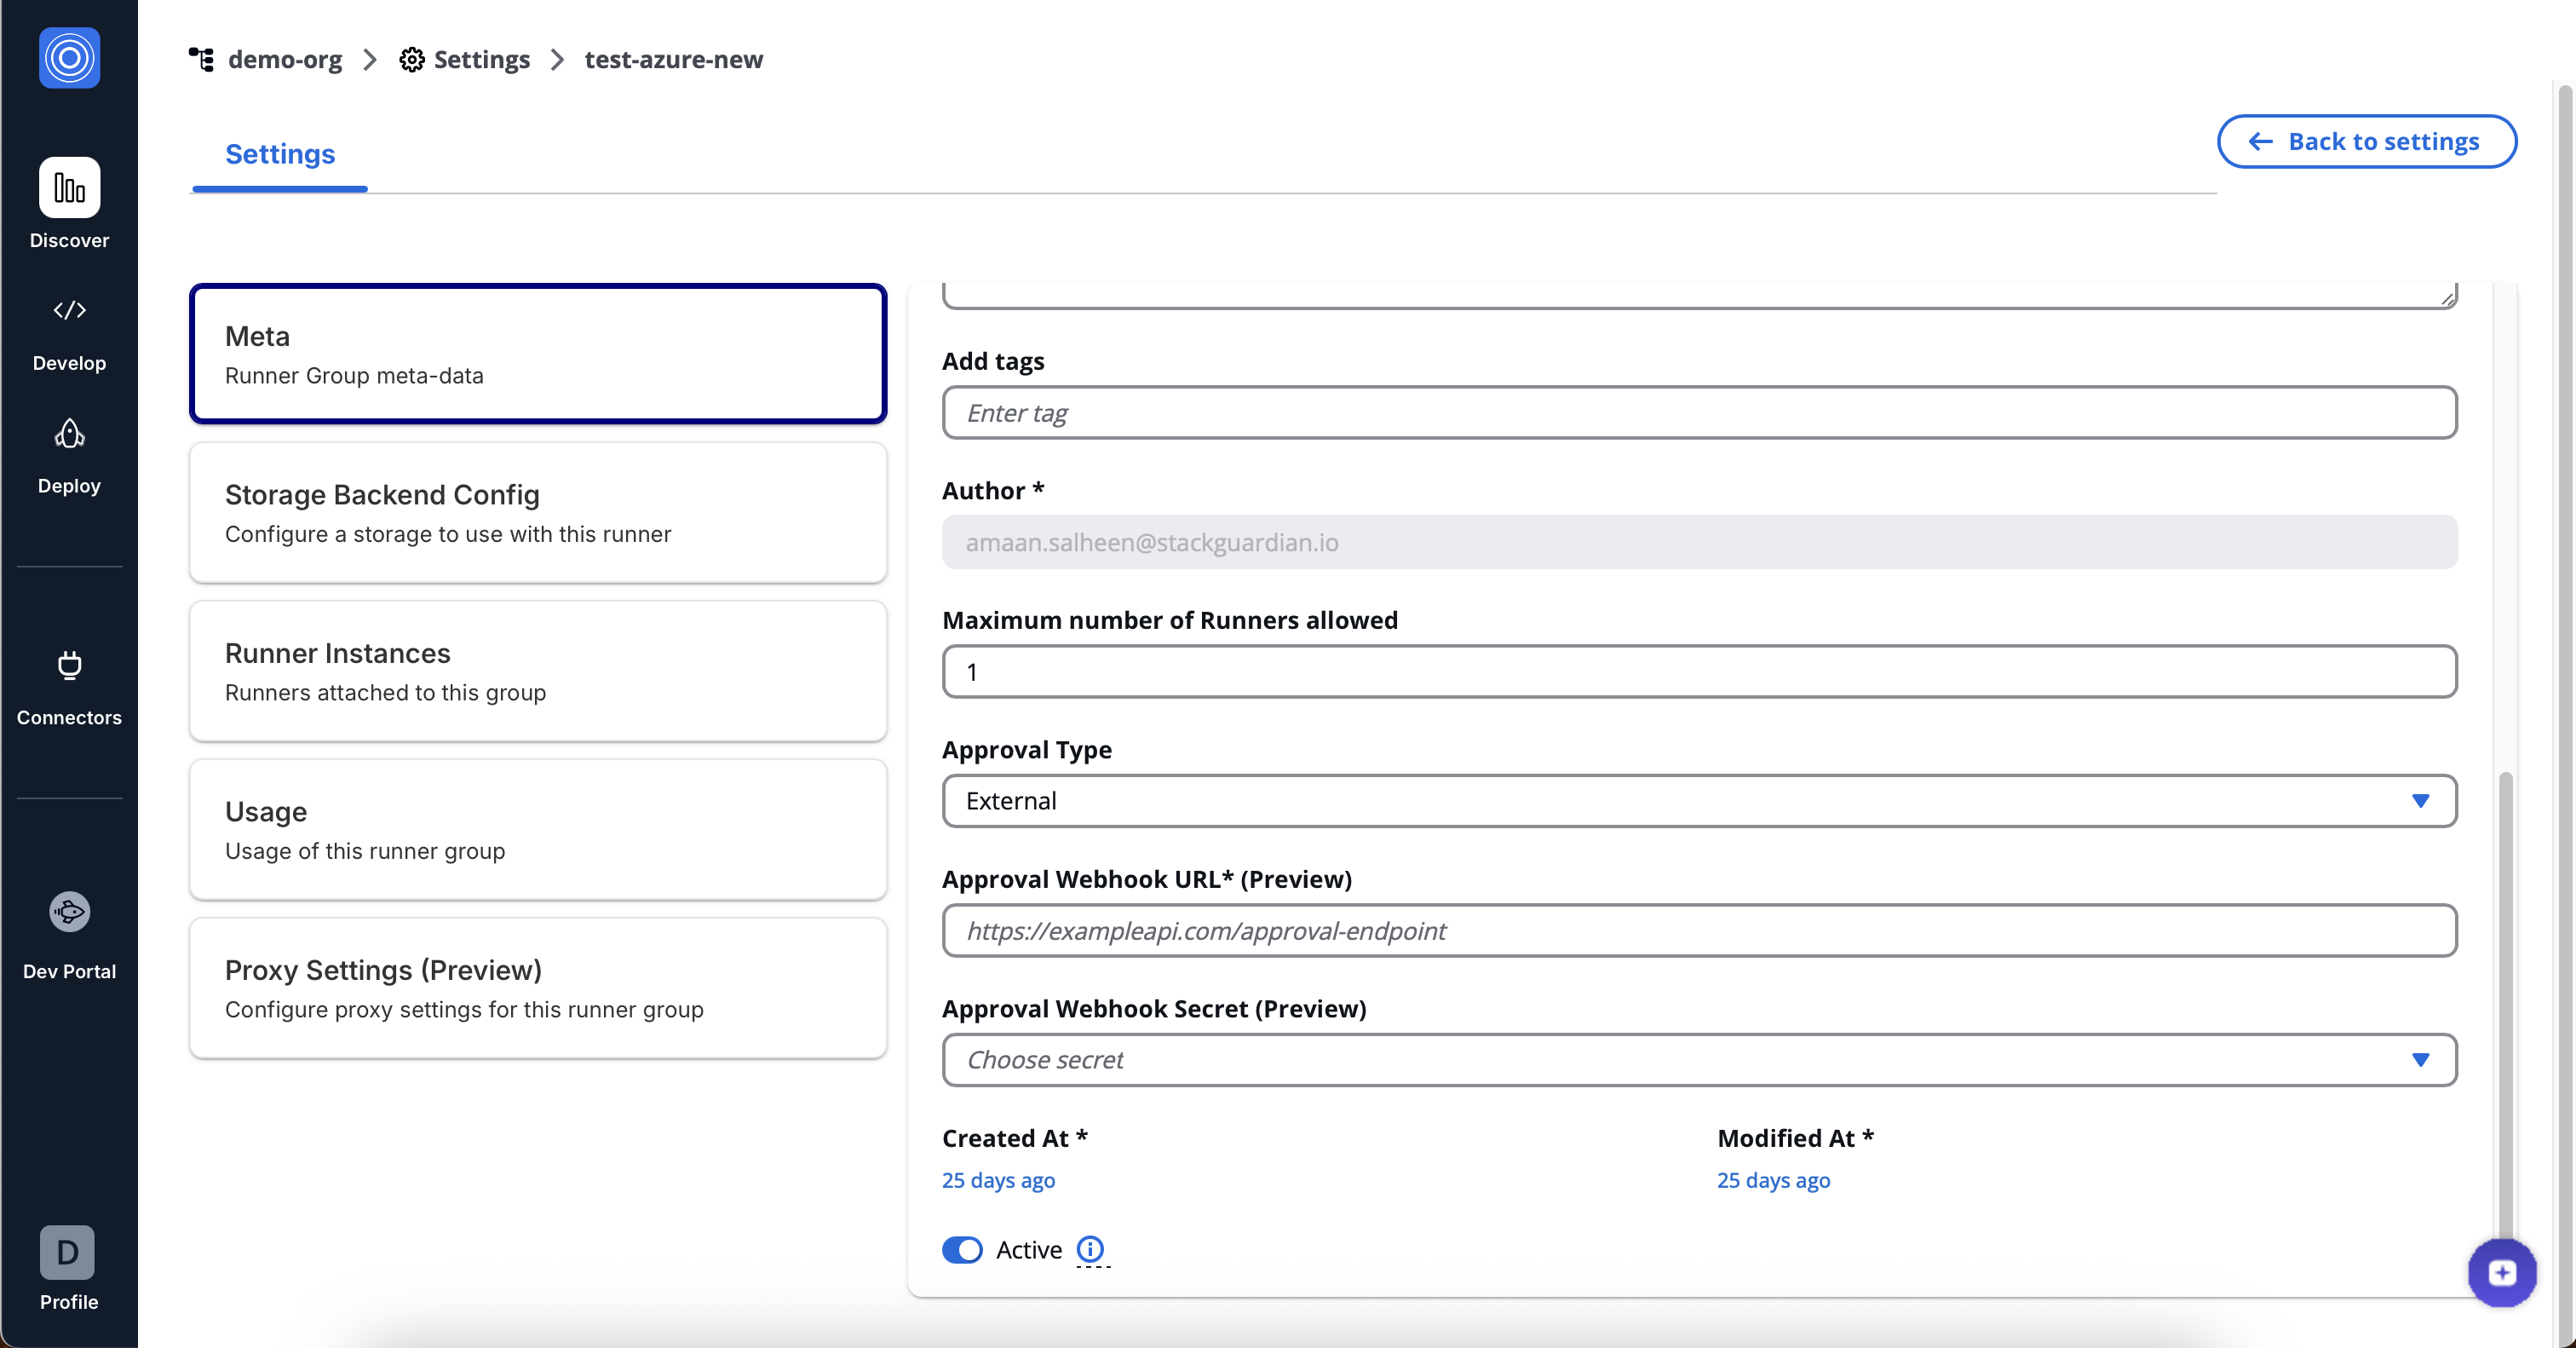
*Enable external approvals in runner group*
note
The actual approval logic and rules are configured in your external service, not in StackGuardian. StackGuardian only activates external approval mode and specifies where to send approval requests.
**Step 2: Assign runner group to workflow**
Navigate to your workflow Settings > Execution Environment:
1. Set Runner Type to "Private"
2. Select the runner group with external approvals enabled
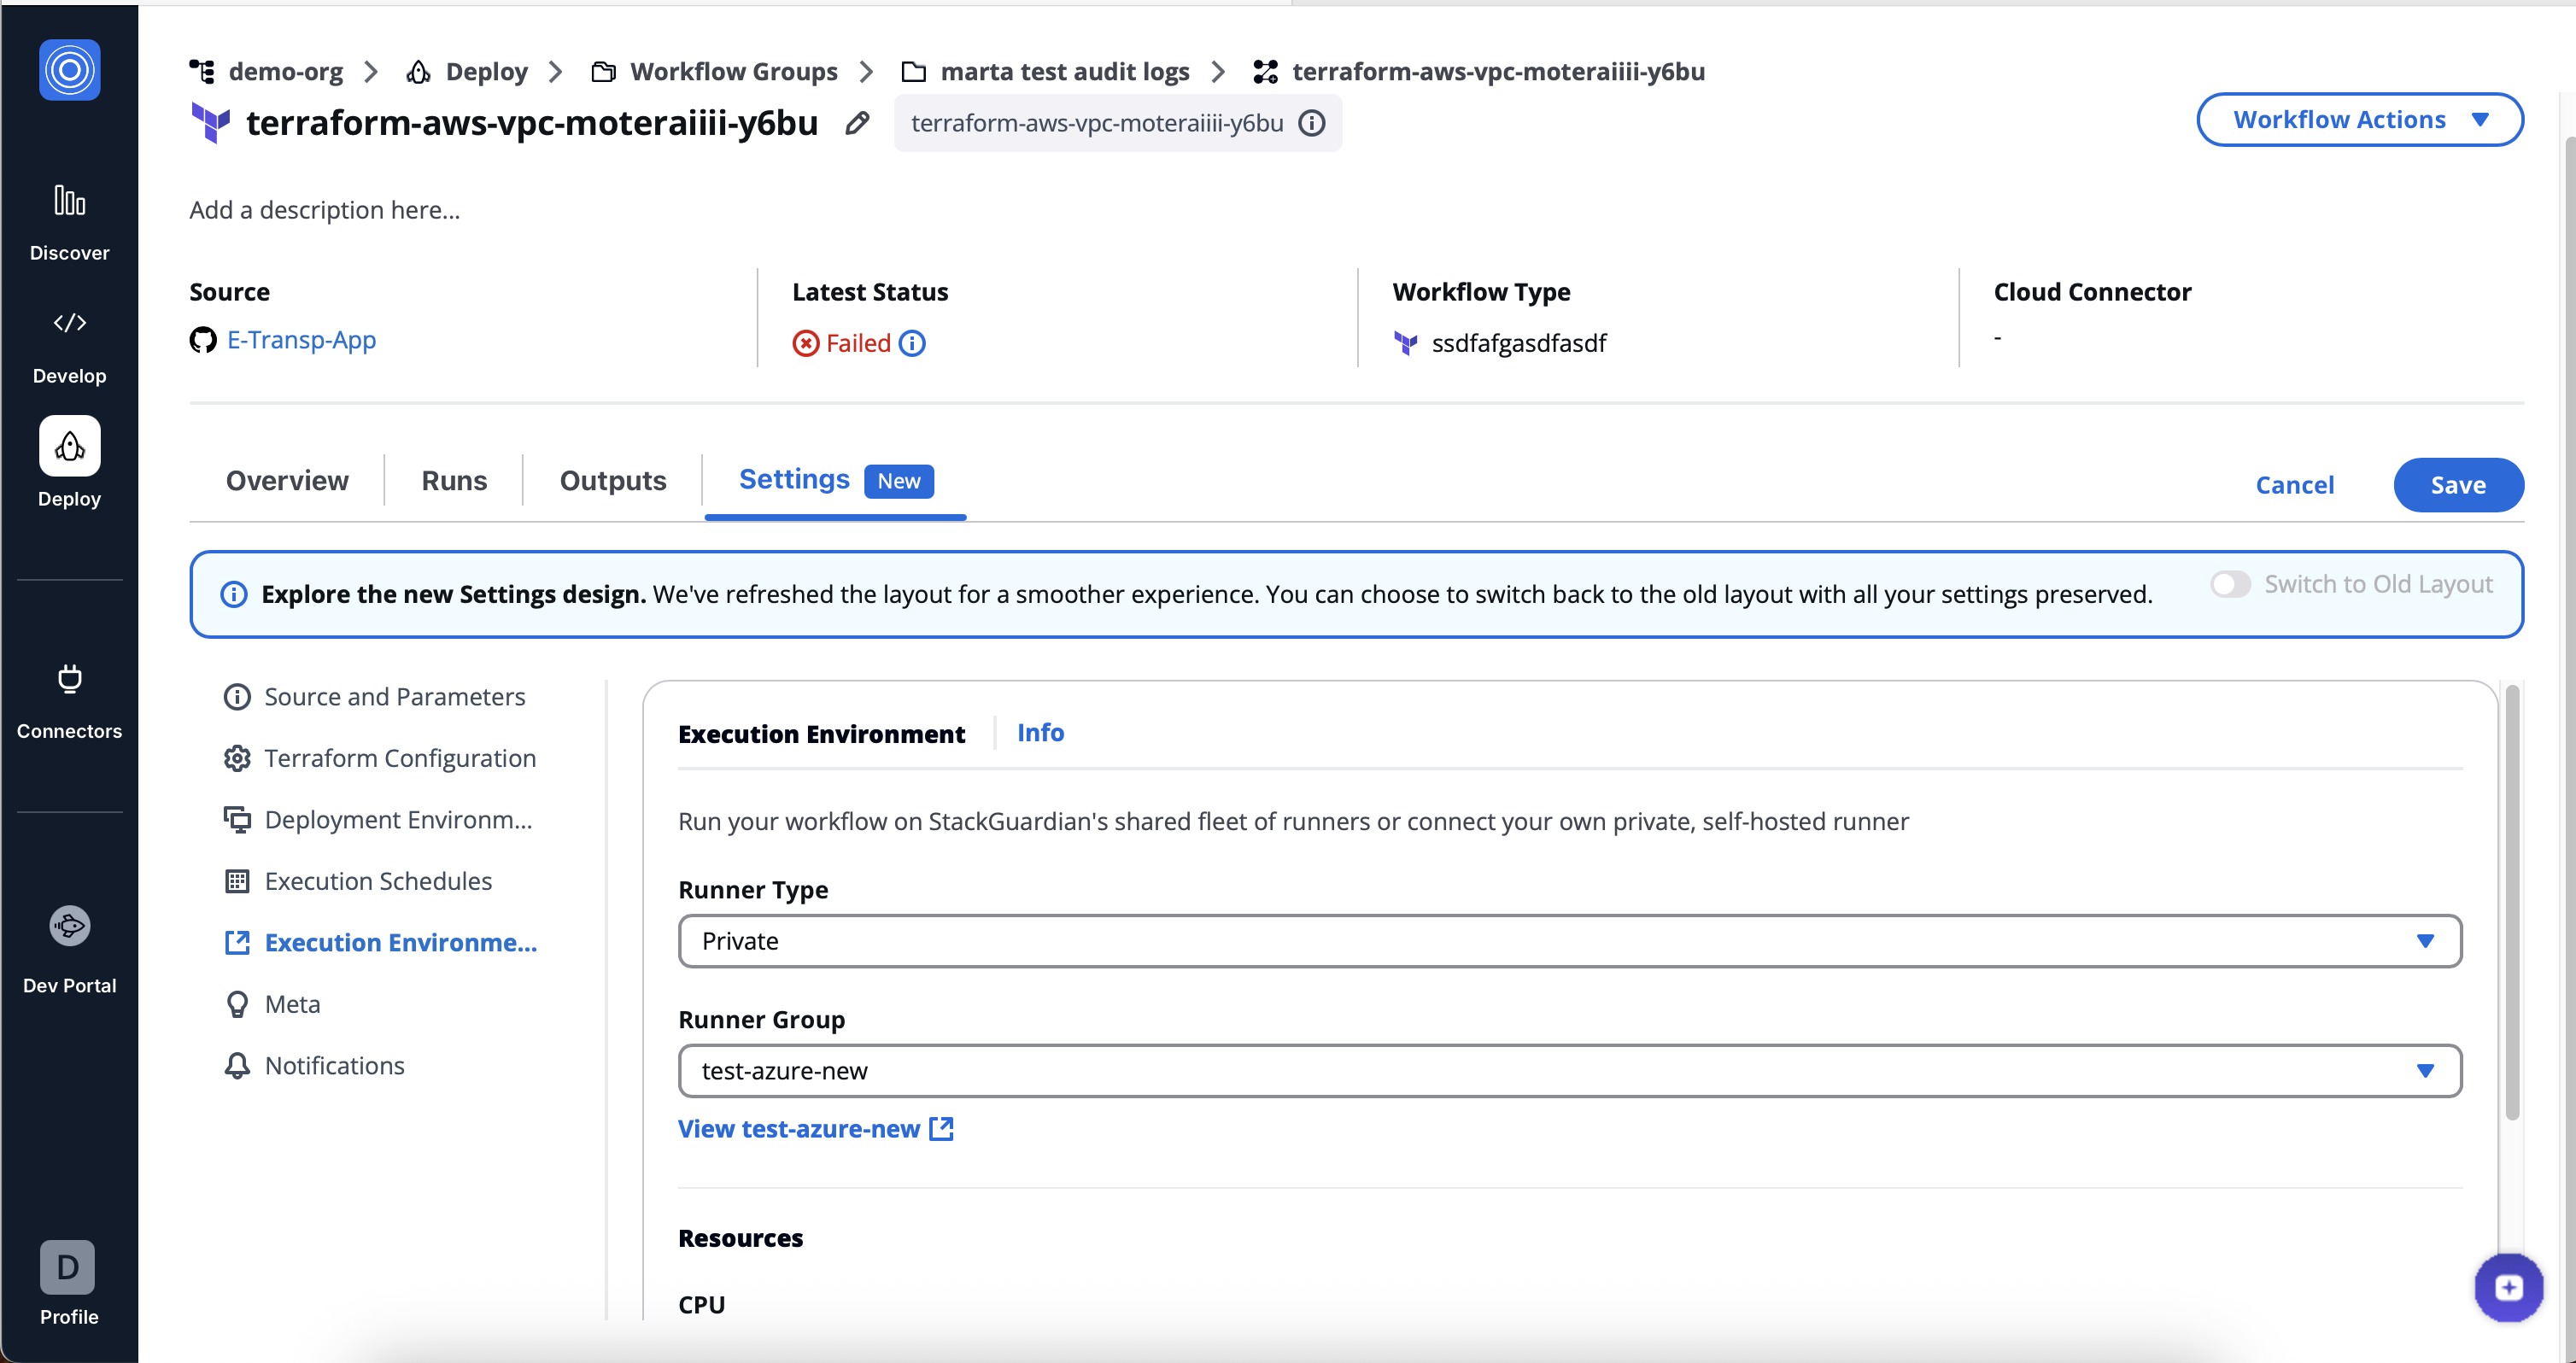
*Assign runner group to workflow*
#### Approval precedence[](#approval-precedence "Direct link to Approval precedence")
External approvals are the single source of truth and override all internal approval configurations:
* **Workflow internal approvals**: Disabled when external approvals are active
* **Policy approvals**: Disabled for policies linked to workflows using external approvals
* **Lifecycle Custom Step approvals**: Use the external system instead of internal settings
If you previously configured internal approvals and then enable external approvals, the internal approvals are placed on hold (not deleted) and ignored while external approvals are active.
#### Workflow approval section when external approvals are enabled[](#workflow-approval-section-when-external-approvals-are-enabled "Direct link to Workflow approval section when external approvals are enabled")
When a workflow uses a runner group with external approvals enabled, the workflow Settings > Terraform Configuration > **Require Approval for Workflow Run** section:
* Displays automatically (cannot be disabled)
* Shows "External approval is enabled for this workflow."
* Includes a link to manage the runner group configuration
* Prevents any internal approval configuration changes
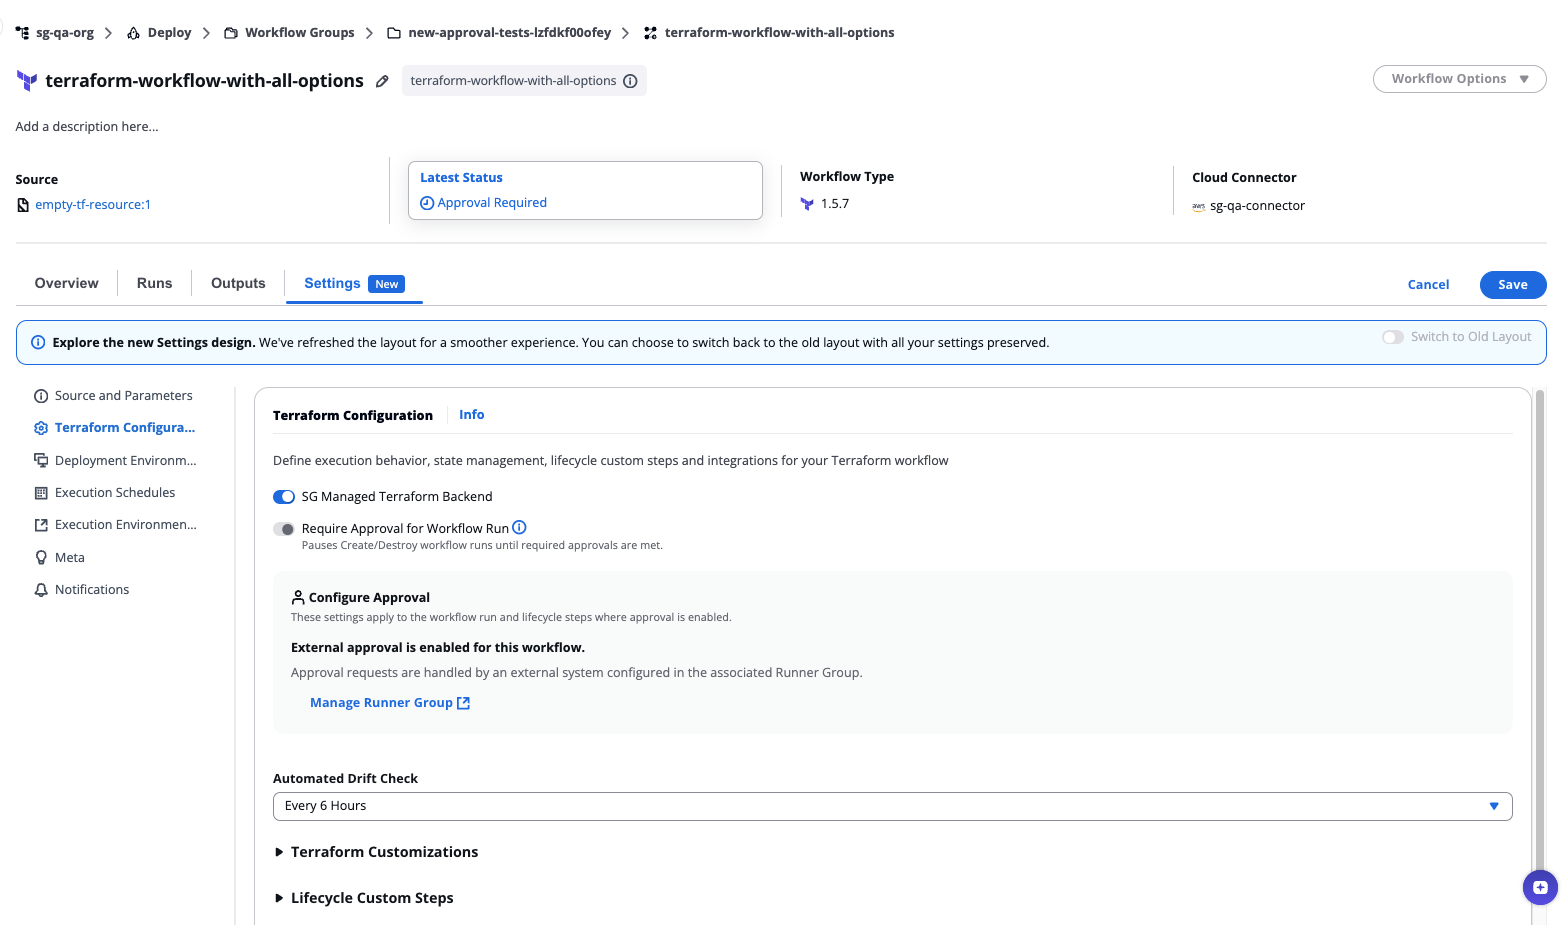
*Workflow approval section when external approvals are enabled*
#### Approval Details modal with external approvals[](#approval-details-modal-with-external-approvals "Direct link to Approval Details modal with external approvals")
The Approval Details modal adapts based on whether the external system has responded and what information it provides.
#### Before external approval is granted[](#before-external-approval-is-granted "Direct link to Before external approval is granted")
When a workflow run is awaiting external approval:
* Displays "Approval requests are **handled by** an **external system**, configured in the associated **Runner Group**"
* Shows approval reasons (what requires approval)
* Includes link to the runner group configuration
* **No action buttons** for regular users
* **Cancel button only** for admins (internal cancellation is still possible for admins)
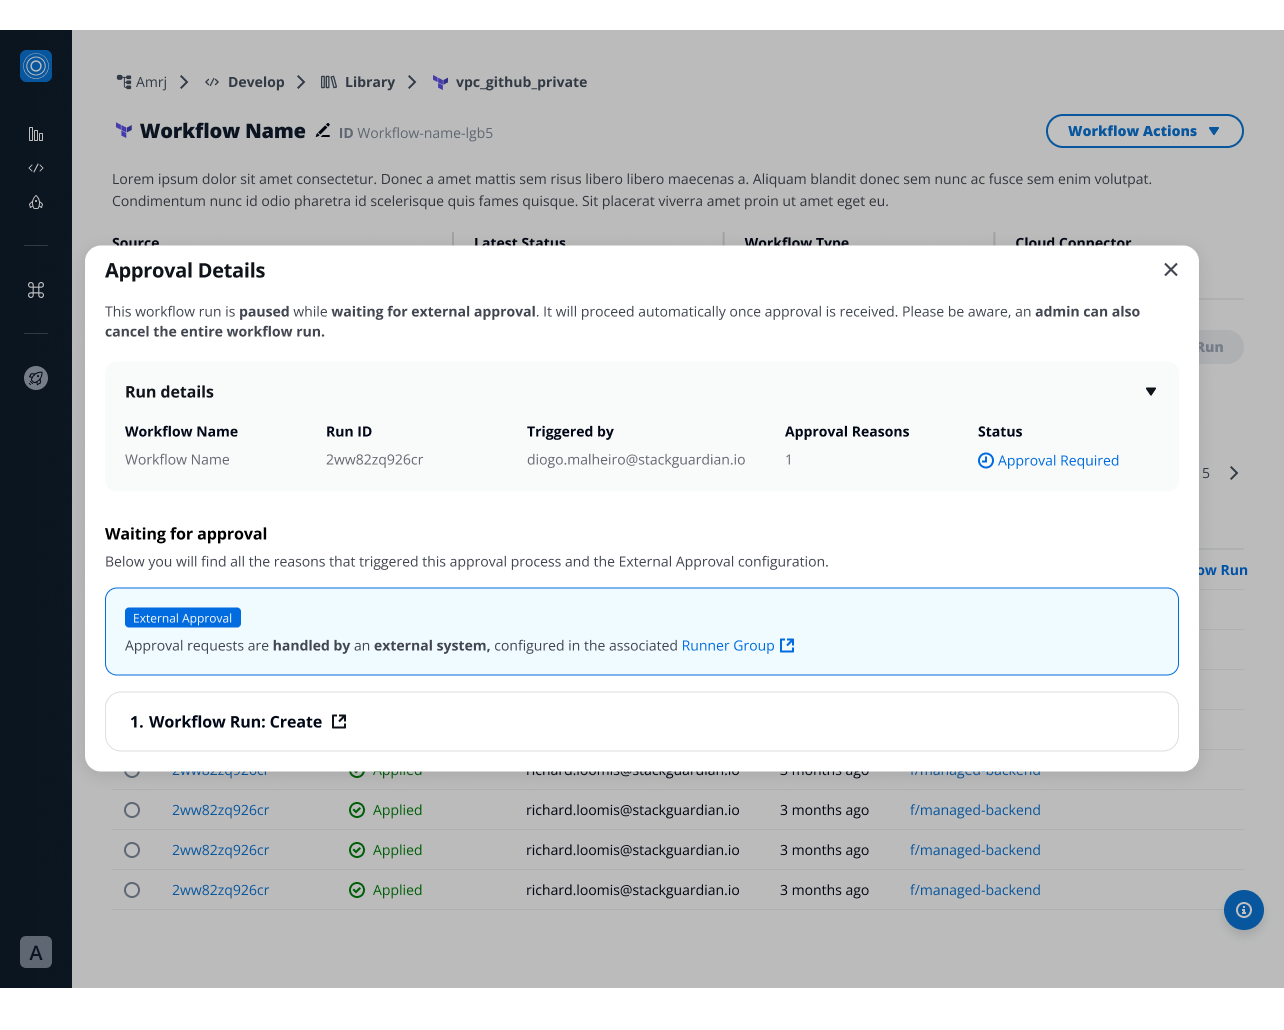
*Before external approval is granted*
#### After external approval is granted[](#after-external-approval-is-granted "Direct link to After external approval is granted")
Once the external system approves, the modal displays one of two formats depending on the external system configuration:
**Without approval details:**
* "This workflow run was **approved** by an **External approval** configured in the associated **Runner Group**"
* Shows approval reasons only
* No additional approver information available
**With approval details:**
* Shows approval reasons
* "Show more details" option reveals:
* Who approved
* When they approved
* Approval message
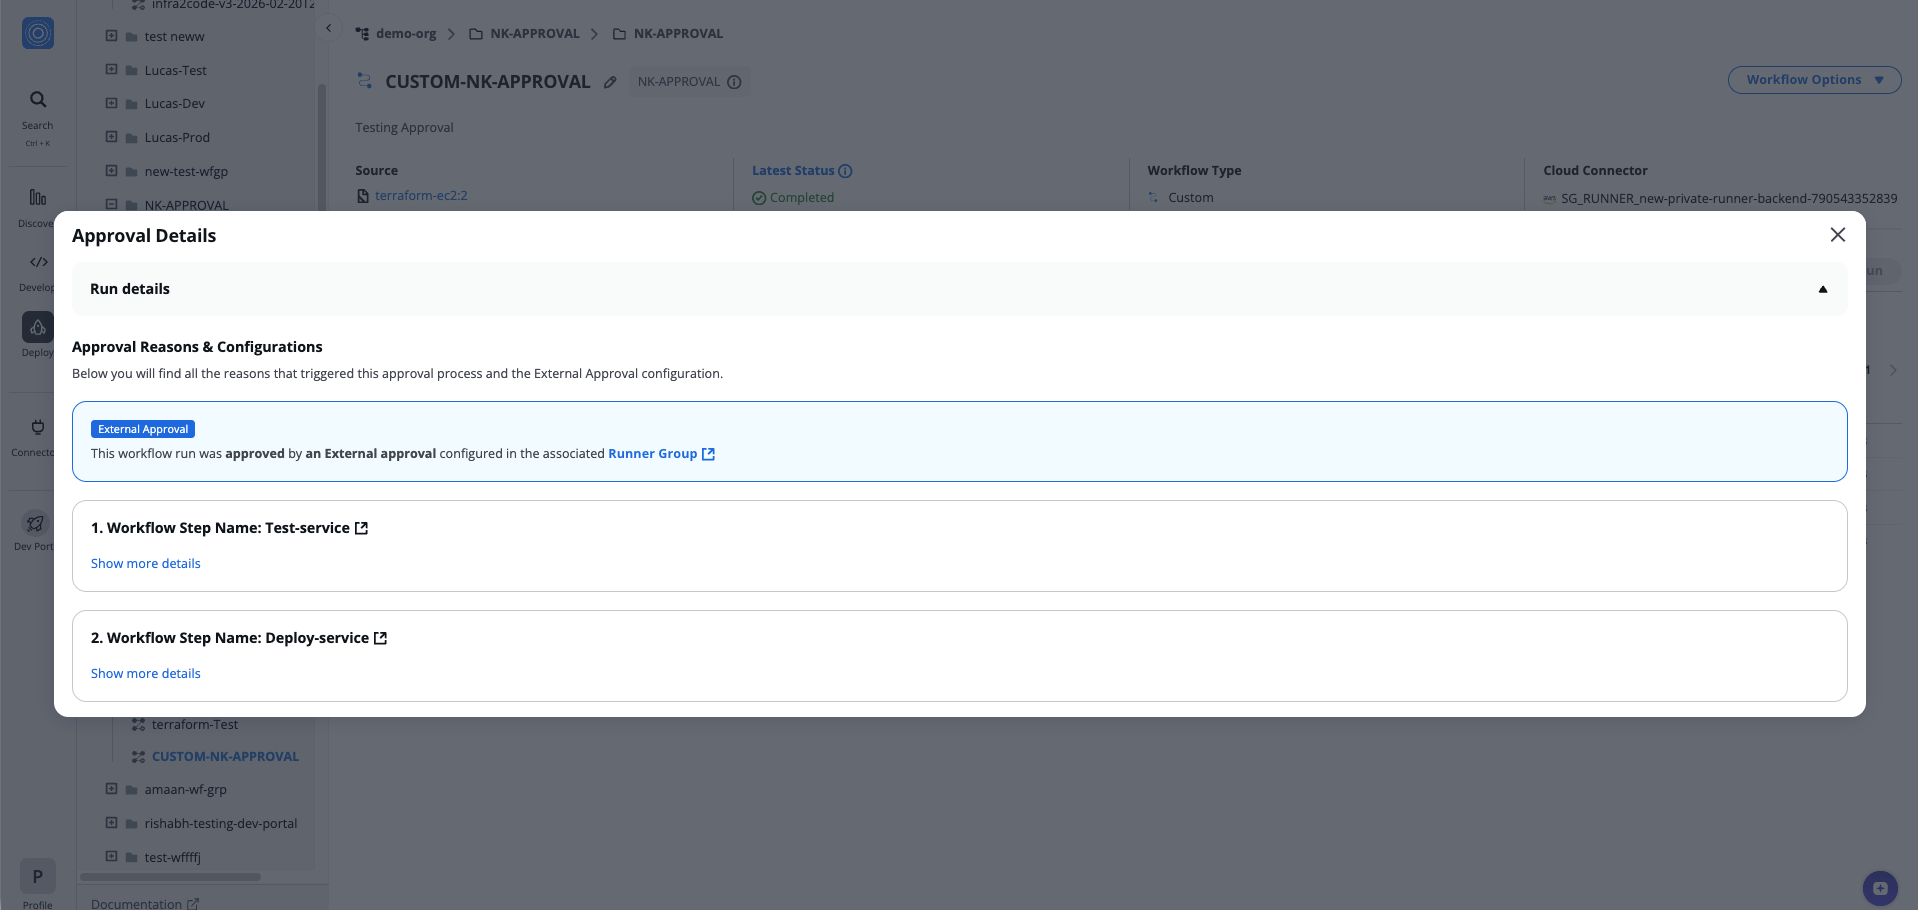
*After external approval is granted*
note
Whether you receive detailed approval information depends on how your external approval system is configured.
#### After external approval is rejected or canceled[](#after-external-approval-is-rejected-or-canceled "Direct link to After external approval is rejected or canceled")
When the external system rejects or cancels the approval request, the Approval Details modal shows:
* "This workflow run was **canceled**. External Approval is configured in the associated **Runner Group**"
* Link to the runner group configuration
* Cancellation details (when provided by external system):
* **Eligible approver**: Email of who canceled
* **Timestamp**: When they canceled
* **Approval Message**: Reason for cancellation
The workflow run status changes to "Cancelled" and cannot be restarted.
**Approval reasons list:**
* Shows all approval reasons that were pending (Workflow Run, Workflow Steps, Policies)
* Each reason displays as a numbered list item with a link to view details
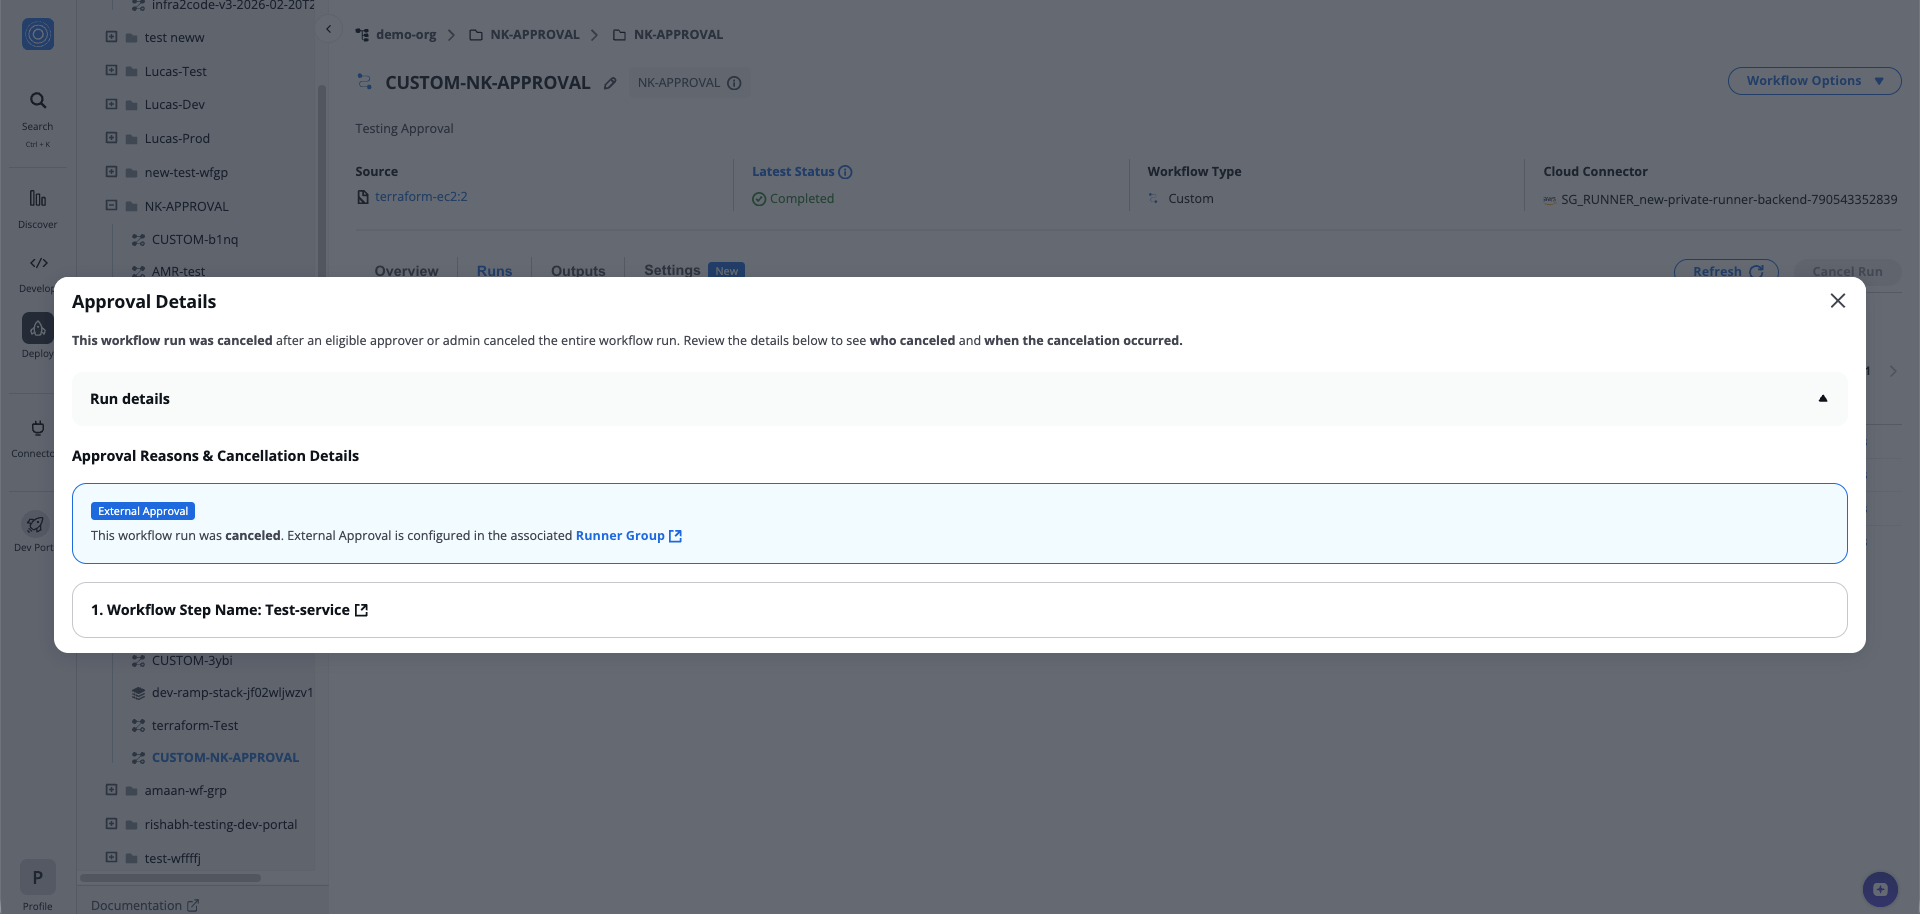
*After external approval is rejected or canceled*
note
The amount of detail shown depends on what information your external approval system sends back to StackGuardian. You may see full cancellation details or only the cancellation status.
---
# 2.2. Custom Workflow Configuration
## Overview[](#overview "Direct link to Overview")
For workflows that do not use Terraform (e.g., Ansible, Helm, or custom automation pipelines), the configuration focuses on workflow steps, approvals, and triggers, without Terraform lifecycle controls.
### VCS and Template Settings[](#vcs-and-template-settings "Direct link to VCS and Template Settings")
| Setting | Description |
| ---------------------------- | -------------------------------------------------------------------------- |
| **Enable VCS Settings** | Integrate workflow with version control (GitHub, GitLab, Bitbucket, etc.). |
| **Activated Templates** | Choose the active workflow template (e.g., `/demo-org/ansible-nginx`). |
| **Change Selected Template** | Switch to a different template. |
| **Select Revision** | Choose which template version to use (e.g., `ansible-nginx:1`). |
| **Input Variables Method** | Choose **Form** or **Code** mode for providing inputs. |
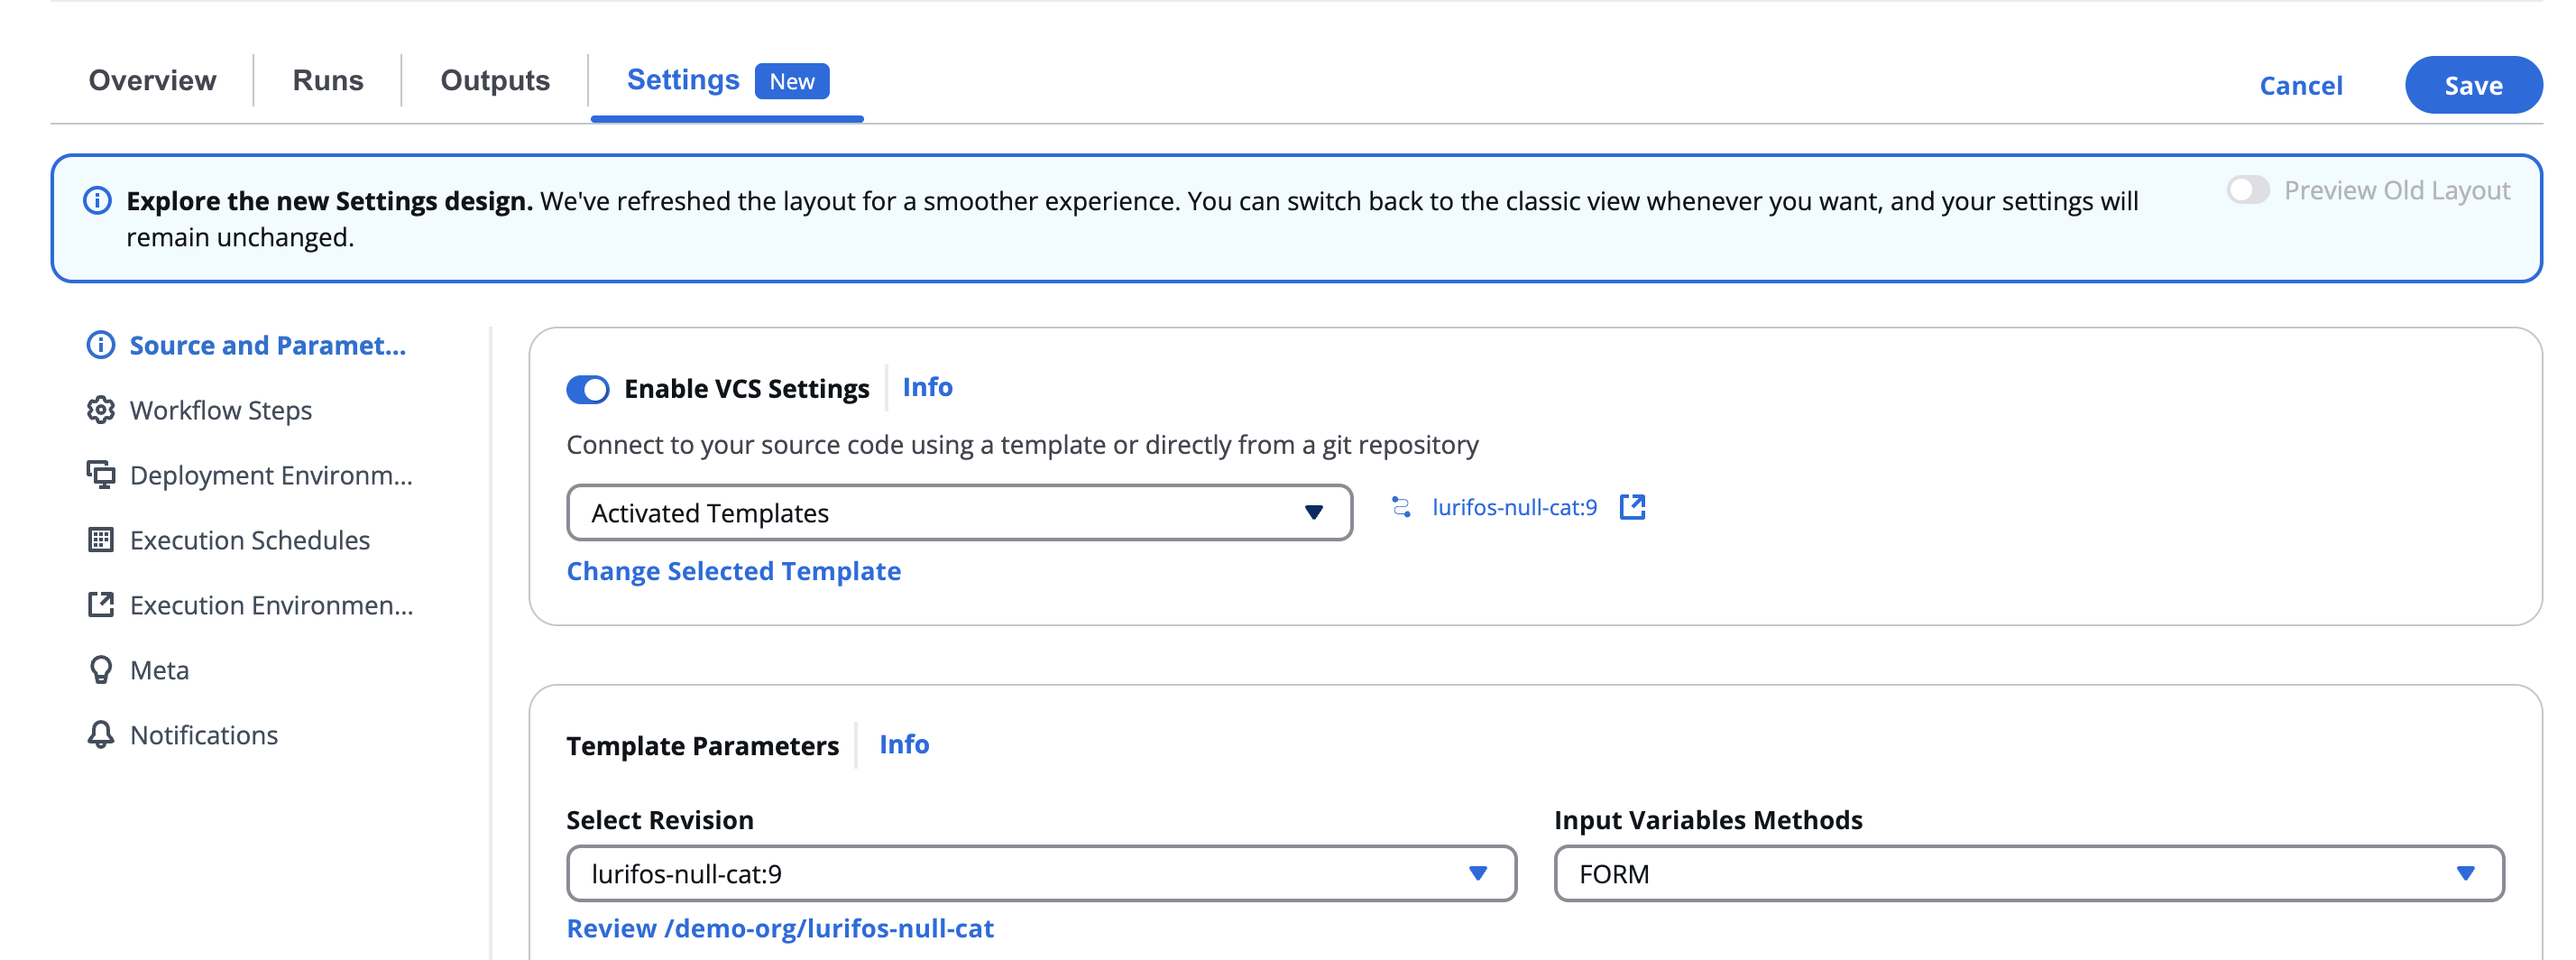
*VCS and Template Settings*
Template variables appear dynamically (e.g., IP address, username, etc.) and support:
* **Manual input**, or
* **Reference linking** via `Create Reference`.
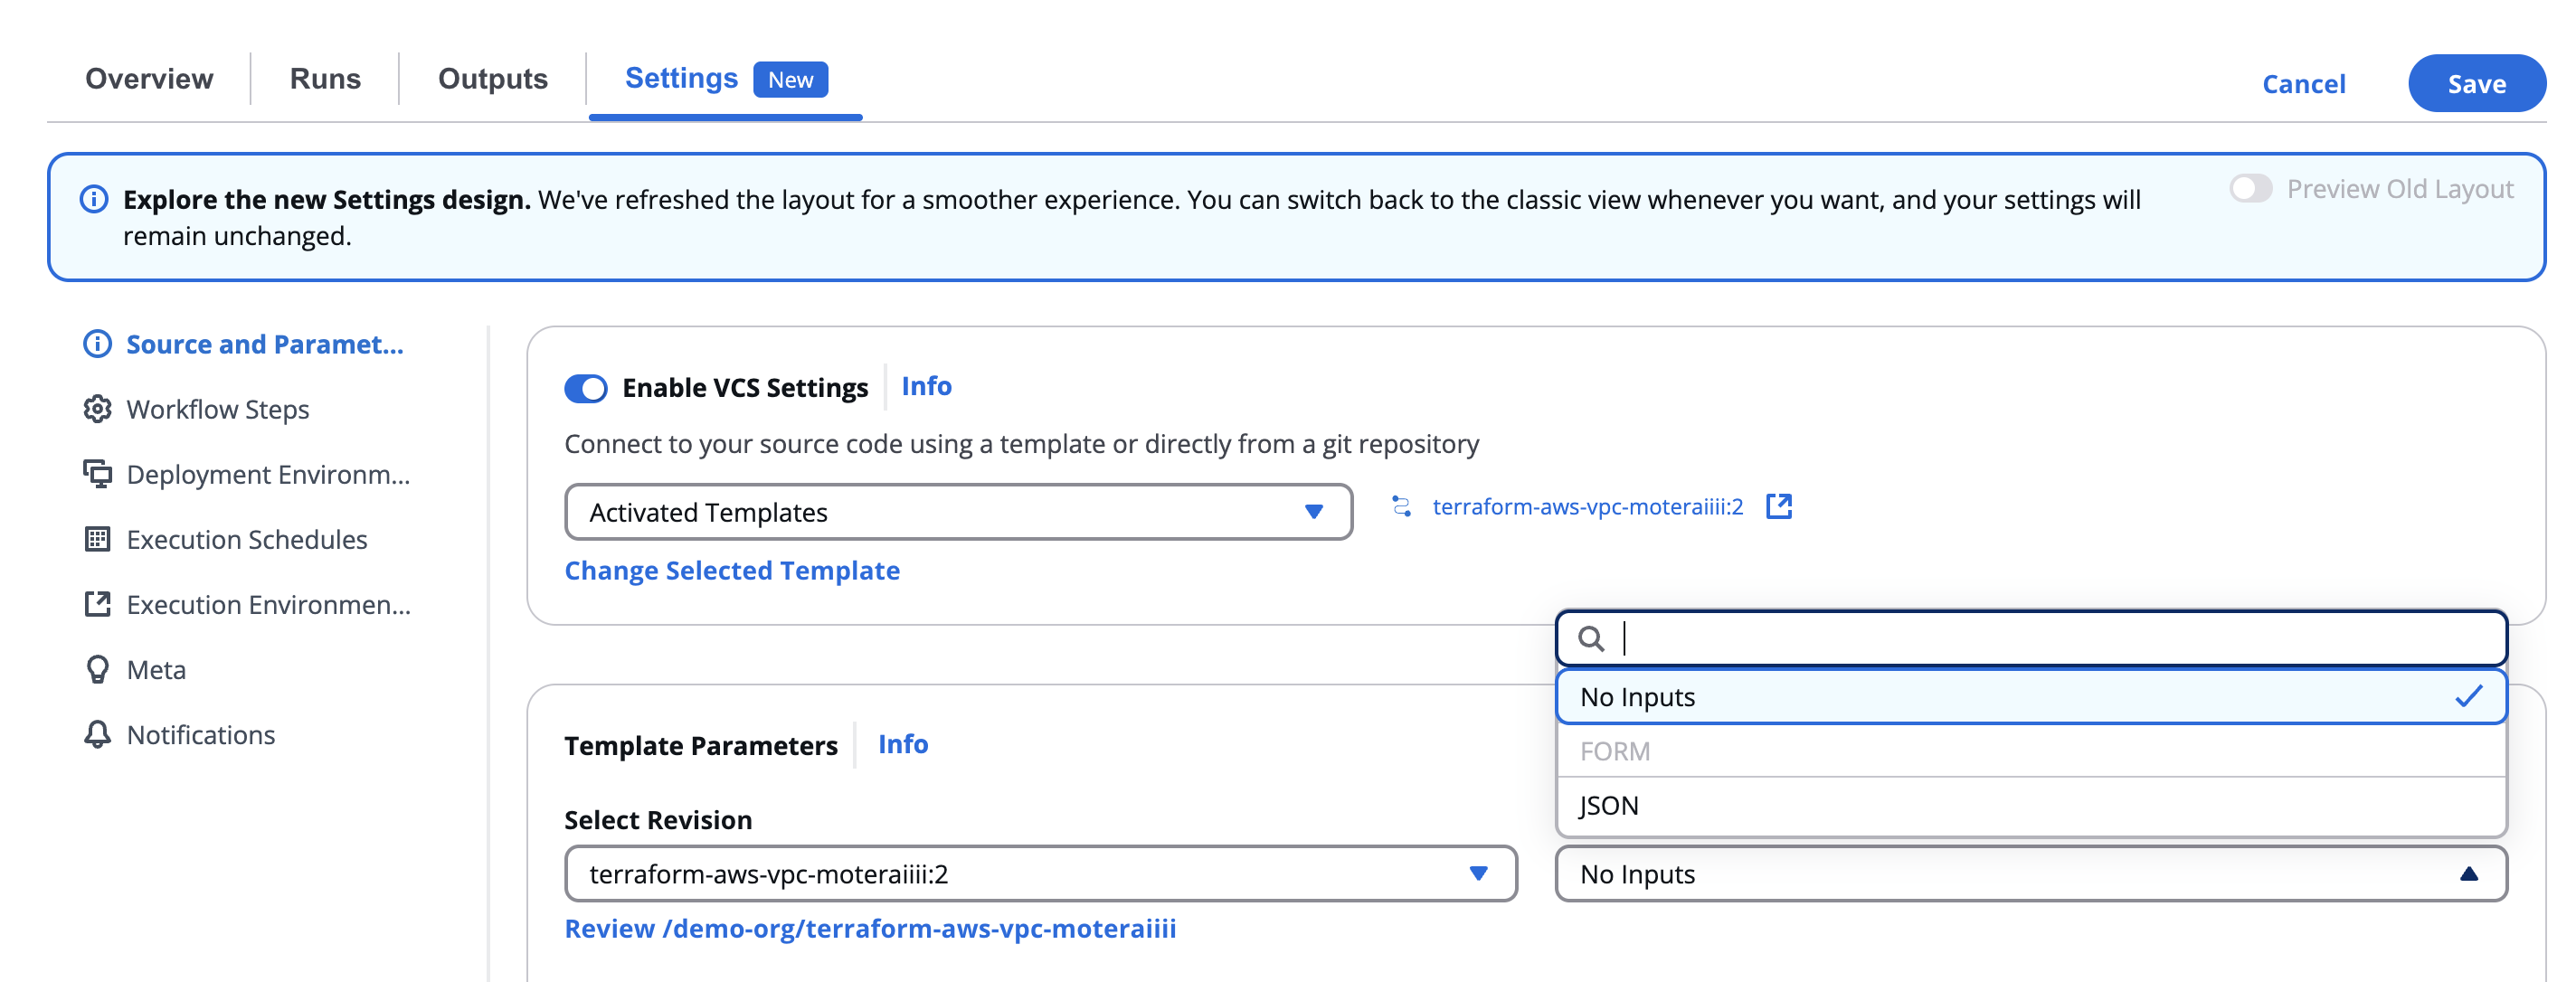
*Custom input*
> Example Variables for Ansible:
>
> * IP Address of Ansible Host
> * Ansible Username
***
### Configure Approval[](#configure-approval "Direct link to Configure Approval")
Custom Workflows support approval at the step level. You enable approval for individual Workflow Steps, so you control exactly which steps pause for review. These settings apply to all Workflow Steps that have approval enabled:
| Setting | Description |
| ----------------------------------------- | ------------------------------------------------------------------------------------------------------------------------------------------------------------ |
| **Allow anyone to approve this workflow** | When enabled, any authenticated user can approve and only one approval is needed. The **Eligible Approvers** and **Required approvers** fields are disabled. |
| **Eligible Approvers** | Select the Users or User Groups who can approve this Workflow. You can combine multiple individual Users with User Groups. |
| **Required approvals** | Set the minimum number of approvals needed before the run can proceed (for example, "From at least 1 approver"). |
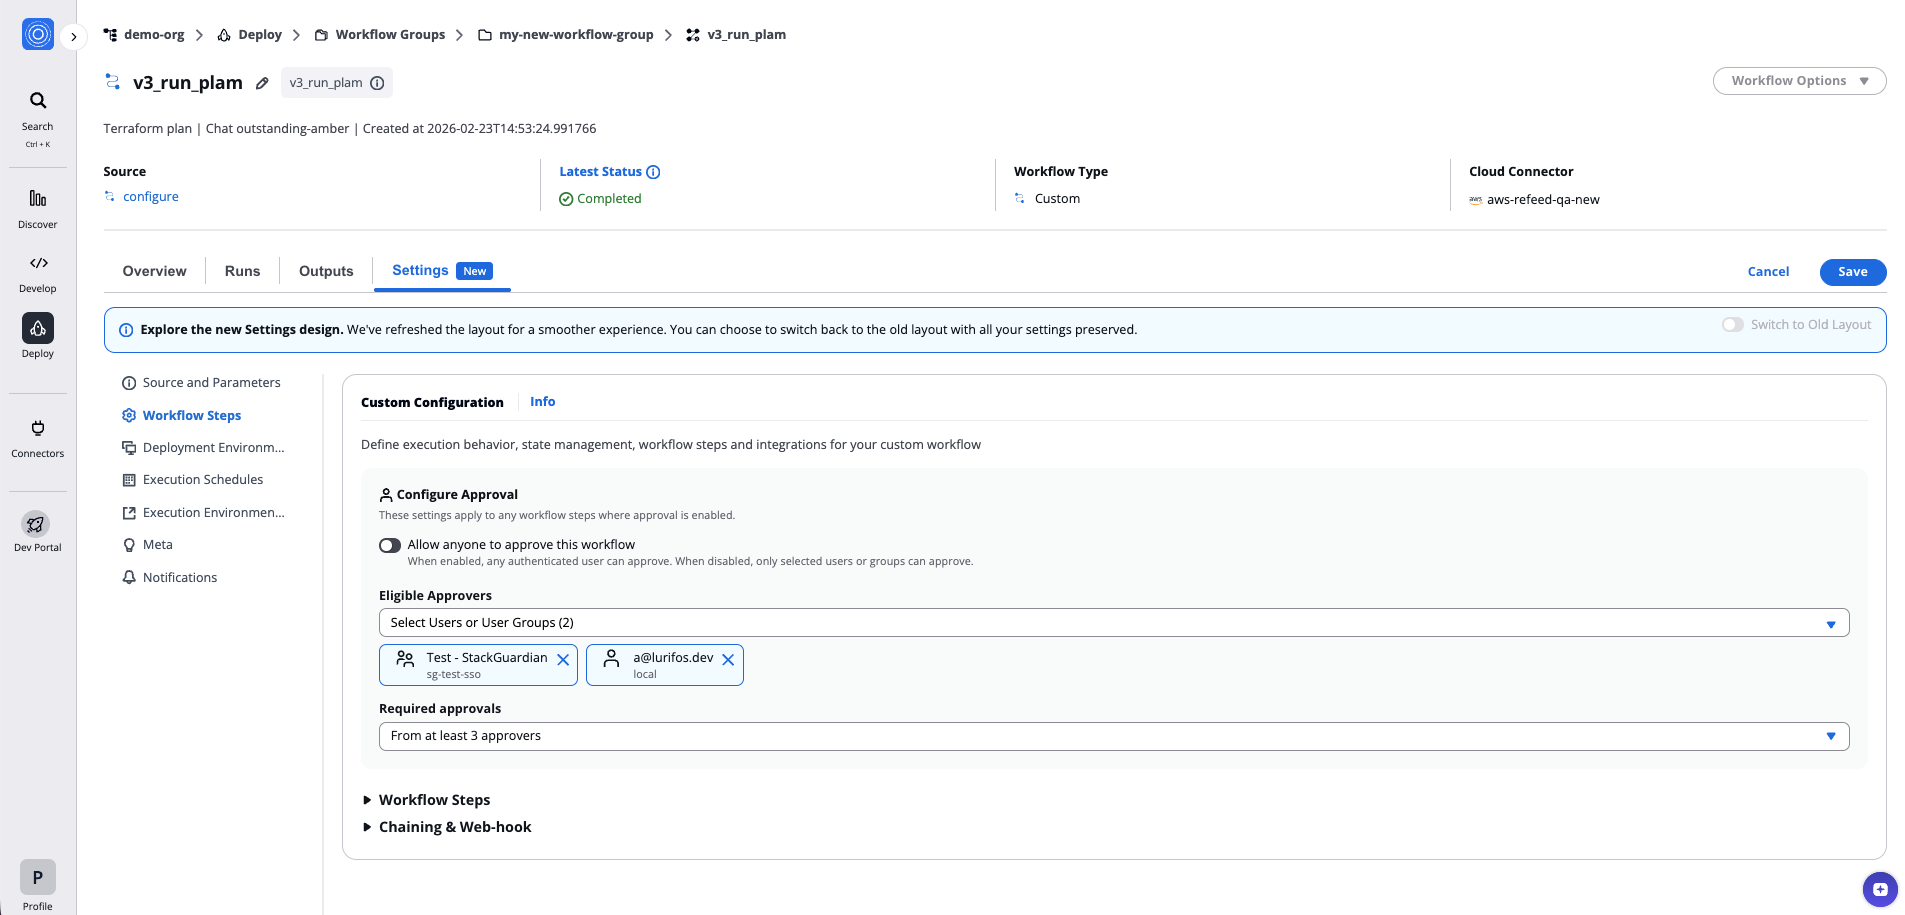
*Configure Approval*
info
For details on how to review and approve workflow runs, approval logic for mixed identity types, and external approval systems, see [Review and approve Workflow Runs](/docs/deploy/workflows/workflow_components/approvals_config/).
### Workflow Steps[](#workflow-steps "Direct link to Workflow Steps")
This section defines the **sequence of actions** (steps) executed when a custom workflow runs.
* **Add Step +** – Add new steps from the workflow library.
* **Step Name** – Unique identifier for each step.
* **Workflow Step Template** – Select a prebuilt step from your organization’s library.
* **Workflow Step Template Revision** – Specify the version of that template.
* **Workflow Step Timeout** – Define maximum runtime.
* **Require Approval for this step** - Pauses the workflow run until this step is approved.
* **Command Override** – Optionally override the default command.
* **Input Variables with noCode Form** – Use a visual form to configure inputs.
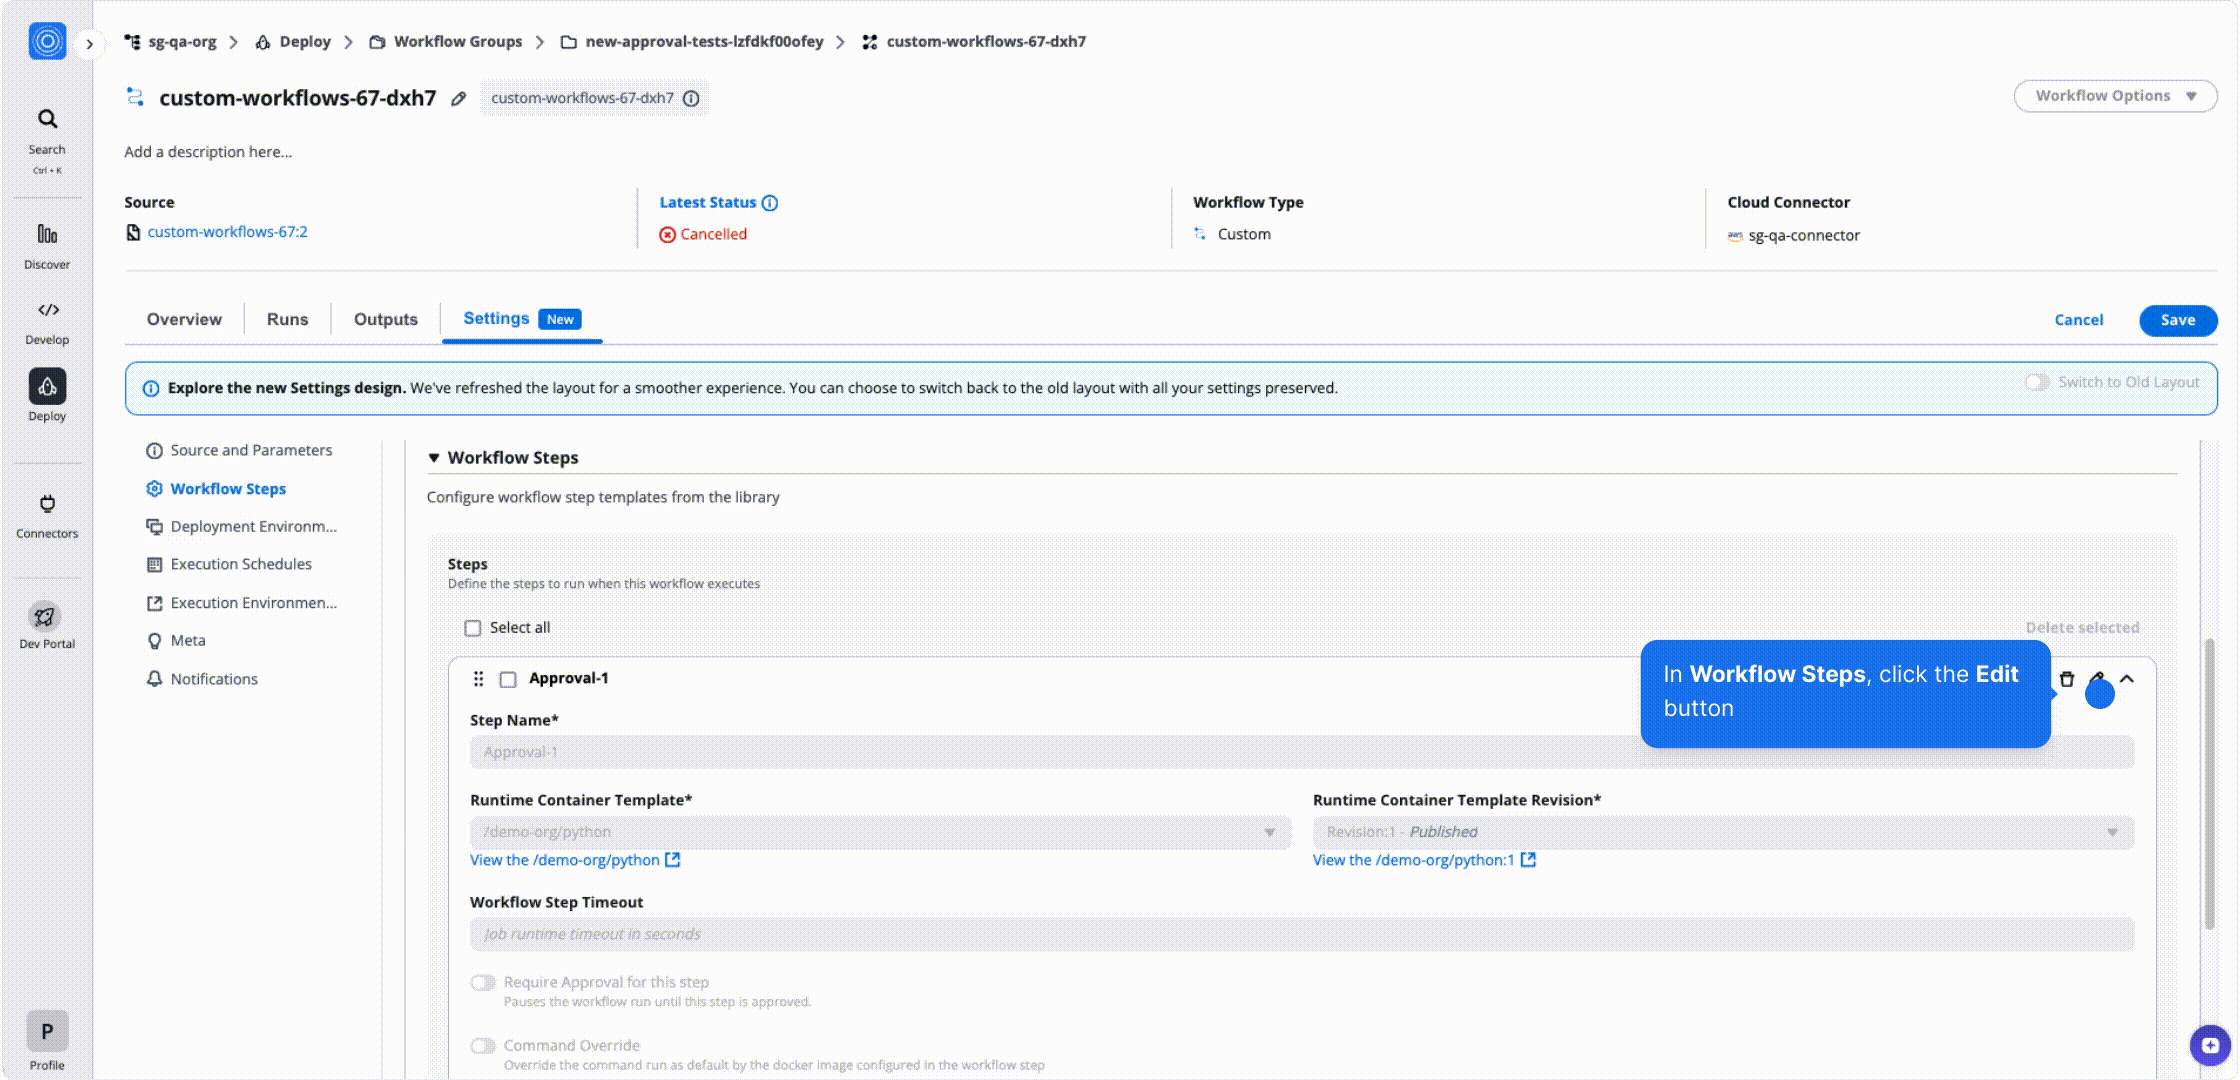
*Workflow Steps*
Steps execute sequentially and can be reordered or deleted easily.
Multiple steps can be combined to build complex, multi-phase automation flows.
### Chaining & Webhook[](#chaining--webhook "Direct link to Chaining & Webhook")
The **Chaining & Webhook** section functions similarly to Terraform workflows.
#### Workflow Chaining[](#workflow-chaining "Direct link to Workflow Chaining")
* **On Error** – Trigger another workflow on failure.
* **On Success** – Trigger another workflow on completion.
Each includes condition filters, target workflow selection, and action type.
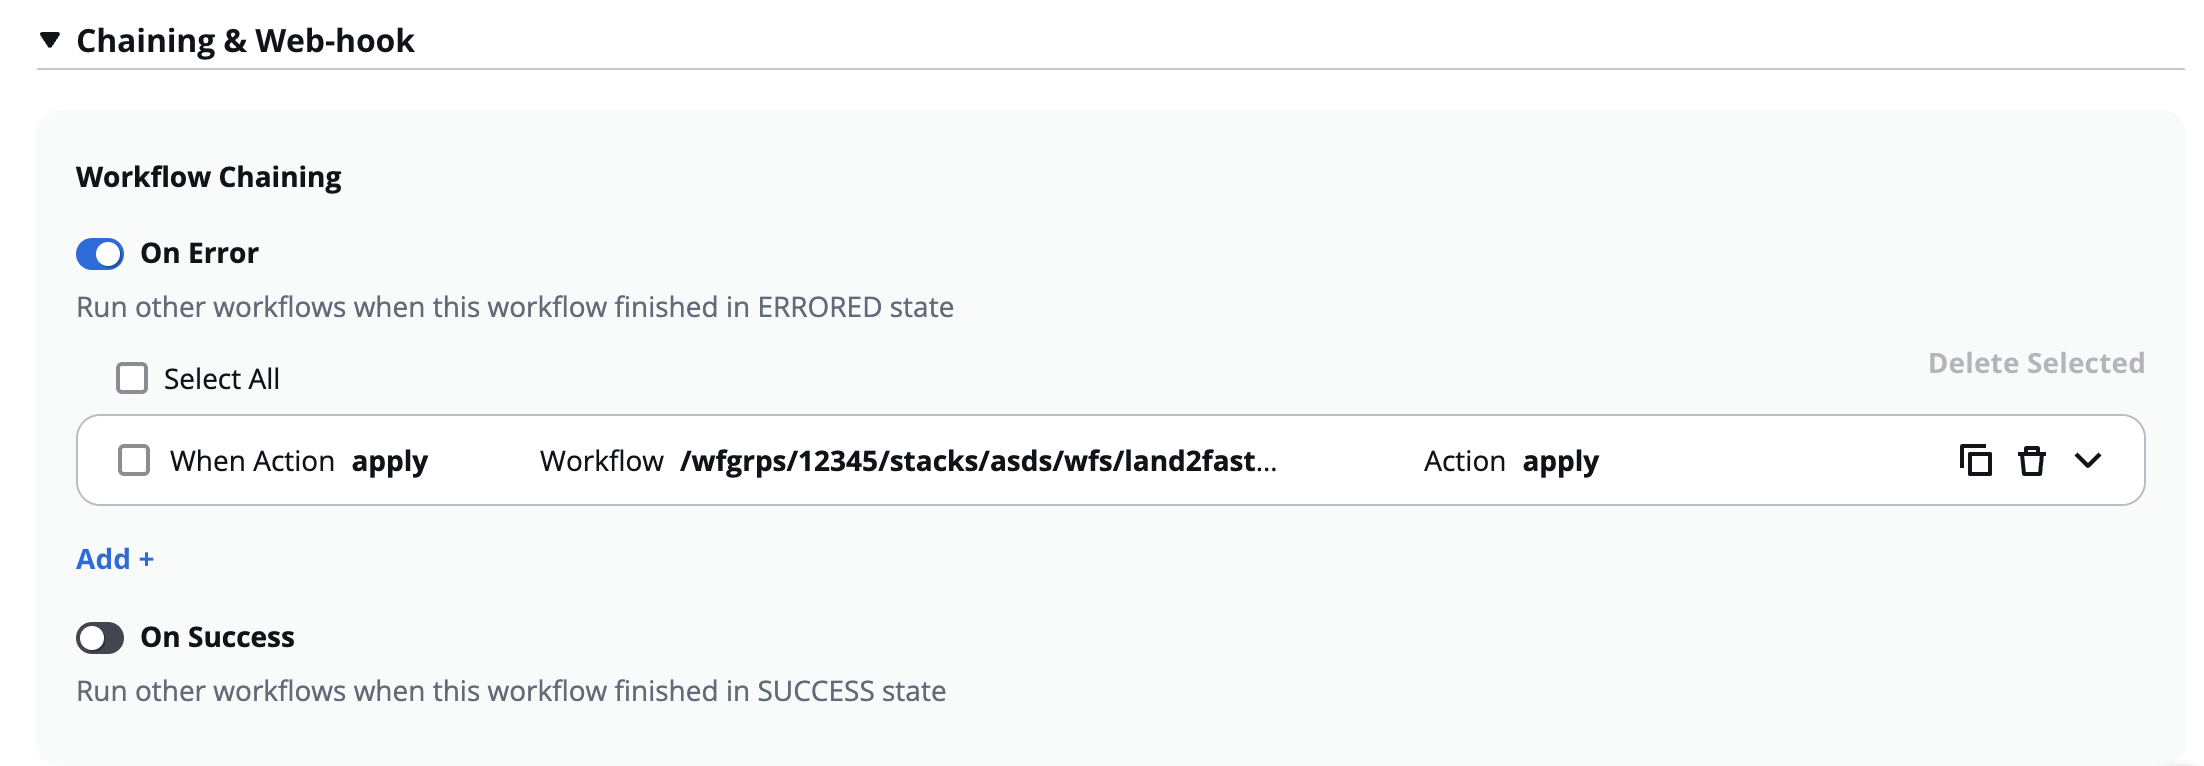
#### Webhook[](#webhook "Direct link to Webhook")
* **On Error** / **On Success** – Define external HTTP endpoints to notify when workflows end.
* Each webhook includes:
* **Webhook Name**
* **Webhook URL**
* **Webhook Secret**
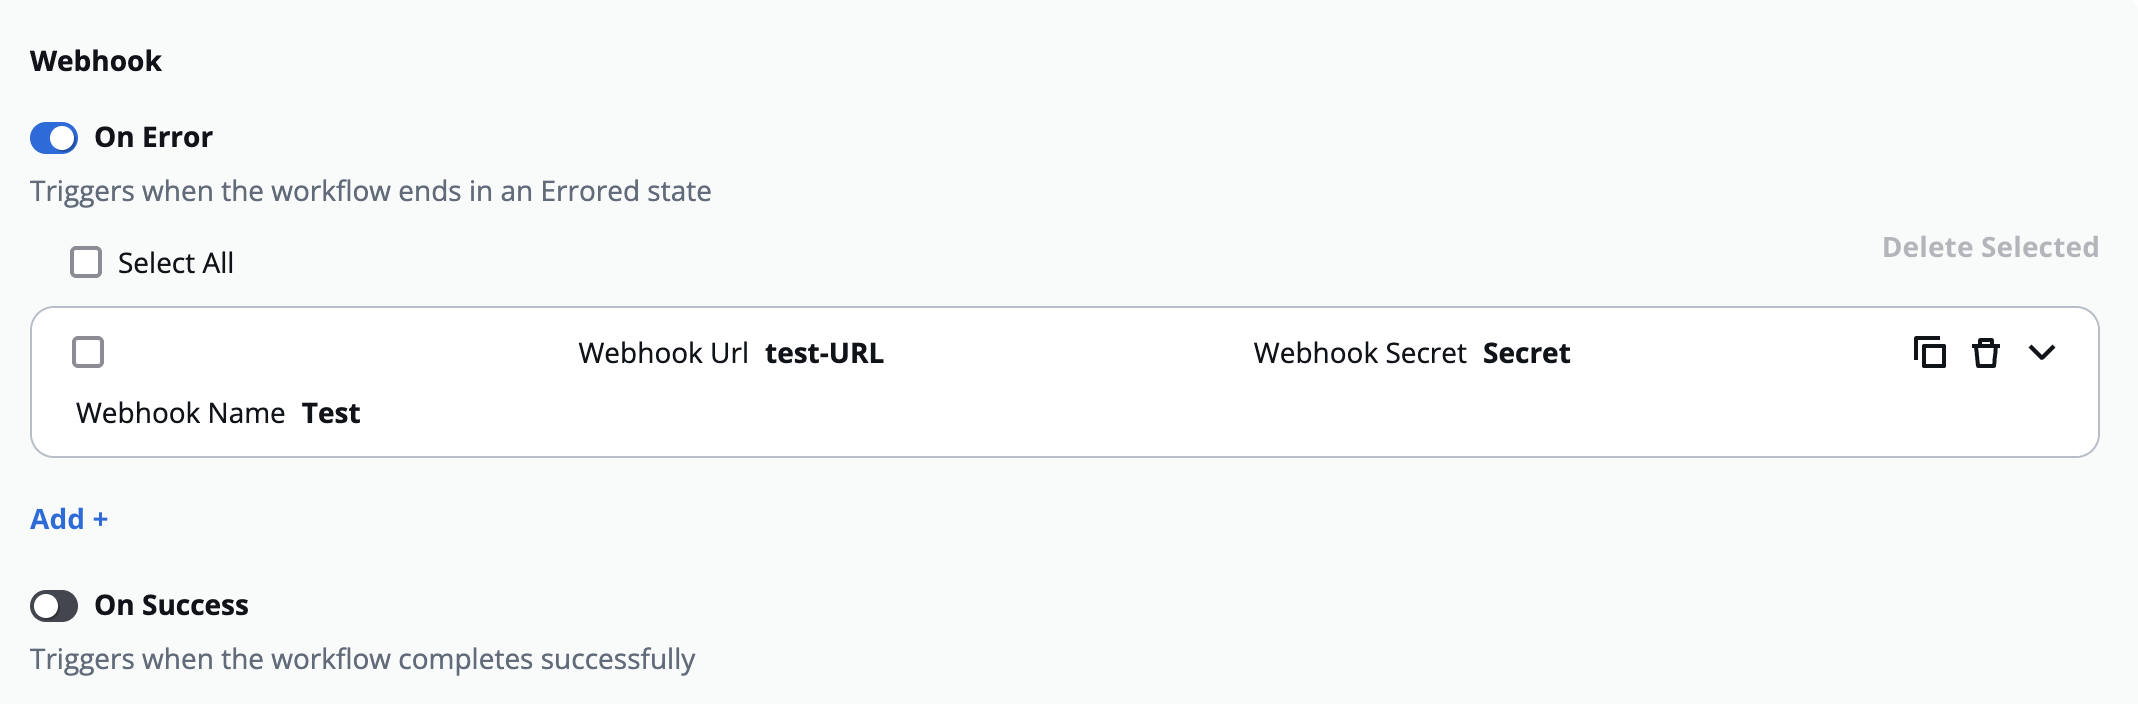
> Example:
>
> * On Success → Trigger a “Configuration Validation” workflow.
> * On Error → Notify the DevOps team via webhook or run a rollback automation.
##### Example: HTTP POST Request Body[](#example-http-post-request-body "Direct link to Example: HTTP POST Request Body")
* Here is an example of what the HTTP POST request body looks like:
```
{
"Org": "wicked-hop",
"Timestamp": 1763045349466,
"WorkflowGroup": {
"ResourceName": "test-webhook"
},
"WorkflowRun": {
"OrgId": "/orgs/wicked-hop",
"WfgrpId": "/wfgrps/test",
"WfId": "/wfgrps/test/wfs/aws-s3-demo-website-op9v",
"WfrunId": "/wfgrps/test/wfs/aws-s3-demo-website-op9v/wfruns/g389yenk9hrp",
"ResourceName": "g389yenk9hrp",
"WfrunDetails": {
"LatestStatus": "COMPLETED",
"LatestStatusKey": "on_0_generate-terraform-plan",
"RuntimeParameters": {
"iacTemplate": {
"/stackguardian/aws-s3-demo-website:16": {
"RuntimeSource": {
"sourceConfigDestKind": "GITHUB_COM",
"config": {
"includeSubModule": false,
"ref": "main",
"isPrivate": false,
"workingDir": "",
"repo": "https://github.com/stackguardian/template-tf-aws-s3-demo-website"
}
},
"IsArchive": "0",
"IsActive": "1",
"IsPublic": "1",
"CreatedAt": 1696247453148,
"TemplateName": "aws-s3-demo-website",
"OwnerOrg": "/orgs/stackguardian",
"TemplateType": "IAC",
"SourceConfigKind": "TERRAFORM",
"TemplateId": "/stackguardian/aws-s3-demo-website:16"
}
},
"wfStepsConfig": [
{
"name": "generate-terraform-plan",
"mountPoints": null,
"wfStepTemplateId": "/stackguardian/terraform:19",
"wfStepInputData": {
"schemaType": "FORM_JSONSCHEMA",
"data": {
"approvalPreApply": false,
"managedTerraformState": true,
"terraformPlanOptions": "",
"prePlanHooks": [],
"runPostPlanHooksOnDrift": false,
"preInitHooks": [],
"postApplyHooks": [],
"terraformInitOptions": "",
"preApplyHooks": [],
"terraformVersion": "1.5.7",
"terraformAction": "plan",
"postPlanHooks": [],
"runPreInitHooksOnDrift": false,
"applyPolicy": true,
"runPrePlanHooksOnDrift": false
}
},
"timeout": 2100,
"approval": false
}
],
"cacheConfig": {
"path": [
"user/repo/.terraform",
"user/repo/tf_plan.out"
],
"enabled": true,
"key": "tf_cache",
"policy": "PULL_PUSH"
},
"runnerConstraints": {
"selectors": [
"shared"
],
"type": "shared",
"sharedType": "shared-external"
},
"terraformAction": {
"action": "plan"
},
"environmentVariables": [],
"deploymentPlatformConfig": [
{
"config": {
"profileName": "aws-demo",
"integrationId": "/integrations/aws-demo"
},
"kind": "AWS_STATIC"
}
],
"workflowStepsTemplates": {
"/stackguardian/terraform:19": {
"SharedOrgs": {
"/orgs/adorsys-test": {},
"/orgs/siemens-di": {},
"/orgs/wicked-hop": {}
},
"RuntimeSource": {
"sourceConfigDestKind": "CONTAINER_REGISTRY",
"config": {
// EU region: 476299211833.dkr.ecr.eu-central-1.amazonaws.com/...
// US region: 476299211833.dkr.ecr.us-east-2.amazonaws.com/...
"dockerImage": "476299211833.dkr.ecr.eu-central-1.amazonaws.com/workflow-steps/iac-terraform:1761049860-v4.0.20-terraform",
"isPrivate": false
}
},
"IsArchive": "0",
"IsPublic": "1",
"IsActive": "1",
"CreatedAt": 1679583161499,
"TemplateName": "terraform",
"OwnerOrg": "/orgs/stackguardian",
"TemplateType": "WORKFLOW_STEP",
"TemplateId": "/stackguardian/terraform:19",
"SourceConfigKind": "DOCKER_IMAGE"
}
},
"iacPoliciesTemplates": {},
"vcsConfig": {
"iacVCSConfig": {
"iacTemplateId": "/stackguardian/aws-s3-demo-website:16",
"useMarketplaceTemplate": true
},
"iacInputData": {
"schemaType": "FORM_JSONSCHEMA",
"data": {
// EU region example: eu-central-1
// US region example: us-east-2
"bucket_region": "eu-central-1"
}
}
},
"terraformConfig": {
"approvalPreApply": false,
"managedTerraformState": true,
"prePlanHooks": [],
"runPostPlanHooksOnDrift": false,
"preInitHooks": [],
"postApplyHooks": [],
"driftCheck": true,
"preApplyHooks": [],
"terraformVersion": "1.5.7",
"postApplyWfStepsConfig": [],
"prePlanWfStepsConfig": [],
"driftCron": "0 */6 * * ? *",
"preApplyWfStepsConfig": [],
"postPlanHooks": [],
"runPreInitHooksOnDrift": false,
"runPrePlanHooksOnDrift": false
},
"wfType": "TERRAFORM"
}
}
},
"Workflow": {
"ResourceName": "aws-s3-demo-website-op9v"
},
"Type": "COMPLETED"
}
```
---
# 3. Deployment Environment
The **Deployment Environment** section defines the cloud or platform environment where your workflow will run.
It allows you to connect to specific accounts or environments via **Connectors**, set environment variables, and link outputs or secrets dynamically across workflows.
This configuration ensures your workflow has the proper credentials and runtime settings to execute tasks on your target infrastructure (e.g., AWS, Azure, GCP, Kubernetes).
***
## 3.1 Overview[](#31-overview "Direct link to 3.1 Overview")
This section appears under **Settings → Deployment Environment** and consists of two main parts:
1. **Connector Selection**
2. **Environment Variables Configuration**
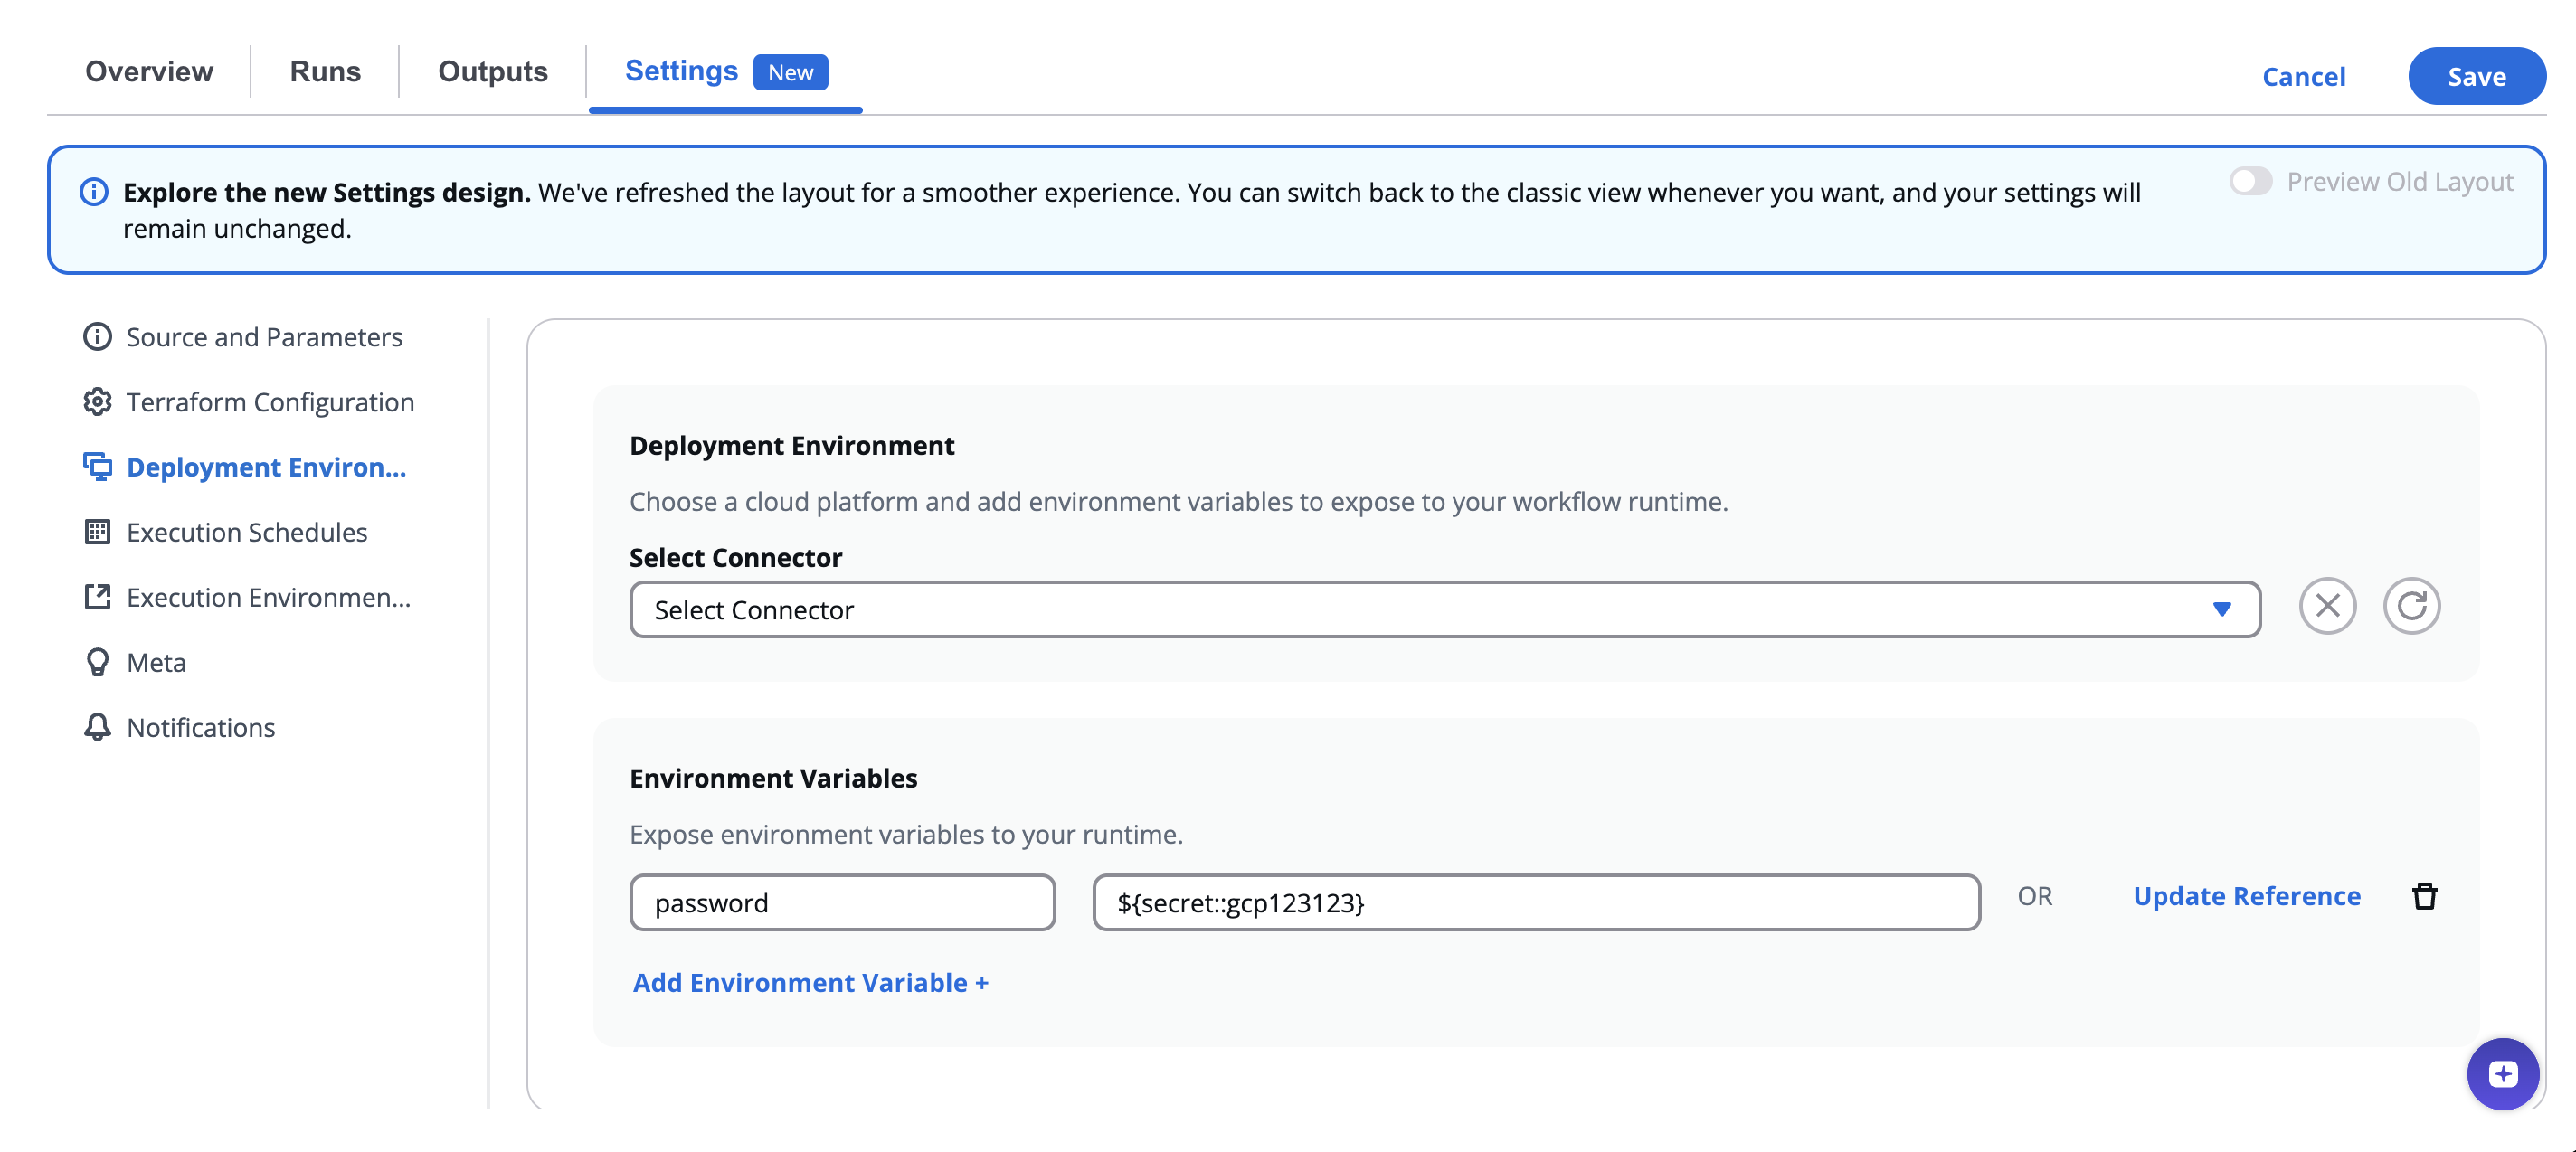
***
## 3.2 Select Connector[](#32-select-connector "Direct link to 3.2 Select Connector")
The **Connector** represents the cloud or infrastructure integration your workflow uses for deployment.
| Field | Description |
| -------------------------- | -------------------------------------------------------------------------------------------------------------------------------------------------------- |
| **Select Connector** | Choose the cloud or infrastructure connector from your organization’s integrations (e.g., AWS, Azure, GCP, VMware, or custom integration) or a connector |
| **Select Child Connector** | (Optional) Choose a specific account, sub-connector, or environment under the parent connector — such as a specific AWS account or subscription. |
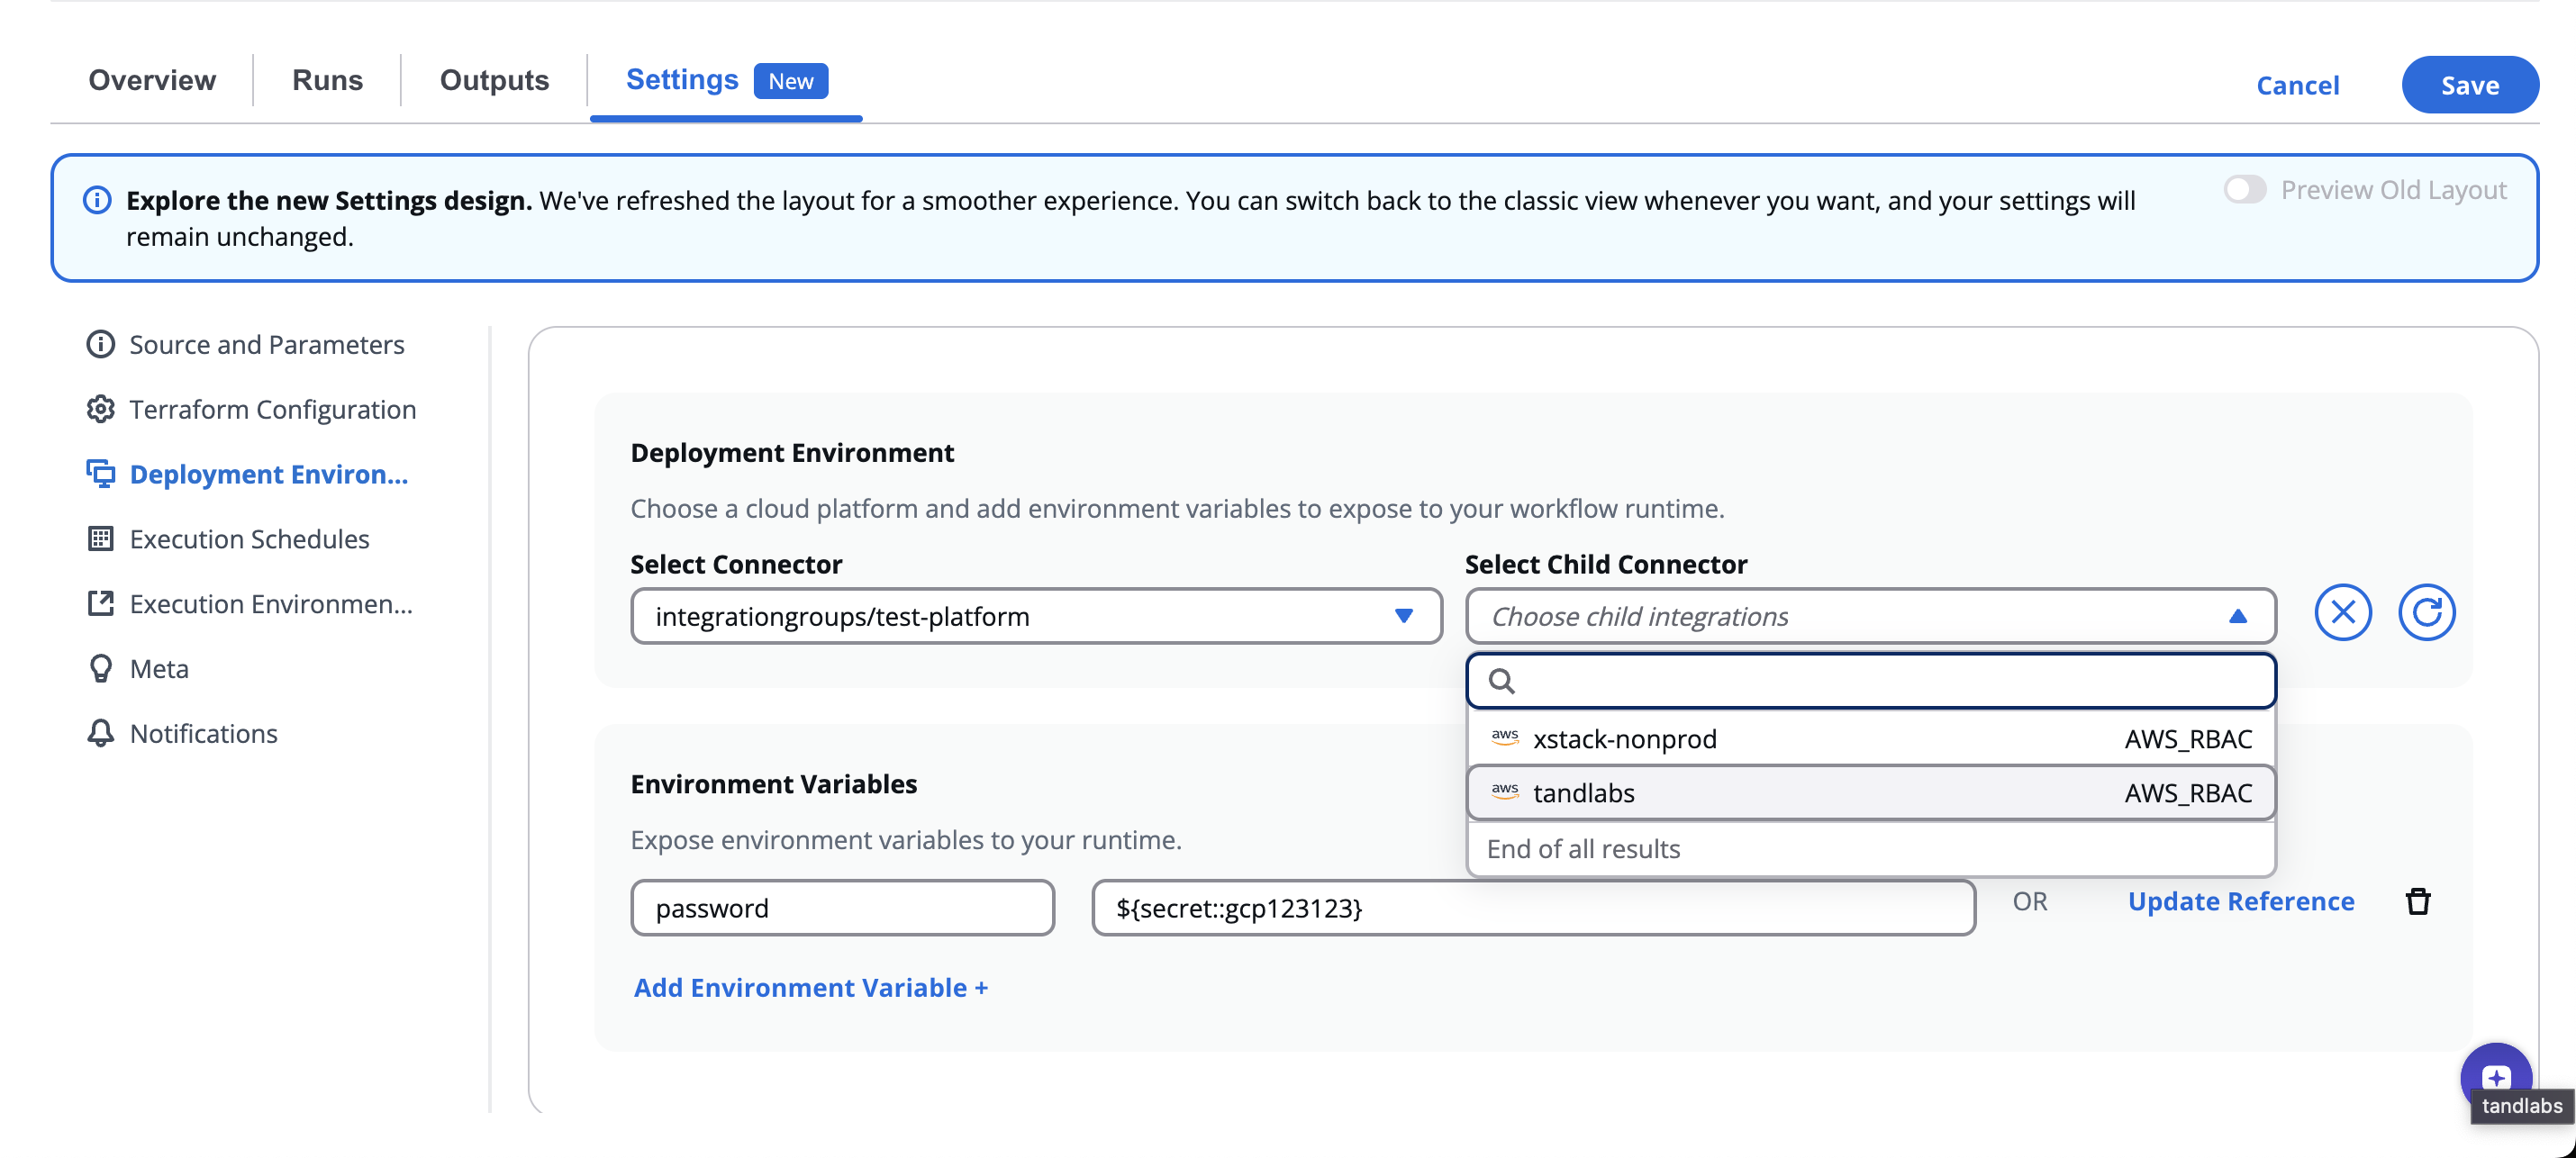
When a connector is selected, it’s displayed as:
`integrationgroups/`
and the connection status is shown (e.g., ✅ *Connected* or 🔴 *Disconnected*).
> ⚙️ The selected connector determines the permissions and APIs accessible to your workflow during execution.
>
> Example: Selecting an **AWS connector** allows Terraform or Ansible steps to provision or configure AWS resources.
***
## 3.3 Environment Variables[](#33-environment-variables "Direct link to 3.3 Environment Variables")
Environment Variables expose custom configuration or runtime data to your workflow environment.
Each variable is defined by a **Key** and **Value**, which are passed to the underlying runtime container.
| Field | Description |
| ------------------------------ | ------------------------------------------------------------------------ |
| **Key** | Name of the environment variable (e.g., `AWS_REGION`, `DEPLOYMENT_ENV`). |
| **Value** | Static or dynamic value assigned to the variable. |
| **Reference Value** | Link this variable to another workflow’s output or a stored secret. |
| **Add Environment Variable +** | Add multiple variables for flexible configuration. |

You can add, edit, or delete environment variables at any time.
> 💡 Example:
>
> * `Key`: `APP_ENV` → `Value`: `production`
> * `Key`: `TF_LOG` → `Value`: `INFO`
> * `Key`: `AWS_DEFAULT_REGION` → `Value`: `us-east-1`
### StackGuardian Environment Variables[](#stackguardian-environment-variables "Direct link to StackGuardian Environment Variables")
This list details the environment variables specific to StackGuardian, necessary for setting up and executing tasks.
| Variable Name | Description |
| ------------------------------------------------ | ---------------------------------------------------------------- |
| **SG\_VCS\_AUTH\_CREDS** | VCS authentication credentials. |
| **SG\_ORG\_ID** | Organization identifier in StackGuardian. |
| **SG\_WORKFLOW\_GROUP\_ID** | Workflow group identifier within StackGuardian. |
| **SG\_WORKFLOW\_ID** | Identifier for the current StackGuardian workflow. |
| **SG\_WORKFLOW\_RUN\_ID** | Current workflow run identifier. |
| **SG\_STACK\_ID** | Stack identifier within the workflow. |
| **SG\_WORKFLOW\_STEP\_TEMPLATE\_ID** | Workflow step template identifier. |
| **SG\_EXECUTOR\_USER** | Username executing the workflow. |
| **SG\_MOUNTED\_IAC\_SOURCE\_CODE\_DIR** | Mounted IAC source code directory path. |
| **SG\_VCS\_WORKING\_DIRECTORY** | VCS repository working directory. |
| **SG\_VCS\_REPO\_URL** | VCS repository URL. |
| **SG\_VCS\_REPO\_NAME** | Name of the VCS repository. |
| **SG\_VCS\_REPO\_REF** | VCS repository reference (branch, tag, commit). |
| **SG\_MOUNTED\_WORKSPACE\_ROOT\_DIR** | Mounted workspace root directory path. |
| **SG\_MOUNTED\_ARTIFACTS\_DIR** | Mounted artifacts directory path. |
| **SG\_BASE64\_POLICIES** | Base64-encoded policy objects associated with the workflow step. |
| **SG\_BASE64\_WORKFLOW\_STEP\_INPUT\_VARIABLES** | Base64-encoded workflow step input variables. |
| **SG\_BASE64\_IAC\_INPUT\_VARIABLES** | Base64-encoded IaC input variables. |
Example of some variables values format:
| Variable Name | Value |
| ------------------------------------ | ------------------------------------------------------------- |
| **SG\_ORG\_ID** | /orgs/organization\_name |
| **SG\_WORKFLOW\_GROUP\_ID** | /wfgrps/workflow\_group |
| **SG\_WORKFLOW\_ID** | /wfgrps/workflow\_group/wfs/workflow\_id |
| **SG\_WORKFLOW\_RUN\_ID** | /wfgrps/workflow\_group/wfs/workflow\_id/wfruns/run\_id |
| **SG\_WORKFLOW\_STEP\_TEMPLATE\_ID** | /organization\_name/template\_name:template\_revision |
| **SG\_EXECUTOR\_USER** | |
***
## 3.4 Referencing Values[](#34-referencing-values "Direct link to 3.4 Referencing Values")
When setting environment variables, you can choose between **manual values** or **references**.
Selecting **Reference Value** opens the **Create Reference** dialog, allowing you to link this variable to data from other workflows or secure secrets.
### Create Reference Dialog[](#create-reference-dialog "Direct link to Create Reference Dialog")
| Field | Description |
| -------------------- | ----------------------------------------------------------------------------------------------------------------------------------------------------------- |
| **Referencing Type** | Choose between: - **Workflow Output**: Use outputs from previously executed workflows. - **Secret**: Fetch a stored vault secret (e.g., API key, password). |
| **Workflow** | Select the workflow whose output you want to reference. |
| **Output Key** | Choose a specific output key from that workflow. |

Once configured, the referenced value will dynamically resolve at runtime.
> 🔒 This mechanism allows for secure and modular environment setup, without exposing sensitive data directly in your workflow configuration.
**Example Use Case:**
* A “Provision Infrastructure” workflow exposes an output `vpc_id`.
* A “Deploy Application” workflow references that `vpc_id` output dynamically using **Workflow Output**.
* Secrets such as access tokens or credentials can be securely injected via **Secret** references from your vault.
For more detailed instructions on creating references, refer to the [**Reference Variables**](/docs/deploy/workflows/workflow_components/reference_variables/) documentation.
***
## 3.5 Referencing StackGuardian Environment Variables[](#35-referencing-stackguardian-environment-variables "Direct link to 3.5 Referencing StackGuardian Environment Variables")
The [**StackGuardian Environment Variables**](#stackguardian-environment-variables) can be utilized in your caller code during workflow execution. This functionality enables you to dynamically associate your executing code with the *StackGuardian Environment* based on the information supplied by the workflow. If necessary, you may reference any [**StackGuardian Environment Variables**](#stackguardian-environment-variables) using a custom variable from the **Deployment Environment**.
For instance, if you wish to incorporate the *StackGuardian Workflow ID* in your caller code, you can access the `SG_WORKFLOW_ID` environment variable. This provides you with the Workflow ID from the StackGuardian runtime for your use.
Furthermore, if you intend to supply [**StackGuardian Environment Variables**](#stackguardian-environment-variables) to define specific **Terraform** or **OpenTofu** variables, you can do so in the following manner:
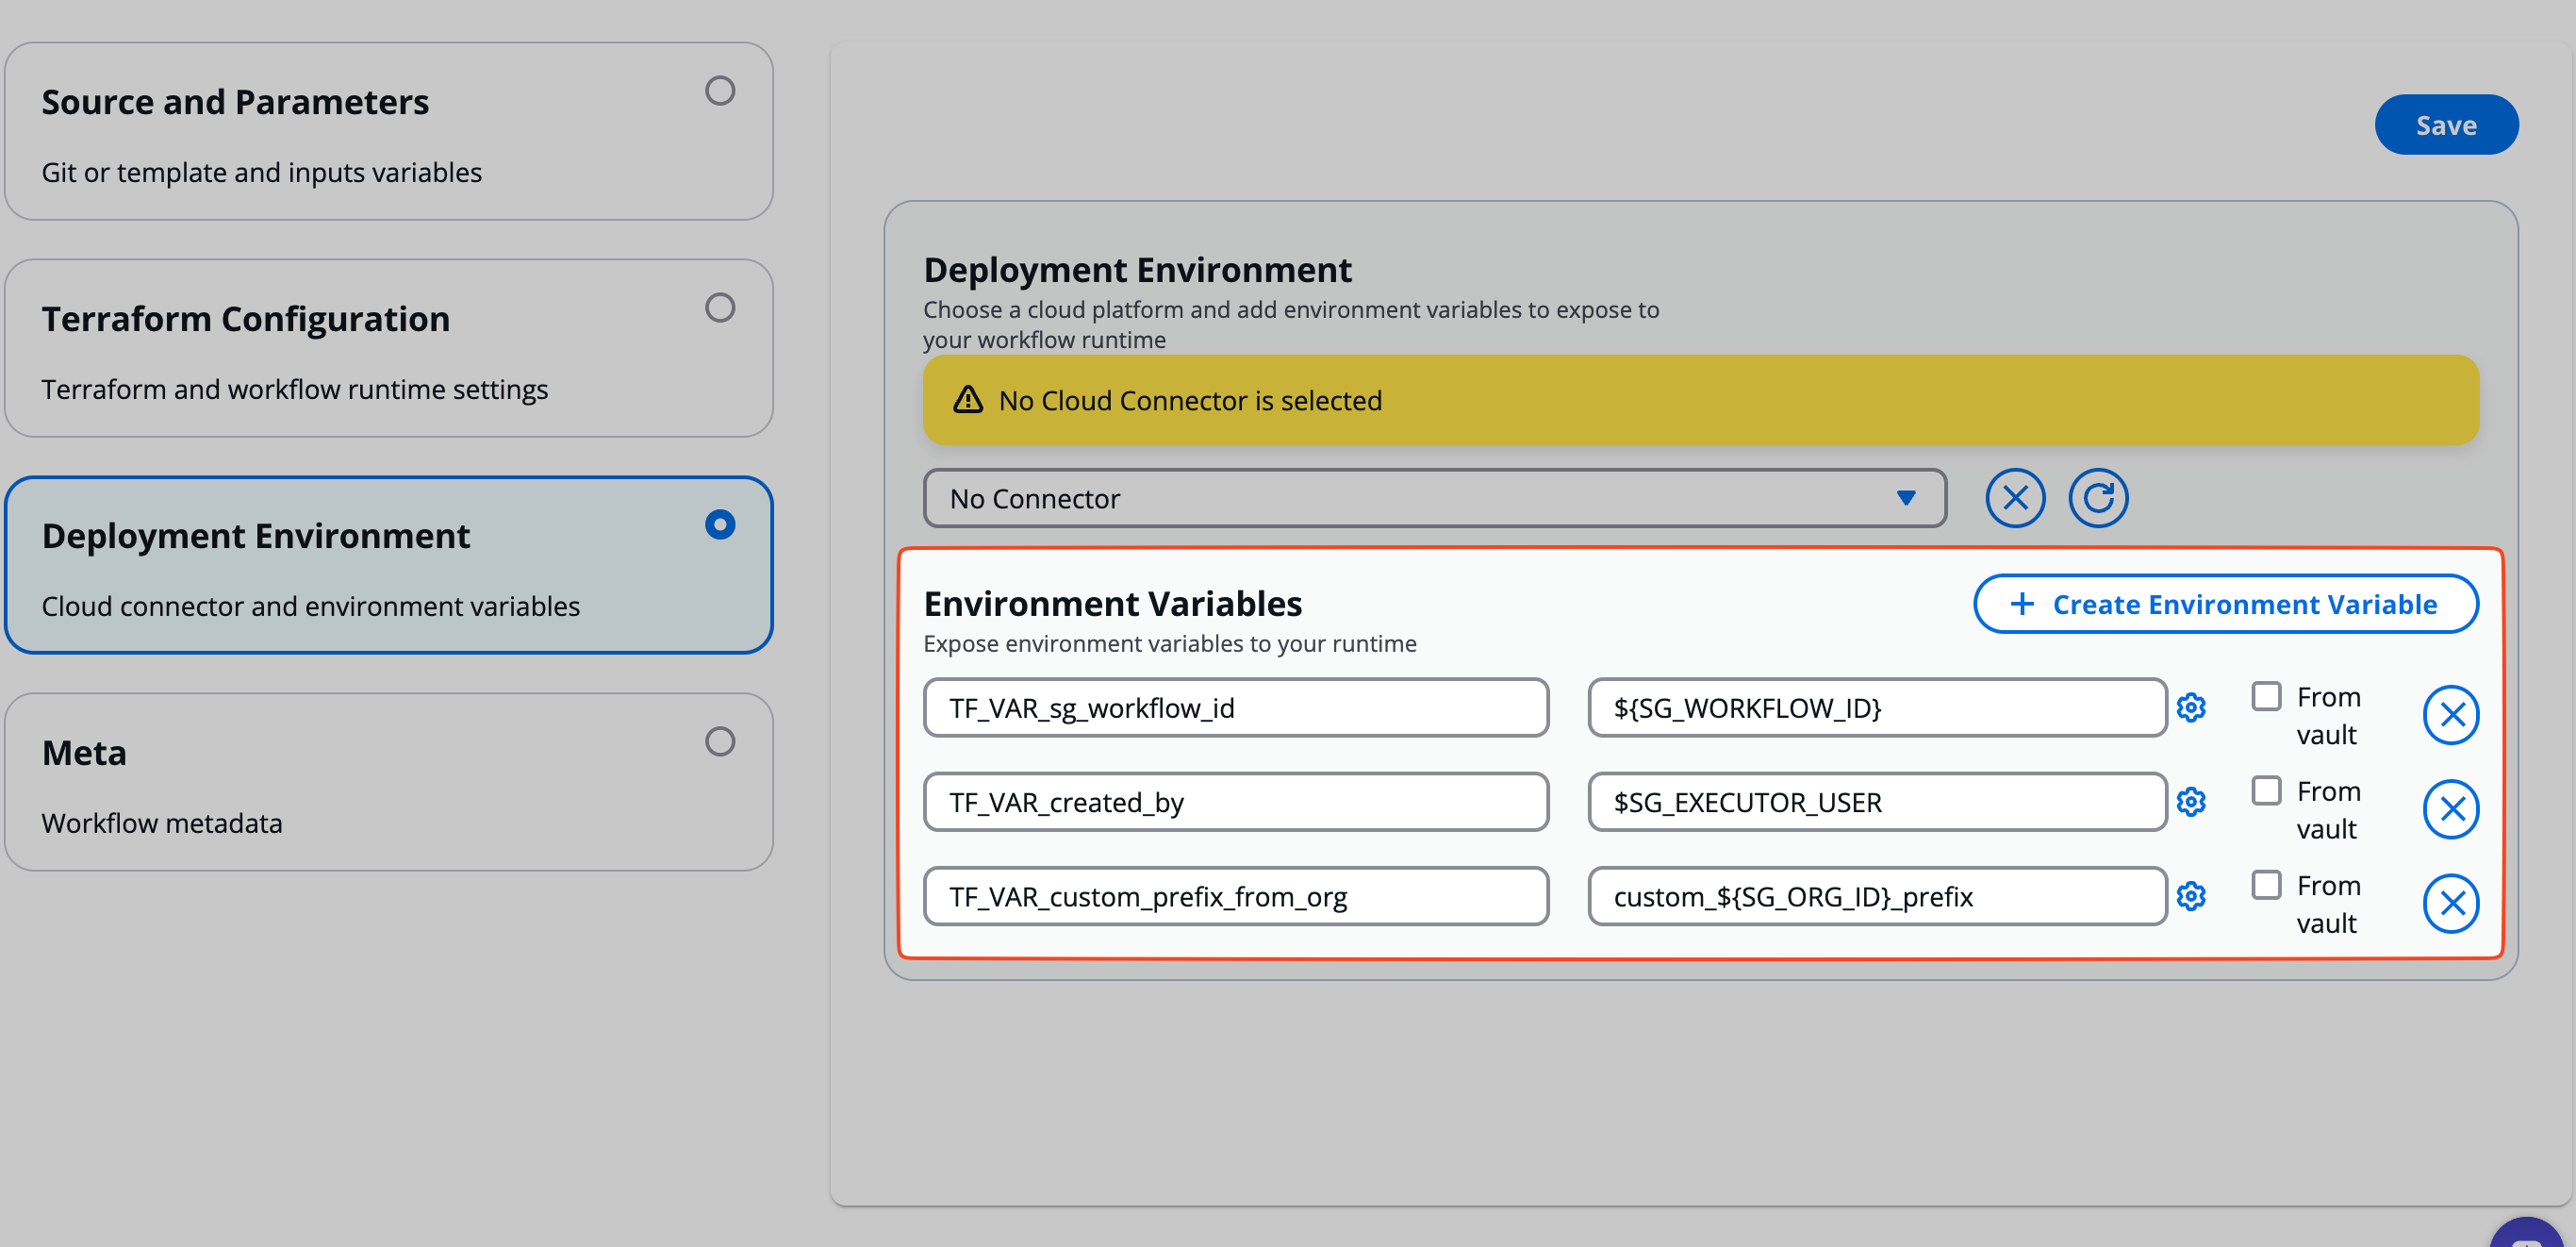
## 3.6 Connector Health & Refresh[](#36-connector-health--refresh "Direct link to 3.6 Connector Health & Refresh")
When a connector becomes **Disconnected**, you’ll see a red status indicator.
To fix this:
* Click the **refresh icon (↻)** to reconnect the integration.
* If the issue persists, verify credentials in the organization’s **Integrations → Connectors** section.
> Maintaining healthy connectors ensures smooth execution of workflows and prevents runtime authentication errors.
***
---
# Execution Environment
The **Execution environment** section defines where and how your workflow runs — determining the compute resources, isolation, and scaling behavior of each execution.
You can choose between **Shared Runners** provided by StackGuardian or your own **Private Runners** for greater control over performance, security, and compliance.
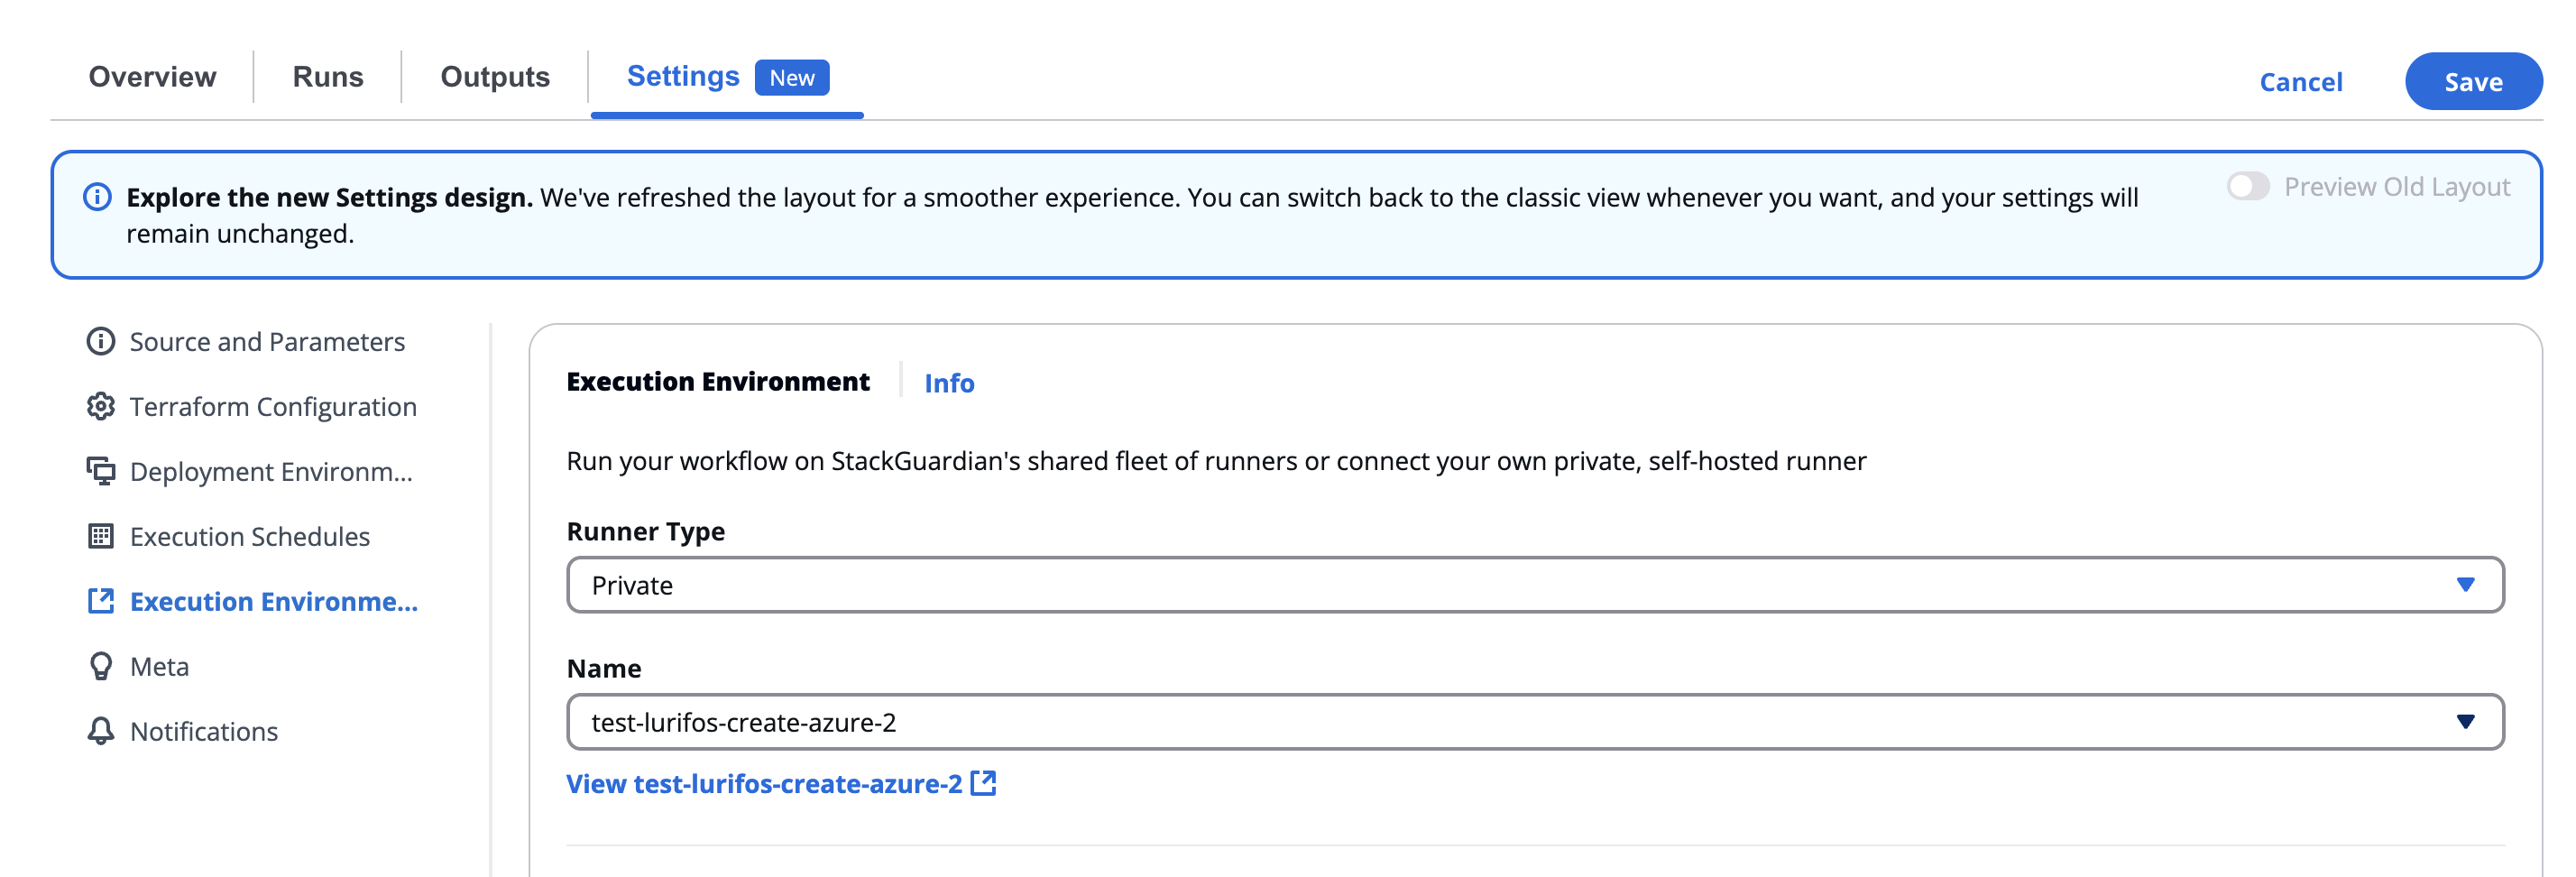
*Execution environment section*
## Overview[](#overview "Direct link to Overview")
Located under **Settings → Execution environment**, this section allows users to configure the runtime infrastructure for workflow executions.
This includes:
* Selecting the **runner type** (Shared or Private)
* Specifying the **runner name** (for Private)
* Allocating **CPU and Memory** resources for each workflow run
note
This configuration ensures that workflows run in the right environment — from lightweight shared runners for simple automation, to private, self-hosted runners for enterprise-grade workloads.
## Runner type[](#runner-type "Direct link to Runner type")
Choose the type of runner your workflow will use:
| Runner Type | Description |
| ----------- | -------------------------------------------------------------------------------------------------------------------------------------------------------------------- |
| **Shared** | Runs on StackGuardian’s shared fleet of managed runners. Ideal for smaller workloads, testing, or non-sensitive operations. |
| **Private** | Runs on your organization’s self-hosted or dedicated runners. Ideal for production workloads, secure environments, or large-scale jobs that need dedicated capacity. |
When switching between **Shared** and **Private**, the system will prompt you to confirm the change, as it may affect how workflow artifacts and states are stored.
**Confirmation dialog example:**
important
Ensure that the new runner has the same storage backend, as it will impact how workflow runs and artifacts are fetched during a run.
You can confirm by selecting **Yes** or cancel the change.
## Private runner configuration[](#private-runner-configuration "Direct link to Private runner configuration")
If **Private** is selected, a searchable list of available private runners appears in the **Name** dropdown.
| Field | Description |
| -------------- | ---------------------------------------------------------------------------------------------------------------------------------------- |
| **Name** | Choose from existing private runners registered under your organization (e.g., `test-resource123`, `test-azure`, `test-runner-group12`). |
| **Search bar** | Quickly locate a specific runner by typing part of its name. |
| **View link** | After selection, you can click **View \[runner name]** to open the runner’s details page. |

*Private runner configuration*
tip
Use private runners to run workflows within your own network or infrastructure (e.g., AWS, Azure, or on-prem), maintaining full data isolation.
## Resource configuration[](#resource-configuration "Direct link to Resource configuration")
Below the runner selection, you can define compute resources for the workflow’s execution container.
### CPU[](#cpu "Direct link to CPU")
Specify the amount of CPU to allocate for the workflow’s runtime.
| Option | Description |
| ----------------------------- | --------------------------------------------- |
| **256 (.25 vCPU)** | Lightweight jobs or testing tasks |
| **512 (.5 vCPU)** *(Default)* | Standard compute level |
| **1024 (1 vCPU)** | Moderate workloads |
| **2048 (2 vCPU)** | Medium to heavy compute workflows |
| **4096 (4 vCPU)** | High-performance tasks |
| **8192 (8 vCPU)** | Intensive infrastructure automation workloads |

*CPU*
note
The default allocation is 512 (.5 vCPU). Increasing CPU allows faster workflow execution but consumes more resources.
### Memory[](#memory "Direct link to Memory")
Specify the memory (RAM) allocation per workflow run.
| Option | Description |
| -------------------- | ------------------------------------------------ |
| **1 GB** *(Default)* | Suitable for most small to mid-sized workloads |
| **2 GB** | Ideal for multi-step or data-heavy tasks |
| **3 GB** | Used for high-memory tools or container builds |
| **4 GB** | For large or complex Terraform/Ansible workflows |
tip
Choose the smallest configuration that safely supports your workflow’s operations. This ensures efficient cost and resource usage.
## Concurrency[](#concurrency "Direct link to Concurrency")
### Allow parallel runs[](#allow-parallel-runs "Direct link to Allow parallel runs")
By enabling this toggle, you let multiple runs of this workflow execute at the same time. Only enable this if your workflow is designed for concurrent access.
## Changing runner configuration[](#changing-runner-configuration "Direct link to Changing runner configuration")
When modifying the **Runner type** or **Runner name**, a confirmation modal appears to prevent accidental changes that might affect artifact storage or state data.
**Modal warning:**
> “Please ensure that the new runner has the same storage backend, as it will impact how workflow runs and artifacts are fetched during a run.”
>
> * Select **Yes** to confirm the change.
> * Select **Cancel** to keep the previous configuration.
>
> ⚠️ If runners use different storage backends, switching between them may cause loss of cached data or require fresh setup for Terraform state synchronization.
## Best practices[](#best-practices "Direct link to Best practices")
* Use **Shared Runners** for development, testing, or low-priority workflows.
* Use **Private Runners** for production pipelines, sensitive data handling, or specific network restrictions.
* Regularly monitor private runner performance and health in the organization’s **Runner Management** view.
* Match resource allocation to workflow complexity — avoid over-provisioning unless required.
* When using Terraform, ensure that runners maintain consistent storage backends for proper state access.
---
# Lifecycle Custom Steps
StackGuardian allows users to create customized runtime environments on the **SG Workflow Engine**, integrating bespoke logic directly into their workflows. These runtimes enable efficient automation tailored to specific needs, leveraging Infrastructure as Code (IAC) capabilities.
## Leveraging Flexibility with Custom Workflows[](#leveraging-flexibility-with-custom-workflows "Direct link to Leveraging Flexibility with Custom Workflows")
When using **custom workflow templates** in StackGuardian:
* **Tool-Specific Syntax**: Each IAC tool has its own syntax. For example, using an **Ansible playbook** involves Ansible’s configuration features, distinct from Terraform's HCL.
* **Smooth Integration**: Custom templates simplify the integration of existing infrastructure code, regardless of the IAC tool.
* **Specialized Capabilities**: Different tools provide specialized features, such as **AWS CloudFormation** for AWS services and **Azure Resource Manager** for Azure services. -->
## Terraform-Specific Lifecycle Custom Steps[](#terraform-specific-lifecycle-custom-steps "Direct link to Terraform-Specific Lifecycle Custom Steps")
Allows users to create customized runtime environments on the **SG Workflow Engine**, integrating bespoke logic directly into their workflows. These runtimes enable efficient automation tailored to specific needs, leveraging Infrastructure as Code (IAC) capabilities.
StackGuardian provides several predefined steps to enhance **Terraform** configurations. These steps allow users to define specific actions at various stages of the workflow.
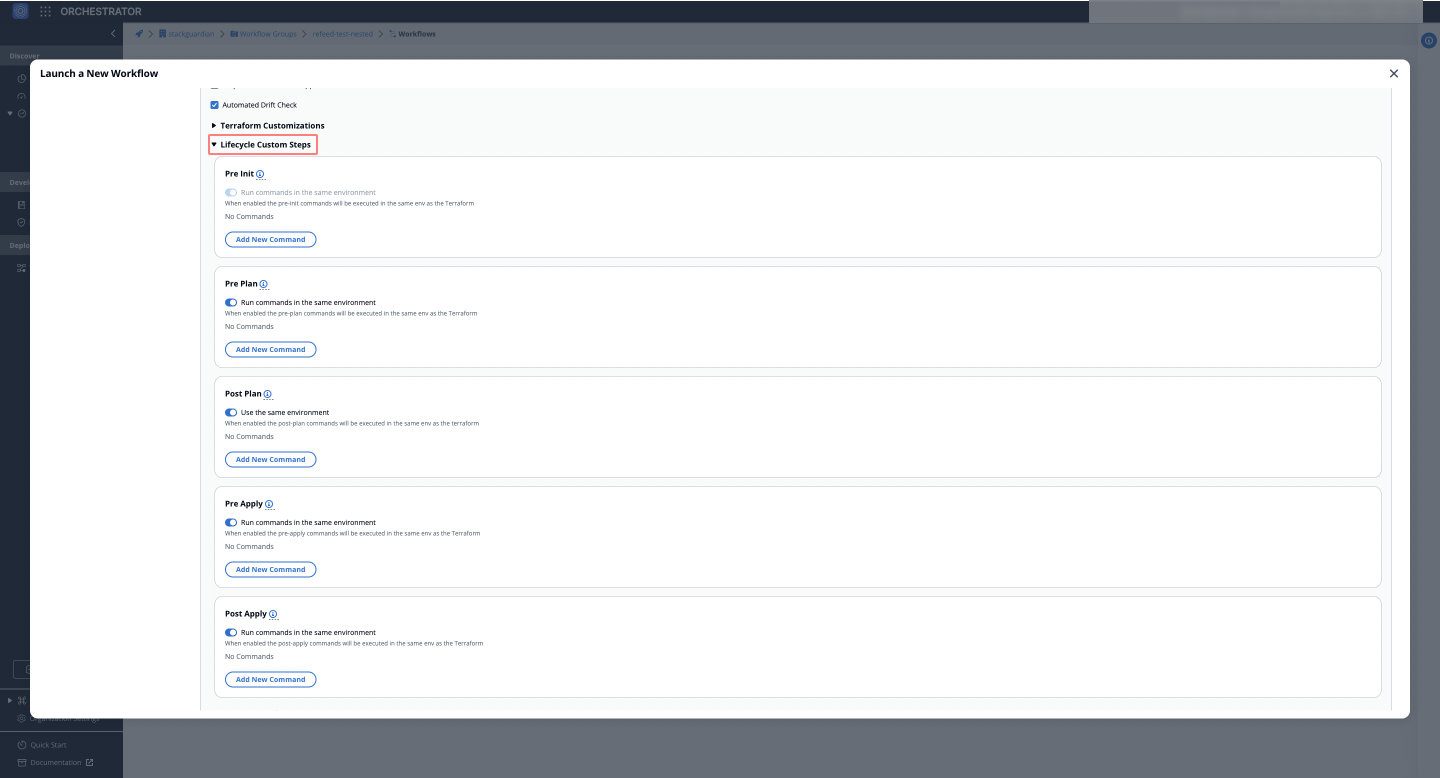
#### Mount Point[](#mount-point "Direct link to Mount Point")
When using [**private runner groups**](/docs/organisation_settings/private_runner/overview/) for deploying workflows, one or more **Mount Points** can be added under the lifecycle custom steps. These are essential for mounting paths from the private runner to the runtime container, such as *files* or *certificates* needed during the execution of the workflow.
##### Mount Points Setup[](#mount-points-setup "Direct link to Mount Points Setup")
To add a Mount Point to a workflow:
1. **Source Path**: Absolute path on the private runner where the directory or file exists that you want to mount inside the workflow step container. For instance: `/usr/bin/terraform1_9_5`
2. **Target Path**: Path inside the workflow container where the source directory or file will be mounted. For example: `/usr/bin/terraform1_9_5`
3. **Is Read Only**: Ensures that the mounted path is read-only, preventing any modifications inside the container.
info
**Pre Init** does not support Mount Points, as `terraform init` involves setting up the backend and modules, and adding mounts at this stage could interfere with the process. Mount Points are supported during **Pre Plan** and later steps, where source files are available and accessible.
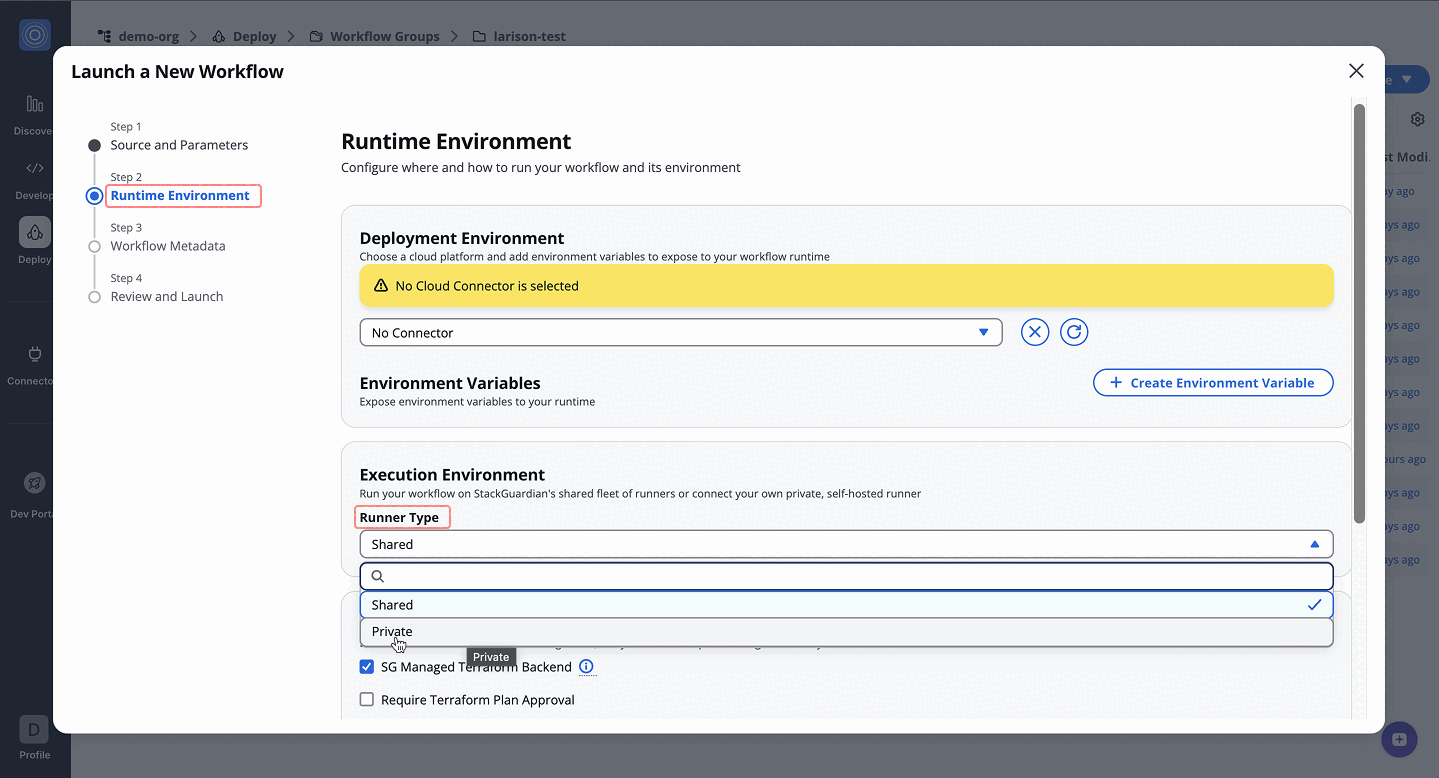
#### Pre Init[](#pre-init "Direct link to Pre Init")
Execute commands or steps before running `terraform init`. This step is useful for setting up the environment or pre-configuration checks that need to be completed before initialization.
#### Pre Plan[](#pre-plan "Direct link to Pre Plan")
Commands or workflow steps executed before `terraform plan`. This is where any required checks or preparations are made before generating a plan.
#### Post Plan[](#post-plan "Direct link to Post Plan")
Steps that are executed after the `terraform plan` has been created. These actions could involve analyzing the plan or performing security scans.
#### Pre Apply[](#pre-apply "Direct link to Pre Apply")
Commands executed before running `terraform apply`. This step ensures everything is in place and that any final checks are performed before making actual infrastructure changes.
#### Post Apply[](#post-apply "Direct link to Post Apply")
Actions taken after running `terraform apply`, such as post-deployment validations, reporting, or triggering additional workflows.
These lifecycle hooks provide users with control over the different stages of the Terraform lifecycle, ensuring each phase is managed efficiently.

## Example: Integrating Wiz.io with Terraform Workflow[](#example-integrating-wizio-with-terraform-workflow "Direct link to Example: Integrating Wiz.io with Terraform Workflow")
In this example, we demonstrate running a **Terraform workflow** that integrates with [**Wiz.io**](http://wiz.io) for vulnerability scanning before deploying resources.
### Prerequisites[](#prerequisites "Direct link to Prerequisites")
* A **private runner** configured for executing the workflow. Set the **Runner Type** to *private* and select the appropriate runner name in the **Execution Environment**.
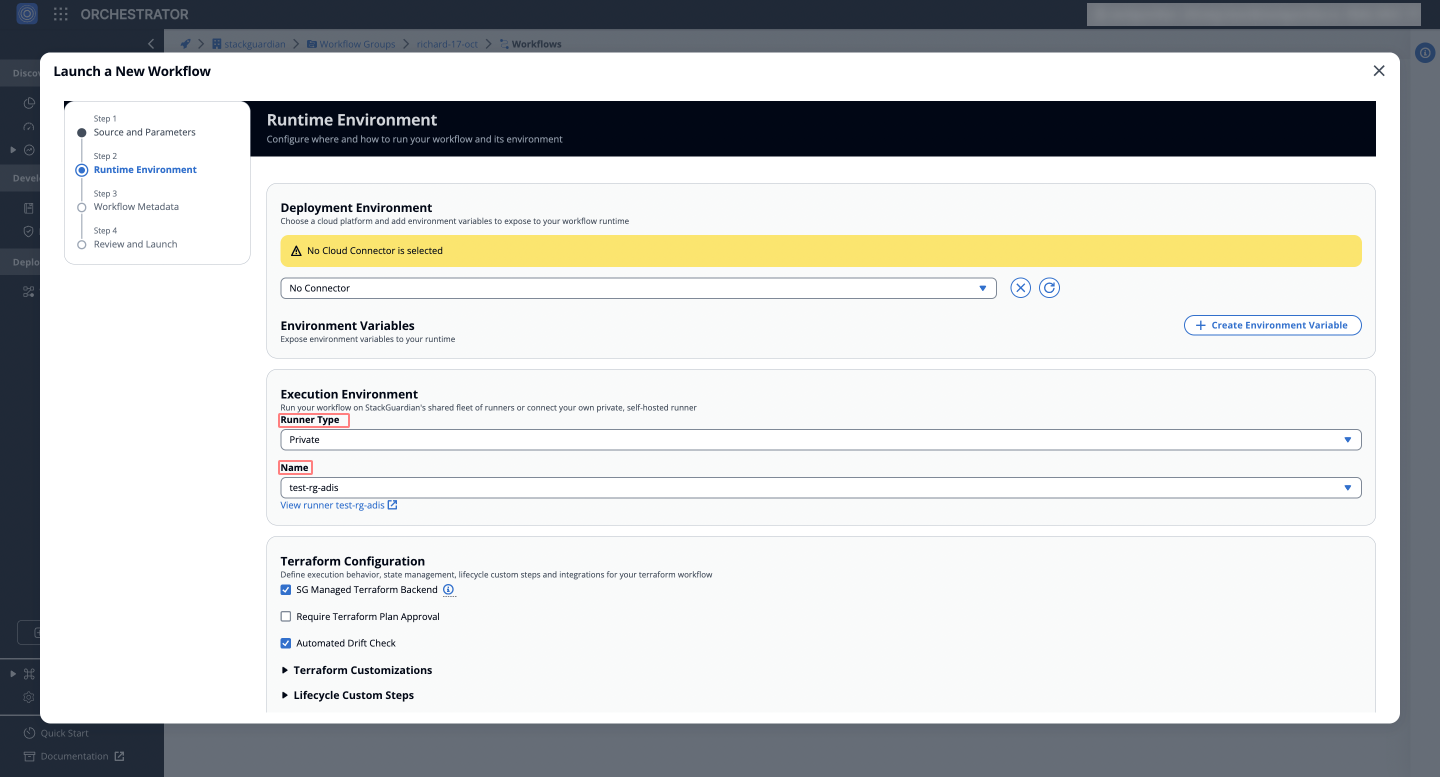
* The [**Wiz.io**](http://wiz.io) custom workflow step from the StackGuardian marketplace. See [**StackGuardian Documentation**](https://docs.stackguardian.io/docs/develop/library/workflow_step/) for more details.
### Step 1: Pre-Apply Authentication with Wiz.io[](#step-1-pre-apply-authentication-with-wizio "Direct link to Step 1: Pre-Apply Authentication with Wiz.io")
To authenticate with **Wiz.io**, an `id` and `secret` are used to generate a token, which is stored in the workspace mount point for later use during the **wiz\_scan** step.
#### Configuration Steps
1. Under **Lifecycle Custom Steps**, disable *"Run commands in the same environment"* for the *pre-apply* step and click "**Add New Step**". 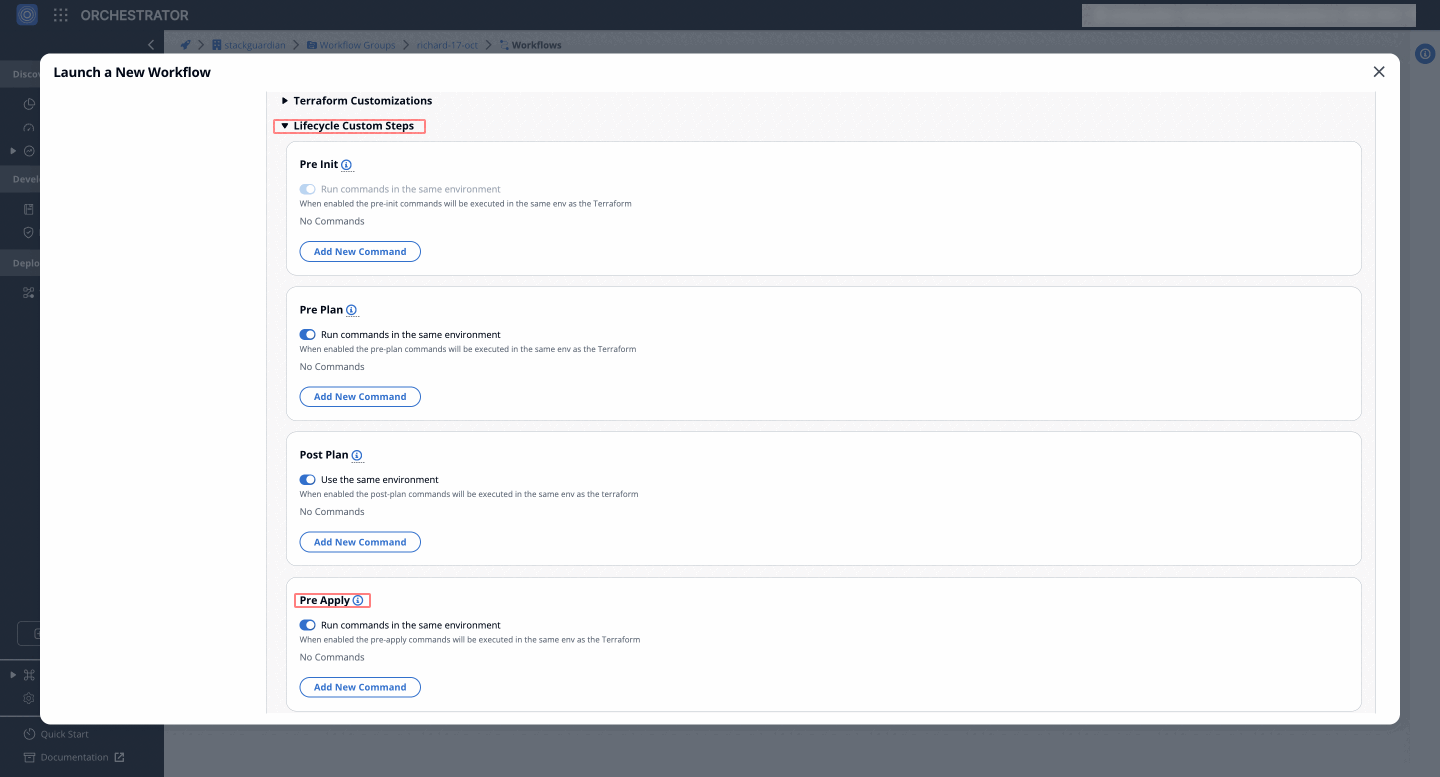
2. In **Mount Points**, configure:
**2.1.** **Source Path**: Specify the path where the Terraform plan is located (e.g., `/var/tmp/workspace/orgs/ORG_NAME/wfgrps/WFGRP_NAME/wfs/WF_NAME/shared-workspace/user`).
**2.2** **Target Path**: Preset path corresponding to Terraform settings (e.g., `/cli`).

### Step 2: Post-Apply Vulnerability Scan[](#step-2-post-apply-vulnerability-scan "Direct link to Step 2: Post-Apply Vulnerability Scan")
In this step, the generated Terraform plan is scanned for security vulnerabilities using Wiz.io. The plan path is defined as follows:
#### Configuration Steps
1. Under **Lifecycle Custom Steps**, disable *"Run commands in the same environment"* for the **post-apply** step and click "**Add New Step**". 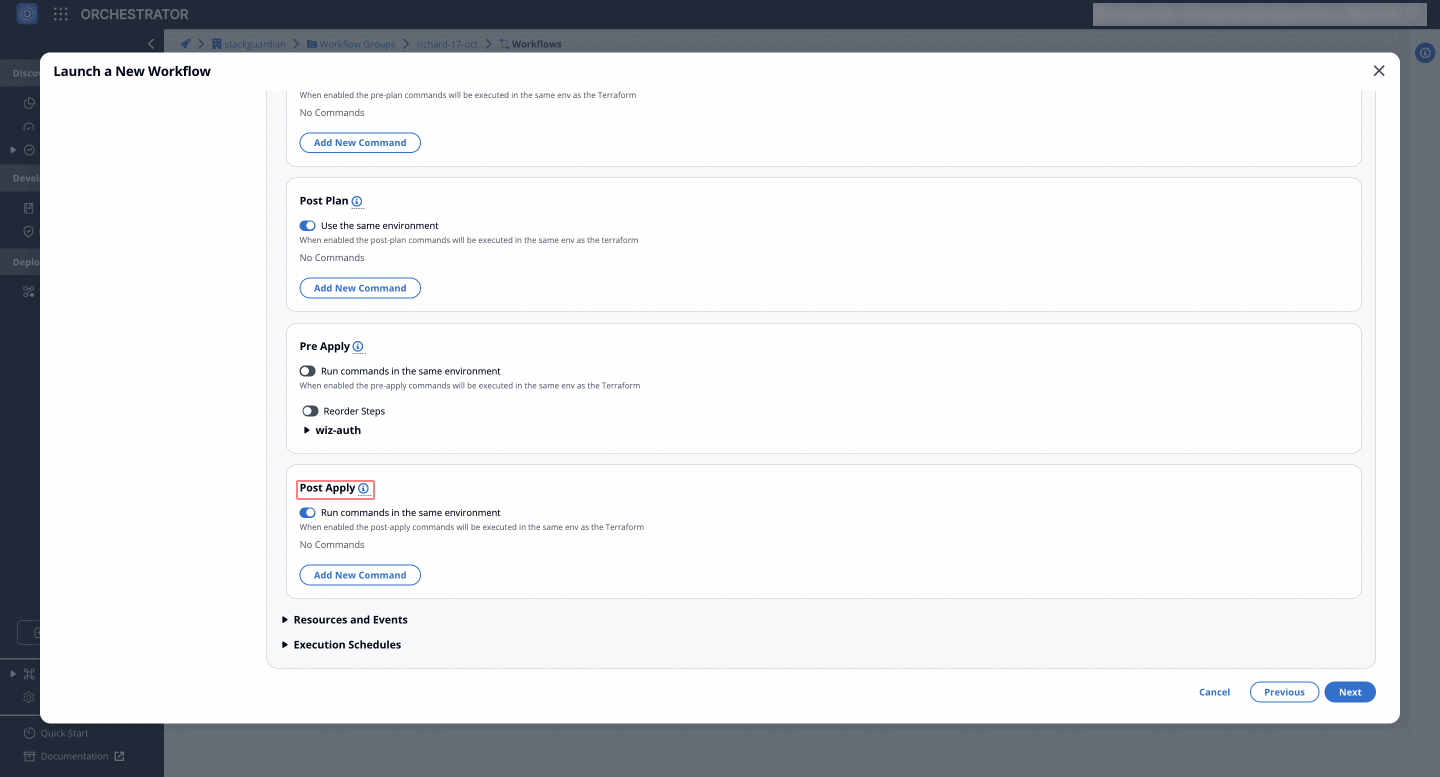
2. In **Mount Points**, configure:
**2.1.** **Source Path**: Specify the path where the Terraform plan is located (e.g., `/var/tmp/workspace/orgs/ORG_NAME/wfgrps/WFGRP_NAME/wfs/WF_NAME/shared-workspace/user`).
**2.2** **Target Path**: Preset path corresponding to Terraform settings (e.g., `/cli`).
3. In **Command Override**, add the path as follows (e.g., `REPOSITORY_NAME/tf_plan.json`).
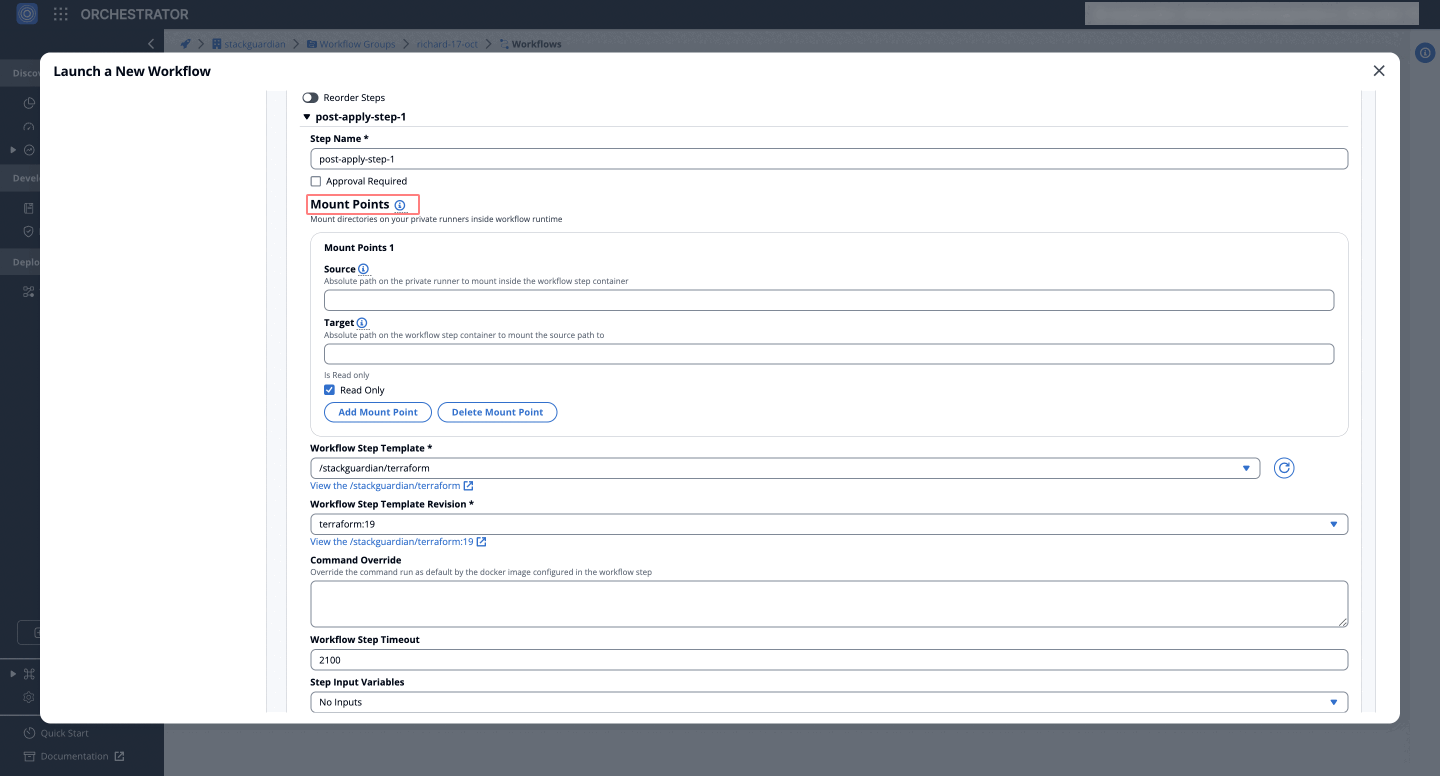
note
The scan analyzes the Terraform plan for risks before proceeding with deployment.
### Step 3: Analysis and Deployment[](#step-3-analysis-and-deployment "Direct link to Step 3: Analysis and Deployment")
After a successful vulnerability analysis, the **Terraform plan** is applied, deploying the necessary resources. Workflow results can be viewed in the **‘Runs’** tab in StackGuardian and also in the Wiz.io portal for further analysis.

StackGuardian’s **Lifecycle Custom Steps** provide flexibility for customizing Terraform workflows by integrating additional tools like **Wiz.io** for risk scanning or using pre- and post-deployment hooks. These steps enhance control, security, and customization, ensuring workflows meet specific needs, whether for configuration management or vulnerability analysis across cloud environments.
---
# 6. Meta
The **Meta** section provides metadata management for the workflow, allowing tagging, context identification, and visibility into author and timestamp details.
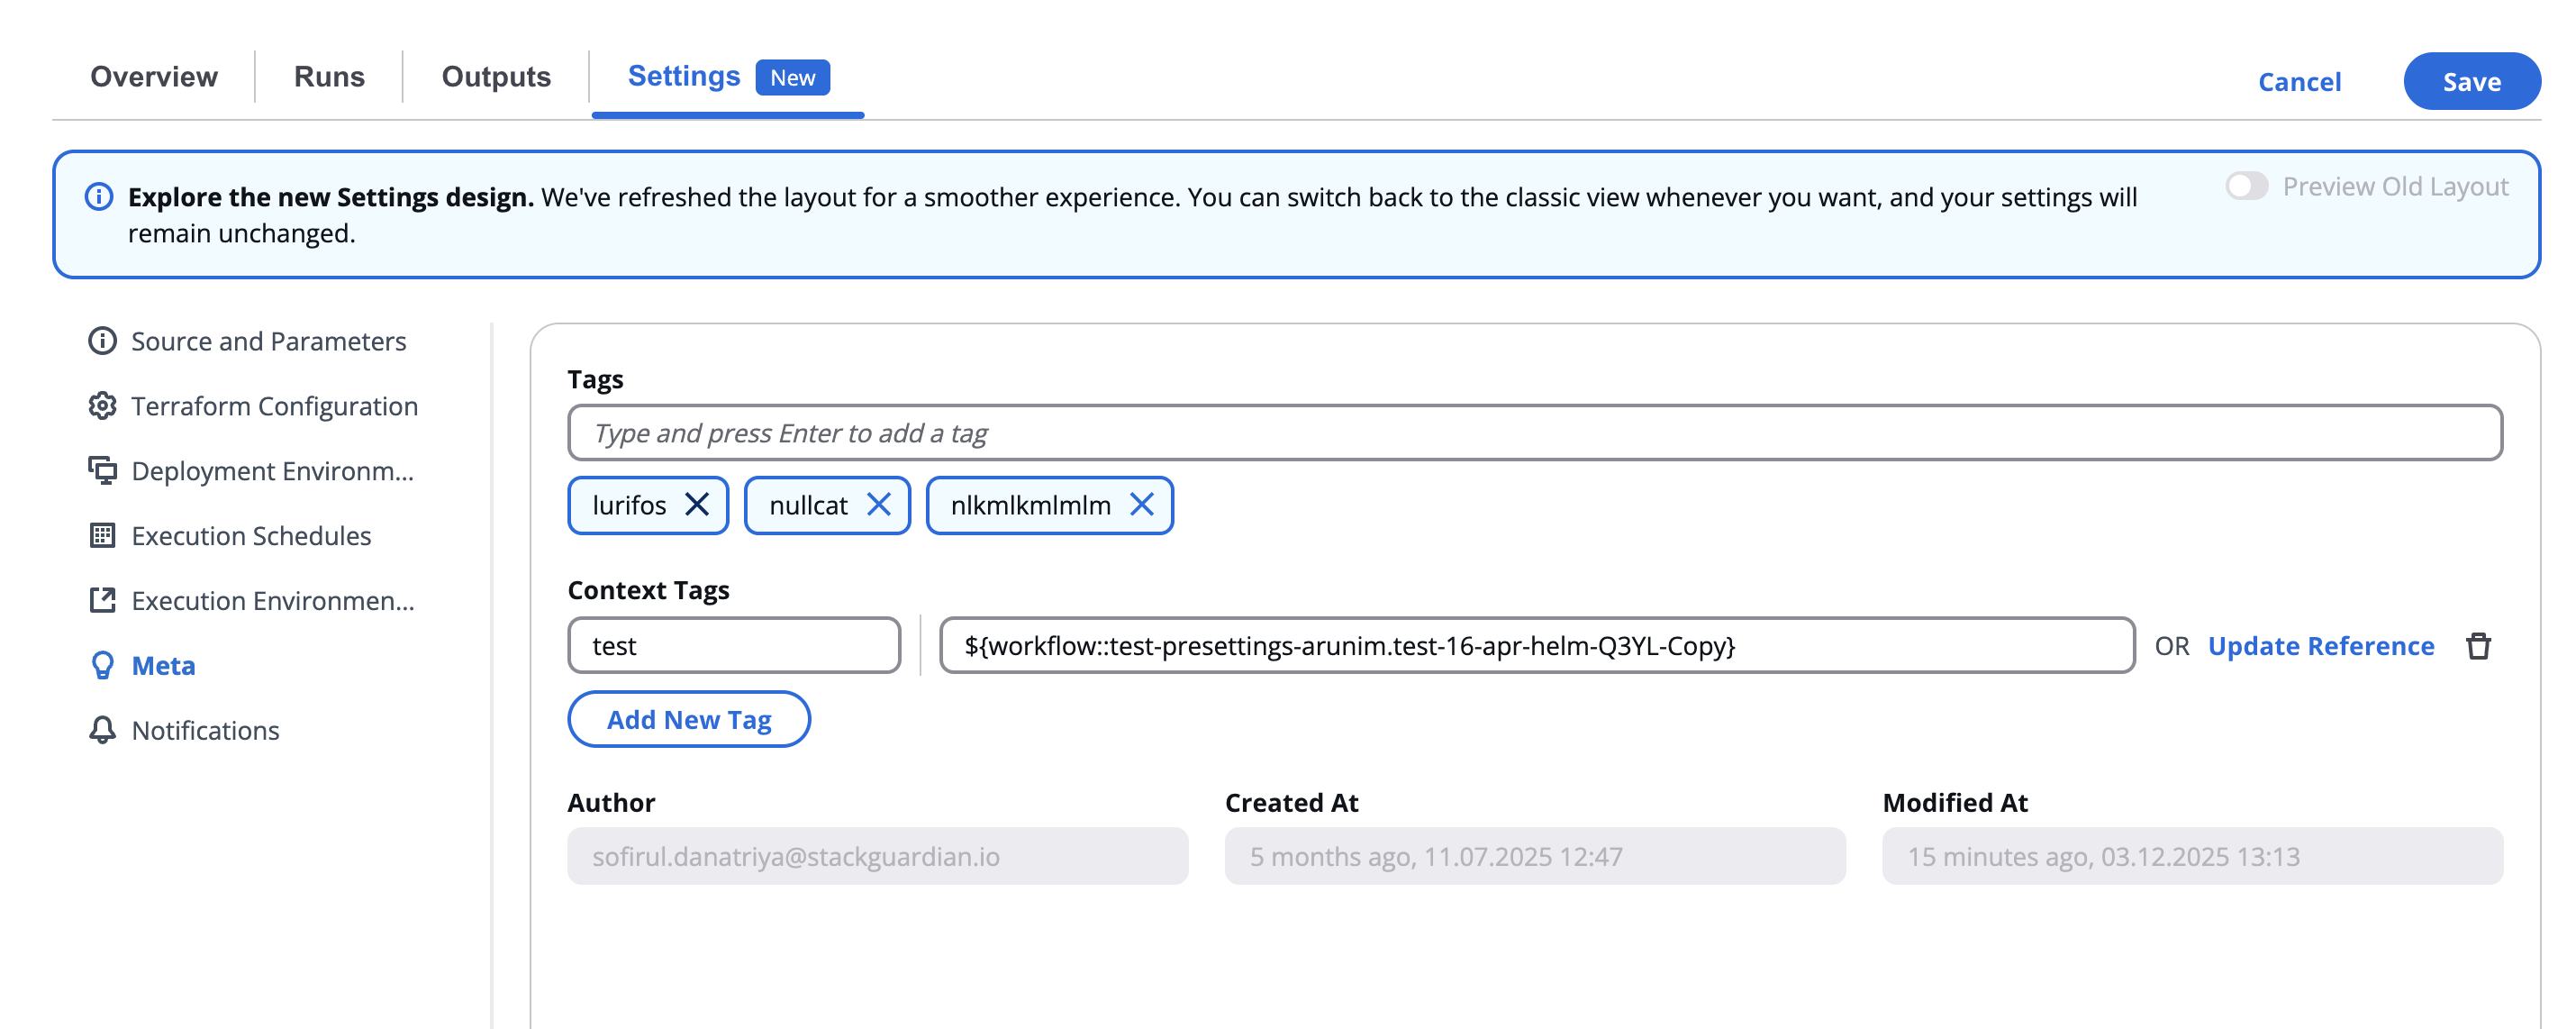
***
## 6.1 Overview[](#61-overview "Direct link to 6.1 Overview")
This section appears under **Settings → Meta** and is designed to help organize workflows, making them easier to search, categorize, and audit.
Metadata fields are typically informational and do not affect workflow execution directly.
***
## 6.2 Tags[](#62-tags "Direct link to 6.2 Tags")
Tags help classify workflows by technology, purpose, or environment.
You can add, remove, or modify tags using the text input field.
| Field | Description |
| ------------------ | ----------------------------------------------------------------------------------------------------------------------------------- |
| **Tags** | Add keywords that describe the workflow (e.g., `terraform`, `ansible`, `production`, `aws`). Press **Enter** after typing each tag. |
| **Remove Tag (x)** | Removes a tag from the list. |

> 💡 Tags improve discoverability when searching workflows within large organizations.
***
## 6.3 Context Tags[](#63-context-tags "Direct link to 6.3 Context Tags")
Context Tags provide additional metadata or grouping beyond standard tags — for instance, linking workflows that belong to the same project, client, or environment set.
| Field | Description |
| --------------- | ----------------------------------- |
| **Add New Tag** | Creates a new context-specific tag. |

> Use context tags to track workflows related to shared infrastructure, cost centers, or automation families.
For more detailed instructions on creating references, refer to the [**Reference Variables**](/docs/deploy/workflows/workflow_components/reference_variables/) documentation.
***
## 6.4 Author and Timestamps[](#64-author-and-timestamps "Direct link to 6.4 Author and Timestamps")
At the bottom of the section, the author and creation/modification metadata are displayed in read-only format.
| Field | Description |
| --------------- | ----------------------------------------------------------------------------- |
| **Author** | The user who created the workflow (e.g., `nathalia.torres@stackguardian.io`). |
| **Created At** | Timestamp indicating when the workflow was first created. |
| **Modified At** | Timestamp of the most recent workflow update. |
> These fields are automatically managed by the platform and cannot be manually edited.
***
---
# 7. Notifications
The **Notifications** section allows users to configure **email alerts** for workflow events such as execution errors or drift detection results.
This helps teams stay informed about issues or state changes without constantly monitoring the dashboard.
***
## 7.1 Overview[](#71-overview "Direct link to 7.1 Overview")
Under **Settings → Notifications**, you can assign one or more recipients for automated email updates.
| Feature | Description |
| --------------------------------- | ---------------------------------------------------------------------------------------------------- |
| **Send Email on Error** | Select users to be notified if a workflow run fails. |
| **Send Email on Drift Detection** | Select users to be notified when configuration drift is detected (for Terraform/OpenTofu workflows). |
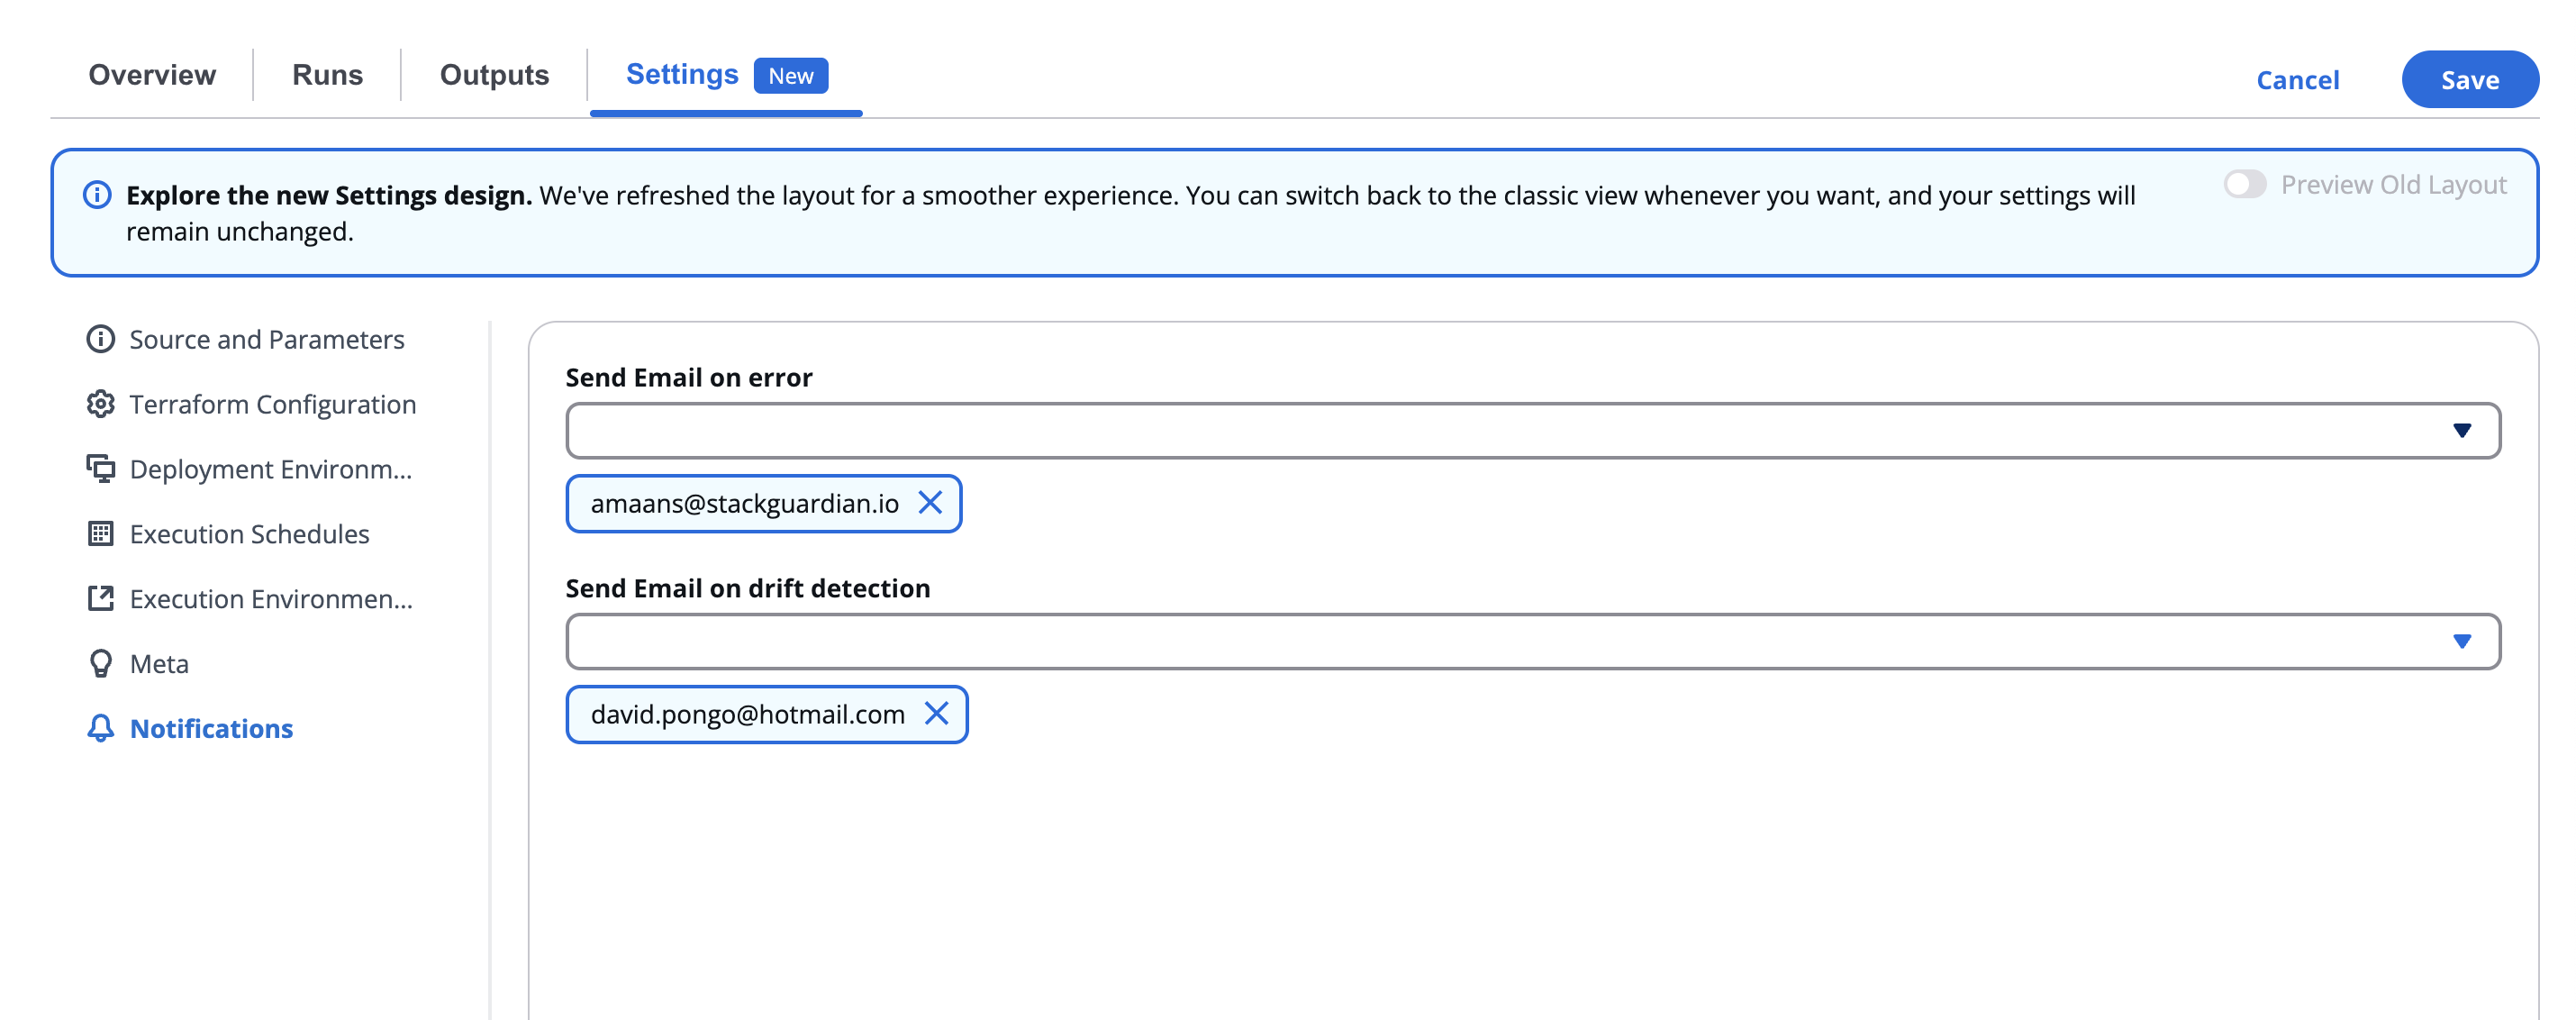
Both fields accept multiple recipients and provide an integrated search and selection interface.
***
## 7.2 Configuring Notification Recipients[](#72-configuring-notification-recipients "Direct link to 7.2 Configuring Notification Recipients")
Click inside either field to open a searchable dropdown list of available users.
* You can **scroll or search** for specific team members by name or email.
* Check the box beside each email to select one or more recipients.
* Once selected, they appear in the field as labeled chips.
> ✉️ The notification system ensures that the right stakeholders are automatically informed about workflow execution events, helping teams respond quickly to issues.
***
## 7.3 Use Cases[](#73-use-cases "Direct link to 7.3 Use Cases")
| Scenario | Recommended Setting |
| ------------------------------- | ------------------------------------------------------------------------------- |
| **Build or deployment failure** | Enable **Send Email on Error** for DevOps or Platform teams. |
| **Terraform drift detection** | Enable **Send Email on Drift Detection** for Infrastructure and Security teams. |
***
---
# Outputs Tab
The **Outputs** tab provides visibility into all output variables generated by the workflow. Outputs are commonly used to pass data to other workflows, automation pipelines, or external systems, making them a key integration point in Infrastructure as Code (IaC) workflows.
## Outputs Table[](#outputs-table "Direct link to Outputs Table")
This table lists all workflow outputs.
Each output shows:
| Field | Description |
| ----------------- | --------------------------------------------------------------------------- |
| **Name** | The output variable name defined in the workflow or Terraform configuration |
| **Type** | The data type (e.g. `string`, `number`, `list`, `map`) |
| **Value** | The actual returned value from the workflow execution |
| **Options Wheel** | Show the reference string, which can be used in workflows and templates |
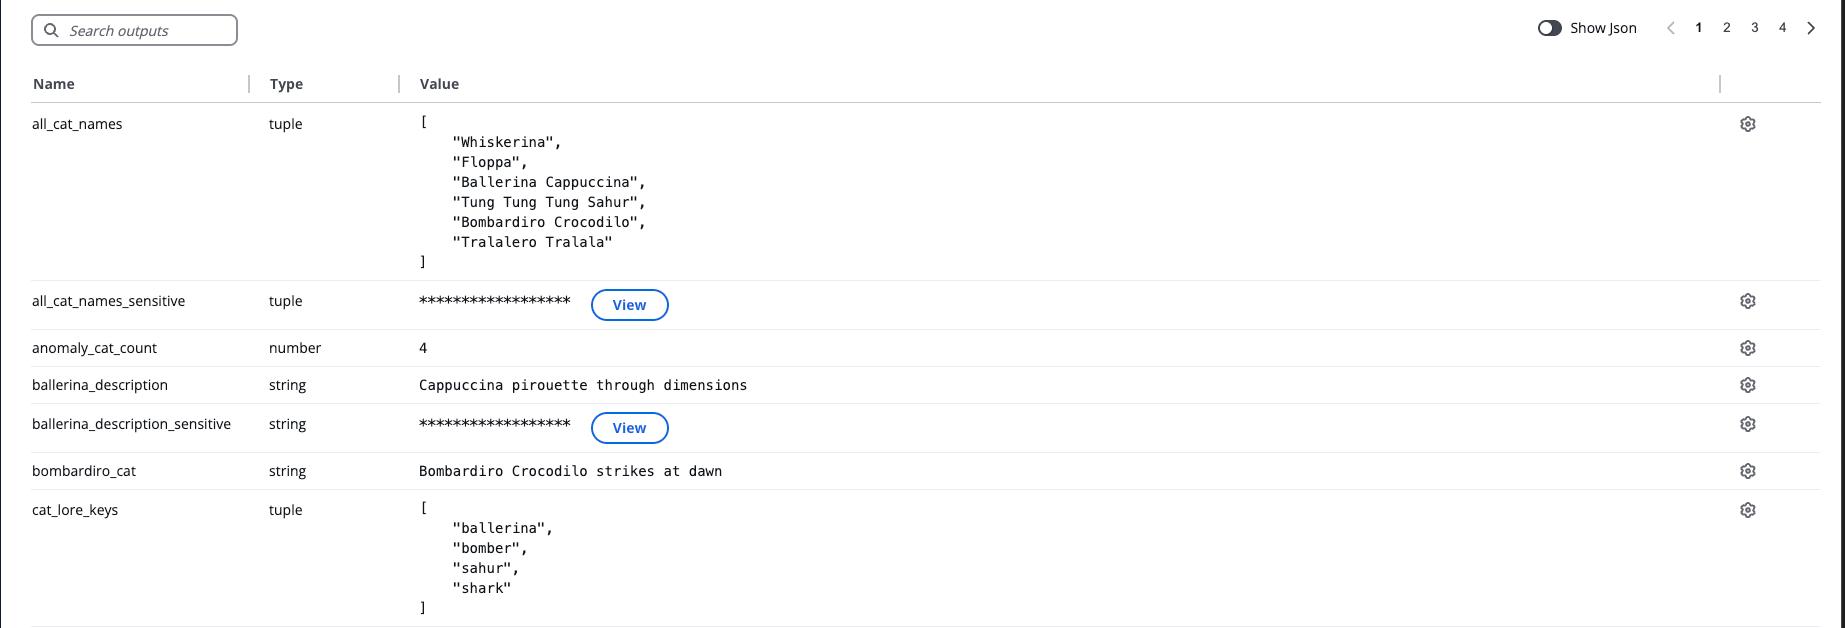
## JSON View[](#json-view "Direct link to JSON View")
When **Show JSON** is enabled:
* All outputs are displayed in raw JSON format
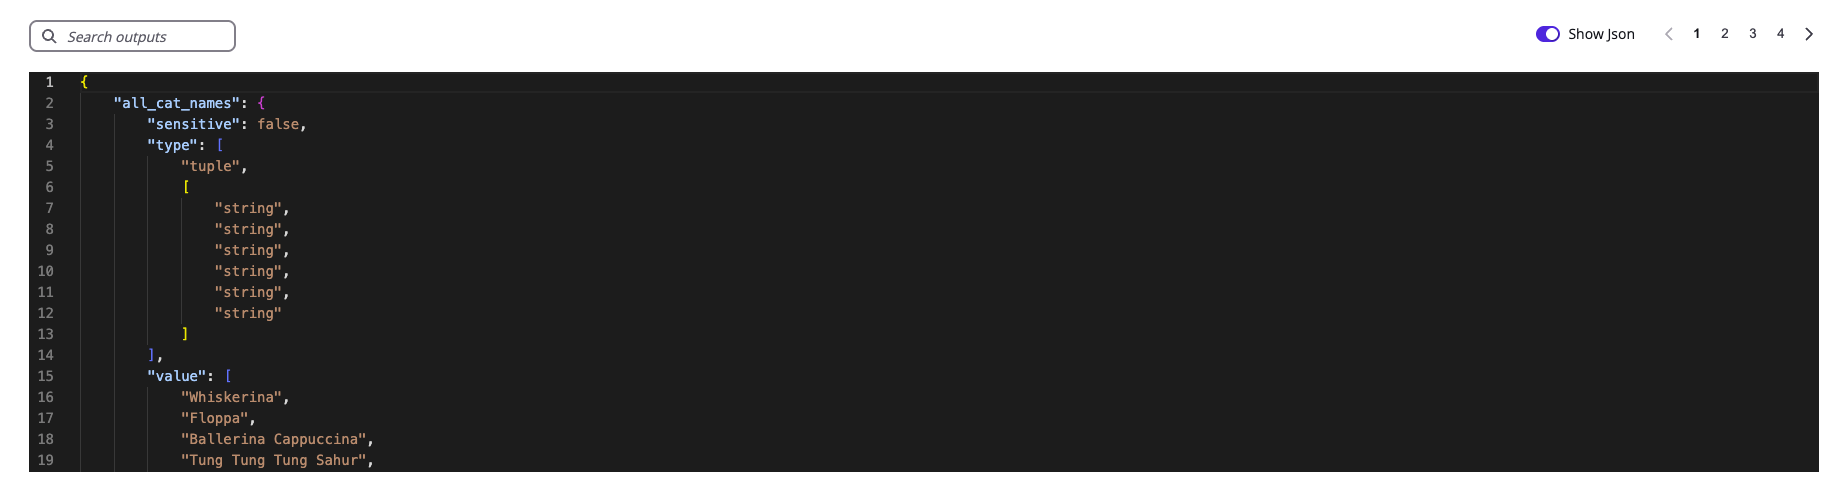
### Sensitive outputs[](#sensitive-outputs "Direct link to Sensitive outputs")
If the output contains sensitive fields such as credentials, passwords, or API tokens, the leaf values are marked as `` to prevent accidental exposure.
Example:
```
{
"sensitive_outputs": {
"sensitive": true,
"type": [
"tuple",
[
"number"
]
],
"value": [
""
]
}
}
```
When `"sensitive": true`, the internal leaf values are masked as ``. The masking applies to individual values within lists, maps, or other complex types, not the entire structure.
info
Sensitive output masking applies only to workflows executed after January 20, 2026. Outputs from workflows run before this date may still display actual sensitive values.
## Output Reference[](#output-reference "Direct link to Output Reference")
StackGuardian allows referencing of outputs between workflows. Outputs can be referenced inside VCS configuration and in Environment Variables of a workflow using the syntax below.
### Terraform Workflow[](#terraform-workflow "Direct link to Terraform Workflow")
* Example syntax to reference a value from the outputs generated by [**Terraform workflow**](/docs/deploy/workflows/workflows_types/terraform/terraform/)
```
${workflow::..outputs..value}
```
* Example syntax to a [**Stack**](/docs/deploy/stack/overview/) which is a *set of workflows that are closely associated with each other*, reference a value from **workflow outputs** under the STACK as follows,
```
${workflow::...outputs..value}
```
* Example syntax to reference an element inside an array value generated by [**Terraform workflow**](/docs/deploy/workflows/workflows_types/terraform/terraform/)
```
${workflow::..outputs..value.1}
```
### Custom Workflow[](#custom-workflow "Direct link to Custom Workflow")
* Example syntax to reference a value from the outputs generated by [**Custom workflow**](/docs/deploy/workflows/workflows_types/custom/)
```
${workflow::..outputs.}
```
### Nested Workflows[](#nested-workflows "Direct link to Nested Workflows")
To reference outputs from Workflows in a nested Workflow Groups or Stack, add the path to the Workflow Group as follows:
```
${workflow::/..}
```
For more detailed instructions on creating references, refer to the [**Reference Variables**](/docs/deploy/workflows/workflow_components/reference_variables/) documentation.
## Artifacts[](#artifacts "Direct link to Artifacts")
Below the Outputs table is the **Artifacts** section. Artifacts include files generated or used by the workflow (e.g., Terraform state files, logs).
Common artifact examples:
* `tfstate.json` — Terraform state storage for tracking deployed infrastructure
* **Logs** — Debugging workflow execution
* **Generated files** — Assets created during workflow runs

*Artifacts*
Actions:
* **Download artifacts** to inspect or reuse locally
* **Upload file** such as existing Terraform state to import environments (must be named `tfstate.json`)
### State file management[](#state-file-management "Direct link to State file management")
The state file is a record of the infrastructure Terraform has provisioned. StackGuardian stores and versions this file automatically, so you can track changes over time and roll back if needed.
note
State file management is only available for Terraform and OpenTofu Workflows configured with a managed backend.
#### Locking state[](#locking-state "Direct link to Locking state")
Locking prevents queued runs from executing while the state file is being modified. New runs can still be created and queued, but they will not start until the state is unlocked.
Locking is applied automatically when the Terraform CLI acquires a state lock. You can also lock the state manually by selecting **Lock State** next to the `tfstate.json` artifact.
**To lock the state:**
1. Select **Lock State** next to the `tfstate.json` artifact.
2. In the confirmation dialog, select **Confirm**.
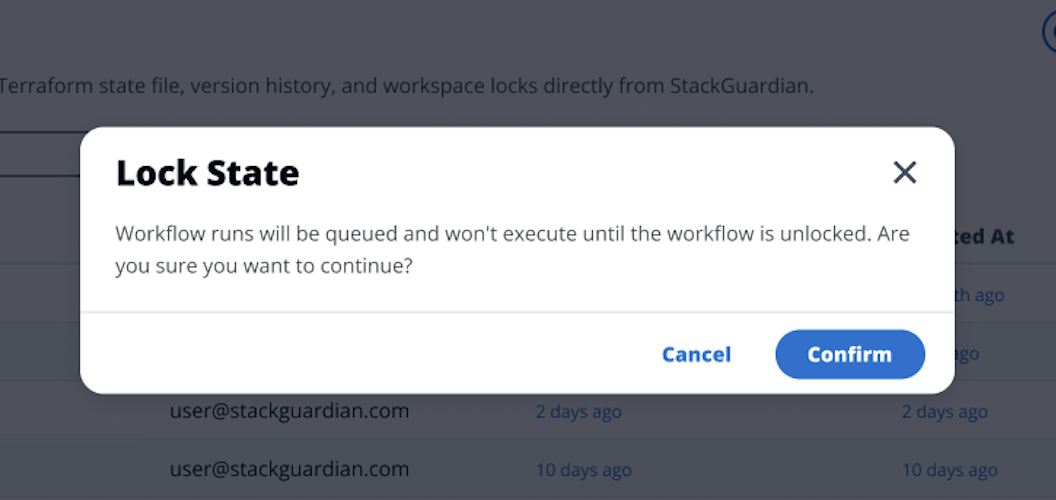
*Locking state*
When the state is locked, a warning banner appears at the top of the page:
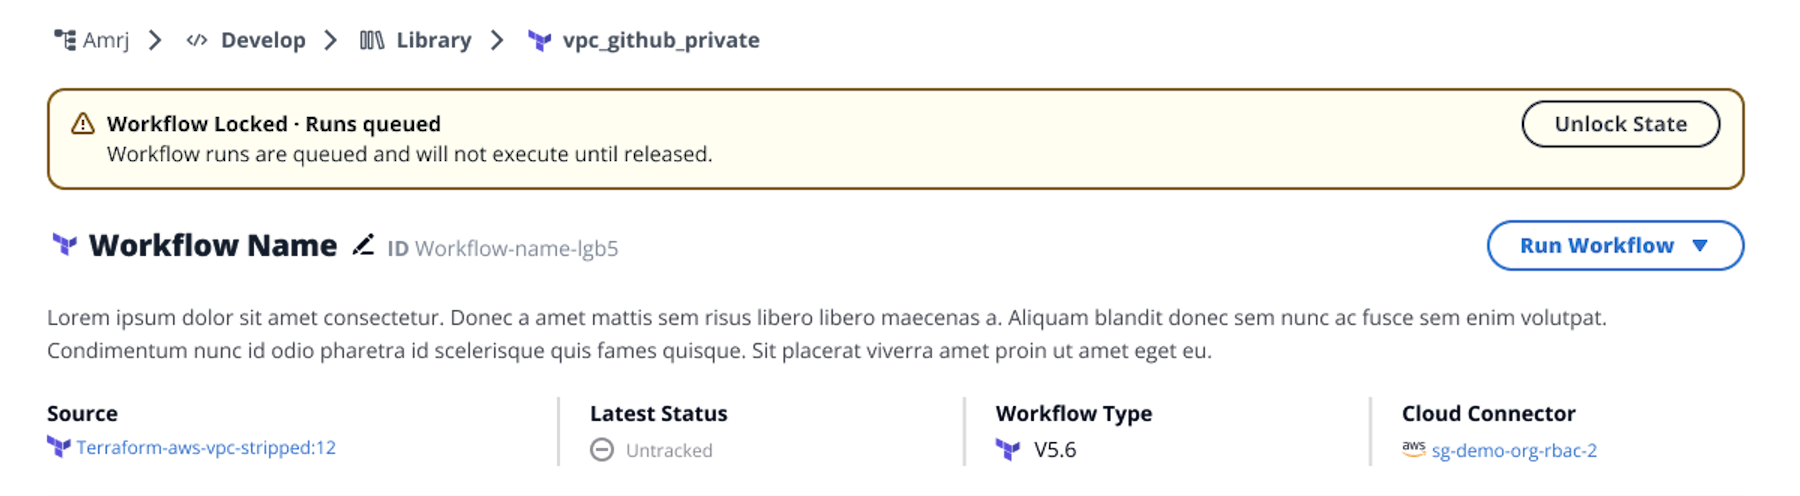
*Locking warning banner*
**To unlock the state:**
Select **Unlock State** in the banner.
#### Managing versions[](#managing-versions "Direct link to Managing versions")
Select **Manage Versions** next to the `tfstate.json` artifact to open the version history. Up to 50 versions are shown, ordered from most recent to oldest.
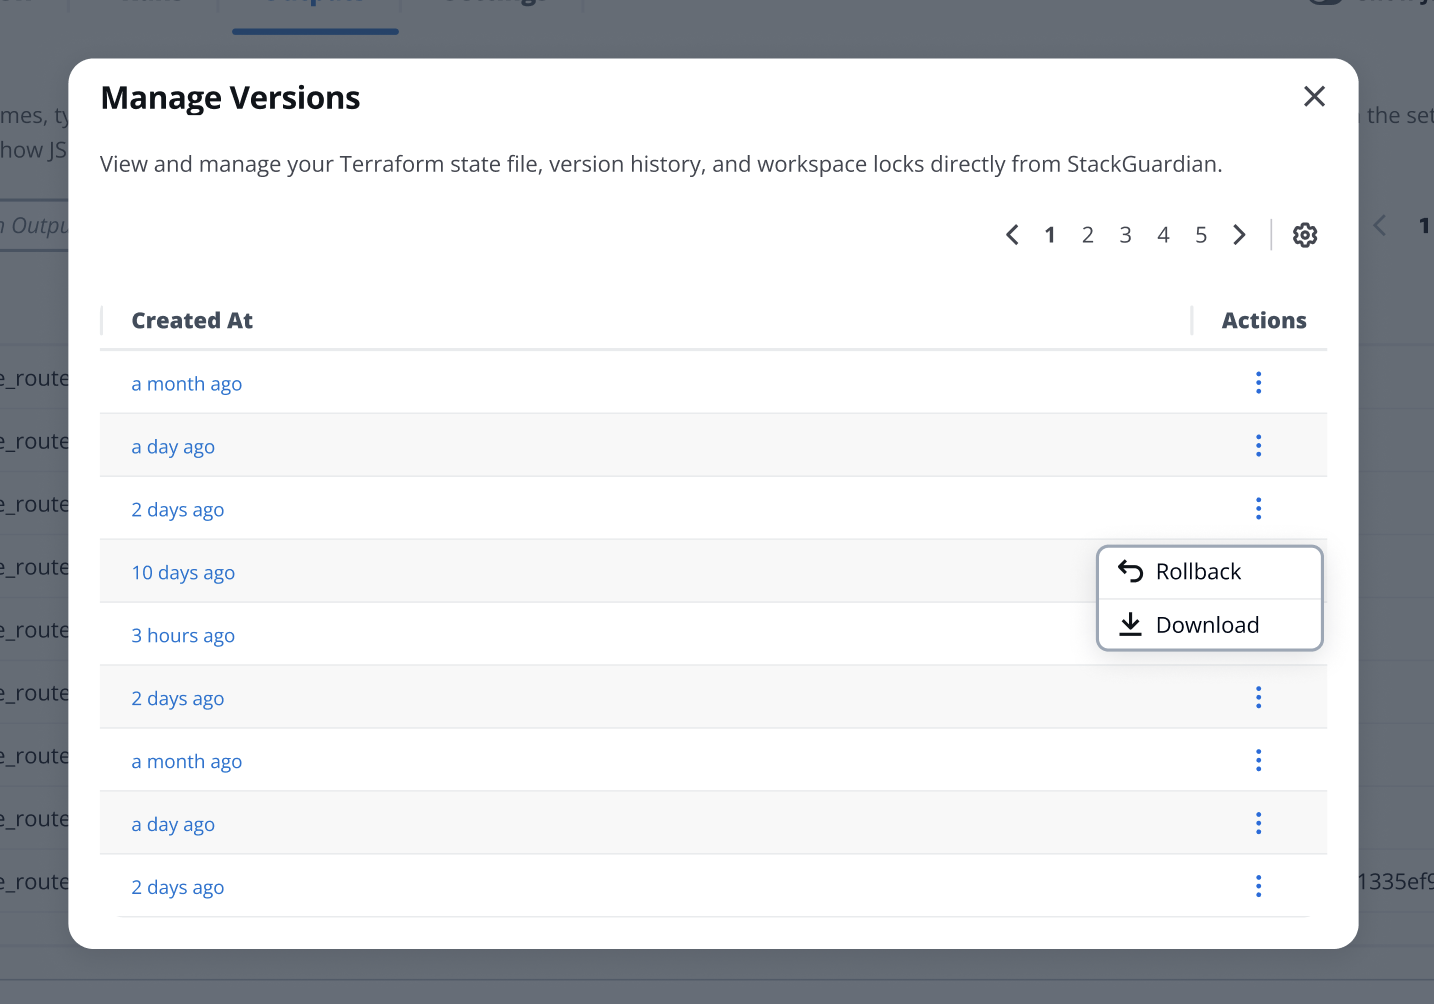
*Manage versions modal*
Each row includes:
* **Created at** — when the version was created
* **Actions** — available actions for that version
Select the three-dot menu in the **Actions** column to act on a specific version:
* **Rollback** — restores the Workflow to that state version. The state is locked automatically during rollback and released when the operation comple
* **Download** — downloads the state file for that version as a JSON file.
warning
Rolling back overwrites the current state with the selected version. This action cannot be undone.
---
# **Overview Tab**
The **Overview** tab provides insight into the workflow’s compliance, cost estimation and managed resources.
***
## 1. Policy Checks[](#1-policy-checks "Direct link to 1. Policy Checks")
### Overview[](#overview "Direct link to Overview")
The **Policy Checks** feature provides organizations with a centralized, transparent way to **enforce compliance and governance controls** across **Workflows** and **Stacks**.
Located under each Workflow or Stack’s **Policy Checks** section inside the Overview tab, this feature helps teams validate actions, configurations, and runtime executions against predefined **policy rules**.
***
### Key Features[](#key-features "Direct link to Key Features")
#### 1. Policy Rule Types[](#1-policy-rule-types "Direct link to 1. Policy Rule Types")
Policy Checks are divided into two categories:
* **Runtime Rules** – Enforced **during Workflow or Stack execution**.
These validations run when a Workflow or Stack is executed, ensuring security and compliance in real time.
* **Configuration Rules** – Enforced **at configuration level**, when a Workflow or **Stack is created, updated or run.**
Defined when the policy provider references a SG Workflow/Stack(JSON) provider.
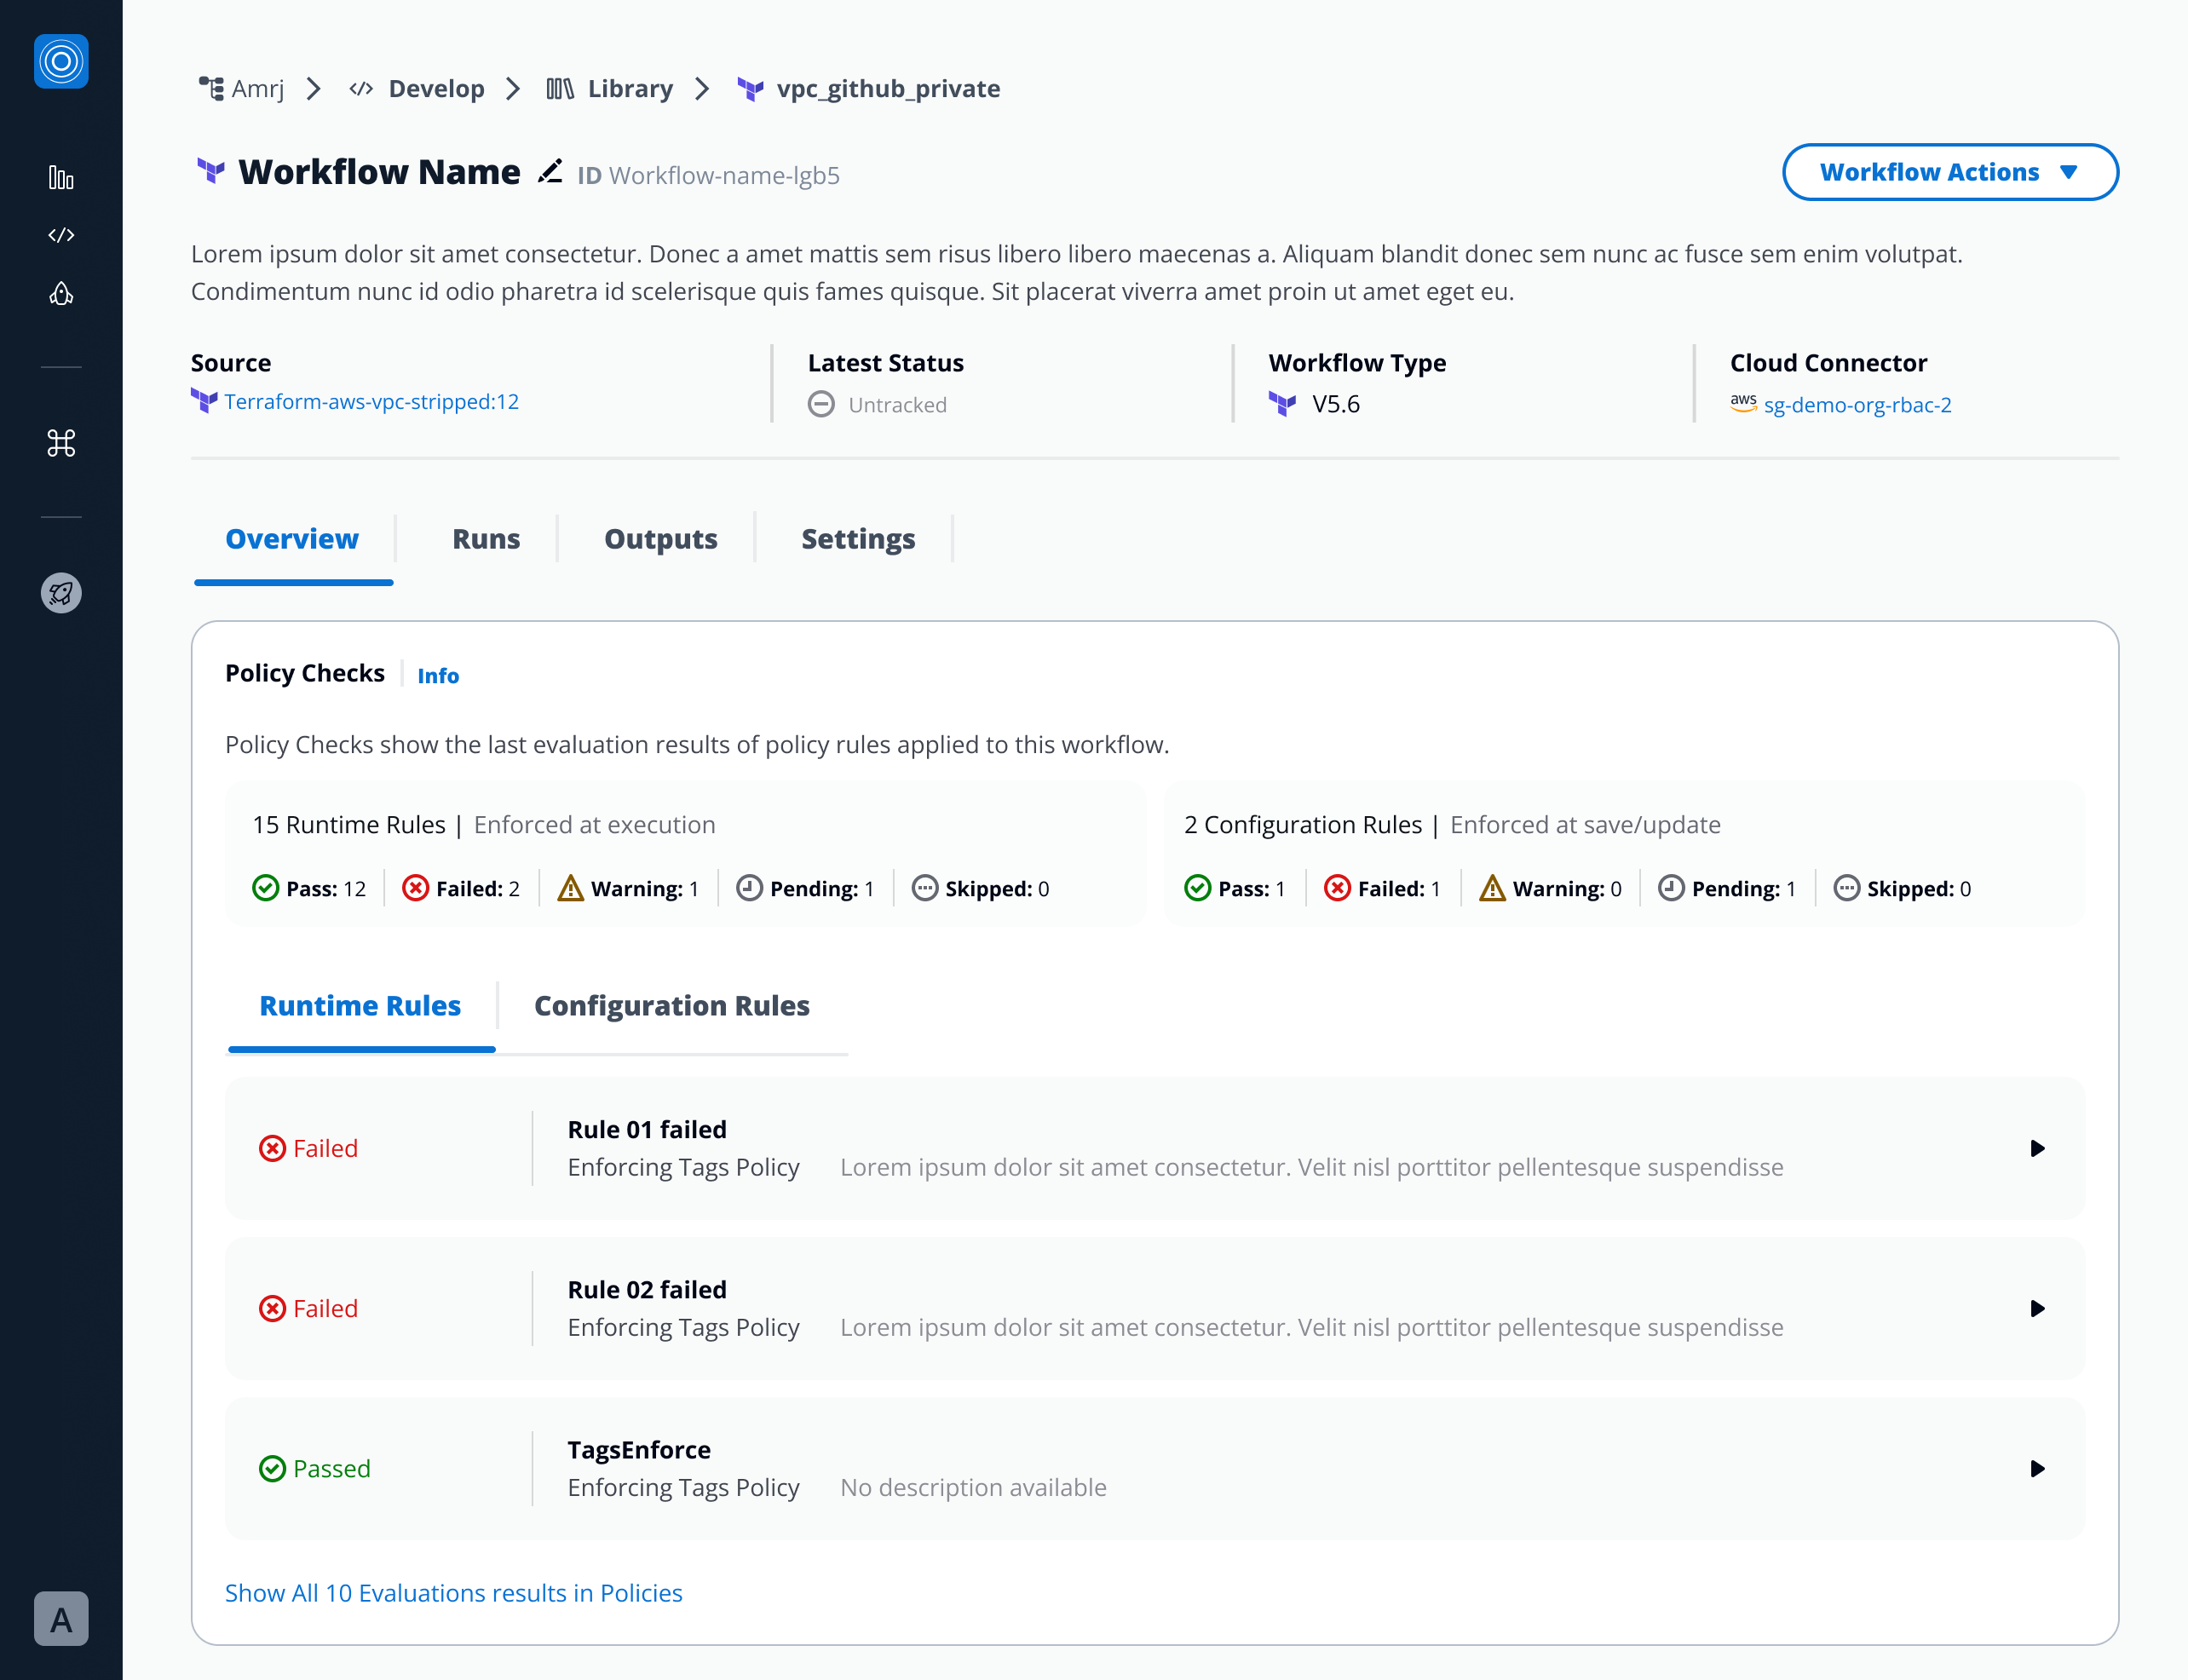
#### 2. Rule Cards and Status[](#2-rule-cards-and-status "Direct link to 2. Rule Cards and Status")
Each rule appears as a **collapsible card**, showing:
* **Policy Rule name**
* **Associated Policy**
* **Policy description**
* **Status**
Expanding a card reveals more details about evaluation results once the policy has run.
Statuses include:
* **Pass** – The policy rule was successfully validated and met all defined conditions.
* **Fail** – The policy rule did not meet the defined conditions and was rejected.
* **Warning** – The rule triggered a cautionary condition but did not block execution or save.
* **Pending** – The rule requires explicit approval before proceeding. Approvals can only be granted **during Workflow Runs**.
* **Skipped** – Intentionally marked to be bypassed during evaluation.
* **Unevaluated** - The policy rule has not yet been checked. This state appears when no configuration change or execution has occurred since the rule was added.
note
* **Runtime Rule results** appear *only after the Workflow or Stack has been executed*.
* **Configuration Rules results** become visible after the configuration is saved or the workflow is run. They are always evaluated first so:
* If they **fail**, the run is **blocked**.
* If they **pass** or **warn**, the run **continues**, and runtime rules are then evaluated during execution.
* If a configuration rule **requires approval**, the run will only proceed once the approval is granted.
***
### Notes from Developers[](#notes-from-developers "Direct link to Notes from Developers")
* **Runtime Rules** → evaluated dynamically during run execution.
* **Configuration Rules** → evaluated immediately at save, update, **and again when a run is triggered** (before runtime evaluation).
* **Approvals** → only available during Workflow Runs; not supported during metadata edits.
* **Status visibility** → updated only after at least one execution.
* **Tabs** → displayed dynamically based on rule presence (both or single type).
* **Actions supported:** `Pass`, `Fail`, `Warn`, `Approval Required`, `Unevaluated`.
## 2. Infracost Estimation[](#2-infracost-estimation "Direct link to 2. Infracost Estimation")
Estimates the cost of infrastructure changes before deployment.
* Displays **estimated cost** based on detected resources.
* Shows:
* Total Estimated Cost
* Breakdown by resource or service:
1. By default the on-demand cost per resource is shown
2. When linking the infracost.io account to StackGuardian
This helps ensure cost visibility and control before applying infrastructure changes.
***
## 3. Resources[](#3-resources "Direct link to 3. Resources")
Lists all resources managed or created by the workflow.
* Displays **name**, **type**, **status**, and **cloud provider details**.
* Supports **search**, **filter**, and **sort** functions.
* Clicking a resource reveals details such as:
* Resource ID and type
* Provider
* Lifecycle state (created, updated, deleted)
* Cloud console link (if available)
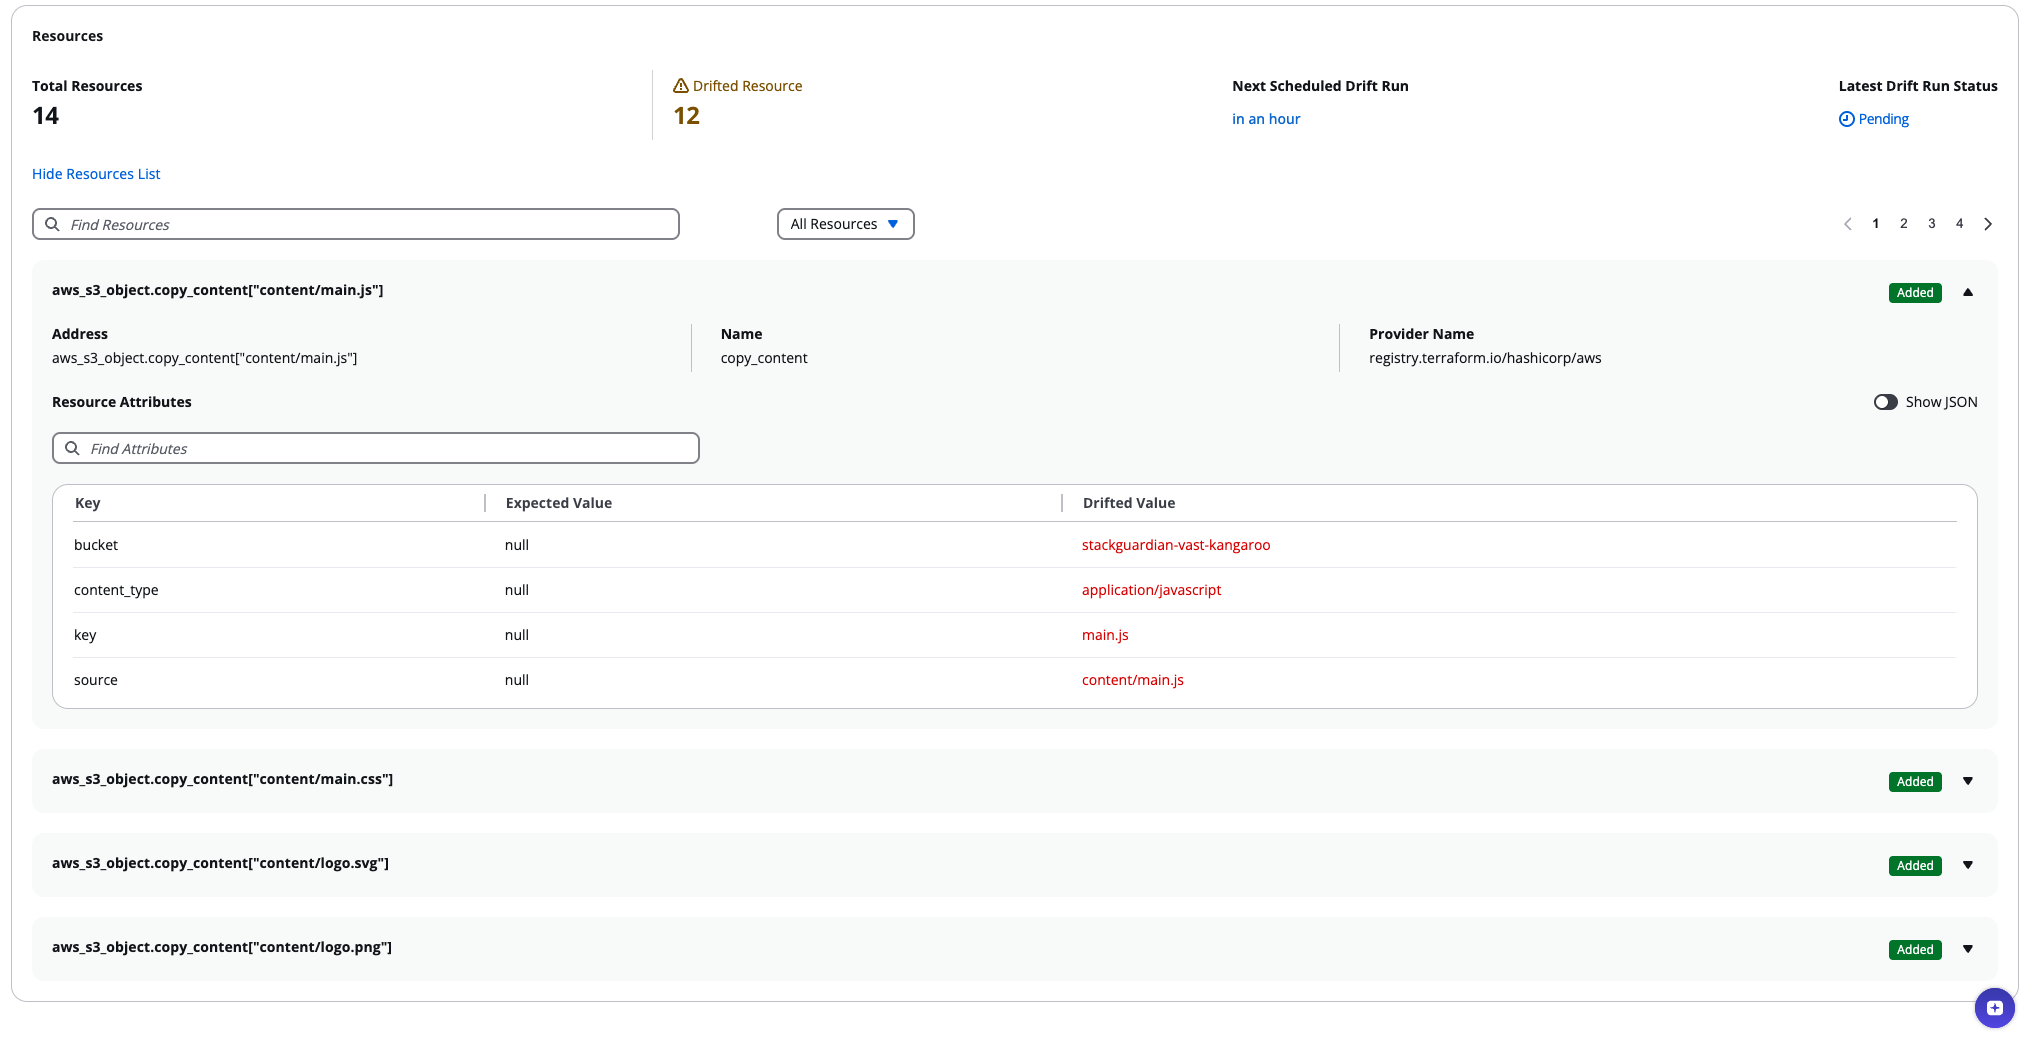
This section provides an instant view of what infrastructure the workflow manages.
---
# Reference Variables
## Overview[](#overview "Direct link to Overview")
Reference variables are crucial for *data transfer* and *state management* within Stacks, templates, and stack workflows. They allow the seamless utilization of output variables from one element (such as a workflow or template) as input references in subsequent elements, thereby streamlining processes and enhancing system modularity.
## Referencing Variables[](#referencing-variables "Direct link to Referencing Variables")
Begin by navigating to **Org** > **Workflow Group** > **Workflow** > **Stack**, and select the desired *workflow*. In the stack workflow, access the settings tab and locate the referencing section.
To reference a variable, click the **gear icon** (⚙) next to the input field. This is essential each time a resource needs to:
* Reference an already created resource.
* Include a secret from the vault.
* Use a value from another template.
note
The 'reference builder' is utilized for these purposes. Access it by choosing your workflow, or Stack, then go to 'Settings'. In the 'FORM' section, click the settings wheel next to the desired input field.
Reference variables can be implemented in the following methods:
* [**Workflow**](#workflow-output): Enable the use of output variables from one workflow as inputs in another for seamless data flow.
* [**Secret**](#secret): Manage and reference sensitive information within workflows securely.
* [**External Secret (Azure Key Vault)**](#external-secret): Integrate secrets from an external secret management system directly into your workflows.
* [**Template**](#template): Utilize predefined variables in templates for consistent and efficient workflow integration.
note
The **Template** type is exclusive to the Stack Templates, as it allows referencing other templates within the same group, relevant primarily for Stack Template constructions.
### Workflow[](#workflow "Direct link to Workflow")
* To create a output reference, click the **Reference Value** link — or, in some cases, the gear icon (
⚙
) — next to the input field where you want to add a reference.
* Select Workflow as the reference type.
* From the dropdown, choose the Workflow Group Name, Stack Name (optional), and Workflow Name.
* After selecting the workflow, choose the Output Key (for example, `public_subnets.value`, `public_subnets.name`) from the available outputs.
* As the final step, click **Use** to confirm your selection.
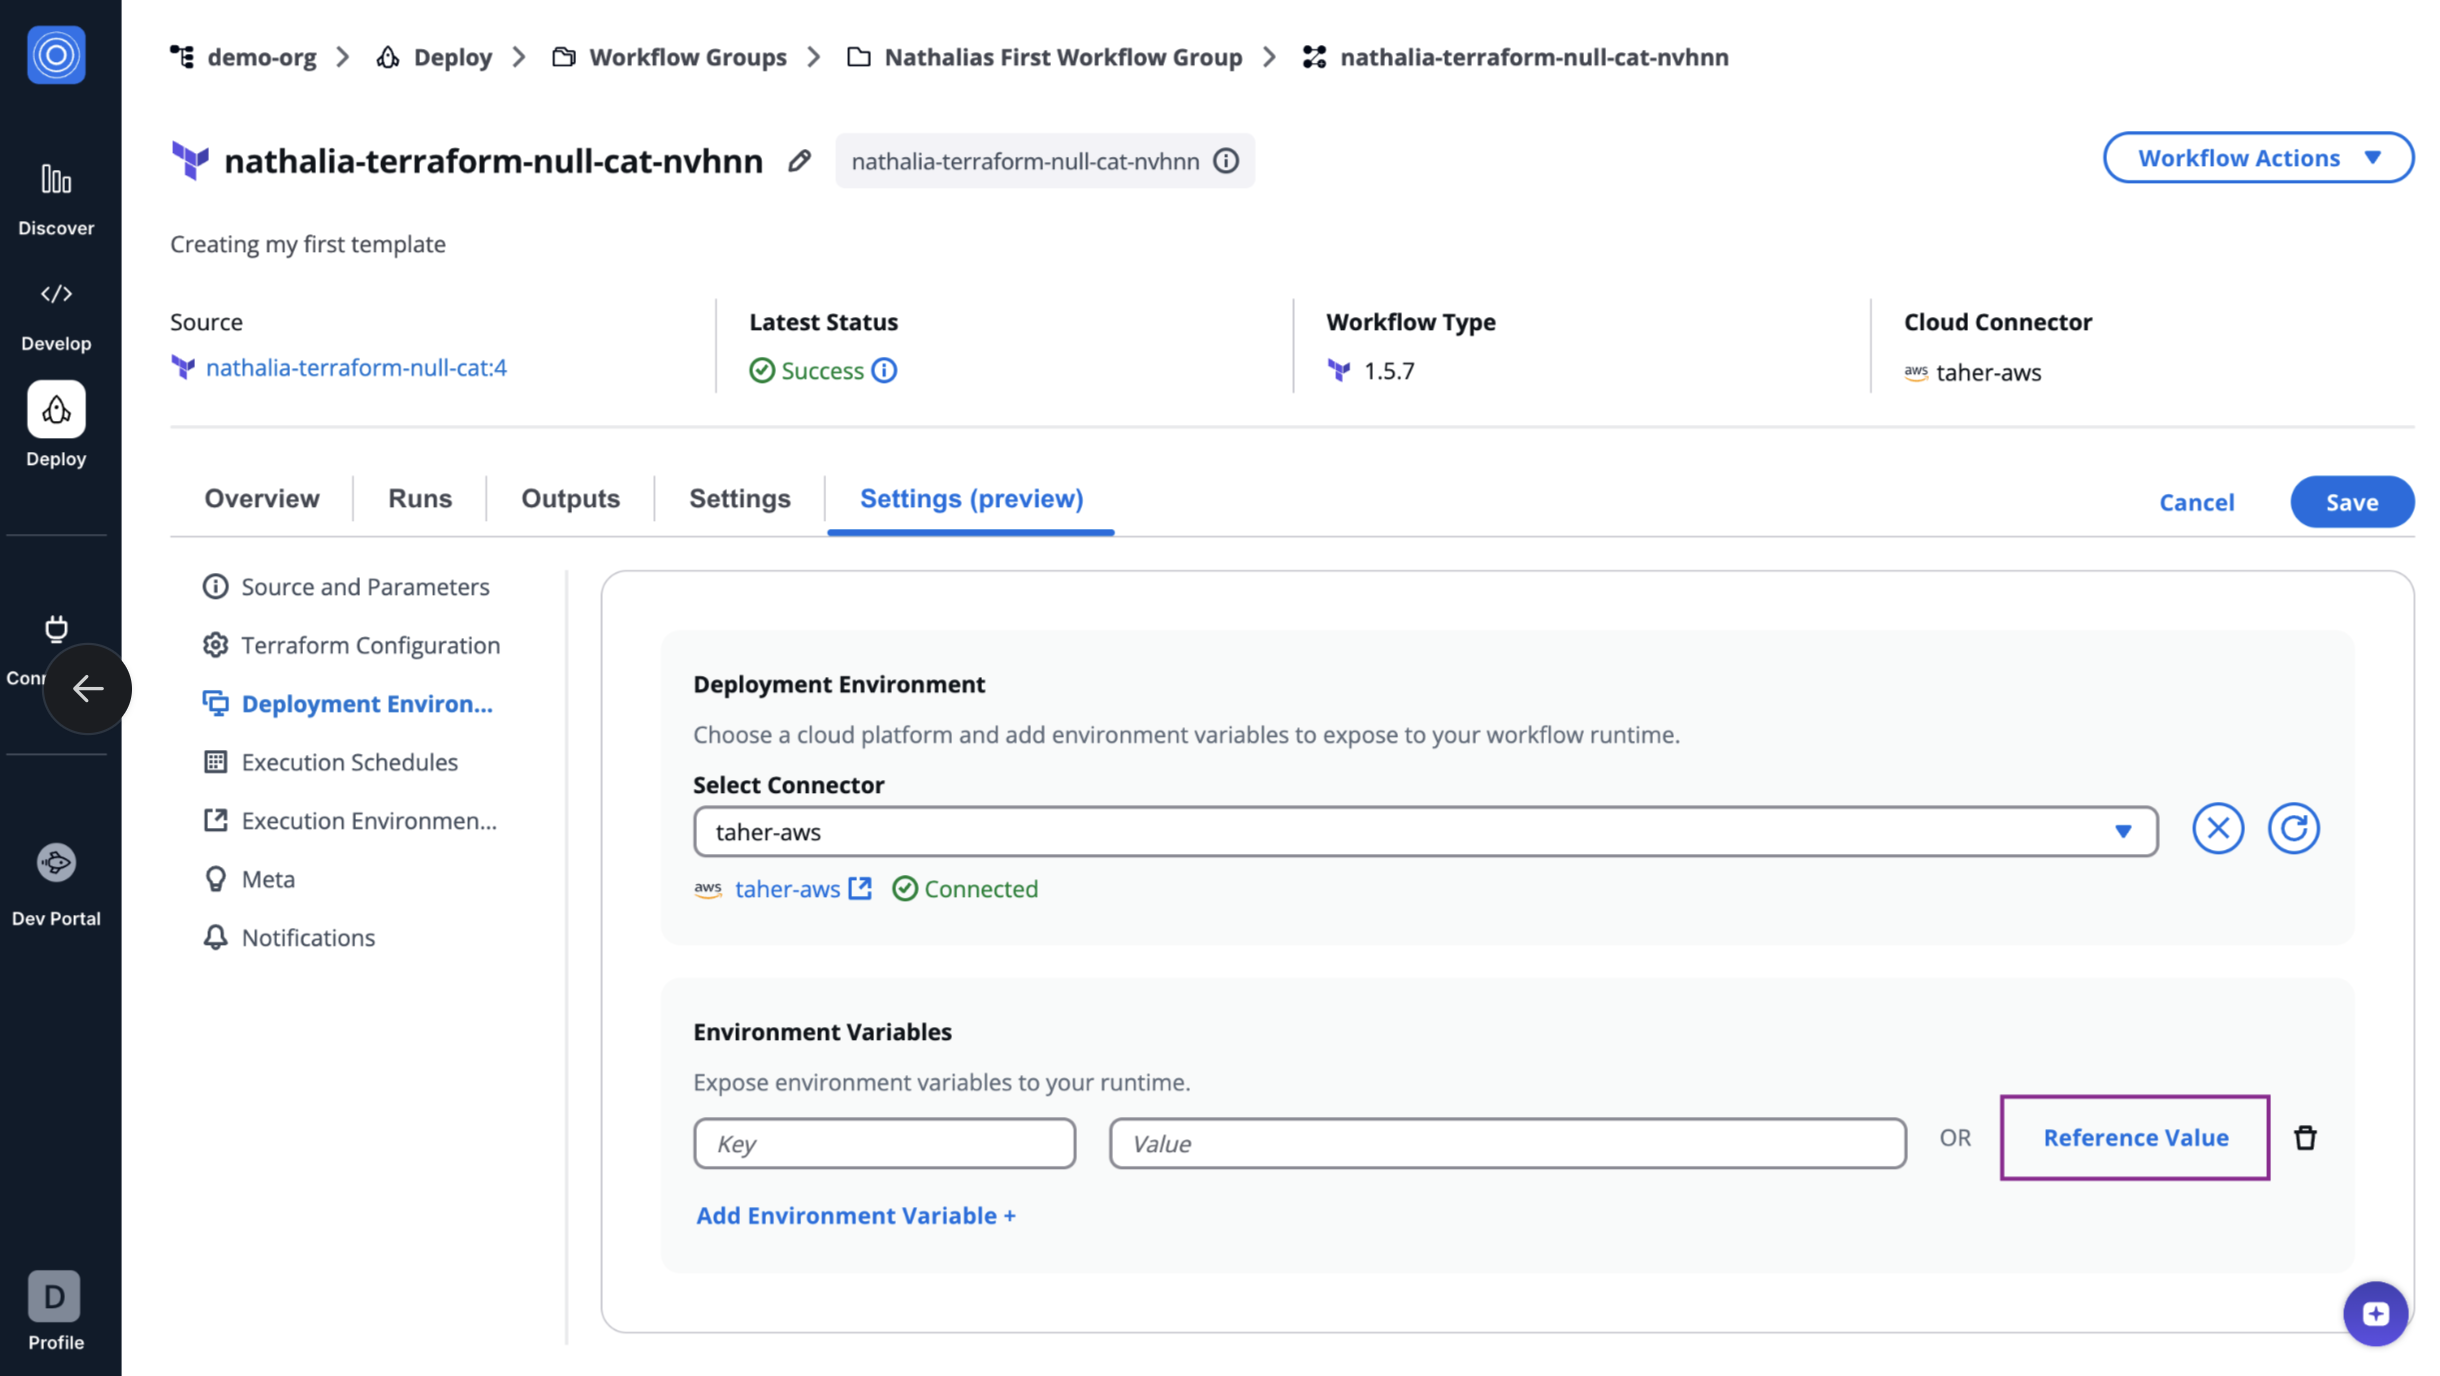
*Reference Variable Structure*
When referencing variables, use the following structures based on the context:
* **Standard Workflow**: This structure is used to reference output variables from a workflow within a workflow group.
```
${workflow::..}
# For Nested Workflow Group
${workflow::/..}
```
* **Workflow in a Stack**: This structure is used to reference output variables from a workflow that is part of a stack.
```
${workflow::...}
# For Nested Workflow Group
${workflow::/...}
```
#### Reference a Workflow Output[](#workflow-output "Direct link to Reference a Workflow Output")
1. From the dropdown, pick the workflow you want to pull the value from. Once selected, the system will automatically fetch all the available output keys for that workflow.
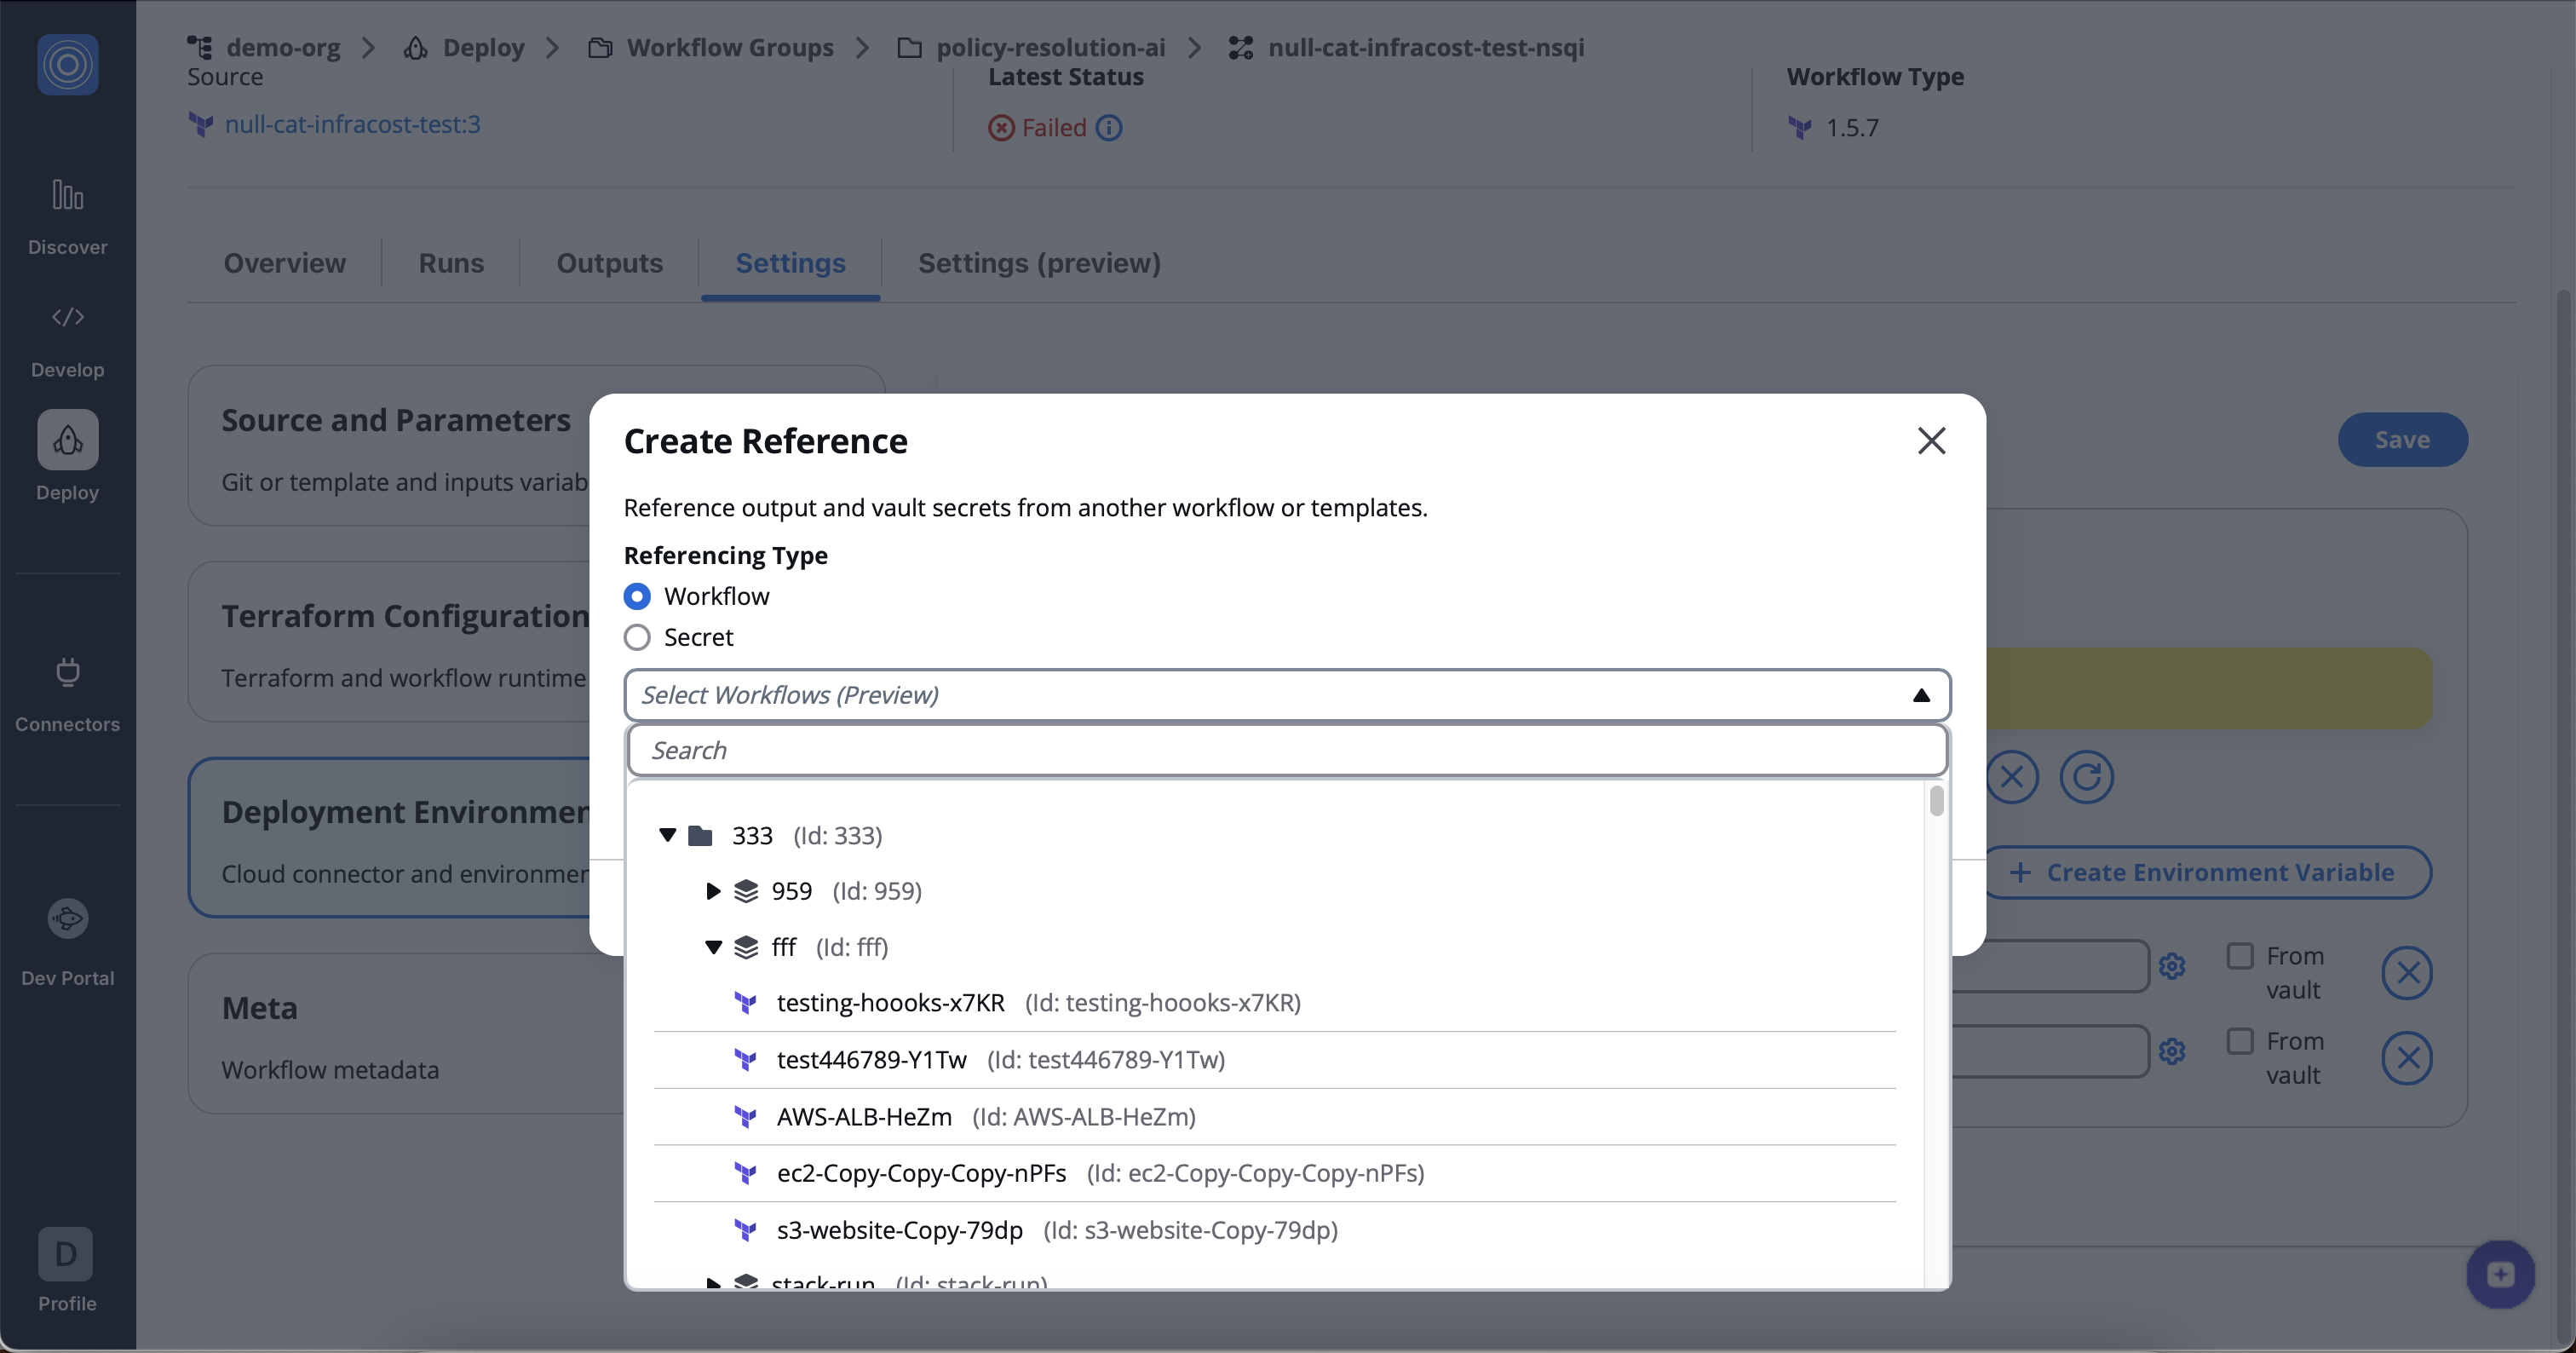
2. Select an Output Key. You have two ways to provide the output key:
* **Paste a specific Key**
If you already know the exact key you want to reference, simply paste it directly into the Output Key input field.
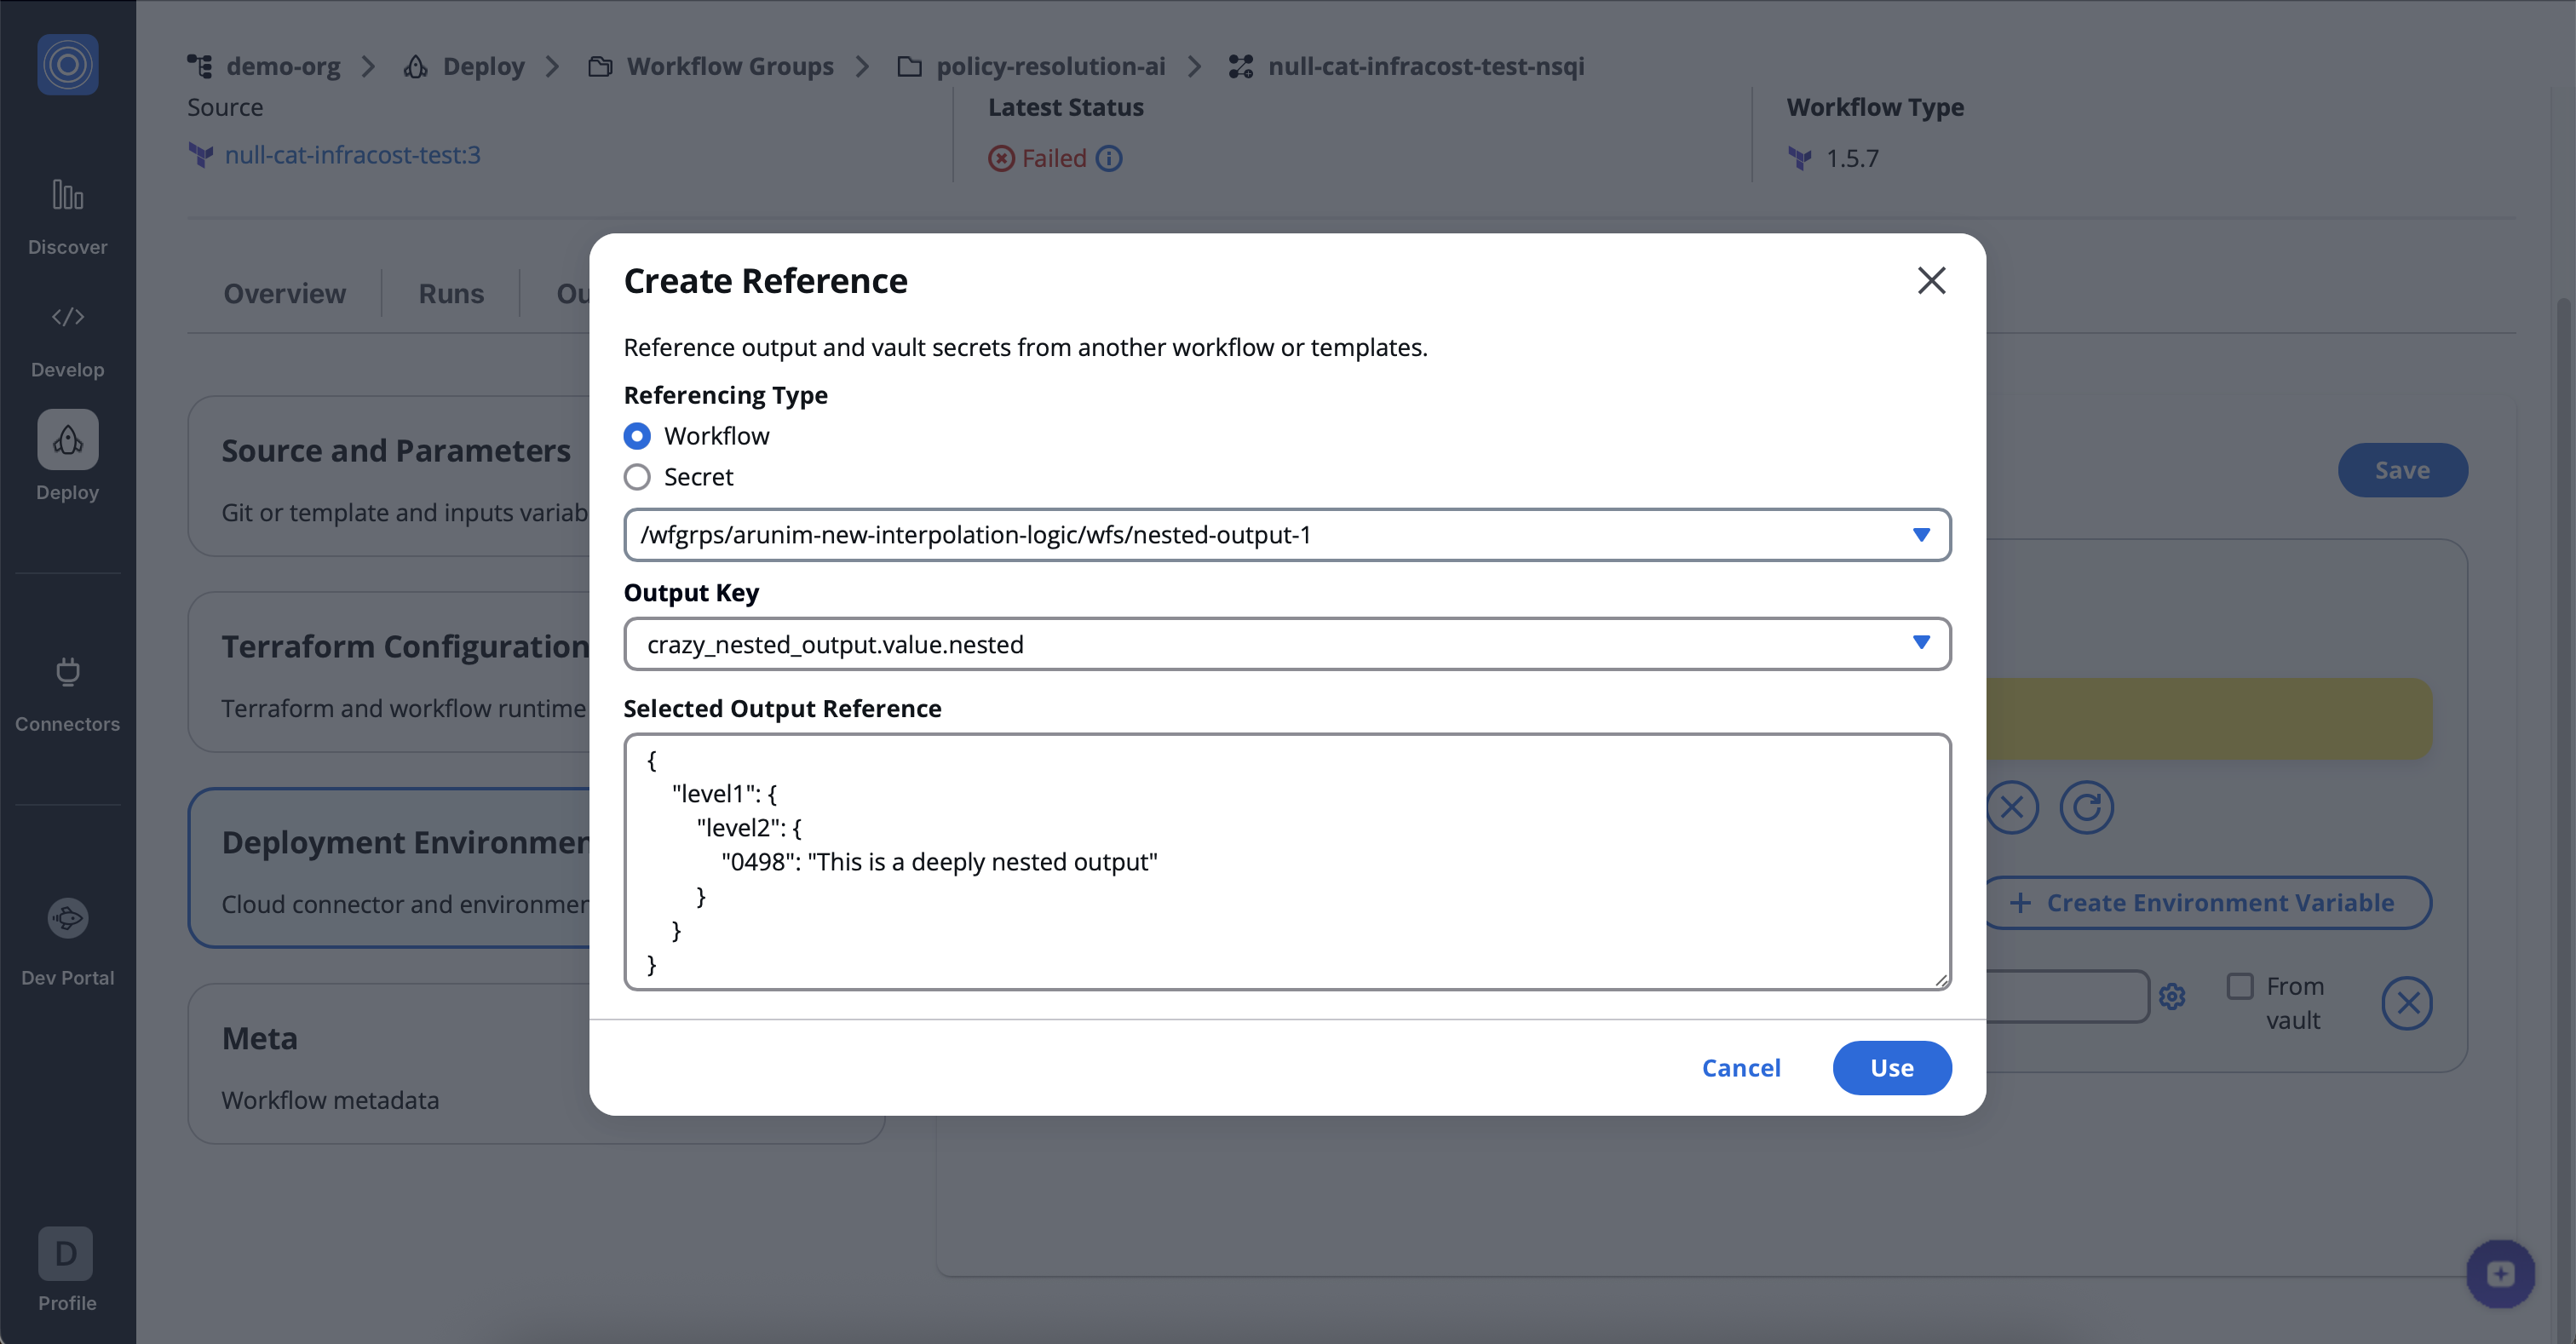
This is helpful when you already know the output path (for example, from a previous workflow run) and don’t need to browse.
* **Select from the dropdown**
If you don’t know the exact key, you can use the interactive dropdown to browse all available outputs from that workflow.
1. Click on the **Search Output References** field.
2. A dropdown will open, showing all available output references.
3. You can search or scroll to find the correct output.
4. The outputs are displayed in **nested folders**, making it easier to locate the specific value you want to reference.
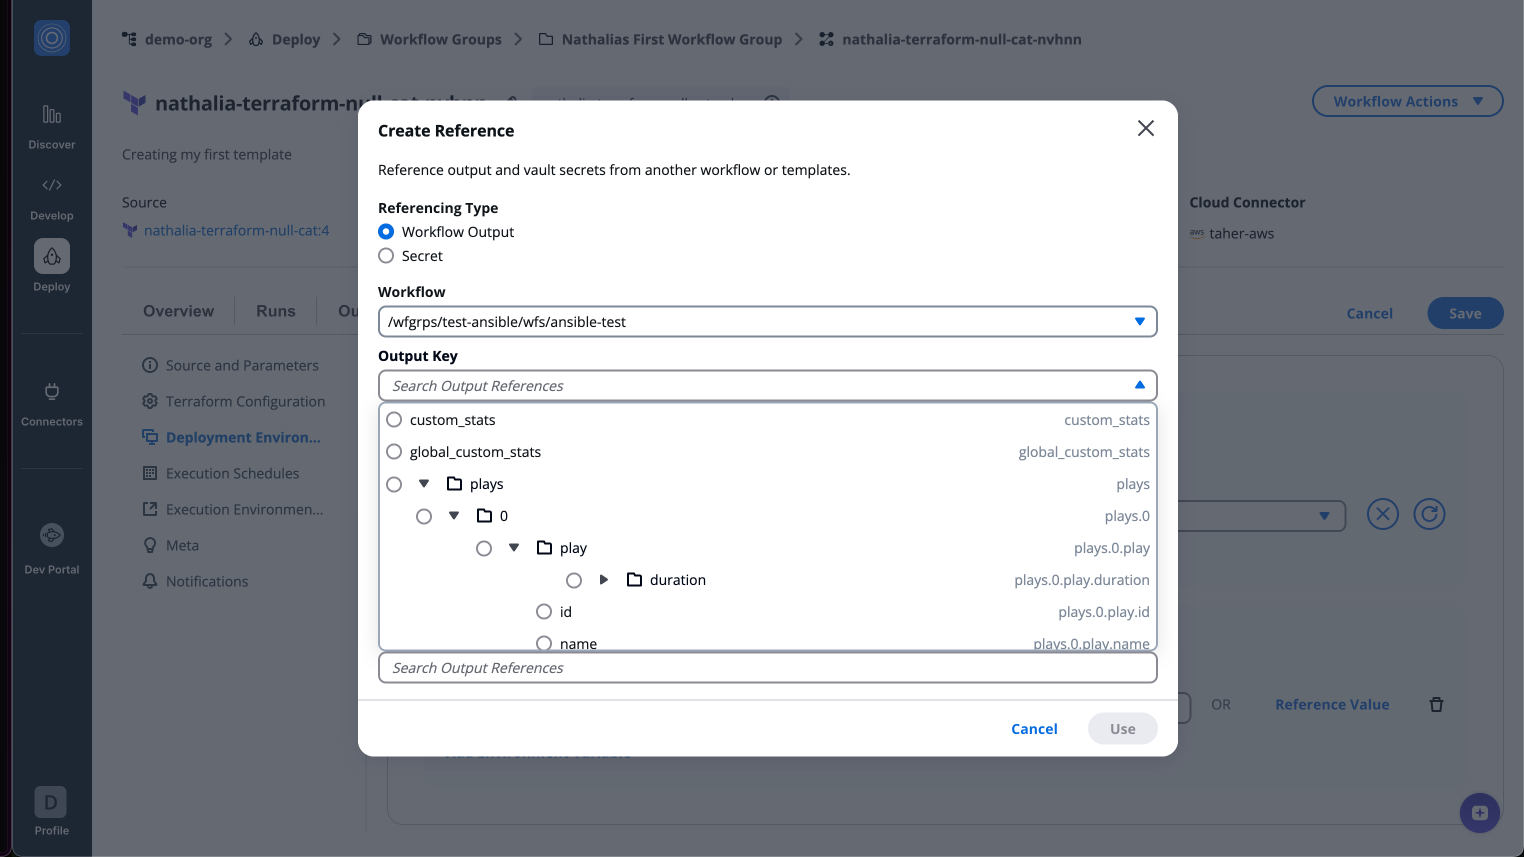
3. Pick Your Output
* From the dropdown, click on the specific output you wish to use.
* When you select an output (for example, `artifact_content.value`), it will appear in the input field, confirming your choice.
Once selected, a preview of the output reference is displayed below, showing the output key and its corresponding value path.
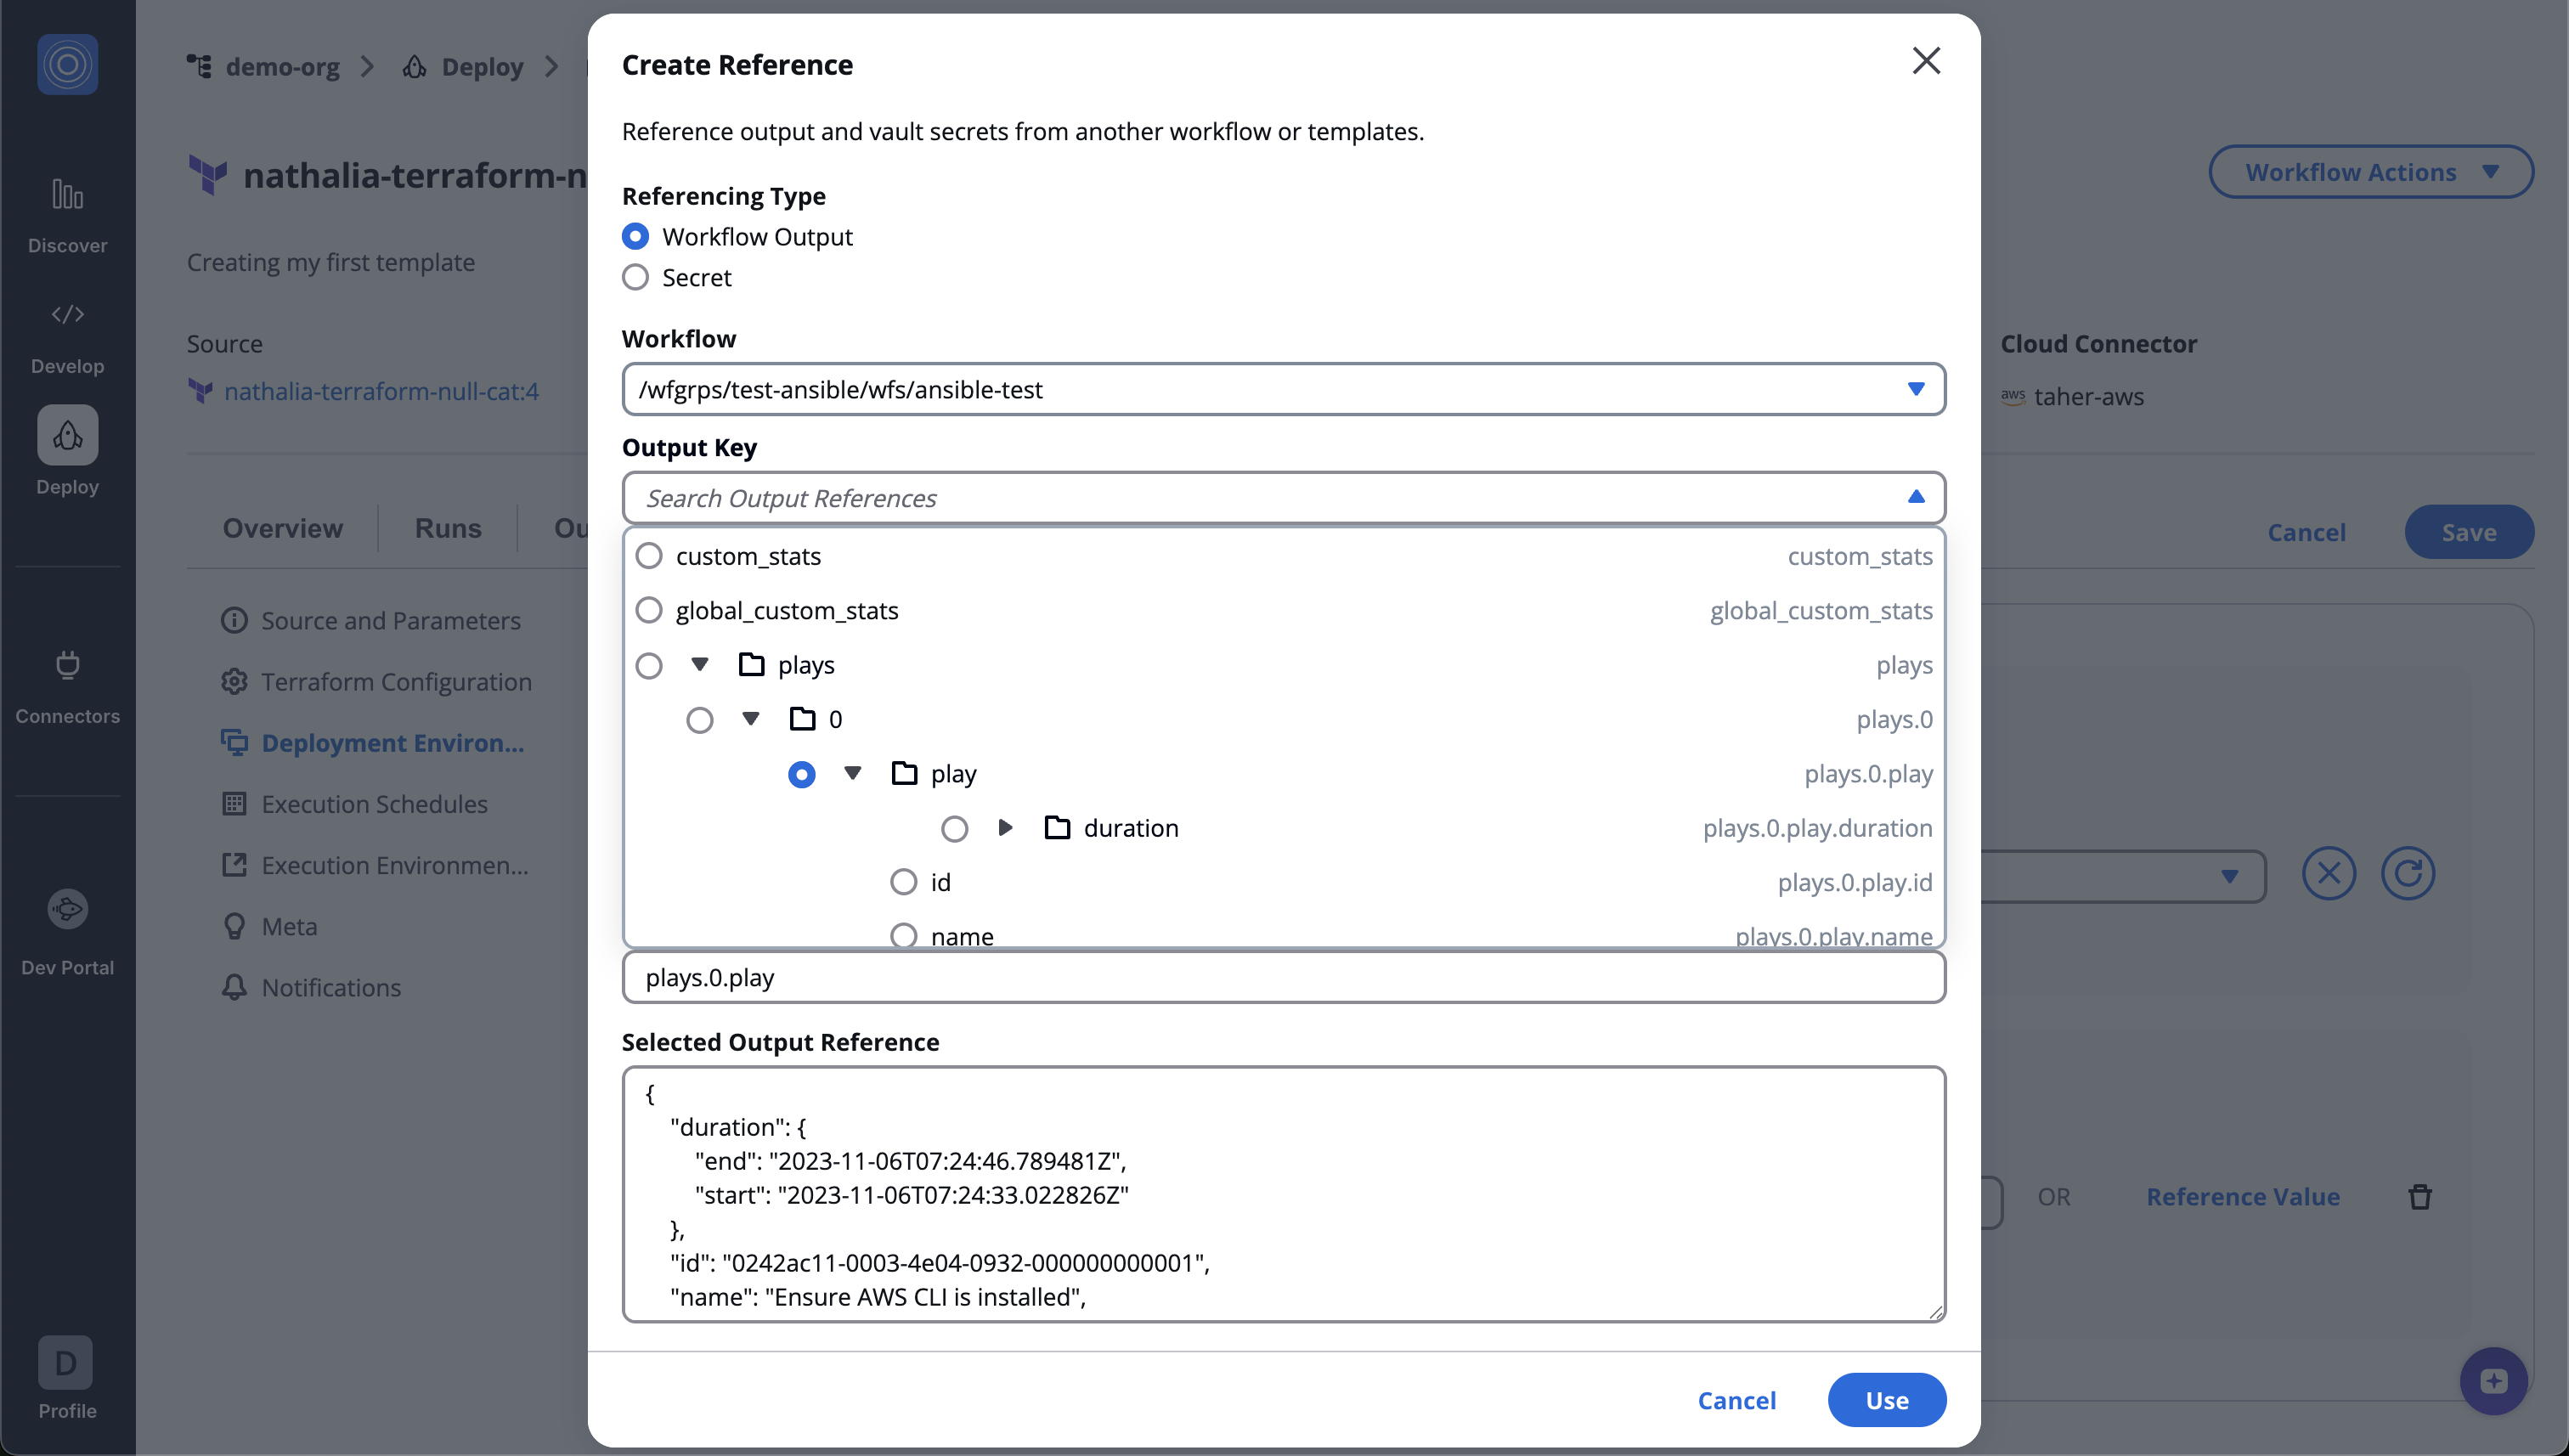
4. Review Your Selection
* After selecting your desired output, a new section called **Selected Output Reference** will appear.
* This section displays the actual value of the selected output reference.
* You can view it to confirm that you’ve selected the correct key.
* The value preview area may also include contextual details (for example, data type or content hints).
You can **copy the value** directly if needed for debugging or for use in another workflow. Once you’ve verified that it’s the correct output, click **Use** to confirm your selection. The system will then populate the reference string as an input for the current workflow or template.

info
When the referenced workflow is a **Terraform workflow**, the structure of the available output keys is slightly different from custom workflows.
* For **Terraform workflows**, only the **`value` folder** is displayed. This means you’ll directly see outputs like `artifact_content.value` instead of multiple nested layers. It simplifies the experience and ensures you can quickly identify the actual usable values without navigating through deeper folder levels.
* For **custom workflows**, the full nested folder structure remains visible, so you can explore all available output groups and subkeys as before.
This distinction helps keep Terraform outputs cleaner and more intuitive to use, while still allowing flexibility for custom workflows.
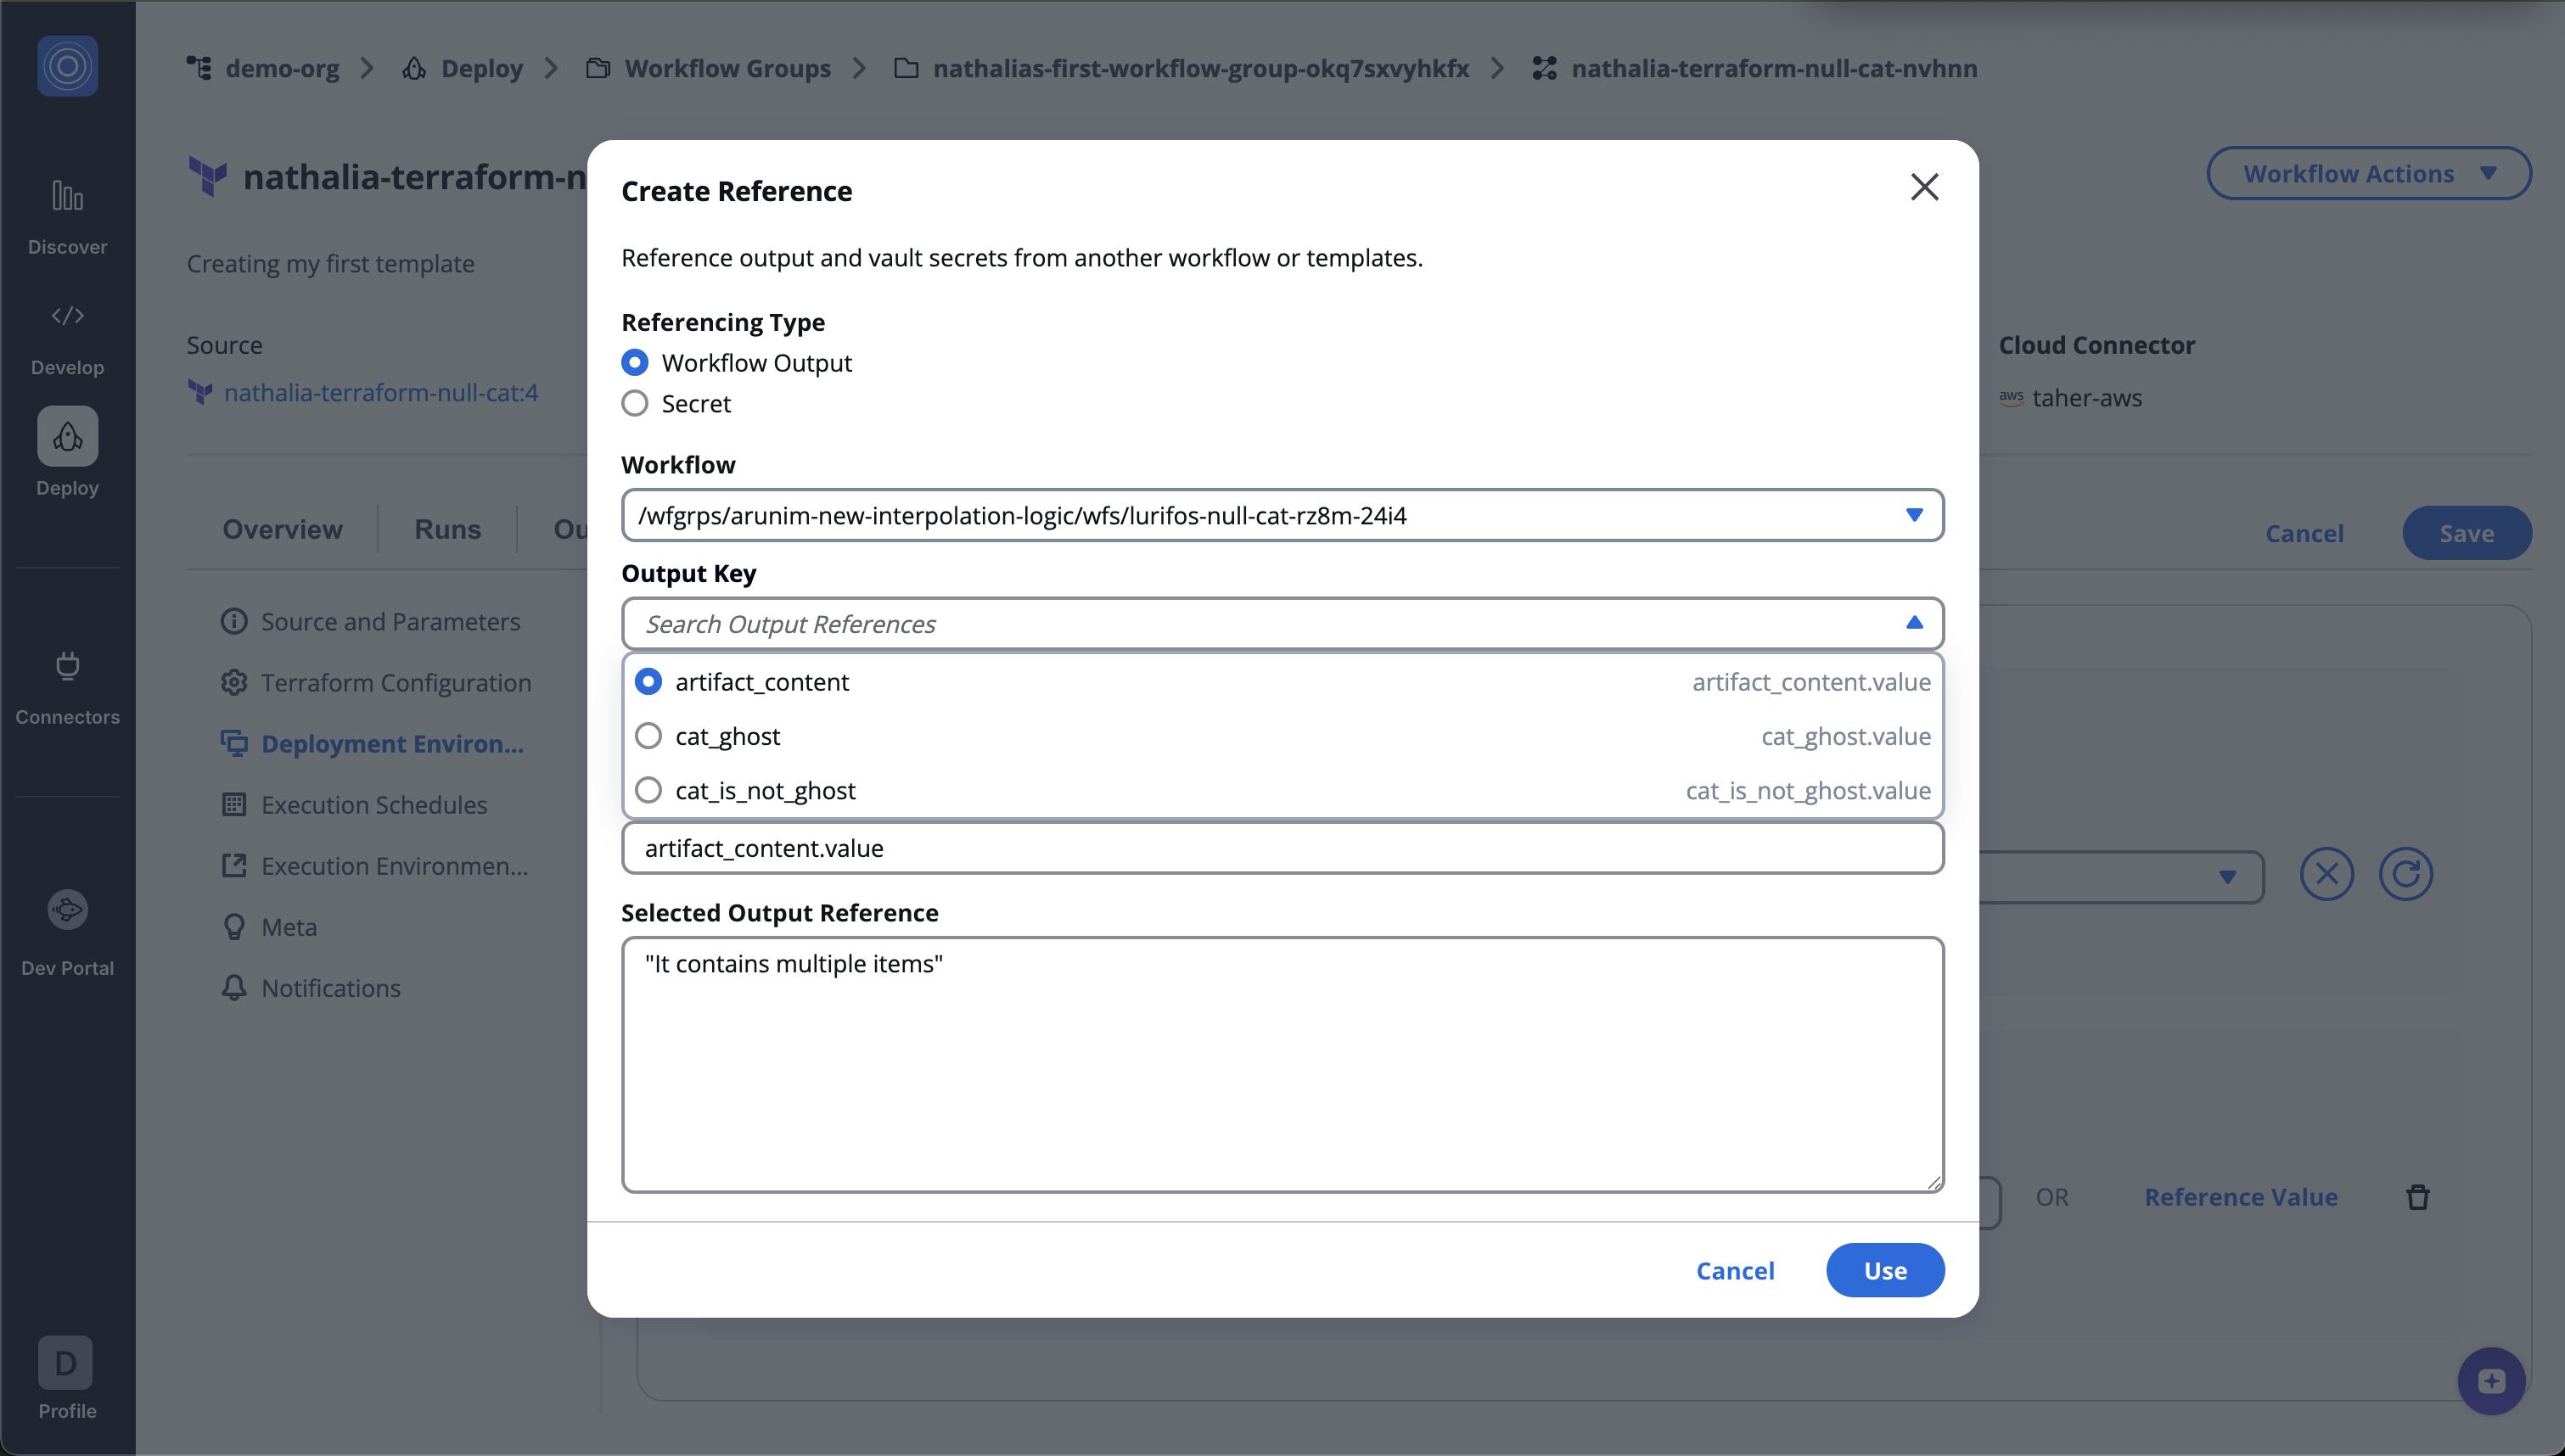
### Secret[](#secret "Direct link to Secret")
Similarly, referencing **secrets** is straightforward. Select any item from your **Vault** for reference.
Reference variable structure: `${secret::vault_name}`
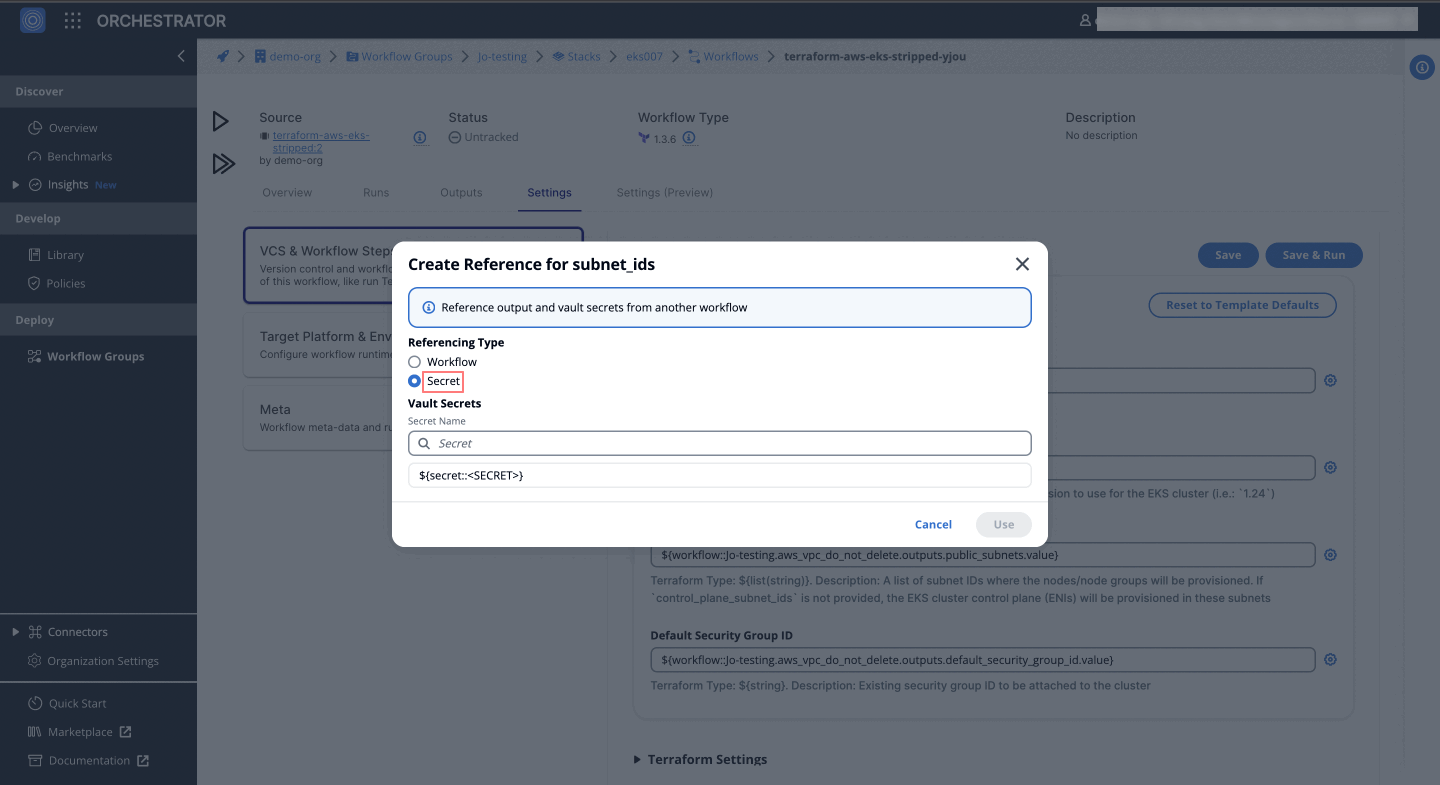
### External Secret (Azure Key Vault)[](#external-secret "Direct link to External Secret (Azure Key Vault)")
When configuring an **External Secret** reference, provide the following information:
* Key Vault Name (required): The name of your external vault or secret store
* Secret Name (required): The specific secret identifier within the vault
* Version (optional): The version of the secret to retrieve. Leave blank to use the latest version
The authorization for accessing external secrets is based on the workflow's Deployment and Environment Configuration.
Reference variable structure: `${ext-secret::azure-kv::.[.]}` (the version is optional)
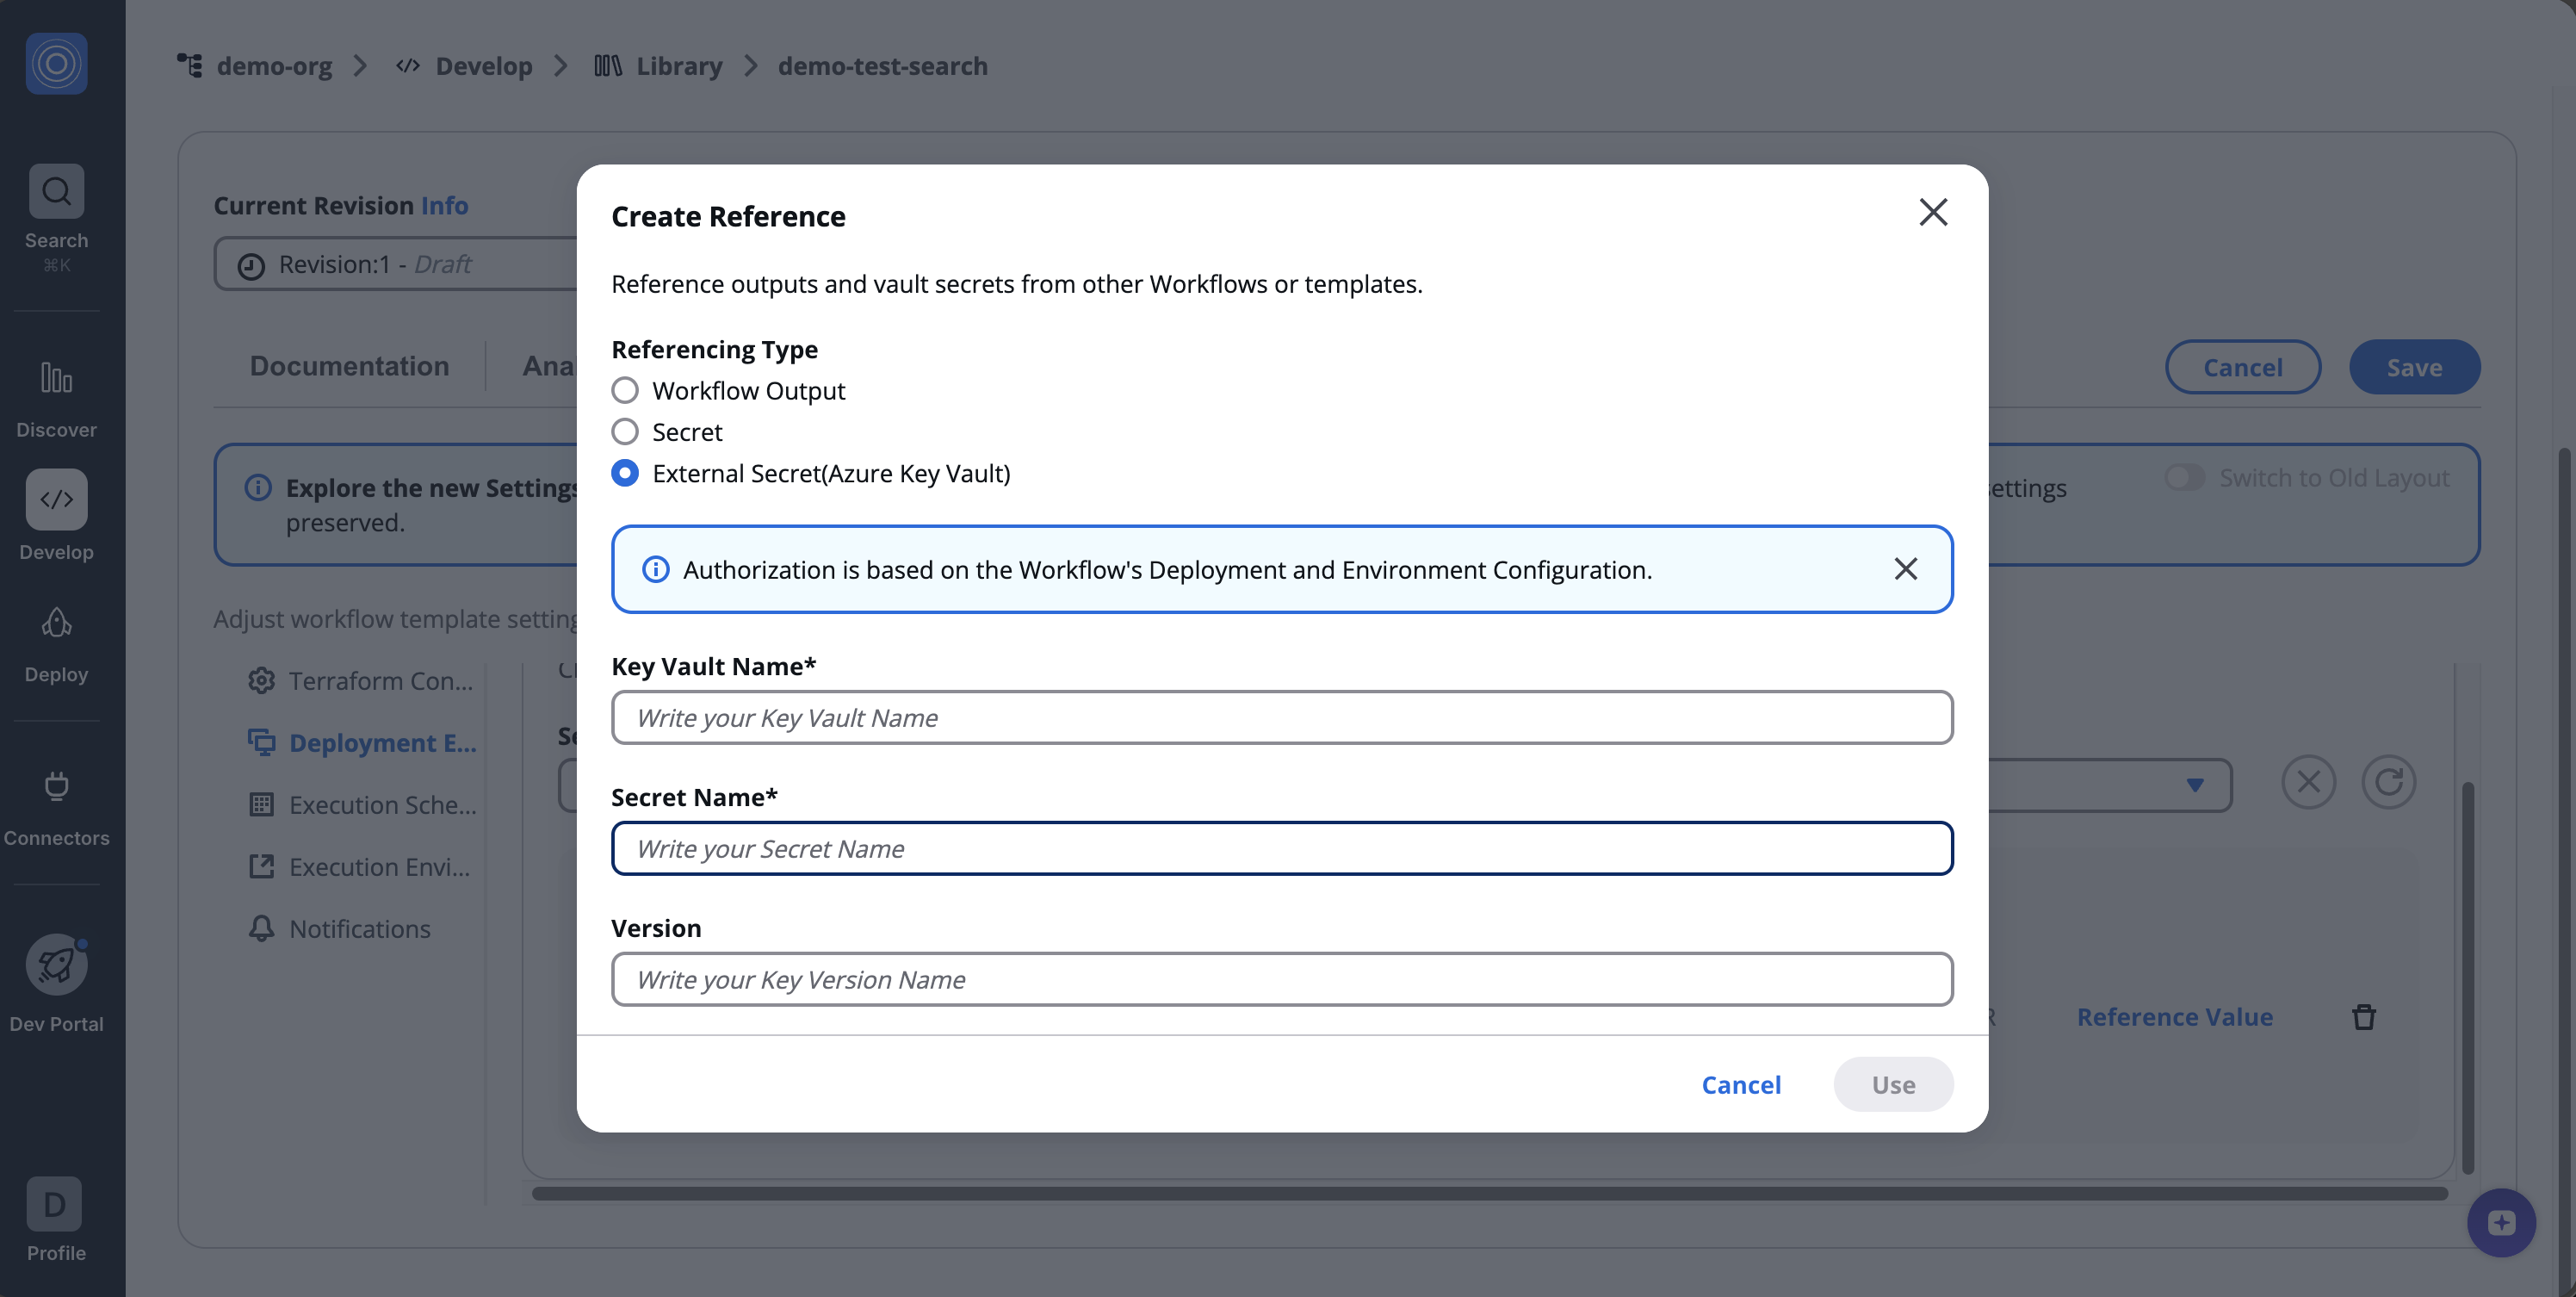
### Template[](#template "Direct link to Template")
Navigate to **Develop** -> **Library** -> **Organization Templates** -> **Workflow & Stack Templates** and select create template and then stack template To connect different templates within your Stack, select a template and proceed as follows:
In the '**Environment Variable**' field, click the *settings* icon and select '**Template**' type. Then, choose a template from the dropdown for reference and specify the "**Output Key**".
Reference variable structure: `${reference::template-group.0.outputs.cluster_name}`
## Viewing Output Variables[](#viewing-output-variables "Direct link to Viewing Output Variables")
To review all reference variables in your workflow, go to **Orchestrator** > **Workflow Groups** and select the pertinent workflow. Under the "**Outputs**" tab, locate "**Workflow Outputs**" to see all *reference points* for an active workflow. Each point has associated values, which can be copied using the settings icon.

---
# Runs Tab
The **Runs** tab lists all workflow executions (runs) and their statuses.
## Runs list[](#runs-list "Direct link to Runs list")
Displays a list of all workflow runs.
Each run entry shows:
* Run ID and trigger source (manual, scheduled, API)
* Latest status (Queued, Pending, In Progress, Running, Succeeded, Failed )
* Context tags
* Created by
* Modified at
* Source
* Approval detail
You can search by name and **filter** or **sort** runs by actions, status and context tags. You can also cancel the active runs by clicking the red button in the **Latest status** column.
*Runs list*
## Run details view[](#run-details-view "Direct link to Run details view")
Clicking a workflow run ID opens a detailed execution view that includes:
* Logs
* Errors
* Compare parameters
* Parameters
* Compliance Checks
* Infracost Estimation
* Plan
* Provisioned Resources
* Comments
This section helps users analyze executions, review outcomes and troubleshoot issues effectively.
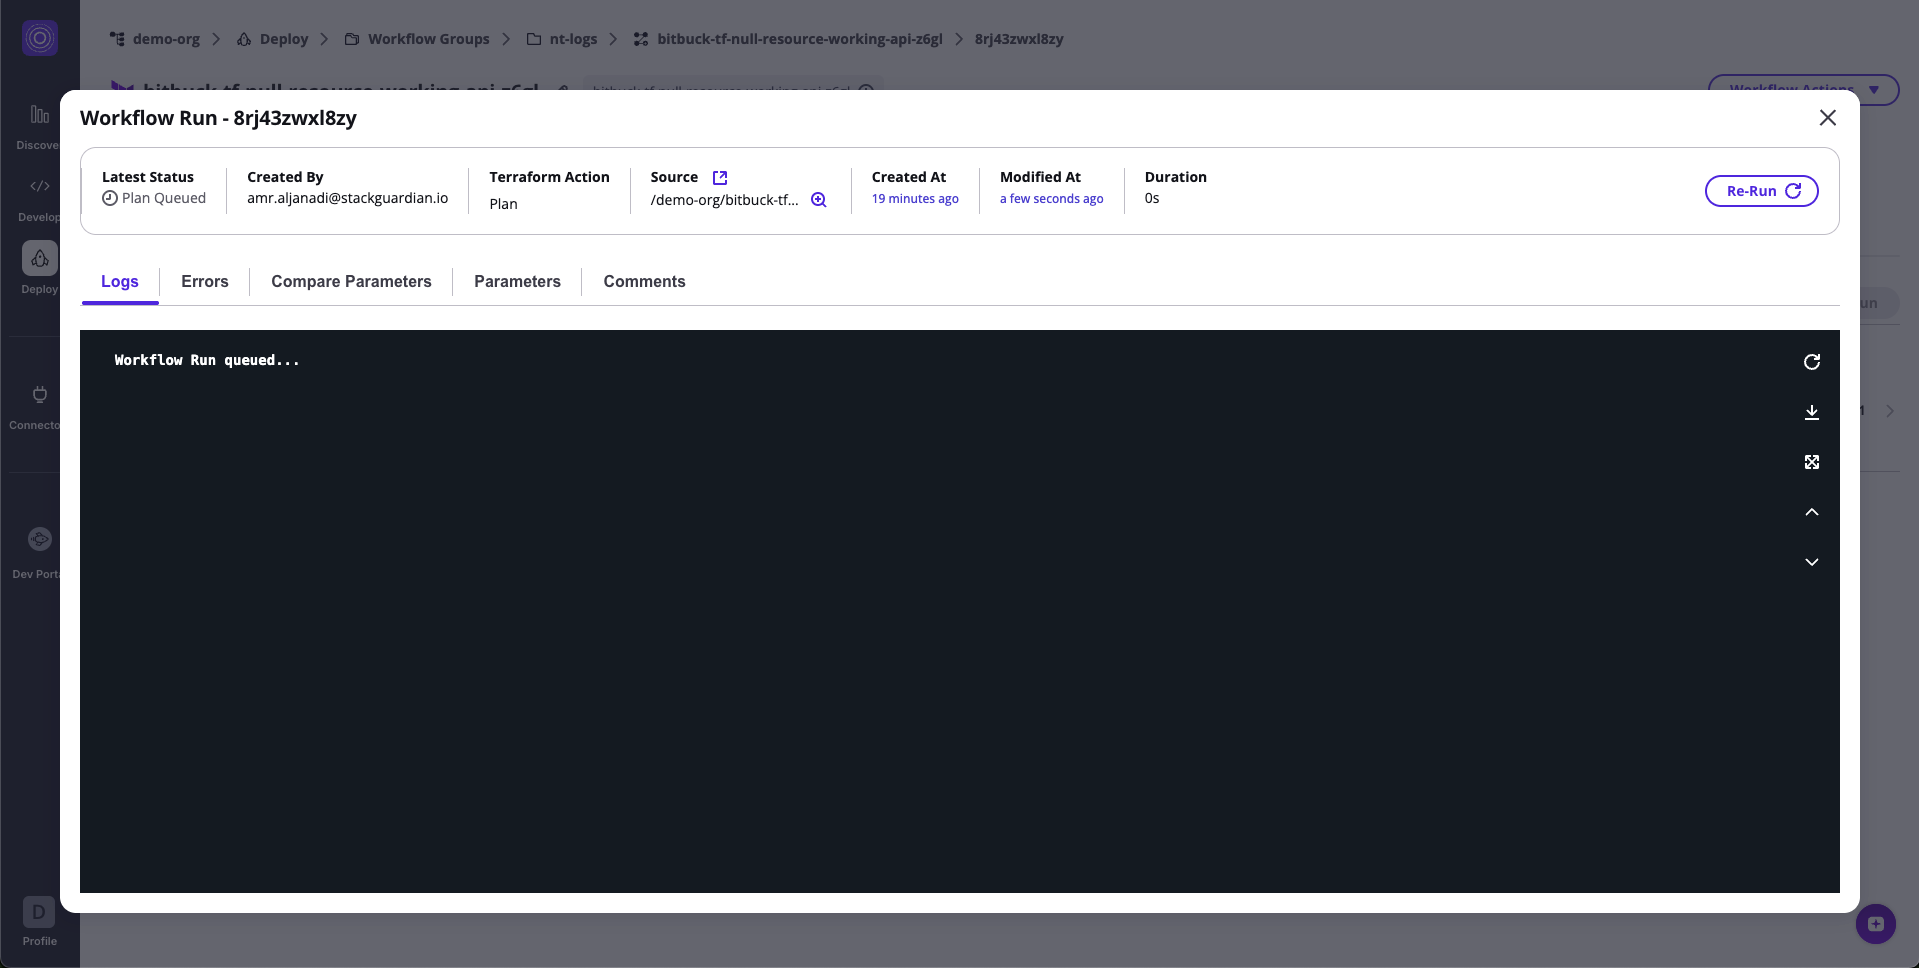
*Run details view*
## Accessing workflow files[](#accessing-workflow-files "Direct link to Accessing workflow files")
StackGuardian simplifies accessing and working with workflow files by providing a dedicated workspace for users to manage their workflow runs. Below are the file paths and directories available within the user's workspace for running their workflows:
**Mount Workflow Files in Workflow Steps**
1. **Root Directory: `/mnt/sg_workspace`**
* This serves as the starting point for accessing all workflow files.
2. **Workflow Steps Directory:**
* **Path**: `/mnt/sg_workspace/user/{repository-name}`
* This directory contains the version control system (VCS) repository, named after the repository's name, and includes all the files from the user's repository.
* **Note**: A `tfplan.json` file is also available in this directory after the Terraform plan step completes. This file is accessible both pre-apply and post-apply.
**Example**:
`/mnt/sg_workspace/user/template-tf-aws-s3-demo-website/tfplan.json`
3. **Artifacts directory:**
* This directory stores all the artifacts generated by the workflow steps. It is crucial for accessing any outputs or logs produced during the workflow run.
Understanding these file paths and directories helps users customize or further process files within the Terraform workflow. It provides a clear structure for accessing and managing files throughout the workflow run.
## Private module VCS Auth in workflows[](#private-module-vcs-auth-in-workflows "Direct link to Private module VCS Auth in workflows")
In order to fetch private modules from version control repositories, you can authenticate correctly using the following ways:
* **Integration**: StackGuardian integrates with Bitbucket, Azure DevOps, and GitHub. When creating a workflow, you provide the **repository URL** and **credentials** within the `VCS settings`. If your repository is *private*, StackGuardian uses these credentials to fetch the required code during workflow runs.
* **Secrets**: Optionally, you can use secrets to manage your authentication credentials. Create a secret with the format `username:password` or just the password, where the default username is `x-access-token`. Secrets provide a more secure way to store sensitive information.
### Fetching private modules[](#fetching-private-modules "Direct link to Fetching private modules")
When utilizing private modules in your workflow, follow this format for your module block:
```
module "vpc" {
source = "git::https://example.com/vpc.git"
}
```
note
Ensure that the repository URL is in the HTTPS format as shown above. It's common to mistakenly use the generic Git repository URL, which might not work as expected.
---
# 4. Execution Schedules
The **Execution Schedules** section automates workflow runs on a fixed or recurring basis — enabling continuous operations like nightly builds, compliance checks, or Terraform drifts without manual intervention.
This feature is available for both **Custom** and **Terraform/OpenTofu** workflows, and can manage **multiple active schedules** simultaneously.
***
## 4.1 Overview[](#41-overview "Direct link to 4.1 Overview")
The **Execution Schedules** tab, under **Settings**, allows users to define, edit, or delete scheduled runs for a workflow.
You can:
* Add multiple schedules with different recurrence settings
* Enable or disable individual schedules
* Apply Infrastructure-as-Code (IaC) variables for scheduled runs
* Manage or bulk delete schedules
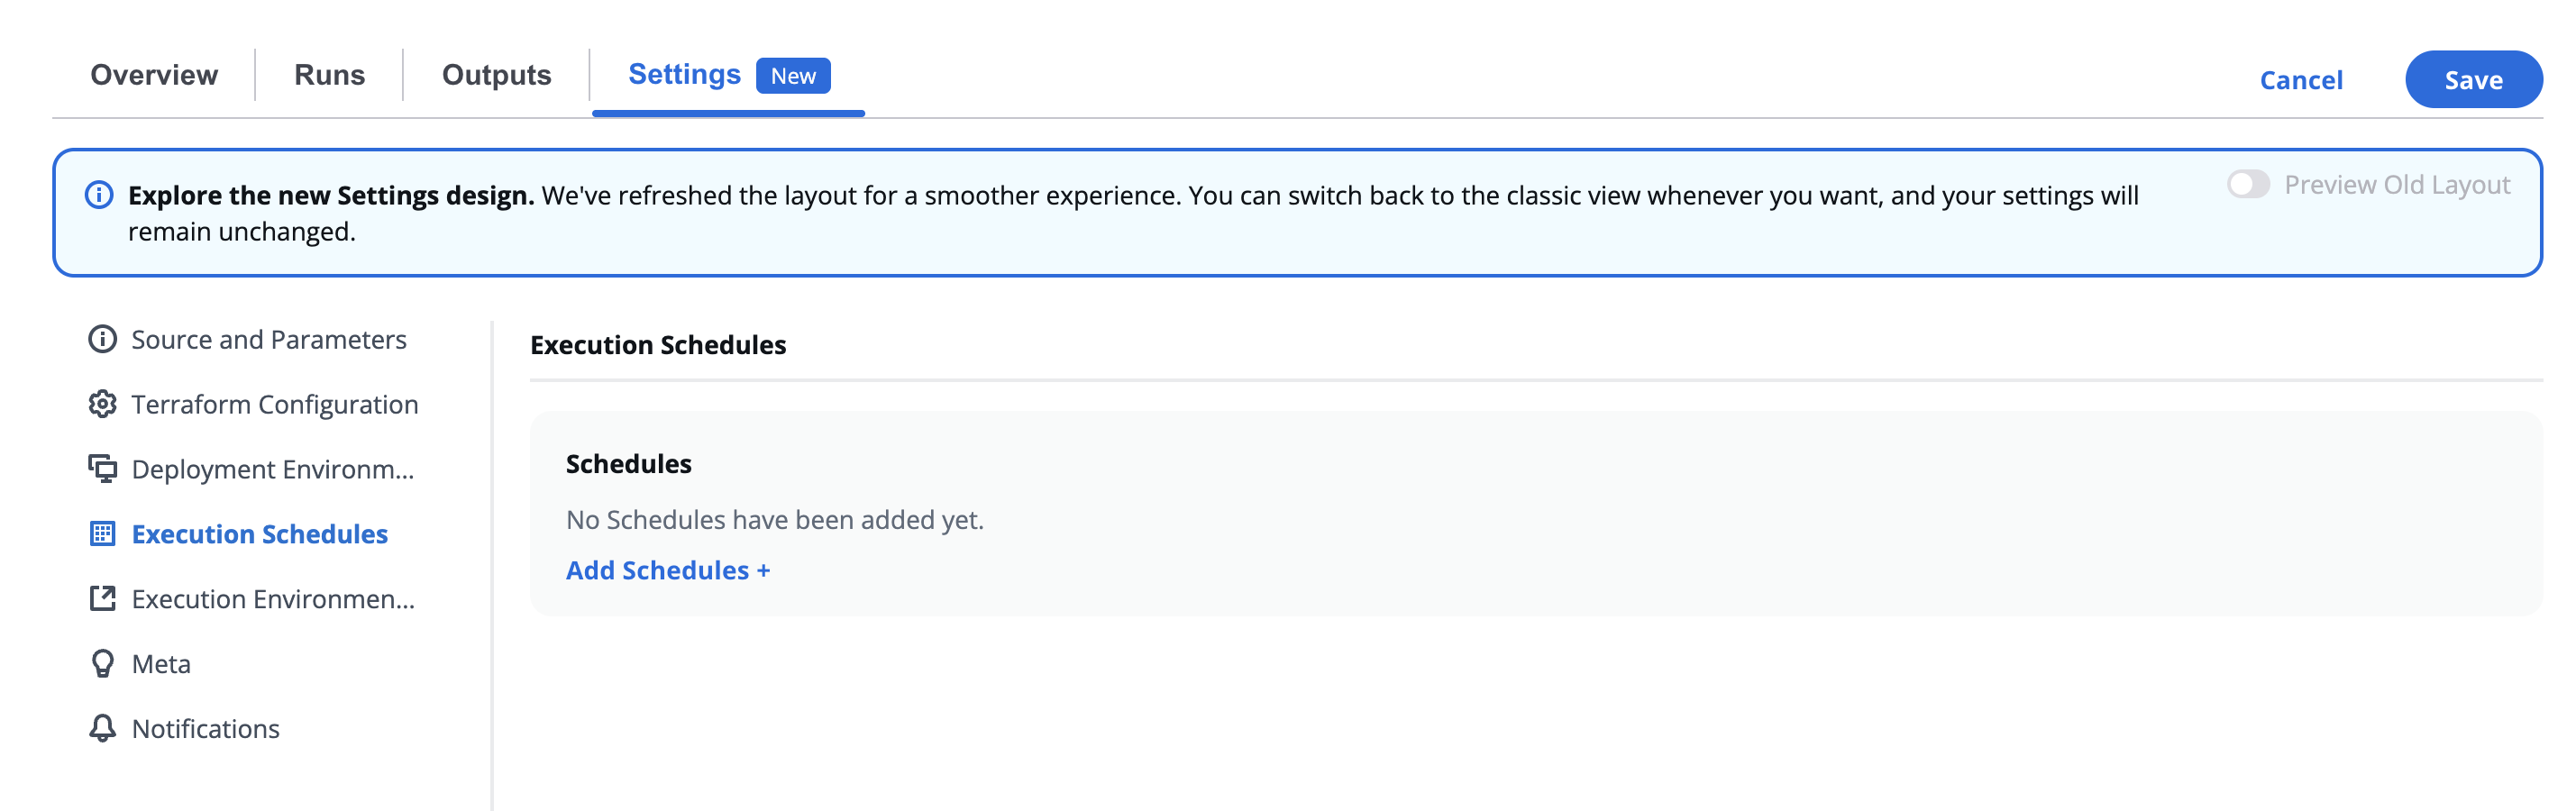
> ⚙️ Automated schedules ensure workflows execute consistently, improving operational reliability and governance.
***
## 4.2 Managing Multiple Schedules[](#42-managing-multiple-schedules "Direct link to 4.2 Managing Multiple Schedules")
When one or more schedules are created, they appear in a table view.
| Feature | Description |
| ------------------- | ---------------------------------------------------------------- |
| **Select All** | Selects all existing schedules for bulk actions. |
| **Delete Selected** | Removes all checked schedules. |
| **Schedule Name** | Each schedule is listed with a unique name (e.g., *Schedule 1*). |
| **Add Schedules +** | Opens the configuration form for creating a new schedule. |
| **Clone Schedules** | Clone existing schedules for more flexibility and ease |
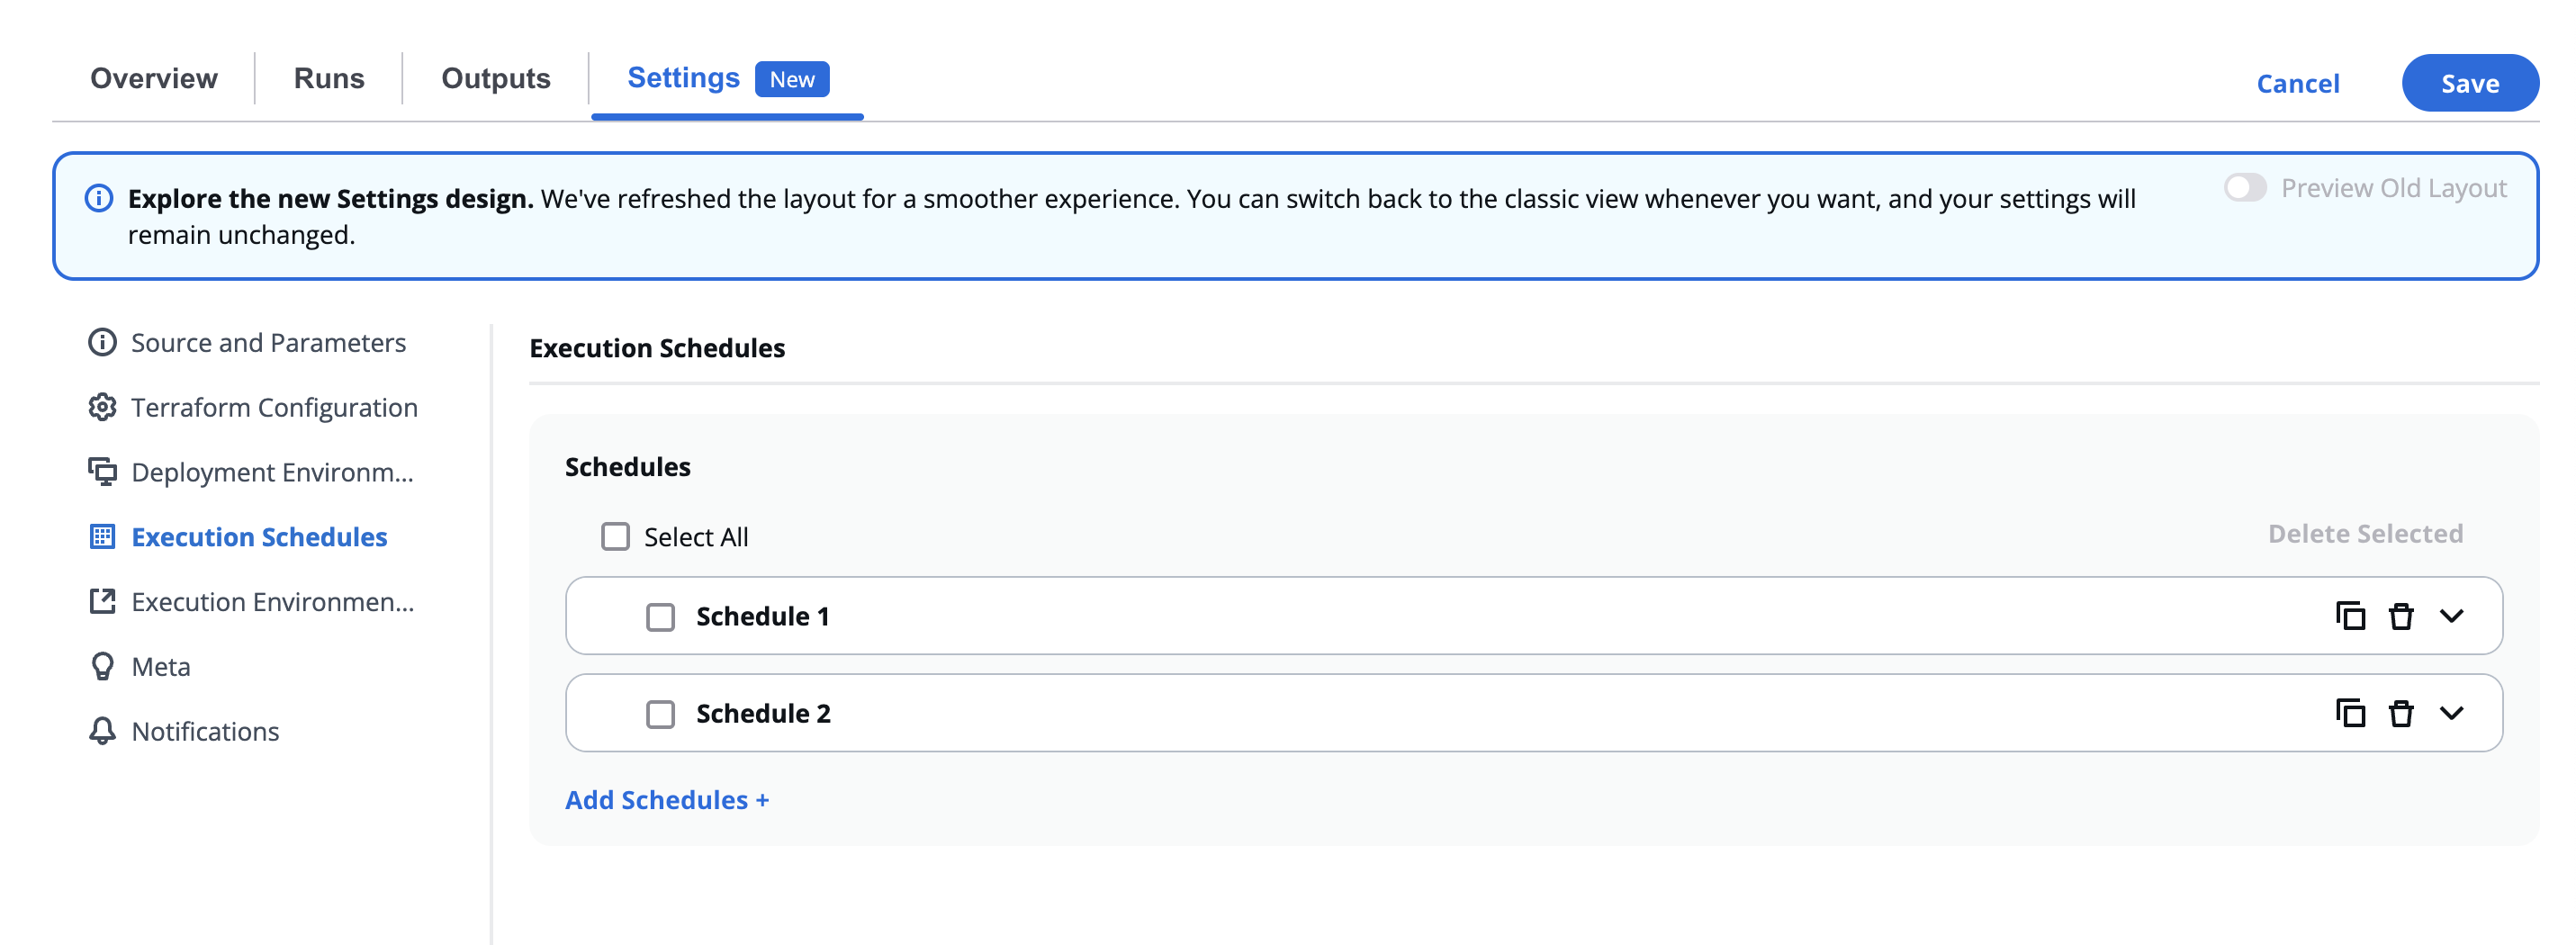
Each schedule can be individually toggled, edited, or deleted.
This multi-schedule feature is especially helpful for workflows that require different run cadences — for instance:
* **Daily:** Terraform plan validation
* **Weekly:** Security compliance check
* **Monthly:** Cost optimization audit
***
## 4.3 Adding or Editing a Schedule[](#43-adding-or-editing-a-schedule "Direct link to 4.3 Adding or Editing a Schedule")
Click **Add Schedules +** (or edit an existing one) to open the schedule configuration form.
| Field | Description |
| --------------- | --------------------------------------------------------------- |
| **Enabled** | Toggles the schedule on or off. |
| **Description** | Optional field for identifying the purpose of the schedule. |
| **Schedule**\* | Defines recurrence — choose between preset or custom intervals. |
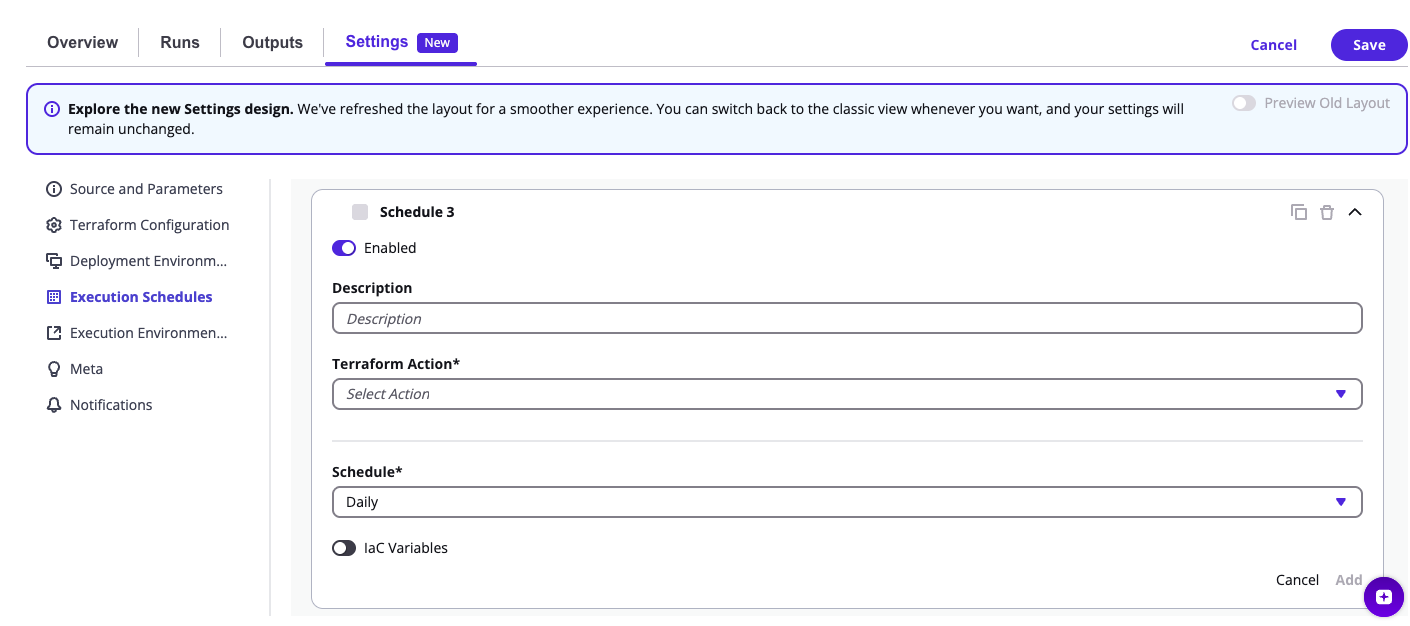
***
## 4.4 Schedule Frequency Options[](#44-schedule-frequency-options "Direct link to 4.4 Schedule Frequency Options")
| Option | Description |
| ----------------- | ------------------------------------------------ |
| **Weekly** | Runs every Monday at 12:00 (noon). |
| **Daily** | Runs every day at 12:00 (noon). |
| **Every 6 Hours** | Runs at 00:00, 06:00, 12:00, and 18:00 UTC. |
| **Every 2 Hours** | Runs at 2-hour intervals. |
| **Custom** | Allows defining an advanced **cron expression**. |
> 💡 The system automatically converts UTC-based times into your local timezone for preview.
***
## 4.5 Custom Schedule (Cron Syntax)[](#45-custom-schedule-cron-syntax "Direct link to 4.5 Custom Schedule (Cron Syntax)")
When **Custom** is selected, detailed **cron (UTC+0)** fields appear.
You can define each time unit manually for complete flexibility.
| Field | Description |
| ---------------- | ------------------------------------------ |
| **Minutes** | Minute(s) of execution (0–59). |
| **Hours** | Hour(s) of execution (0–23). |
| **Day of Month** | Days to execute (1–31 or \* for all). |
| **Month** | Month(s) of execution (1–12 or JAN–DEC). |
| **Day of Week** | Days of the week (0–6 or SUN–SAT). |
| **Year** | Optional, to limit runs to specific years. |
Below the cron fields, a **Next 5 Iterations** section automatically displays upcoming scheduled run times in both **UTC** and **local timezone**.
Example:
```
Minutes: 0
Hours: 11
Day of Month: *
Month: *
Day of Week: ?
Year: *
```
**Result:**
Runs daily at **11:00 UTC (12:00 Europe/Rome)**.
> Cron scheduling allows precise timing for maintenance windows, testing cycles, or recurring operations.
***
## 4.6 IaC Variables[](#46-iac-variables "Direct link to 4.6 IaC Variables")
The **IaC Variables** section defines environment-specific variables used during scheduled runs.
When enabled, a **JSON editor** appears — allowing you to write or paste variable definitions directly in structured format.
Example:
```
{
"environment": "production",
"region": "us-east-1",
"backup_enabled": true}
```
These variables are passed into the workflow at runtime, ensuring consistent configuration across all scheduled executions.
| Field | Description |
| ------------------------ | ---------------------------------------------- |
| **IaC Variables Toggle** | Enables or disables custom variable injection. |
| **Code Editor** | Define JSON-formatted variable sets. |
> This feature is especially useful for Terraform and Ansible workflows where variable consistency across time-based runs is critical.
***
## 4.7 Schedule Management Actions[](#47-schedule-management-actions "Direct link to 4.7 Schedule Management Actions")
Each existing schedule can be controlled directly from the main list:
| Action | Description |
| --------------------------- | ----------------------------------------------------------- |
| **Edit** | Modify frequency, description, or variables. |
| **Delete** | Permanently remove a schedule. |
| **Duplicate** | Clone an existing schedule configuration for reuse. |
| **Enable / Disable Toggle** | Temporarily pause or resume a schedule without deleting it. |
> These controls streamline workflow lifecycle automation and simplify complex scheduling setups.
---
# Settings Tab
The **Settings** tab defines the configuration, lifecycle, and automation behavior of your workflow.
It allows you to manage backend setup, approvals, drift detection, custom lifecycle steps, workflow chaining, and webhook triggers.
1. [**Source and Parameters**](/docs/deploy/workflows/workflow_components/source_parameters/)
2. [**Configuration**](/docs/deploy/workflows/workflow_components/workflow_config/)
3. [**Deployment Environment**](/docs/deploy/workflows/workflow_components/deployment_environment/)
4. [**Execution Schedules**](/docs/deploy/workflows/workflow_components/scheduled_workflow/)
5. [**Execution Environment**](/docs/deploy/workflows/workflow_components/execution_environment/)
6. [**Meta**](/docs/deploy/workflows/workflow_components/meta/)
7. [**Notifications**](/docs/deploy/workflows/workflow_components/notifications/)
---
# 1. Source and Parameters
This section controls where your workflow’s source code comes from and how its input variables are provided.
## Source Type[](#source-type "Direct link to Source Type")
There are two main ways to define the source:
* **Activated Templates** – Use pre-activated templates available within your organization.
Select from the list of existing templates and choose the desired revision.
* **Git Repository** – Connect directly to a version control system (e.g., GitHub, GitLab, Bitbucket, or custom Git).
Define the repository, authentication method, and branch or commit.
## Switching Source Type[](#switching-source-type "Direct link to Switching Source Type")
* Toggle **Change Source Type** to switch between **Activated Template** and **Git Repository** modes.
* Changing the source type allows you to migrate from a managed template to a Git-based configuration.
***
## Activated Templates Mode[](#activated-templates-mode "Direct link to Activated Templates Mode")
When using **Activated Templates**:
* **Template Selection** – Choose from available activated templates.
Each template includes details such as:
* Template Name
* Automation Tool (Terraform, Ansible, etc.)
* Status (Active/Inactive)
* Creation Date
* **Template Parameters** – Choose the template revision and define **Input Variable Methods**:
* `JSON-formatted input` – Enter variables in JSON format.
* **Review Link** – A shortcut to view the template definition or configuration.
> 💡 Use this mode when you want to quickly reuse organization-approved templates with standardized settings.
***
## Git Repository Mode[](#git-repository-mode "Direct link to Git Repository Mode")
When connecting directly to a Git repository:
* **Version Control** – Select a pre-configured VCS connector (e.g., `github_com`, `Git Others`) or add a new one.
* **Repository URL** – Provide the repository path, for example:
`https://github.com/org/project-template-tf`
* **Authentication Method** – Choose an authentication option for private repositories:
* `No Auth` – For public repositories
* Secret-based or integrated connectors – For private repos (e.g., `/secrets/vault-token`, `/integrations/github_com`)
* **Branch, Tag, or Commit** – Specify which version of the code to pull (e.g., `main`, `develop`, or a commit SHA).
* **Working Directory** – Define the path within the repository containing the IaC configuration (e.g., `/infra`, `/modules/vm`).
* **Sparse Checkout Config** *(optional)* – Use for partial repository checkout.
* **Enable git core.autocrlf** – Automatically converts line endings during checkout (recommended for Windows-based environments).
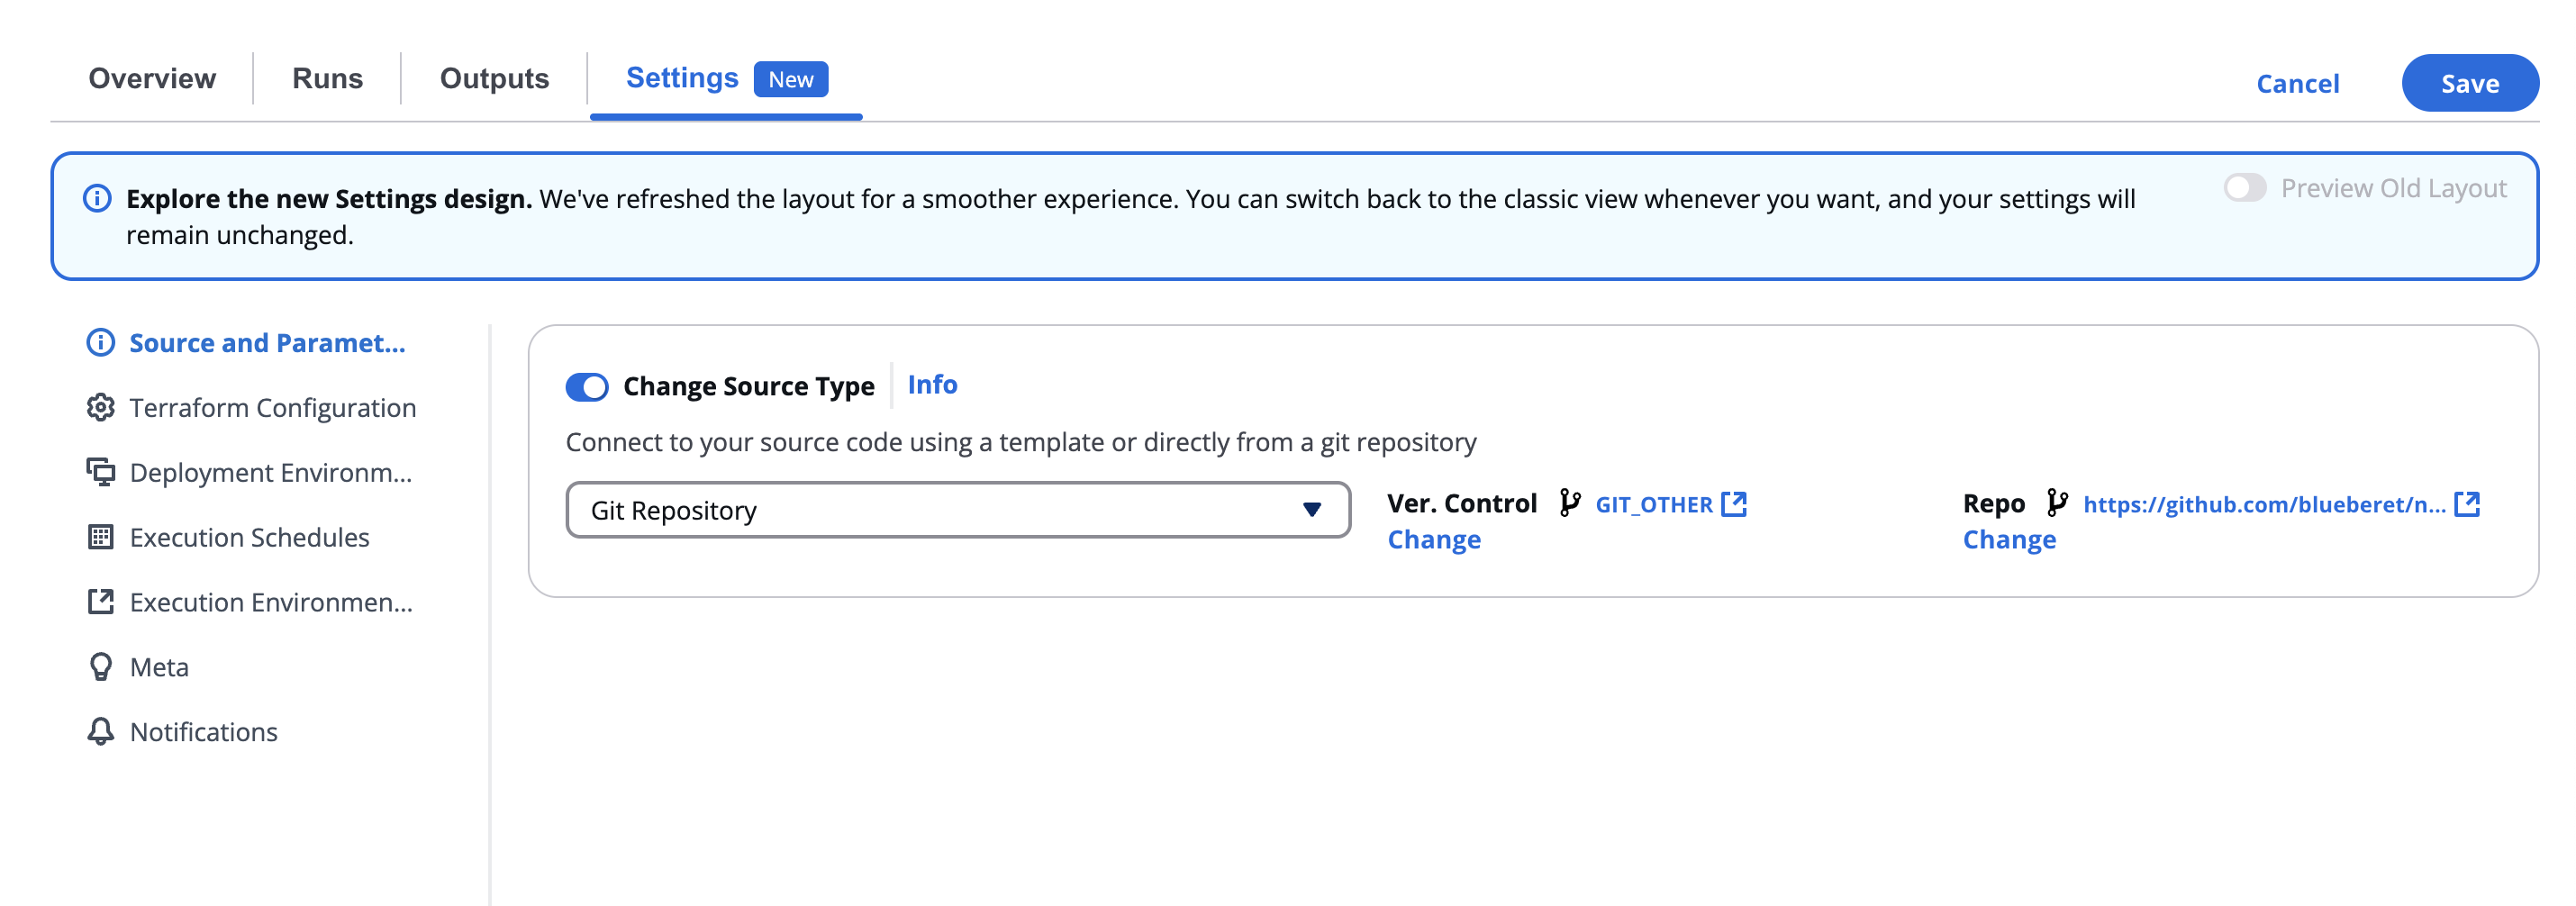
***
## Input Variables Methods[](#input-variables-methods "Direct link to Input Variables Methods")
Input variables define the configuration values passed into your IaC templates.
You can select one of the following input formats:
* **No Inputs** – Use when no external variables are needed.
* **JSON-formatted input** – Define variables directly as a JSON object.
* SG noCode
You can also:
* Add **IaC Variables** dynamically using the “Add IaC Variable +” option.
* Toggle **Show in Editor** to view or modify them inline.
> 🧩 IaC variables make workflows flexible and reusable across environments.
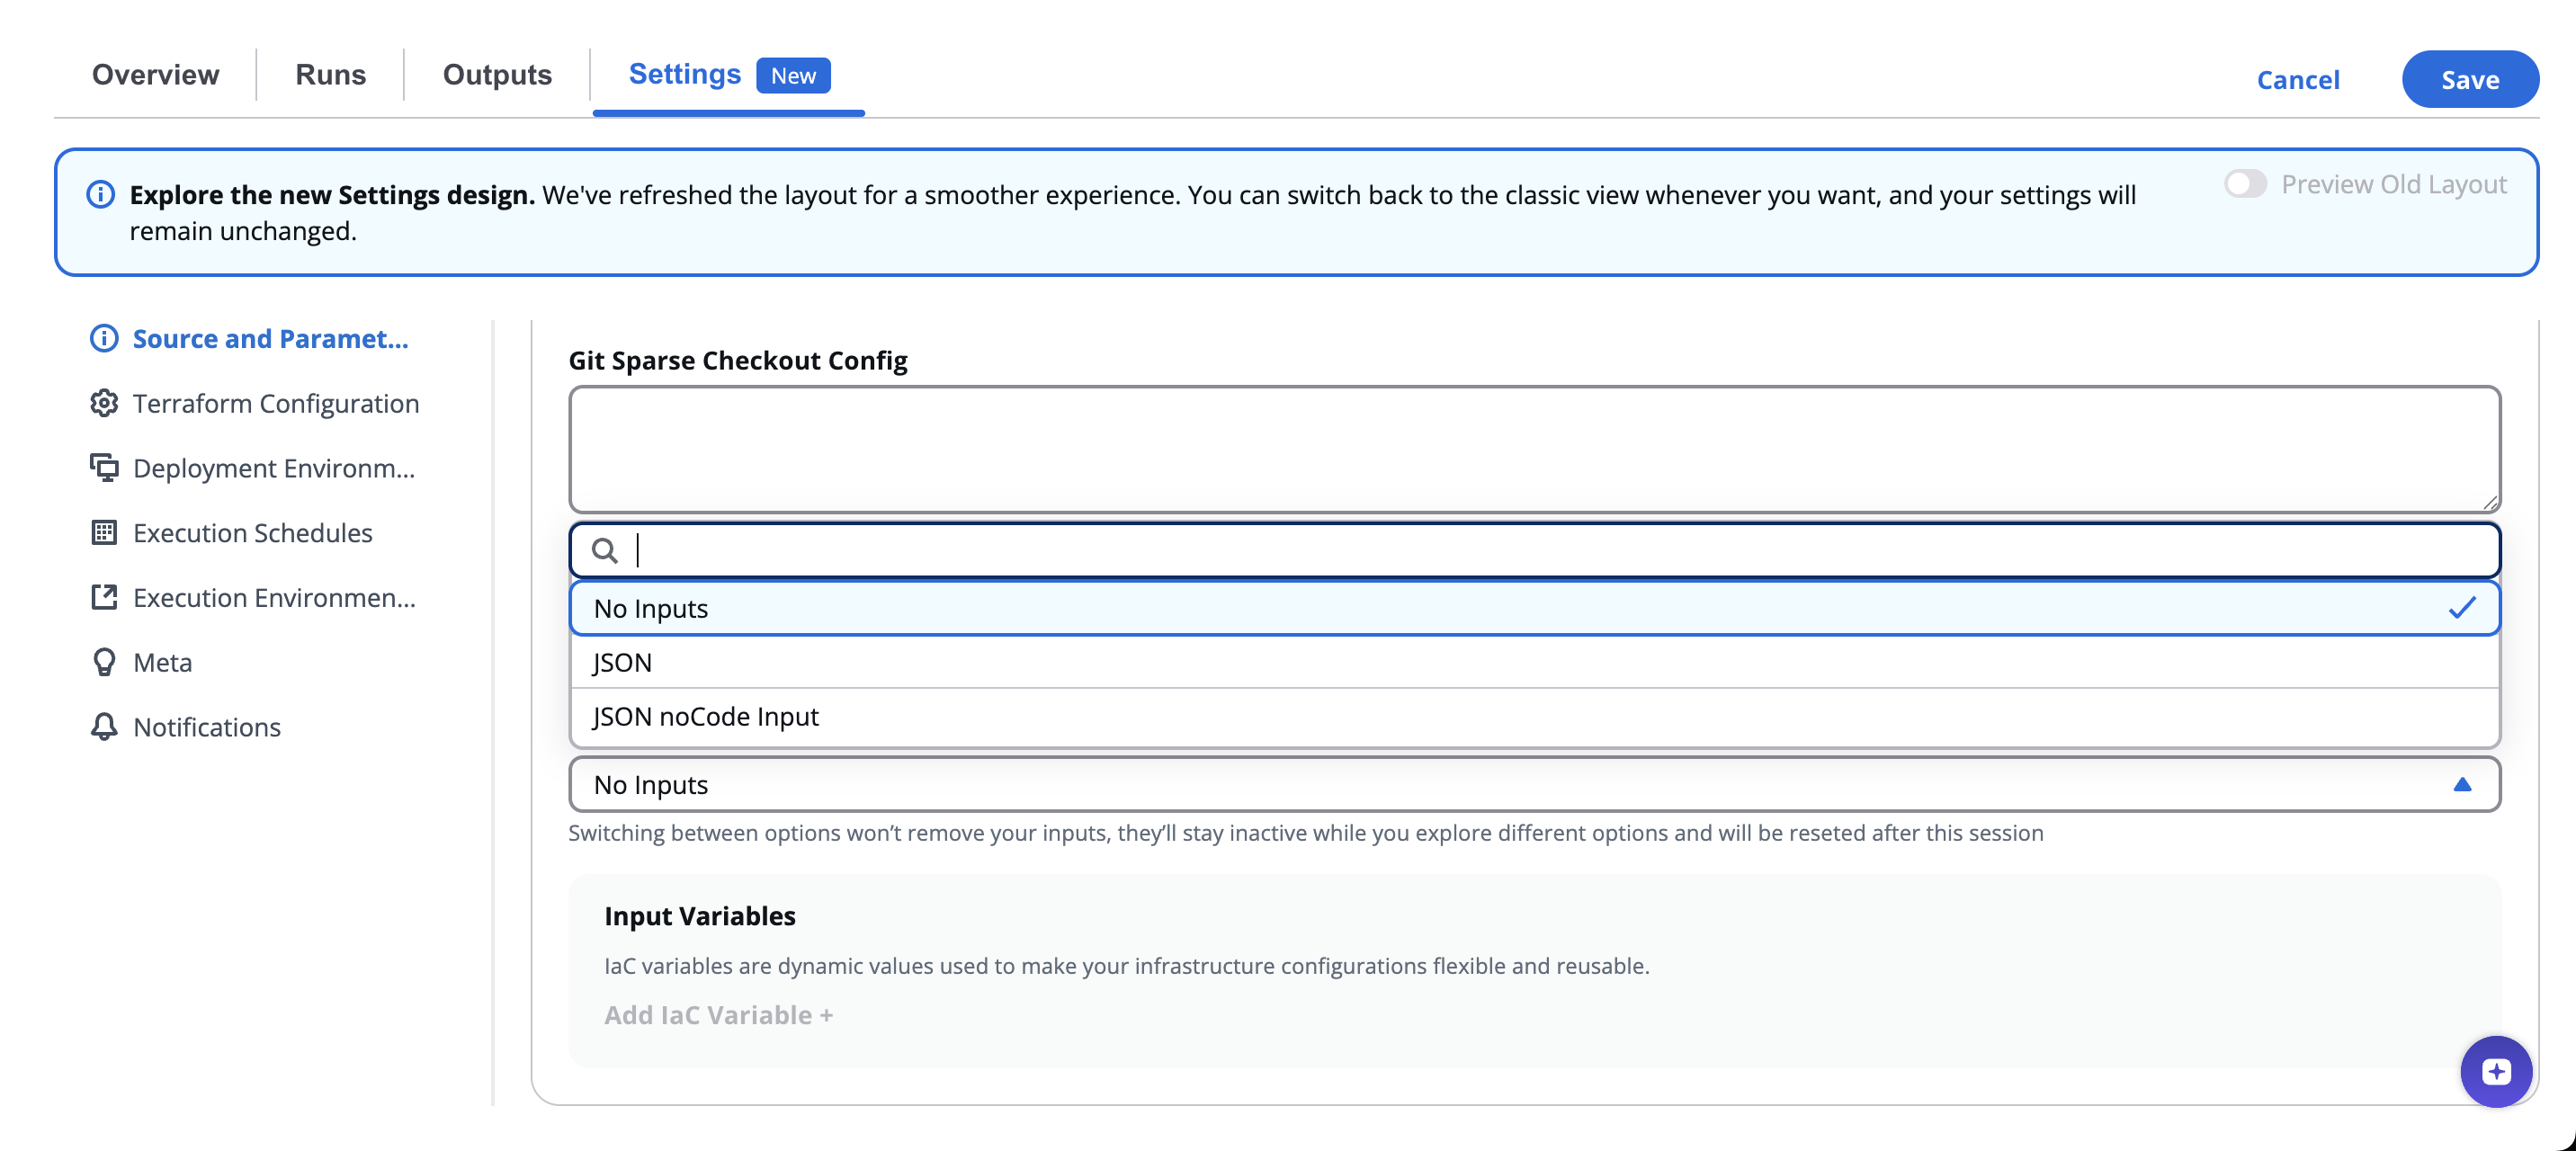
note
Your inputs won’t be lost when switching options — they’ll just be inactive while you explore and will reset when the session ends.
***
---
# 2.1. Terraform/OpenTofu Configuration
## Overview[](#overview "Direct link to Overview")
This configuration section defines how Terraform or OpenTofu executes within the workflow — including state management, approval checkpoints, drift detection, CLI customizations, and lifecycle extensions.
### SG Managed Terraform Backend[](#sg-managed-terraform-backend "Direct link to SG Managed Terraform Backend")
When enabled, StackGuardian manages Terraform state automatically, ensuring secure storage, versioning, rollback support, and collaborative execution. Disable this only if your Terraform code includes a custom backend configuration (such as S3, GCS, or Azure Storage).
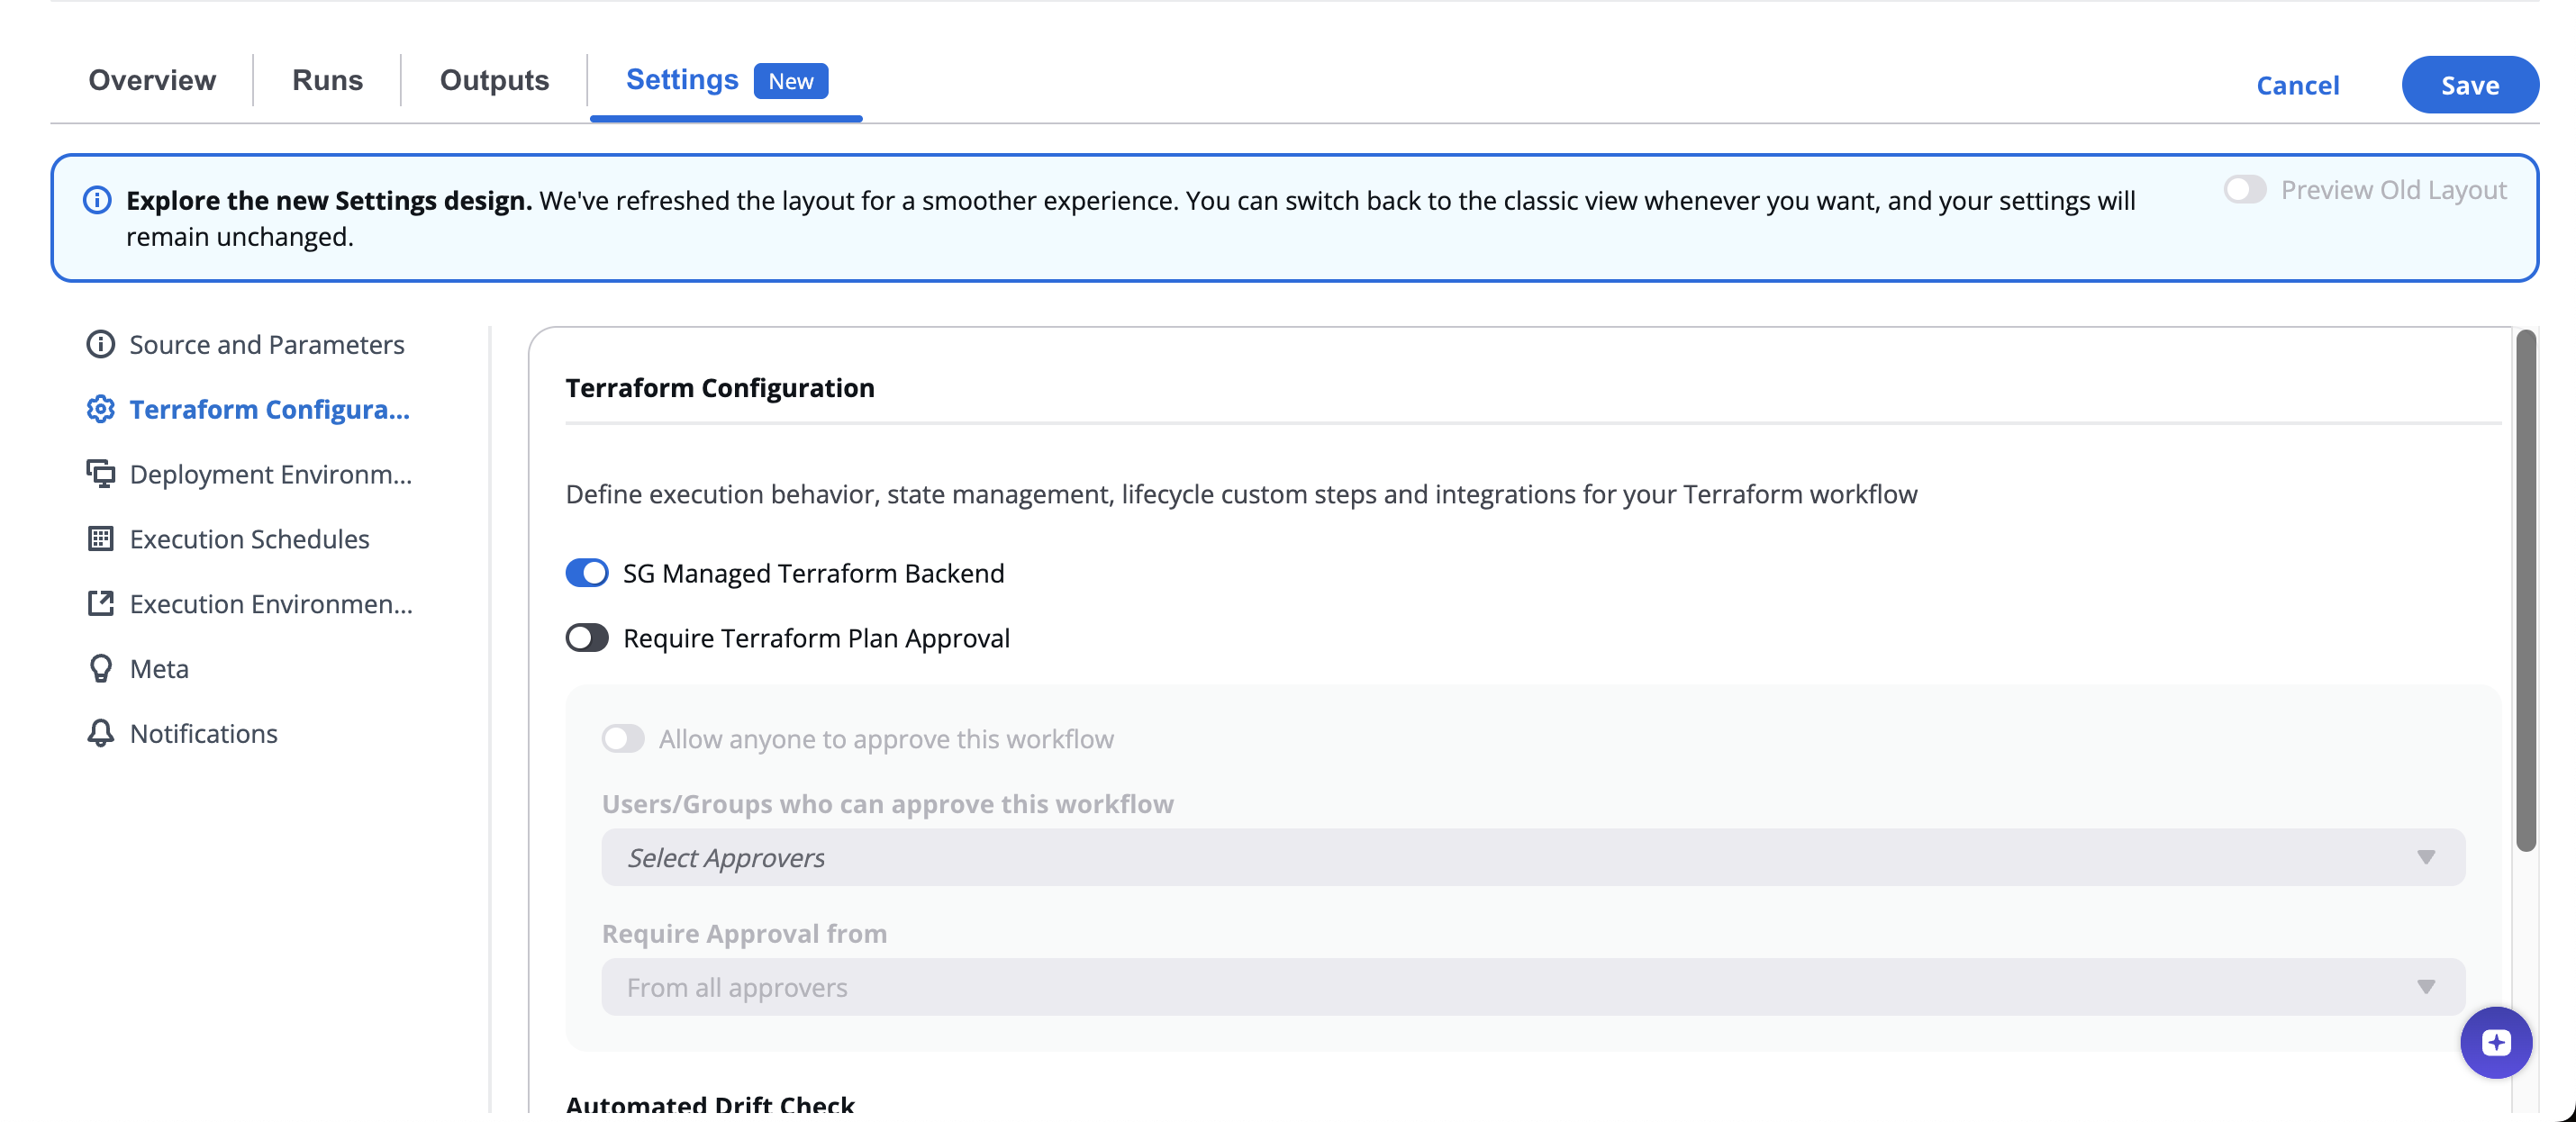
### Require Approval For Workflow Run[](#require-approval-workflow-run "Direct link to Require Approval For Workflow Run")
When enabled, Create and Destroy Workflow runs pause until the required approvals are met. This ensures changes are reviewed before deployment, supporting compliance and change-control processes.
The **Configure Approval** section appears with additional settings. These settings apply to the Workflow Run. Any [Lifecycle Custom Steps](#lifecycle-custom-steps) where approval is enabled inherit these settings:
| Setting | Description |
| ----------------------------------------- | ------------------------------------------------------------------------------------------------------------------------------------------------------------ |
| **Allow anyone to approve this workflow** | When enabled, any authenticated user can approve and only one approval is needed. The **Eligible Approvers** and **Required approvers** fields are disabled. |
| **Eligible Approvers** | Select the Users or User Groups who can approve this Workflow. You can combine multiple individual Users with User Groups. |
| **Required approvals** | Set the minimum number of approvals needed before the run can proceed (for example, "From at least 1 approver"). |
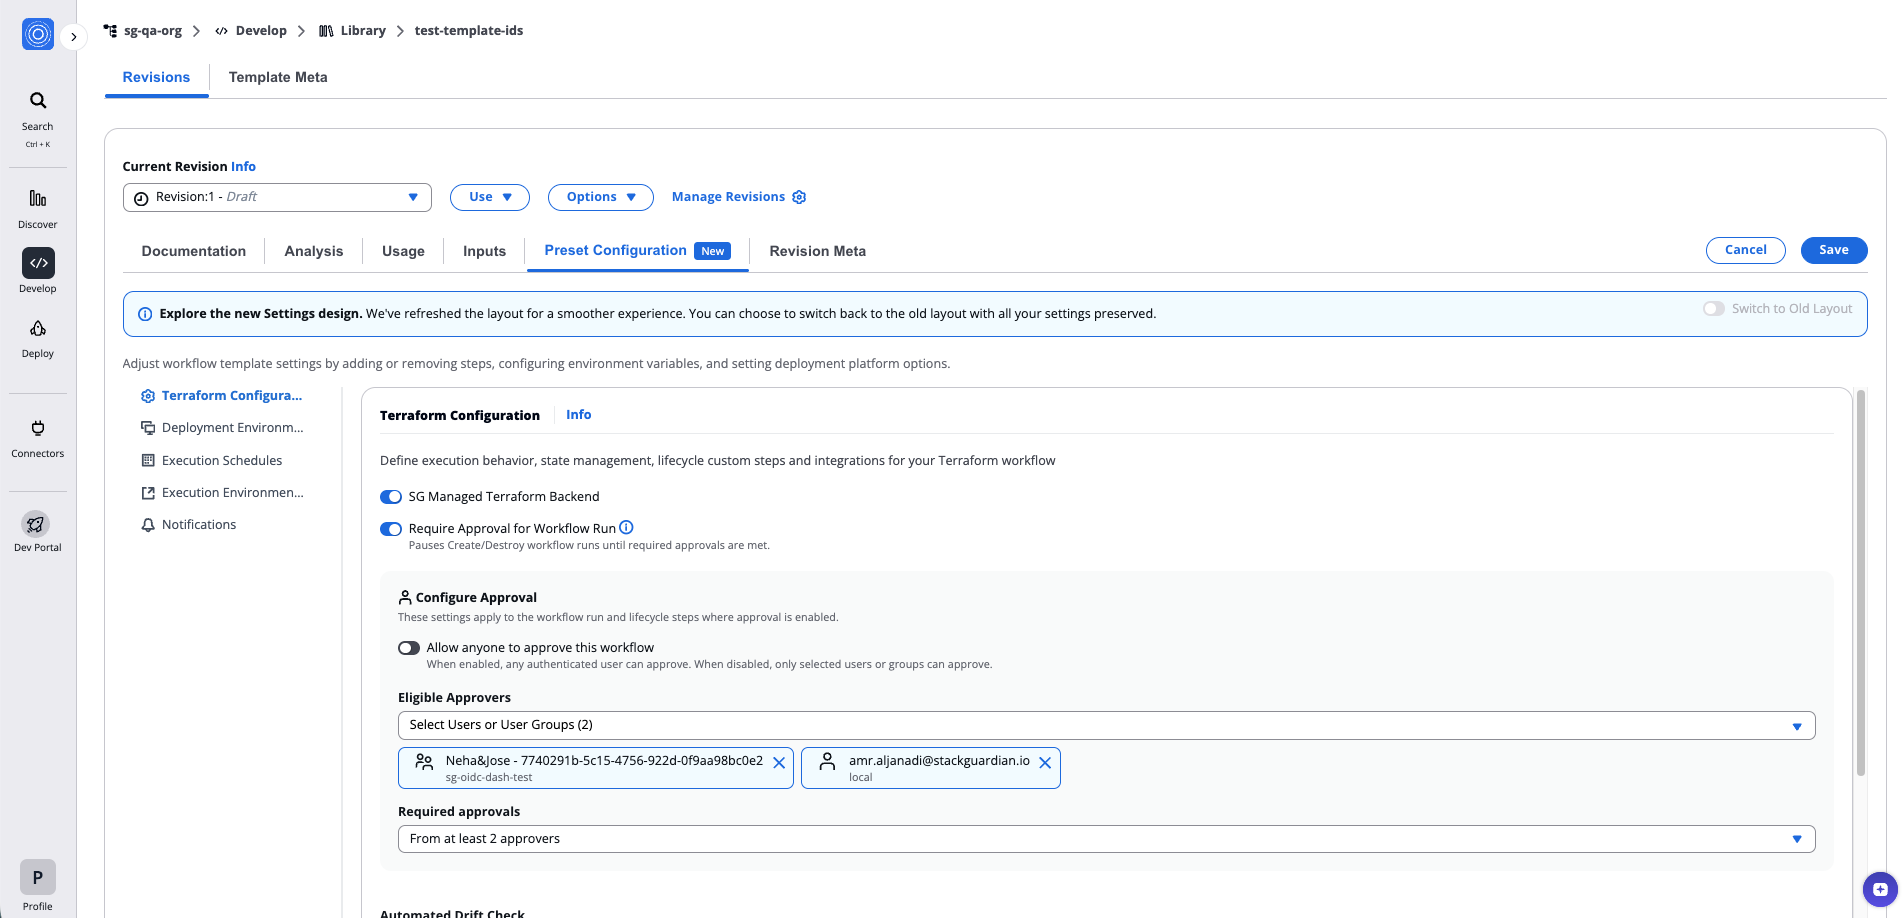
*Require Approval for Workflow Run*
info
For details on how to review and approve workflow runs, approval logic for mixed identity types, and external approval systems, see [Review and approve Workflow Runs](/docs/deploy/workflows/workflow_components/approvals_config/).
### Automated Drift Detection[](#automated-drift-detection "Direct link to Automated Drift Detection")
Drift detection identifies differences between the deployed infrastructure and the Terraform configuration.
Options include:
* **None** – Disable drift detection.
* **Weekly / Daily / Every 6 Hours / Every 2 Hours** – Predefined schedules.
* **Custom** – Use a cron expression for precise control.
When selecting **Custom**, the interface provides fields for minute, hour, day, and month parameters, plus a preview of the next five runs.
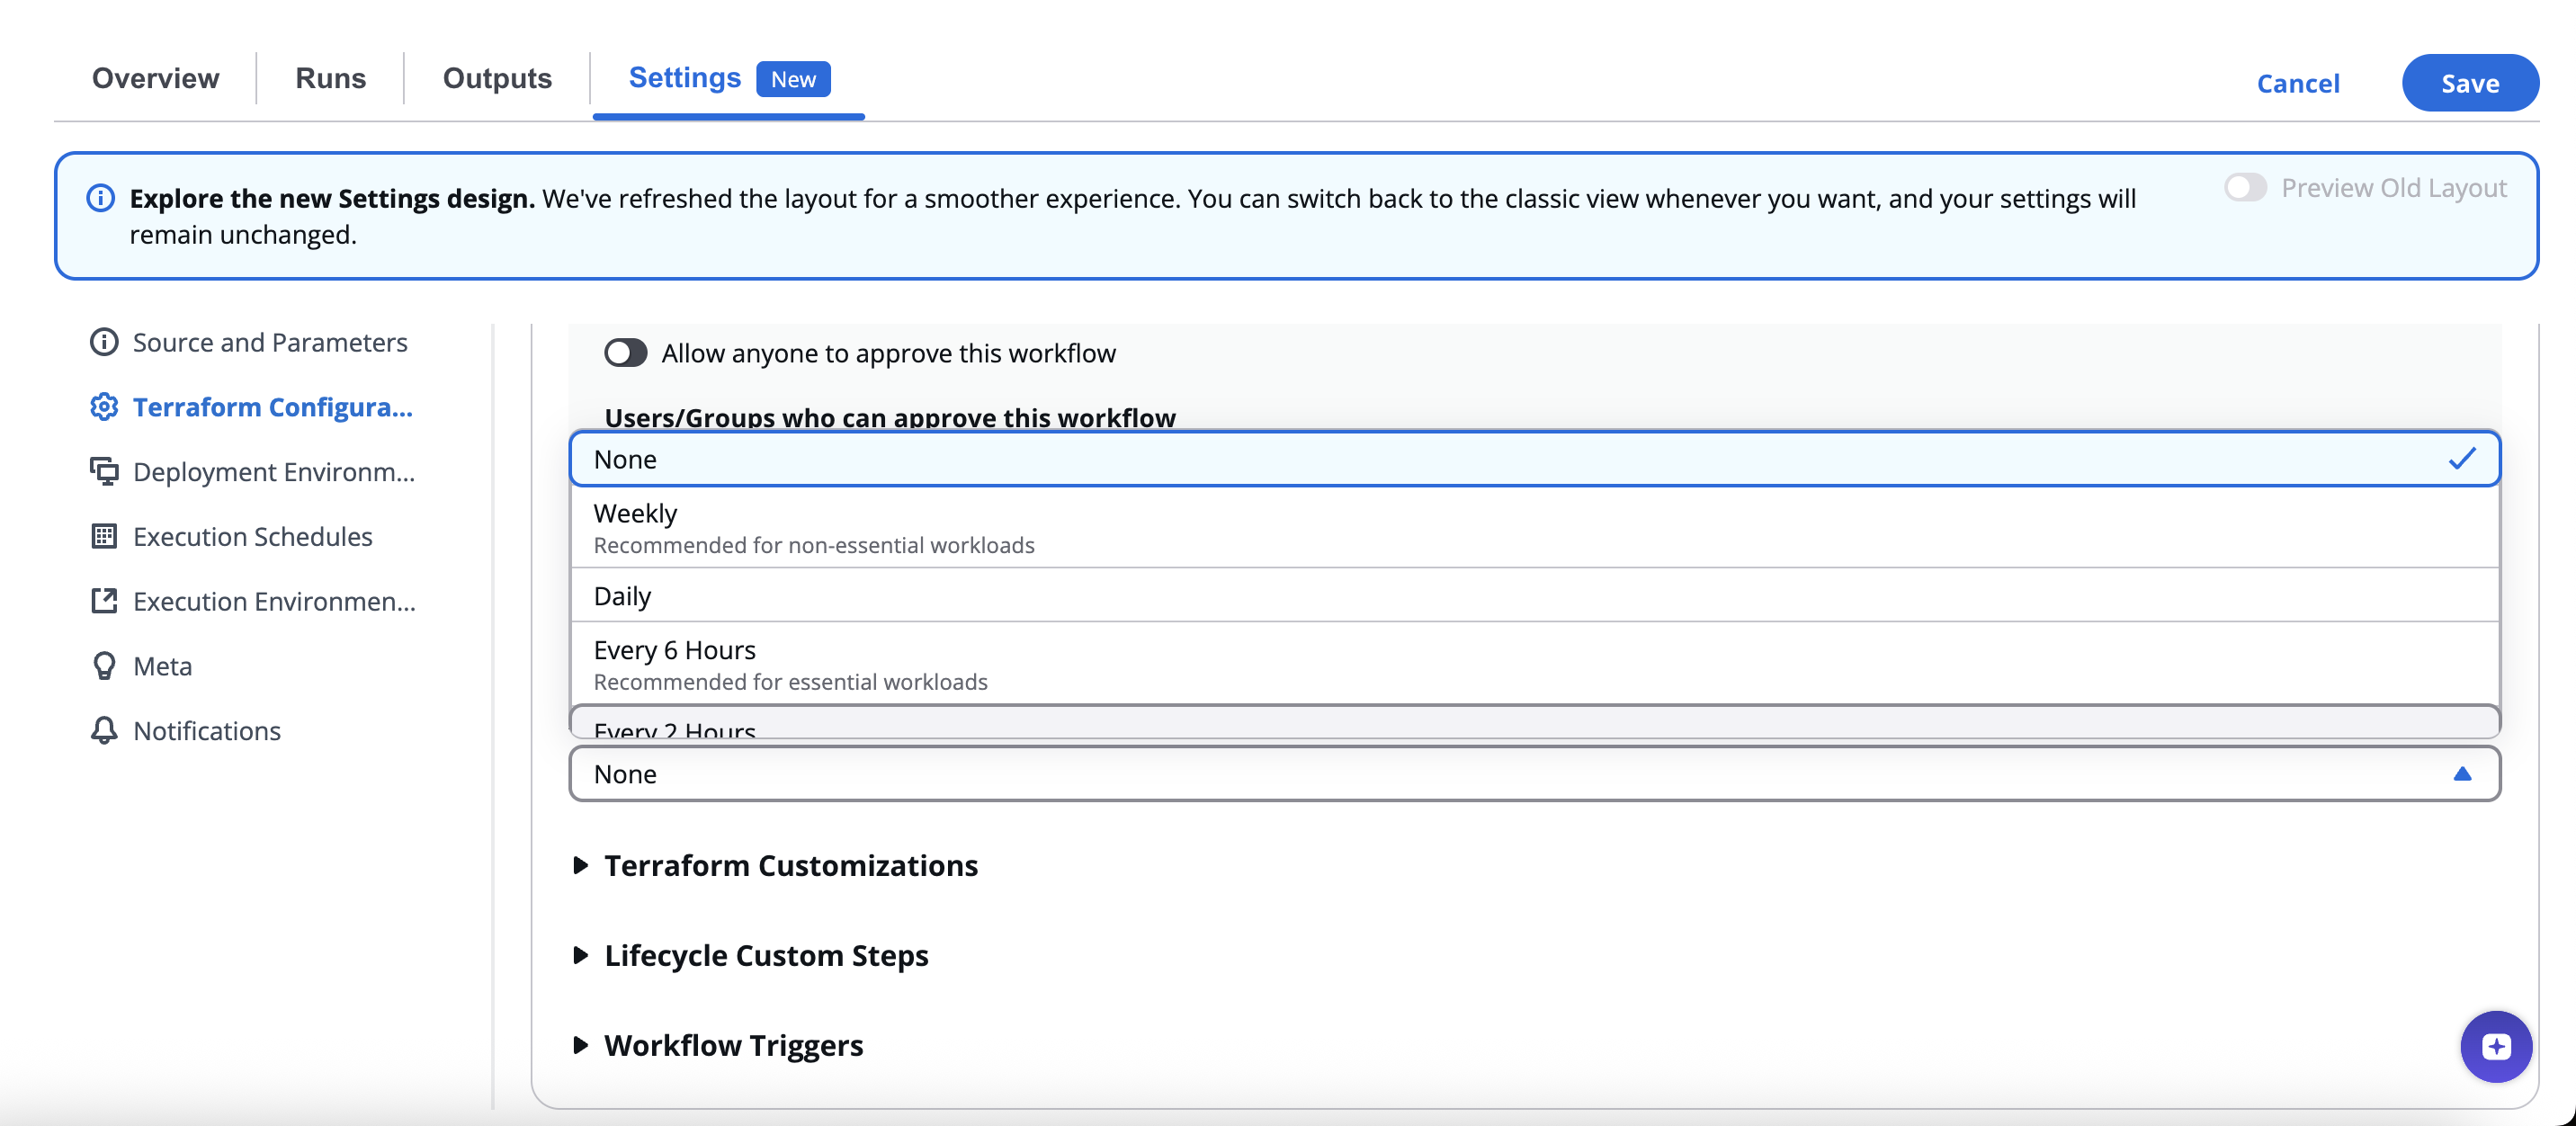
*Automated Drift Detection*
info
Drift detection ensures deployed resources remain compliant with desired configurations and helps detect manual or unauthorized changes.
### Terraform/OpenTofu Customizations[](#terraformopentofu-customizations "Direct link to Terraform/OpenTofu Customizations")
Advanced controls for tuning execution:
| Setting | Description |
| ------------------------------ | ------------------------------------------------------------------------------ |
| **Terraform/OpenTofu Version** | Select the Terraform/OpenTofu version used in execution. |
| **Extra Init CLI Options** | Add flags to customize `terraform init` (e.g., `-upgrade`). |
| **Extra Plan CLI Options** | Add flags for `terraform plan`. |
| **Workflow Step Timeout** | Define maximum execution time per step (default: 2100 seconds). |
| **Custom Mount Points** | Optionally mount local directories or dependencies when using private runners. |
| **Custom Terraform Path** | to execute a specific binary version. |
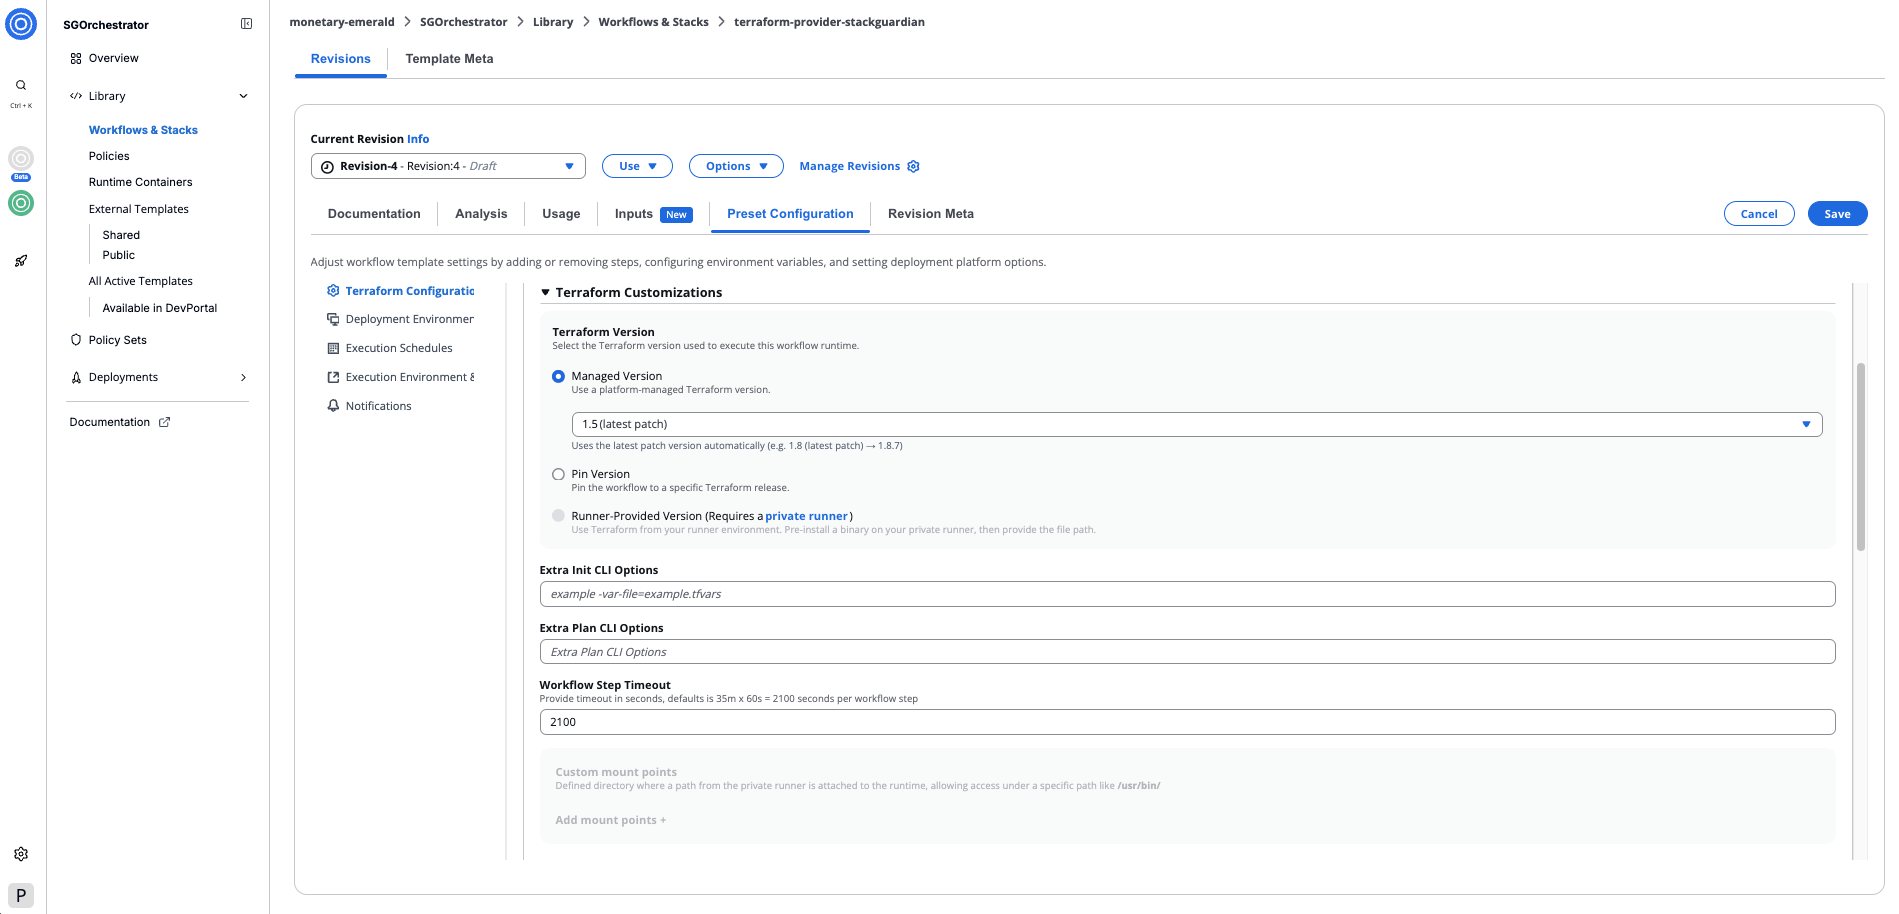
*Terraform/OpenTofu Customizations*
#### Terraform/OpenTofu Version[](#terraformopentofu-version "Direct link to Terraform/OpenTofu Version")
Select the Terraform/OpenTofu version used to execute this workflow runtime. Three options are available:
* **Managed Version:** Use a platform-managed Terraform/OpenTofu version. Select a major.minor version from the dropdown — the latest patch is applied automatically (e.g. `1.5 (latest patch) → 1.5.7`).
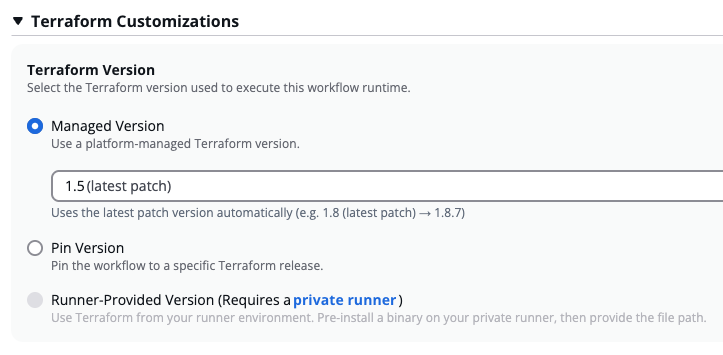
*Managed Version*
* **Pin Version:** Pin the workflow to a specific Terraform/OpenTofu release. Enter the version in major.minor.patch format (e.g. `1.5.7`).
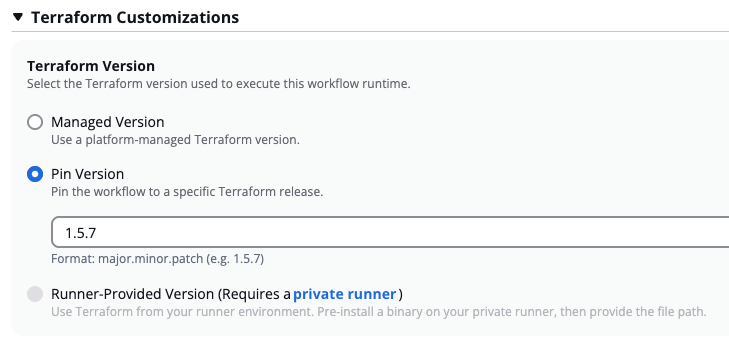
*Pin Version*
info
StackGuardian offers Terraform up to `v1.5.7`. For newer versions, use a [Custom Runtime Image](/docs/develop/library/custom-runtime-image/) or a Runner-Provided Version.
* **Runner-Provided Version:** Use a Terraform binary pre-installed on your private runner. Requires a private runner. When selected, a Mount your own version subsection appears — use **Add Path +** to provide the path to the binary on your runner. The mounted binary is used for all Terraform commands (`init`, `plan`, `apply`).
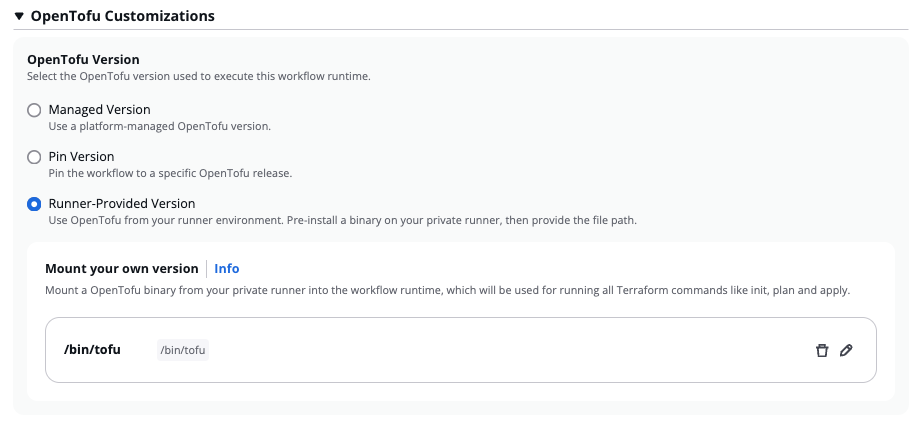
*Runner-Provided Version*
#### Custom Runtime Image[](#custom-runtime-image "Direct link to Custom Runtime Image")
For full control over the runtime environment, you can also provide a Custom Runtime Image — a custom Docker image built on top of the StackGuardian base image, extended with your own tools and dependencies. See [Custom Runtime Image](/docs/develop/library/custom-runtime-image/) for details.

*Custom Runtime Image*
#### Mount Point[](#mount-point "Direct link to Mount Point")
When using [**private runner groups**](/docs/organisation_settings/private_runner/overview/) for deploying workflows, one or more **Mount Points** can be added under the lifecycle custom steps. These are essential for mounting paths from the private runner to the runtime container, such as *files* or *certificates* needed during the execution of the workflow.
##### Mount Points Setup[](#mount-points-setup "Direct link to Mount Points Setup")
To add a Mount Point to a workflow:
1. **Source Path**: Absolute path on the private runner where the directory or file exists that you want to mount inside the workflow step container. For instance: `/usr/bin/terraform1_9_5`
2. **Target Path**: Path inside the workflow container where the source directory or file will be mounted. For example: `/usr/bin/terraform1_9_5`
3. **Is Read Only**: Ensures that the mounted path is read-only, preventing any modifications inside the container.
Use CLI flags and mounts to adapt Terraform execution to specific environments and compliance policies.
### Lifecycle Custom Steps[](#lifecycle-custom-steps "Direct link to Lifecycle Custom Steps")
**Lifecycle Custom Steps** allow users to inject custom logic or extend behavior at different Terraform lifecycle stages: `Init`, `Plan`, and `Apply`. Use them for validation, compliance scans, or post-deployment automation.
#### Available Stages[](#available-stages "Direct link to Available Stages")
Each stage supports **pre** and **post** hooks:
* **Add Pre Init+**
* **Add Pre Plan+ / Post Plan+**
* **Add Pre Apply+ / Post Apply+**
#### Adding a Custom Step[](#adding-a-custom-step "Direct link to Adding a Custom Step")
When adding a new lifecycle step, you can either:
* **Enter Command** – Execute a custom shell command.
* **Add a Step** – Add an existing workflow step template.
#### Add Step Dialog Fields[](#add-step-dialog-fields "Direct link to Add Step Dialog Fields")
| Field | Description |
| ------------------------------------ | -------------------------------------------------------------------------------------------------------------------- |
| **Step Name** | Unique identifier (e.g., `security-scan`). |
| **Approval** | Optionally add an approval checkpoint for the step. |
| **Workflow Step Template** | Select a predefined step from the library (e.g., `/demo-org/ansible-test-data`). |
| **Workflow Step Template Revision** | Choose the template version (e.g., `:1`). |
| **Workflow Step Timeout** | Set step timeout in seconds. |
| **Require Approval for this step** | Inherit eligible approvers and approval count from the [Workflow approval settings](#require-approval-workflow-run). |
| **Command Override** | Override the default command from the Docker image. |
| **Input Variables with noCode Form** | Enable graphical input of variables. |
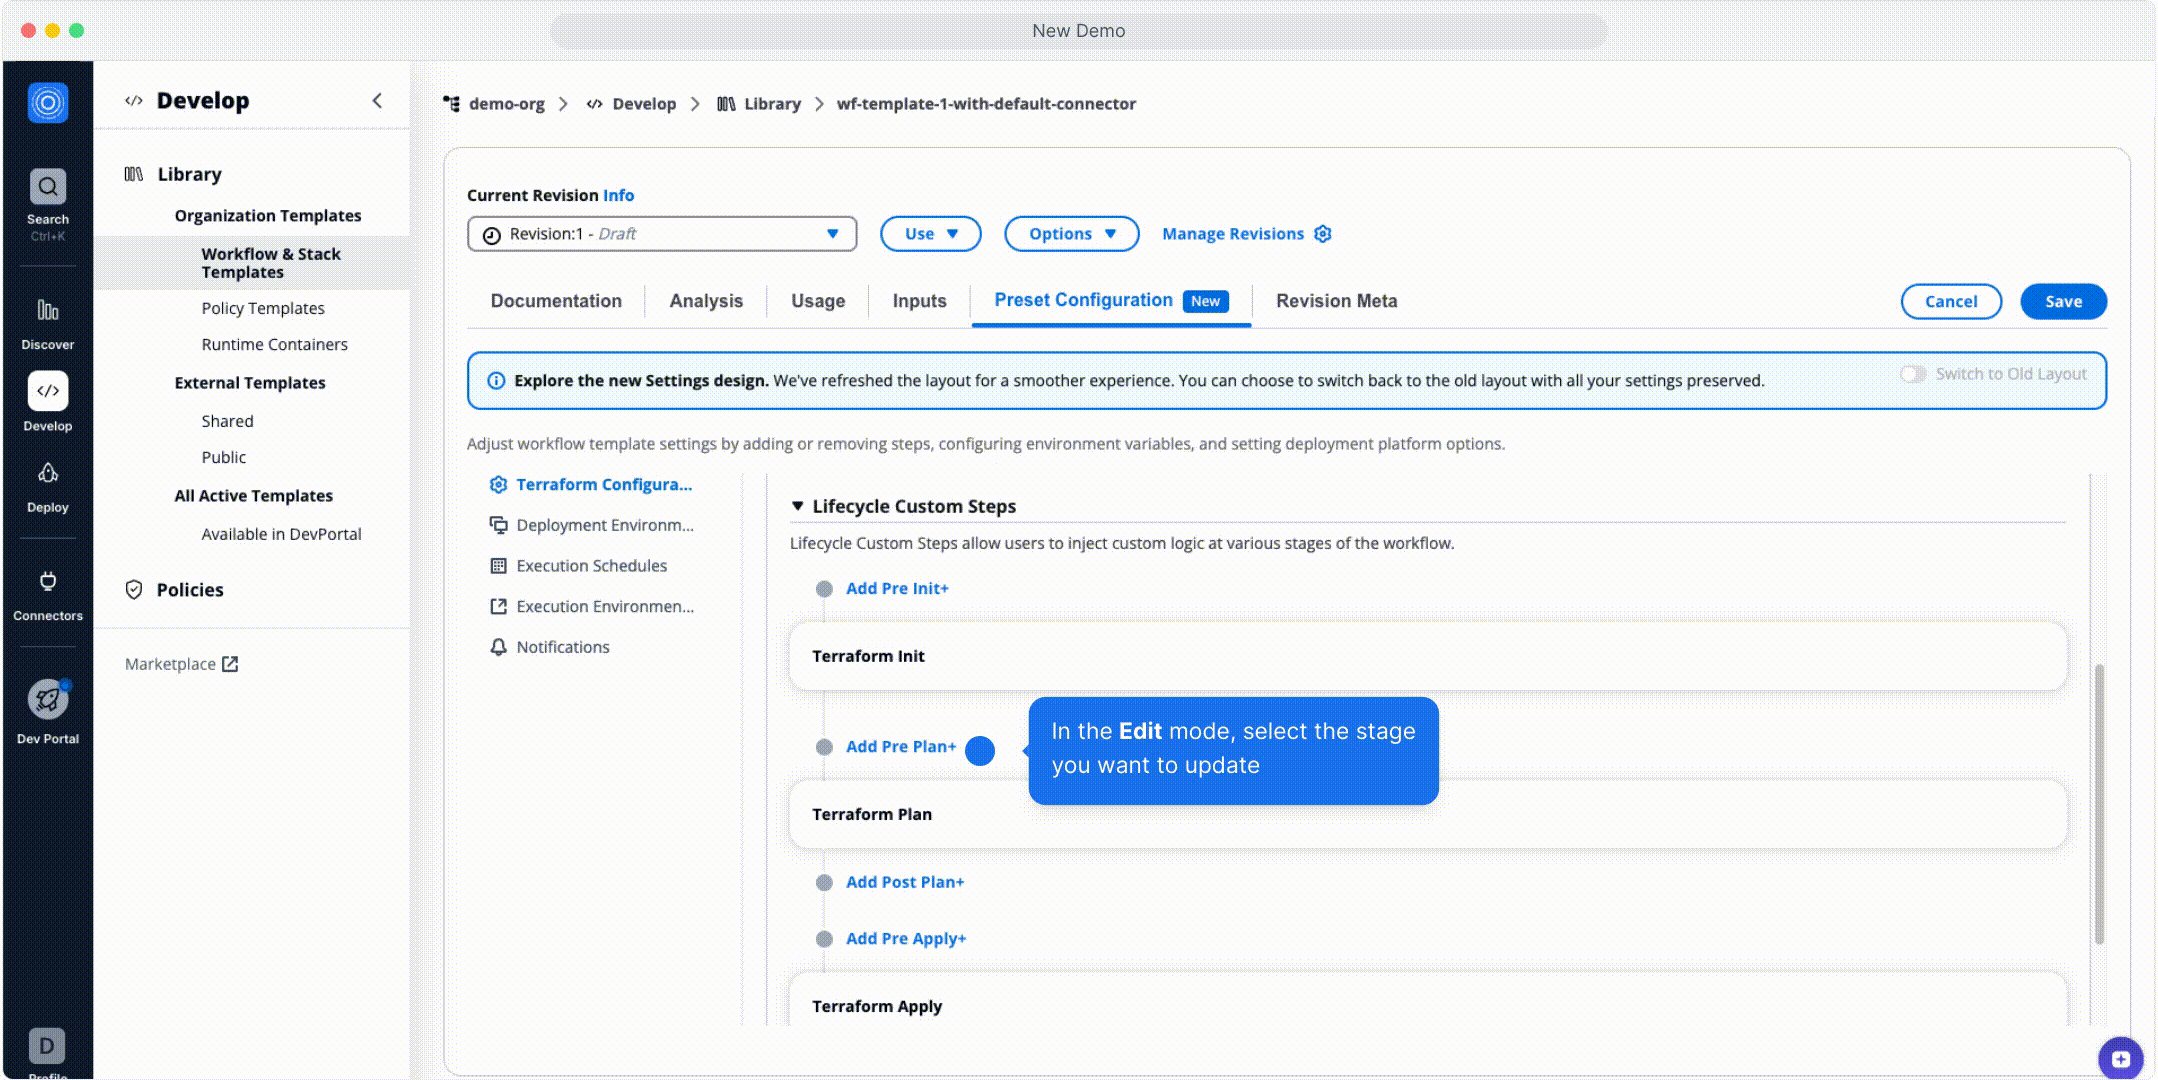
*Add Step Dialog Fields*
### Workflow Triggers[](#workflow-triggers "Direct link to Workflow Triggers")
The **Workflow Triggers** section enables automation based on workflow results or drift events.
It allows **chaining other workflows** and **sending webhooks** to external systems.
#### Workflow Chaining[](#workflow-chaining "Direct link to Workflow Chaining")
Run other workflows automatically based on the outcome of the current workflow.
Available triggers:
* **On Error** – Fires when the workflow finishes in an errored state.
* **On Success** – Fires when the workflow finishes successfully.
Each trigger includes:
| Field | Description |
| ---------------------------------------- | -------------------------------------------------------------------------------------- |
| **Condition (when Terraform Action is)** | Specify which Terraform action (`Create`, `Destroy`, `Plan`) should trigger the chain. |
| **Workflow Group, Stacks and Workflows** | Choose which workflows to trigger. |
| **Action Type** | Select what action the next workflow should perform. |
You can define multiple chained workflows using **Add +** to build complex orchestration pipelines.
> Example: If a Create workflow fails, trigger a rollback workflow. If it succeeds, trigger an application deployment.
#### Webhook Triggers[](#webhook-triggers "Direct link to Webhook Triggers")
Webhooks allow external systems to receive notifications or trigger actions when workflows complete or detect drift.
Available trigger types:
* **On Error** – Fires when a workflow ends in an errored state.
* **On Success** – Fires when a workflow completes successfully.
* **On Drift Detection** – Fires when drift is found between the current and desired state.
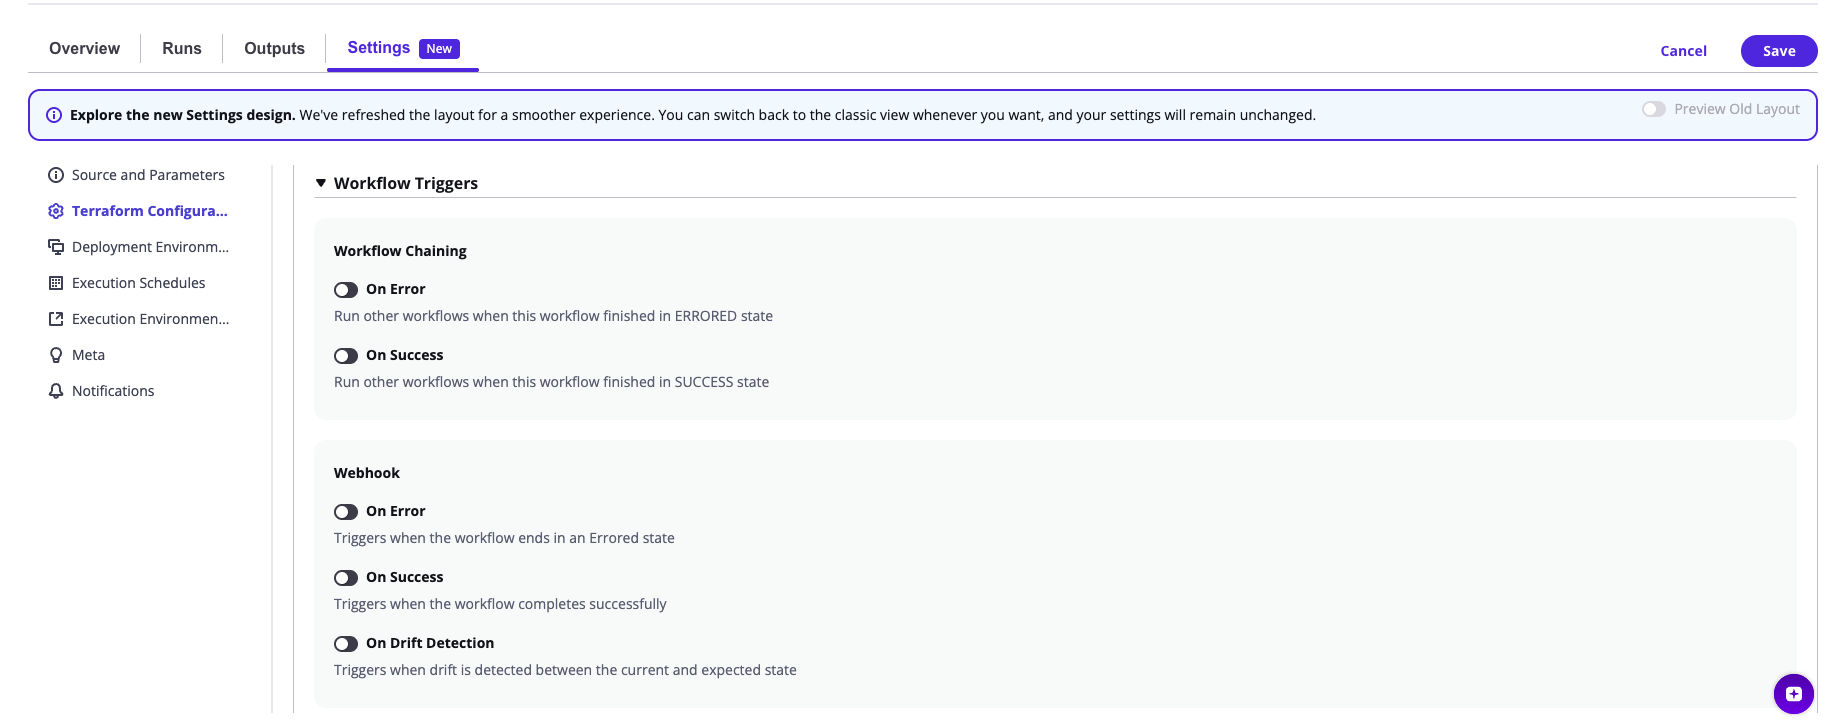
Each webhook includes:
| Field | Description |
| ------------------ | ----------------------------------- |
| **Webhook Name**\* | Name for identification. |
| **Webhook URL**\* | Target endpoint for event payloads. |
| **Webhook Secret** | Optional token for payload signing. |
You can add, clone or delete multiple webhooks per trigger and manage them via **Select All** or **Delete Selected** options.
> Example:
>
> * On Success → Notify Slack or GitLab pipeline.
> * On Error → Trigger PagerDuty or send a failure event to an incident management tool.
> * On Drift Detection → Send updates to monitoring dashboards.
---
# Webhook 🆕
**Webhooks** in StackGuardian, offer a dynamic way to integrate external services with your cloud infrastructure workflows. These hooks trigger ***HTTP POST*** requests in response to specified events in your workflows or stacks, enabling real-time *automation* and *communication* with other systems.
### Step-by-Step Guide to Create a Webhook[](#step-by-step-guide-to-create-a-webhook "Direct link to Step-by-Step Guide to Create a Webhook")
In this guide, we configure a **webhook** to alert the team upon the **success**, **failure**, or **on Drift Detection** of a Terraform workflow. This workflow is responsible for deploying and managing an AWS website using the '**aws-s3-demo-website**' Infrastructure as Code template.
To begin, click "**Create Workflow**" and select the `terraform` type with **Use Wizard (Preview)**: 
#### 1. Source and Parameters[](#1-source-and-parameters "Direct link to 1. Source and Parameters")
1. Choose "**Subscribed Templates**" for ready-to-use blueprint templates from your library.
2. Under **Source Type**, choose **Subscribed Template** and search for `aws-s3-demo-website`
3. In "**Template Parameters**" pick the latest revision, click **Next**.
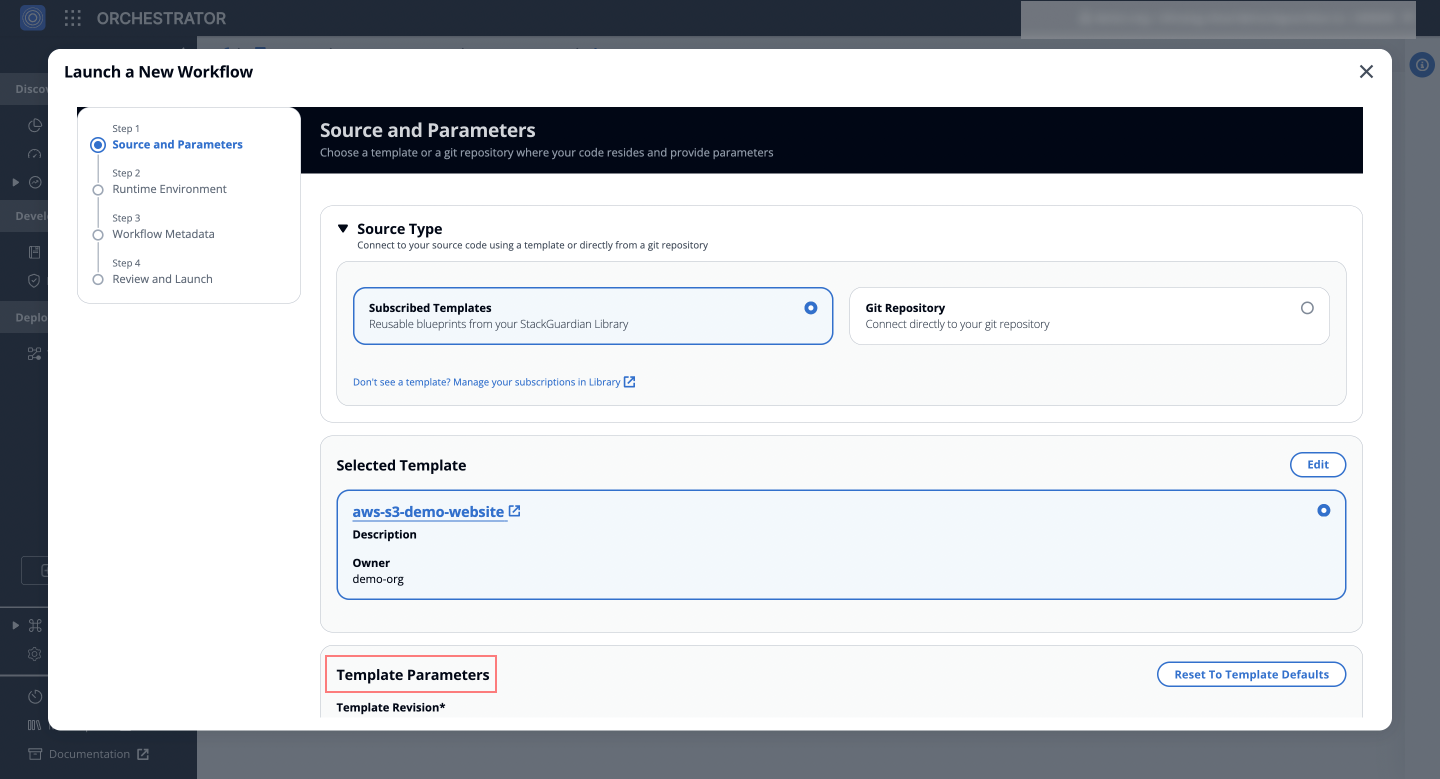
#### 2. Runtime Environment[](#2-runtime-environment "Direct link to 2. Runtime Environment")
1. In "**Deployment Environment**", select a connector that matches your platform or environment, set **environment variables** if needed, and click **Next**.
2. Specify the "**Runner type**" under "**Execution Environment**" for execution flexibility and organizational visibility.
3. Opt-in for `Automated Drift Check`, `Terraform Plan Approval`, and `SG Managed Backend` to streamline workflow execution, state and lifecycle management for the workflows.
4. Under **Advanced Options** > **Resources and Events** > **Webhook**, set up the webhooks:
* **For Errors**: Captures and notifies when workflow errors occur.
* **Webhook Name**: `Error Webhook`.
* **Webhook URL**: Enter the Generic JSON webhook URL.
* **Webhook Secret**: Enter the secret (*optional*).
* **For Success**: Sends notifications upon successful completion of the workflow.
* **Webhook Name**: `Success Webhook`.
* Use the same Generic JSON webhook URL and secret as for errors.
* **On Drift Detection**: Alerts when configuration drift is detected in the infrastructure.
* **Webhook Name**: `Drift Detection Webhook`.
* Use the same Generic JSON webhook URL and secret as for other events.
* Click `Add` for each event to finalize and click **Next**.
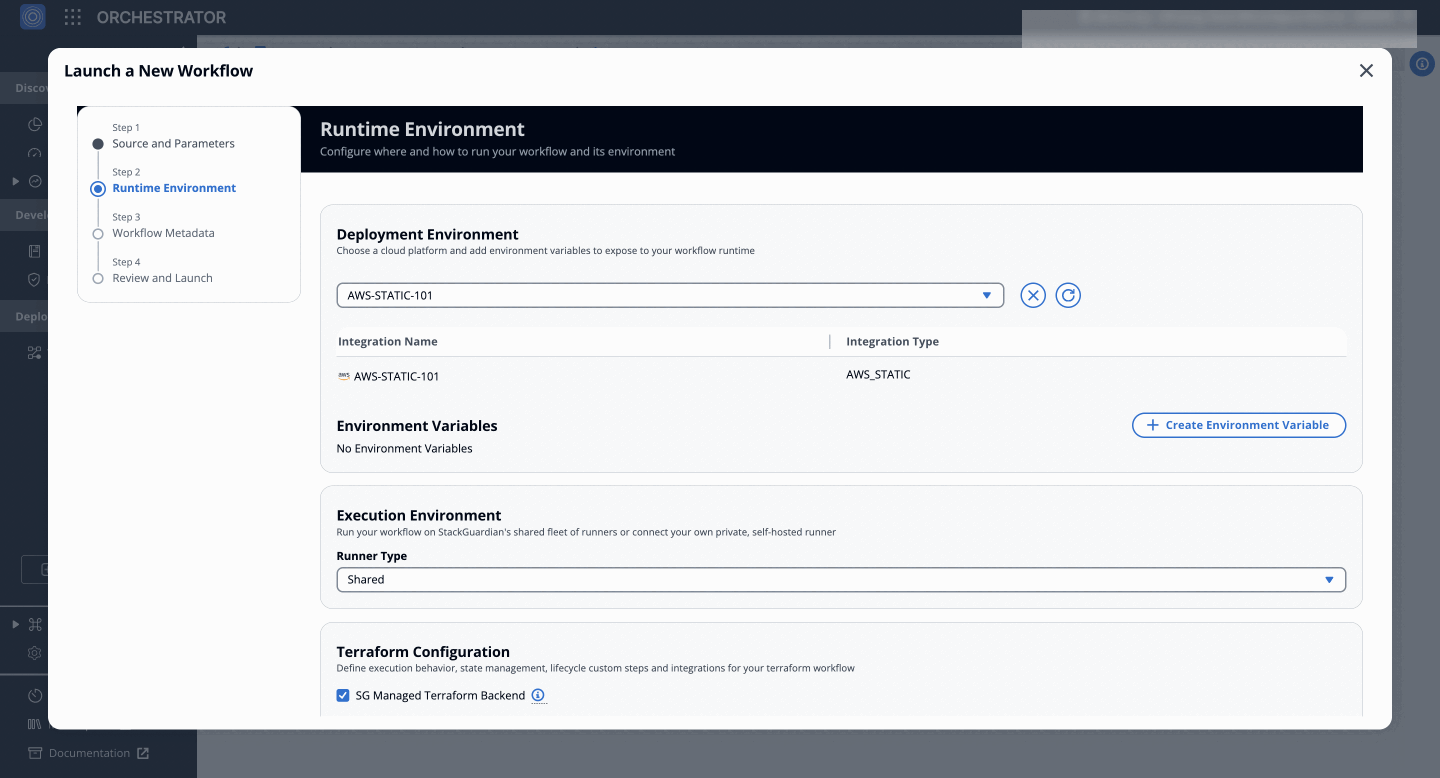
#### 3. Workflow Metadata[](#3-workflow-metadata "Direct link to 3. Workflow Metadata")
1. **Workflow Name**: Suggest a name, like `wehook-workflow`.
2. **Description and Tags**: Provide an optional description and tags, click "***Next***" to proceed.
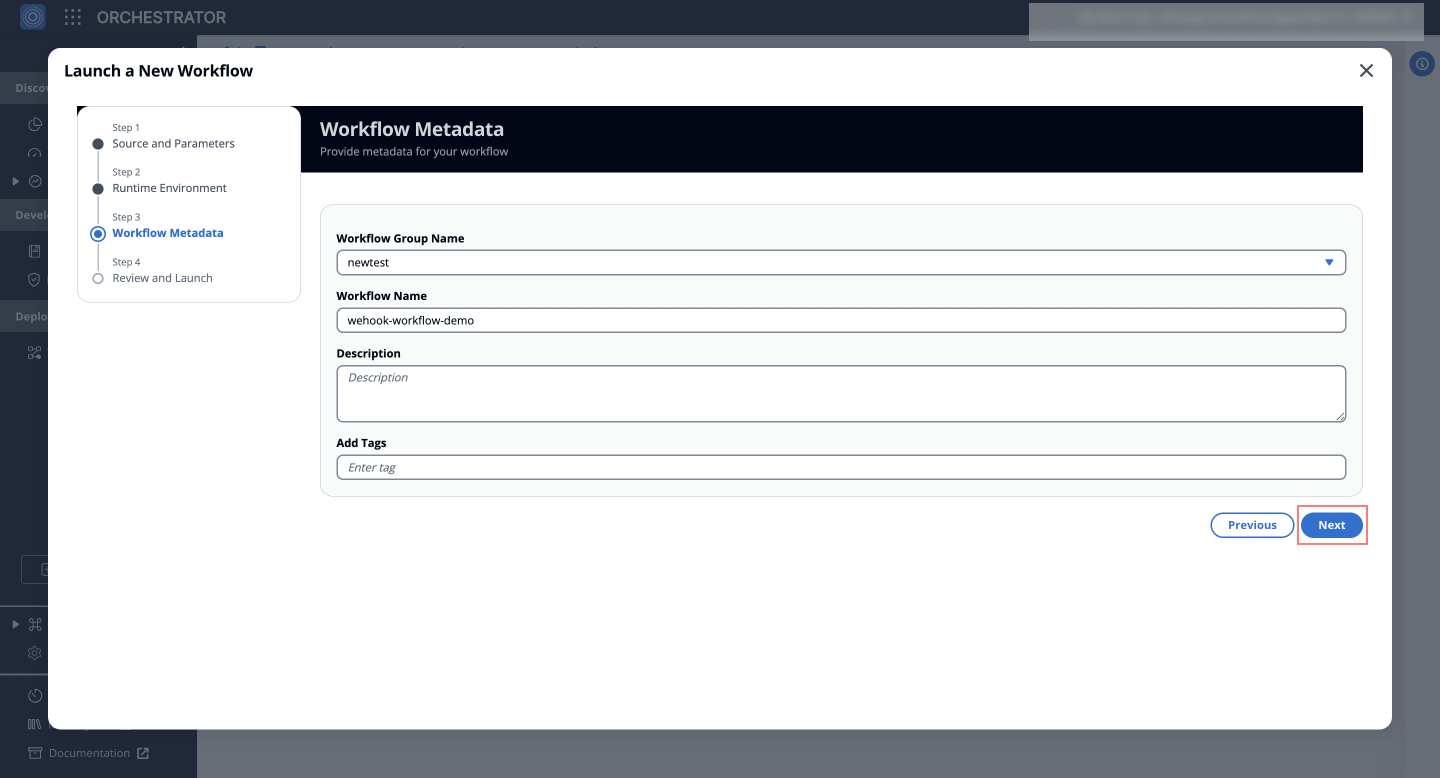
#### 4. Review and Launch[](#4-review-and-launch "Direct link to 4. Review and Launch")
* Review the settings and click **Launch** to create your workflow.
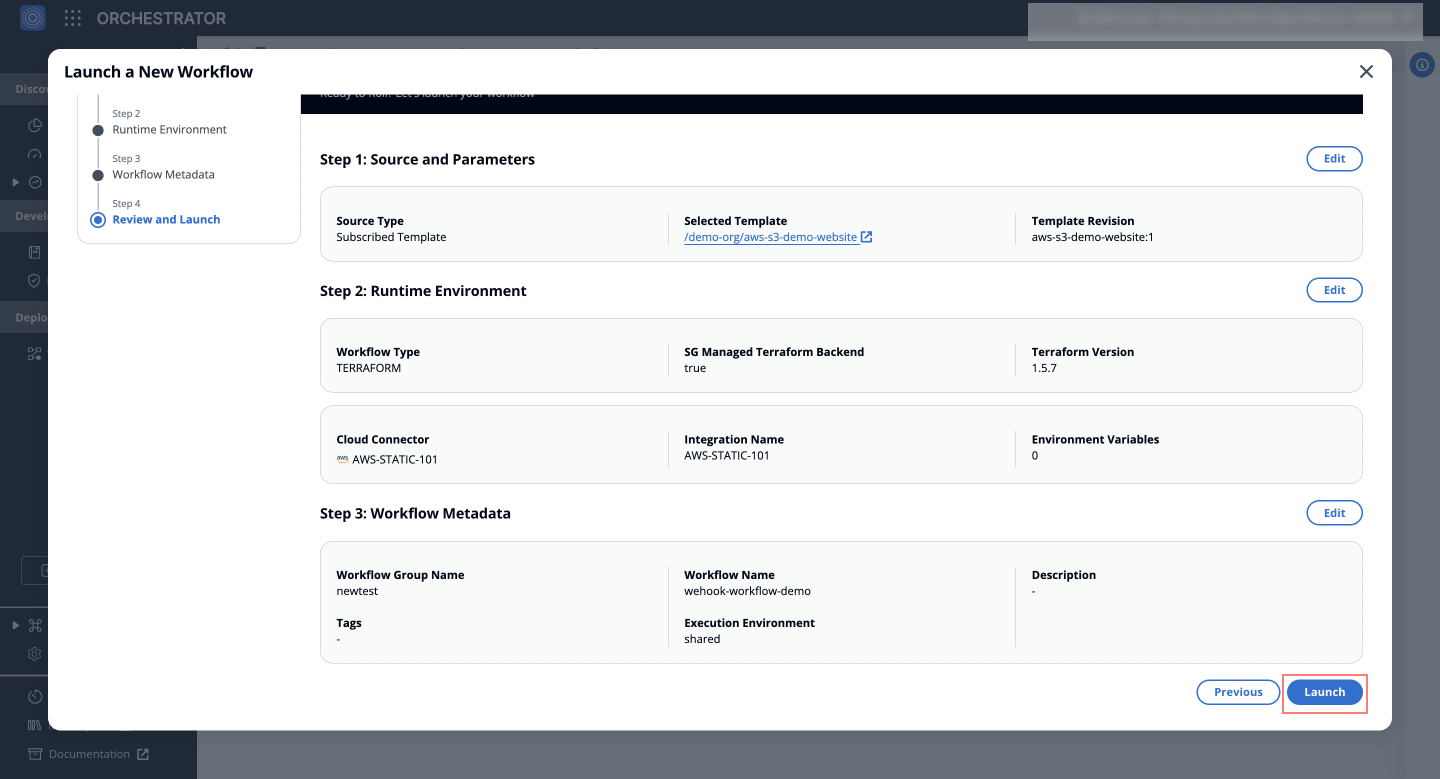
*Fig:* Setting up a **'Static S3 website'** Terraform workflow with **webhook**
With these steps, StackGuardian will emit a *JSON payload* the workflow's outcome, which can integrated with other different services.
#### Example: HTTP POST Request Body[](#example-http-post-request-body "Direct link to Example: HTTP POST Request Body")
* Here is an example of what the HTTP POST request body looks like:
```
{
"Org": "wicked-hop",
"Timestamp": 1763045349466,
"WorkflowGroup": {
"ResourceName": "test-webhook"
},
"WorkflowRun": {
"OrgId": "/orgs/wicked-hop",
"WfgrpId": "/wfgrps/test",
"WfId": "/wfgrps/test/wfs/aws-s3-demo-website-op9v",
"WfrunId": "/wfgrps/test/wfs/aws-s3-demo-website-op9v/wfruns/g389yenk9hrp",
"ResourceName": "g389yenk9hrp",
"WfrunDetails": {
"LatestStatus": "COMPLETED",
"LatestStatusKey": "on_0_generate-terraform-plan",
"RuntimeParameters": {
"iacTemplate": {
"/stackguardian/aws-s3-demo-website:16": {
"RuntimeSource": {
"sourceConfigDestKind": "GITHUB_COM",
"config": {
"includeSubModule": false,
"ref": "main",
"isPrivate": false,
"workingDir": "",
"repo": "https://github.com/stackguardian/template-tf-aws-s3-demo-website"
}
},
"IsArchive": "0",
"IsActive": "1",
"IsPublic": "1",
"CreatedAt": 1696247453148,
"TemplateName": "aws-s3-demo-website",
"OwnerOrg": "/orgs/stackguardian",
"TemplateType": "IAC",
"SourceConfigKind": "TERRAFORM",
"TemplateId": "/stackguardian/aws-s3-demo-website:16"
}
},
"wfStepsConfig": [
{
"name": "generate-terraform-plan",
"mountPoints": null,
"wfStepTemplateId": "/stackguardian/terraform:19",
"wfStepInputData": {
"schemaType": "FORM_JSONSCHEMA",
"data": {
"approvalPreApply": false,
"managedTerraformState": true,
"terraformPlanOptions": "",
"prePlanHooks": [],
"runPostPlanHooksOnDrift": false,
"preInitHooks": [],
"postApplyHooks": [],
"terraformInitOptions": "",
"preApplyHooks": [],
"terraformVersion": "1.5.7",
"terraformAction": "plan",
"postPlanHooks": [],
"runPreInitHooksOnDrift": false,
"applyPolicy": true,
"runPrePlanHooksOnDrift": false
}
},
"timeout": 2100,
"approval": false
}
],
"cacheConfig": {
"path": [
"user/repo/.terraform",
"user/repo/tf_plan.out"
],
"enabled": true,
"key": "tf_cache",
"policy": "PULL_PUSH"
},
"runnerConstraints": {
"selectors": [
"shared"
],
"type": "shared",
"sharedType": "shared-external"
},
"terraformAction": {
"action": "plan"
},
"environmentVariables": [],
"deploymentPlatformConfig": [
{
"config": {
"profileName": "aws-demo",
"integrationId": "/integrations/aws-demo"
},
"kind": "AWS_STATIC"
}
],
"workflowStepsTemplates": {
"/stackguardian/terraform:19": {
"SharedOrgs": {
"/orgs/adorsys-test": {},
"/orgs/siemens-di": {},
"/orgs/wicked-hop": {}
},
"RuntimeSource": {
"sourceConfigDestKind": "CONTAINER_REGISTRY",
"config": {
// EU region: 476299211833.dkr.ecr.eu-central-1.amazonaws.com/...
// US region: 476299211833.dkr.ecr.us-east-2.amazonaws.com/...
"dockerImage": "476299211833.dkr.ecr.eu-central-1.amazonaws.com/workflow-steps/iac-terraform:1761049860-v4.0.20-terraform",
"isPrivate": false
}
},
"IsArchive": "0",
"IsPublic": "1",
"IsActive": "1",
"CreatedAt": 1679583161499,
"TemplateName": "terraform",
"OwnerOrg": "/orgs/stackguardian",
"TemplateType": "WORKFLOW_STEP",
"TemplateId": "/stackguardian/terraform:19",
"SourceConfigKind": "DOCKER_IMAGE"
}
},
"iacPoliciesTemplates": {},
"vcsConfig": {
"iacVCSConfig": {
"iacTemplateId": "/stackguardian/aws-s3-demo-website:16",
"useMarketplaceTemplate": true
},
"iacInputData": {
"schemaType": "FORM_JSONSCHEMA",
"data": {
// EU region example: eu-central-1
// US region example: us-east-2
"bucket_region": "eu-central-1"
}
}
},
"terraformConfig": {
"approvalPreApply": false,
"managedTerraformState": true,
"prePlanHooks": [],
"runPostPlanHooksOnDrift": false,
"preInitHooks": [],
"postApplyHooks": [],
"driftCheck": true,
"preApplyHooks": [],
"terraformVersion": "1.5.7",
"postApplyWfStepsConfig": [],
"prePlanWfStepsConfig": [],
"driftCron": "0 */6 * * ? *",
"preApplyWfStepsConfig": [],
"postPlanHooks": [],
"runPreInitHooksOnDrift": false,
"runPrePlanHooksOnDrift": false
},
"wfType": "TERRAFORM"
}
}
},
"Workflow": {
"ResourceName": "aws-s3-demo-website-op9v"
},
"Type": "COMPLETED"
}
```
---
# 2. Configuration
## Overview[](#overview "Direct link to Overview")
StackGuardian supports different workflow types, each with specific configuration options. The configuration section adapts dynamically depending on your workflow type.
* [2.1. Terraform/OpenTofu](/docs/deploy/workflows/workflow_components/terraform_config/)
* [2.2. Custom (e.g., Ansible, Helm, etc.)](/docs/deploy/workflows/workflow_components/custom_config/)
## Workflow approvals[](#workflow-approvals "Direct link to Workflow approvals")
Control how workflow runs are reviewed and approved before deployment:
[Internal approvals](/docs/deploy/workflows/workflow_components/approvals_config/#overview): Configure eligible approvers, required approval counts, and approval logic for mixed identity types (SSO and local users) [External approvals](/docs/deploy/workflows/workflow_components/approvals_config/#external-approvals): Integrate with external approval systems like ServiceNow or Jira to manage approvals outside StackGuardian
---
# Workflow Groups
**Workflow Groups** in StackGuardian allow you to organize workflows by *teams*, *divisions*, or *environments*. They provide structured management and fine-grained access control over **workflows**.
## Creating a Workflow Group[](#creating-a-workflow-group "Direct link to Creating a Workflow Group")
Workflow Groups ensure streamlined organization and efficient management of your workflows. Follow these steps to create a Workflow Group:
1. Navigate to **Orchestrator** > **Workflow Groups** and click **Create Workflow Group**.
2. Fill in the required details:
* **Workflow Group Name**: Provide a unique name.
* **Workflow Group ID**: Auto-generated from the Workflow Group Name. You can customize it using only letters, numbers, underscores (\_), or dashes (-). This cannot be changed after creation.
* **Description**: Add a brief description of the group.
* **Tags**: Use tags to categorize and organize the group.
3. Click **Create** to create the group.

*Creating a Workflow Group*
## Move resources[](#move-resources "Direct link to Move resources")
You can reorganize workflows, stacks, and workflow groups by moving them between workflow groups. This helps you maintain a clear structure as your infrastructure grows or your team organization changes.
1. Navigate to **Orchestrator > Workflow groups**
2. Select the workflow group you want to manage
3. Select one or more resources from the table using the checkboxes. You can select:
* Workflow groups (moves the group and everything inside it)
* Stacks (moves the stack and all its workflows automatically)
* Individual workflows (only workflows not part of a stack)
4. With resources selected, open the **Options** dropdown in the top right
5. Select **Move**
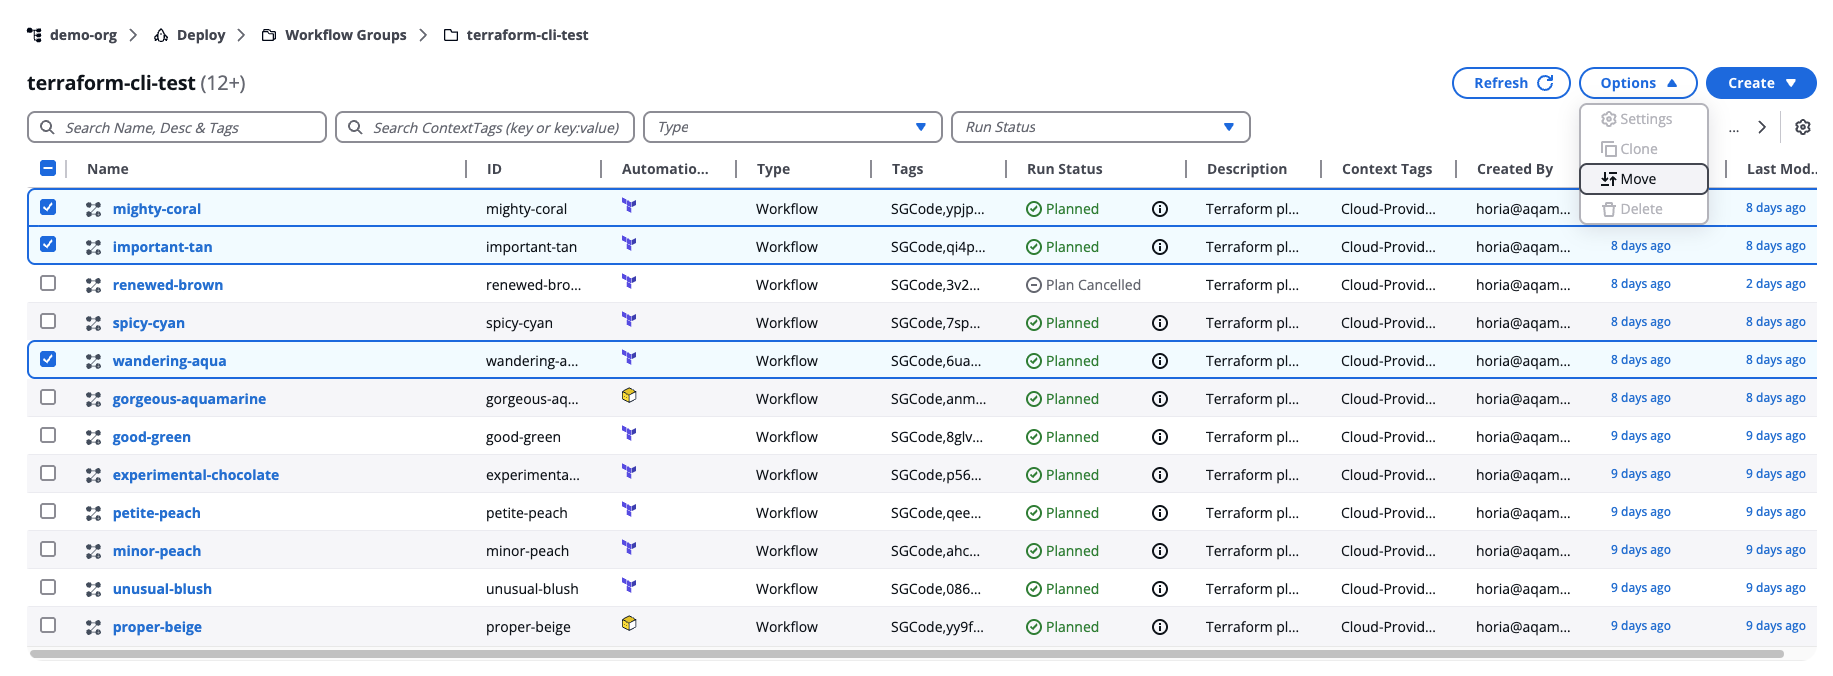
*Move resources*
The **Move resources** modal opens with two panels:
* **Selected resources** — Shows your selection with each resource's name, type (Workflow, Stack, or Workflow Group), and ID. Review this list to confirm you're moving the correct resources.
* **Destination** — Shows all available workflow groups as a tree. The number next to each group shows how many resources it contains. Expand a group to see nested groups.
Select a destination workflow group from the **Destination** tree, then select **Move**.
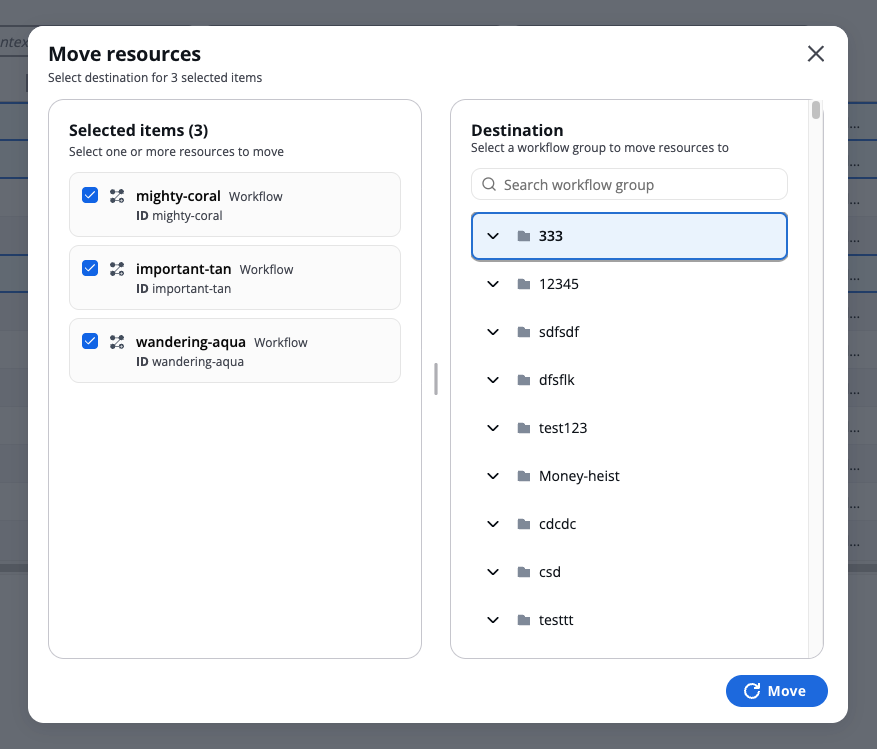
*Moving resources modal*
After the move completes, a summary appears showing:
* How many resources were moved
* The destination workflow group
* A list of each moved resource with its type and original location
Important move behaviors
* A single move operation can handle up to 100 resources. If you need to move more, perform multiple move operations.
* Workflows that belong to a stack cannot be moved independently. Moving a stack automatically moves all its workflows. If you try to move only a workflow that belongs to a stack, the move will fail.
* Moving resources does not automatically update references between workflows, stacks, or policies. References continue to function, but affected resources display an Update badge prompting you to review and update them manually.
---
# Terragrunt Workflow
A **Terragrunt workflow** simplifies the management of Terraform configurations using Terragrunt. It enables you to structure, validate, and deploy Terraform-based infrastructures efficiently.
### Create a Terragrunt Workflow[](#create-a-terragrunt-workflow "Direct link to Create a Terragrunt Workflow")
Follow these steps to create and configure a Terragrunt workflow:
#### Step 1: Launch a New Workflow[](#step-1-launch-a-new-workflow "Direct link to Step 1: Launch a New Workflow")
1. Navigate to **Deployments > Workflow Groups**.
2. Click **Create Workflow**, select **"Use Wizard"**, and then choose **"Custom"**.
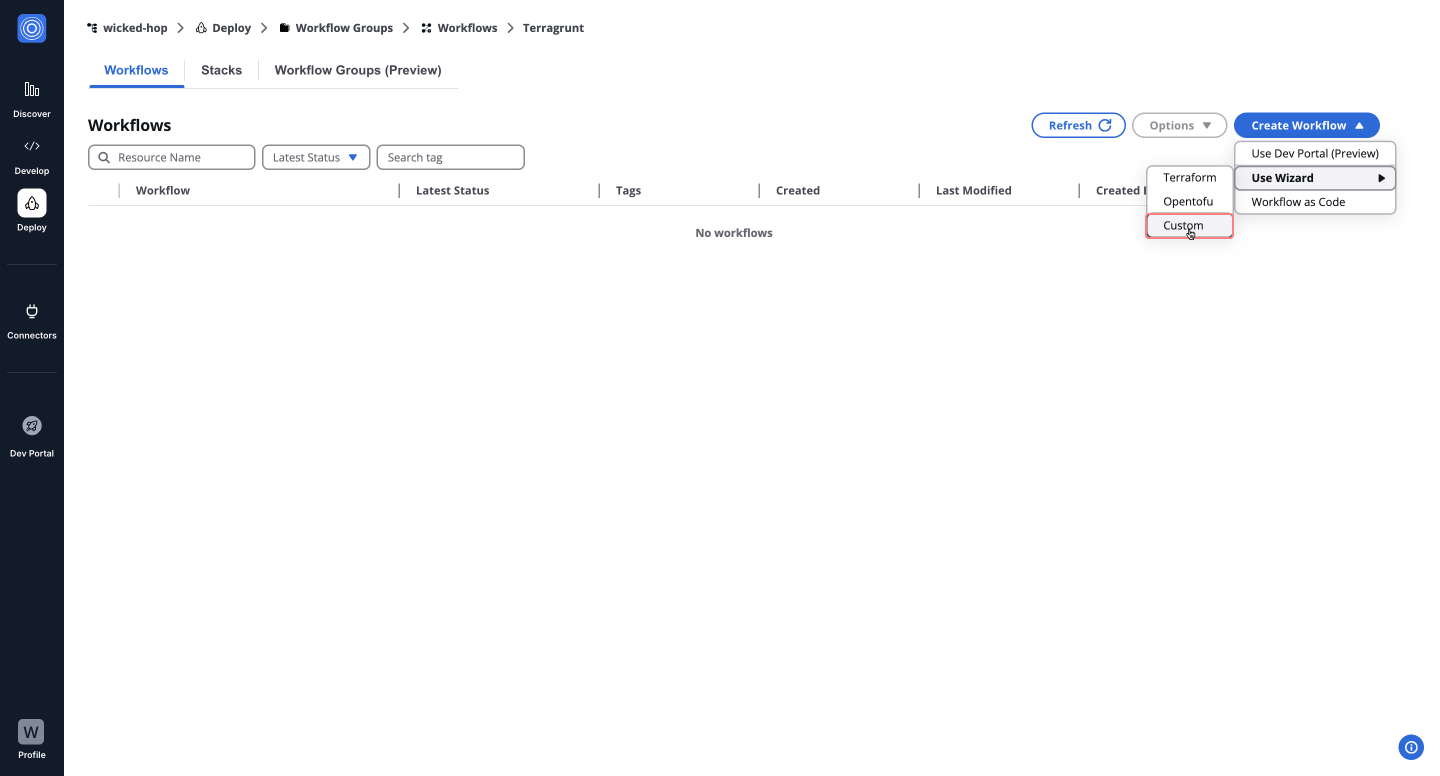
#### Step 2: Configure Source and Parameters[](#step-2-configure-source-and-parameters "Direct link to Step 2: Configure Source and Parameters")
1. Enable **VCS Settings** to connect your Git repository.
2. Select **Git Repository** and provide the repository URL, branch, or tag as needed.
3. Customize advanced options like **Working Directory** and **Sparse Checkout Config** if required. Click "**Next**".
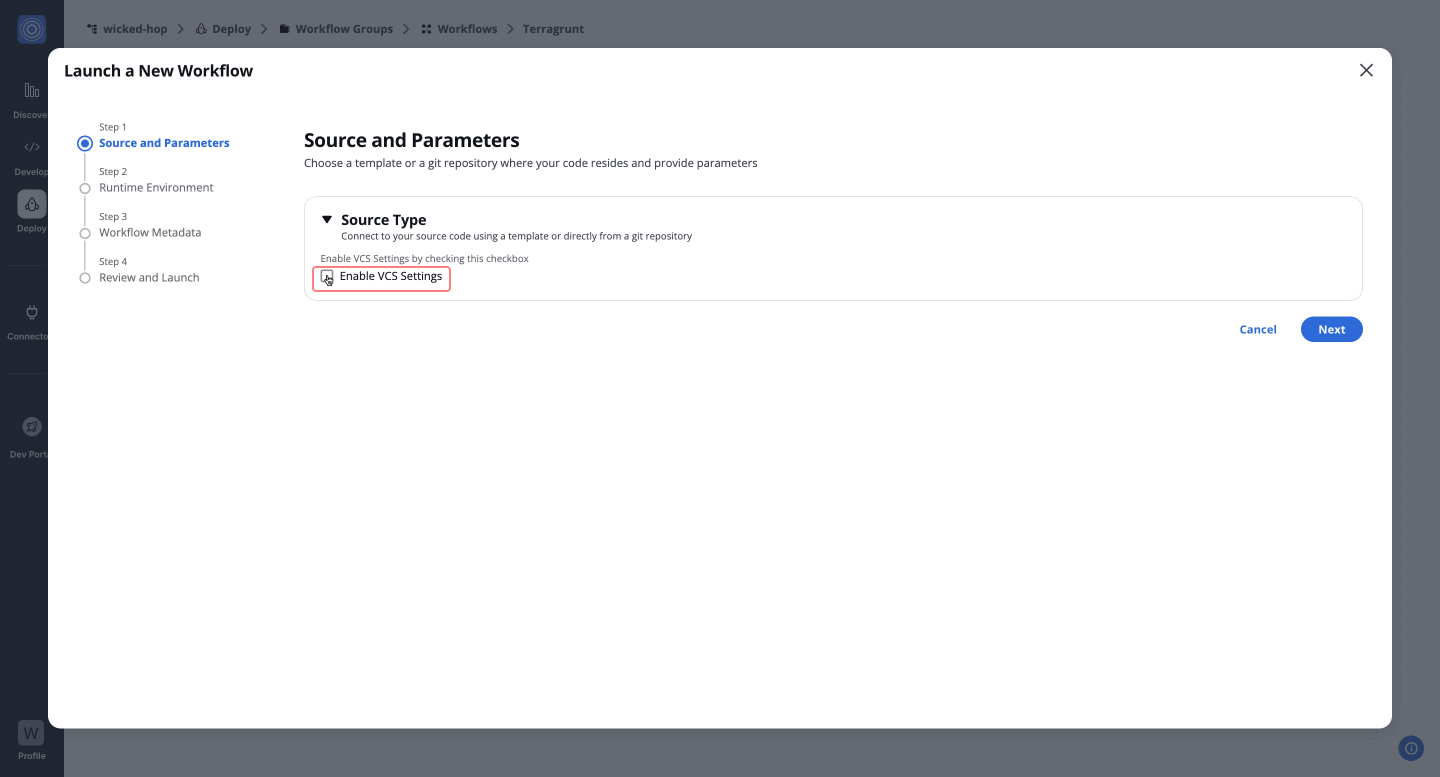
#### Step 3: Configure Runtime Environment[](#step-3-configure-runtime-environment "Direct link to Step 3: Configure Runtime Environment")
1. Select a deployment environment or create new environment variables.
2. Choose the execution environment (**Shared** or **Private Runner**).
3. Click **Add New Step** to proceed.
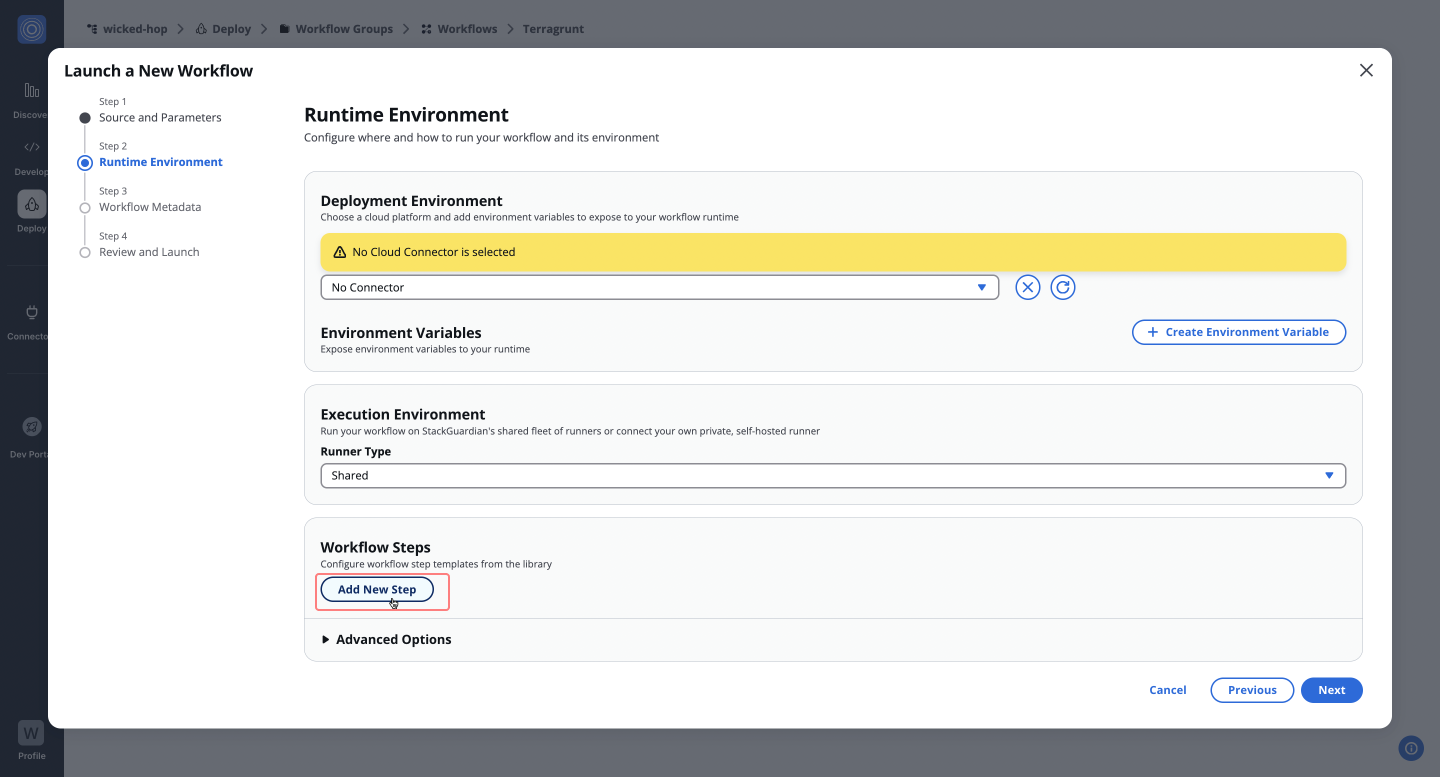
#### Step 4: Configure Workflow Steps[](#step-4-configure-workflow-steps "Direct link to Step 4: Configure Workflow Steps")
1. Enter a **Step Name** (e.g., `terragrunt-apply`).
2. Select the **Workflow Step Template** and **Revision**.
3. Choose the **Terragrunt Action**:
* `plan for create`: Generate a Terraform plan for new infrastructure.
* `apply from plan`: Apply a previously generated plan.
* `plan for destroy`: Plan for infrastructure destruction.
* `destroy-all`: Destroy all resources.
4. Specify **Terraform Version** and optional parameters like **Command Override**.
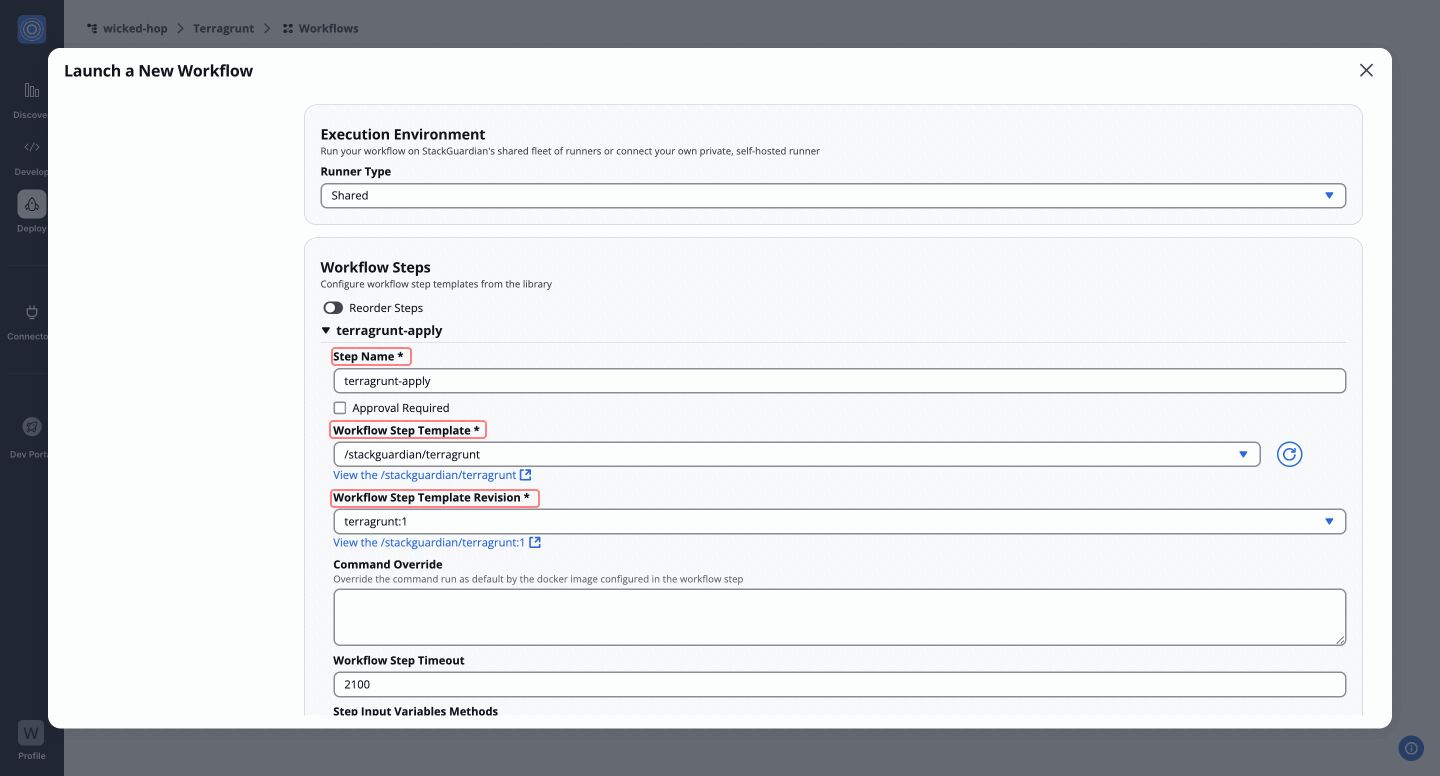
#### Step 5: Add Workflow Metadata[](#step-5-add-workflow-metadata "Direct link to Step 5: Add Workflow Metadata")
1. Provide a **Workflow Name**, **Description**, and optional **Tags**.
2. Assign the workflow to a **Workflow Group**.
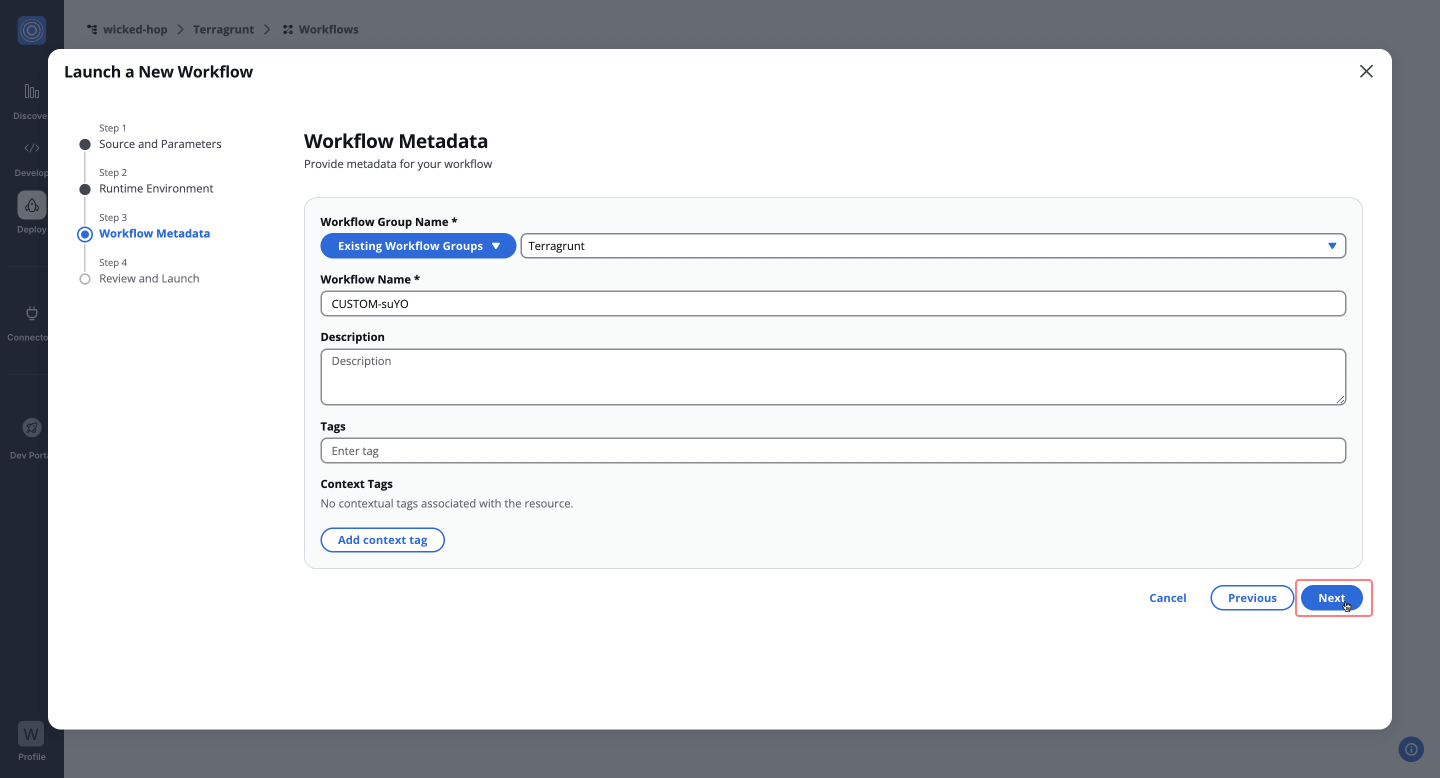
#### Step 6: Review and Launch[](#step-6-review-and-launch "Direct link to Step 6: Review and Launch")
1. Review the configured workflow.
2. Click **Launch Workflow** to start execution.
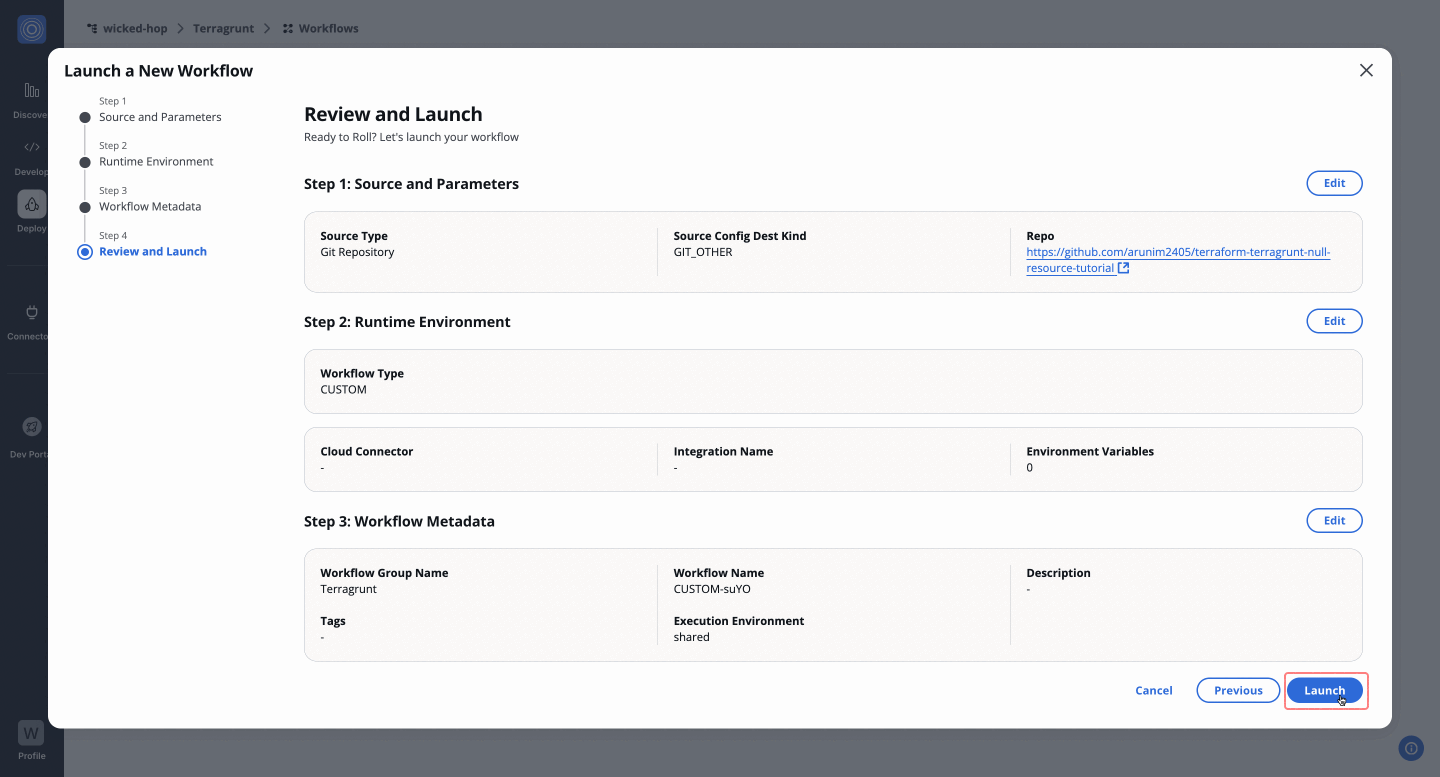
### Available Terragrunt Actions[](#available-terragrunt-actions "Direct link to Available Terragrunt Actions")
Below are the available Terragrunt actions and their use cases:
* **plan for create**: Generate a plan to deploy new resources.
* **apply from plan**: Apply a saved plan to execute changes.
* **plan for destroy**: Preview the destruction of resources without executing it.
* **destroy-all**: Remove all resources defined in the configuration.
* **plan-all**: Generate plans for all modules in the configuration.
* **apply-all**: Apply changes for all modules in the configuration.
* **detect drift**: Identify differences between the current state and the desired configuration.
This Terragrunt workflow allows users to manage Terraform configurations effortlessly, ensuring scalability, efficiency, and maintainability for infrastructure-as-code deployments.
### Overview[](#overview "Direct link to Overview")
The **Overview** tab highlights key workflow details, including compliance check results, cost estimations, and resource summaries like drift detection and schedules. It offers a quick snapshot of your workflow's status.
[Learn more in the **Workflow Overview Guide**](/docs/deploy/workflows/workflow_components/overview/).
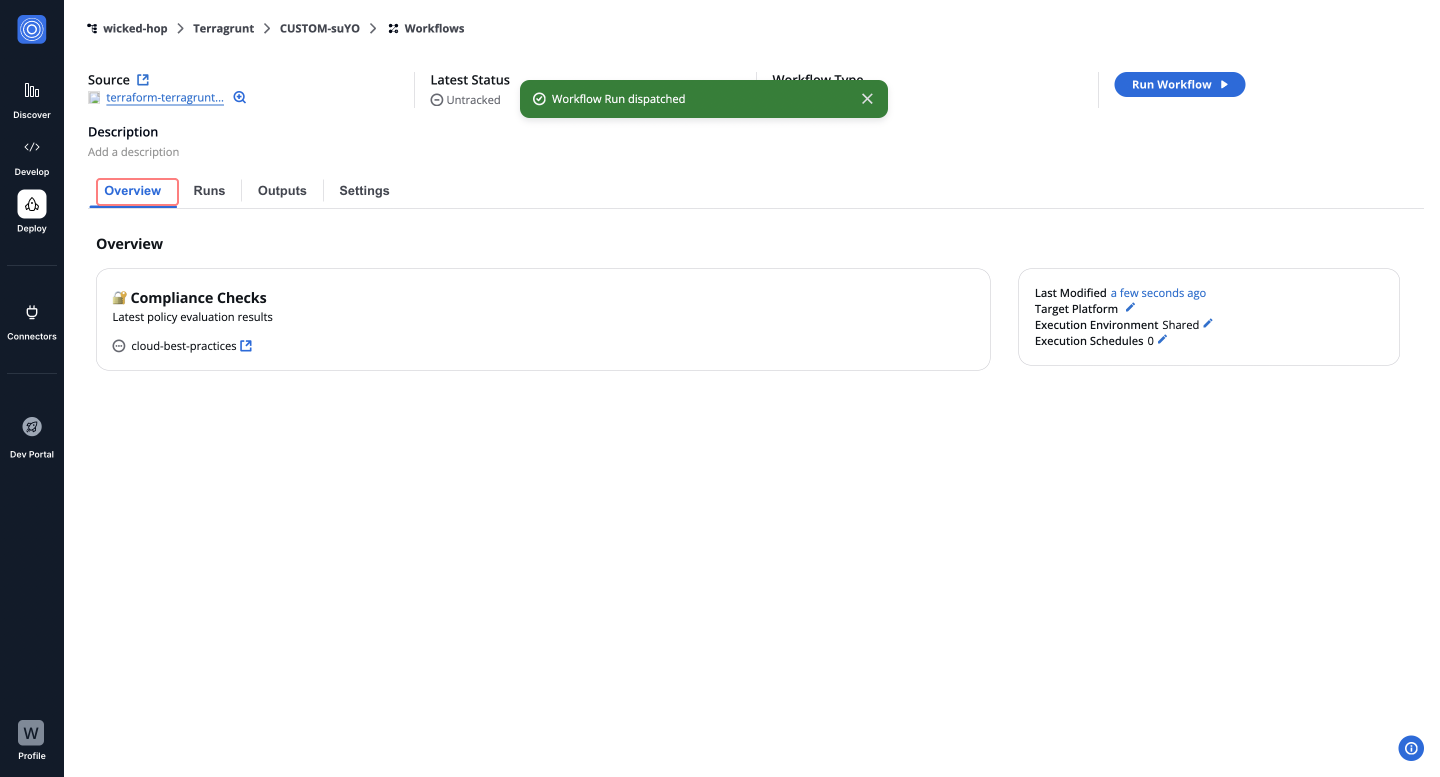
***
### Runs[](#runs "Direct link to Runs")
The **Runs** tab lists all executions with real-time status, unique run IDs, and metadata, such as user actions and modification timestamps. Click a **Run ID** to view detailed logs and execution progress.
[Explore the **Workflow Runs Guide**](/docs/deploy/workflows/workflow_components/run/).
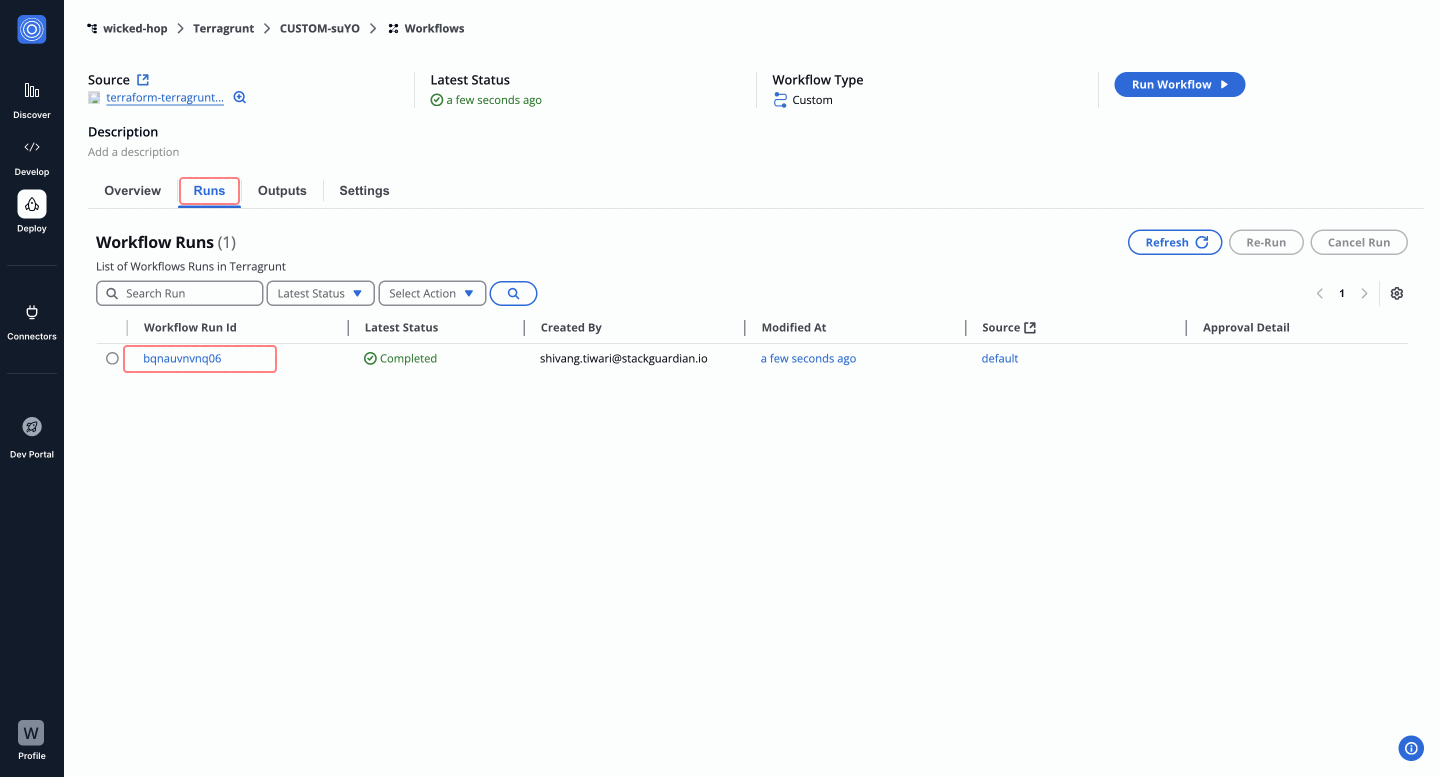
***
### Outputs[](#outputs "Direct link to Outputs")
The **Outputs** tab displays execution results and downloadable artifacts like `tfstate.json`. Use key-value pairs to reference outputs in other workflows, making your infrastructure provisioning more dynamic.
[See the **Workflow Outputs Guide**](/docs/deploy/workflows/workflow_components/outputs/).

***
### Settings[](#settings "Direct link to Settings")
The **Settings** tab enables post-creation updates, such as modifying input variables, refining Terraform runtime settings, reordering custom steps, or managing cloud connectors and environment variables.
[Learn more in the **Workflow Settings Guide**](/docs/deploy/workflows/workflow_components/settings/).
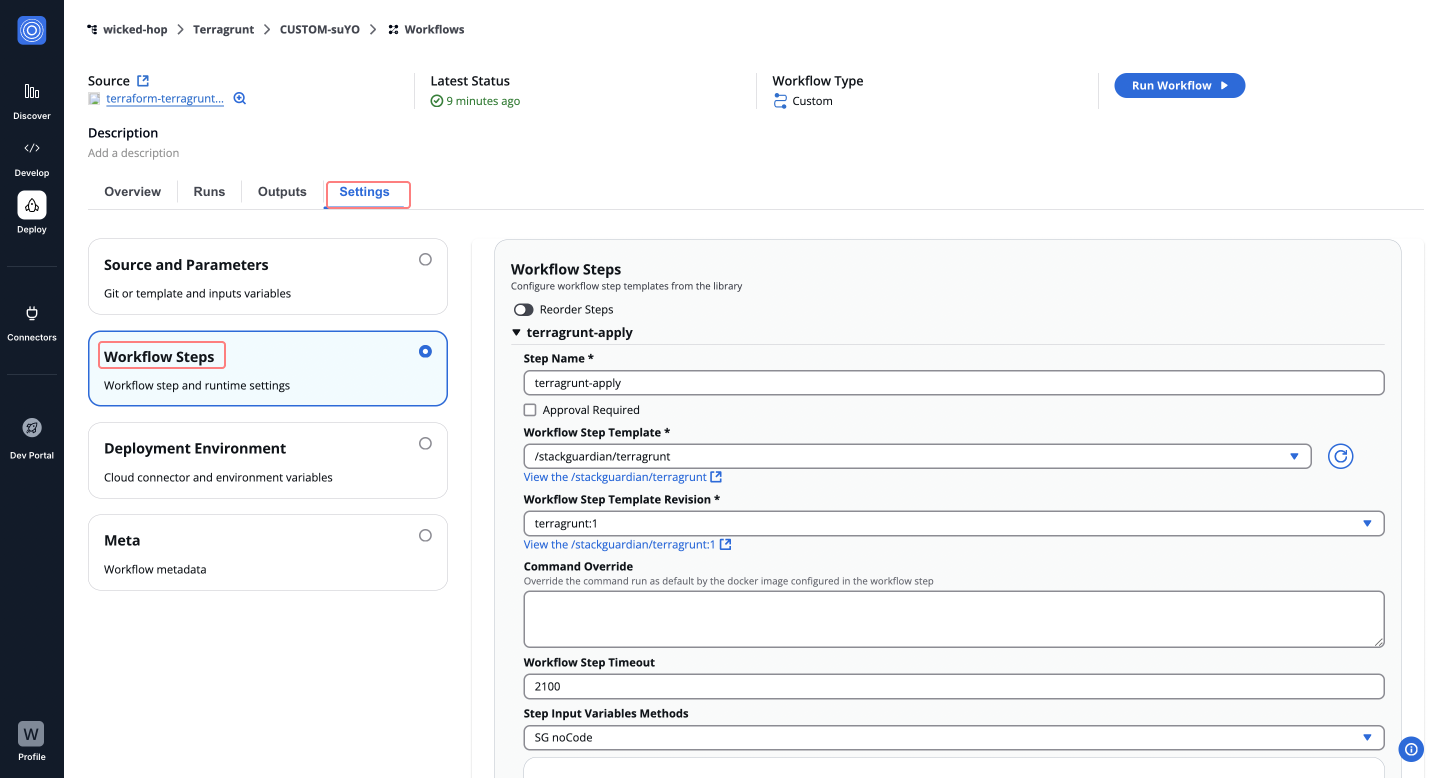
---
# Workflow triggers
## Overview[](#overview "Direct link to Overview")
Workflow triggers allow you to automatically run a workflow in response to VCS events such as pushes, pull requests, and tag creation. Triggers are configured per workflow and are available for GitHub, GitLab, and Bitbucket.
note
Triggers become active only after you save the workflow.
## Configure triggers[](#configure-triggers "Direct link to Configure triggers")
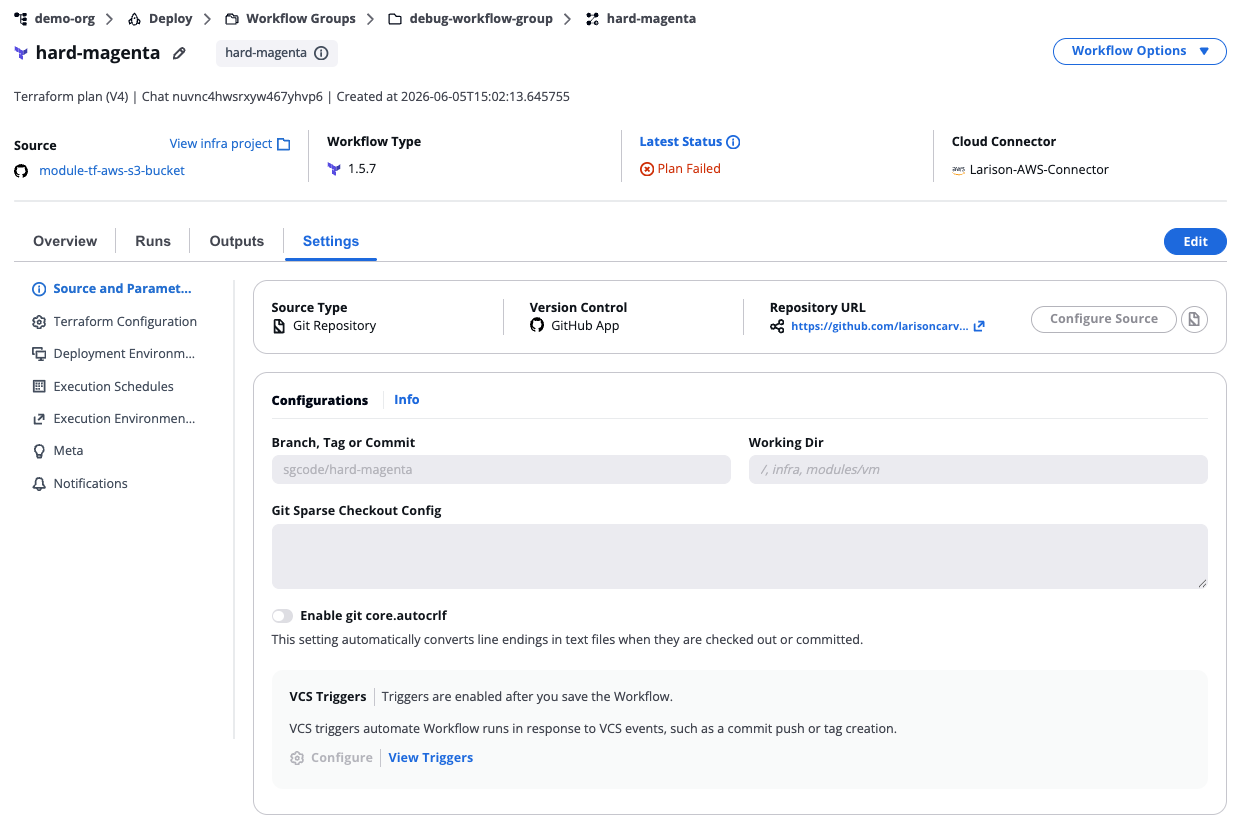
*VCS triggers*
* GitHub
* GitLab
* Bitbucket
1. Select the target workflow.
2. Navigate to **Source and Parameters** > **Configurations**.
3. Under **VCS Triggers**, select **View Triggers** to review the current configuration, or **Configure** to edit it.
4. In the **VCS Triggers** modal, configure the options described below.
5. Select **Save**.
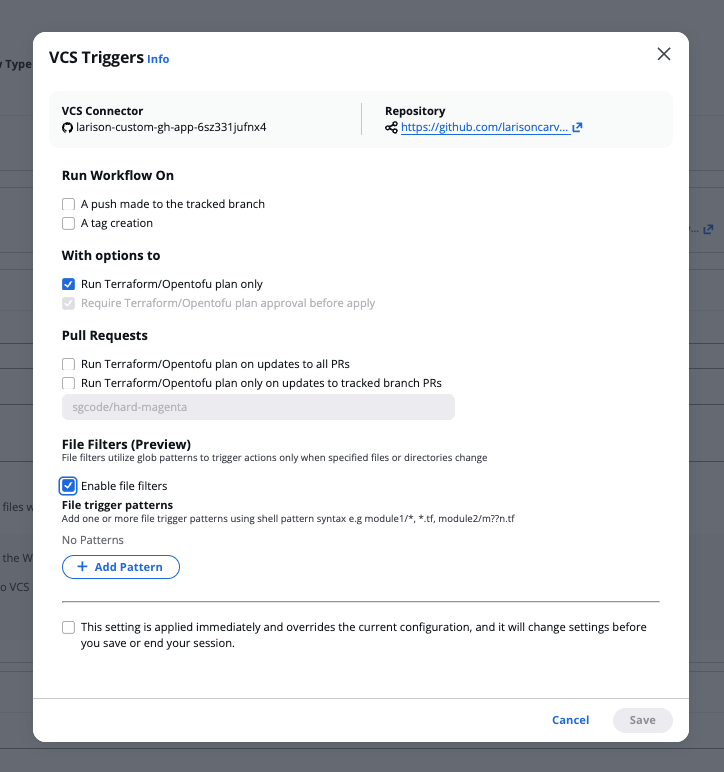
*GitHub triggers*
The modal header shows the **VCS Connector** and **Repository** for the workflow.
1. Select the target workflow.
2. Navigate to **Source and Parameters** > **Configurations**.
3. Under **VCS Triggers**, select **View Triggers** to review the current configuration, or **Configure** to edit it.
4. In the **VCS Triggers** modal, configure the options described below.
5. Select **Save**.
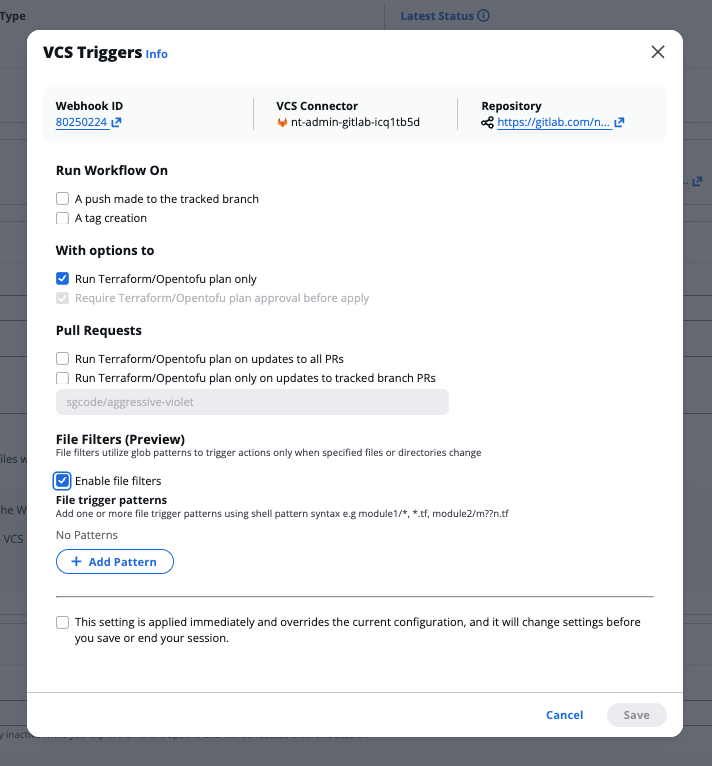
*GitLab triggers*
The modal header shows the **Webhook ID**, **VCS Connector**, and **Repository** for the workflow. All trigger options are the same as GitHub — refer to the GitHub tab for option descriptions and screenshots.
note
Before configuring triggers, ensure your Bitbucket access token includes the `pullrequest`, `repository`, and `webhook` scopes. See [Bitbucket connector setup](/docs/connectors/vcs/bitbucket/).
1. Select the target workflow.
2. Navigate to **Source and Parameters** > **Configurations**.
3. Under **VCS Triggers**, select **View Triggers** to review the current configuration, or **Configure** to edit it.
4. In the **VCS Triggers** modal, configure the options described below.
5. Select **Save**.

*Bitbucket triggers*
The modal header shows the **Webhook ID**, **VCS Connector**, and **Repository** for the workflow. All trigger options are the same as GitHub — refer to the GitHub tab for option descriptions and screenshots.
**Run Workflow On**
* **A push made to the tracked branch** — Triggers a workflow run when a push is made to the tracked branch.
* **A tag creation** — Triggers a workflow run when a new tag is created.
**With options to**
* **Run Terraform/Opentofu plan only** — Executes a plan without applying changes. Selecting this option disables the **Require Terraform/Opentofu plan approval before apply** option.
* **Require Terraform/Opentofu plan approval before apply** — Requires plan approval before changes are applied.
**Pull Requests**
* **Run Terraform/Opentofu plan on updates to all PRs** — Triggers a plan run on any pull request update in the repository. Selecting this option disables the tracked branch PR option below.
* **Run Terraform/Opentofu plan only on updates to tracked branch PRs** — Triggers a plan run only on pull requests targeting the tracked branch.
* **Where the target branch is** — Enter the branch name in the **Specify the branch name** field. This applies when **Run Terraform/Opentofu plan only on updates to tracked branch PRs** is selected.
**File Filters (Preview)**
File filters use glob patterns to trigger a workflow only when specific files or directories change.
1. Select the **Enable file filters** checkbox.
2. Under **File trigger patterns**, select **+ Add Pattern**.
3. Enter one or more patterns using shell pattern syntax (for example, `module1/*`, `*.tf`, `module2/m?n.tf`).
**Supported pattern syntax**
| Pattern | Matches |
| -------- | --------------------------------- |
| `*` | Any string within a directory |
| `?` | Any single character |
| `[seq]` | Any character in the sequence |
| `[!seq]` | Any character not in the sequence |
note
Patterns are matched against the full file path (for example, `module1/main.tf`). Relative path depth matters.
## Session override setting[](#session-override-setting "Direct link to Session override setting")
All trigger modals include the following option at the bottom:
note
This setting is applied immediately and overrides the current configuration, and it will change settings before you save or end your session.
Enable this checkbox to apply trigger configuration changes immediately without waiting for the next save.
---
# Ansible Workflow
An **Ansible workflow** is a powerful automation framework that allows IT teams to execute complex infrastructure and application management tasks. By coordinating these tasks in a structured and repeatable manner, Ansible helps ensure that infrastructure remains consistent and reliable, while reducing manual efforts.
The Ansible workflow would handle tasks like setting up *servers*, *configuring software*, and *deploying* the application code. It helps in **streamlining** the entire process and **ensures** consistent results across different environments.
### Create an Ansible Workflow[](#create-an-ansible-workflow "Direct link to Create an Ansible Workflow")
**Subscribe** and **use** StackGuardian's [**ansible-workflow-step**](https://app.stackguardian.io/orchestrator/WORKFLOW_STEP/stackguardian/ansible). This template automates Ansible playbooks to manage infrastructure and applications, using SSH authentication and customizable variables for streamlined deployment and configuration.
Following this guide, let's configure a **Ansible** workflow.
1. In the **Orchestrator**, navigate to the **Workflow Groups** tab. Create a new **Workflow Group**, enter it, and click **Create Workflow**. Choose **"Use Wizard"** > **"Custom"**.
2. StackGuardian provides two options:
* Enable **VCS settings** to connect your code from the Git repository by providing the URL, then click **"Next"**.
* Or simply, click **"Next"** to proceed without it.
3. Configure the **Add New Step**:
* **Step Name**: Name the step,for example `ansible_wf`.
* **Workflow Step Template**: Select `/stackguardian/ansible`.
* **Workflow Step Template Revision**: Choose the latest version, e.g., `ansible:16`.
* **Command Override**: Leave blank unless customization is needed.
* **Playbook Path**: Set to `playbook.yml`.
* **Action**: Select `run`. Other options include `check-diff` and `dry-run`.
* **Capture Output**: Ensure this is checked.
* **Run Ansible on localhost**: Checked by default. For remote execution, provide a list of target machine IPs (space-separated).
4. After configuring the step, click **Next** to fill in the workflow metadata. Finally, click **Next** to launch the Ansible workflow.
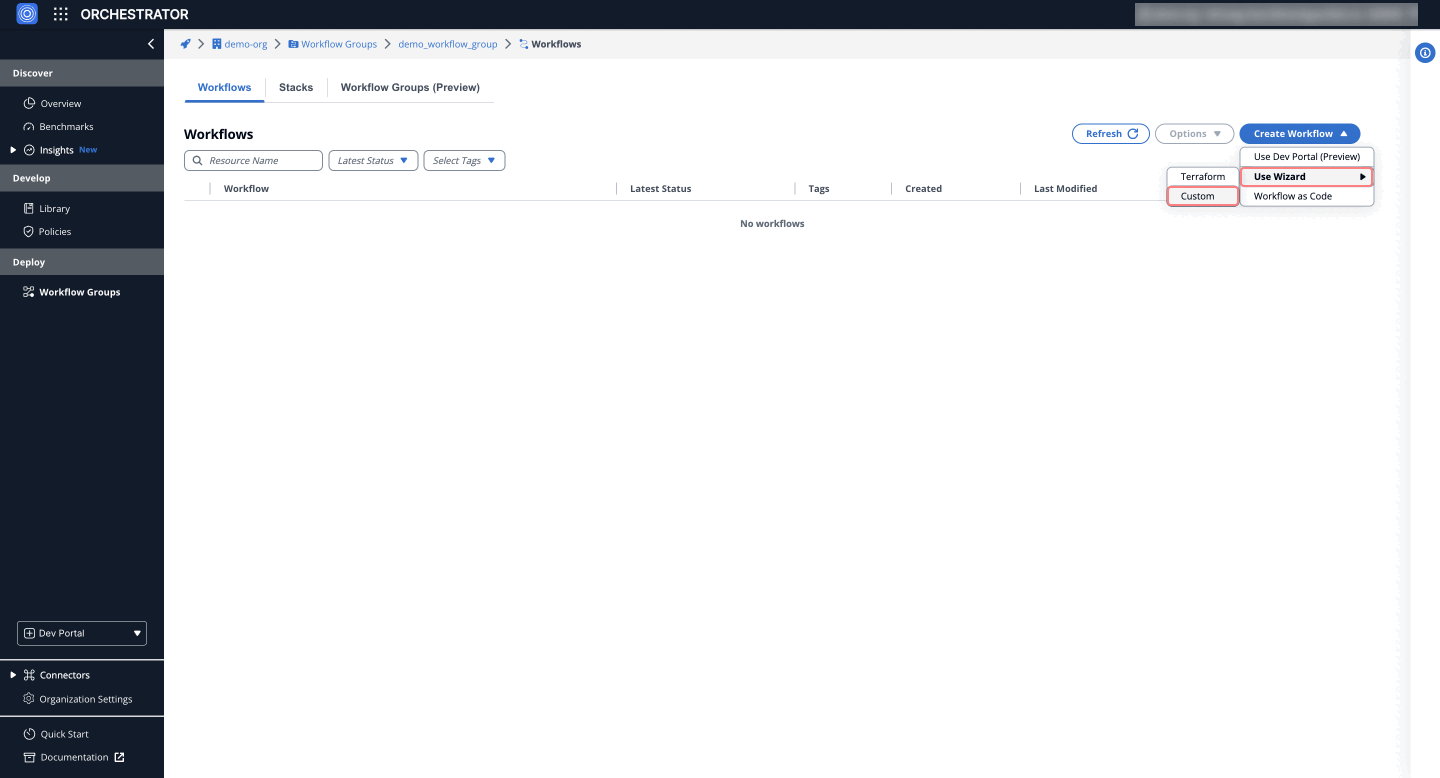
*Fig:* Ansible Workflow
## Dive into Workflow[](#dive-into-workflow "Direct link to Dive into Workflow")
StackGuardian workflows provide multiple tabs for monitoring, managing, and refining your deployments. Each tab offers specific insights and actions to optimize your workflow experience.
### Overview[](#overview "Direct link to Overview")
The **Overview** tab highlights key workflow details, including compliance check results, cost estimations, and resource summaries like drift detection and schedules. It offers a quick snapshot of your workflow's status.
[Learn more in the **Workflow Overview Guide**](/docs/deploy/workflows/workflow_components/overview/).
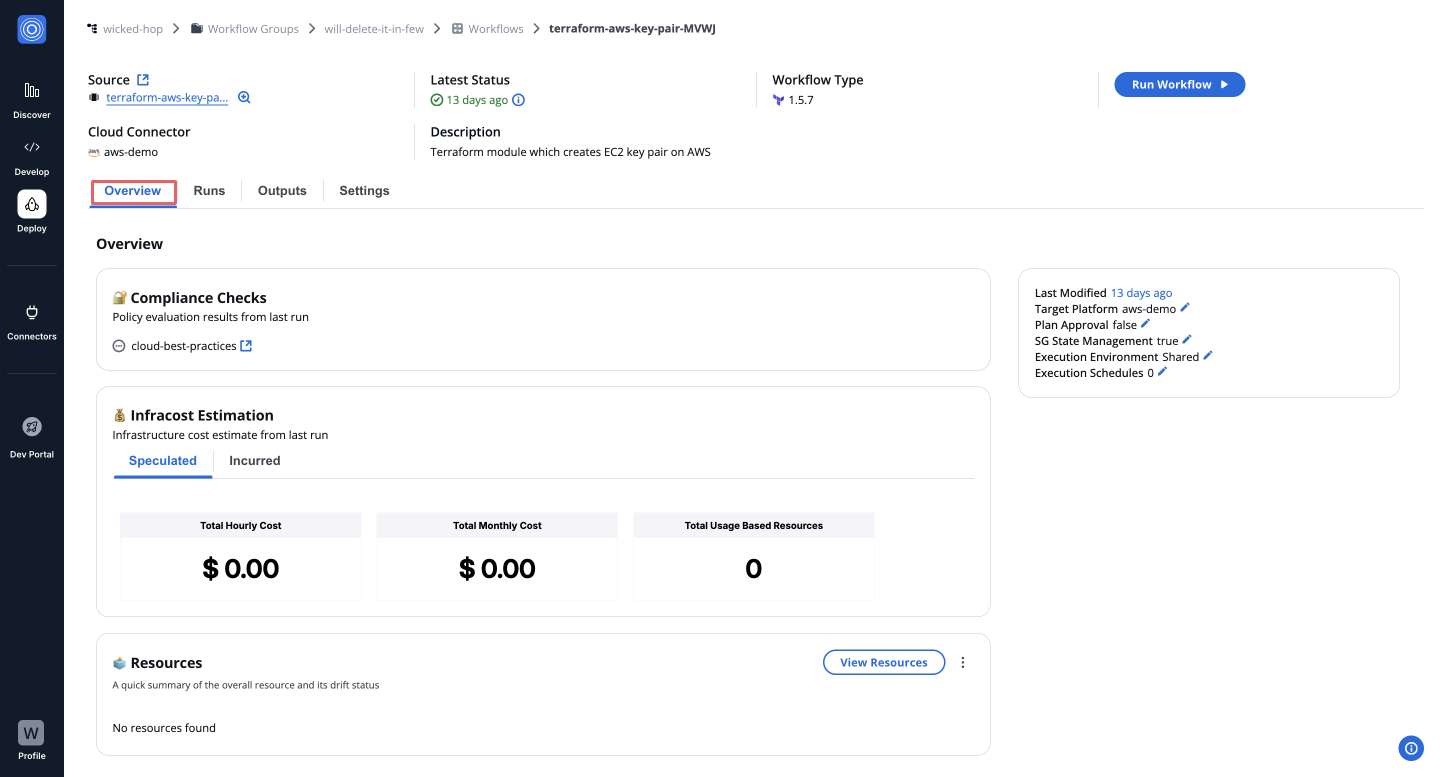
***
### Runs[](#runs "Direct link to Runs")
The **Runs** tab lists all executions with real-time status, unique run IDs, and metadata, such as user actions and modification timestamps. Click a **Run ID** to view detailed logs and execution progress.
[Explore the **Workflow Runs Guide**](/docs/deploy/workflows/workflow_components/run/).

***
### Outputs[](#outputs "Direct link to Outputs")
The **Outputs** tab displays execution results and downloadable artifacts like `tfstate.json`. Use key-value pairs to reference outputs in other workflows, making your infrastructure provisioning more dynamic.
[See the **Workflow Outputs Guide**](/docs/deploy/workflows/workflow_components/outputs/).
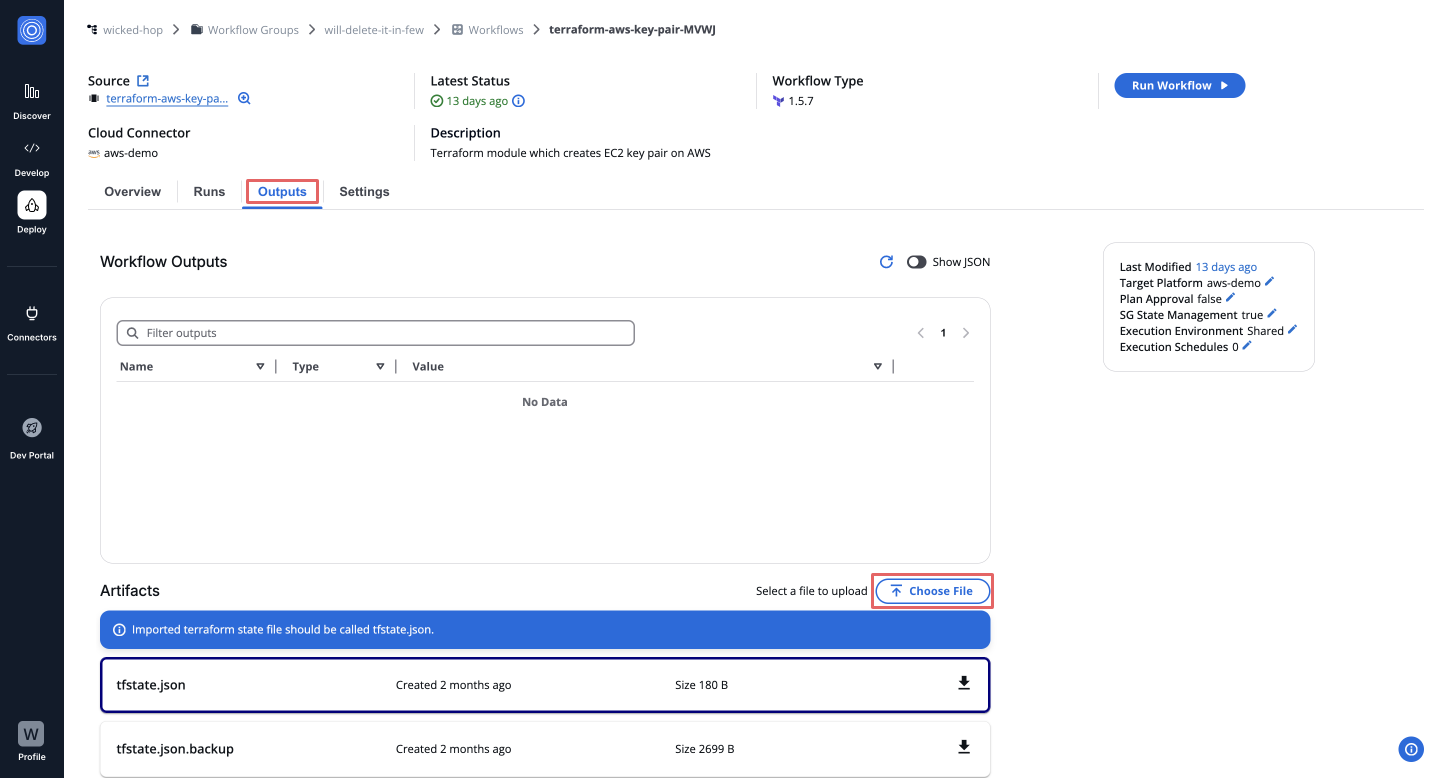
***
### Settings[](#settings "Direct link to Settings")
The **Settings** tab enables post-creation updates, such as modifying input variables, refining Terraform runtime settings, reordering custom steps, or managing cloud connectors and environment variables.
[Learn more in the **Workflow Settings Guide**](/docs/deploy/workflows/workflow_components/settings/).
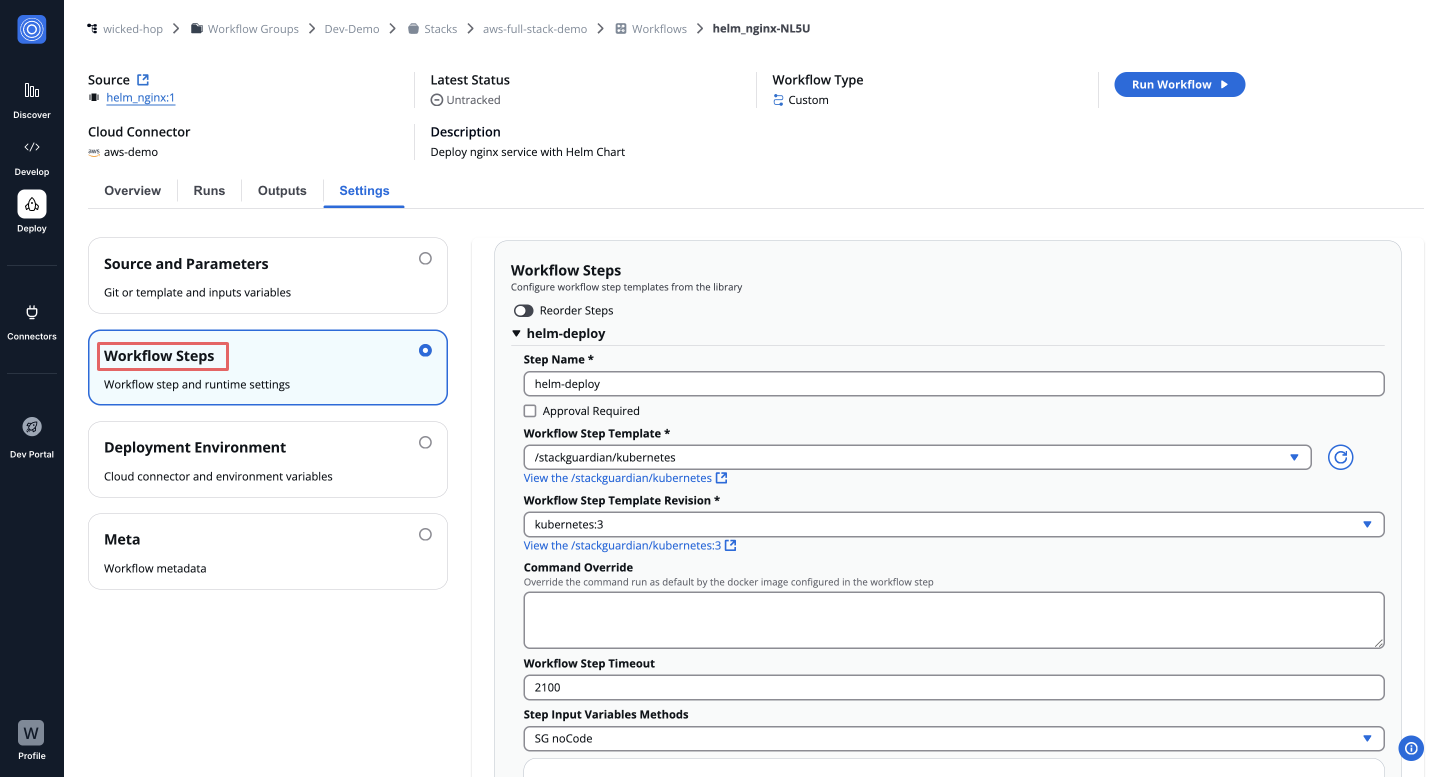
---
# CloudFormation Workflow
A **CloudFormation workflow** allows IT teams to automate the deployment and management of AWS resources using Infrastructure as Code (IaC). It provides a structured way to define and provision infrastructure, ensuring consistency and scalability.
**For example**, when deploying an entire AWS stack, a CloudFormation workflow would handle the provisioning of resources such as EC2 instances, S3 buckets, and RDS databases, all defined in a template. This approach simplifies infrastructure management and ensures repeatable and reliable deployments.
### Create a CloudFormation Workflow[](#create-a-cloudformation-workflow "Direct link to Create a CloudFormation Workflow")
**Subscribe** and **use** StackGuardian's [**cloudformation-template**](https://app.stackguardian.io/orchestrator/WORKFLOW_STEP/stackguardian/cloudformation), which provides a pre-configured environment specifically designed for configuring CloudFormation workflows on the StackGuardian platform. It supports actions such as creating and executing change sets, deleting stacks, and performing drift detection. Following this guide, let's configure a **CloudFormation** workflow.
1. Navigate into the **Workflow Group**, click **Create Workflow** and choose **"Use Wizard"** > **"Custom"**.
2. StackGuardian provides two options:
* Enable **VCS settings** to connect your code from the Git repository by providing the URL, then click **"Next"**.
* Or simply, click **"Next"** to proceed without it.
3. To create a **Change Set**, which allows to preview changes before applying them to a stack, click on **"Add New Step"** and enter the following details:
#### Creating a Changeset[](#creating-a-changeset "Direct link to Creating a Changeset")
* **Step Name**: Enter a relevant name, such as "*create-Changeset*".
* **Workflow Step Template**: Select `/stackguardian/cloudformation`.
* **Workflow Step Template Revision**: Choose the latest, e.g., `cloudformation:1`.
* **Command Override**: Leave blank unless customization is needed.
* **Stack Action**: Select **Create Changeset**. This prepares a set of changes to apply to the stack.
* **Stack Name**: Enter the name or unique ID of the stack for which you're creating the changeset, e.g., `vpc-22-apr`.
* **Template File**: Provide a valid JSON file located in the repository. Specify either the **Template File** or **Template URL**, not both.
* **Template URL**: Optionally, specify the URL of the template in an S3 bucket or Systems Manager document.
* **Parameter File**: Specify the file path or URL where the *CloudFormation* parameters file is located.
* **CloudFormation Capabilities**:
* **CAPABILITY\_IAM**: Allows the creation of IAM resources.
* **CAPABILITY\_NAMED\_IAM**: Grants permission to create IAM resources with specific names.
* **CAPABILITY\_AUTO\_EXPAND**: Automatically processes nested stacks.
4. To execute a **Change Set**, which applies the prepared changes to the stack, follow these steps:
#### Executing a Changeset[](#executing-a-changeset "Direct link to Executing a Changeset")
* **Step Name**: Enter a relevant name, such as "*apply-Changeset*".
* **Workflow Step Template**: Select `/stackguardian/cloudformation`.
* **Workflow Step Template Revision**: Choose the latest, e.g., `cloudformation:1`.
* **Command Override**: Leave blank unless customization is needed.
* **Stack Action**: Select **Execute Changeset**. This applies the changeset to the specified stack.
* **Stack Name**: Enter the name or ID of the stack, e.g., `vpc-22-apr`.
* **Retain Except on Create**: Check this box to ensure resources marked for retention are not deleted when rolling back.
5. After configuring the steps, click **Next** to fill in the workflow **metadata**. Finally, click **Next** to *launch* the CloudFormation workflow.

*Fig:* CloudFormation workflow example
Using this setup, you can create a flexible CloudFormation workflow to manage your stacks efficiently on the StackGuardian platform. Whether it's creating changesets, applying them, or checking for stack drift, this setup covers the essential fields and actions required for CloudFormation automation.
### Dive into Workflow[](#dive-into-workflow "Direct link to Dive into Workflow")
StackGuardian workflows provide multiple tabs for monitoring, managing, and refining your deployments. Each tab offers specific insights and actions to optimize your workflow experience.
### Overview[](#overview "Direct link to Overview")
The **Overview** tab highlights key workflow details, including compliance check results, cost estimations, and resource summaries like drift detection and schedules. It offers a quick snapshot of your workflow's status.
[Learn more in the **Workflow Overview Guide**](/docs/deploy/workflows/workflow_components/overview/).

***
### Runs[](#runs "Direct link to Runs")
The **Runs** tab lists all executions with real-time status, unique run IDs, and metadata, such as user actions and modification timestamps. Click a **Run ID** to view detailed logs and execution progress.
[Explore the **Workflow Runs Guide**](/docs/deploy/workflows/workflow_components/run/).

***
### Outputs[](#outputs "Direct link to Outputs")
The **Outputs** tab displays execution results and downloadable artifacts like `tfstate.json`. Use key-value pairs to reference outputs in other workflows, making your infrastructure provisioning more dynamic.
[See the **Workflow Outputs Guide**](/docs/deploy/workflows/workflow_components/outputs/).

***
### Settings[](#settings "Direct link to Settings")
The **Settings** tab enables post-creation updates, such as modifying input variables, refining Terraform runtime settings, reordering custom steps, or managing cloud connectors and environment variables.
[Learn more in the **Workflow Settings Guide**](/docs/deploy/workflows/workflow_components/settings/).

---
# Custom Workflow
A **Custom workflow** allows customers to bring any environment or toolset onto the platform, beyond what is already available (such as Ansible, Kubernetes, or CloudFormation). It offers IT teams the flexibility to create and execute workflows tailored to their specific needs, enabling automation beyond standard options.
The versatility of custom workflows allows for the automation of processes that do not fall under conventional workflow types.
### Prerequisites[](#prerequisites "Direct link to Prerequisites")
* Create a personalized **Workflow Steps Template** to use within the workflow. Visit [**here**](https://docs.qa.stackguardian.io/docs/develop/library/workflow_step/) for detailed instructions.
### Create a Custom Workflow[](#create-a-custom-workflow "Direct link to Create a Custom Workflow")
Once the workflow steps template is ready, follow these steps to create a custom workflow:
1. Navigate to the **Workflow Group**, click **Create Workflow**, and choose **"Use Wizard"** > **"Custom"**.
2. StackGuardian provides two options:
* Enable **VCS settings** to connect your code from the Git repository by providing the URL, then click **"Next"**.
* Or simply, click **"Next"** to proceed without it.
3. Click **"Add New Step"** and configure the following:
* **Step Name**: Enter a relevant name for the workflow step.
* **Workflow Step Template**: Select the template created earlier.
* **Workflow Step Template Revision**: Choose the latest version.
* **Command Override**: Leave blank unless customization is required.
4. Click **Next** to update the workflow *metadata* and **Launch** to execute the workflow.

### Custom Workflow Example[](#custom-workflow-example "Direct link to Custom Workflow Example")
**Subscribe** and **use** StackGuardian's [**SG-Common-Utils-Template**](https://app.stackguardian.io/orchestrator/WORKFLOW_STEP/stackguardian/sg-common-utils?revision=%2Fstackguardian%2Fsg-common-utils%3A1\&tab=general), which provides a *pre-configured* environment with tools like *cloud provider CLIs*, *Python*, essential libraries such as *Boto3, Google Cloud SDK, and more*.
Following this example, let's configure a custom workflow to execute **Bash** and **Python** scripts.
1. Navigate into the **Workflow Group**, click **Create Workflow** and choose **"Use Wizard"** > **"Custom"**.
2. Click **Next** to continue without **Enabling VCS settings**.
3. Click on **"Add New Step"** and configure it as follows:
#### Bash Script[](#bash-script "Direct link to Bash Script")
Ideal for more complex tasks like data analysis, API interactions, or any process requiring dynamic decision-making.
* **Step Name**: Enter a relevant name, such as "*bash*".
* **Workflow Step Template**: Select `/stackguardian/sg-common-utils`.
* **Workflow Step Template Revision**: Choose the latest version, e.g., `sg-common-utils:1`.
#### Python Script[](#python-script "Direct link to Python Script")
Can be used to automate server configurations, manage files, or interact with cloud services using command-line tools.
* **Step Name**: Enter a relevant name, such as "*python*".
* **Workflow Step Template**: Select `/stackguardian/sg-common-utils`.
* **Workflow Step Template Revision**: Choose the latest version, e.g., `sg-common-utils:1`.
4. After configuring the workflow step, click **Next** to fill in the workflow **metadata**. Finally, click **Next** to *launch* the workflow.
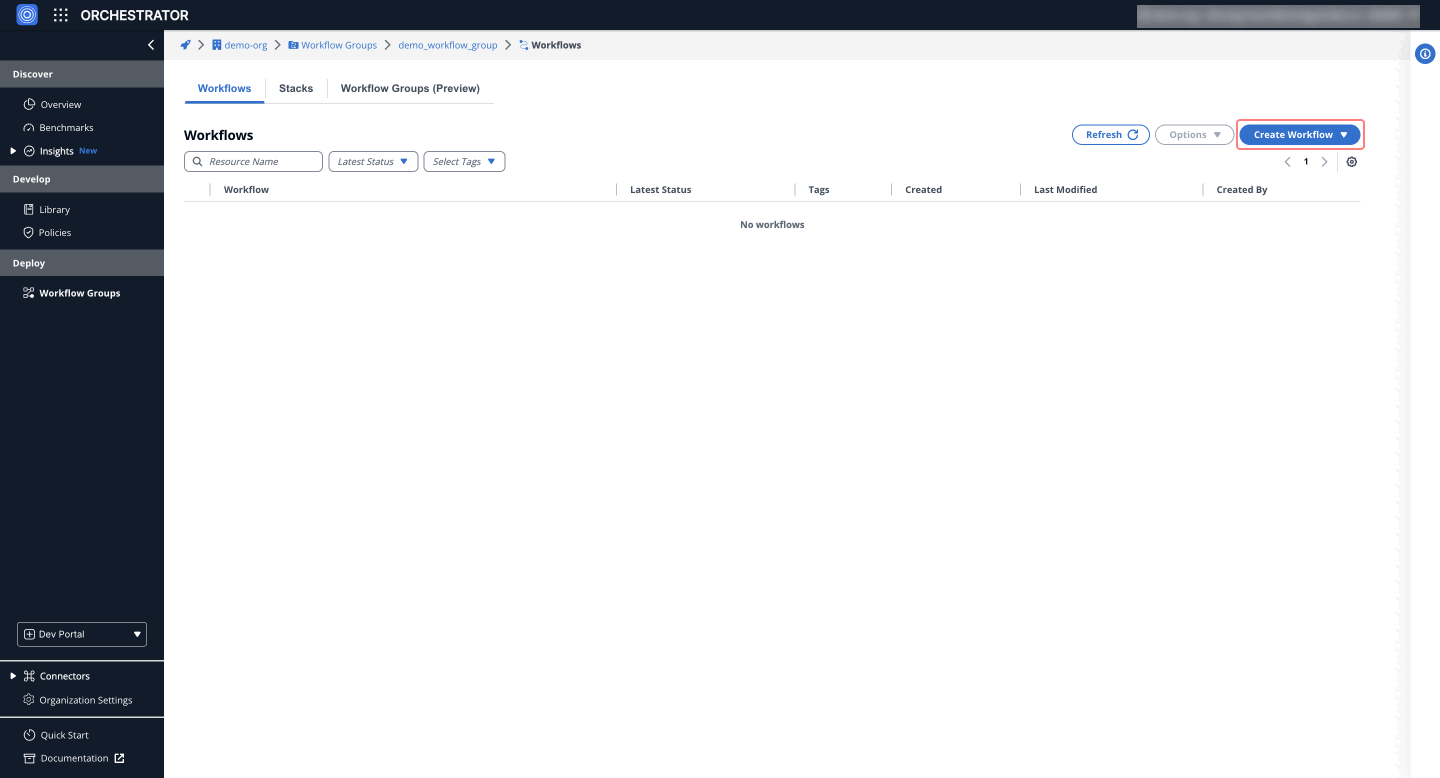
*Fig:* Custom Workflow executing Bash and Python scripts
Using this setup, one can create a robust, tailored workflow that automates specific tasks and processes within their organization.
## Dive into Workflow[](#dive-into-workflow "Direct link to Dive into Workflow")
StackGuardian workflows provide multiple tabs for monitoring, managing, and refining your deployments. Each tab offers specific insights and actions to optimize your workflow experience.
### Overview[](#overview "Direct link to Overview")
The **Overview** tab highlights key workflow details, including compliance check results, cost estimations, and resource summaries like drift detection and schedules. It offers a quick snapshot of your workflow's status.
[Learn more in the **Workflow Overview Guide**](/docs/deploy/workflows/workflow_components/overview/).

***
### Runs[](#runs "Direct link to Runs")
The **Runs** tab lists all executions with real-time status, unique run IDs, and metadata, such as user actions and modification timestamps. Click a **Run ID** to view detailed logs and execution progress.
[Explore the **Workflow Runs Guide**](/docs/deploy/workflows/workflow_components/run/).

***
### Outputs[](#outputs "Direct link to Outputs")
The **Outputs** tab displays execution results and downloadable artifacts like `tfstate.json`. Use key-value pairs to reference outputs in other workflows, making your infrastructure provisioning more dynamic.
[See the **Workflow Outputs Guide**](/docs/deploy/workflows/workflow_components/outputs/).

***
### Settings[](#settings "Direct link to Settings")
The **Settings** tab enables post-creation updates, such as modifying input variables, refining Terraform runtime settings, reordering custom steps, or managing cloud connectors and environment variables.
[Learn more in the **Workflow Settings Guide**](/docs/deploy/workflows/workflow_components/settings/).

---
# Helm Workflow
A **Helm workflow** simplifies the deployment and management of Kubernetes applications by using Helm charts. It enables teams to define, install, and upgrade even the most complex Kubernetes applications.
**For example**, when deploying a microservices application on Kubernetes, a Helm workflow would manage the configuration and deployment of each service using Helm charts, ensuring consistency and easy rollbacks.
### Create a Helm Workflow[](#create-a-helm-workflow "Direct link to Create a Helm Workflow")
**Subscribe** and **use** StackGuardian's [**helm-template**](https://app.stackguardian.io/orchestrator/WORKFLOW_STEP/stackguardian/kubernetes), which provides a pre-configured environment for managing Kubernetes clusters with tools like **kubectl** and **Helm**, which is a package manager for Kubernetes that simplifies the deployment, management, and versioning of Kubernetes applications.
Following this guide, let's configure a **Helm** workflow.
1. Navigate into the **Workflow Group**, click **Create Workflow** and choose **"Use Wizard"** > **"Custom"**.
2. StackGuardian provides two options:
* Enable **VCS settings** to connect your code from the Git repository by providing the URL, then click **"Next"**.
* Or simply, click **"Next"** to proceed without it.
3. To create a Helm action, click on **"Add New Step"** and configure it as follows:
* **Step Name**: Enter a relevant name, such as "*helm-deploy*".
* **Workflow Step Template**: Select `/stackguardian/kubernetes`.
* **Workflow Step Template Revision**: Choose the latest version, e.g., `kubernetes:4`.
* **Command Override**: Leave blank unless customization is needed.
* **Kubectl Version**: Select the latest available version, e.g., `1.26.0`.
* **Namespace**: Set to `default`, or specify a custom namespace if needed.
* **Select Executable**: Choose `helm` from the dropdown.
* **Helm Action**: Select `upgrade` to modify an existing Helm deployment (other options: `status` to check a release, `list` to view releases, and `uninstall` to remove a release)
* **Release Name**: Specify the name of the release you wish to upgrade, for example, `wfs-demo`.
* **Run with --dry-run**: Check this option to simulate the upgrade before applying it.
* **Additional Parameters**: Optional; use this for referencing output or vault secrets from other workflows.
4. After configuring the step, click **Next** to fill in the workflow **metadata**. Finally, click **Next** to *launch* the workflow.

*Fig:* Helm Workflow for Deploying a Helm Service
Once the workflow is executed, Helm will manage the desired Kubernetes resources. You can verify the deployment using the `kubectl get svc` command or other relevant Helm or Kubernetes commands to check the status of the deployment.
## Dive into Workflow[](#dive-into-workflow "Direct link to Dive into Workflow")
StackGuardian workflows provide multiple tabs for monitoring, managing, and refining your deployments. Each tab offers specific insights and actions to optimize your workflow experience.
### Overview[](#overview "Direct link to Overview")
The **Overview** tab highlights key workflow details, including compliance check results, cost estimations, and resource summaries like drift detection and schedules. It offers a quick snapshot of your workflow's status.
[Learn more in the **Workflow Overview Guide**](/docs/deploy/workflows/workflow_components/overview/).

***
### Runs[](#runs "Direct link to Runs")
The **Runs** tab lists all executions with real-time status, unique run IDs, and metadata, such as user actions and modification timestamps. Click a **Run ID** to view detailed logs and execution progress.
[Explore the **Workflow Runs Guide**](/docs/deploy/workflows/workflow_components/run/).

***
### Outputs[](#outputs "Direct link to Outputs")
The **Outputs** tab displays execution results and downloadable artifacts like `tfstate.json`. Use key-value pairs to reference outputs in other workflows, making your infrastructure provisioning more dynamic.
[See the **Workflow Outputs Guide**](/docs/deploy/workflows/workflow_components/outputs/).

***
### Settings[](#settings "Direct link to Settings")
The **Settings** tab enables post-creation updates, such as modifying input variables, refining Terraform runtime settings, reordering custom steps, or managing cloud connectors and environment variables.
[Learn more in the **Workflow Settings Guide**](/docs/deploy/workflows/workflow_components/settings/).

---
# Kubectl Workflow
A **Kubectl workflow** provides a direct way to interact with a Kubernetes cluster, allowing teams to manage resources, deploy applications, and troubleshoot issues using `kubectl` commands.
**For example**, when scaling an application or deploying a new version, a Kubectl workflow would execute the necessary `kubectl` commands to update the deployment, manage services, or monitor the status of resources in the cluster.
### Create a Kubernetes Workflow[](#create-a-kubernetes-workflow "Direct link to Create a Kubernetes Workflow")
**Subscribe** and **use** StackGuardian's [**kubernetes-template**](https://app.stackguardian.io/orchestrator/WORKFLOW_STEP/stackguardian/kubernetes). This template provides a pre-configured environment for managing Kubernetes clusters with tools like **kubectl** and **Helm**.
Following this guide, let's configure a **Kubernetes** workflow.
1. Navigate into the **Workflow Group**, click **Create Workflow** and choose **"Use Wizard"** > **"Custom"**.
2. StackGuardian provides two options:
* Enable **VCS settings** to connect your code from the Git repository by providing the URL, then click **"Next"**.
* Or simply, click **"Next"** to proceed without it.
3. To create an **apply** action (used to apply Kubernetes manifests), click on **"Add New Step"** and configure it as follows:
* **Step Name**: Enter a relevant name, such as "*apply-manifest*".
* **Workflow Step Template**: Select `/stackguardian/kubernetes`.
* **Workflow Step Template Revision**: Choose the latest, e.g., `kubernetes:4`.
* **Command Override**: Leave blank unless customization is needed.
* **Kubectl Version**: Choose the latest version. `1.26.0`
* **Namespace**: Set to `default` or specify a custom namespace.
* **Select Executable**: Choose `kubectl`.
* **Kubectl Action**: Select `apply` (other options include `get` to retrieve resources, and `delete` to remove resources).
* **Run with --dry-run**: Check this if you want to simulate the action without actually executing it.
* **Additional Parameters**: Optional; used for referencing output or vault secrets from other workflows.
4. After configuring the step, click **Next** to fill in the workflow **metadata**. Finally, click **Next** to *launch* the workflow.
*Fig:* Kubernetes workflow type
Using this setup, you can create and manage Kubernetes workflows for applying manifests, retrieving resources, and deleting them as needed. You can also create a workflow step to delete or get resources based on your specific requirements.
## Dive into Workflow[](#dive-into-workflow "Direct link to Dive into Workflow")
StackGuardian workflows provide multiple tabs for monitoring, managing, and refining your deployments. Each tab offers specific insights and actions to optimize your workflow experience.
### Overview[](#overview "Direct link to Overview")
The **Overview** tab highlights key workflow details, including compliance check results, cost estimations, and resource summaries like drift detection and schedules. It offers a quick snapshot of your workflow's status.
[Learn more in the **Workflow Overview Guide**](/docs/deploy/workflows/workflow_components/overview/).

***
### Runs[](#runs "Direct link to Runs")
The **Runs** tab lists all executions with real-time status, unique run IDs, and metadata, such as user actions and modification timestamps. Click a **Run ID** to view detailed logs and execution progress.
[Explore the **Workflow Runs Guide**](/docs/deploy/workflows/workflow_components/run/).

***
### Outputs[](#outputs "Direct link to Outputs")
The **Outputs** tab displays execution results and downloadable artifacts like `tfstate.json`. Use key-value pairs to reference outputs in other workflows, making your infrastructure provisioning more dynamic.
[See the **Workflow Outputs Guide**](/docs/deploy/workflows/workflow_components/outputs/).

***
### Settings[](#settings "Direct link to Settings")
The **Settings** tab enables post-creation updates, such as modifying input variables, refining Terraform runtime settings, reordering custom steps, or managing cloud connectors and environment variables.
[Learn more in the **Workflow Settings Guide**](/docs/deploy/workflows/workflow_components/settings/).

---
# OpenTofu Configuration
### SG Managed OpenTofu Backend[](#sg-managed-opentofu-backend "Direct link to SG Managed OpenTofu Backend")
Enable the `Use Managed OpenTofu State` option under **OpenTofu Customizations**. This feature ensures that StackGuardian automatically injects and manages the OpenTofu state file, providing secure, tracked, and remotely managed infrastructure states.
Enable the `Use Managed OpenTofu State` option under **OpenTofu Customizations**. This feature ensures that StackGuardian automatically injects and manages the OpenTofu state file, providing secure, tracked, and remotely managed infrastructure states. StackGuardian uses `tfstate.json` as the file name for storing your backend. Alternatively, you can add [StackGuardian State Backend explicitly to your OpenTofu code](#configuring-stackguardian-state-backend-in-opentofu-code). In either case, the state is stored in the same type of storage backend.
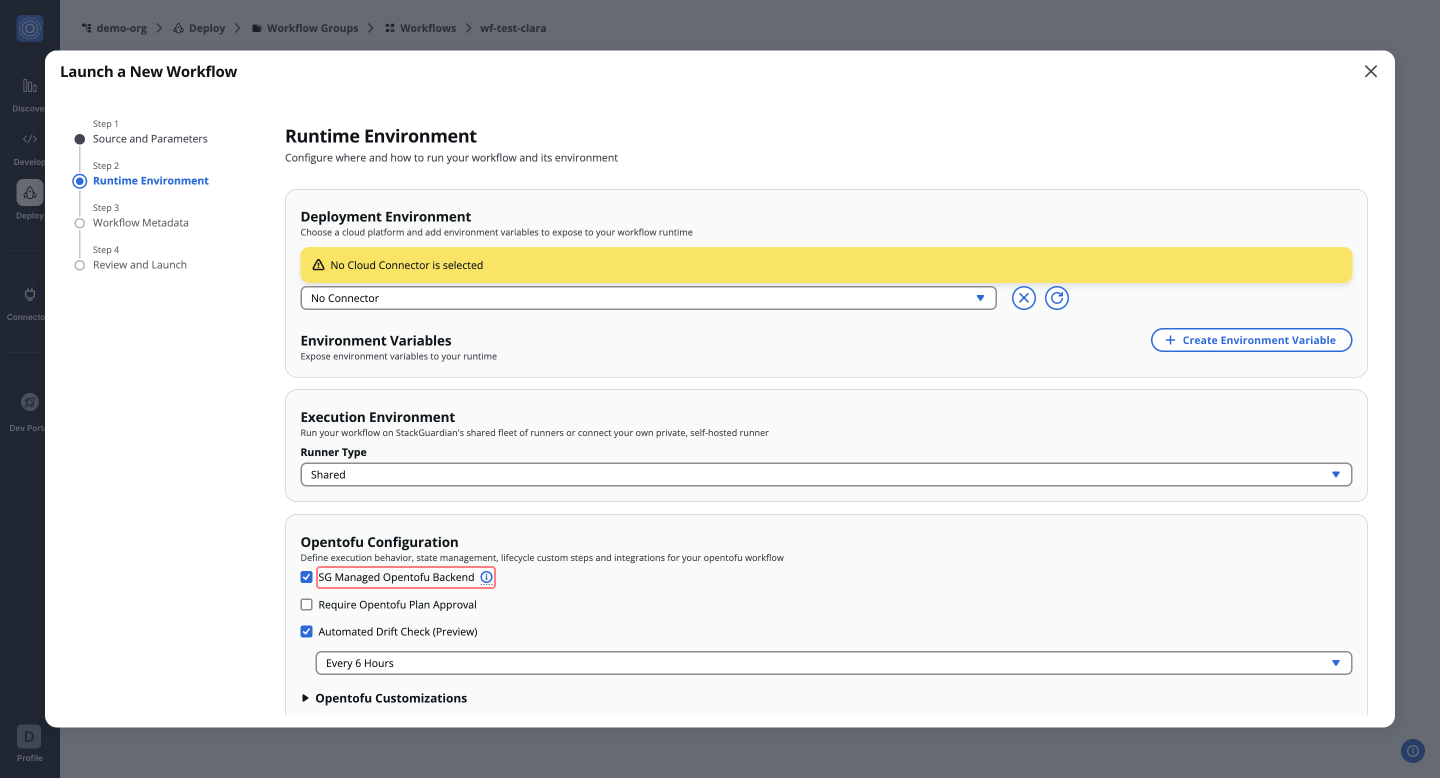
### Configuring StackGuardian State Backend in OpenTofu Code[](#configuring-stackguardian-state-backend-in-opentofu-code "Direct link to Configuring StackGuardian State Backend in OpenTofu Code")
StackGuardian supports the use of an *HTTP backend* for OpenTofu, facilitating secure, remote storage and management of OpenTofu **state files**. This configuration is crucial for teams requiring centralized state management to improve ***collaboration*** and avoid ***state locking conflicts***.
To integrate StackGuardian with your OpenTofu setup, configure the state backend as follows:
* EU Region
* US Region
```
terraform {
backend "http" {
address = "https://api.app.stackguardian.io/api/v1/orgs/[SG_ORG_ID]/wfgrps/[SG_WORKFLOW_GROUP_ID]/wfs/[WORKFLOW_OR_STACK_PATH]/artifacts/tfstate.json"
retry_wait_min = 5 # The minimum time in seconds to wait between HTTP request attempts
username = "SG_EMAIL" # Can also be passed using TF_HTTP_USERNAME env var
password = "SG_API_TOKEN" # Can also be passed using TF_HTTP_PASSWORD env var
}
}
```
**Reference URLs:**
* **Standard Workflows**: `https://api.app.stackguardian.io/api/v1/orgs/[SG_ORG_ID]/wfgrps/[SG_WORKFLOW_GROUP_ID]/wfs/[SG_WORKFLOW_ID]/artifacts/tfstate.json`
* **Stack Workflows**: `https://api.app.stackguardian.io/api/v1/orgs/[SG_ORG_ID]/wfgrps/[SG_WORKFLOW_GROUP_ID]/stacks/[SG_STACK_ID]/wfs/[SG_WORKFLOW_ID]/artifacts/tfstate.json`
```
terraform {
backend "http" {
address = "https://api.us.stackguardian.io/api/v1/orgs/[SG_ORG_ID]/wfgrps/[SG_WORKFLOW_GROUP_ID]/wfs/[WORKFLOW_OR_STACK_PATH]/artifacts/tfstate.json"
retry_wait_min = 5 # The minimum time in seconds to wait between HTTP request attempts
username = "SG_EMAIL" # Can also be passed using TF_HTTP_USERNAME env var
password = "SG_API_TOKEN" # Can also be passed using TF_HTTP_PASSWORD env var
}
}
```
**Reference URLs:**
* **Standard Workflows**: `https://api.us.stackguardian.io/api/v1/orgs/[SG_ORG_ID]/wfgrps/[SG_WORKFLOW_GROUP_ID]/wfs/[SG_WORKFLOW_ID]/artifacts/tfstate.json`
* **Stack Workflows**: `https://api.us.stackguardian.io/api/v1/orgs/[SG_ORG_ID]/wfgrps/[SG_WORKFLOW_GROUP_ID]/stacks/[SG_STACK_ID]/wfs/[SG_WORKFLOW_ID]/artifacts/tfstate.json`
In your OpenTofu backend configuration, replace **`[WORKFLOW_OR_STACK_PATH]`** with the appropriate path depending on your workflow type. Use ***`wfs/[SG_WORKFLOW_ID]`*** for general workflows, or ***`stacks/[SG_STACK_ID]/wfs/[SG_WORKFLOW_ID]`*** for specific stack workflows.
note
Replace ***`SG_ORG_ID`, `SG_WORKFLOW_GROUP_ID`, `SG_STACK_ID`, `SG_WORKFLOW_ID, SG_EMAIL`***, and ***`SG_API_TOKEN`*** with your actual StackGuardian configuration details.
### Require OpenTofu Plan Approval[](#require-opentofu-plan-approval "Direct link to Require OpenTofu Plan Approval")
Enable this feature to add an extra layer of *governance*. This allows you to choose **Users who can approve the workflow** and specify **Require Approval from** to ensure that changes are reviewed before application.
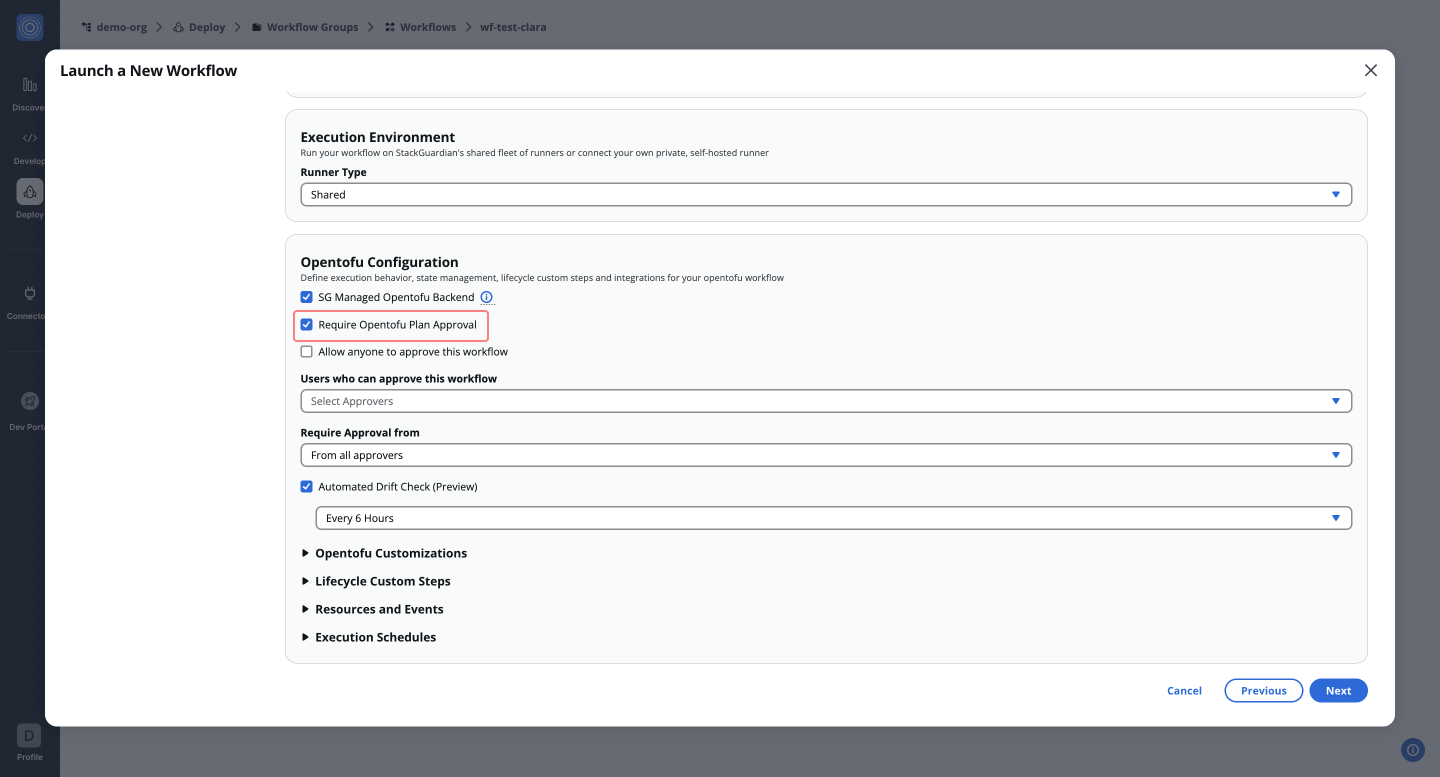
### Automated Drift Check[](#automated-drift-check "Direct link to Automated Drift Check")
Enable `Automated Drift Check` to allow StackGuardian to run drift checks regularly on your deployed infrastructure. If drifts are detected, users can rerun the workflow to reconcile the drift or modify the OpenTofu configuration to import the changes.
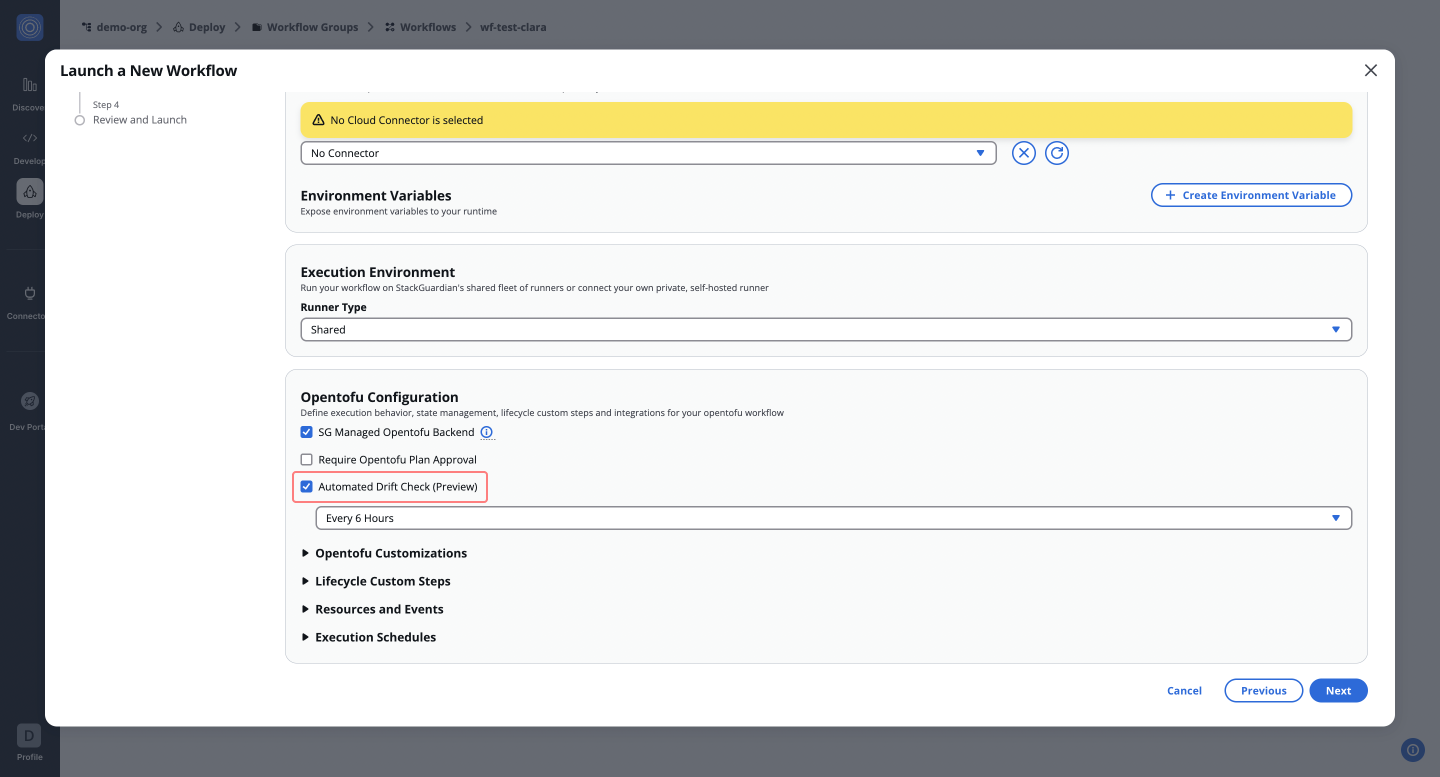
### OpenTofu Customizations[](#opentofu-customizations "Direct link to OpenTofu Customizations")
This feature allows users to configure specific OpenTofu settings to tailor the workflow as needed.

* **OpenTofu Version**: Ensures compatibility with specific OpenTofu versions or custom environments. Users can select from available versions (e.g., `1.5.7`) or specify a **Custom Tool Path** for non-standard setups.
* **Extra CLI Options**: Add custom command-line options for OpenTofu commands, useful for advanced configurations where additional flags or settings are needed.
* **Workflow Step Timeout**: Set a time limit for each step, preventing the workflow from hanging indefinitely during execution.
* **Import Existing OpenTofu State File**: If **`Use Managed OpenTofu State`** is enabled, users can upload an existing JSON state file for seamless state migration.
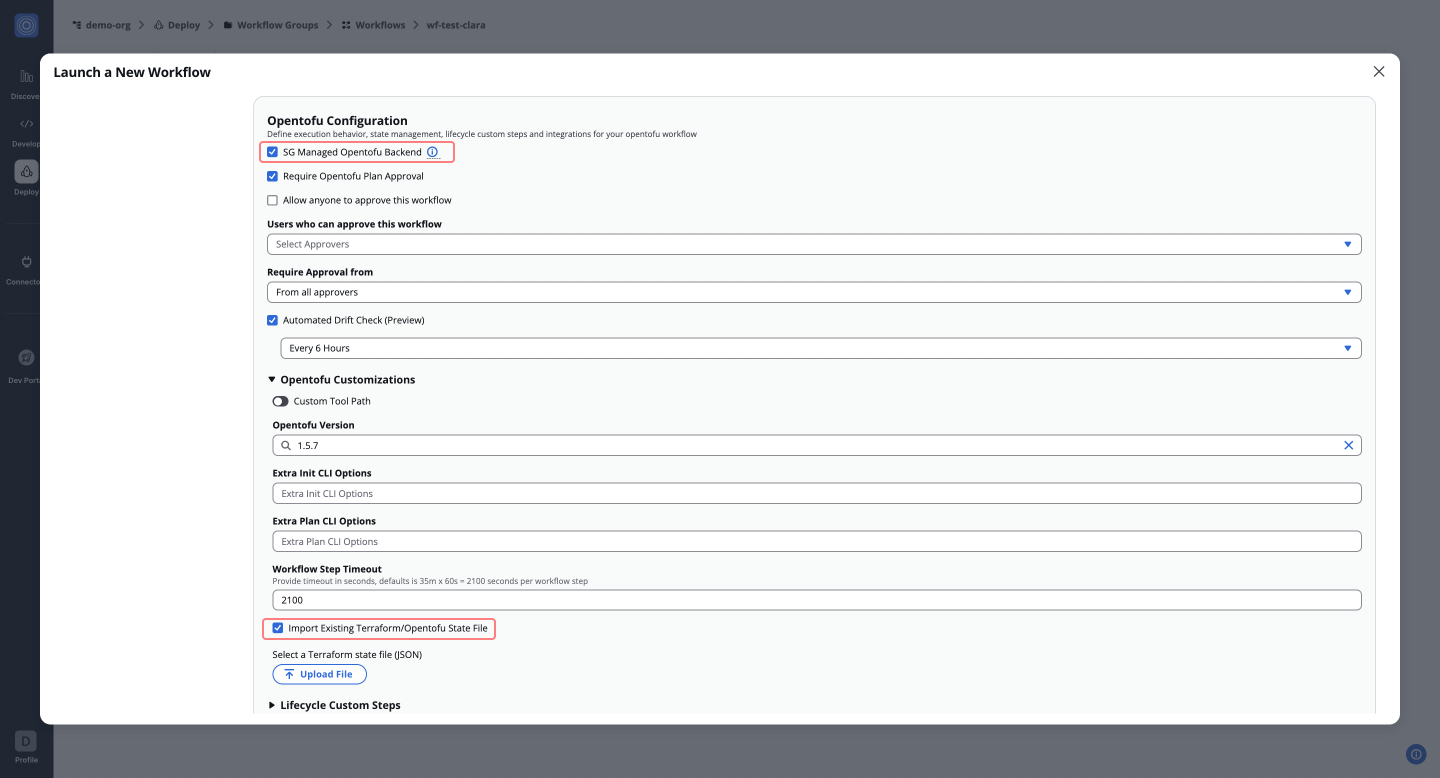
### Lifecycle Custom Steps[](#lifecycle-custom-steps "Direct link to Lifecycle Custom Steps")
Allows users to inject custom logic at different stages of the OpenTofu workflow, offering flexibility to perform additional tasks before or after OpenTofu commands.
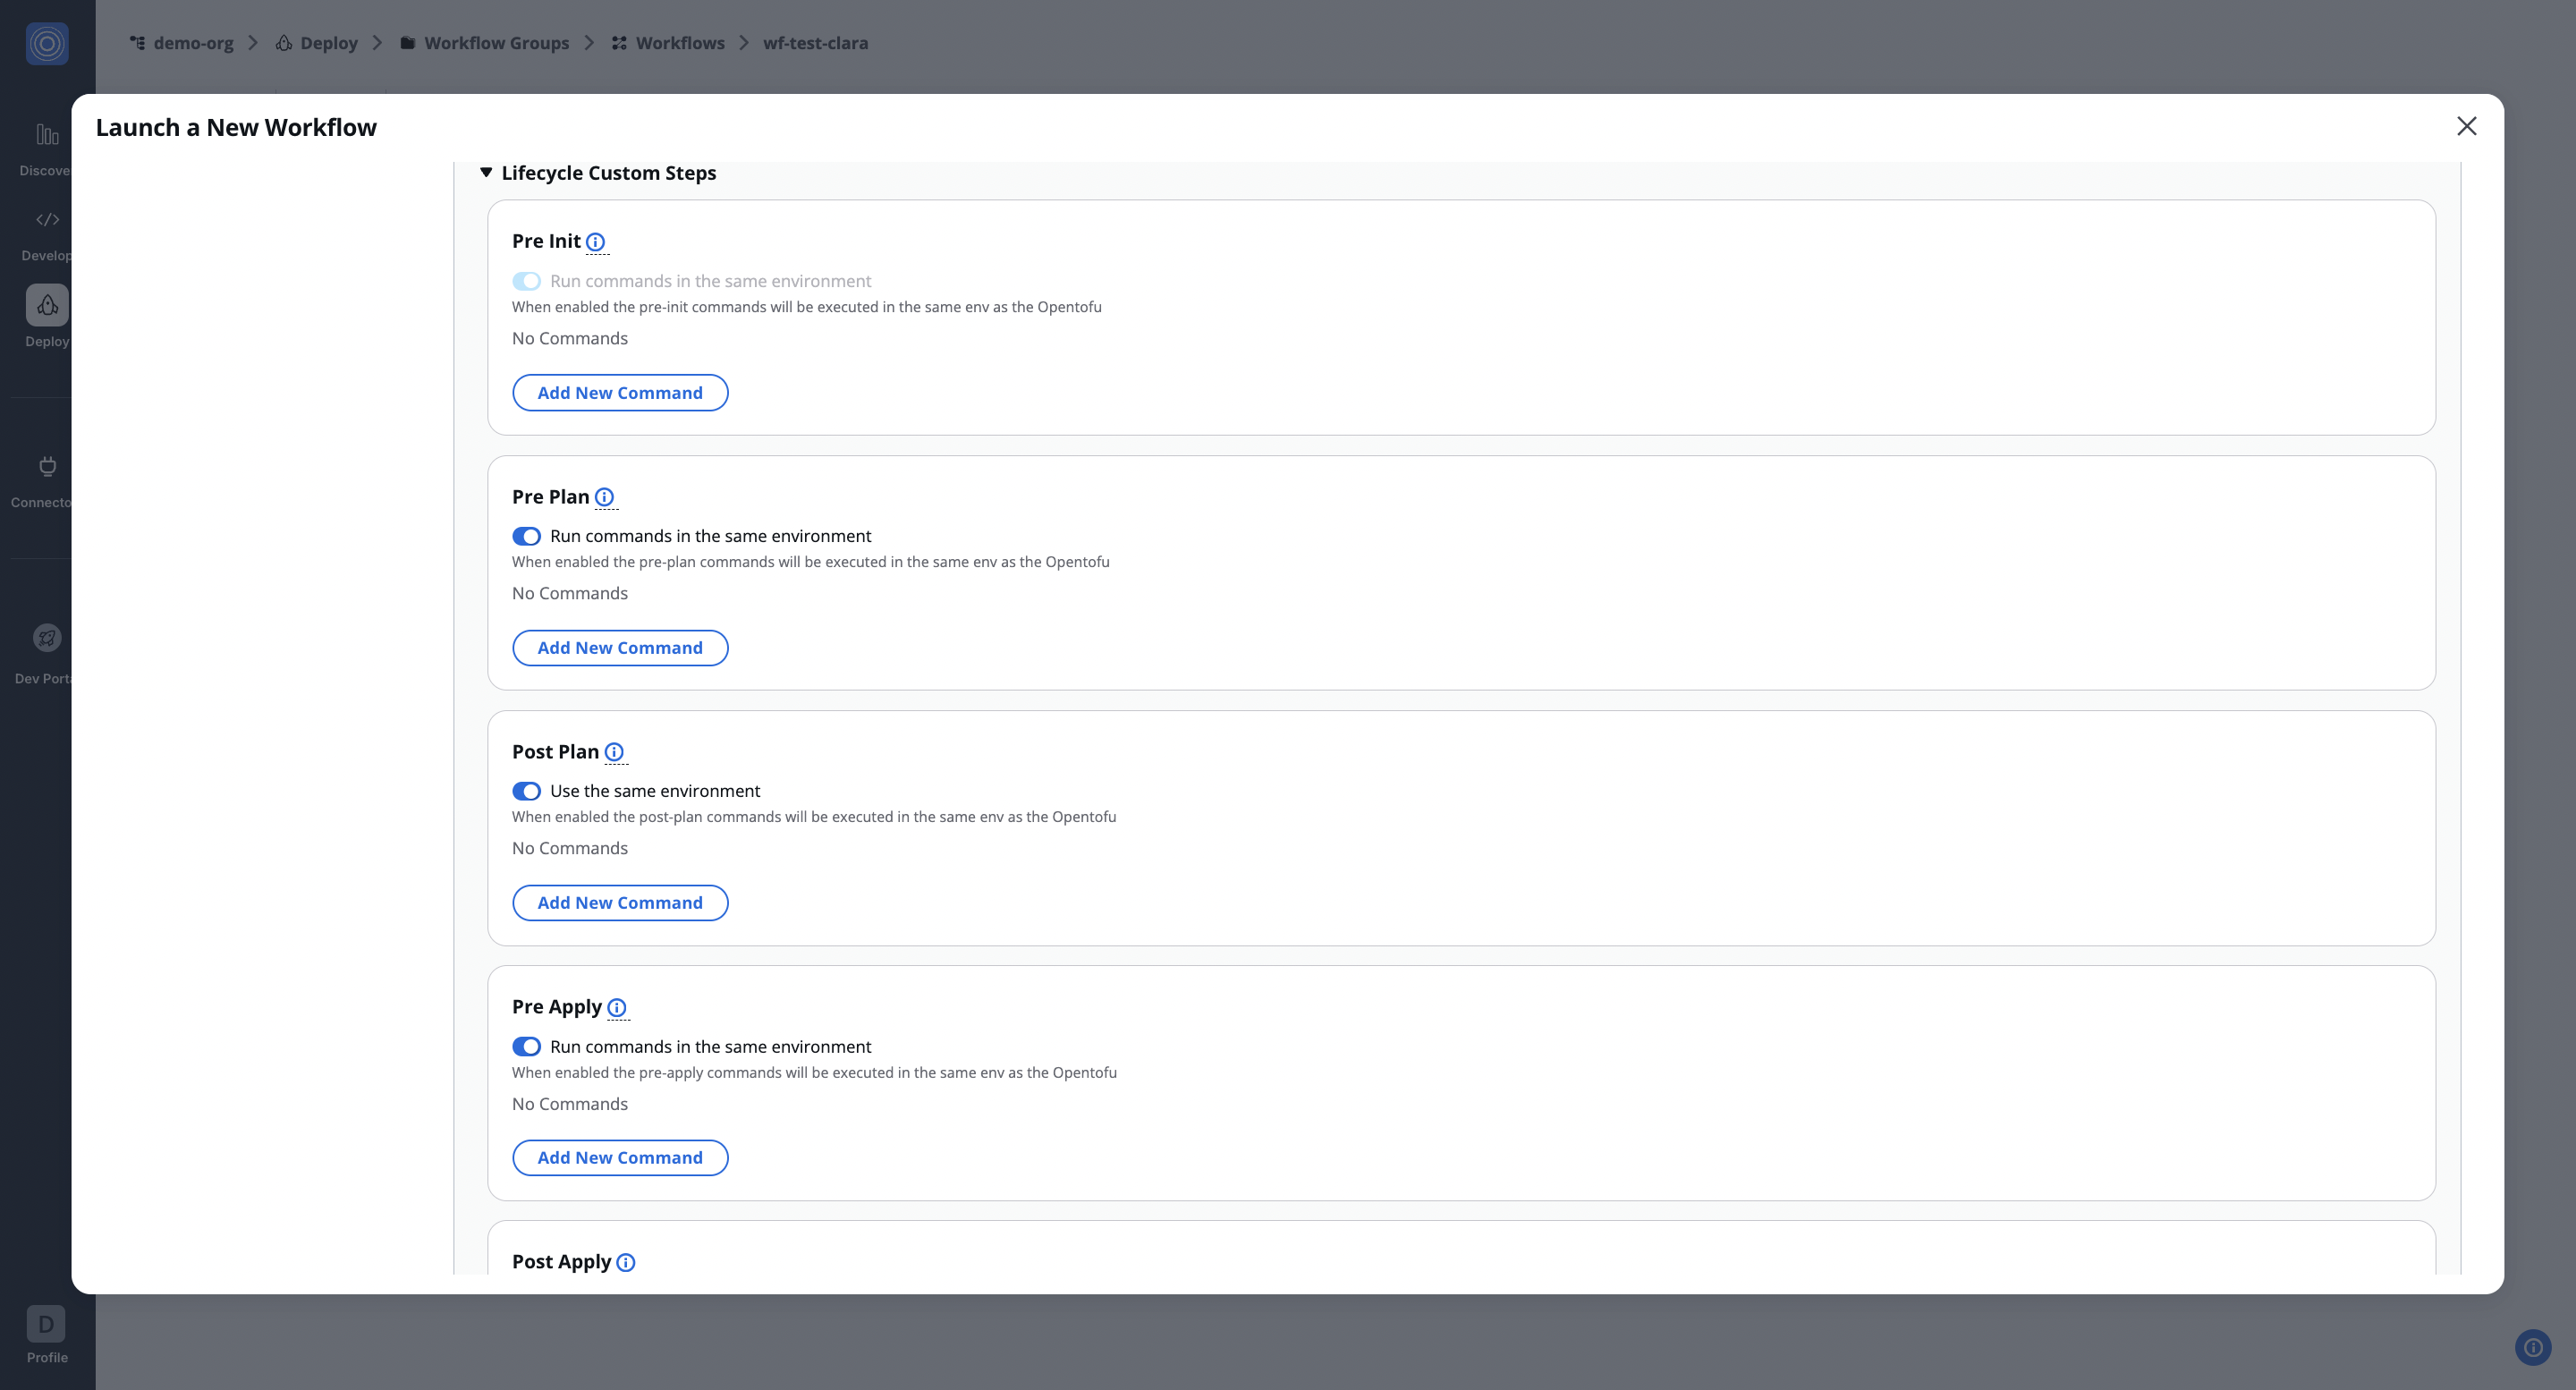
* **Pre Init**: Executes commands or steps before **`tofu init`**.
* **Pre Plan**: Executes commands or steps before **`tofu plan`**.
* **Post Plan**: Executes steps after the **`tofu plan`** is generated, such as running a security scan.
* **Pre Apply**: Executes commands or steps before **`tofu apply`**.
* **Post Apply**: Executes steps after applying changes, like validation or notifications.
These lifecycle steps enable integration with tools and processes such as vulnerability scanning, validation, or post-deployment configurations directly into the OpenTofu workflow. **For example**, users can integrate security scans (e.g., **`wiz.io`**) to validate the OpenTofu plan before proceeding with deployment.
Run commands in the same environment
When **enabled**, lifecycle steps run within the same OpenTofu environment. If **disabled**, multiple custom steps can be *added* and *reordered*, providing flexibility for more complex workflows. Learn more in the [**Lifecycle Custom Steps**](/docs/deploy/workflows/workflow_components/lifecycle_custom_steps/) documentation.
### Resources and Events[](#resources-and-events "Direct link to Resources and Events")
Explore options to customize the resources **allocated** to your workflow and to trigger *notifications* or *actions* based on workflow events.
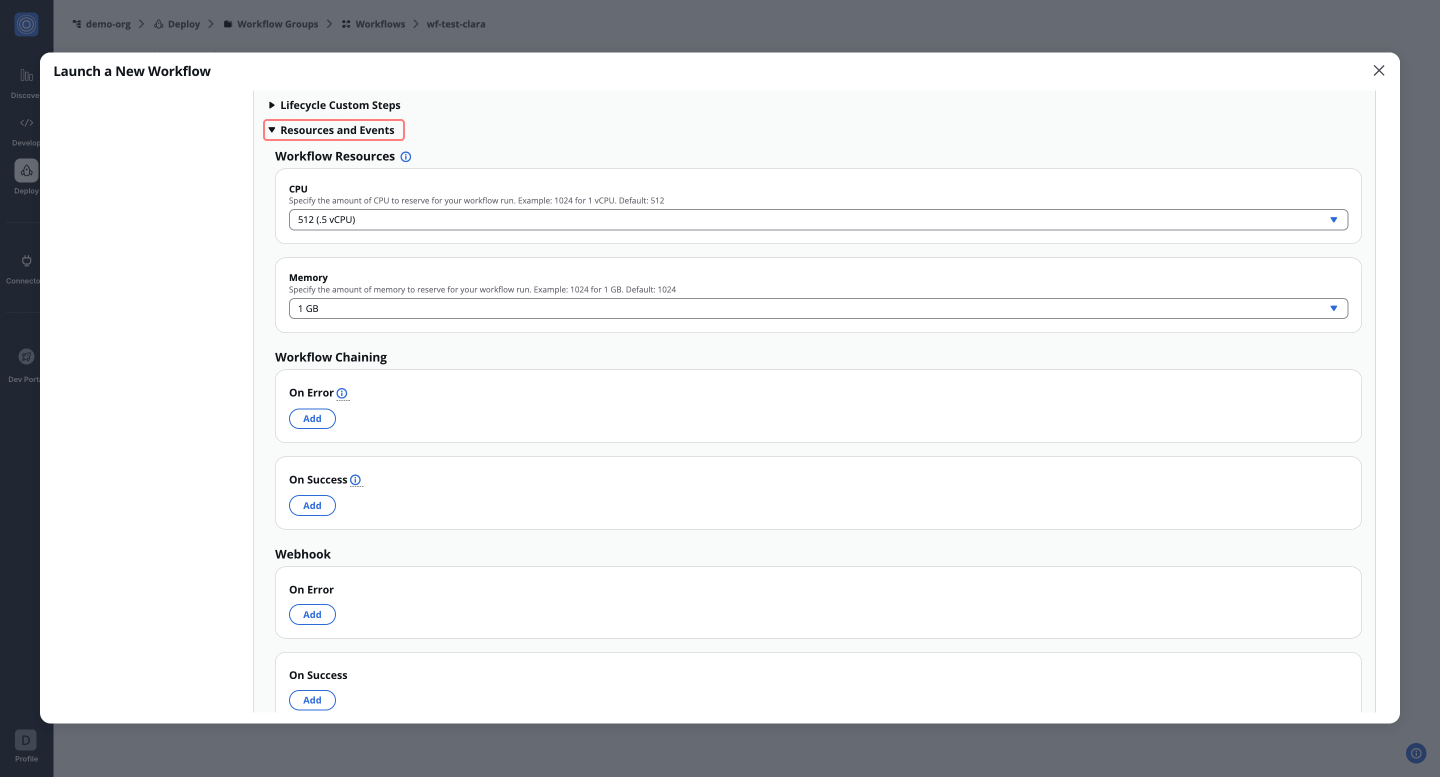
* **Workflow Resources**: Allocate CPU and memory resources for workflow execution (e.g., 1024 for 1 vCPU, 1024 for 1GB memory).
* **Workflow Chaining**: Chain workflows together for sequential execution.
* **Webhook**: Configure webhooks to trigger notifications or actions based on workflow status or events.
* **Notifications**: Set up alerts for key workflow events, such as start, success, or failure.

### Execution Schedules[](#execution-schedules "Direct link to Execution Schedules")
You can automate the execution of workflows using a **cron schedule**. This allows users to define specific intervals for when the workflow should run, whether it’s a one-time deployment or a recurring task.
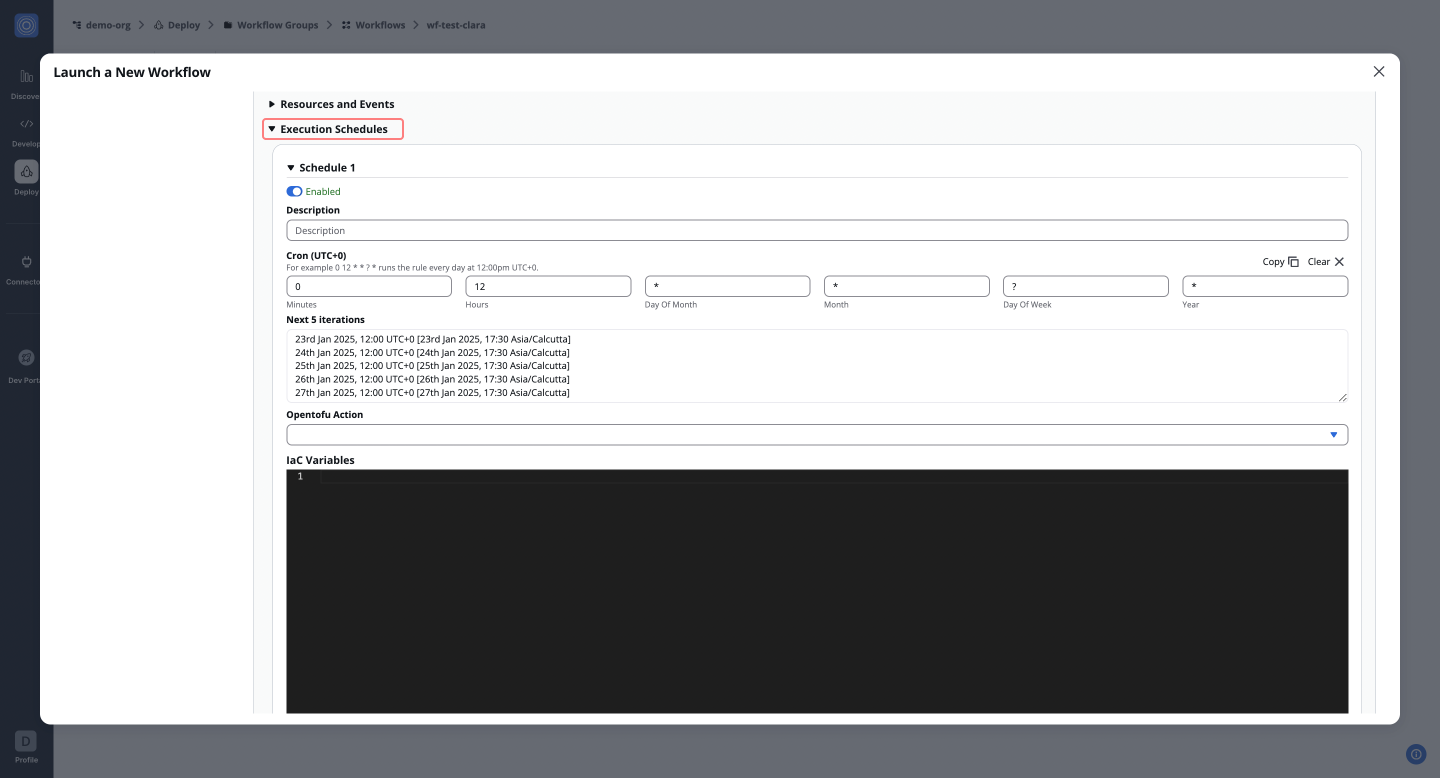
---
# OpenTofu Workflow
**OpenTofu** is an *open-source* infrastructure-as-code (IaC) tool that helps you define and manage cloud infrastructure through code. It offers a transparent, community-driven alternative to **Terraform**, ensuring open usage without licensing restrictions.
StackGuardian’s integration with OpenTofu simplifies infrastructure workflows, empowering teams to manage infrastructure efficiently and at scale. This integration offers:
* **Unrestricted Usage**: Built on an Apache 2.0 license, OpenTofu ensures flexibility for all users, including commercial entities.
* **Simplified Migration**: Existing Terraform workflows can transition to OpenTofu with minimal changes.
* **Enhanced Control**: Users benefit from custom lifecycle actions, approvals, and workflow automation, tailored to diverse environments.
* **Future-Proof Innovation**: OpenTofu’s community-driven development ensures compatibility and a user-focused roadmap.
## Introduction[](#introduction "Direct link to Introduction")
This guide walks you through creating an OpenTofu workflow on StackGuardian and explores each configuration option in detail.
### Source and Parameters[](#source-and-parameters "Direct link to Source and Parameters")
OpenTofu workflows on StackGuardian support two source types:
1. **Git Repository**: Fetch configuration code directly from private repositories using version control systems like **GitHub** or **GitLab**. Learn more about configuring repositories in [**Version Control Settings**](/docs/deploy/workflows/workflow_components/source_parameters/).
2. **Subscribed Templates**: Use **pre-built templates** from the StackGuardian Library to deploy infrastructure with a no-code approach. These templates simplify deployment and reduce manual configuration efforts.
For more detailed information, refer to the [**Source and Parameters Guide**](/docs/deploy/workflows/workflow_components/source_parameters/).
***
### Runtime Environment[](#runtime-environment "Direct link to Runtime Environment")
Define the deployment and execution environment for your OpenTofu workflow. This includes selecting cloud connectors, specifying variables, and configuring private runners if necessary.
You can reference the [**StackGuardian Environment Variables**](/docs/deploy/workflows/workflow_components/deployment_environment/#referencing-stackguardian-environment-variables) for your OpenTofu variables.
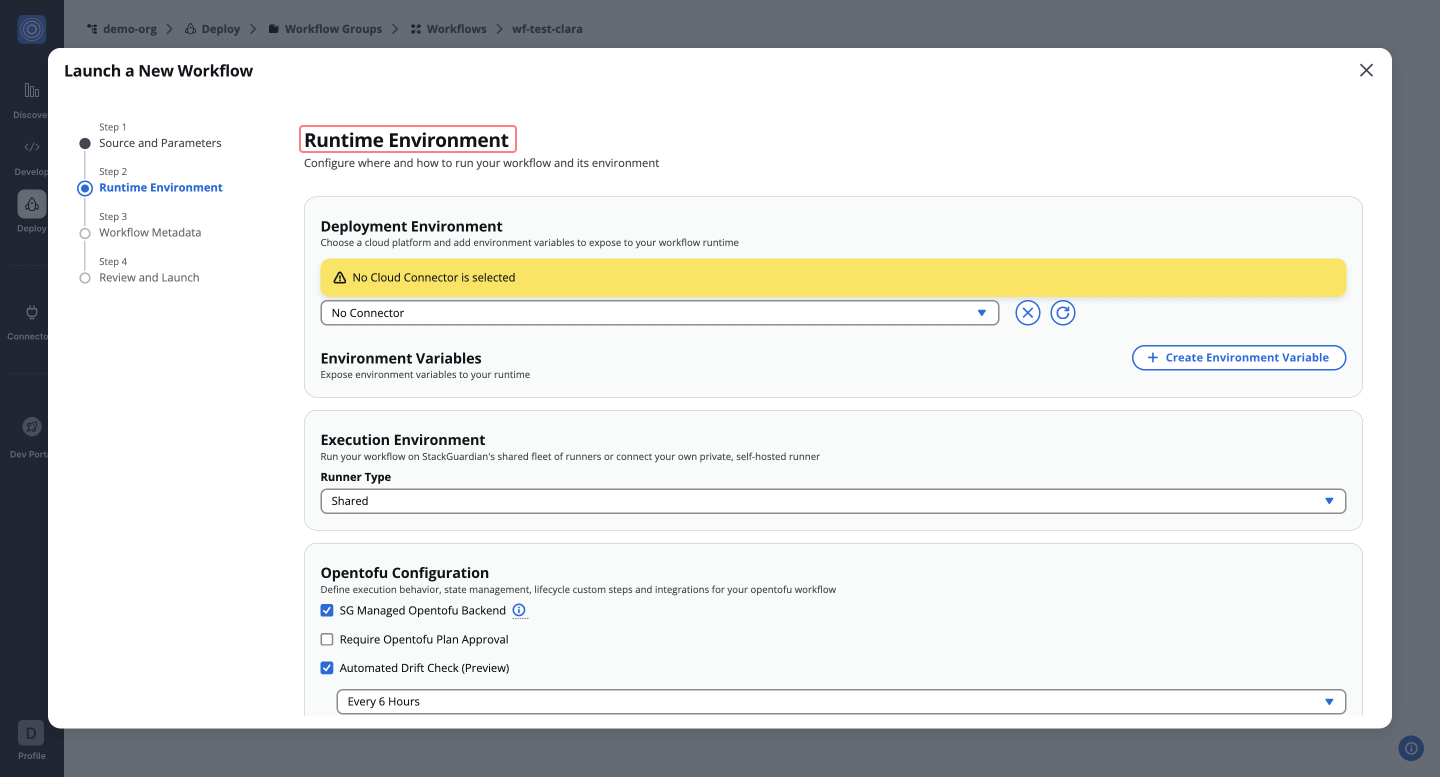
***
### OpenTofu Configuration[](#opentofu-configuration "Direct link to OpenTofu Configuration")
In the **OpenTofu Configuration** section, you can define runtime behaviors such as state management, lifecycle custom steps, and integrations. This step includes configurations for actions like initializing, planning, applying, or destroying resources.
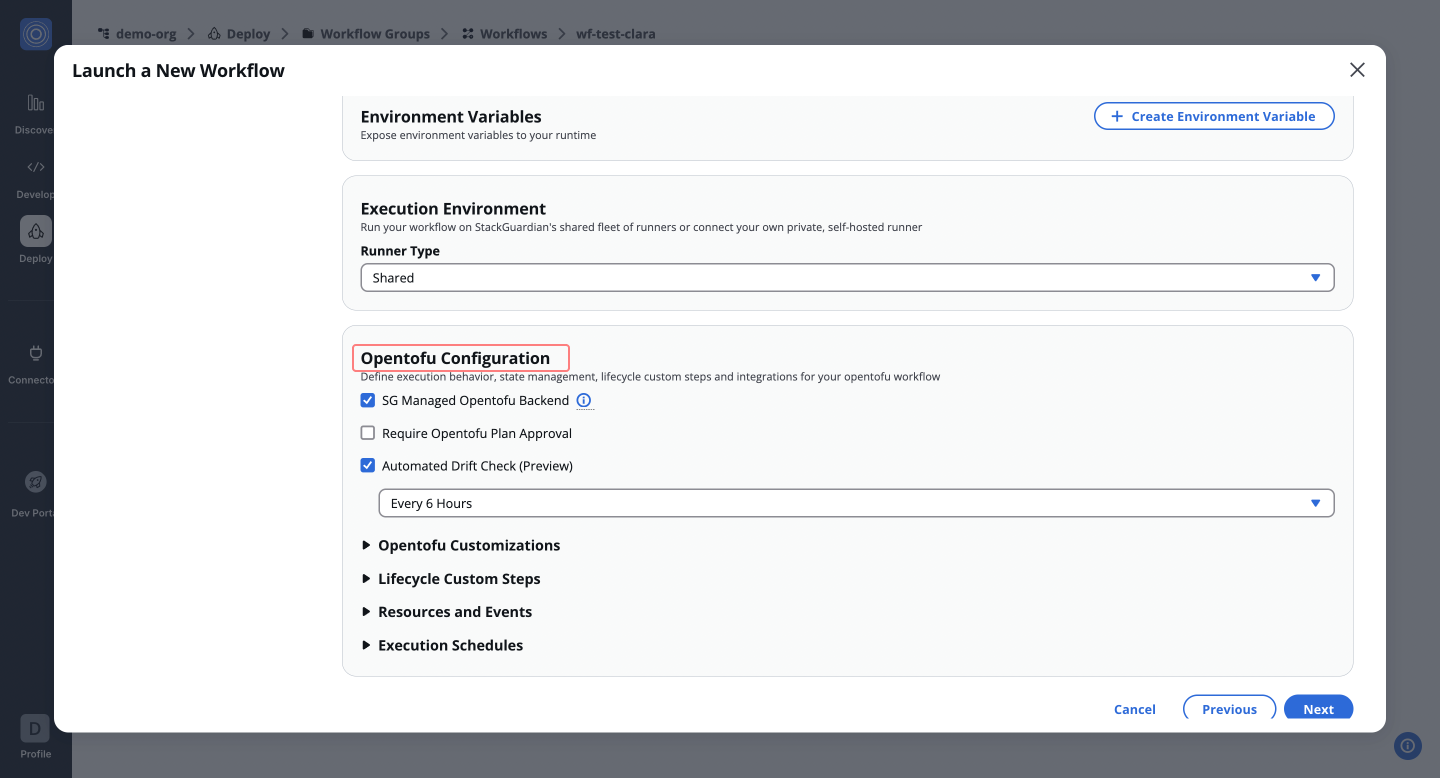
To learn more about runtime environment settings, see the [**Runtime Configuration Guide**](/docs/deploy/workflows/workflow_components/deployment_environment/).
***
### Metadata, Review, and Launch[](#metadata-review-and-launch "Direct link to Metadata, Review, and Launch")
After configuring the OpenTofu workflow, click **Next** to update the workflow metadata (e.g., name, description, and tags). Finally, click **Launch** to execute the workflow.
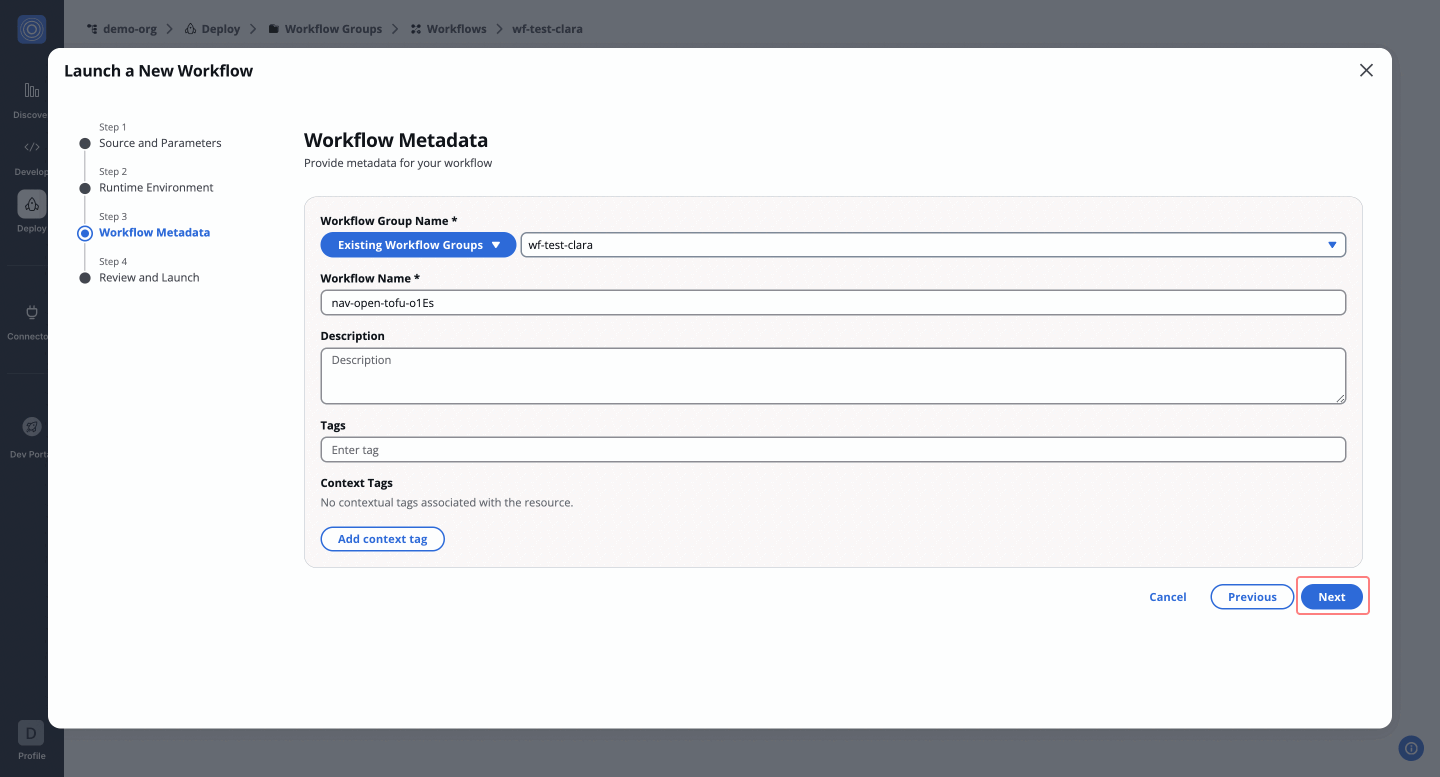
## Create OpenTofu Workflow[](#create-opentofu-workflow "Direct link to Create OpenTofu Workflow")
Discover additional ways to [**Create OpenTofu Workflows**](/docs/deploy/workflows/create_workflow/overview/) on StackGuardian.
***
## OpenTofu-Specific Lifecycle Custom Steps[](#opentofu-specific-lifecycle-custom-steps "Direct link to OpenTofu-Specific Lifecycle Custom Steps")
StackGuardian enables users to define custom actions at different stages of the OpenTofu workflow lifecycle. These steps provide fine-grained control over the execution process.
1. **Pre Init**: Execute commands before running `tofu init`. This is useful for environment setup and pre-configuration checks.
2. **Pre Plan**: Run steps before `tofu plan` to validate configurations or prepare resources.
3. **Post Plan**: Perform actions after the plan is generated, such as analyzing or auditing the plan.
4. **Pre Apply**: Ensure all prerequisites are met before applying changes to infrastructure.
5. **Post Apply**: Execute post-deployment validations or trigger follow-up actions after the apply phase.

For more details, refer to the [**Lifecycle Custom Steps Guide**](/docs/deploy/workflows/workflow_components/lifecycle_custom_steps/).
***
## Accessing Workflow Files in StackGuardian[](#accessing-workflow-files-in-stackguardian "Direct link to Accessing Workflow Files in StackGuardian")
StackGuardian provides a clear directory structure for accessing and managing files during workflow execution. For a detailed overview on the *key directories*, refer to [**Accessing Workflow Files**](/docs/deploy/workflows/workflow_components/run/).
## Mounting Custom Binaries[](#mounting-custom-binaries "Direct link to Mounting Custom Binaries")
StackGuardian supports mounting custom binaries for advanced workflows. This enables users to execute additional logic by integrating custom scripts or binaries directly into the workflow runtime.
### Prerequisites[](#prerequisites "Direct link to Prerequisites")
Before configuring custom binaries, ensure that:
* A **private runner** is used, as custom binaries require controlled environments for security and accessibility.
* The required **Terraform/OpenTofu binary** is stored on the private runner.
### Configuring Custom Binaries for OpenTofu[](#configuring-custom-binaries-for-opentofu "Direct link to Configuring Custom Binaries for OpenTofu")
StackGuardian allows users to specify a **Custom Tool Path** for OpenTofu workflows to execute a specific binary version.
### Steps to Configure[](#steps-to-configure "Direct link to Steps to Configure")
1. **Navigate to the Workflow Configuration** Go to **Library > Configure Workflow** and open the **OpenTofu Configuration** section.
2. **Enable OpenTofu Customizations** Click on **OpenTofu Customizations** to expand the options.
3. **Enable Custom Tool Path** Select the **Custom Tool Path** option.
4. **Specify the Custom OpenTofu Binary** Enter the full path to the custom OpenTofu binary stored in your private runner. Example: `/usr/bin/terraform198`
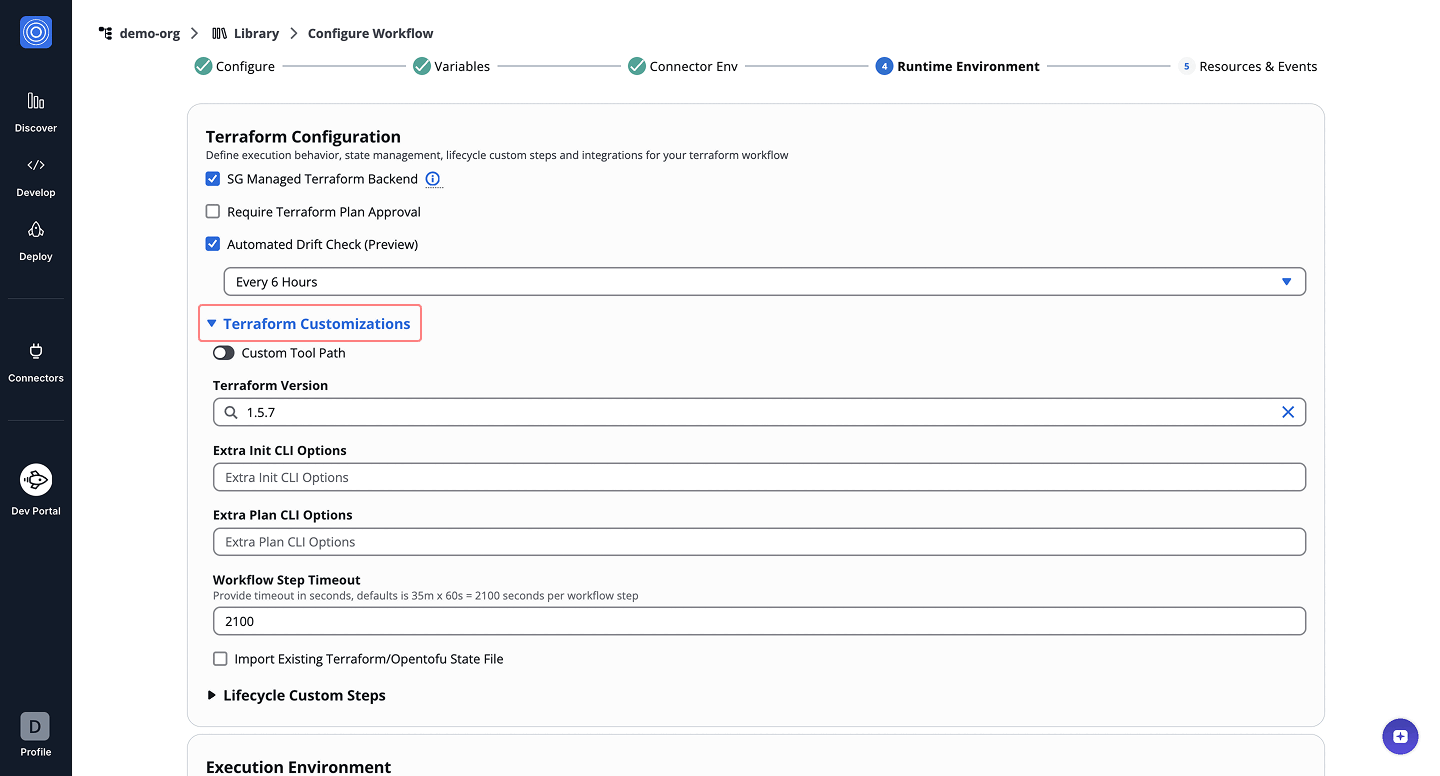
## Dive into Workflow[](#dive-into-workflow "Direct link to Dive into Workflow")
StackGuardian workflows provide multiple tabs for monitoring, managing, and refining your deployments. Each tab offers specific insights and actions to optimize your workflow experience.
### Overview[](#overview "Direct link to Overview")
The **Overview** tab highlights key workflow details, including compliance check results, cost estimations, and resource summaries like drift detection and schedules. It offers a quick snapshot of your workflow's status. [Learn more in the **Workflow Overview Guide**](/docs/deploy/workflows/workflow_components/overview/).
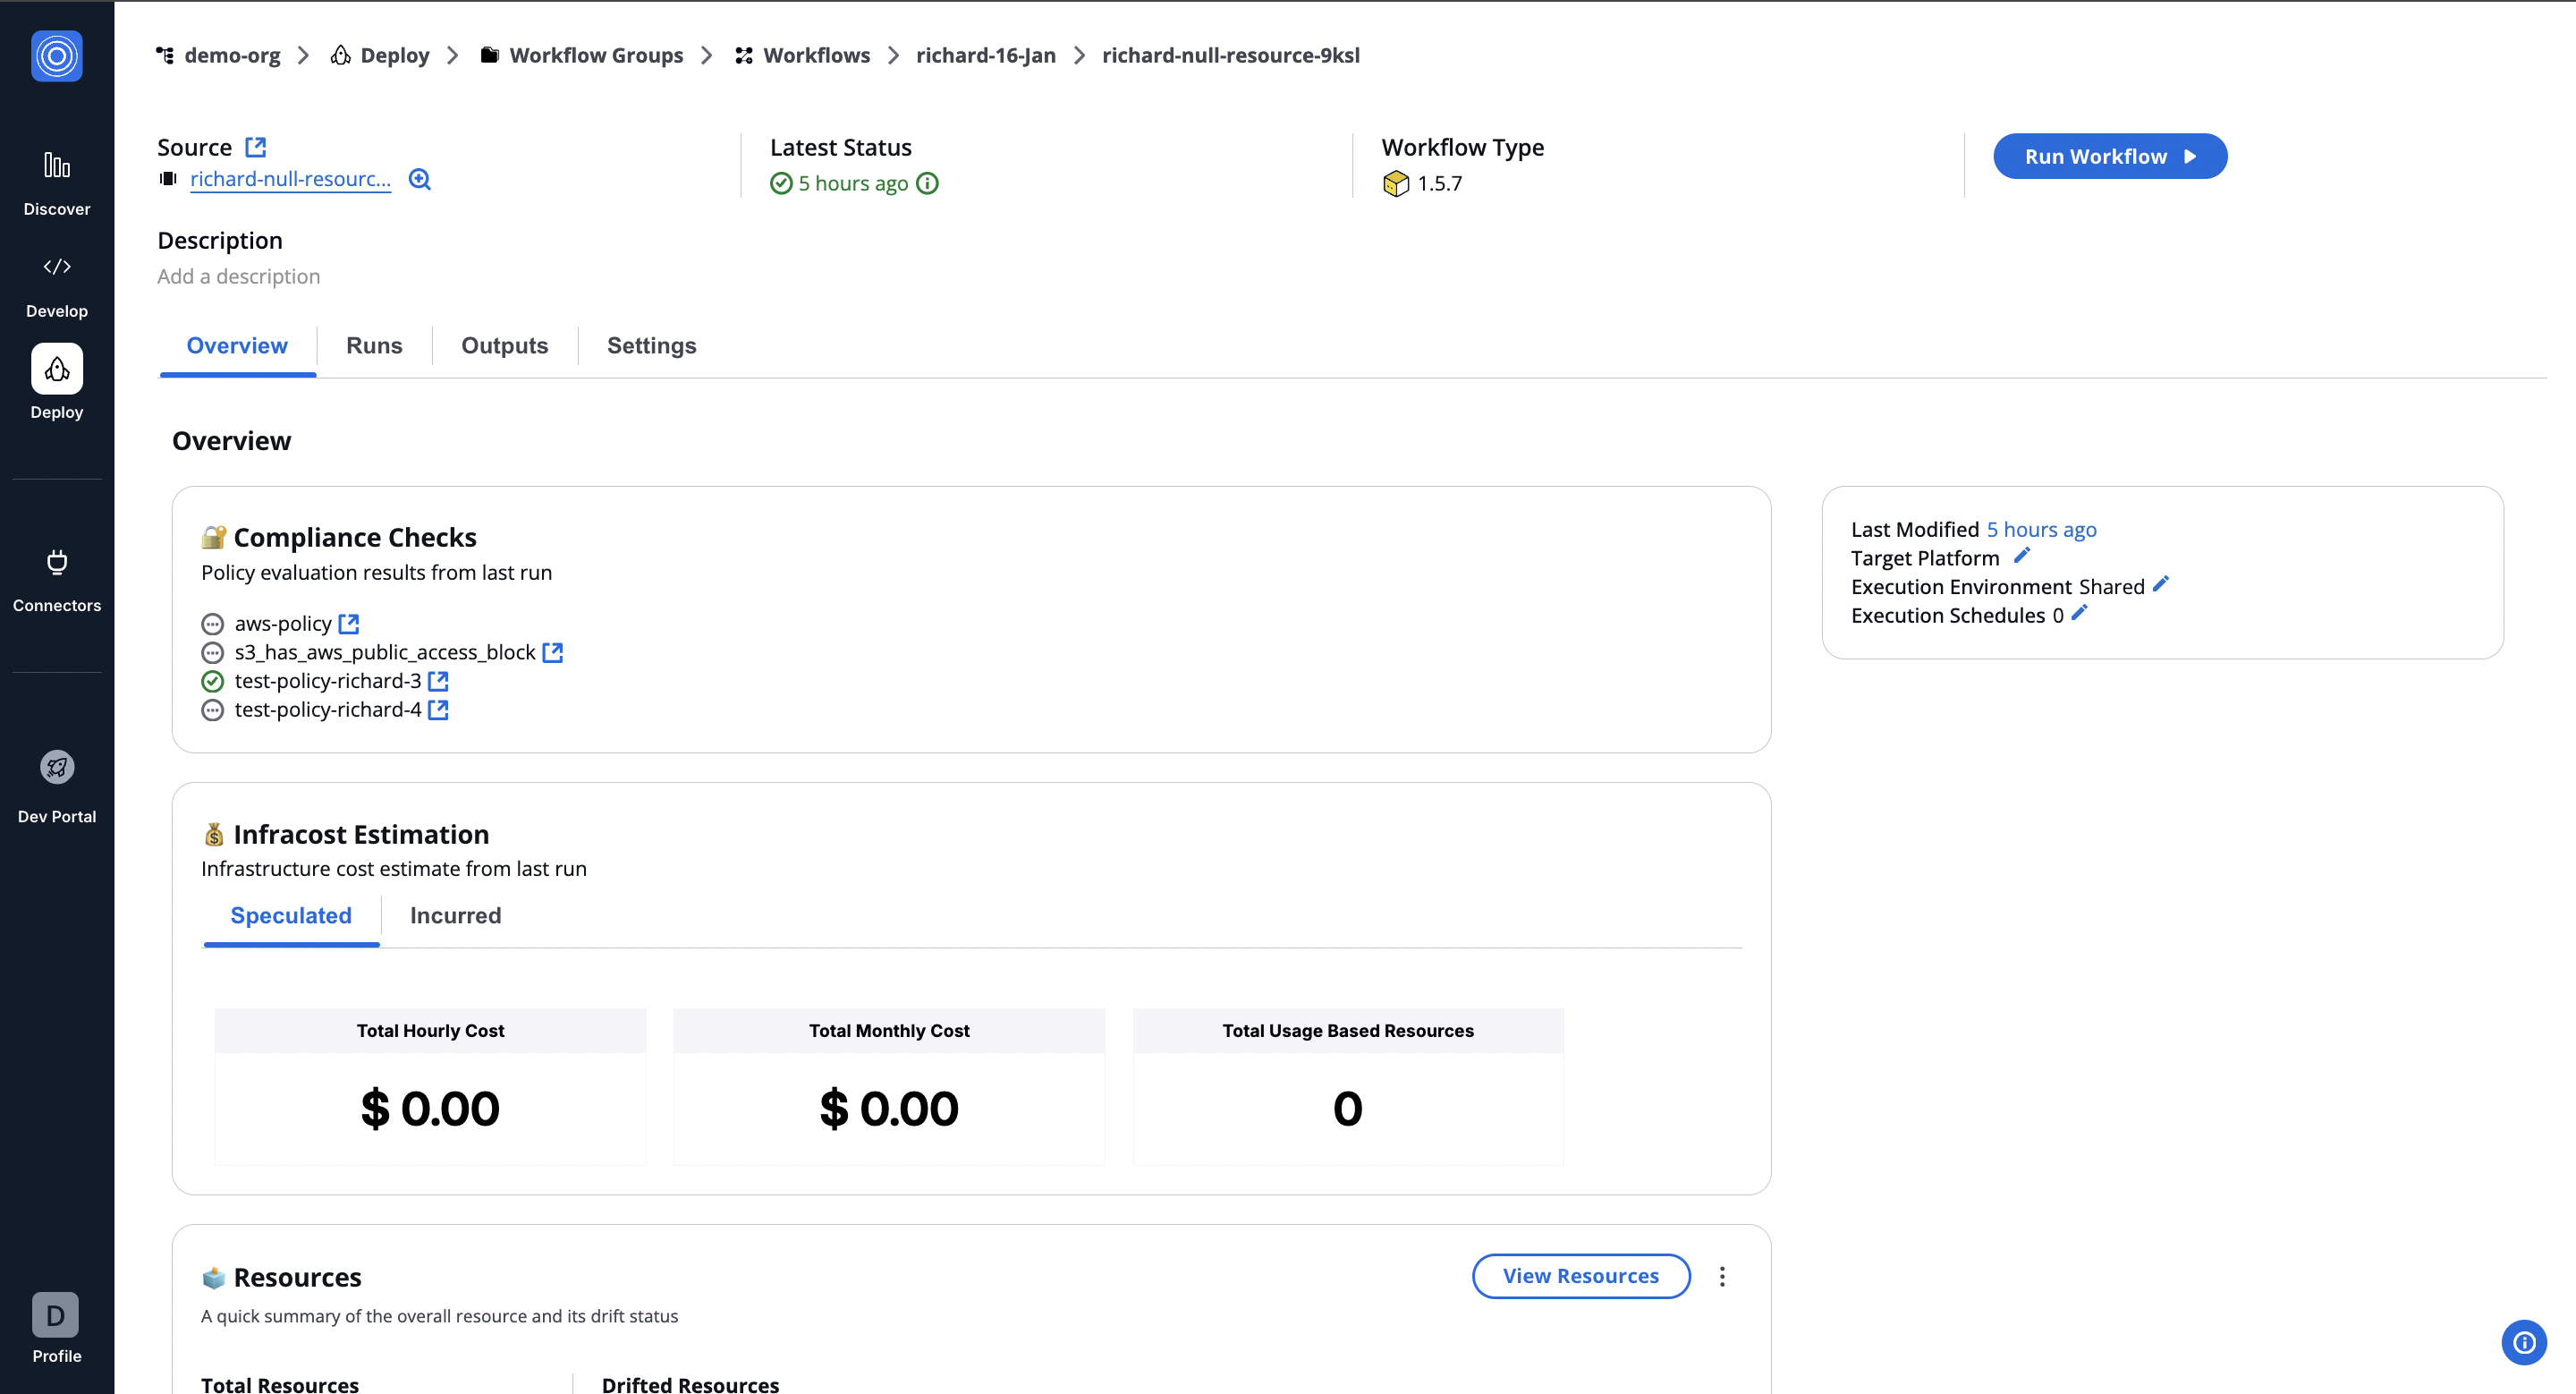
***
### Runs[](#runs "Direct link to Runs")
The **Runs** tab lists all executions with real-time status, unique run IDs, and metadata, such as user actions and modification timestamps. Click a **Run ID** to view detailed logs and execution progress. [Explore the **Workflow Runs Guide**](/docs/deploy/workflows/workflow_components/run/).
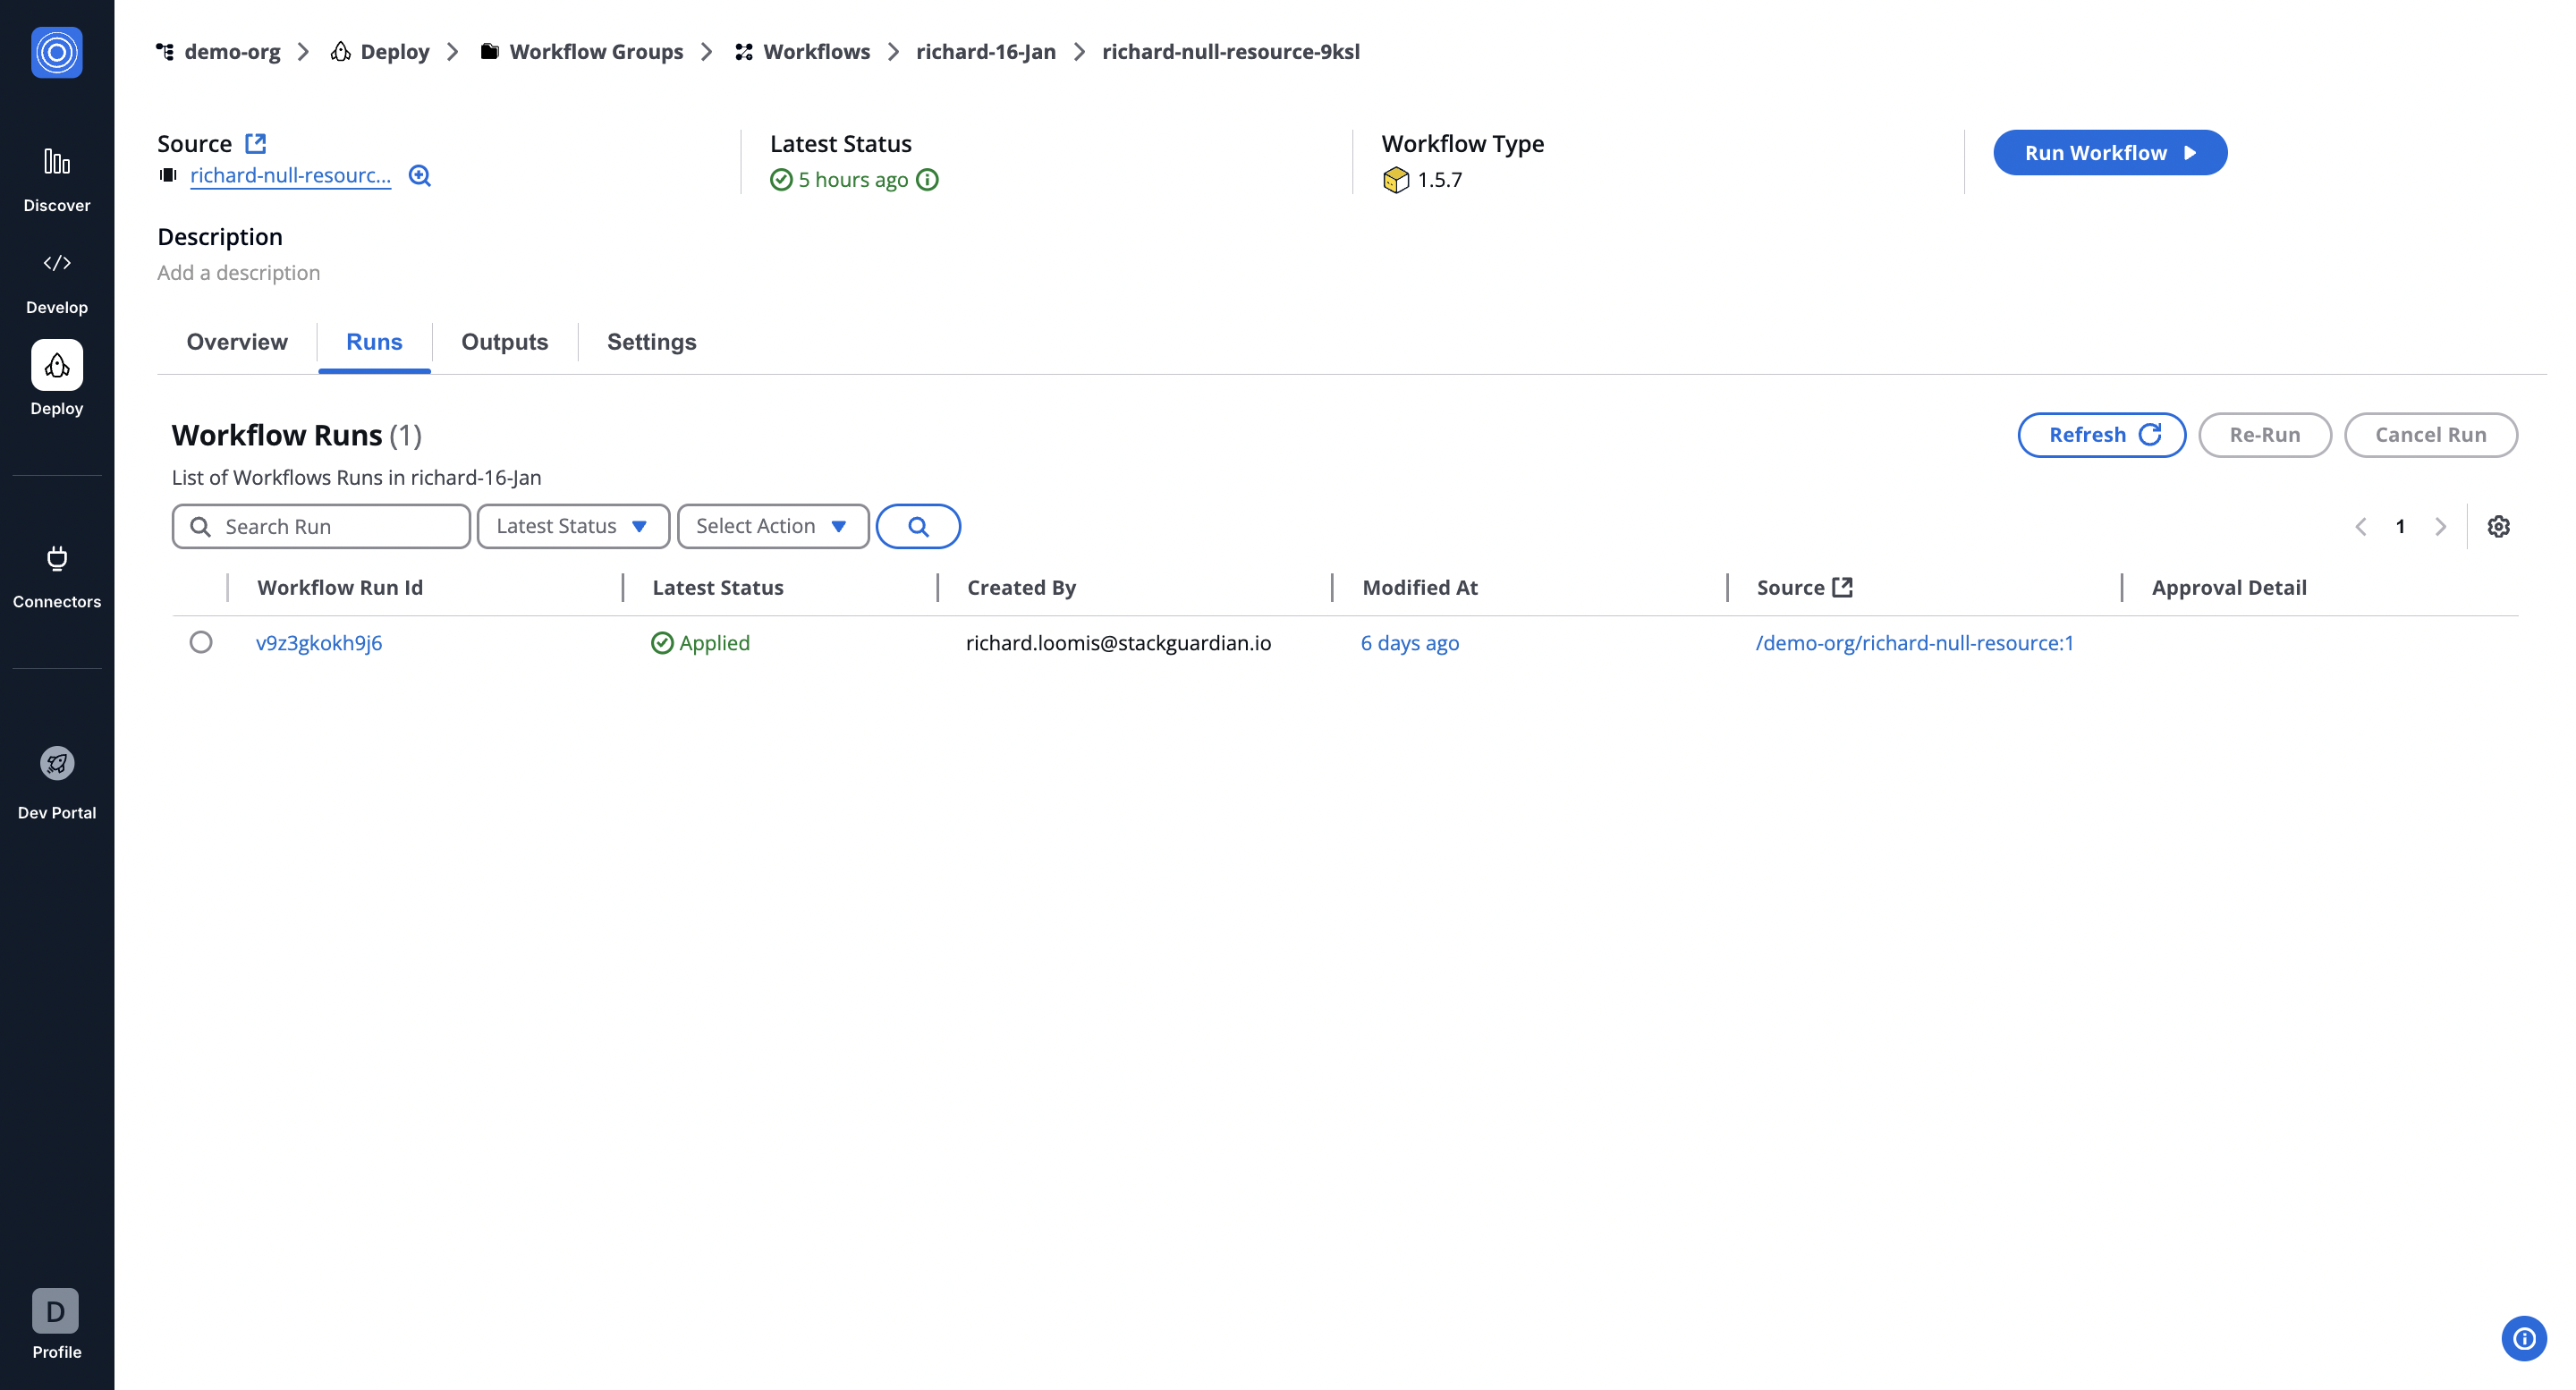
***
### Outputs[](#outputs "Direct link to Outputs")
The **Outputs** tab displays execution results and downloadable artifacts like `tfstate.json`. Use key-value pairs to reference outputs in other workflows, making your infrastructure provisioning more dynamic. [See the **Workflow Outputs Guide**](/docs/deploy/workflows/workflow_components/outputs/).
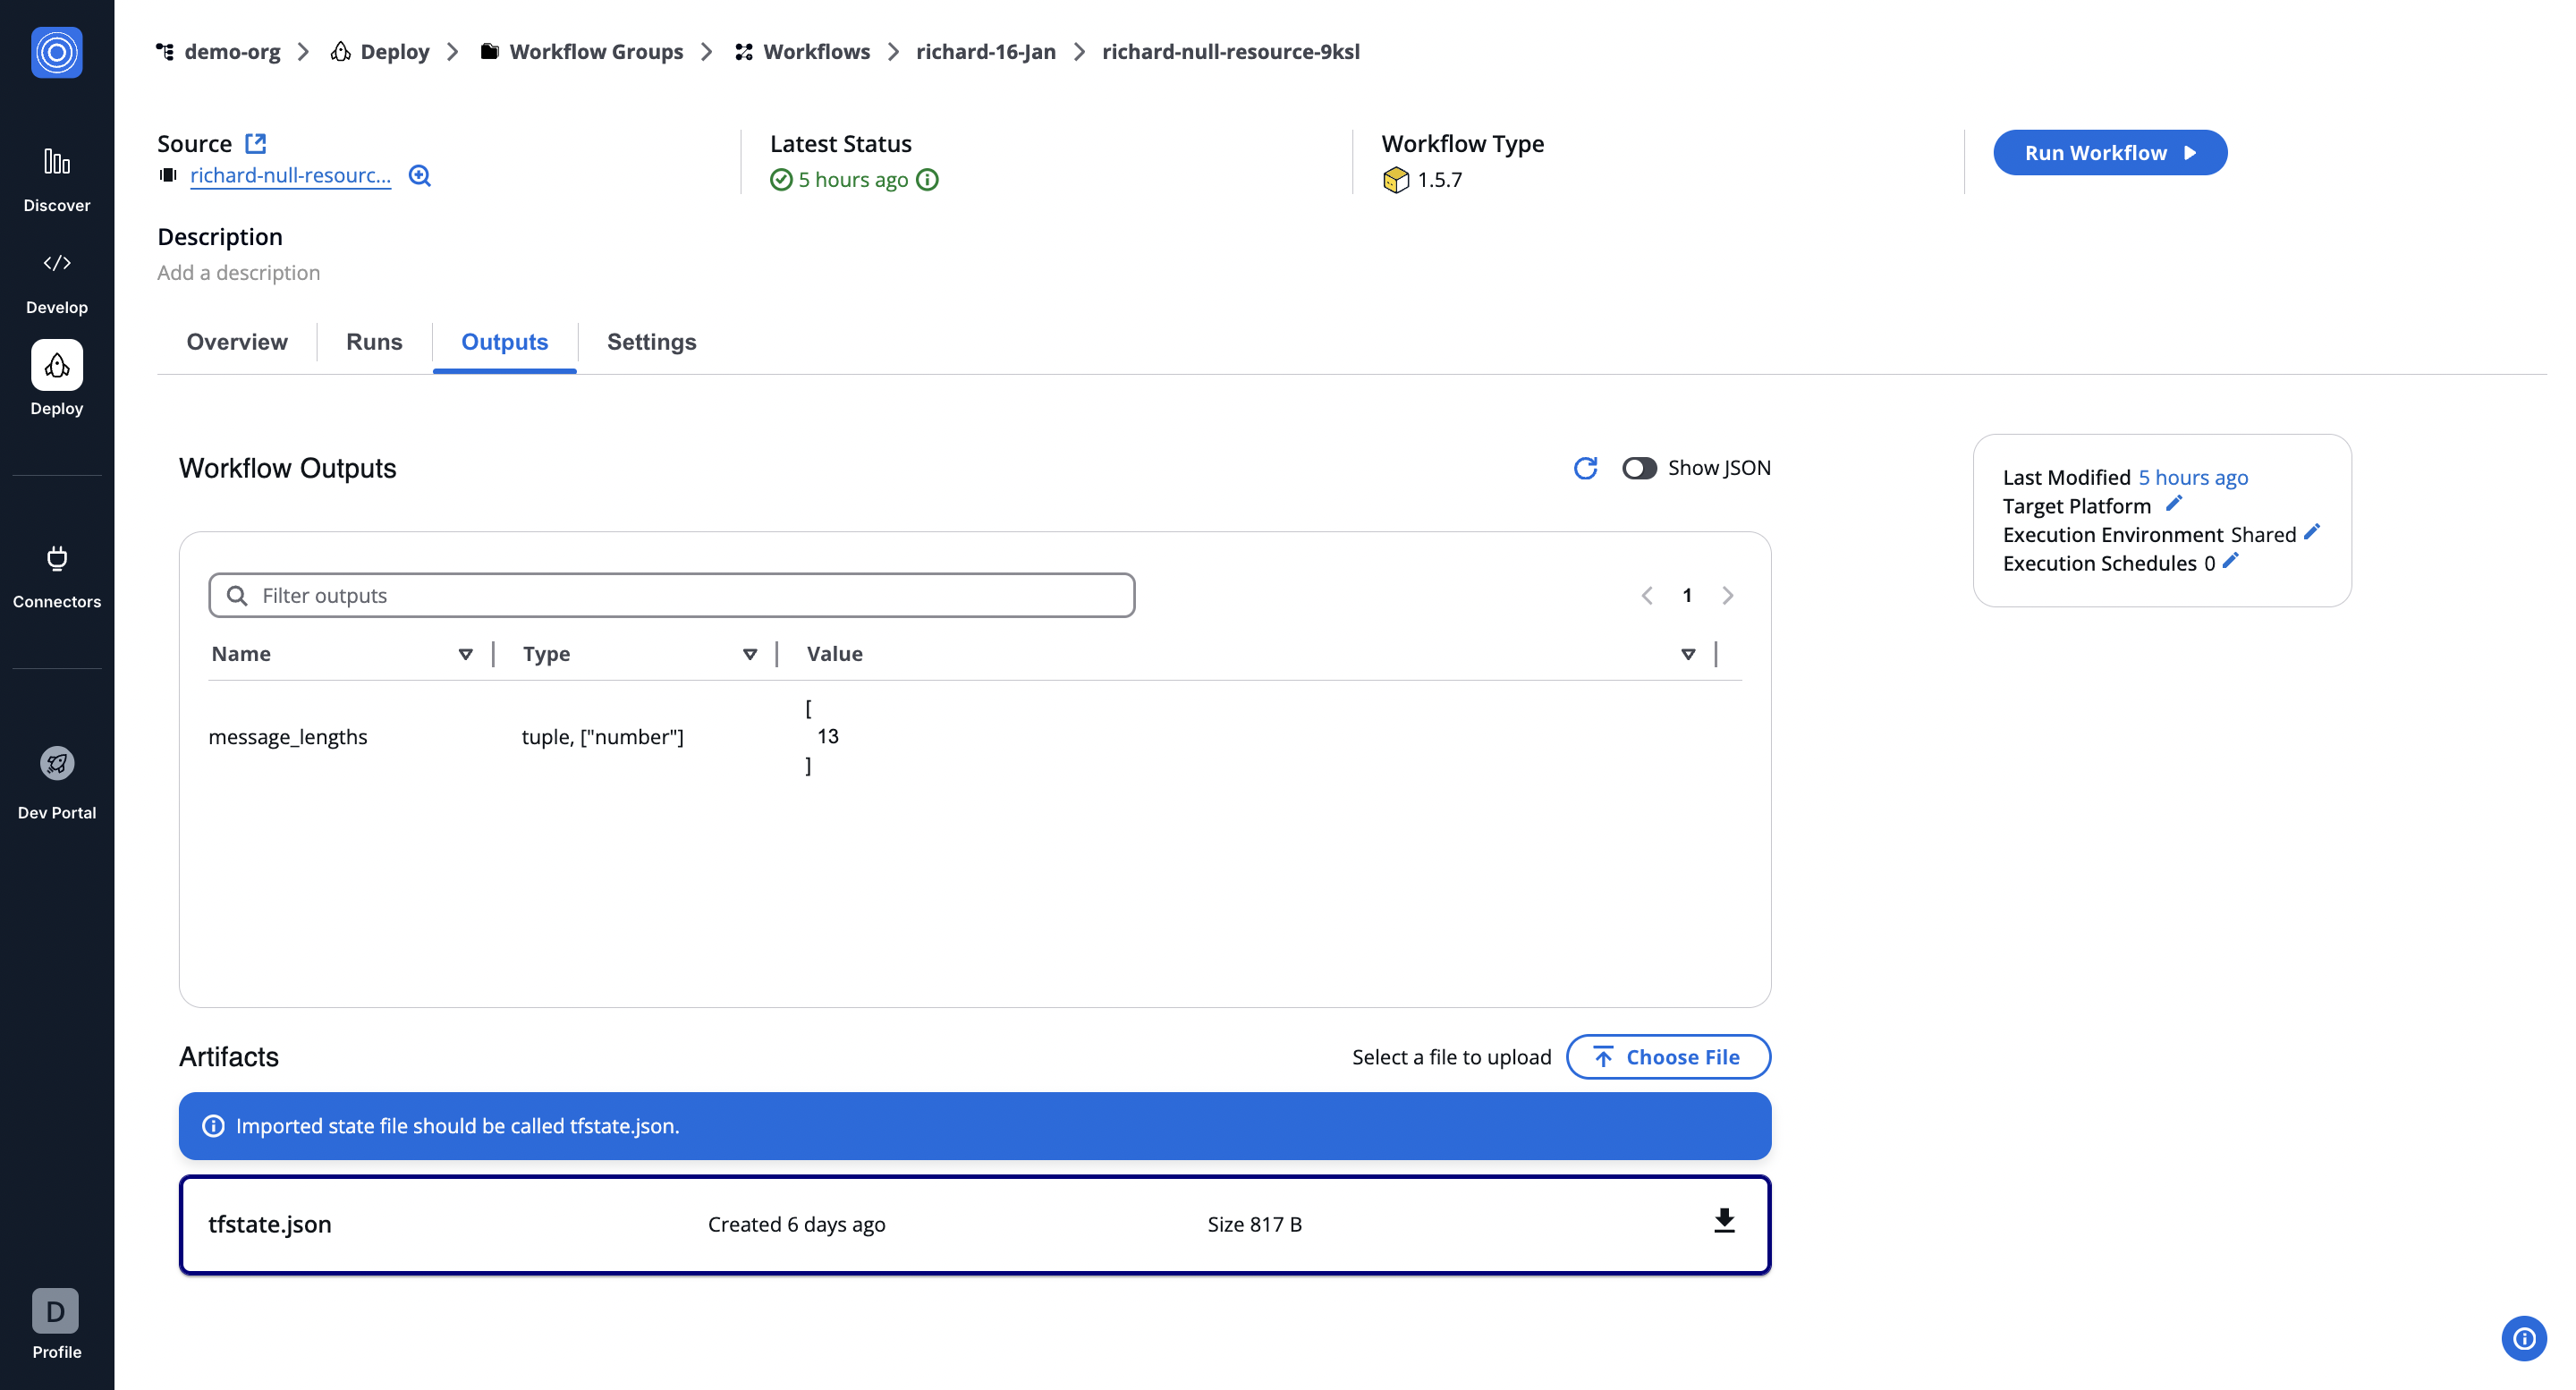
***
### Settings[](#settings "Direct link to Settings")
The **Settings** tab enables post-creation updates, such as modifying input variables, refining OpenTofu runtime settings, reordering custom steps, or managing cloud connectors and environment variables. [Learn more in the **Workflow Settings Guide**](/docs/deploy/workflows/workflow_components/settings/).
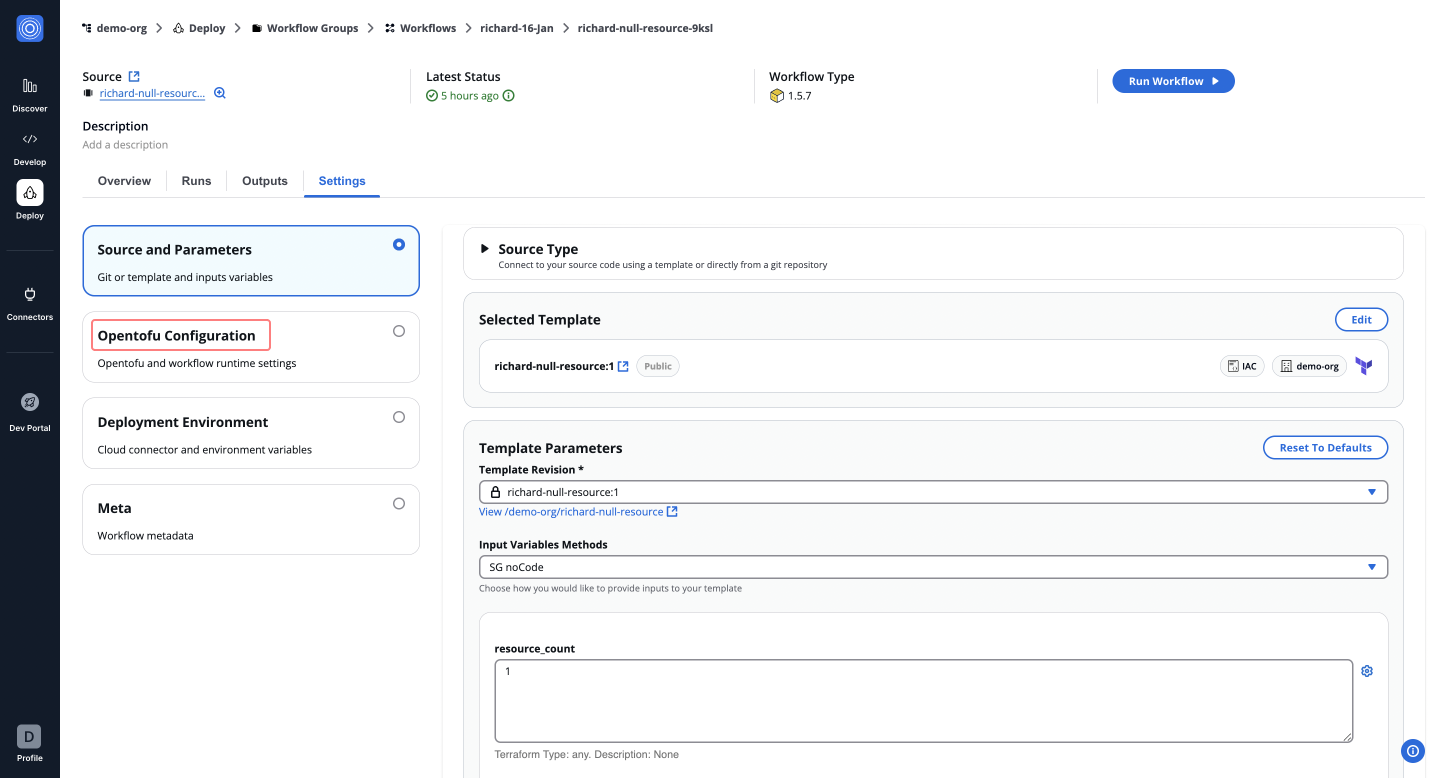
---
# Terraform Configuration
### SG Managed Terraform Backend[](#sg-managed-terraform-backend "Direct link to SG Managed Terraform Backend")
Enable the `Use Managed Terraform State` option under **Terraform Customizations**. This feature ensures that StackGuardian automatically injects and manages the Terraform state file, providing secure, tracked, and remotely managed infrastructure states. StackGuardian uses `tfstate.json` as the file name for storing your backend. Alternatively, you can add [StackGuardian State Backend explicitly to your Terraform code](#configuring-stackguardian-state-backend-in-terraform-code). In either case, the state is stored in the same type of storage backend.
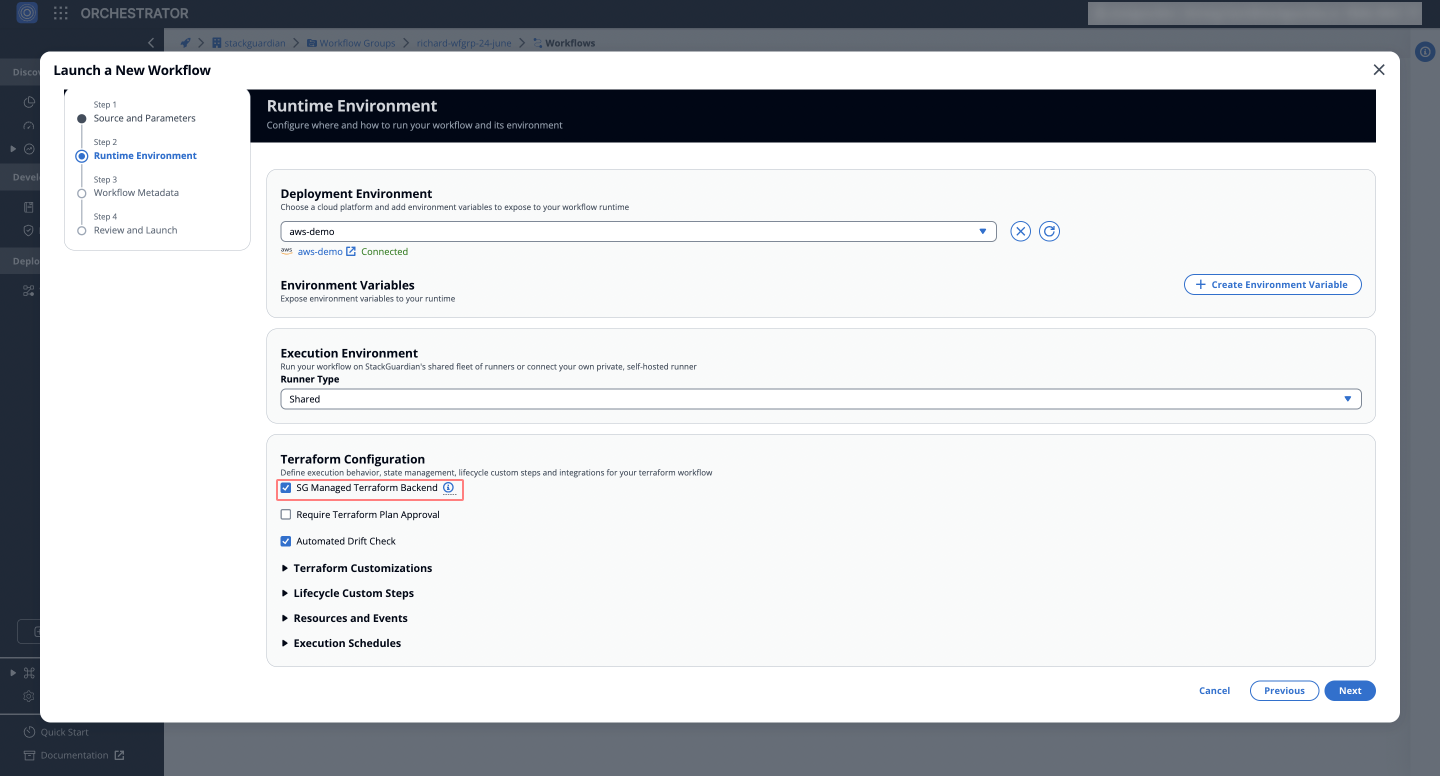
### Configuring StackGuardian State Backend in Terraform Code[](#configuring-stackguardian-state-backend-in-terraform-code "Direct link to Configuring StackGuardian State Backend in Terraform Code")
StackGuardian supports the use of an *HTTP backend* for Terraform, facilitating secure, remote storage and management of Terraform **state files**. This configuration is crucial for teams requiring centralized state management to improve ***collaboration*** and avoid ***state locking conflicts***.
To integrate StackGuardian with your Terraform setup, configure the state backend as follows:
* EU Region
* US Region
```
terraform {
backend "http" {
address = "https://api.app.stackguardian.io/api/v1/orgs/[SG_ORG_ID]/wfgrps/[SG_WORKFLOW_GROUP_ID]/wfs/[WORKFLOW_OR_STACK_PATH]/artifacts/tfstate.json"
retry_wait_min = 5 # The minimum time in seconds to wait between HTTP request attempts
username = "SG_EMAIL" # Can also be passed using TF_HTTP_USERNAME env var
password = "SG_API_TOKEN" # Can also be passed using TF_HTTP_PASSWORD env var
}
}
```
**Reference URLs:**
* **Standard Workflows**: `https://api.app.stackguardian.io/api/v1/orgs/[SG_ORG_ID]/wfgrps/[SG_WORKFLOW_GROUP_ID]/wfs/[SG_WORKFLOW_ID]/artifacts/tfstate.json`
* **Stack Workflows**: `https://api.app.stackguardian.io/api/v1/orgs/[SG_ORG_ID]/wfgrps/[SG_WORKFLOW_GROUP_ID]/stacks/[SG_STACK_ID]/wfs/[SG_WORKFLOW_ID]/artifacts/tfstate.json`
```
terraform {
backend "http" {
address = "https://api.us.stackguardian.io/api/v1/orgs/[SG_ORG_ID]/wfgrps/[SG_WORKFLOW_GROUP_ID]/wfs/[WORKFLOW_OR_STACK_PATH]/artifacts/tfstate.json"
retry_wait_min = 5 # The minimum time in seconds to wait between HTTP request attempts
username = "SG_EMAIL" # Can also be passed using TF_HTTP_USERNAME env var
password = "SG_API_TOKEN" # Can also be passed using TF_HTTP_PASSWORD env var
}
}
```
**Reference URLs:**
* **Standard Workflows**: `https://api.us.stackguardian.io/api/v1/orgs/[SG_ORG_ID]/wfgrps/[SG_WORKFLOW_GROUP_ID]/wfs/[SG_WORKFLOW_ID]/artifacts/tfstate.json`
* **Stack Workflows**: `https://api.us.stackguardian.io/api/v1/orgs/[SG_ORG_ID]/wfgrps/[SG_WORKFLOW_GROUP_ID]/stacks/[SG_STACK_ID]/wfs/[SG_WORKFLOW_ID]/artifacts/tfstate.json`
In your Terraform backend configuration, replace **`[WORKFLOW_OR_STACK_PATH]`** with the appropriate path depending on your workflow type. Use ***`wfs/[SG_WORKFLOW_ID]`*** for general workflows, or ***`stacks/[SG_STACK_ID]/wfs/[SG_WORKFLOW_ID]`*** for specific stack workflows.
note
Replace ***`SG_ORG_ID`, `SG_WORKFLOW_GROUP_ID`, `SG_STACK_ID`, `SG_WORKFLOW_ID, SG_EMAIL`***, and ***`SG_API_TOKEN`*** with your actual StackGuardian configuration details.
### Require Terraform Plan Approval[](#require-terraform-plan-approval "Direct link to Require Terraform Plan Approval")
Enable this feature to add an extra layer of *governance*. This allows you to choose **Users who can approve the workflow** and specify **Require Approval from** to ensure that changes are reviewed before application.

### Automated Drift Check[](#automated-drift-check "Direct link to Automated Drift Check")
Enable `Automated Drift Check` to allow StackGuardian to run drift checks regularly on your deployed infrastructure. If drifts are detected, users can rerun the workflow to reconcile the drift or modify the Terraform configuration to import the changes.

### Terraform Customizations[](#terraform-customizations "Direct link to Terraform Customizations")
This feature allows users to configure specific Terraform settings to tailor the workflow as needed.
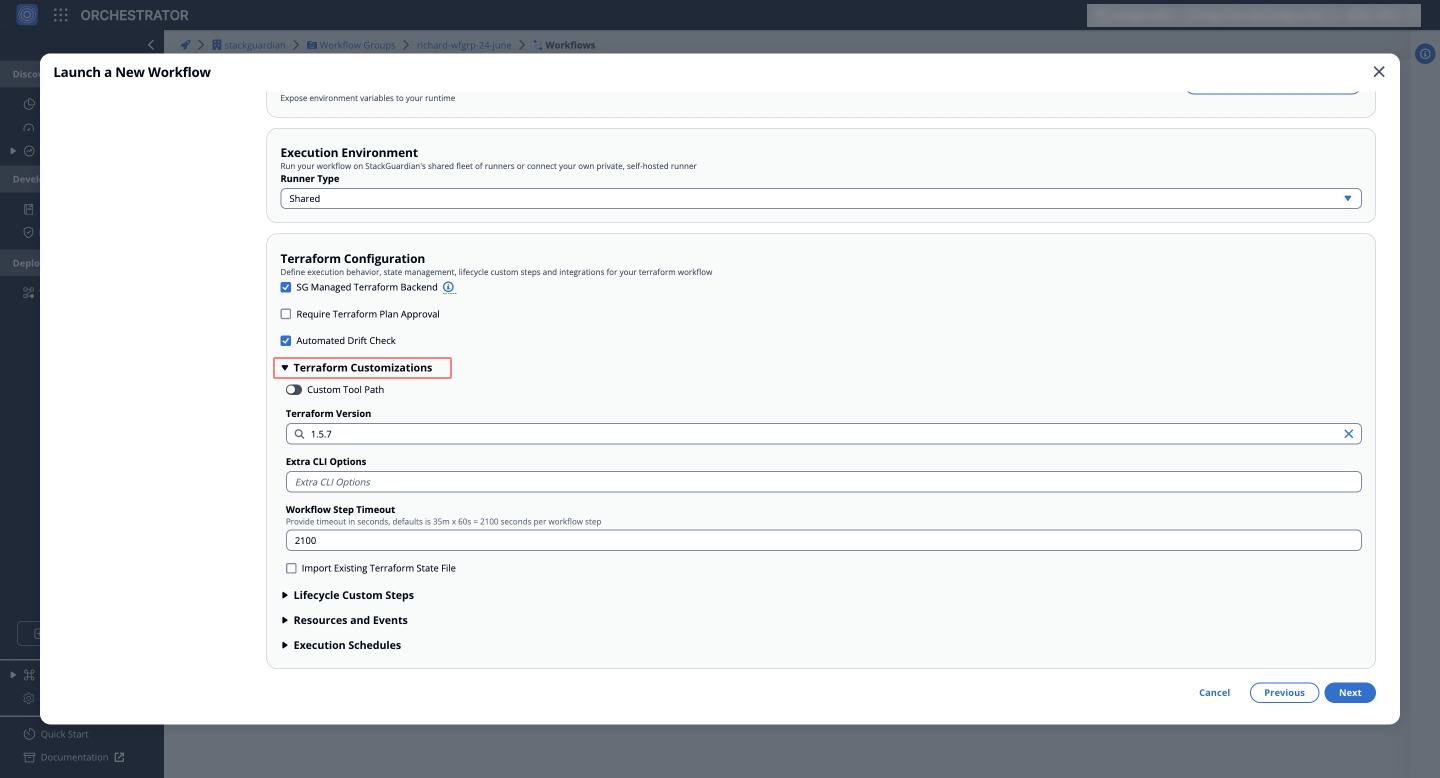
* **Terraform Version**: Ensures compatibility with specific Terraform versions or custom environments. Users can select from available versions (e.g., `1.5.7`) or specify a **Custom Tool Path** for non-standard setups.
* **Extra CLI Options**: Add custom command-line options for Terraform commands, useful for advanced configurations where additional flags or settings are needed.
* **Workflow Step Timeout**: Set a time limit for each step, preventing the workflow from hanging indefinitely during execution.
* **Import Existing Terraform State File**: If **`Use Managed Terraform State`** is enabled, users can upload an existing JSON state file for seamless state migration.
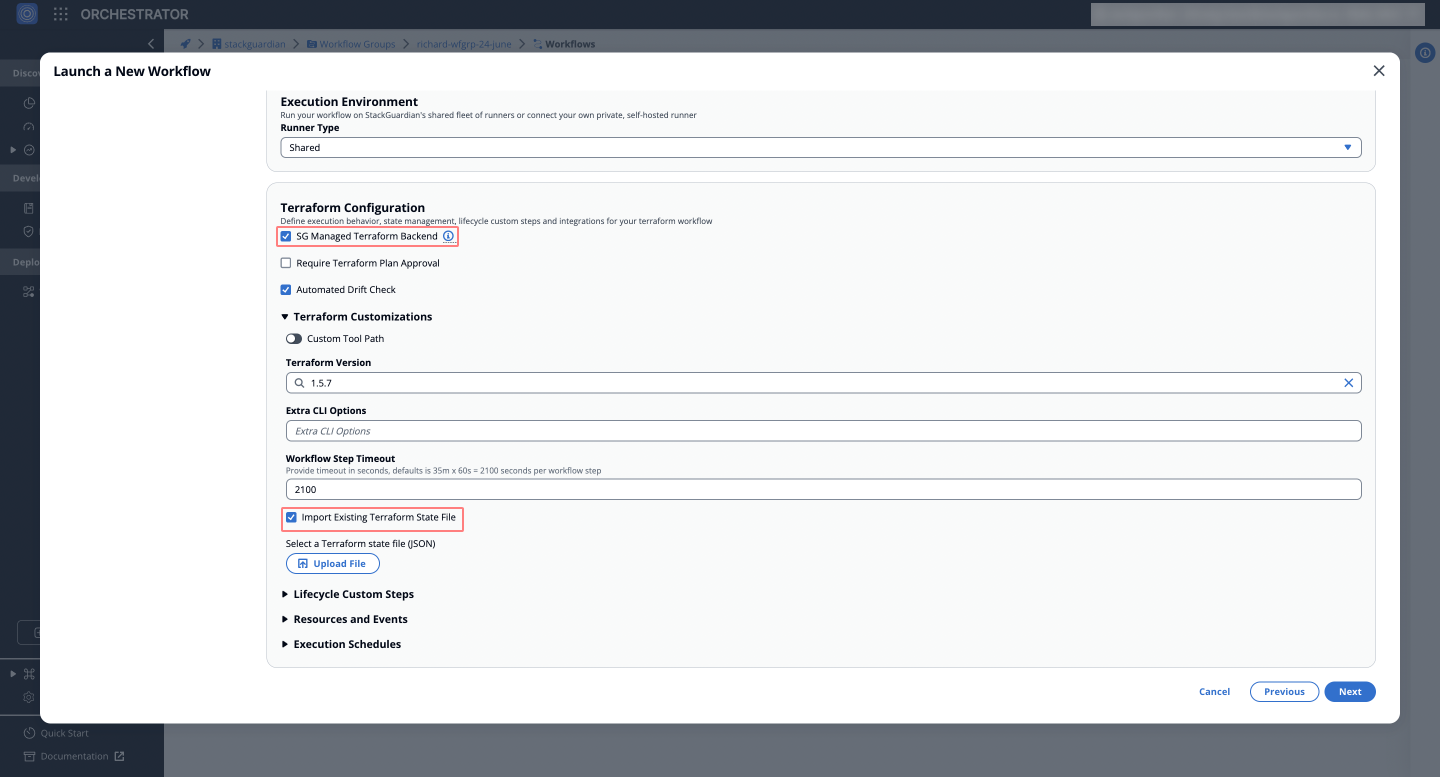
### Lifecycle Custom Steps[](#lifecycle-custom-steps "Direct link to Lifecycle Custom Steps")
Allows users to inject custom logic at different stages of the Terraform workflow, offering flexibility to perform additional tasks before or after Terraform commands.

* **Pre Init**: Executes commands or steps before **`terraform init`**.
* **Pre Plan**: Executes commands or steps before **`terraform plan`**.
* **Post Plan**: Executes steps after the **`terraform plan`** is generated, such as running a security scan.
* **Pre Apply**: Executes commands or steps before **`terraform apply`**.
* **Post Apply**: Executes steps after applying changes, like validation or notifications.
These lifecycle steps enable integration with tools and processes such as vulnerability scanning, validation, or post-deployment configurations directly into the Terraform workflow. **For example**, users can integrate security scans (e.g., **`wiz.io`**) to validate the Terraform plan before proceeding with deployment.
Run commands in the same environment
When **enabled**, lifecycle steps run within the same Terraform environment. If **disabled**, multiple custom steps can be *added* and *reordered*, providing flexibility for more complex workflows. Learn more in the [**Lifecycle Custom Steps**](/docs/deploy/workflows/workflow_components/lifecycle_custom_steps/) documentation.
### Resources and Events[](#resources-and-events "Direct link to Resources and Events")
Explore options to customize the resources **allocated** to your workflow and to trigger *notifications* or *actions* based on workflow events.
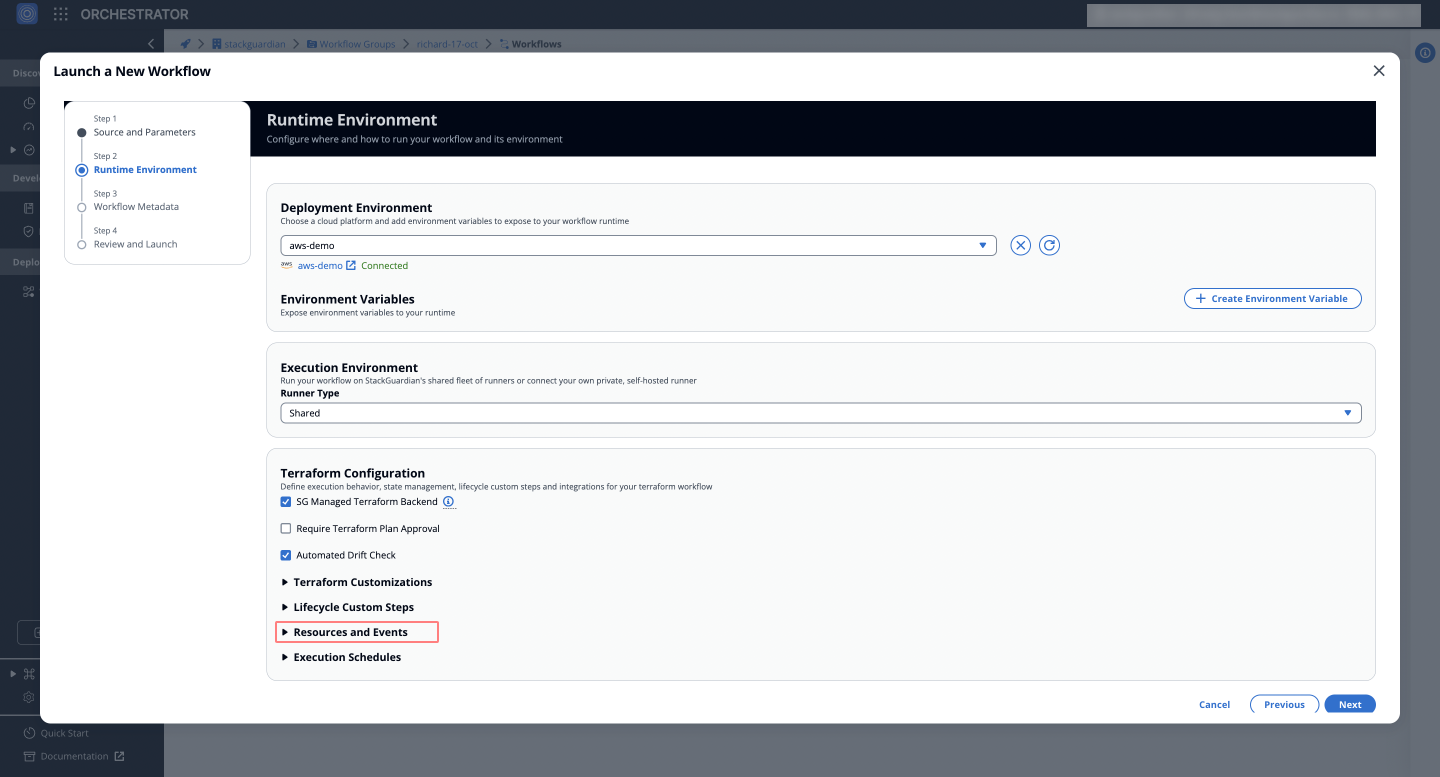
* **Workflow Resources**: Allocate CPU and memory resources for workflow execution (e.g., 1024 for 1 vCPU, 1024 for 1GB memory).
* **Workflow Chaining**: Chain workflows together for sequential execution.
* **Webhook**: Configure webhooks to trigger notifications or actions based on workflow status or events.
* **Notifications**: Set up alerts for key workflow events, such as start, success, or failure.

### Execution Schedules[](#execution-schedules "Direct link to Execution Schedules")
You can automate the execution of workflows using a **cron schedule**. This allows users to define specific intervals for when the workflow should run, whether it’s a one-time deployment or a recurring task.
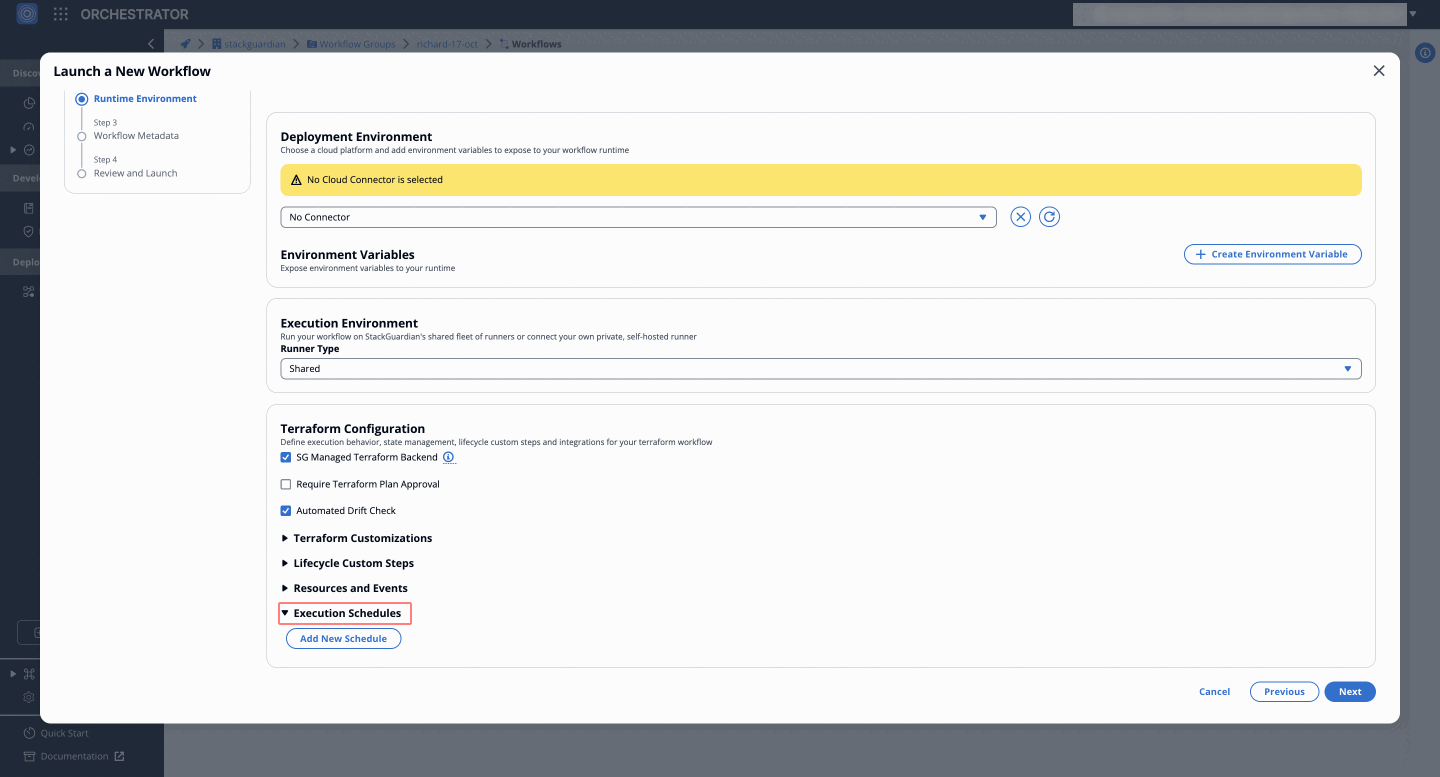
### Custom Workflow Steps[](#custom-workflow-steps "Direct link to Custom Workflow Steps")
Non-Terraform Workflows
For **non-Terraform workflows**, users can define **Workflow Steps** instead of Terraform-specific configurations. These steps allow users to:
* **Create Custom Workflow Steps**: Configure workflow steps for execution flexibility by defining *template parameters* and other template based meta information. Adjust the *sequence* of steps by reordering them as needed.
* **Resources and Events**: Allocate CPU and memory resources to optimize workflow runtime.
* **Workflow Chaining**: Set triggers like "On Error" or "On Success" to execute dependent workflows automatically.
* **Approval Settings**: Enable or disable workflow approvals.
* **Webhooks and Notifications**: Configure webhooks for automated notifications or triggers.

This flexibility enables teams to create highly customized workflows tailored to their unique requirements.
---
# Terraform Workflow
StackGuardian provides **first-class support** for Terraform workflows, allowing users to select **Terraform** as the workflow type during workflow creation. This simplifies infrastructure automation by removing the need to write custom Terraform code.
## Introduction[](#introduction "Direct link to Introduction")
This guide walks you through creating a Terraform workflow on StackGuardian and explores each configuration option in detail.
***
### Source and Parameters[](#source-and-parameters "Direct link to Source and Parameters")
Terraform workflows on StackGuardian support two source types:
1. **Git Repository**: Fetch configuration code directly from private repositories using version control systems like **GitHub** or **GitLab**. Learn more about configuring repositories in [**Version Control Settings**](/docs/deploy/workflows/workflow_components/source_parameters/).
2. **Subscribed Templates**: Use **pre-built templates** from the StackGuardian Library to deploy infrastructure with a no-code approach. These templates simplify deployment and reduce manual configuration efforts.
For more detailed information, refer to the [**Source and Parameters Guide**](/docs/deploy/workflows/workflow_components/source_parameters/).
***
### Terraform Configuration[](#terraform-configuration "Direct link to Terraform Configuration")
In the **Terraform Configuration** section, you can define runtime behaviors such as state management, lifecycle custom steps, and integrations. This step includes configurations for actions like initializing, planning, applying, or destroying resources.

To learn more about runtime environment settings, see the [**Runtime Configuration Guide**](/docs/deploy/workflows/workflow_components/deployment_environment/).
***
### Configure Deployment Environment[](#configure-deployment-environment "Direct link to Configure Deployment Environment")
Define the execution environment for your Terraform workflow. This includes selecting cloud connectors, specifying variables, and configuring private runners if necessary.
You can reference the [**StackGuardian Environment Variables**](/docs/deploy/workflows/workflow_components/deployment_environment/#referencing-stackguardian-environment-variables) in your Terraform variables.
***
### Metadata, Review, and Launch[](#metadata-review-and-launch "Direct link to Metadata, Review, and Launch")
After configuring the Terraform workflow, click **Next** to update the workflow metadata (e.g., name, description, and tags). Finally, click **Launch** to execute the workflow.

## Create Terraform Workflow[](#create-terraform-workflow "Direct link to Create Terraform Workflow")
Discover additional ways to [**Create Terraform Workflows**](/docs/deploy/workflows/create_workflow/overview/) on StackGuardian.
***
## Terraform-Specific Lifecycle Custom Steps[](#terraform-specific-lifecycle-custom-steps "Direct link to Terraform-Specific Lifecycle Custom Steps")
StackGuardian enables users to define custom actions at different stages of the Terraform workflow lifecycle. These steps provide fine-grained control over the execution process.
1. **Pre Init**: Execute commands before running `terraform init`. This is useful for environment setup and pre-configuration checks.
2. **Pre Plan**: Run steps before `terraform plan` to validate configurations or prepare resources.
3. **Post Plan**: Perform actions after the plan is generated, such as analyzing or auditing the plan.
4. **Pre Apply**: Ensure all prerequisites are met before applying changes to infrastructure.
5. **Post Apply**: Execute post-deployment validations or trigger follow-up actions after the apply phase.

For more details, refer to the [**Lifecycle Custom Steps Guide**](/docs/deploy/workflows/workflow_components/lifecycle_custom_steps/).
***
## Accessing Workflow Files in StackGuardian[](#accessing-workflow-files-in-stackguardian "Direct link to Accessing Workflow Files in StackGuardian")
StackGuardian provides a clear directory structure for accessing and managing files during workflow execution. For a detailed overview on the *key directories*, refer to [**Accessing Workflow Files**](/docs/deploy/workflows/workflow_components/run/).
## Mounting Custom Binaries[](#mounting-custom-binaries "Direct link to Mounting Custom Binaries")
StackGuardian supports mounting custom binaries for advanced workflows. This enables users to execute additional logic by integrating custom scripts or binaries directly into the workflow runtime.
### Prerequisites[](#prerequisites "Direct link to Prerequisites")
Before configuring custom binaries, ensure that:
* A **private runner** is used, as custom binaries require controlled environments for security and accessibility.
* The required **Terraform/OpenTofu binary** is stored on the private runner.
### Configuring Custom Binaries for Terraform[](#configuring-custom-binaries-for-terraform "Direct link to Configuring Custom Binaries for Terraform")
StackGuardian allows users to specify a **Custom Tool Path** for Terraform workflows to execute a specific binary version.
### Steps to Configure[](#steps-to-configure "Direct link to Steps to Configure")
1. **Navigate to the Workflow Configuration** Go to **Library > Configure Workflow** and open the **Terraform Configuration** section.
2. **Enable Terraform Customizations** Click on **Terraform Customizations** to expand the options.
3. **Enable Custom Tool Path** Select the **Custom Tool Path** option.
4. **Specify the Custom Terraform Binary** Enter the full path to the custom Terraform binary stored in your private runner. Example: `/usr/bin/terraform198`

## Dive into Workflow[](#dive-into-workflow "Direct link to Dive into Workflow")
StackGuardian workflows provide multiple tabs for monitoring, managing, and refining your deployments. Each tab offers specific insights and actions to optimize your workflow experience.
### Overview[](#overview "Direct link to Overview")
The **Overview** tab highlights key workflow details, including compliance check results, cost estimations, and resource summaries like drift detection and schedules. It offers a quick snapshot of your workflow's status. [Learn more in the **Workflow Overview Guide**](/docs/deploy/workflows/workflow_components/overview/).

***
### Runs[](#runs "Direct link to Runs")
The **Runs** tab lists all executions with real-time status, unique run IDs, and metadata, such as user actions and modification timestamps. Click a **Run ID** to view detailed logs and execution progress. [Explore the **Workflow Runs Guide**](/docs/deploy/workflows/workflow_components/run/).

***
### Outputs[](#outputs "Direct link to Outputs")
The **Outputs** tab displays execution results and downloadable artifacts like `tfstate.json`. Use key-value pairs to reference outputs in other workflows, making your infrastructure provisioning more dynamic. [See the **Workflow Outputs Guide**](/docs/deploy/workflows/workflow_components/outputs/).

***
### Settings[](#settings "Direct link to Settings")
The **Settings** tab enables post-creation updates, such as modifying input variables, refining Terraform runtime settings, reordering custom steps, or managing cloud connectors and environment variables. [Learn more in the **Workflow Settings Guide**](/docs/deploy/workflows/workflow_components/settings/).
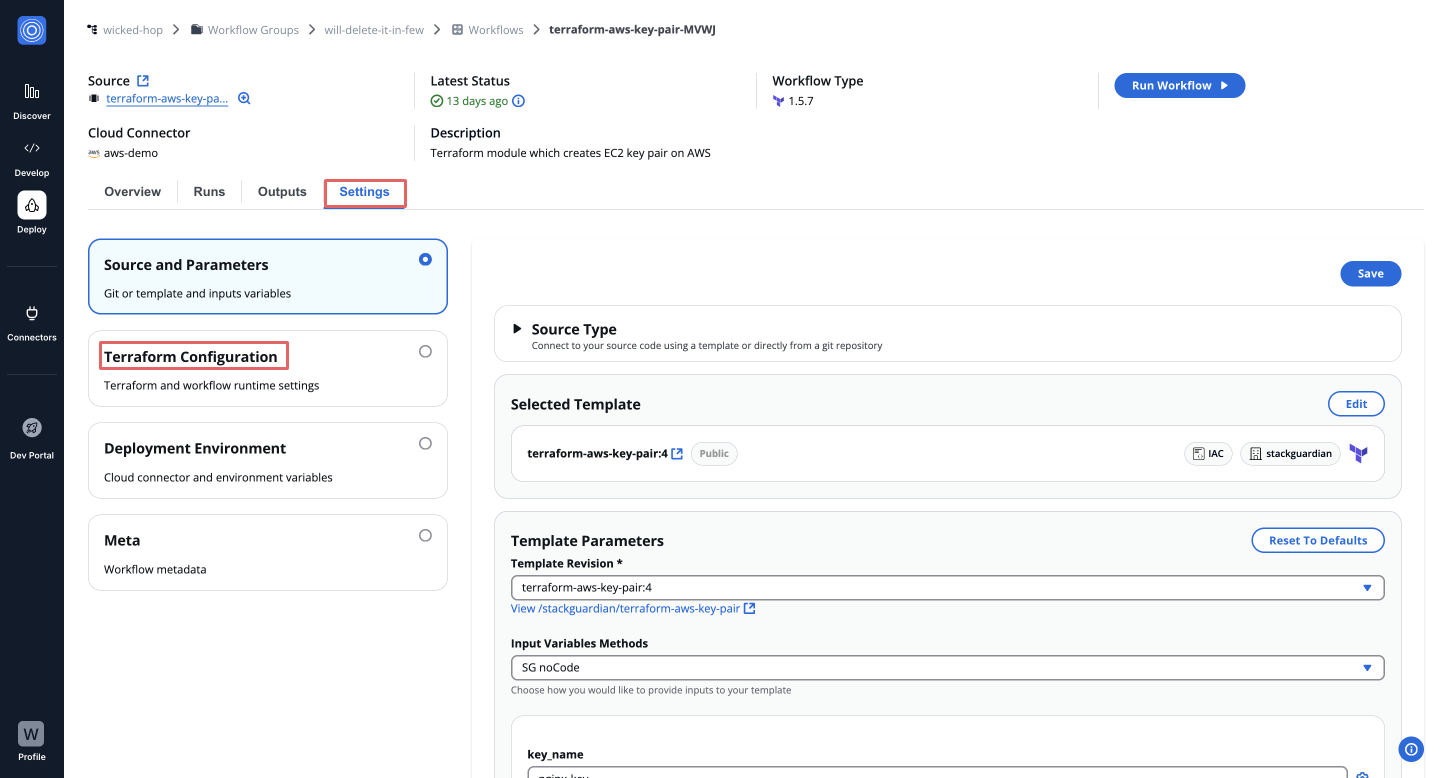
---
# Custom Runtime Image
Professional Package
Custom Runtime Images are available exclusively with the **Professional** package. [Contact us](https://www.stackguardian.io/contact) to learn more about upgrading your subscription.
## Overview[](#overview "Direct link to Overview")
StackGuardian provides a **base** variant of the Terraform/OpenTofu runtime image that you can extend with your own tools and dependencies.
**Prerequisites**:
* Docker 20.10+
* Access to the StackGuardian container registry
## Base Image[](#base-image "Direct link to Base Image")
StackGuardian provides a base runtime image that you can use as your parent image. It includes:
* Pre-cached OpenTofu and Terraform binaries with on-demand version resolution
* OPA, Infracost, and Terragrunt
* Python 3.12 runtime and the StackGuardian workflow application
* A non-root `stackguardian` user (UID 911)
The base image URL is available in your **Organization Settings → Runner Groups** in the StackGuardian platform. In the examples below, it is referred to as ``.
note
The base image has a fully functional Alpine package manager (`apk`) and `pip` and is the supported starting point for installing additional system or Python dependencies.
## Writing your Dockerfile[](#writing-your-dockerfile "Direct link to Writing your Dockerfile")
```
FROM
# Switch to root to install packages
USER root
# Install system packages
RUN apk add --no-cache \
aws-cli \
azure-cli \
jq \
bash
# Install Python packages
RUN pip install --no-cache-dir \
boto3 \
requests
# Switch back to the application user
USER stackguardian
```
Key rules:
* Switch to `USER root` before installing packages.
* Switch back to `USER stackguardian` when done.
* Do not override `ENTRYPOINT` or `CMD` -- the application entrypoint is already configured.
* Do not modify files under `/usr/local/bin/` -- these are the cached IaC tool binaries.
## Examples[](#examples "Direct link to Examples")
### AWS CLI + 1Password CLI[](#aws-cli--1password-cli "Direct link to AWS CLI + 1Password CLI")
```
FROM
USER root
RUN apk add --no-cache aws-cli
RUN wget -q -O /tmp/op.zip \
https://cache.agilebits.com/dist/1P/op2/pkg/v2.24.0/op_linux_amd64_v2.24.0.zip && \
unzip /tmp/op.zip -d /usr/local/bin/ && \
rm /tmp/op.zip && \
chmod +x /usr/local/bin/op
USER stackguardian
```
### Custom Python Libraries[](#custom-python-libraries "Direct link to Custom Python Libraries")
```
FROM
USER root
RUN pip install --no-cache-dir \
checkov \
pyyaml
USER stackguardian
```
### Azure CLI with Extensions[](#azure-cli-with-extensions "Direct link to Azure CLI with Extensions")
```
FROM
USER root
RUN apk add --no-cache \
py3-pip \
gcc \
musl-dev \
python3-dev \
libffi-dev
RUN pip install --no-cache-dir azure-cli
USER stackguardian
```
## Security hardening (Optional)[](#security-hardening-optional "Direct link to Security hardening (Optional)")
The base image ships a hardening script at `/usr/local/bin/harden.sh`. This script strips the image down for production use by:
* Removing unnecessary system accounts
* Removing SUID/SGID binaries and dangerous commands
* Removing admin commands from `/sbin` and `/usr/sbin` (except `apk`)
* Disabling interactive login shells
* Locking down file permissions
`apk` and `pip` remain available after hardening so that downstream images can still install packages if needed.
To apply hardening after installing your packages:
```
FROM
USER root
RUN apk add --no-cache aws-cli
RUN pip install --no-cache-dir boto3
# Apply security hardening (must be the last RUN step as root)
RUN /usr/local/bin/harden.sh stackguardian
USER stackguardian
```
important
Run `harden.sh` as the **last root step** in your Dockerfile. Most admin tools and system commands will be removed after hardening — only `apk` and `pip` are preserved for package management.
## Build and test[](#build-and-test "Direct link to Build and test")
```
# Build your custom image
docker build -t my-custom-runtime:latest .
# Verify your tools are available
docker run --rm my-custom-runtime:latest aws --version
docker run --rm my-custom-runtime:latest pip list
# Verify the application still starts
docker run --rm my-custom-runtime:latest
```
## Working directory[](#working-directory "Direct link to Working directory")
The application working directory is `/opt/stackguardian`. Avoid writing to this directory as it contains the application code. Use `/tmp` or `/mnt` for temporary files.
## Troubleshooting[](#troubleshooting "Direct link to Troubleshooting")
| Problem | Cause | Fix |
| -------------------------------------- | ---------------------------------------- | --------------------------------------------------------- |
| `apk add` fails with permission denied | Not running as root | Add `USER root` before install commands |
| `apk add` fails with "not found" | Using the hardened image instead of base | Use the base image provided in your Organization Settings |
| Application fails to start | `CMD` or `ENTRYPOINT` was overridden | Remove any `CMD`/`ENTRYPOINT` from your Dockerfile |
| Binary not found at runtime | Installed to wrong path | Ensure binaries are in `/usr/local/bin/` or on `$PATH` |
---
# Policies Templates
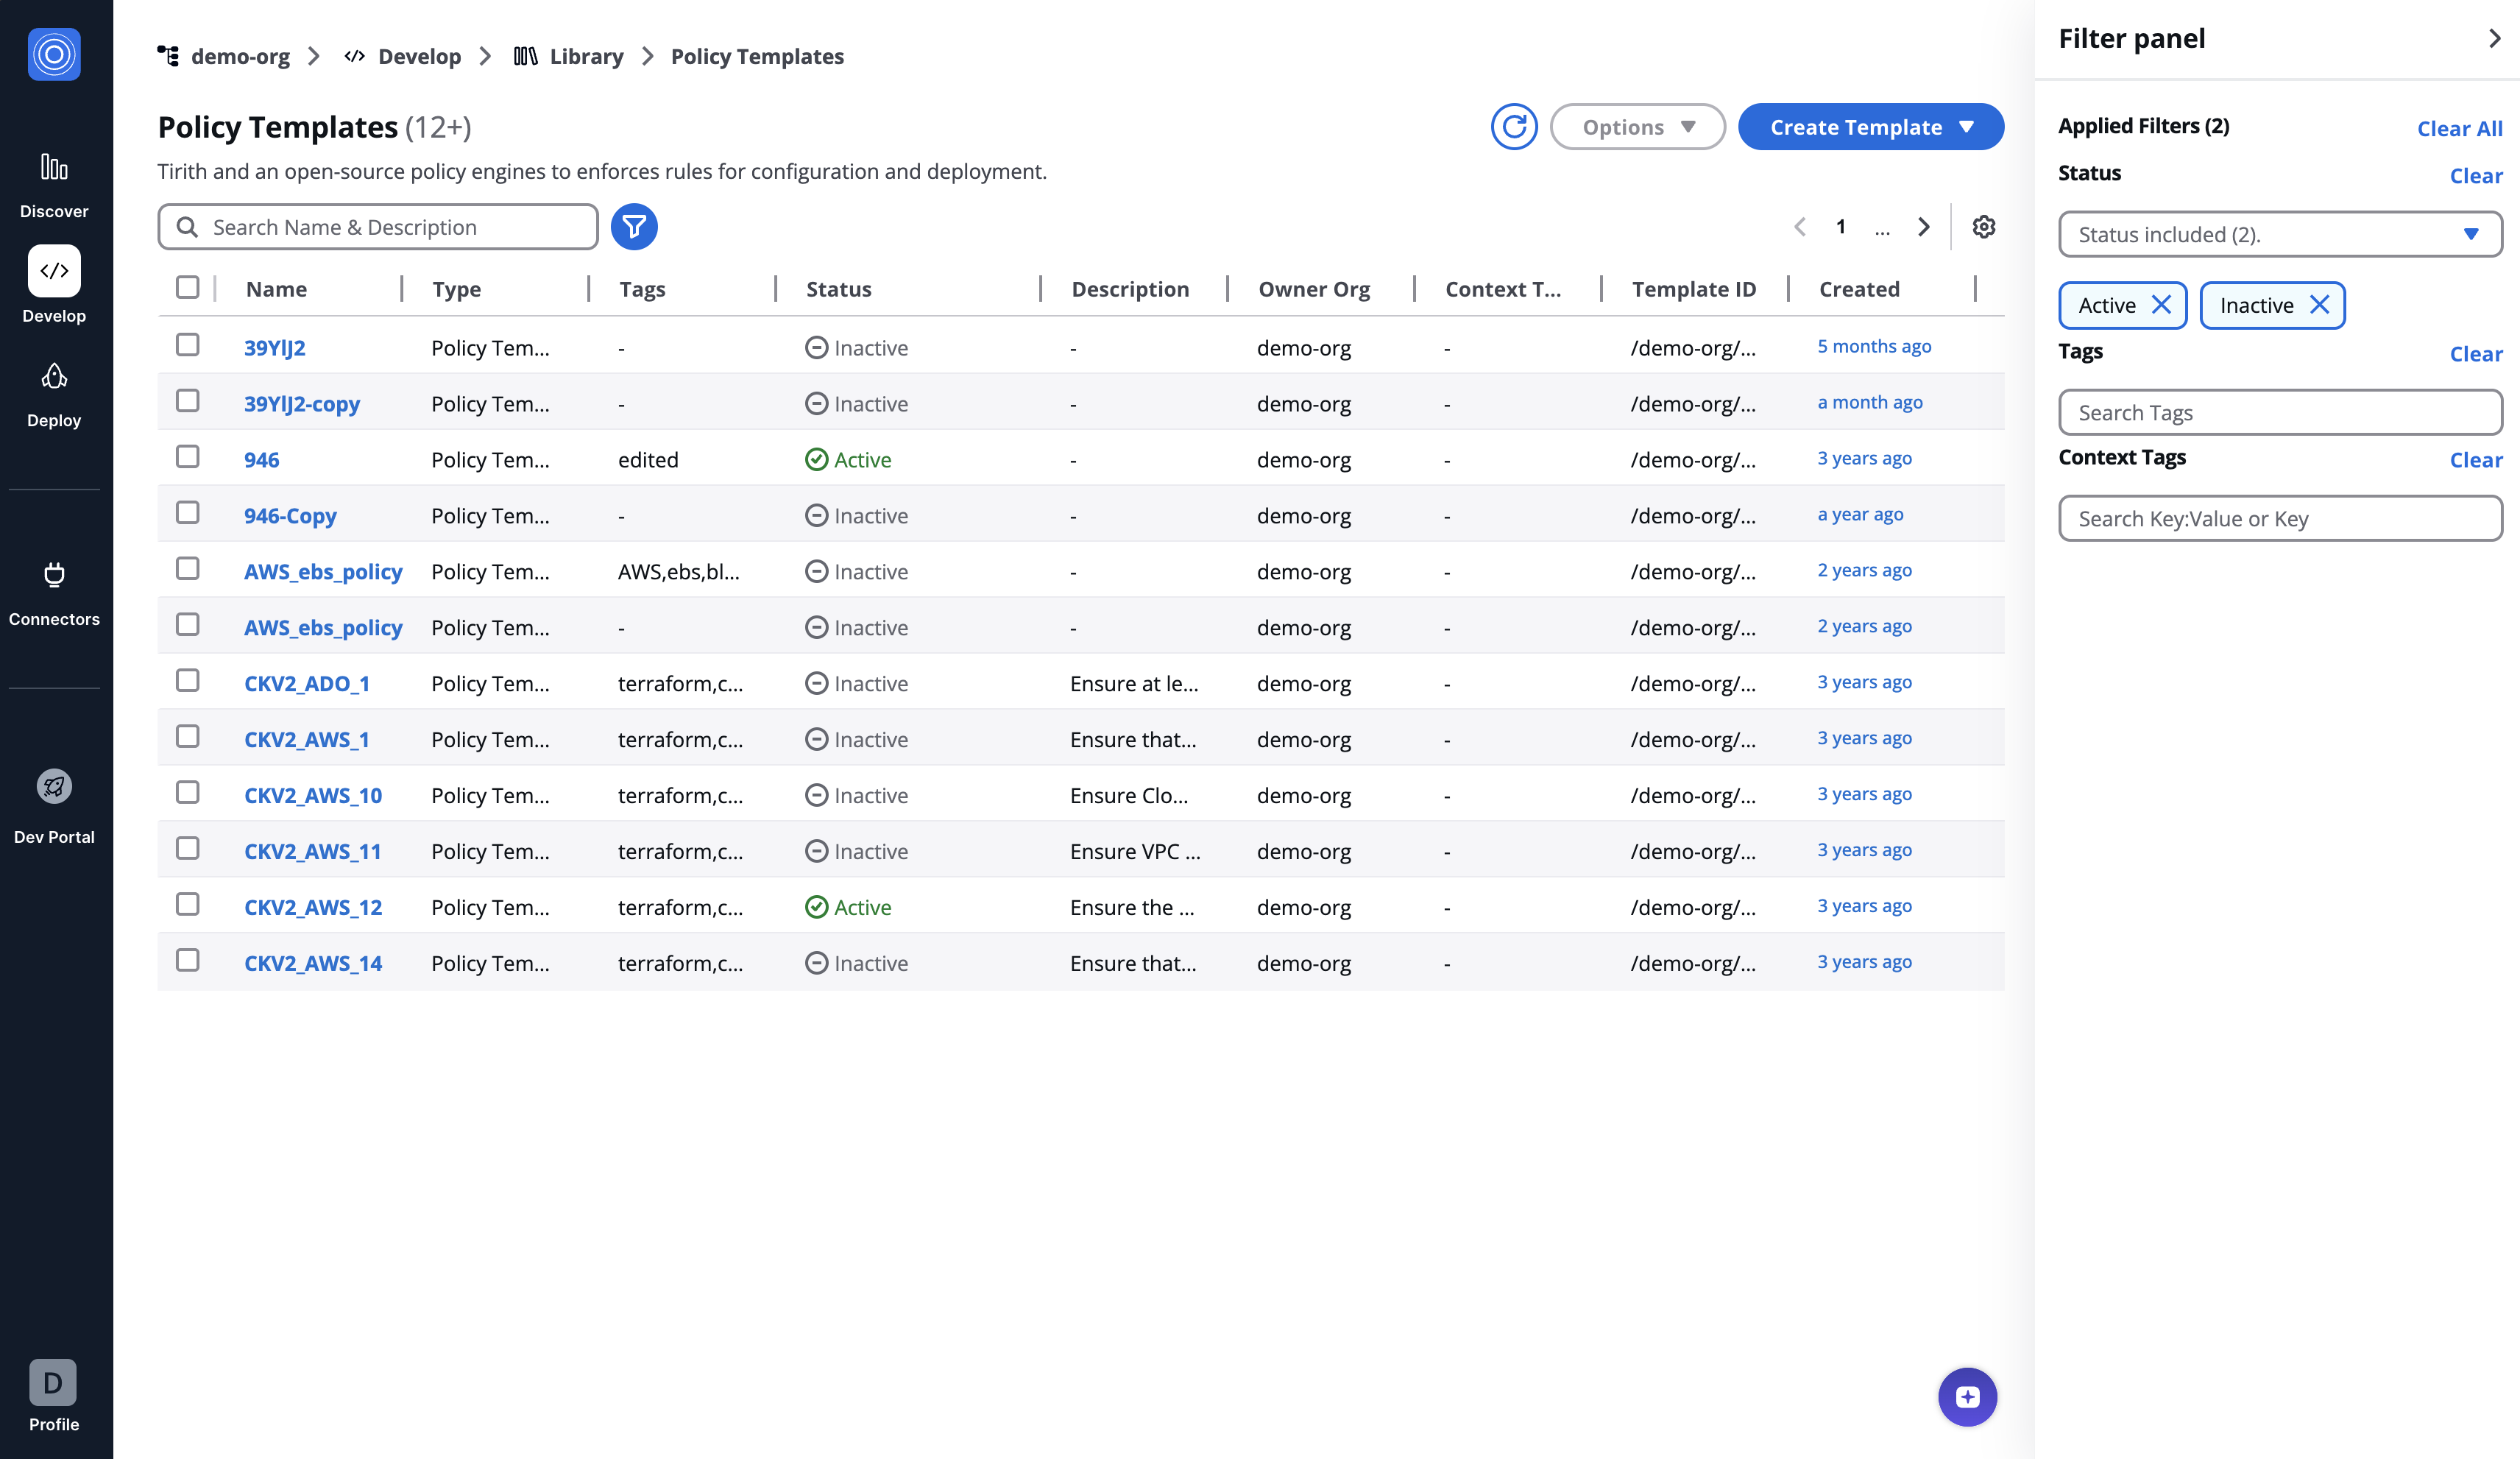
A Policy template (IAC policy) is a set of rules that govern the configuration and provisioning of infrastructure through code. With StackGuardian, you can implement custom logic within these policies to ensure your infrastructure aligns with organizational standards and best practices.
For instance, an IAC policy might enforce security standards by restricting access levels or ensuring all deployed resources are tagged correctly.
### Create a Policy Template[](#create-a-policy-template "Direct link to Create a Policy Template")
In **Library** > **Policies**, click **Create Template**.
#### Template Details[](#template-details "Direct link to Template Details")
* **Template Type**: This specifies the kind of template you are creating, in this case, a policy template. For example `IAC_POLICY`
* **Template Name**: A unique name for your template within the organization. For example `No_Root_Access_Key_Policy`
* **Template ID**: Auto-generated from the Template Name. You can customize it using only letters, numbers, underscores (\_), or dashes (-). This cannot be changed after creation.
* **Owner Org**: The organization within StackGuardian that will own and manage this template. For example `demo-org`
#### Template Description[](#template-description "Direct link to Template Description")
* **Short Description**: A brief explanation of what the template does or is used for. For example `Ensures AWS root account's keyless security.`
#### Tags and Documentation[](#tags-and-documentation "Direct link to Tags and Documentation")
* **Add Tag**: Tags for categorizing and searching templates within the marketplace. For example `aws`, `root`, `noaccesskeys`
* **Documentation**: Provide any additional information or instructions in markdown format.
#### Configuration Settings[](#configuration-settings "Direct link to Configuration Settings")
* **Source Config Kind**: The policy framework or tool you are using to write the policy. For example *Open Policy Agent (OPA)*
* **Source Config Dest Kind**: The destination type where the policy configuration is hosted, such as GitHub, Gitlab, BitBucket and so on. For example *GITHUB.COM*
* **Repository URL**: The URL where the IAC policy configuration is stored. For example `https://github.com/your-org-name/template-aws-root-access-policy`
* **Reference**: he branch or tag in the repository that should be used. For example *main*
* **Working Dir**: The directory within the repository where the policy configuration is located. For example *policy/app1/aws/ec2*
* **Git Sparse Checkout Config**: Select paths to include or exclude when checking out the repository, similar to `.gitignore` rules.
* **Enable git core.autocrlf**: If checked, Git will automatically convert line endings to maintain consistency across different operating systems.
* **Authentication Method**: If using a private repository, specify the authentication method that should be used.
* **OPA Deciding Query**: The OPA rule that will decide the final policy result. For example, *\.\*
* **Template Inputs**: Define the input for your policy in JSON format. Here is an example that specifies the *denial of access key creation for the IAM root user*:
```
{
"Version": "2012-10-17",
"Statement": [
{
"Effect": "Deny",
"Action": "iam:CreateAccessKey",
"Resource": "arn:aws:iam::*:user/root",
"Condition": { "Bool": { "aws:ViaAWSService": "false" } }
}
]
}
```
### Create and Manage Template Revisions[](#create-and-manage-template-revisions "Direct link to Create and Manage Template Revisions")
All template types in StackGuardian support versioned revisions for controlled deployment and collaboration. You can select, clone, publish, deprecate versions and more. Visit the [Manage Template Revision](/docs/develop/library/manage_template_revisions/) guide.
---
# Workflows & Stacks Templates
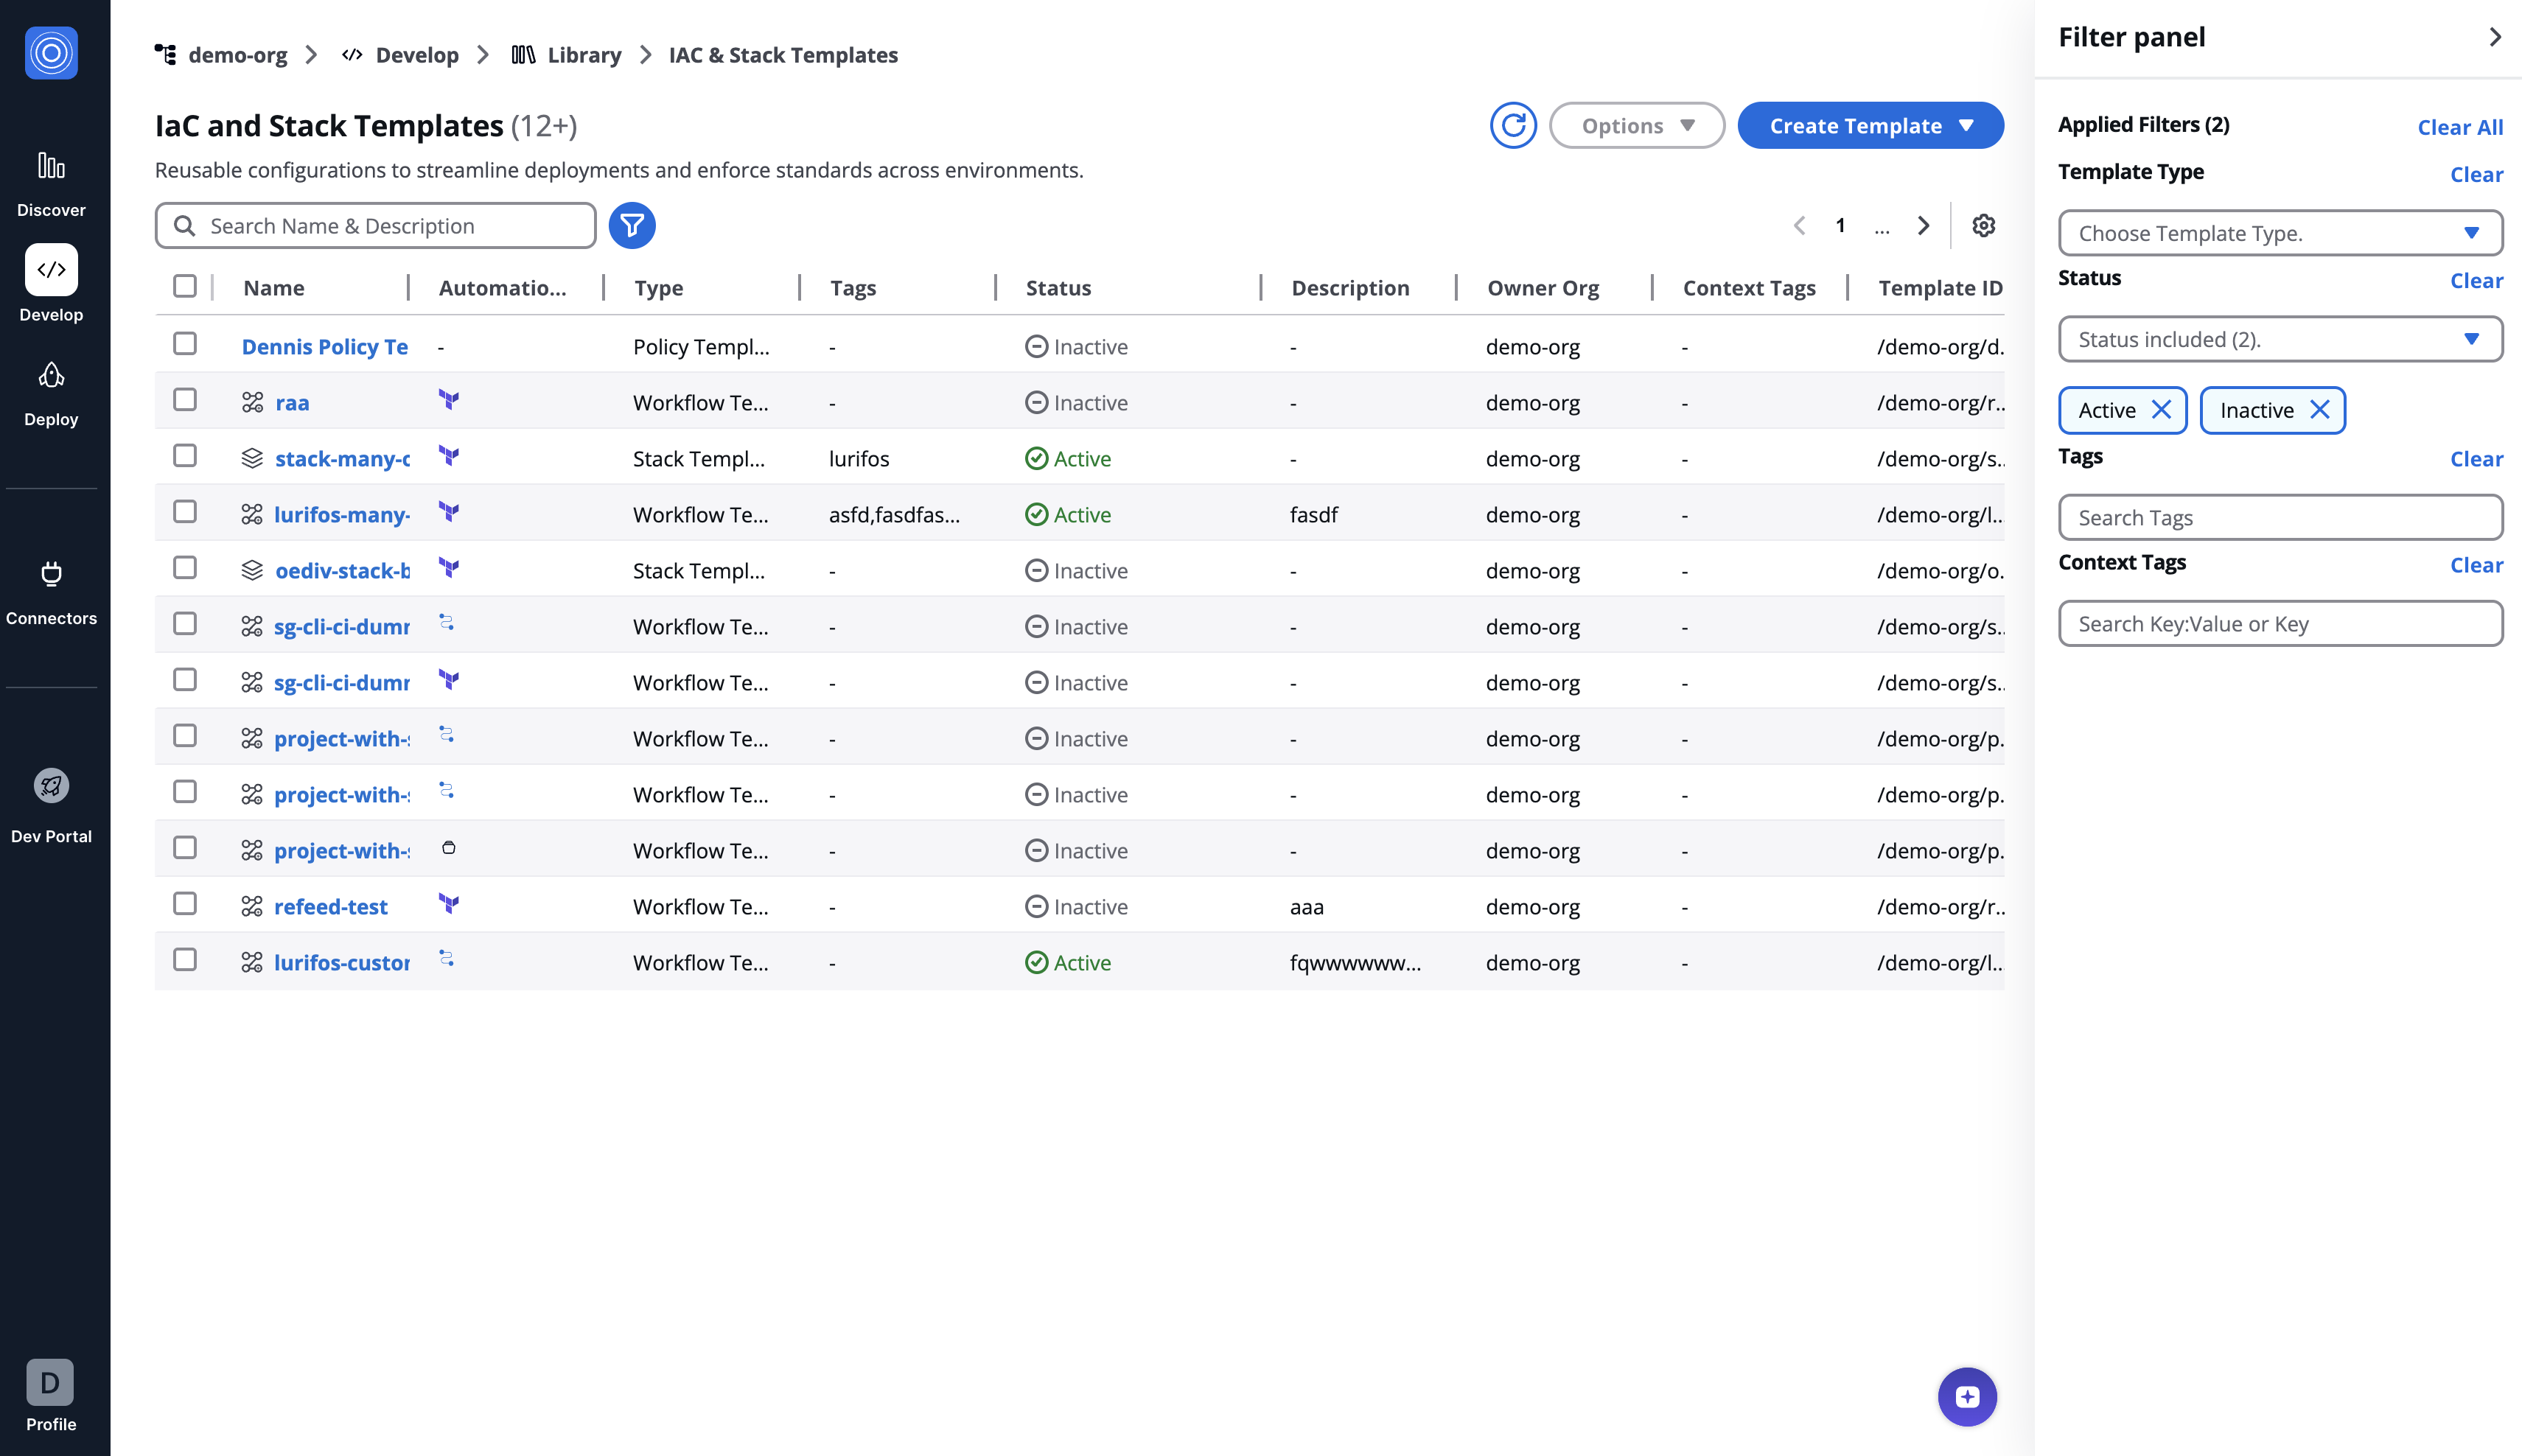
*Workflows & Stacks Templates*
### Workflow Templates[](#workflow-templates "Direct link to Workflow Templates")
Workflow Templates are automated blueprints for provisioning cloud infrastructure. They support rapid deployment with features like version control, JSON-based configurations, and customizable settings for infrastructure components.
### Create a Workflow Template[](#create-a-workflow-template "Direct link to Create a Workflow Template")
To create a workflow template:
1. Navigate to [organization's library](/docs/develop/library/overview/) and select **Create Template** in the top-right corner.
2. Select the **Template type**.
3. Select the **Git Repository**:
* **Version Control**: Choose the repository service, e.g., GitHub.
* **Repository**: Enter the URL where the IAC configuration is hosted.
* **Working Dir**: Directory path for the IAC configuration if not at the repo's root.
* **Git Sparse Checkout Config**: Git Sparse Checkout Config: Specify paths to include or exclude for the repository checkout, akin to .gitignore. By default we checkout the full repository.
* **Enable git core.autocrlf**: Tick if you need to normalize line endings.
4. Fill the Template configuration:
* **Template Name**: Unique identifier, e.g., `aws-ec2-demo`.
* **Template ID**: Auto-generated from the Template Name. You can customize it using only letters, numbers, underscores (\_), or dashes (-). This cannot be changed after creation.
* **Description**: Brief description, e.g., "EC2 instance setup template for production environment".
* **Template Tags**: Add tags to categorize the Template.
5. Click **Create**.
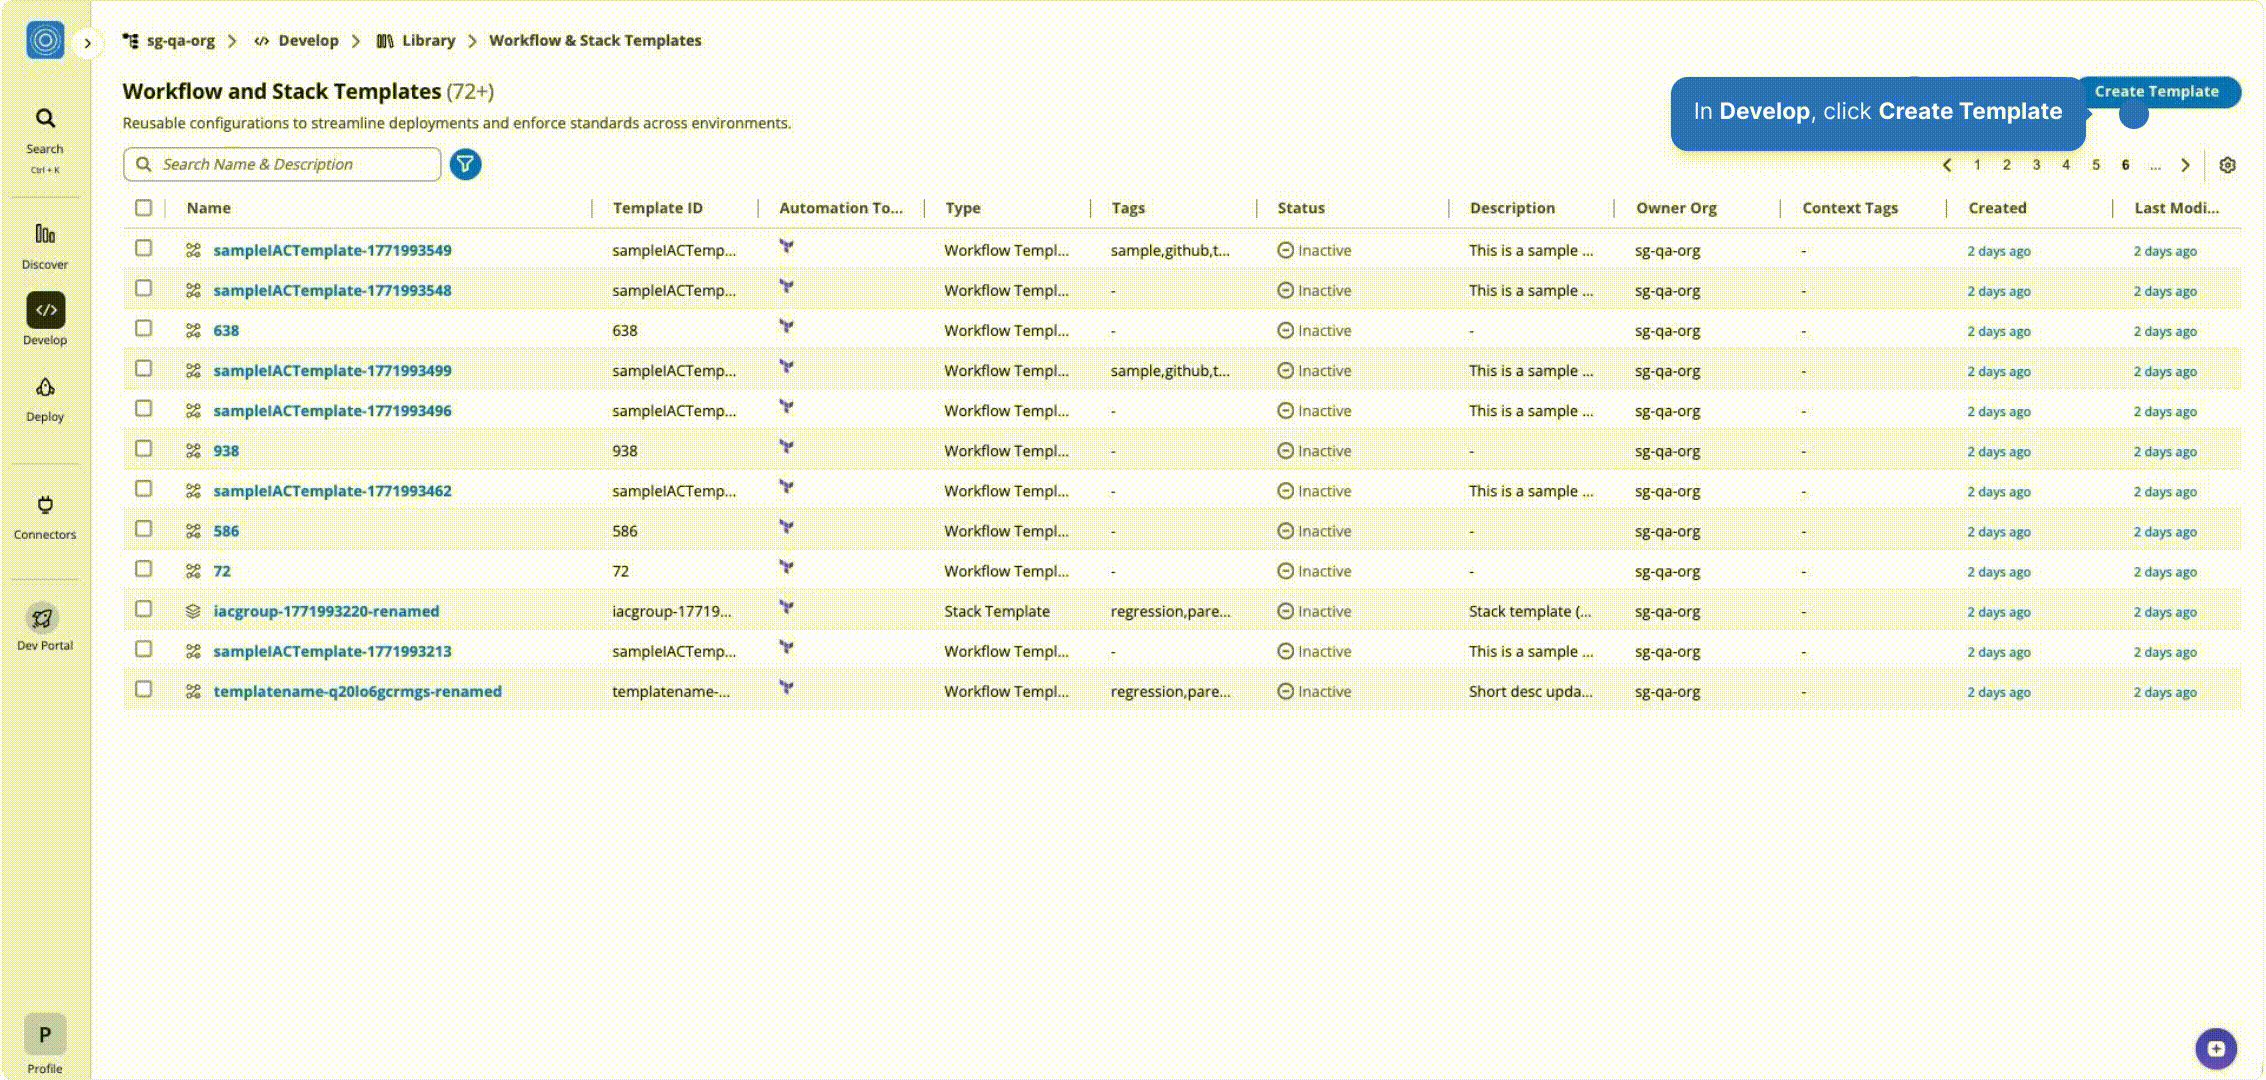
*Create Workflow Template*
#### Template Inputs[](#template-inputs "Direct link to Template Inputs")
Select between **FORM** and **JSON** for input methods. Here's a JSON example for creating a simple EC2 instance:
```
{
"create": true,
"name": "production-instance",
"instance_type": "t2.micro",
"ami": "ami-0110d1b5b1cdd8780",
"key_name": "production-key",
"vpc_security_group_ids": ["sg-12345678"],
"subnet_id": "subnet-12345678"
}
```
### Create and Manage Template Revisions[](#create-and-manage-template-revisions "Direct link to Create and Manage Template Revisions")
All template types in StackGuardian support versioned revisions for controlled deployment and collaboration. You can select, clone, publish, deprecate versions and more. Visit the [Manage Template Revision](/docs/develop/library/manage_template_revisions/) guide.
### Stack Templates[](#stack-templates "Direct link to Stack Templates")
Stack Templates are sets of interrelated workflow templates that orchestrate the provisioning of infrastructure components. They simplify the management of complex environments by combining templates into a unified workflow.
For instance, a Stack might include templates for setting up databases, servers, and load balancers that are deployed together to form a scalable web application environment.
### Create a Stack Template[](#create-a-stack-template "Direct link to Create a Stack Template")
To create a Stack Template:
1. Navigate to [organization's library](/docs/develop/library/overview/) and select **Create Template** in the top-right corner.
2. Click **Add Template** to incorporate your chosen templates.
3. Select the latest revision to ensure the Stack uses the most current configurations.
4. Correctly sequence your templates by dragging them into the desired order, paying attention to dependency requirements.
5. Click **Next: Configure**.
6. Fill in the Stack Template details:
* **Template Name**: Assign a descriptive name, such as '*web-store-app*'.
* **Template ID**: Auto-generated from the Template Name. You can customize it using only letters, numbers, underscores (\_), or dashes (-). This cannot be changed after creation.
* **Description**: Describe the group's purpose, e.g. *Templates for a complete web store infrastructure*.
* **Template Tags**: Add tags to categorize the Template.
5. Click **Create** to finalize your Stack Template.
*Create Stack Template*
### Create and Manage Template Revisions[](#create-and-manage-template-revisions-1 "Direct link to Create and Manage Template Revisions")
All template types in StackGuardian support *versioned revisions* for *controlled deployment* and *collaboration*. You can select, clone, publish, deprecate versions and more. Visit the [Manage Template Revision](/docs/develop/library/manage_template_revisions/) guide.
---
# Manage Template Revisions
## Overview[](#overview "Direct link to Overview")
Workflow Templates and Stack Templates are version-controlled in StackGuardian through **revisions**. Each revision is an immutable snapshot of your template, so you can track changes, roll back to a previous state, and control which version your Workflows and Stacks use.
## Template overview[](#template-overview "Direct link to Template overview")
Go to **Library** > **Workflows & Stacks** > **Select a template**. Each template page provides high-level metadata and controls, including:
* **Template Name**: The name assigned to the template, e.g., `terraform-aws-key-pair`. Can be changed after creation, but the TemplateID will remain the same.
* **Repository URL**: A link to the source code repository (e.g., **GitHub**).
* **Template Type**: The type of template, such as *Terraform*, *Opentofu*, *Ansible*, *Helm*, and more.
* **Owner Organization**: The organization that owns the template. Most often, this will be your own organization, but templates can also be shared between organizations.
* **Activation status**: This indicates if template is activated or not. Activated templates will only appear in dev portal.
* **Sharing status**: This indicates the current sharing status of template. (Public, Private or Shared)
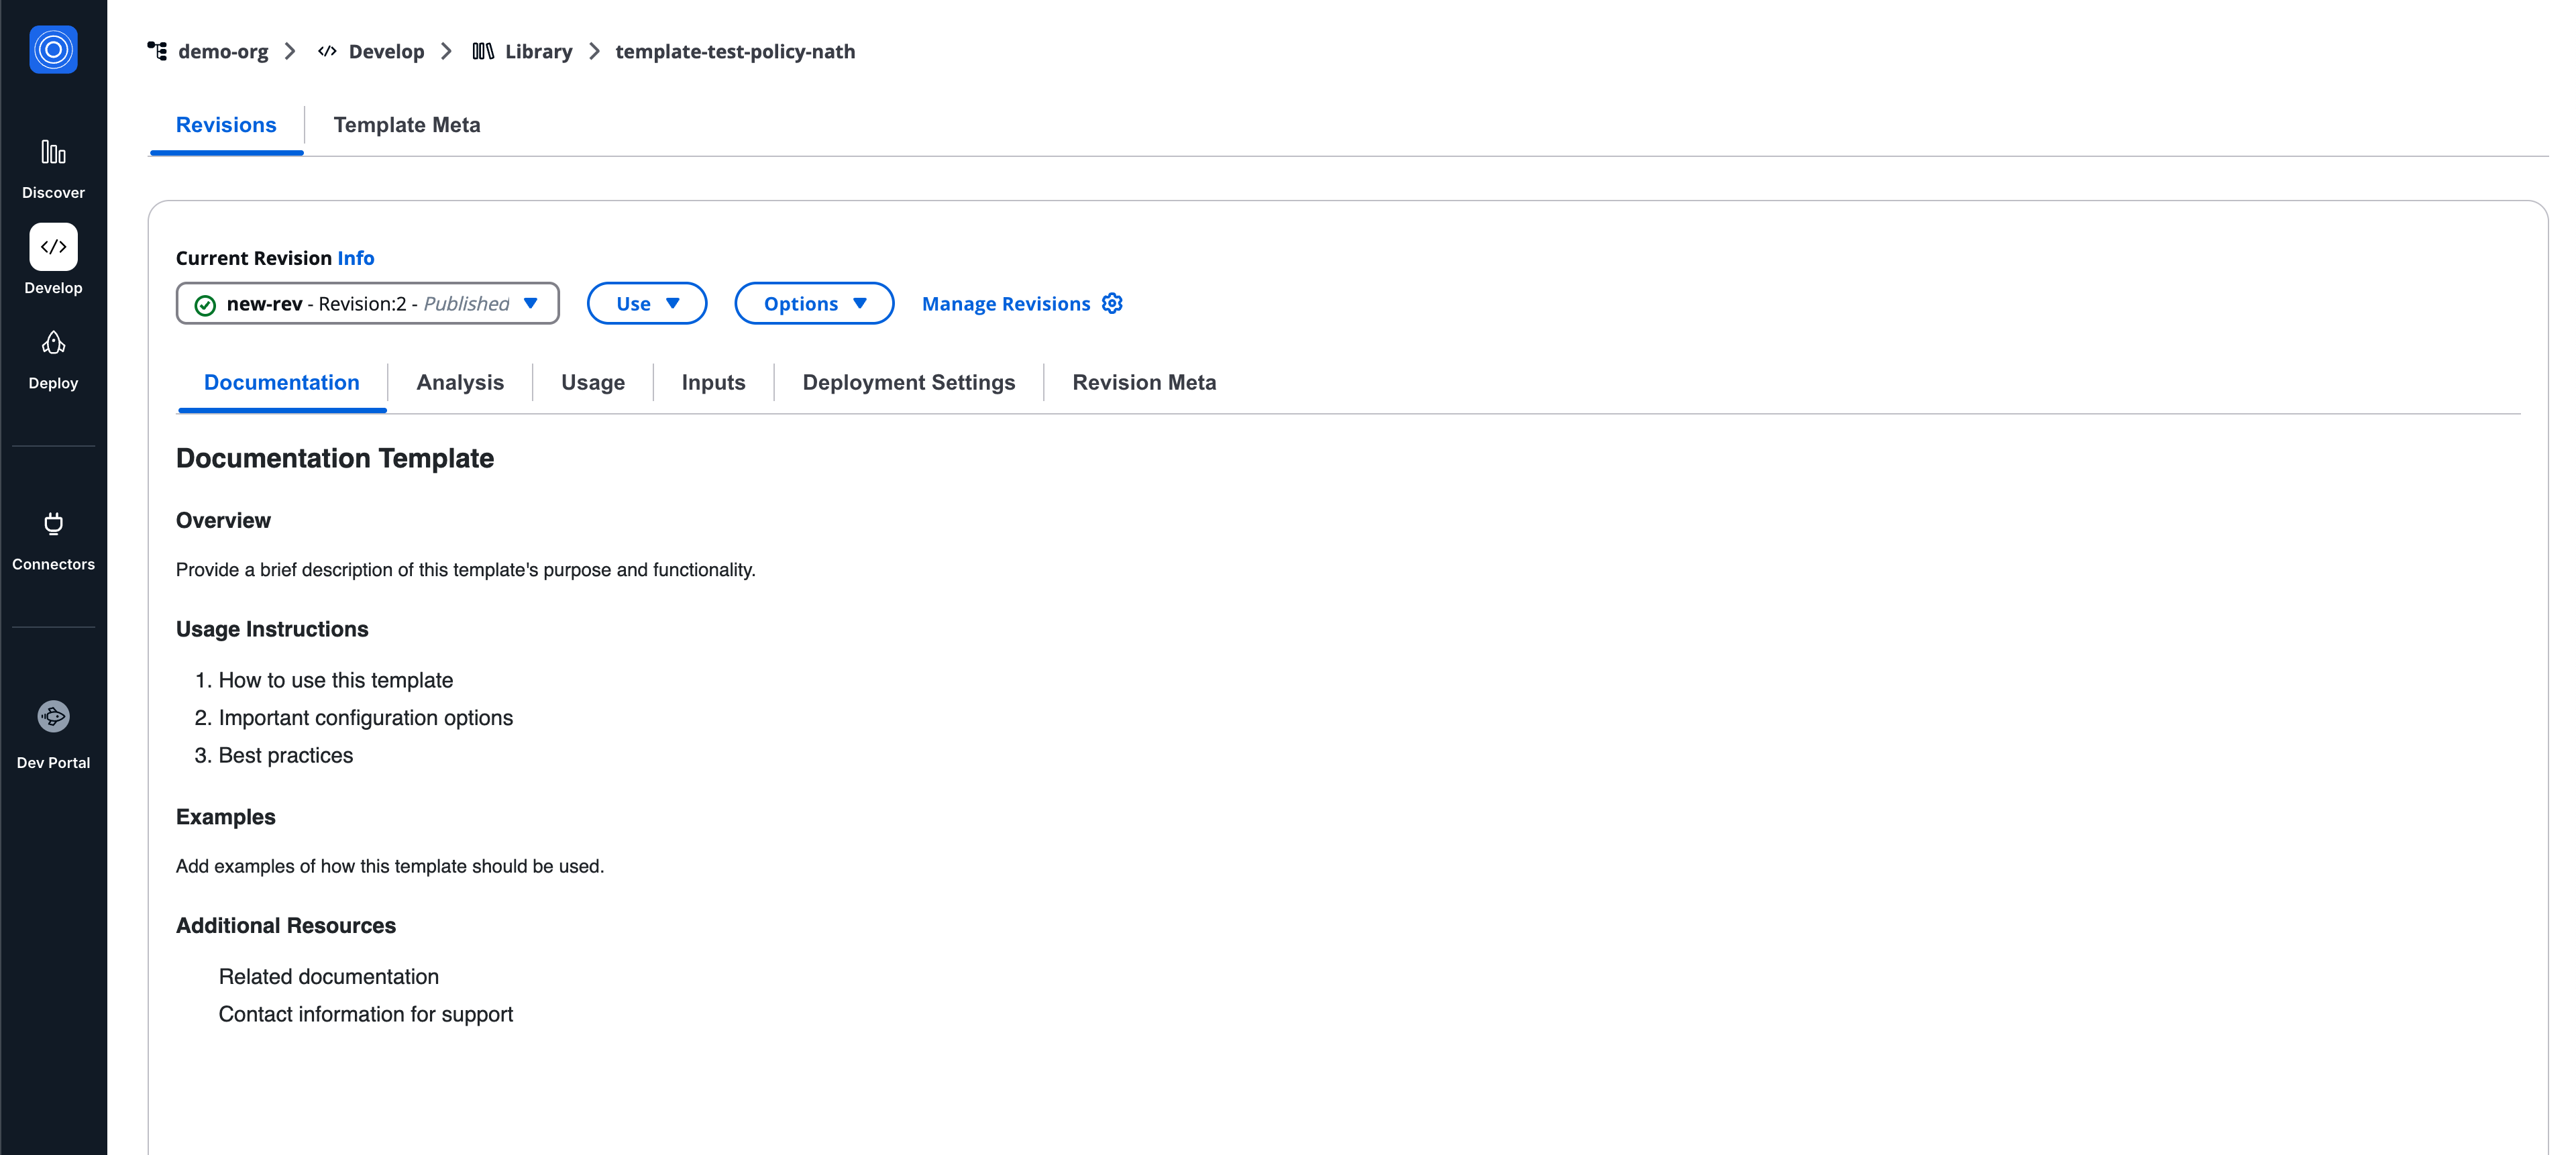
### Template options[](#template-options "Direct link to Template options")
Template-level actions are available via **Template Options**:
* **Activate/Deactivate** the template to control its usage within your organization.
* **Share Template** with other StackGuardian organizations where you also hold admin access.
* **Set visibility (public or private)** to control the template's visibility on the community marketplace. Note: To make a template public, its underlying repository must also be public.

## Template sections[](#template-sections "Direct link to Template sections")
Each template page contains two main sections:
* **Revisions** - This contains detailed information about all the revisions of a template.
* **Template meta** - This contains static metadata information of a template
## Template meta[](#template-meta "Direct link to Template meta")
The Template meta tab displays static metadata for the template.
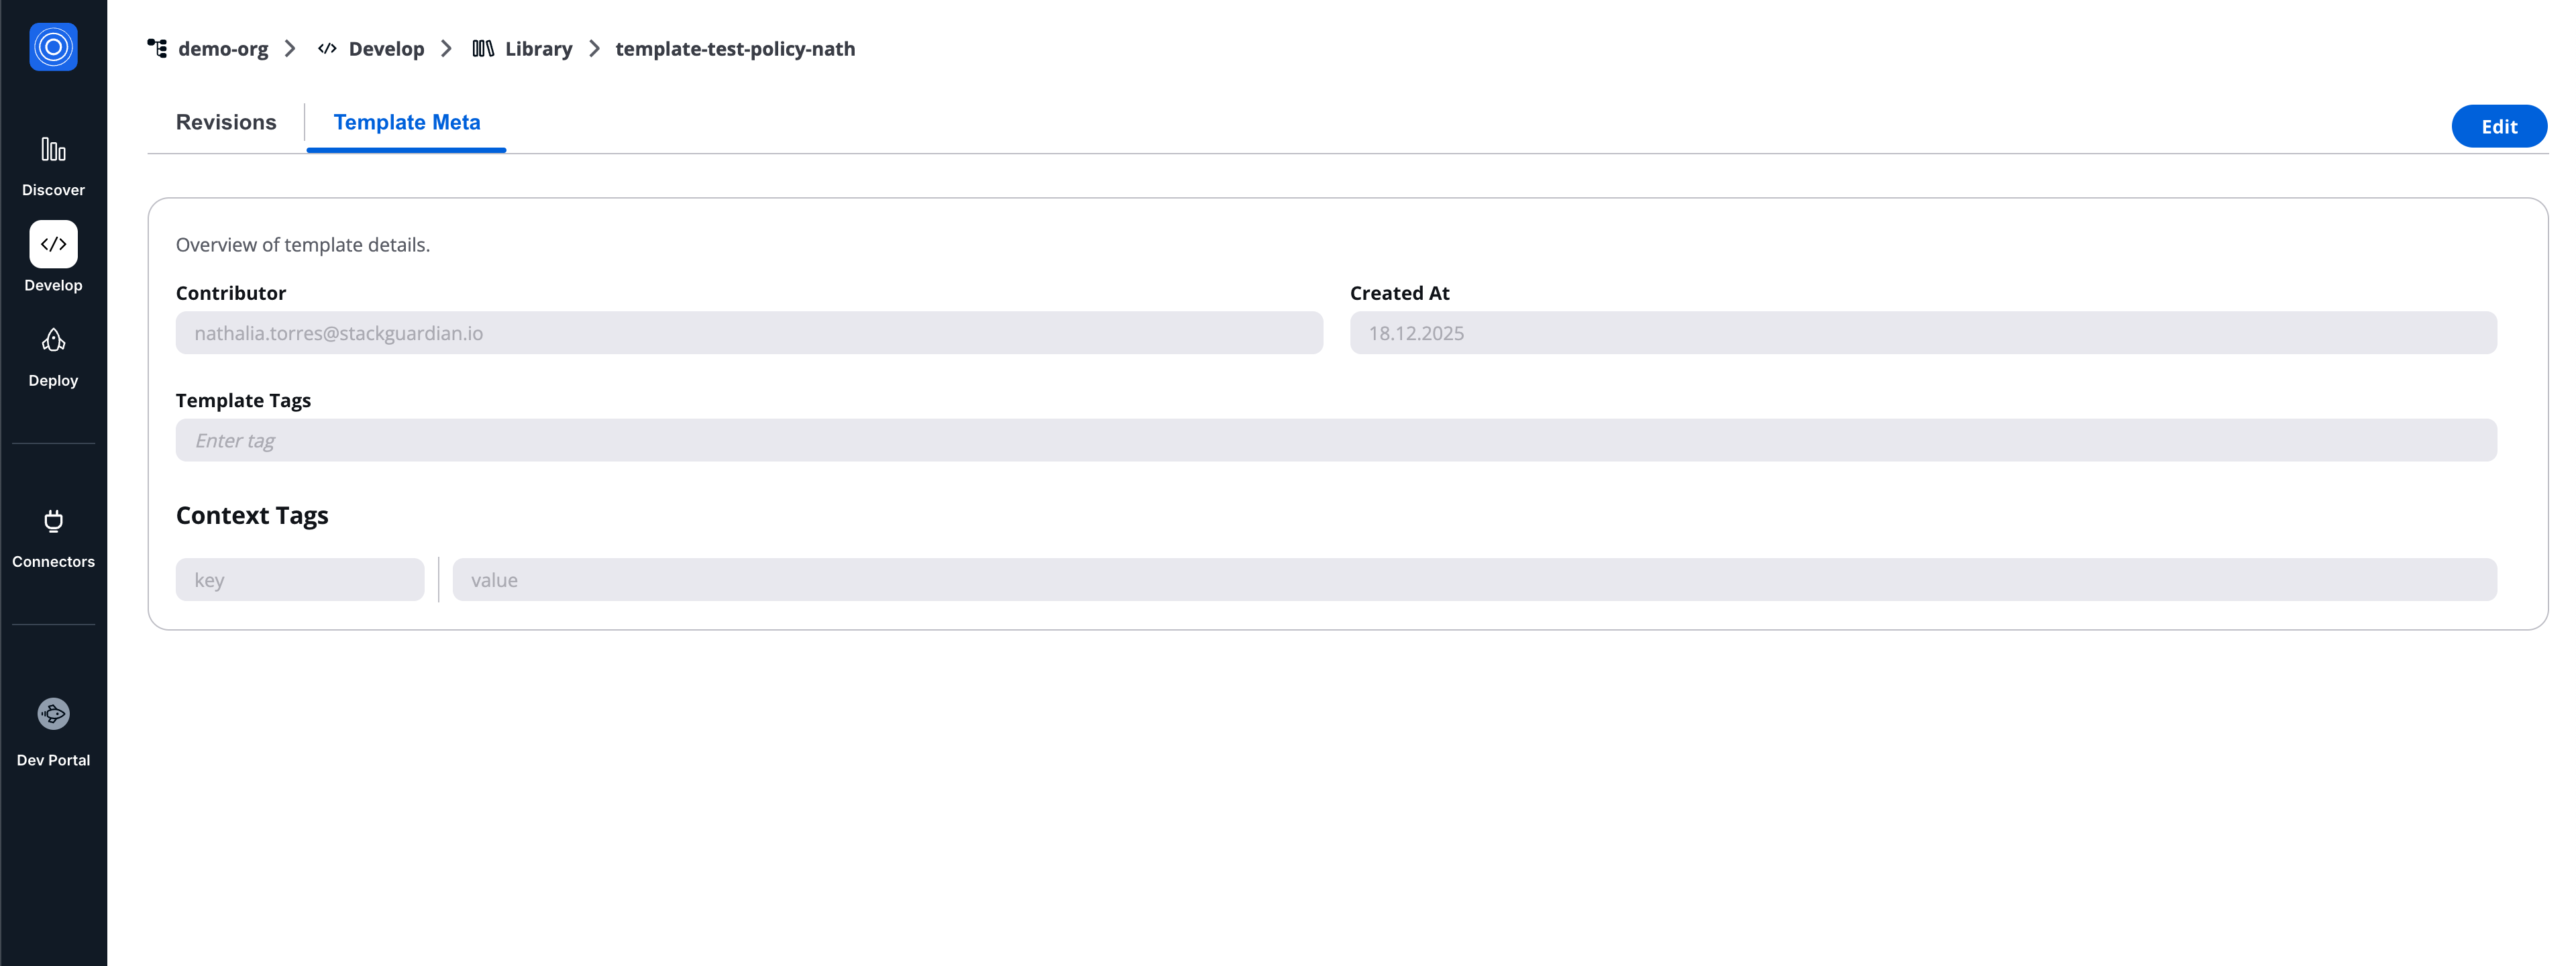
### Overview of template details[](#overview-of-template-details "Direct link to Overview of template details")
* **Contributor**
* **Created at**
* **Template tags**
* **Context tags**
## Revisions tab[](#revisions-tab "Direct link to Revisions tab")
The **Revisions** tab lists all revisions of the template and provides revision-level actions.
### Current revision info[](#current-revision-info "Direct link to Current revision info")
At the top of the Revisions tab, the **Current revision info** section shows:
* Selected revision (revision number, alias, and status)
* **Use** button
* **Options** button
* **Manage revisions** link

### Use menu[](#use-menu "Direct link to Use menu")
The **Use** menu allows consuming a revision:
* **Deploy with DevPortal** (published revisions)
* **Programmatically** (published revisions)
* **Test with DevPortal** (draft revisions)
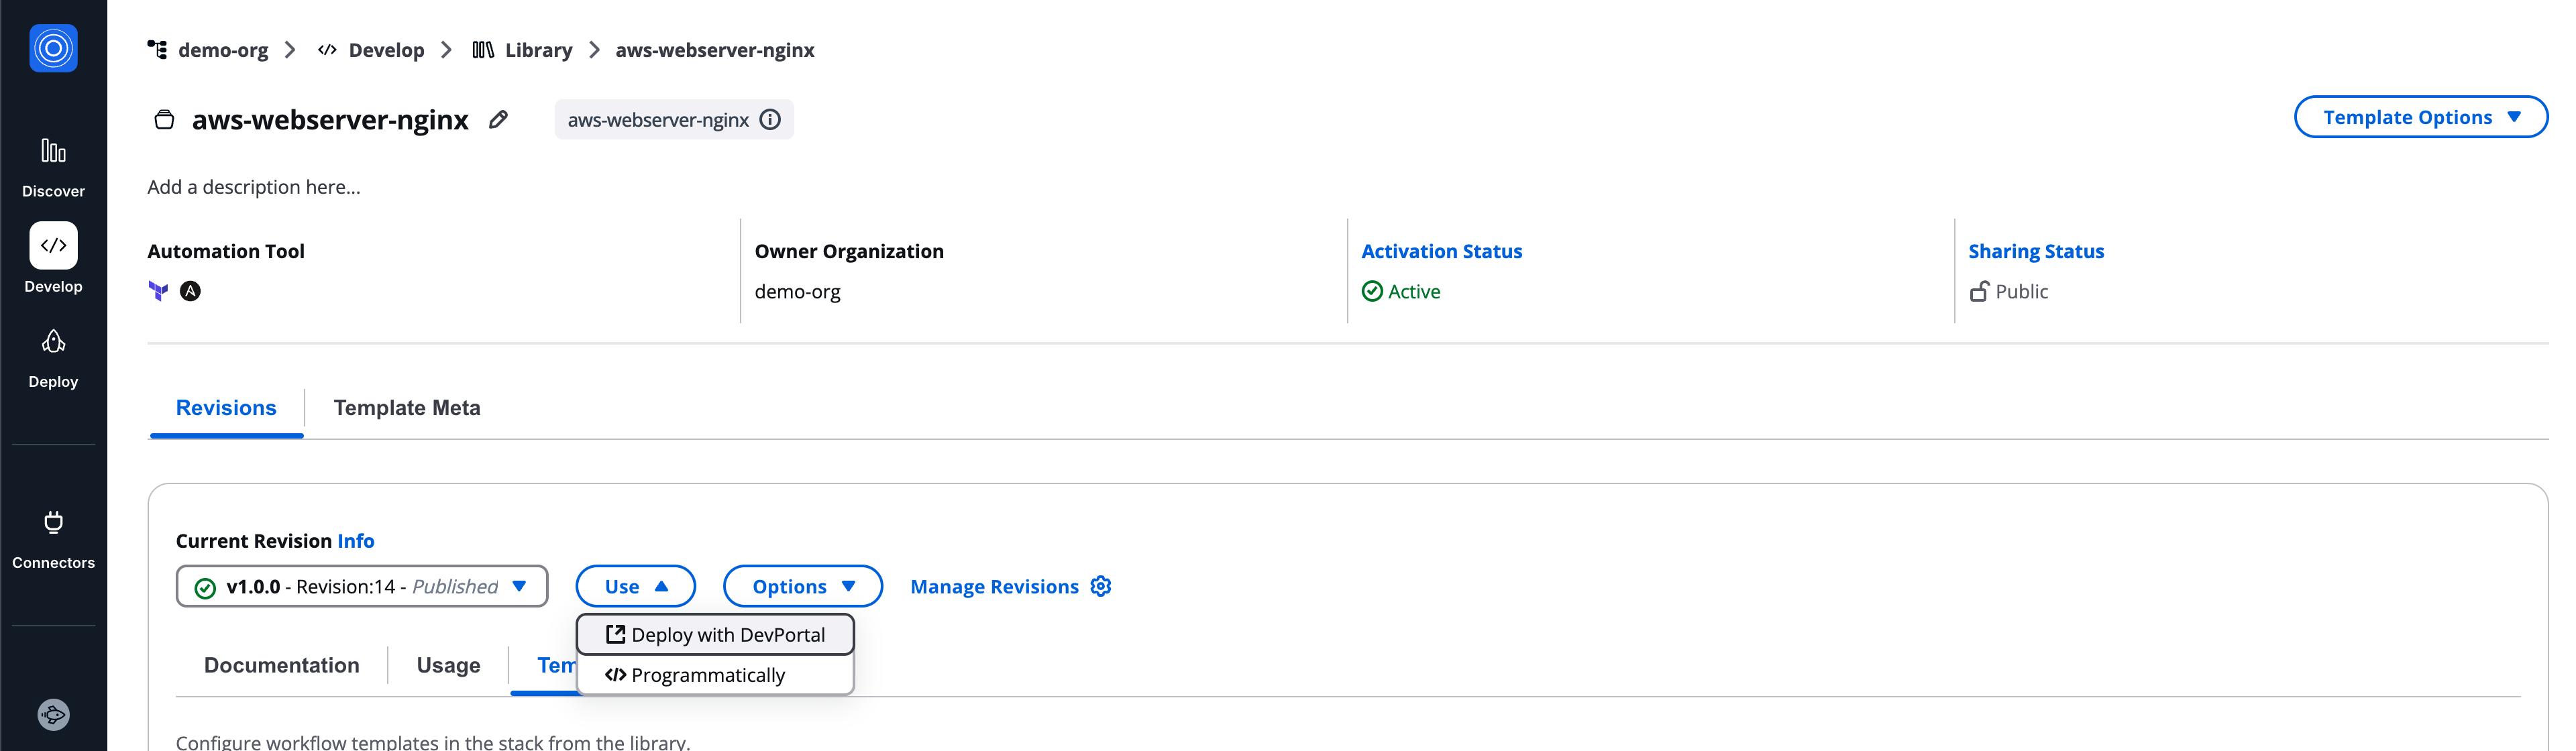
info
When testing a draft revision: A warning modal is displayed and an explicit confirmation is required beside a warning banner remains visible during the flow.
### Options menu[](#options-menu "Direct link to Options menu")
The **Options** menu includes the following actions:
* **Publish**: By publishing the revision it can not be changed anymore. Making the deployment behaviour predictable.
* **Deprecate**: Retire outdated versions but still keeping track of usage.
* **Create New Revision**: Create a complete new template - starting with this revision.
* **Clone to new revision**: Create a complete new template - starting with this revision.
* **Delete**: Permanently remove this revision.
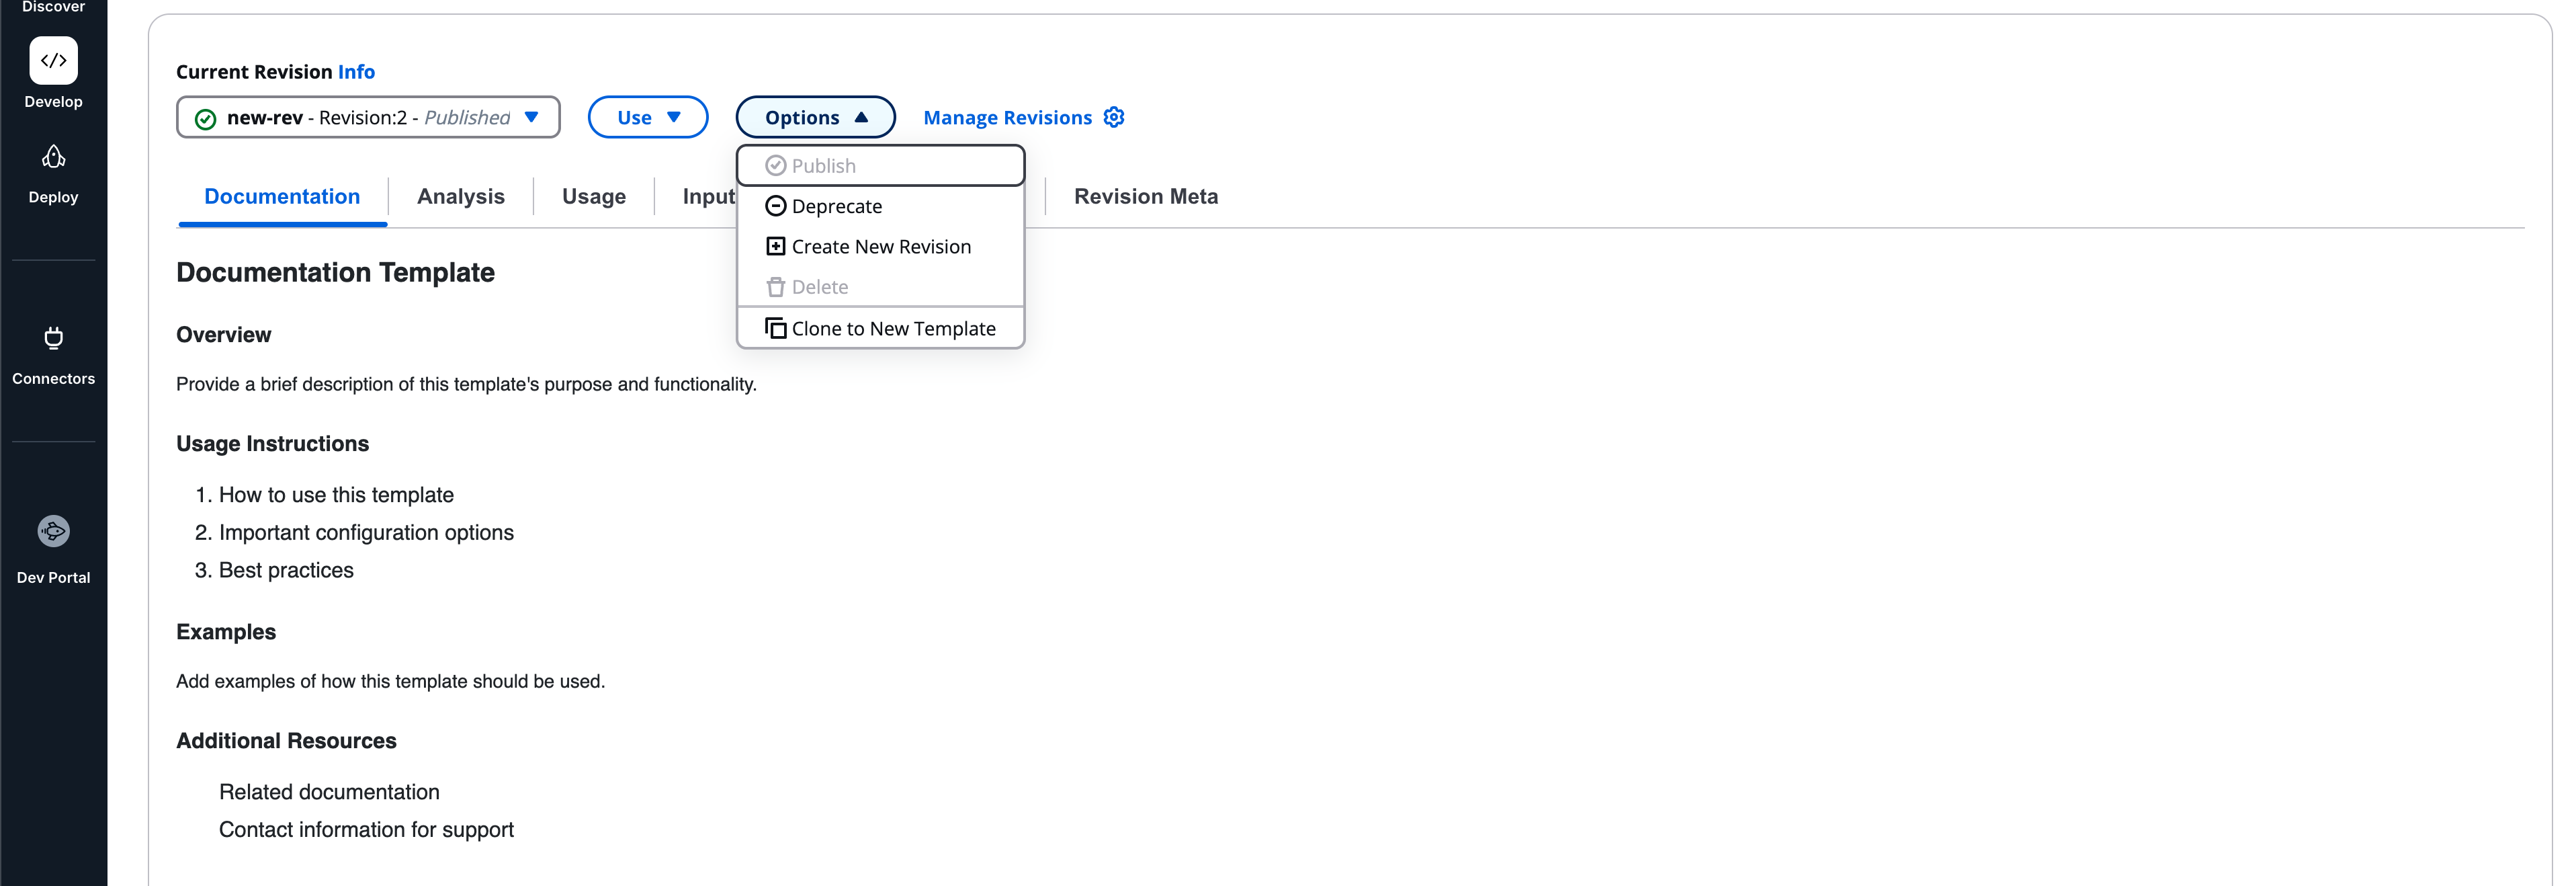
### Manage revisions[](#manage-revisions "Direct link to Manage revisions")
Select **Manage revisions** to open the revisions panel.
Each revision shows:
* Revision
* Alias
* Status
* Latest
* Notes
* Created
### Revision states[](#revision-states "Direct link to Revision states")
* Draft
* Published
* Deprecation scheduled
* Deprecated
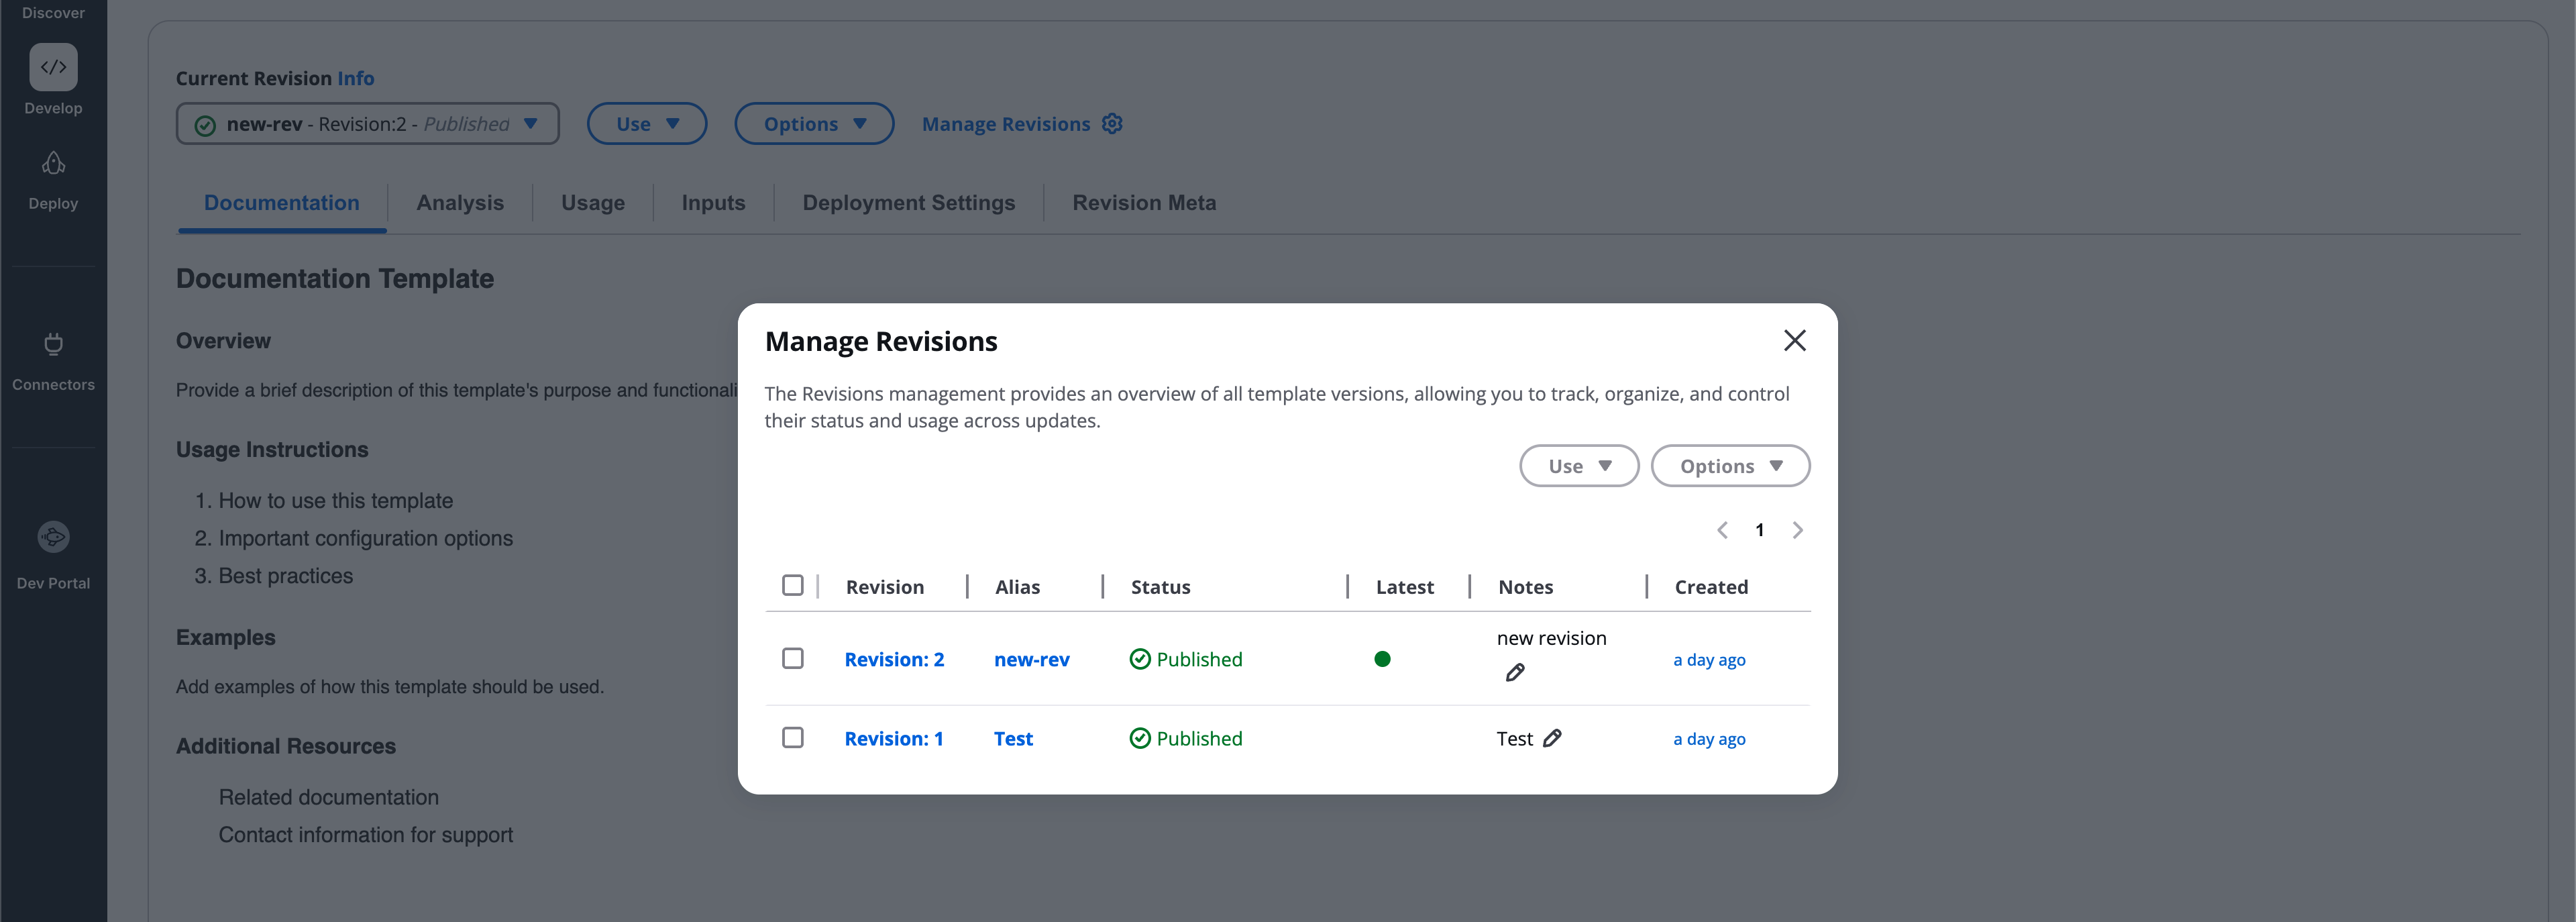
### Publish revision[](#publish-revision "Direct link to Publish revision")
Publishing a revision:
* Requires an alias name
* Allows an optional publication note
* Is irreversible

### Deprecate revision[](#deprecate-revision "Direct link to Deprecate revision")
Deprecation retires a revision:
* Immediate or scheduled
* Requires confirmation
* Cannot be undone
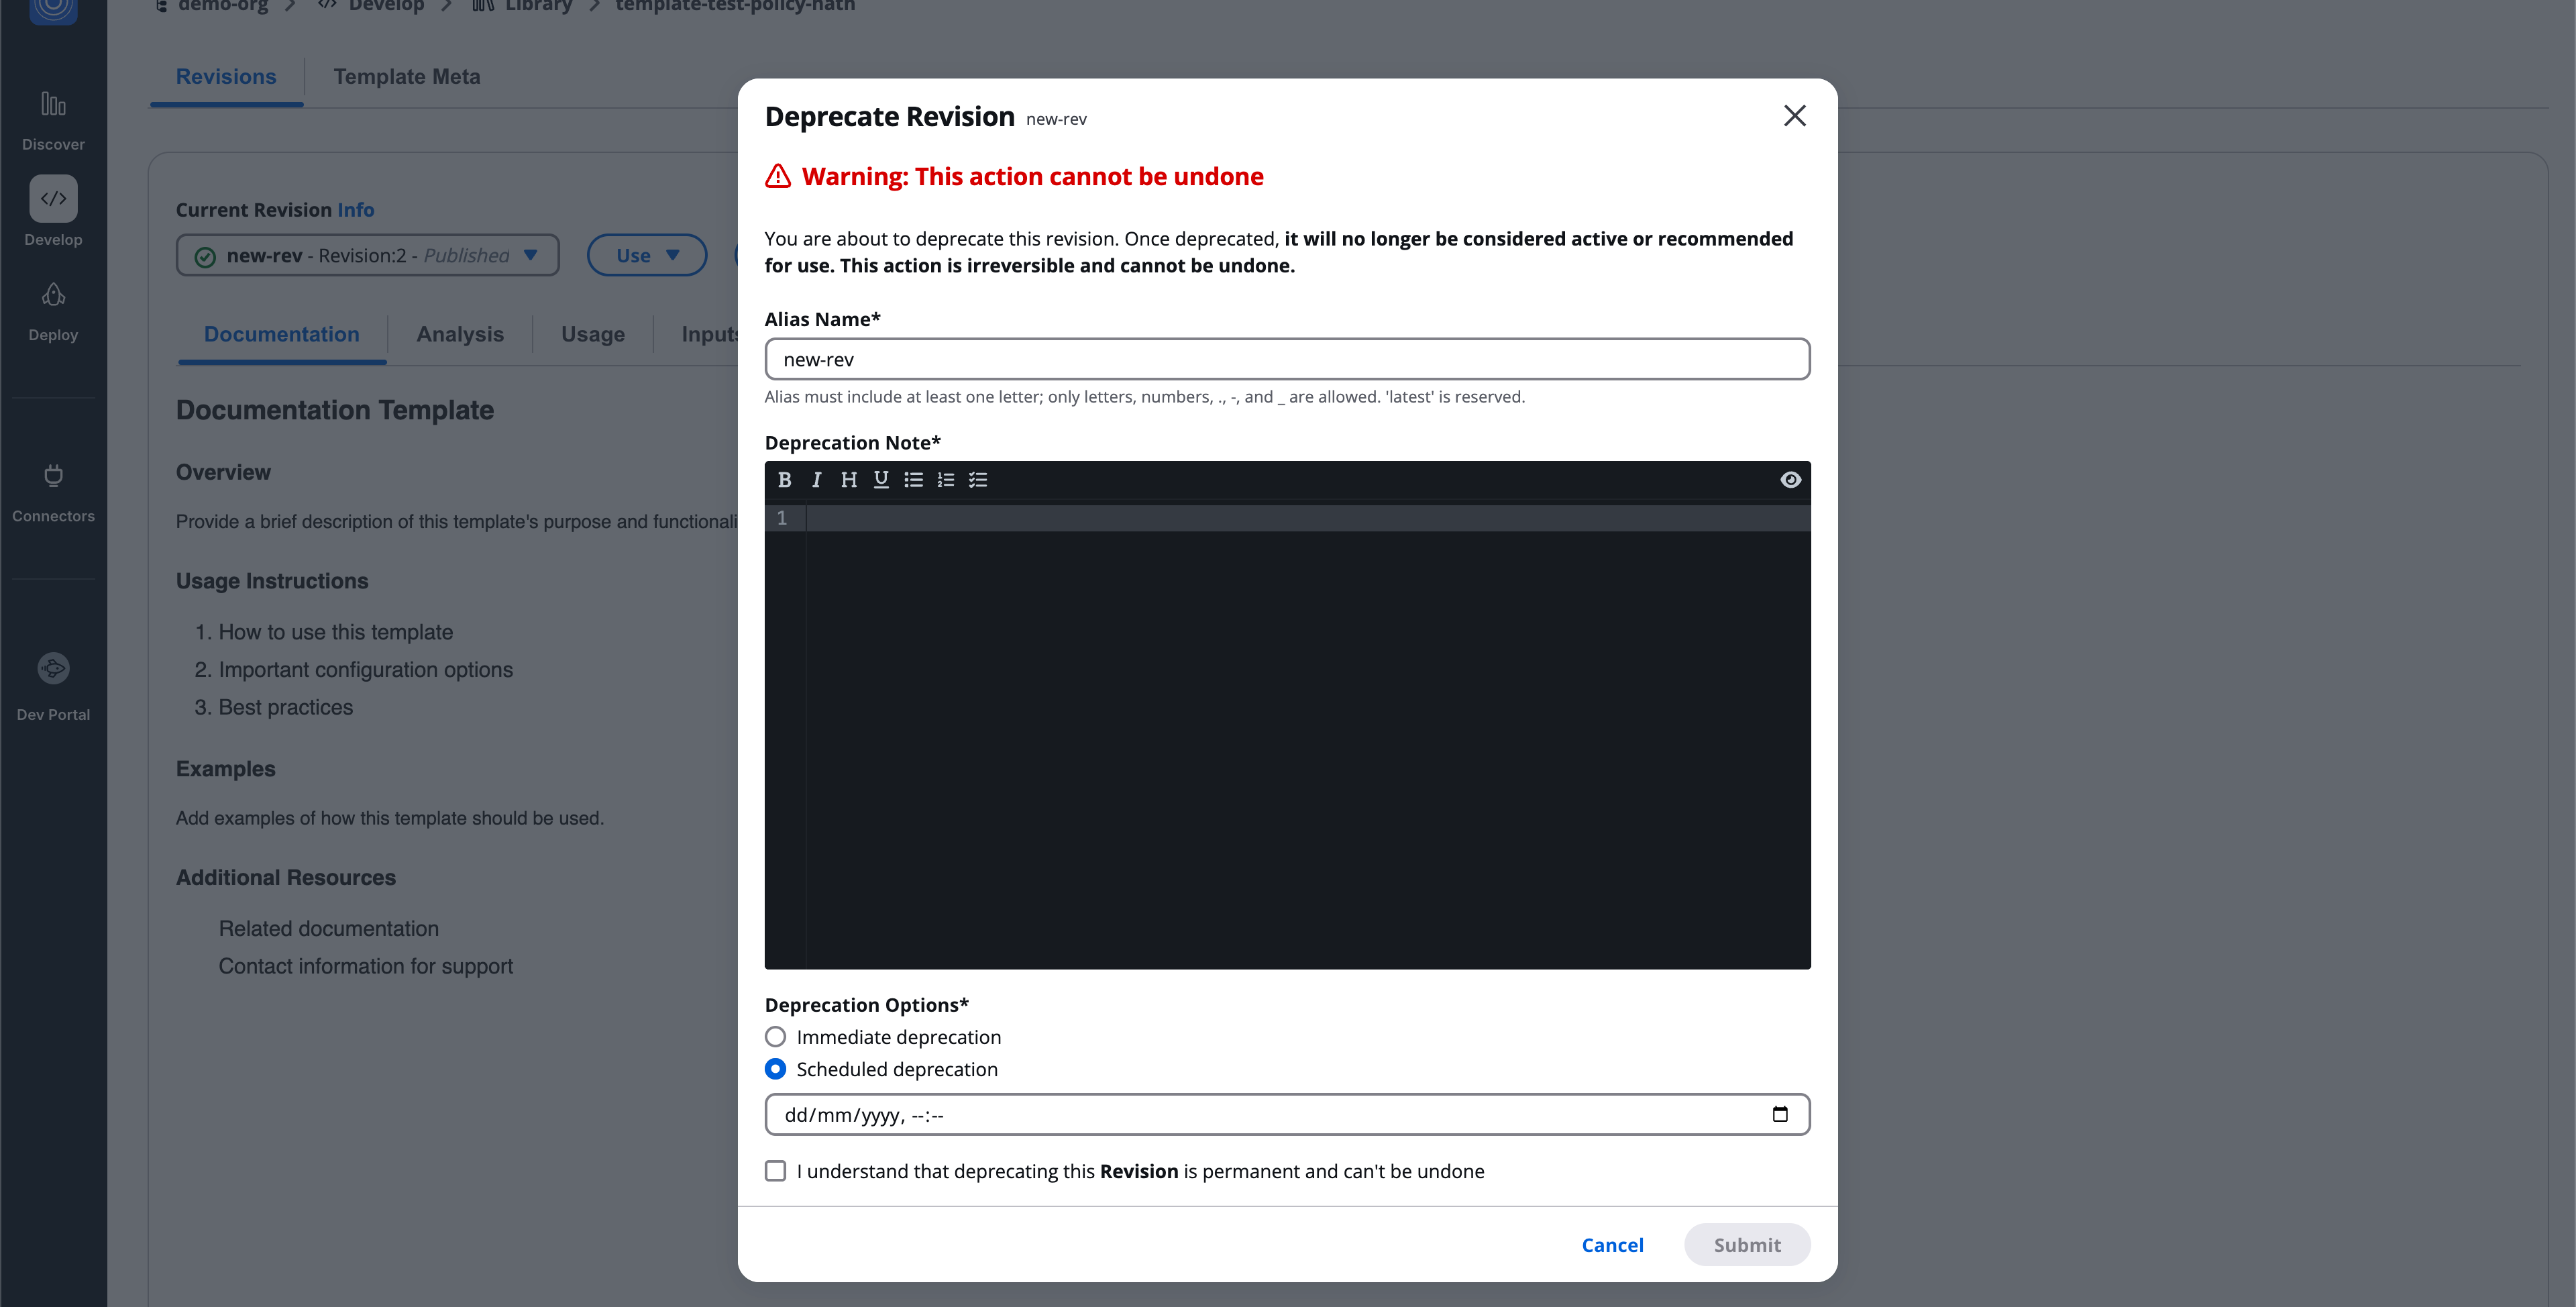
### Create new revision[](#create-new-revision "Direct link to Create new revision")
Creates a new draft revision based on the selected revision.
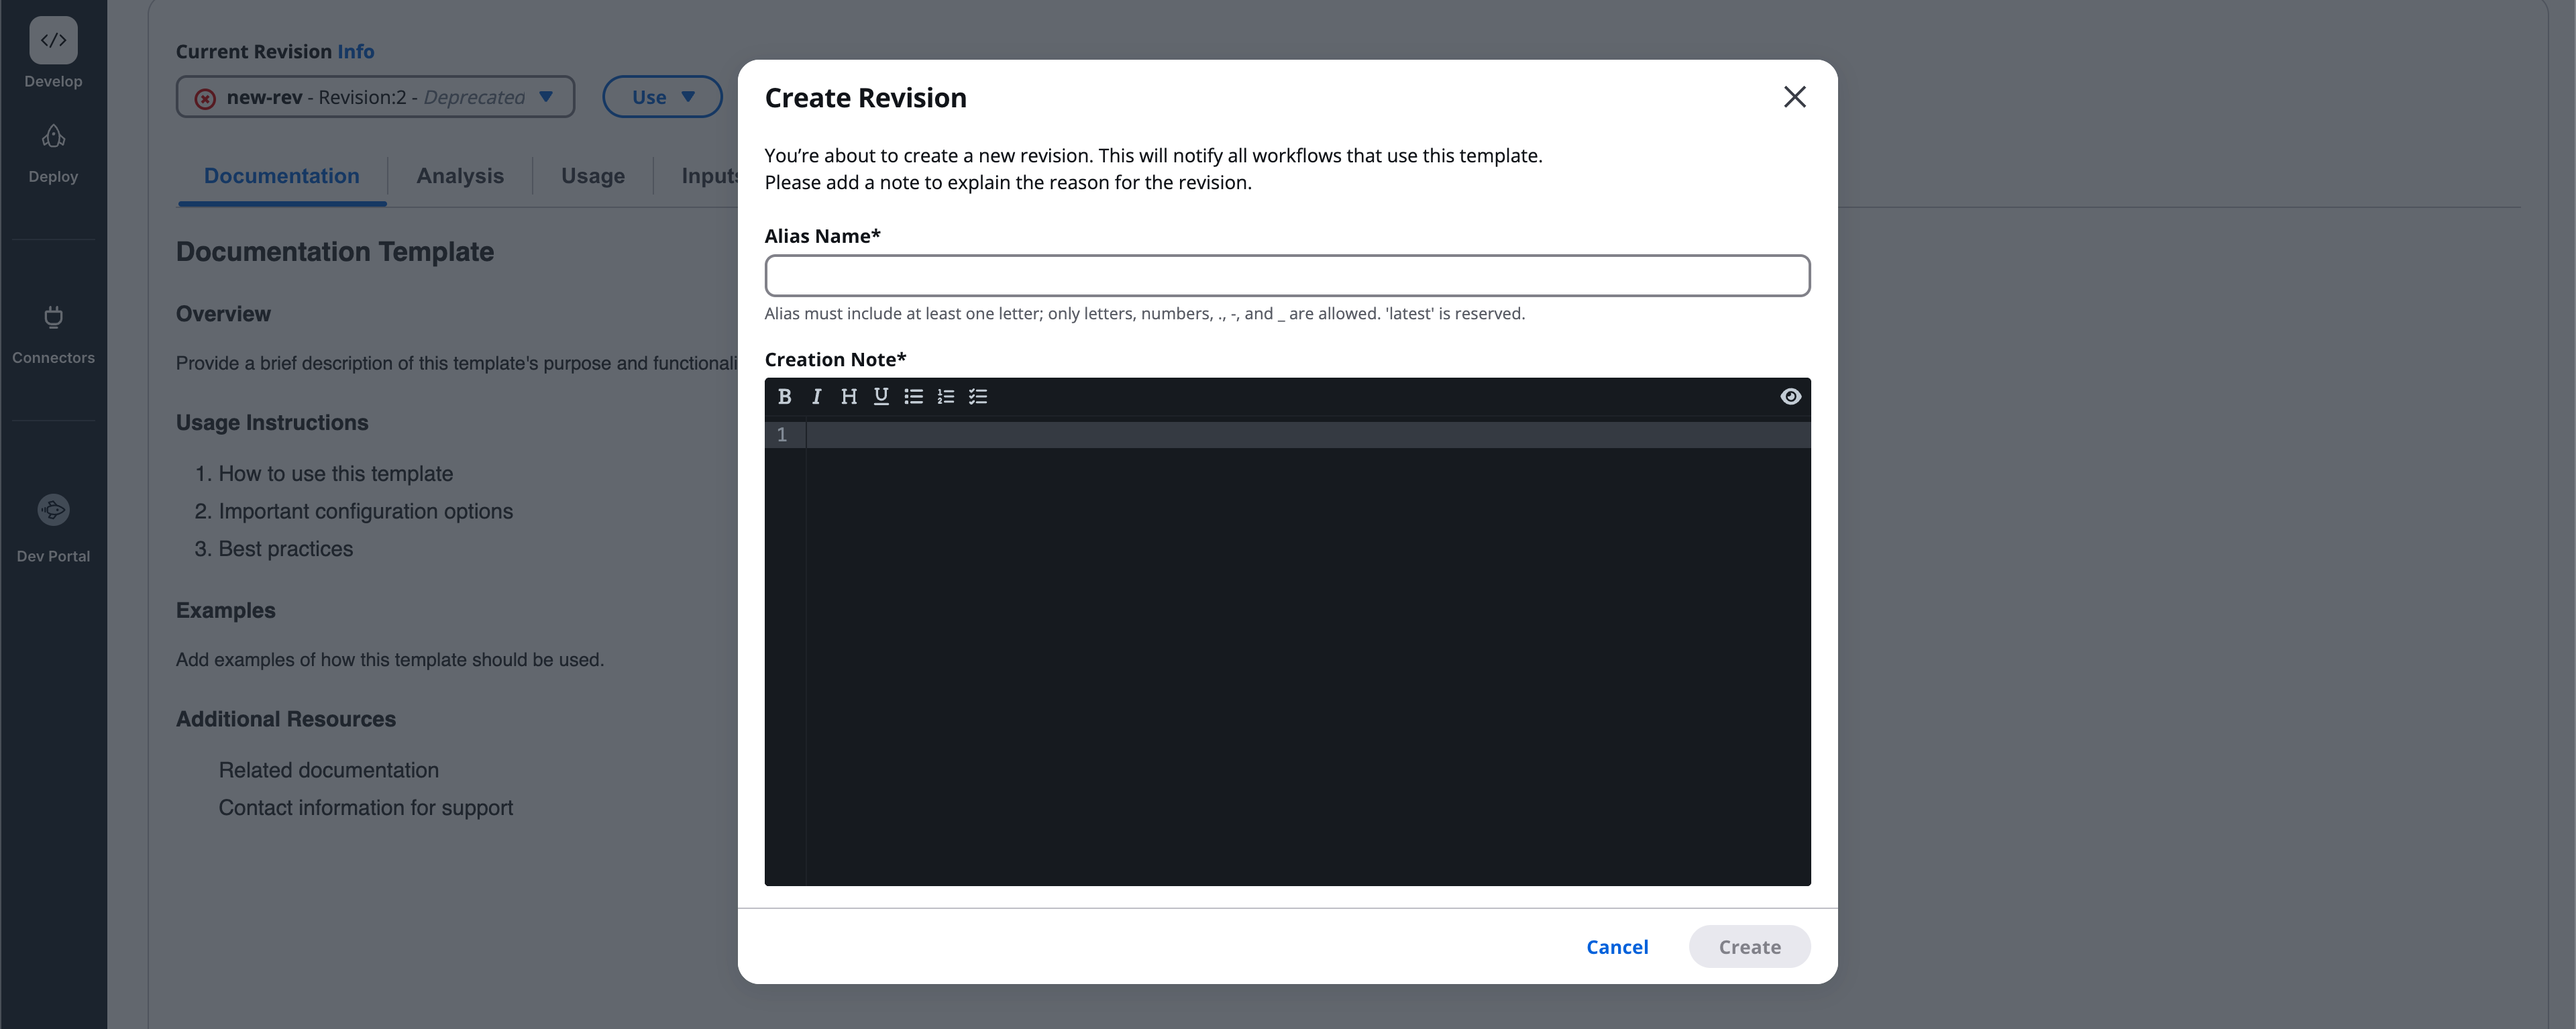
### Clone to new template[](#clone-to-new-template "Direct link to Clone to new template")
Creates a new template starting from the selected revision.
### Delete revision[](#delete-revision "Direct link to Delete revision")
Permanently deletes selected deprecated revisions.
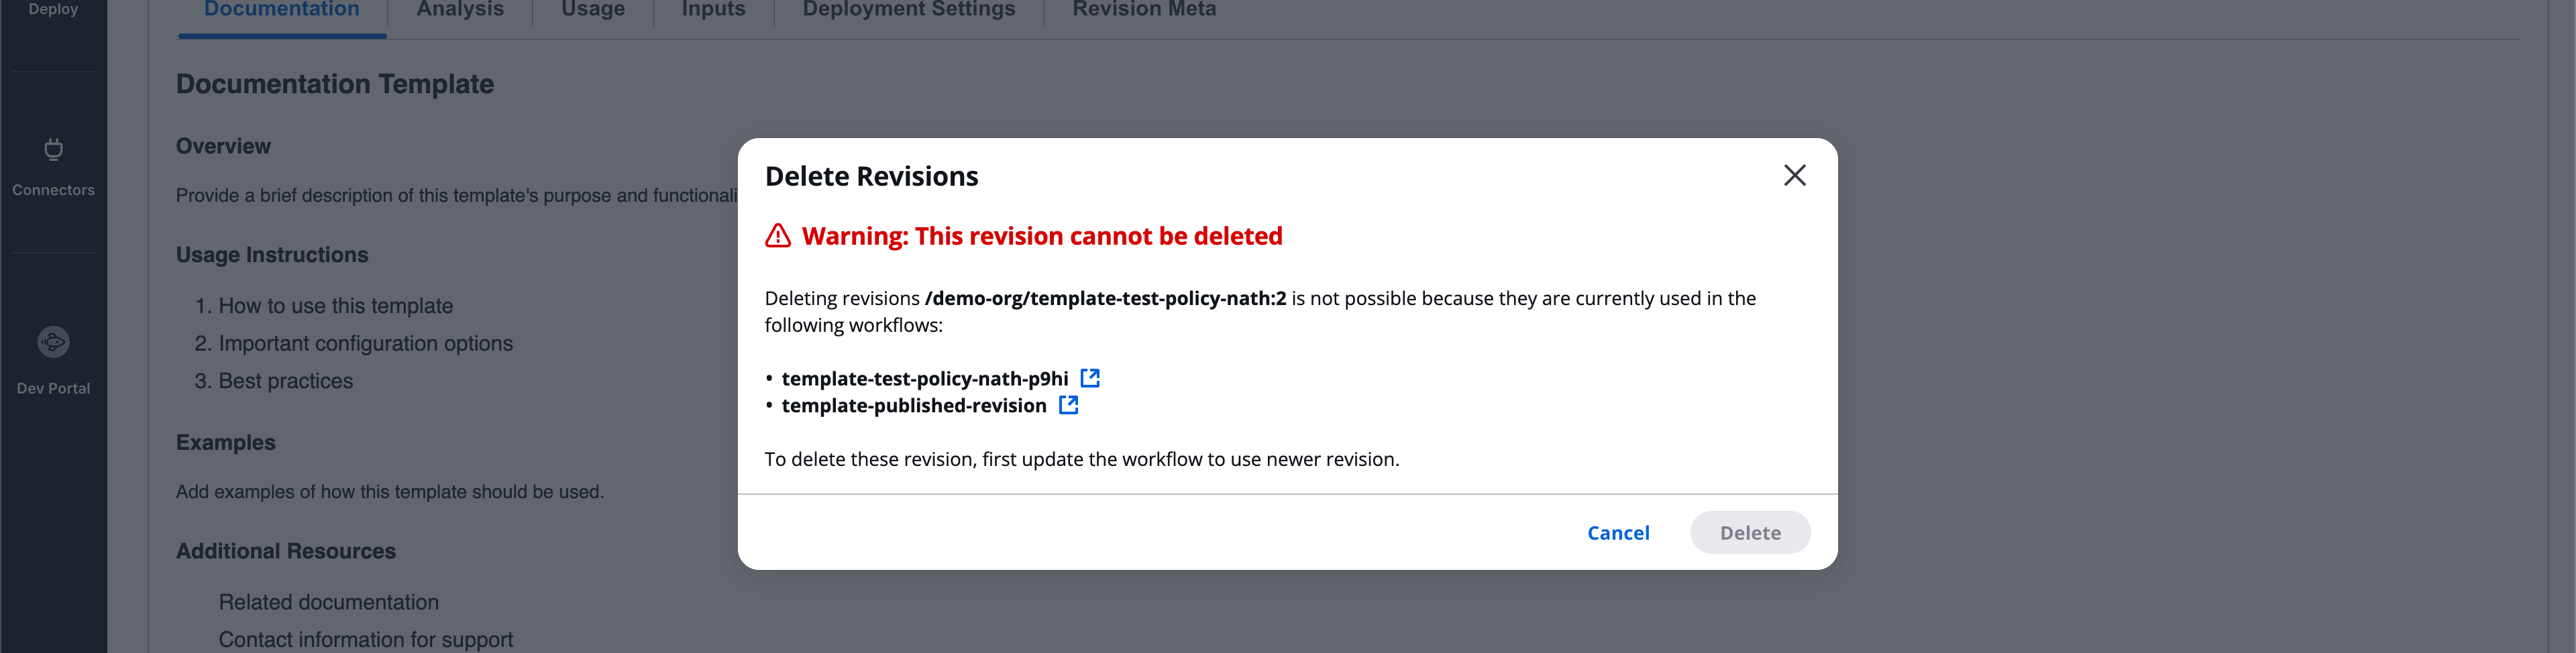
# Workflow templates
Workflow templates define executable workflows and use the full revision interface.
## Workflow template revision tabs[](#workflow-template-revision-tabs "Direct link to Workflow template revision tabs")
Each workflow template revision includes the following tabs:
* **Documentation**
* **Analysis**
* **Usage**
* **Inputs**
* **Preset configuration**
* **Revision meta**
## Documentation[](#documentation "Direct link to Documentation")
The **Documentation** tab allows authors to write any human-readable information related to the revision.
This content is fully flexible and may include:
* Purpose and overview
* Usage and execution guidance
* Examples and best practices
* Known limitations
* External references and links
There are **no enforced sections or structure**.

info
Documentation supports Markdown formatting.
## Analysis[](#analysis "Direct link to Analysis")
The **Analysis** tab automatically inspects Terraform or OpenTofu code and displays:
* **Outputs**
* **Modules**
* **Resources**
Features:
* Search within each section
* **Reanalyze** button to refresh results
This tab is read-only and provides visibility into what the workflow defines.

## Usage[](#usage "Direct link to Usage")
The **Usage** tab shows all workflows and stacks consuming the revision.
Columns include:
* Workflow
* Status
* Modified
Additional features:
* Search
* Pagination
* Refresh
* Actions menu
If unused, the table displays **No Workflows**.
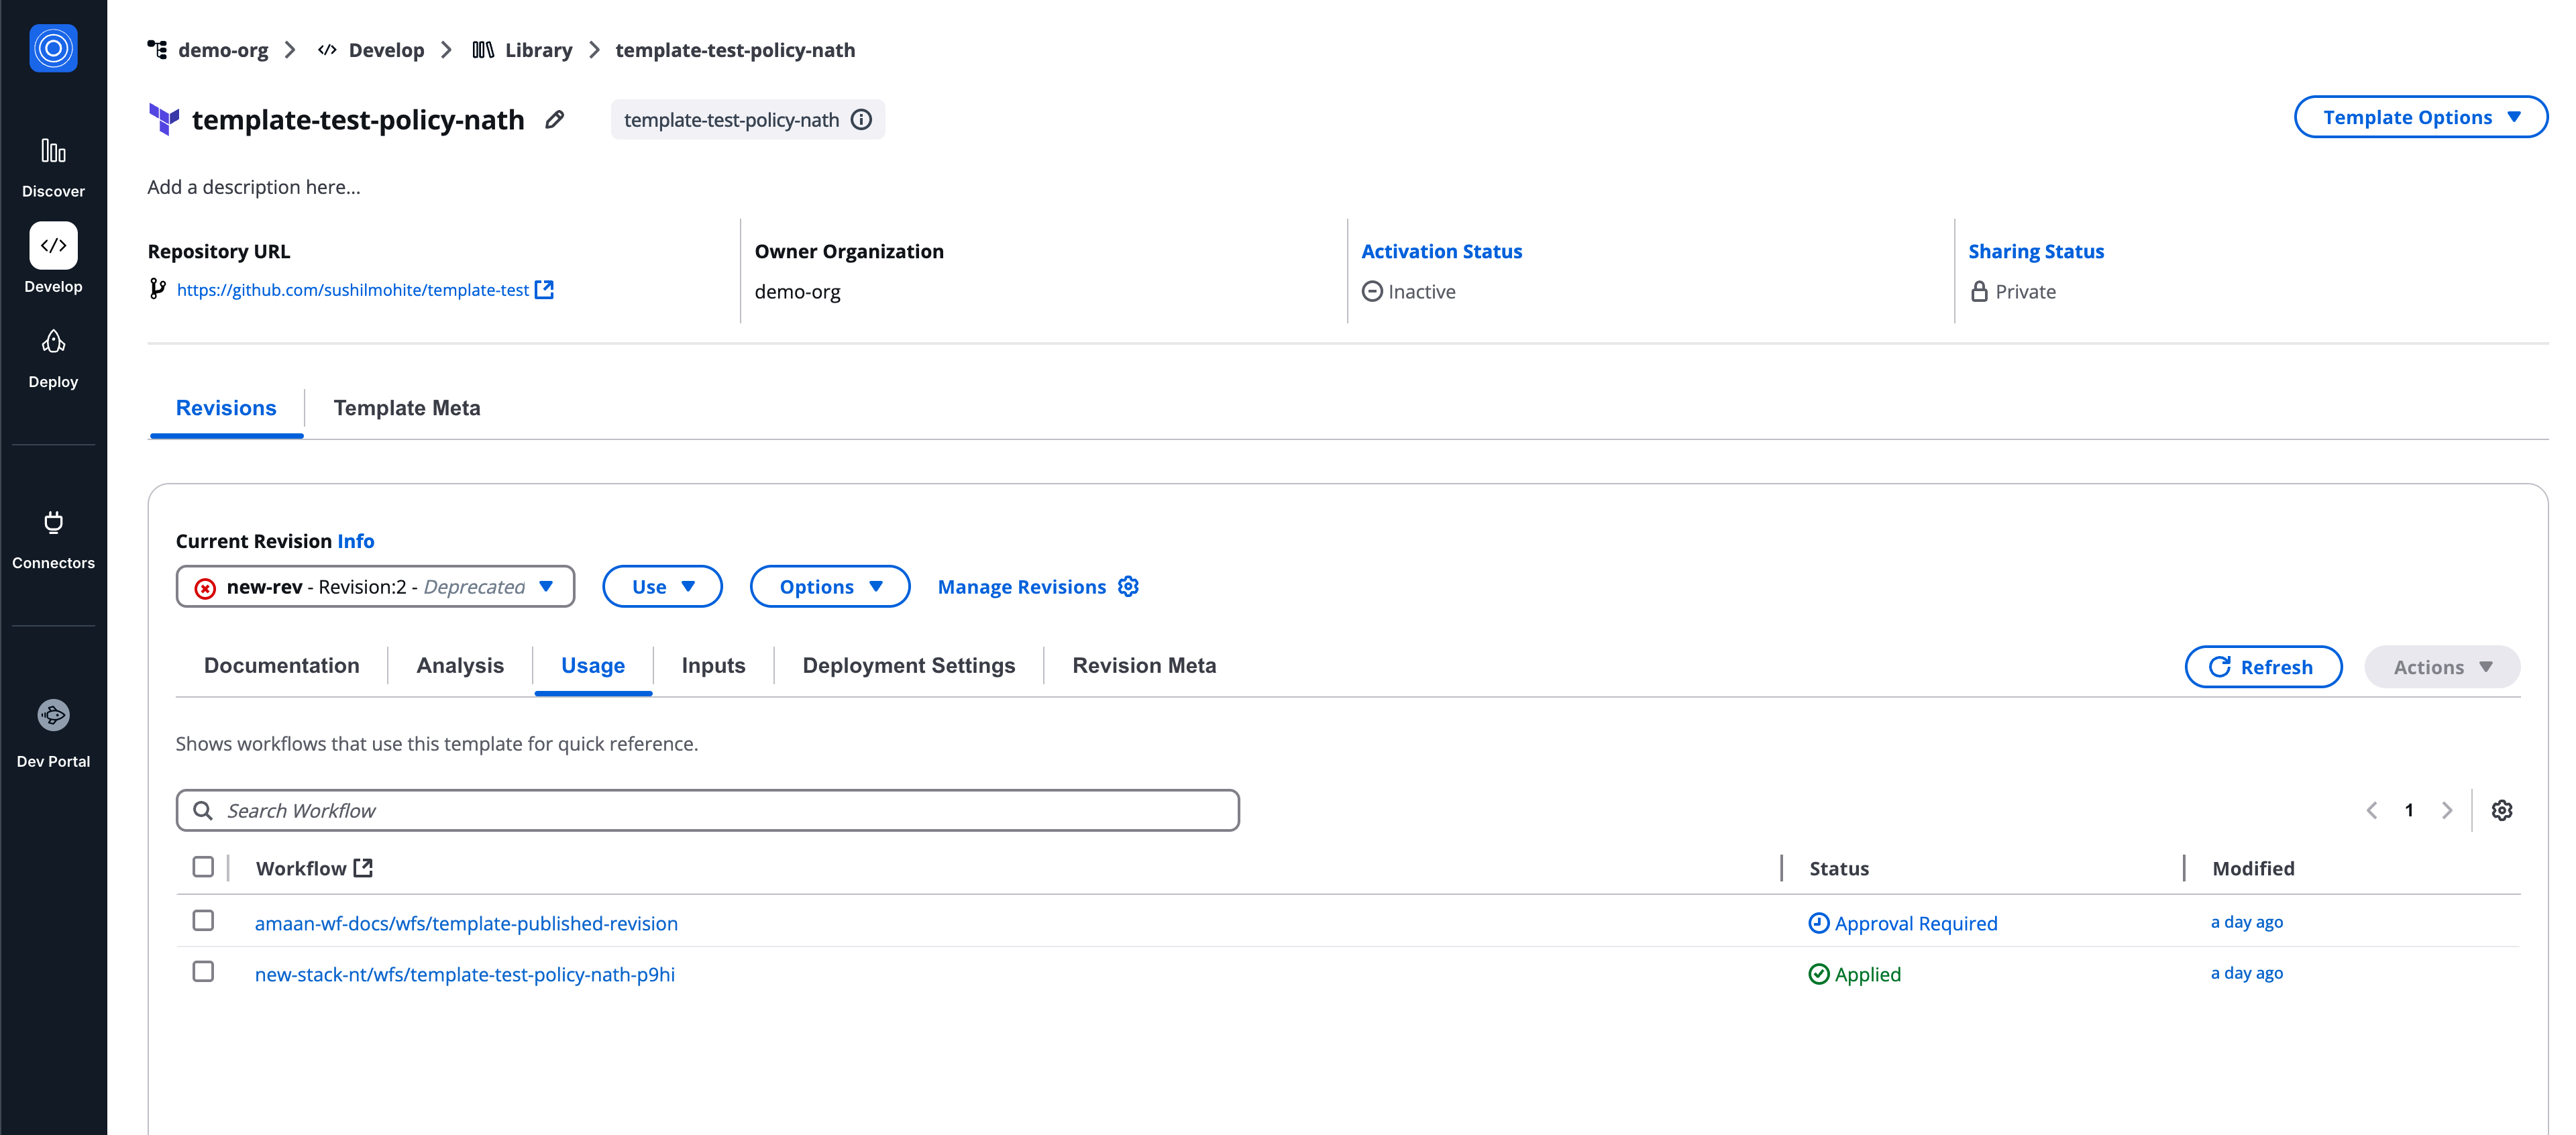
## Inputs[](#inputs "Direct link to Inputs")
The **Inputs** tab defines how values are supplied to the workflow template.
Supported methods:
* **SG noCode**
* **Code**
This tab follows the **same input model as workflows** and serves as a reference point.
For detailed input configuration, refer to **Workflow Inputs Documentation**.
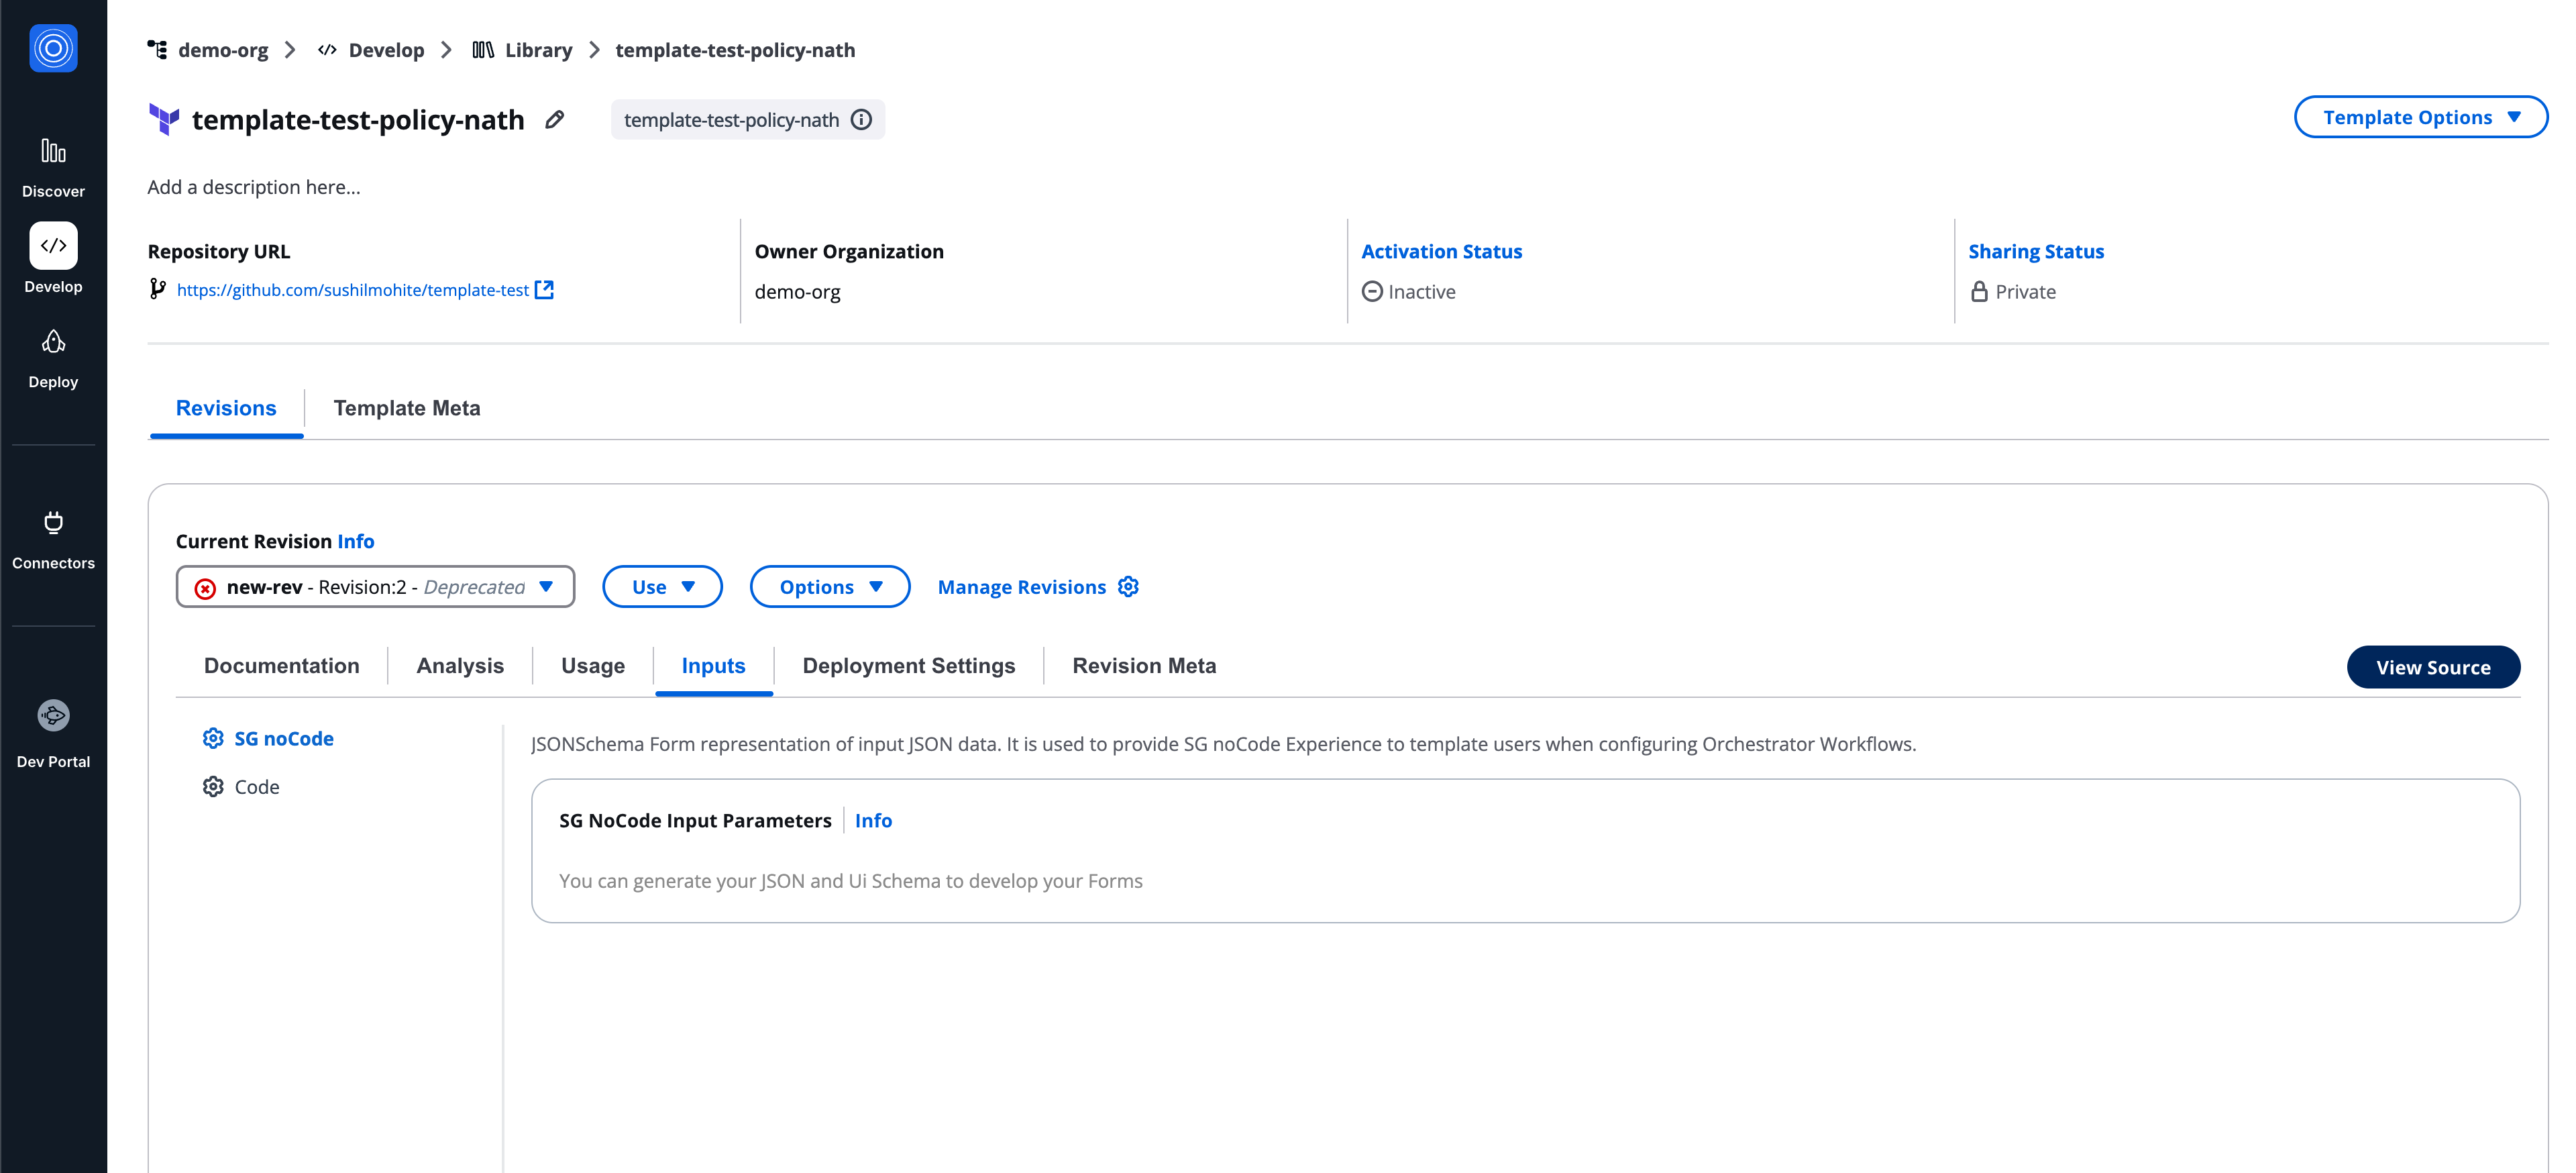
## Preset configuration[](#preset-configuration "Direct link to Preset configuration")
Preset configuration defines default workflow settings for workflows created from this template.
It mirrors **Workflow Settings**, excluding **Resources**.
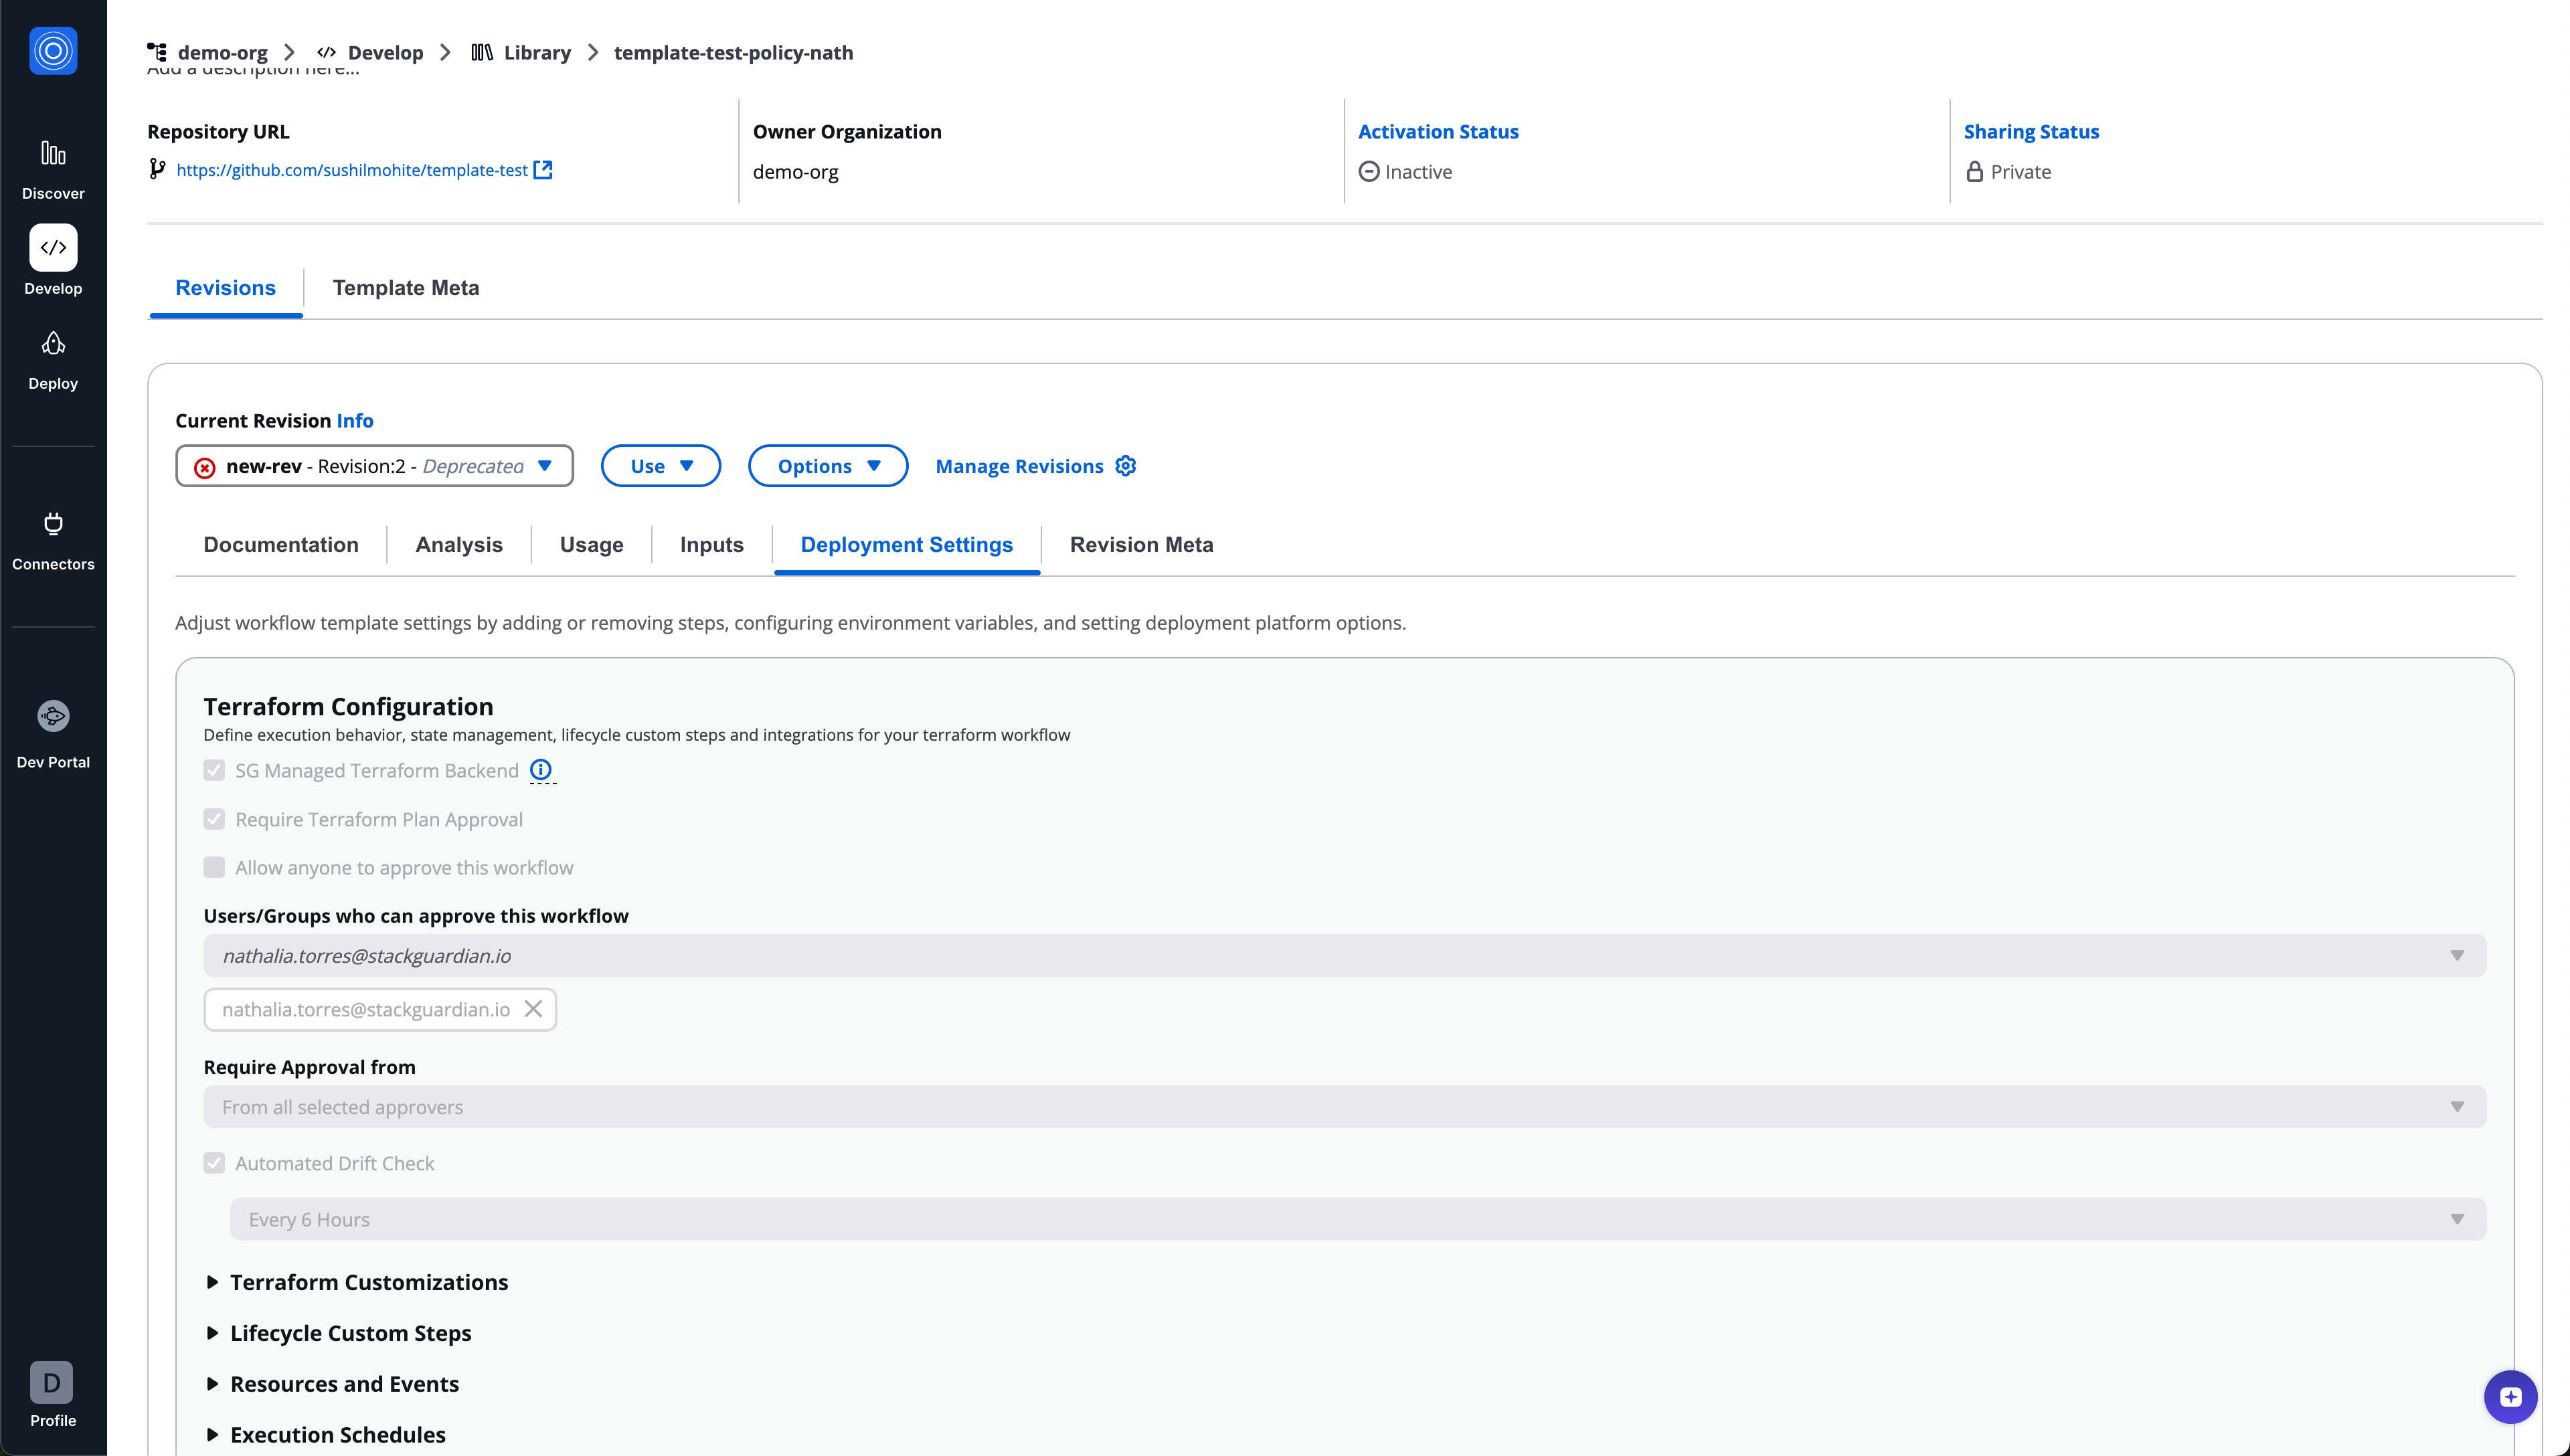
## Revision meta[](#revision-meta "Direct link to Revision meta")
Displays metadata specific to the revision.
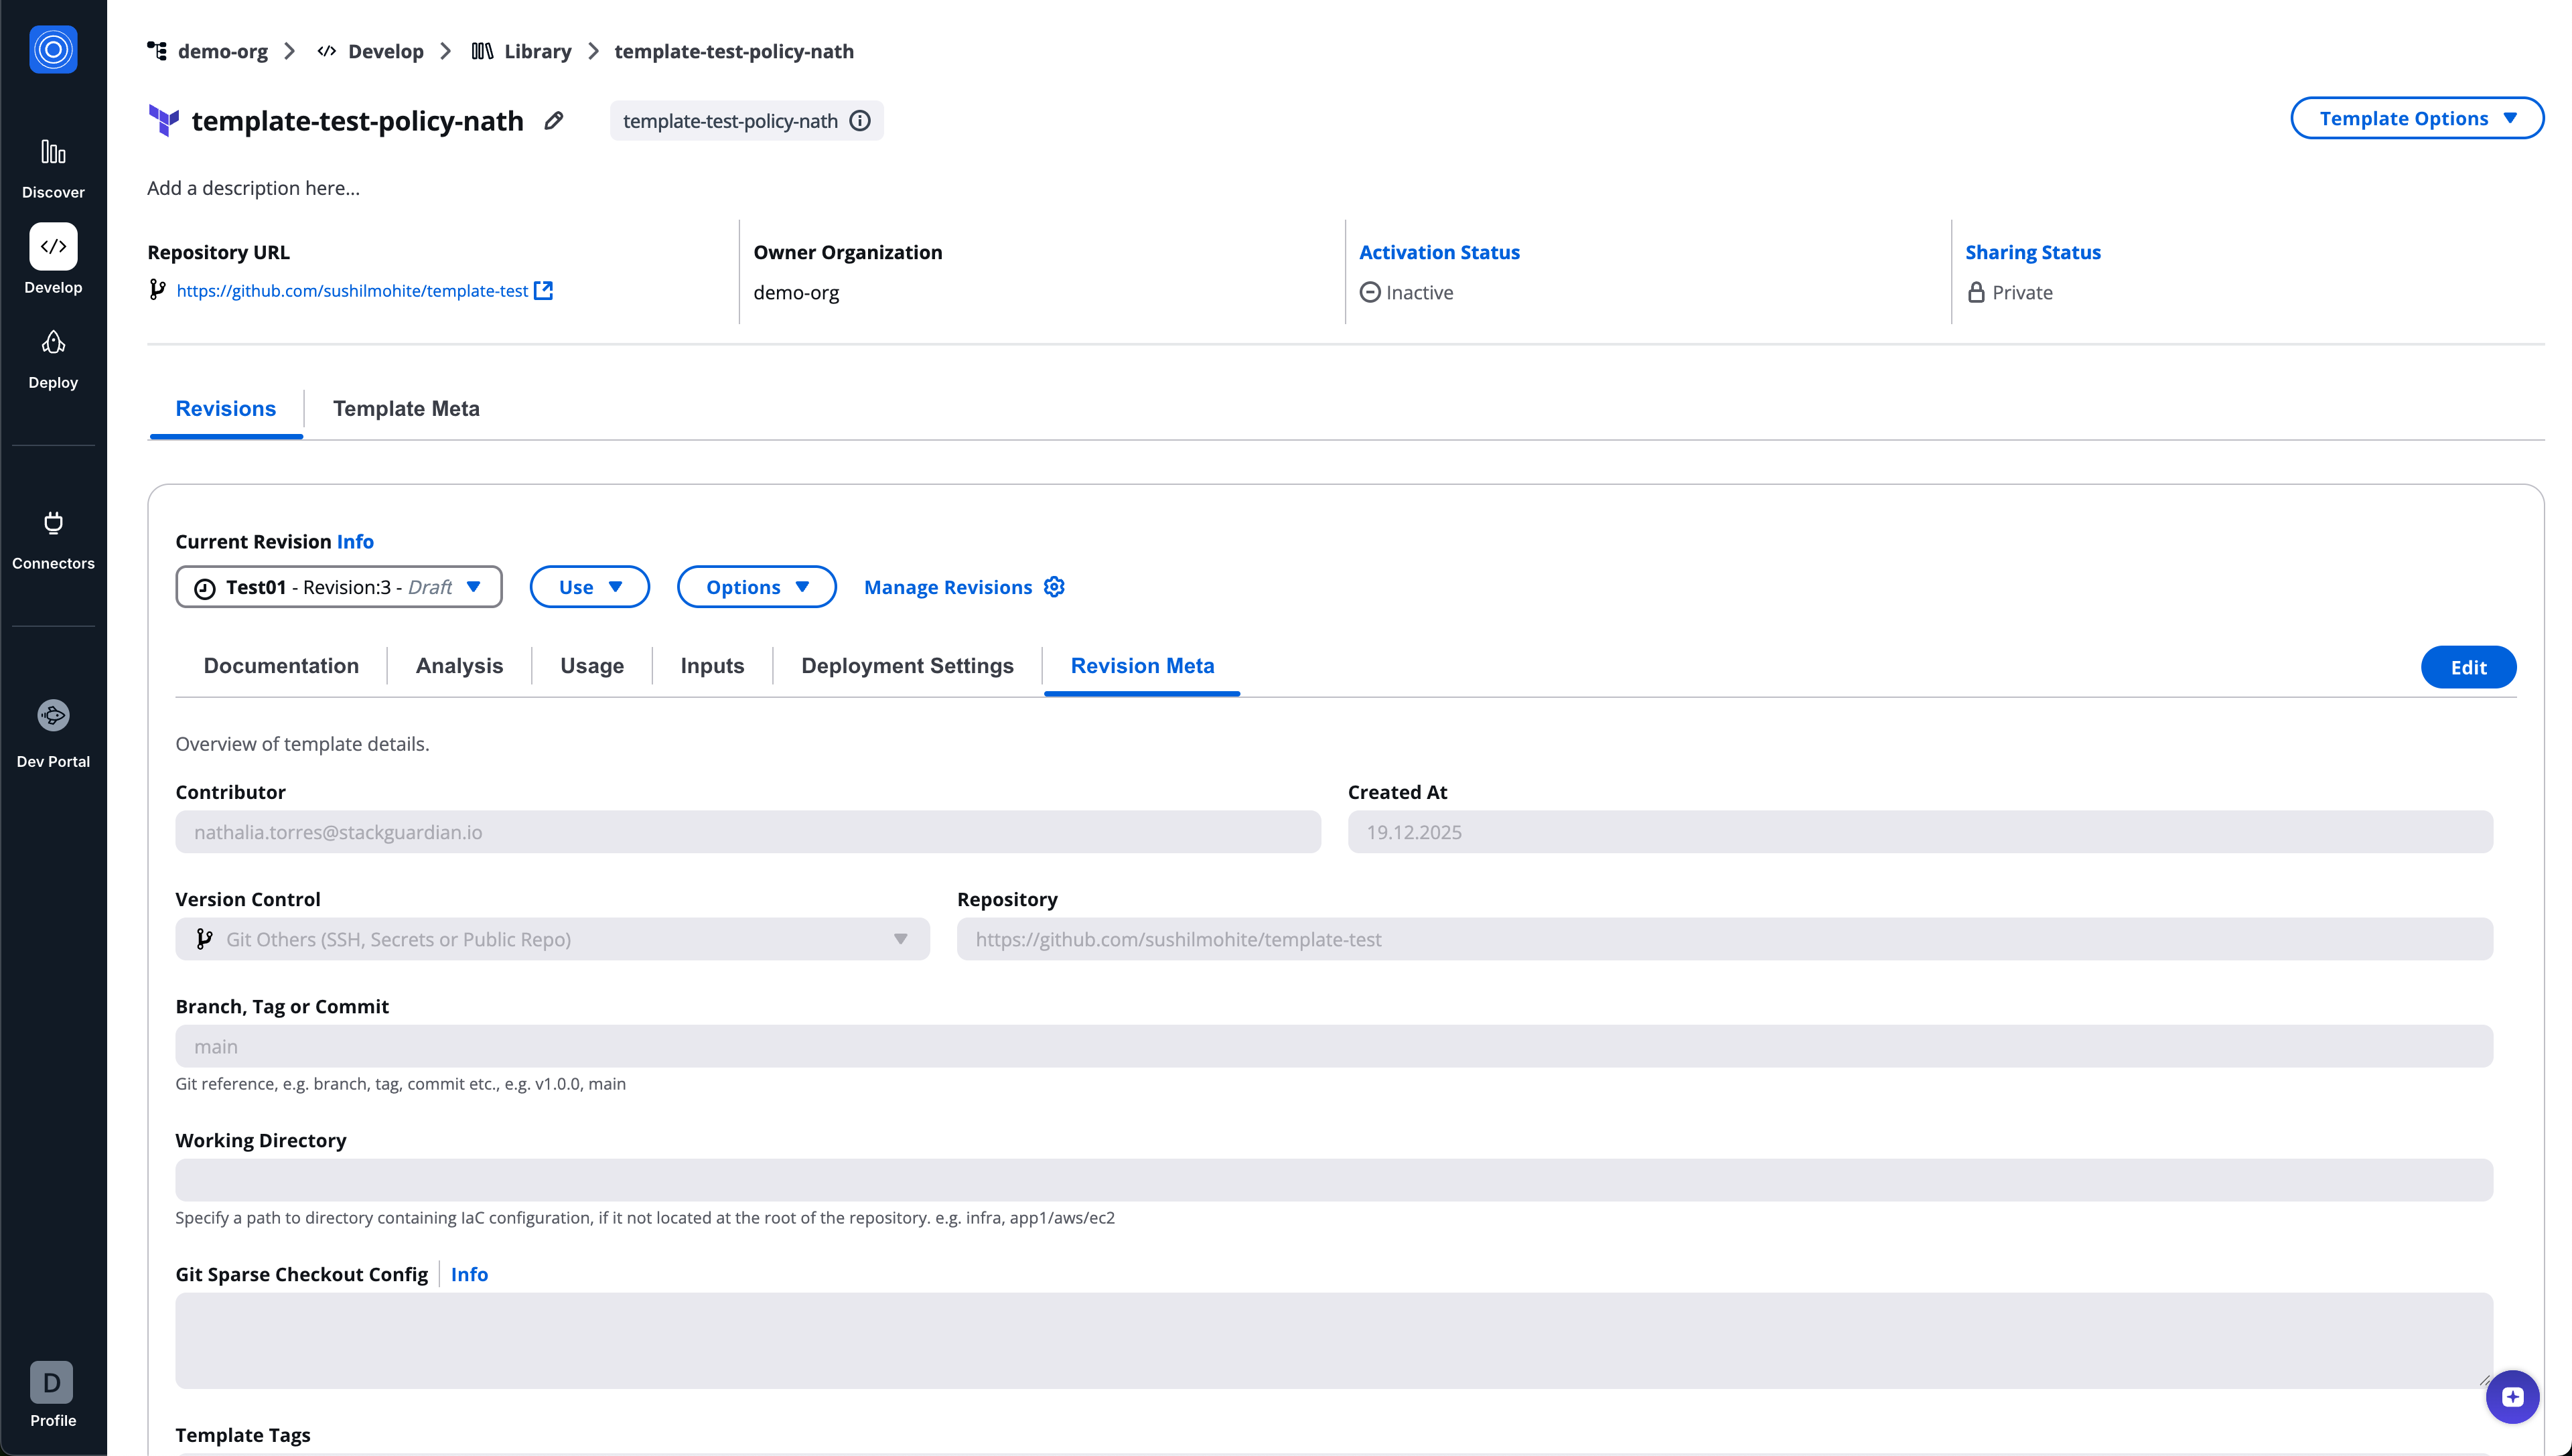
# Stack template
Stack templates define collections of workflow templates executed together.
## Stack template revision tabs[](#stack-template-revision-tabs "Direct link to Stack template revision tabs")
* Documentation
* Usage
* Templates
* Revision meta
## Templates tab[](#templates-tab "Direct link to Templates tab")
The **Templates** tab allows you to configure workflows inside the stack.
Capabilities:
* Add workflow templates from the library
* Select the revision per workflow
* Reorder workflows
* Remove workflows
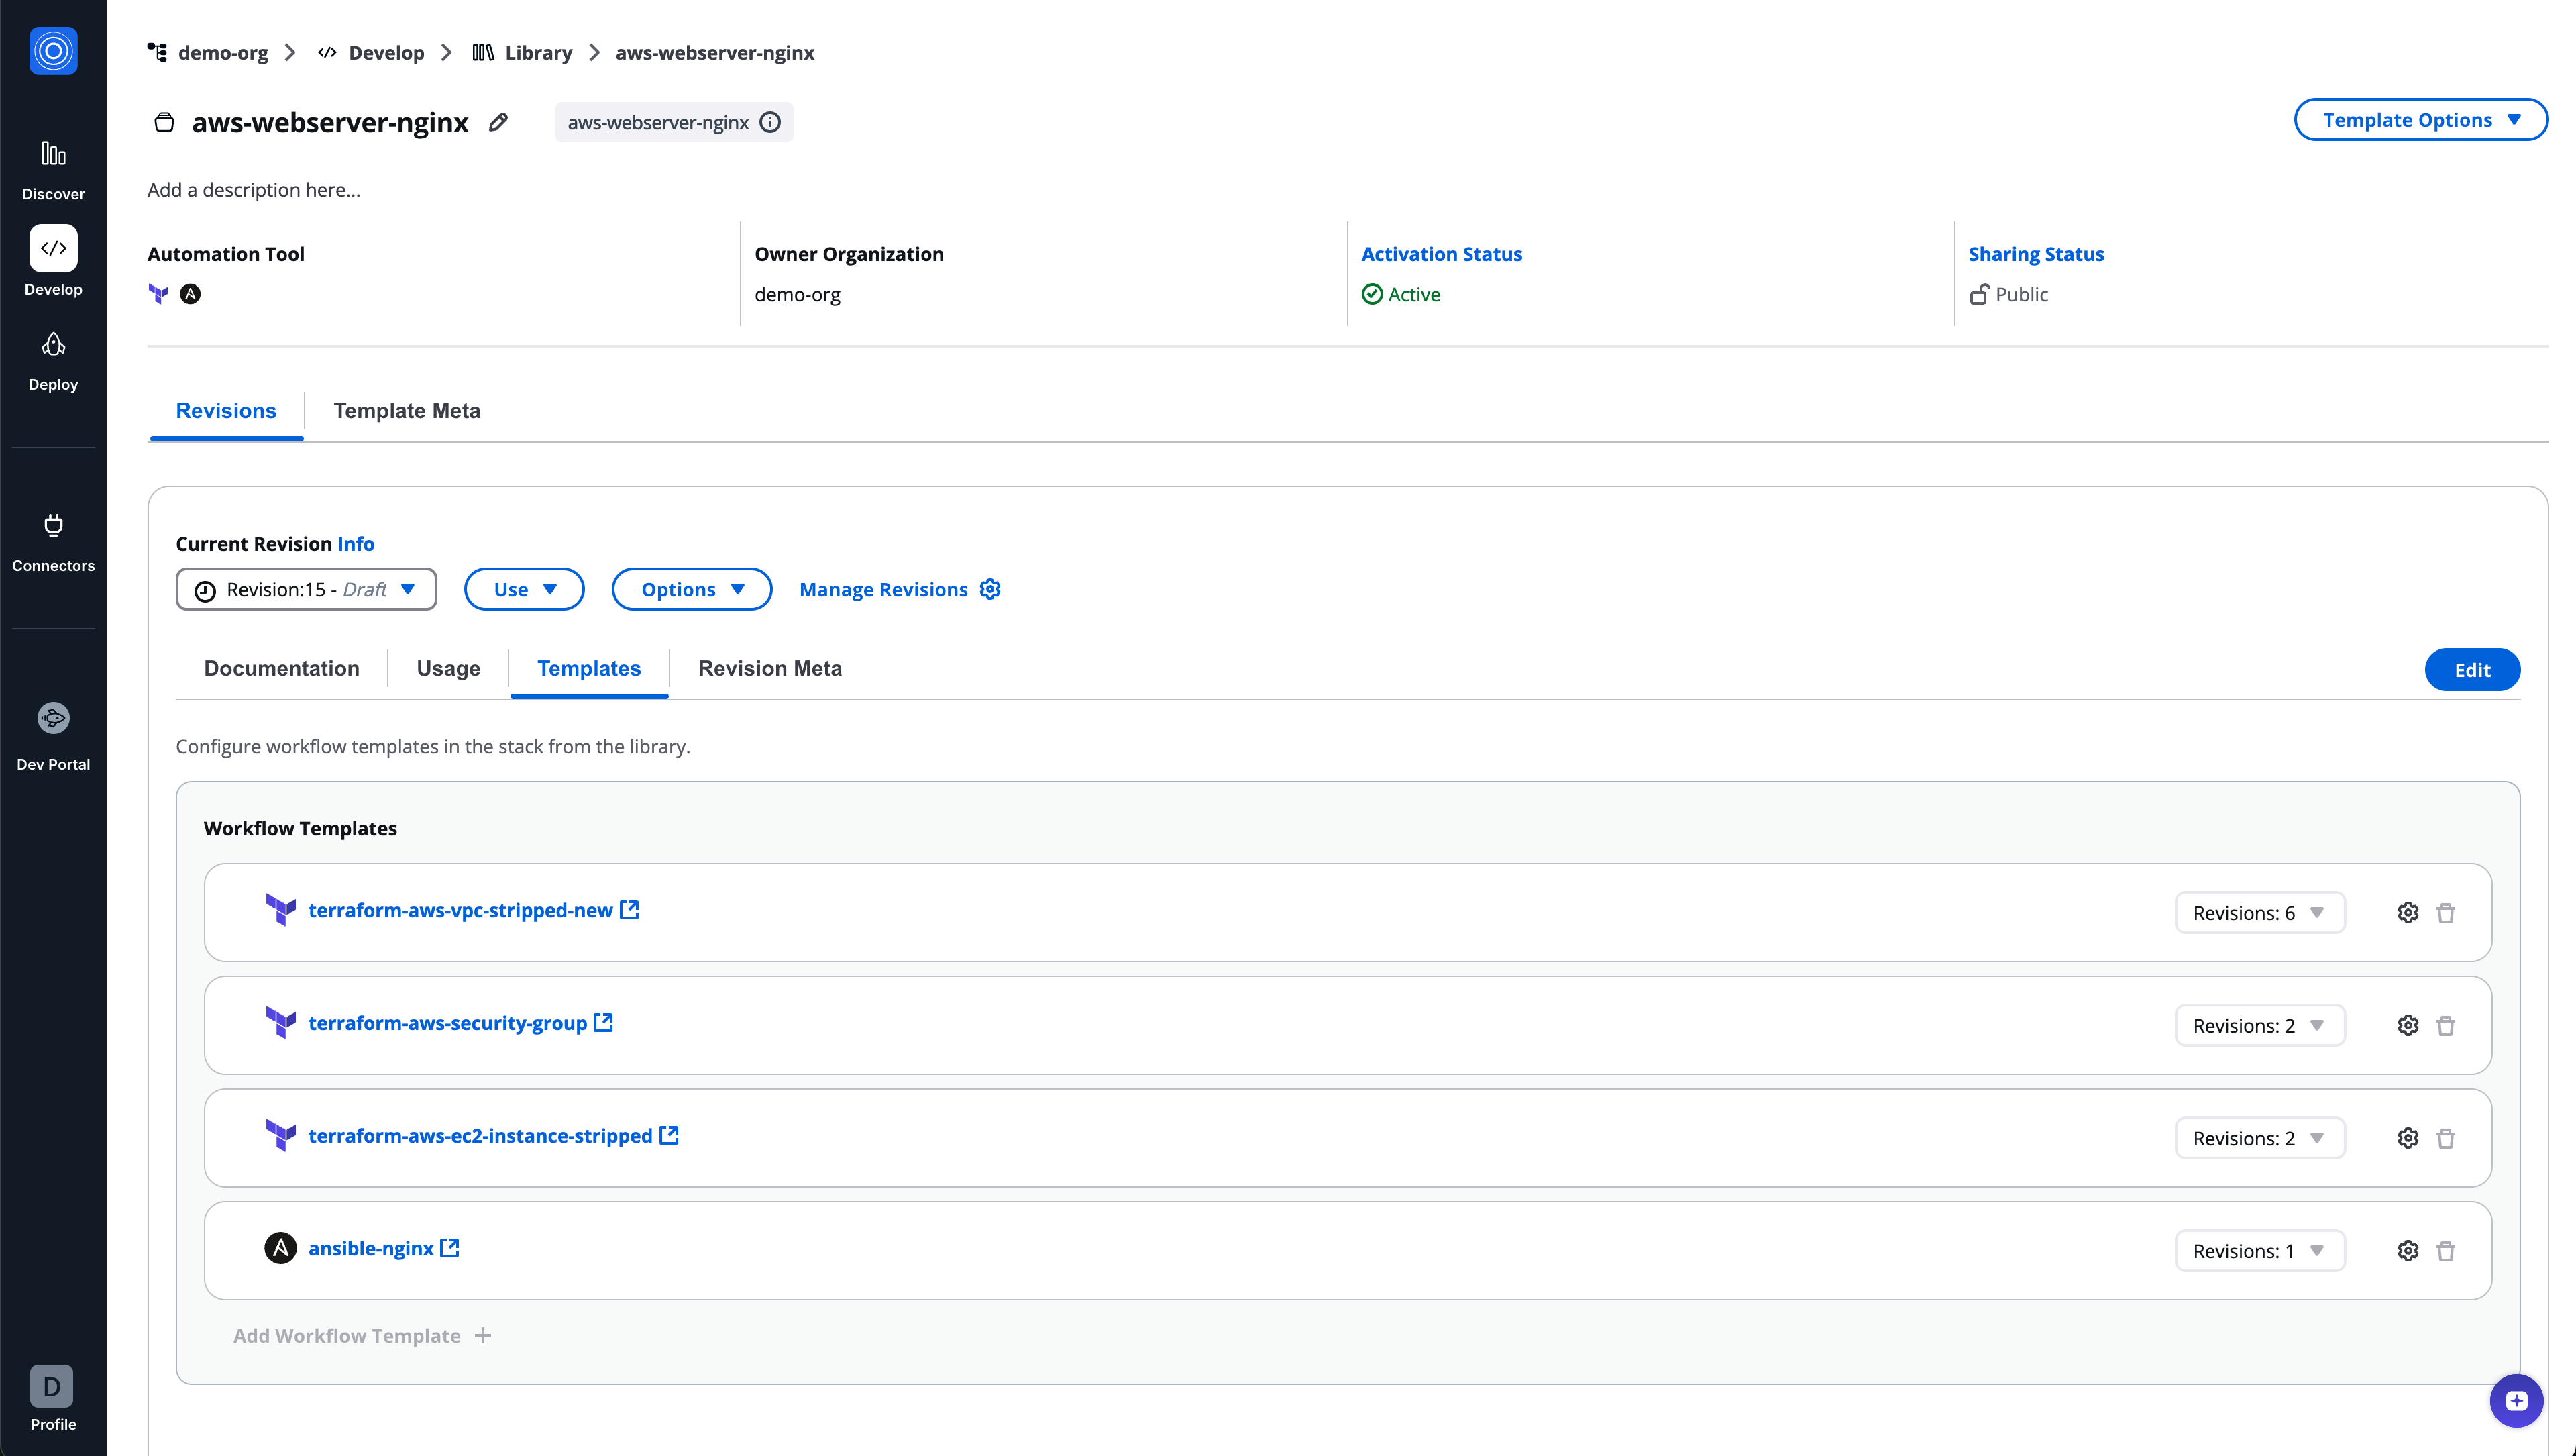
### Preset configuration overrides[](#preset-configuration-overrides "Direct link to Preset configuration overrides")
Each workflow template in a stack includes a **settings icon**.
This allows:
* Viewing workflow template preset configuration
* Overriding preset values **at the stack level**
* Customizing behavior without modifying the original workflow template
Overrides apply **only within the stack**.
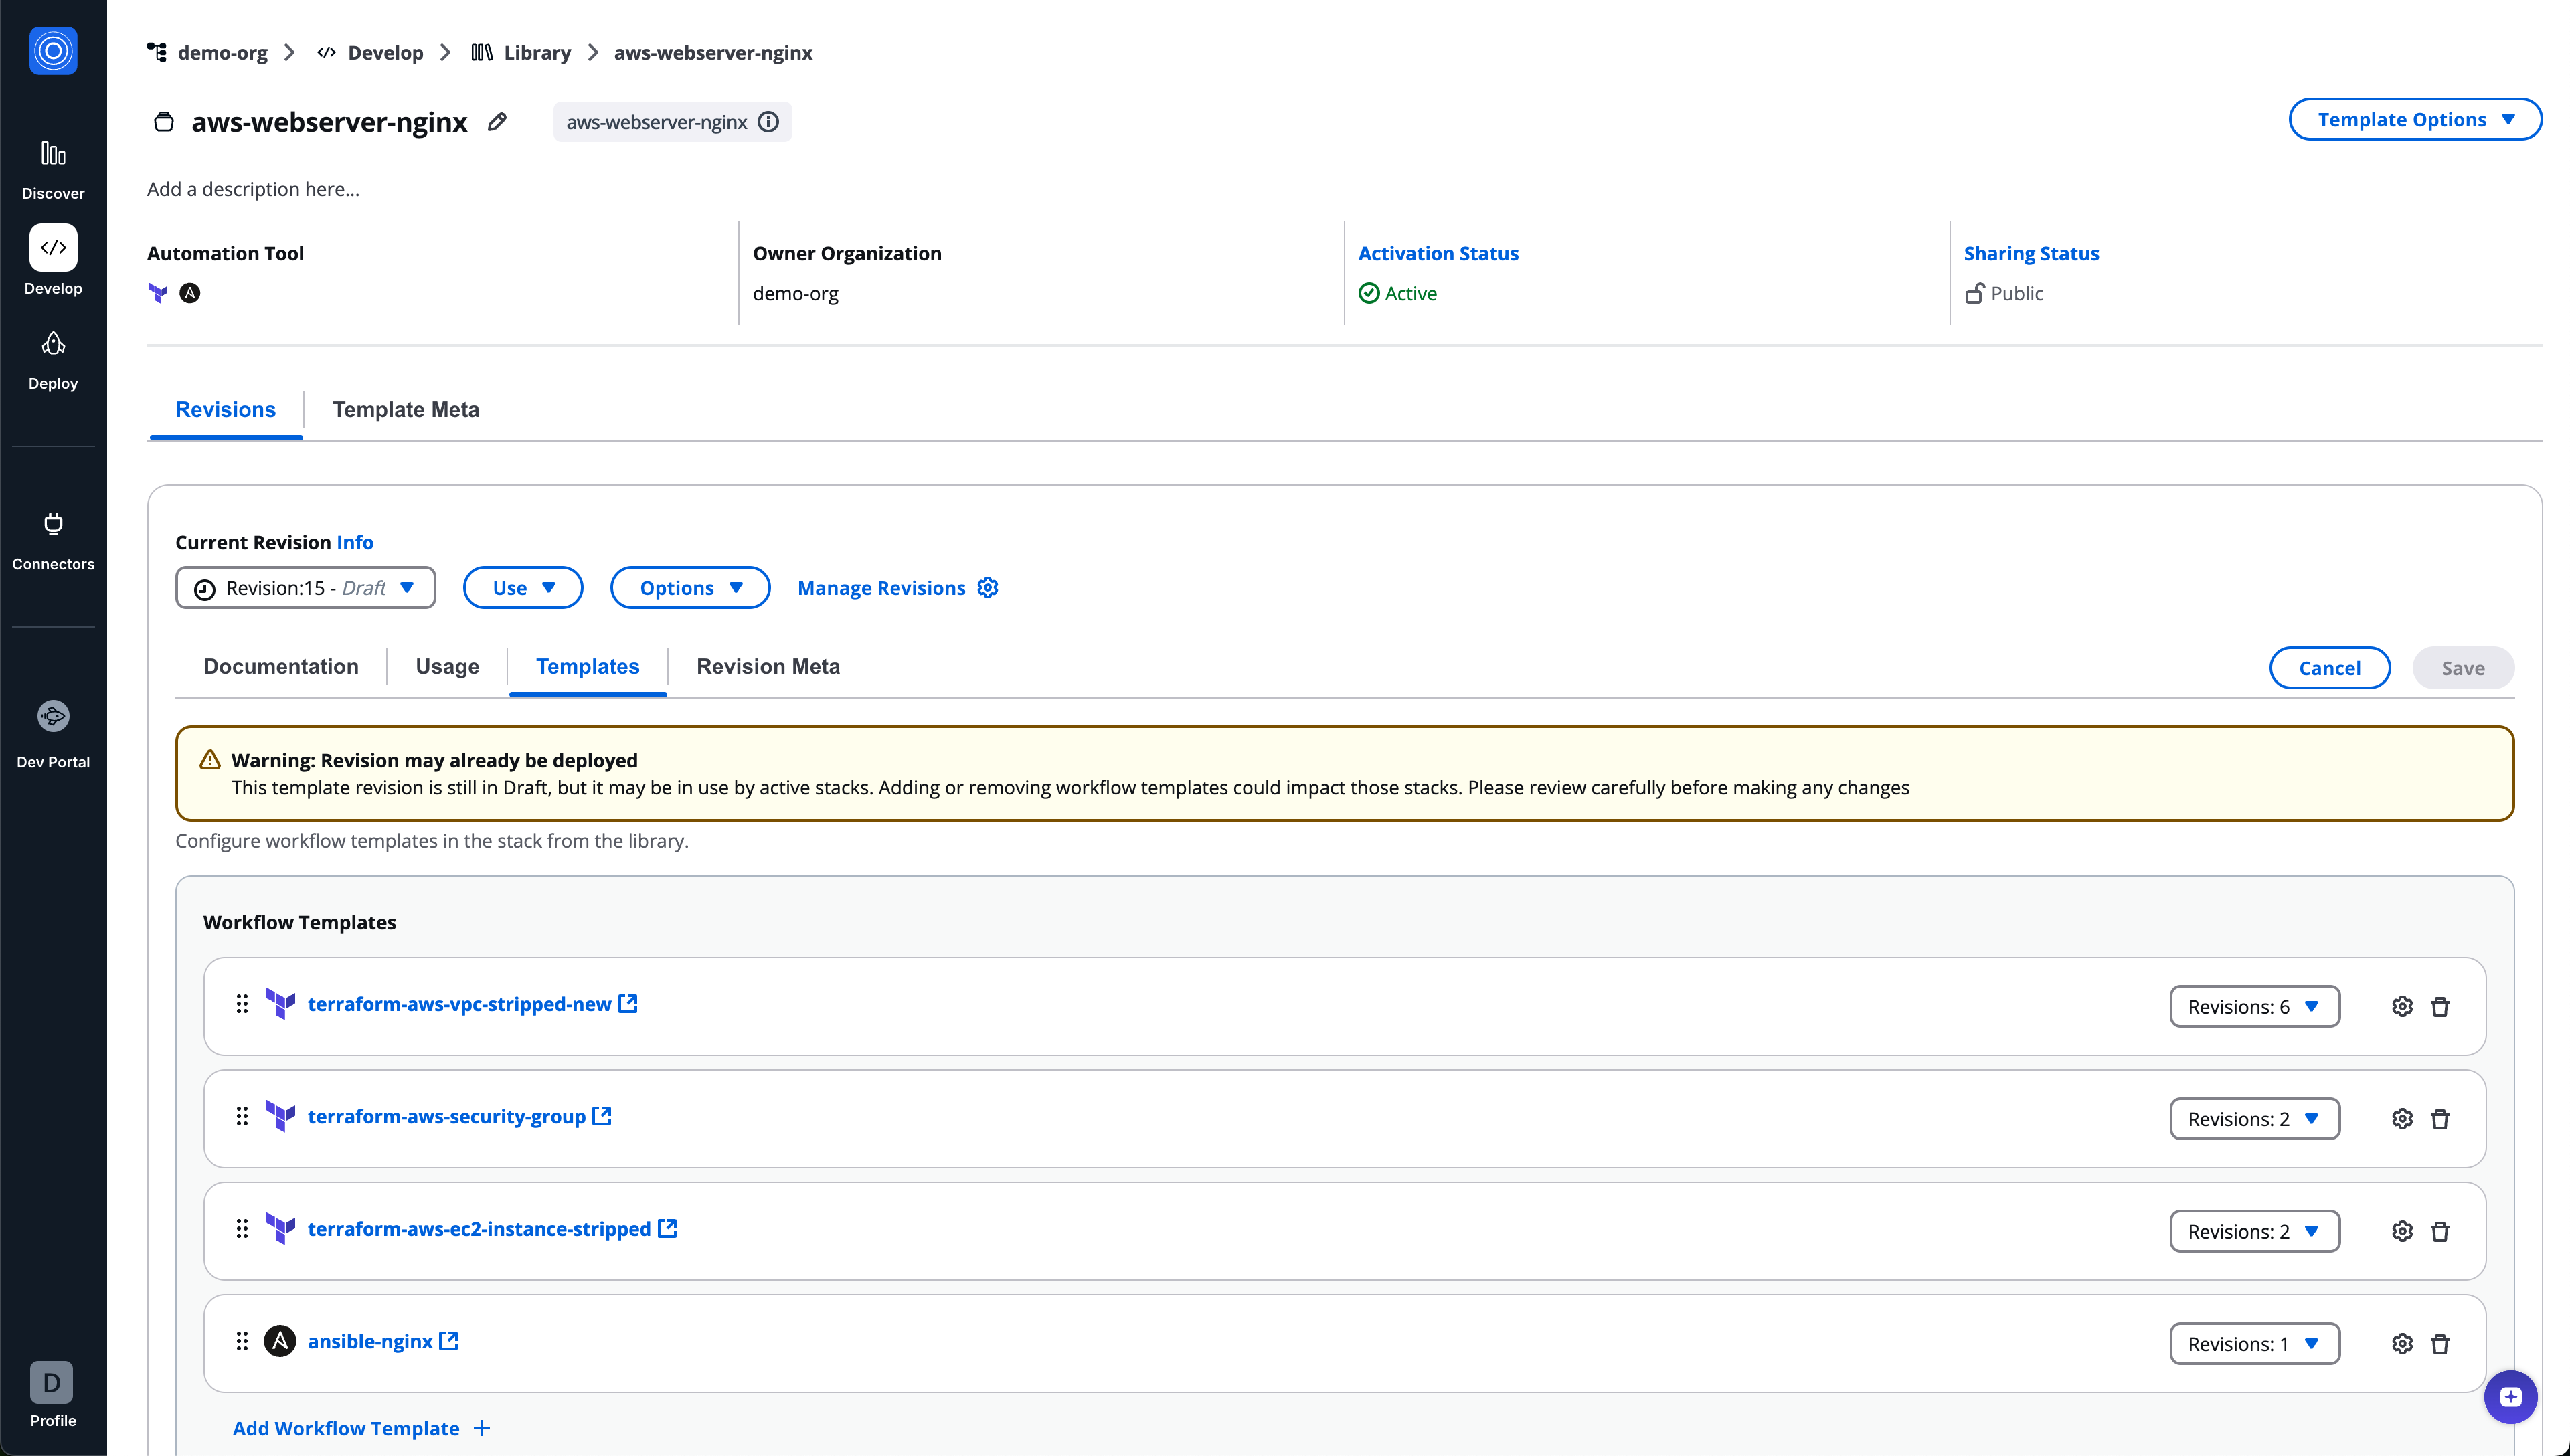
info
If the stack revision is in draft state and already deployed, a warning banner is shown and users are advised that changes may impact active stacks
# Policy template
Policy templates define compliance and governance rules using SG noCode.
## Policy template revision tabs[](#policy-template-revision-tabs "Direct link to Policy template revision tabs")
* Documentation
* Policy Builder
* Revision meta

## Policy Builder[](#policy-builder "Direct link to Policy Builder")
The Policy Builder provides a declarative, no-code interface for defining policies.
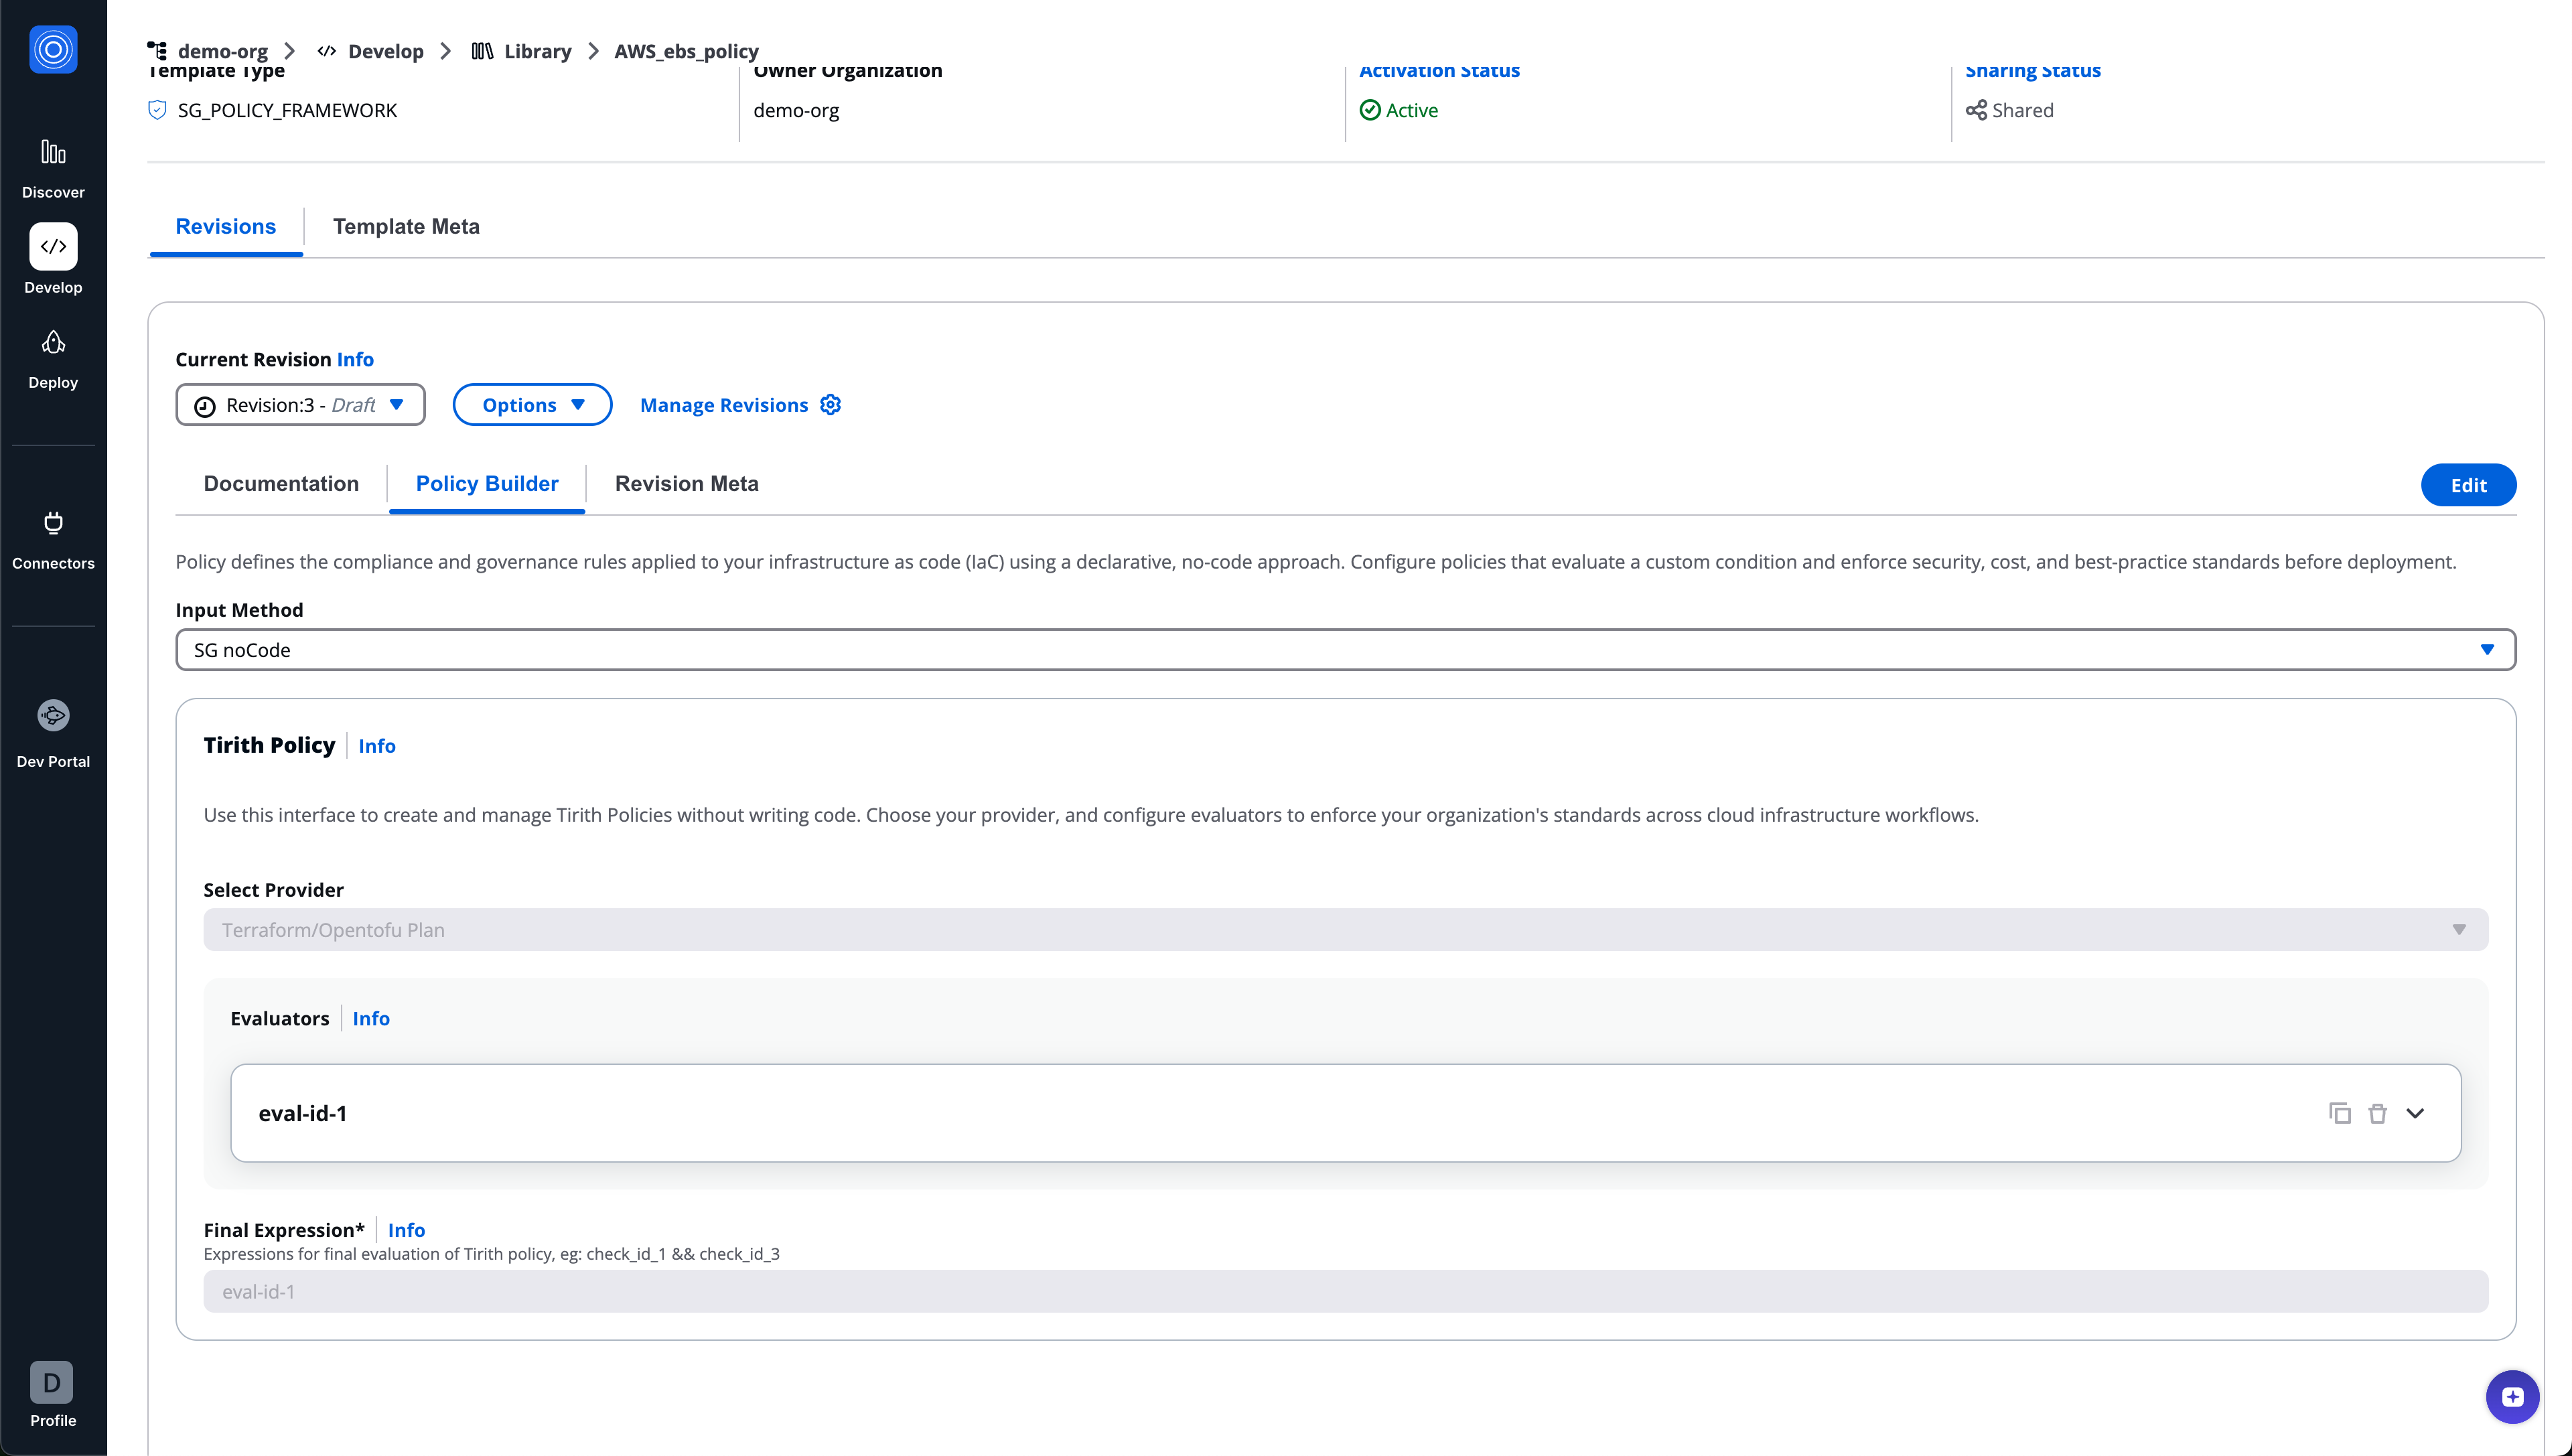
### Input methods[](#input-methods "Direct link to Input methods")
* SG noCode
* Code
### Provider selection[](#provider-selection "Direct link to Provider selection")
Select the evaluation provider, for example:
* Terraform / OpenTofu Plan

### Evaluators[](#evaluators "Direct link to Evaluators")
Each policy contains one or more evaluators.
Each evaluator includes:
* Evaluator ID
* Description
* Operation type
* Cloud provider
* Terraform/OpenTofu resource type
* Resource attribute
* Condition type
* Condition value type
* Condition value
* Error tolerance value
Evaluators can be added, expanded, duplicated, or deleted.
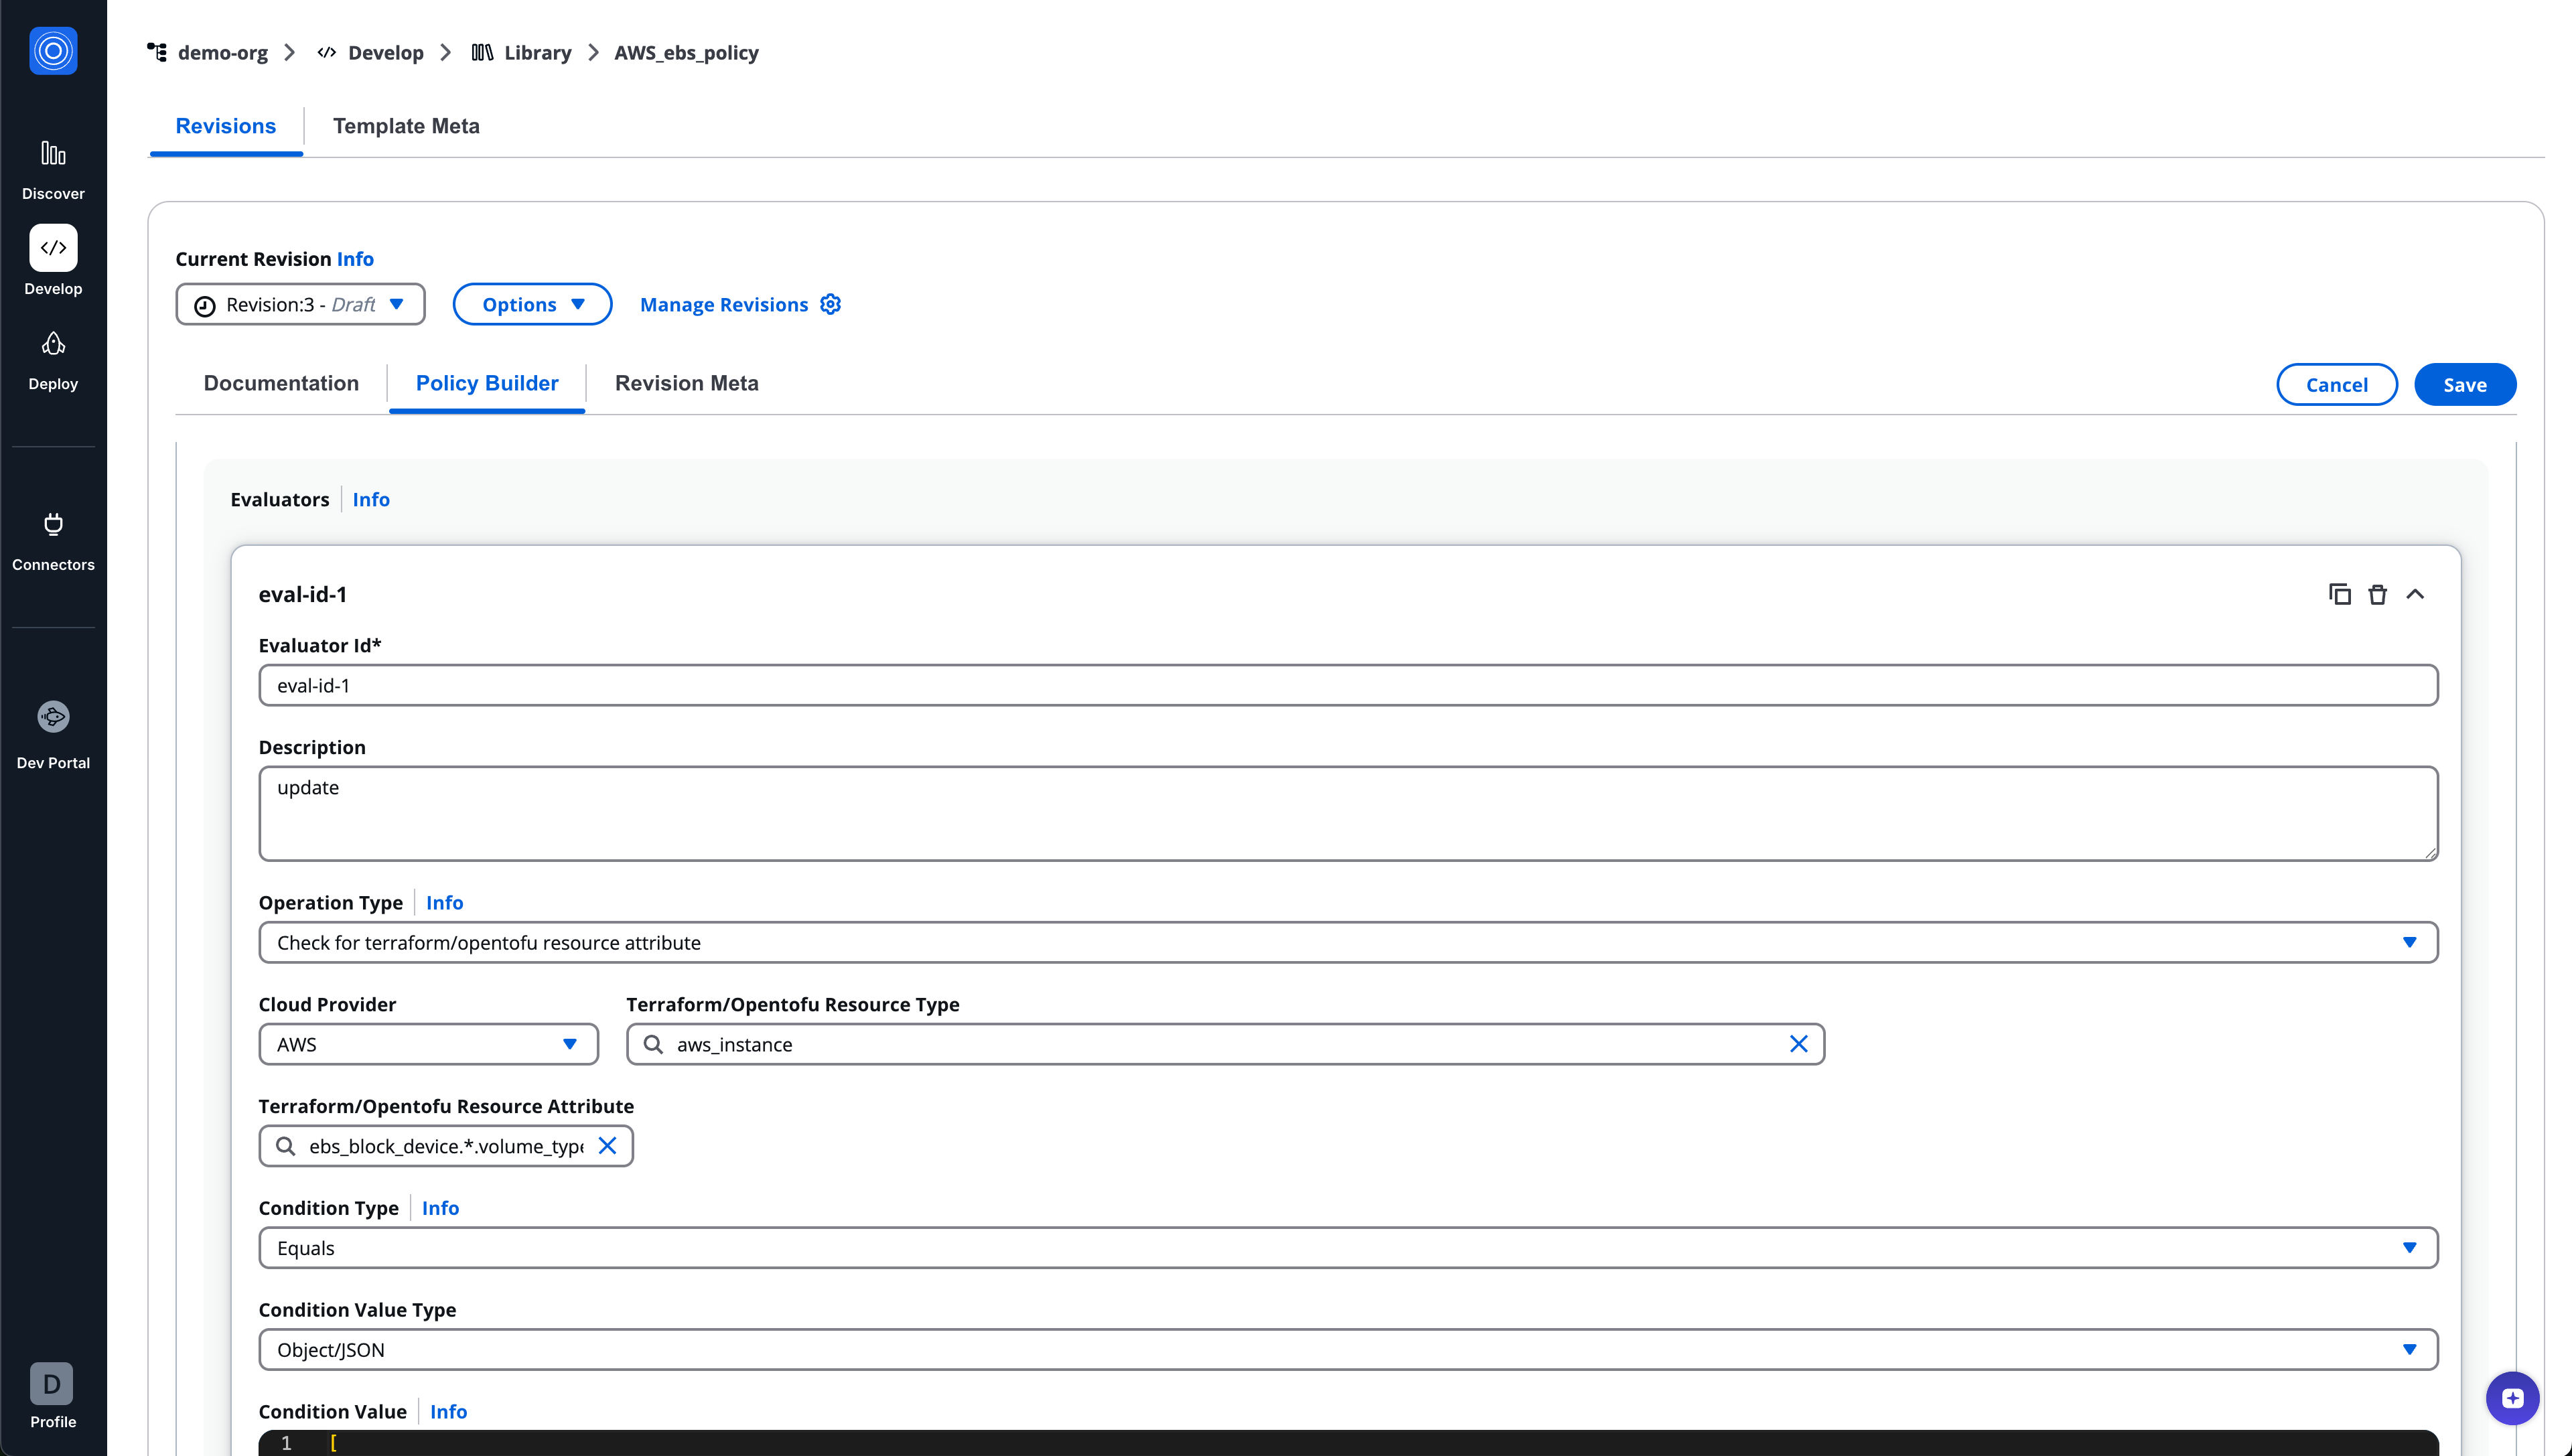
### Final expression[](#final-expression "Direct link to Final expression")
Defines how evaluators are combined for final policy evaluation.
Example: `eval-id-1 && eval-id-3`
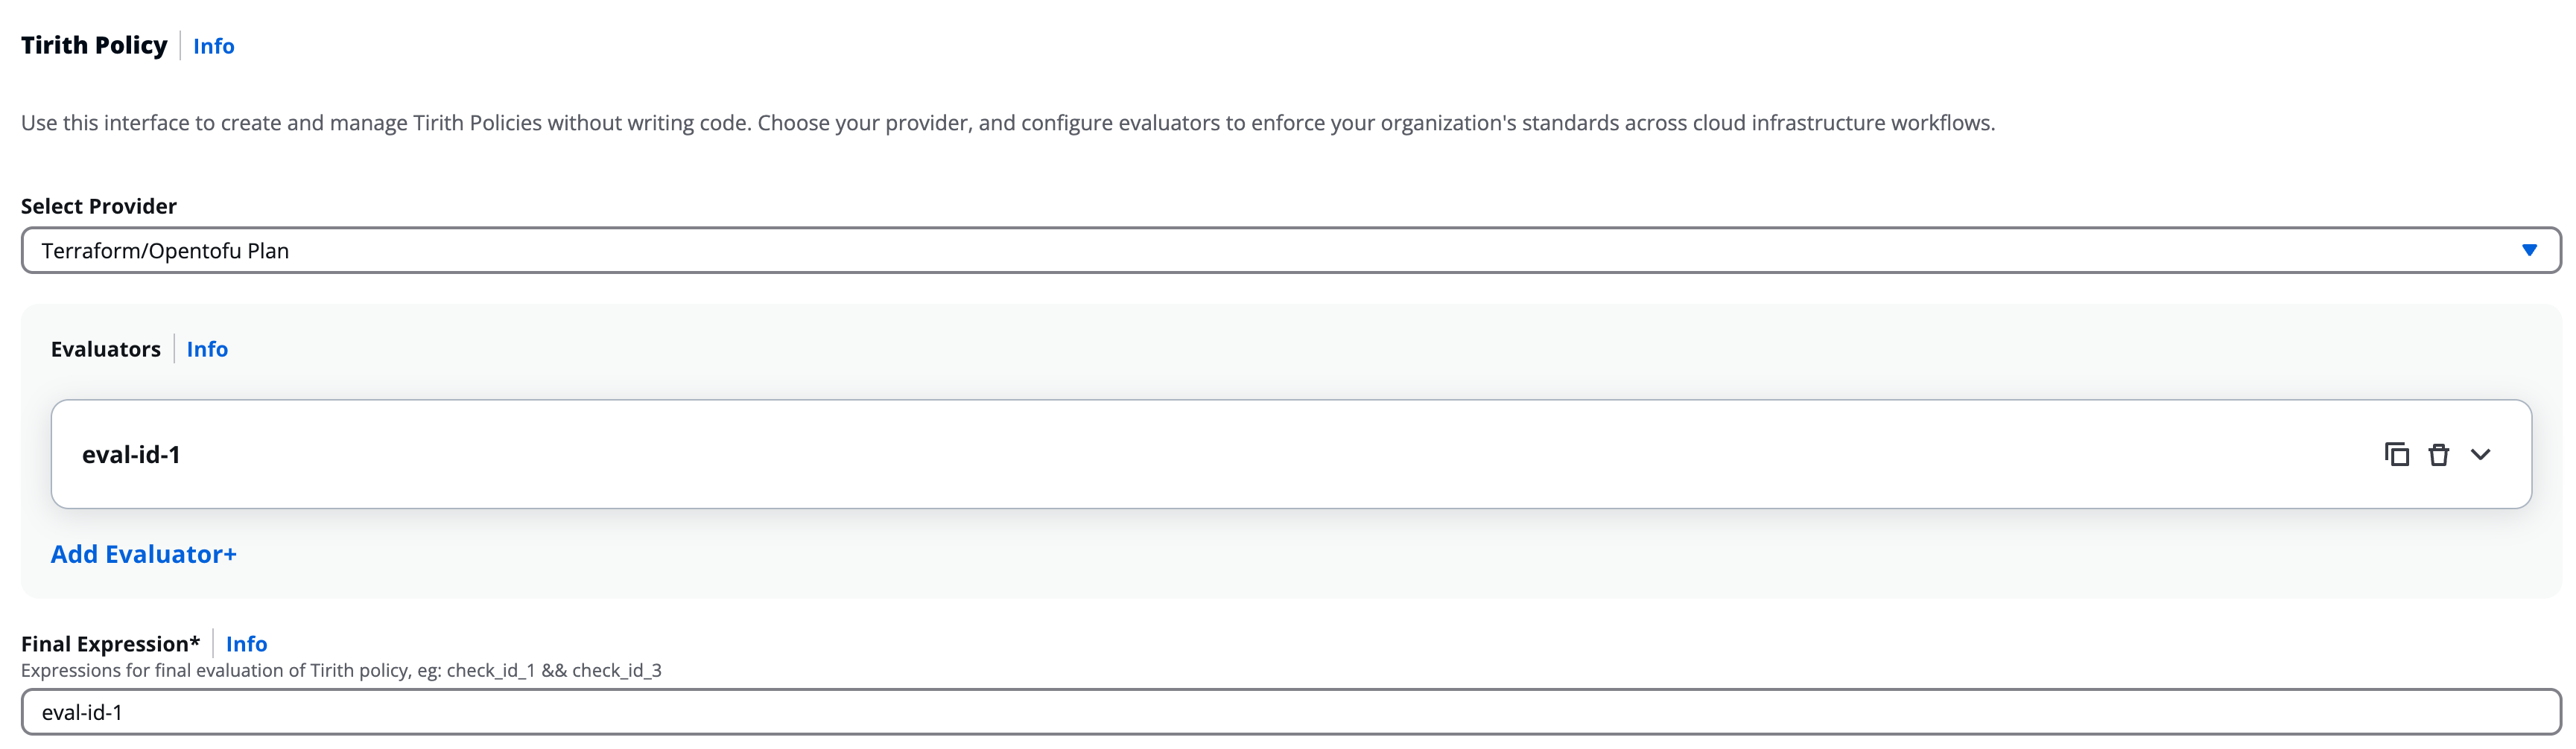
# Runtime container templates
Runtime container templates define execution environments used by workflows.
## Runtime container revision tabs[](#runtime-container-revision-tabs "Direct link to Runtime container revision tabs")
* Documentation
* Inputs
* Revision meta
## Inputs (Runtime containers)[](#inputs-runtime-containers "Direct link to Inputs (Runtime containers)")
Inputs define runtime parameters for the container.
Supported methods:
* **SG noCode**
* **Code**
SG noCode behavior is shared and documented separately and is not redefined here.
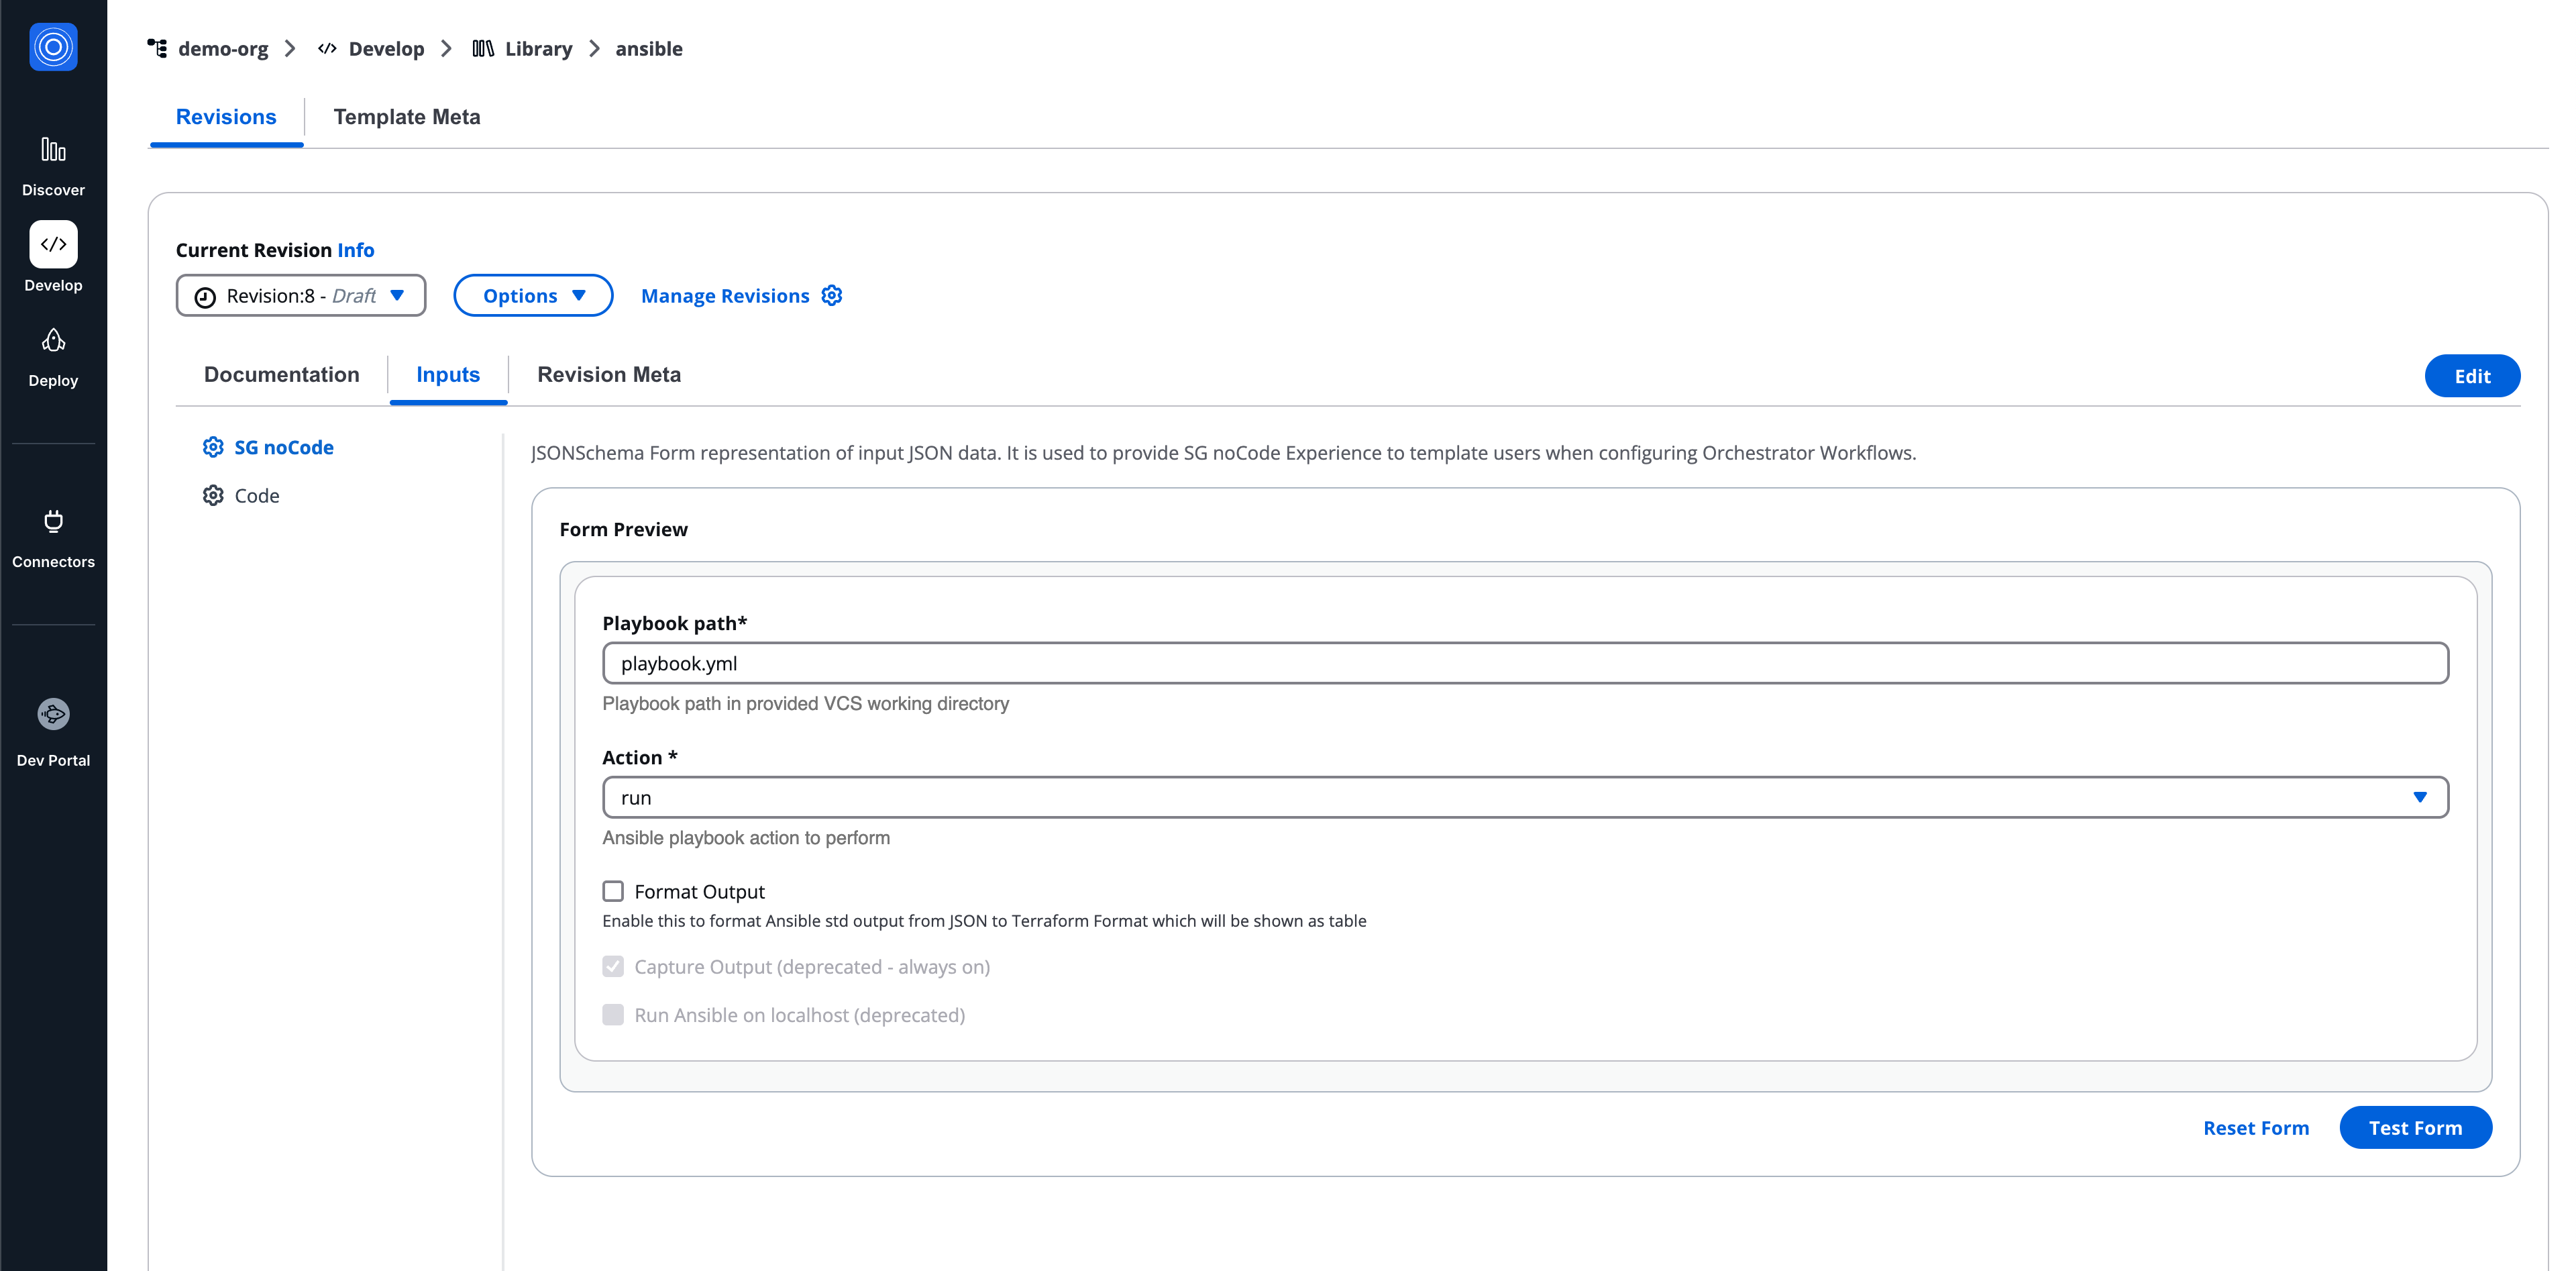
## Revision meta (Runtime containers)[](#revision-meta-runtime-containers "Direct link to Revision meta (Runtime containers)")
Displays metadata specific to the runtime container revision.
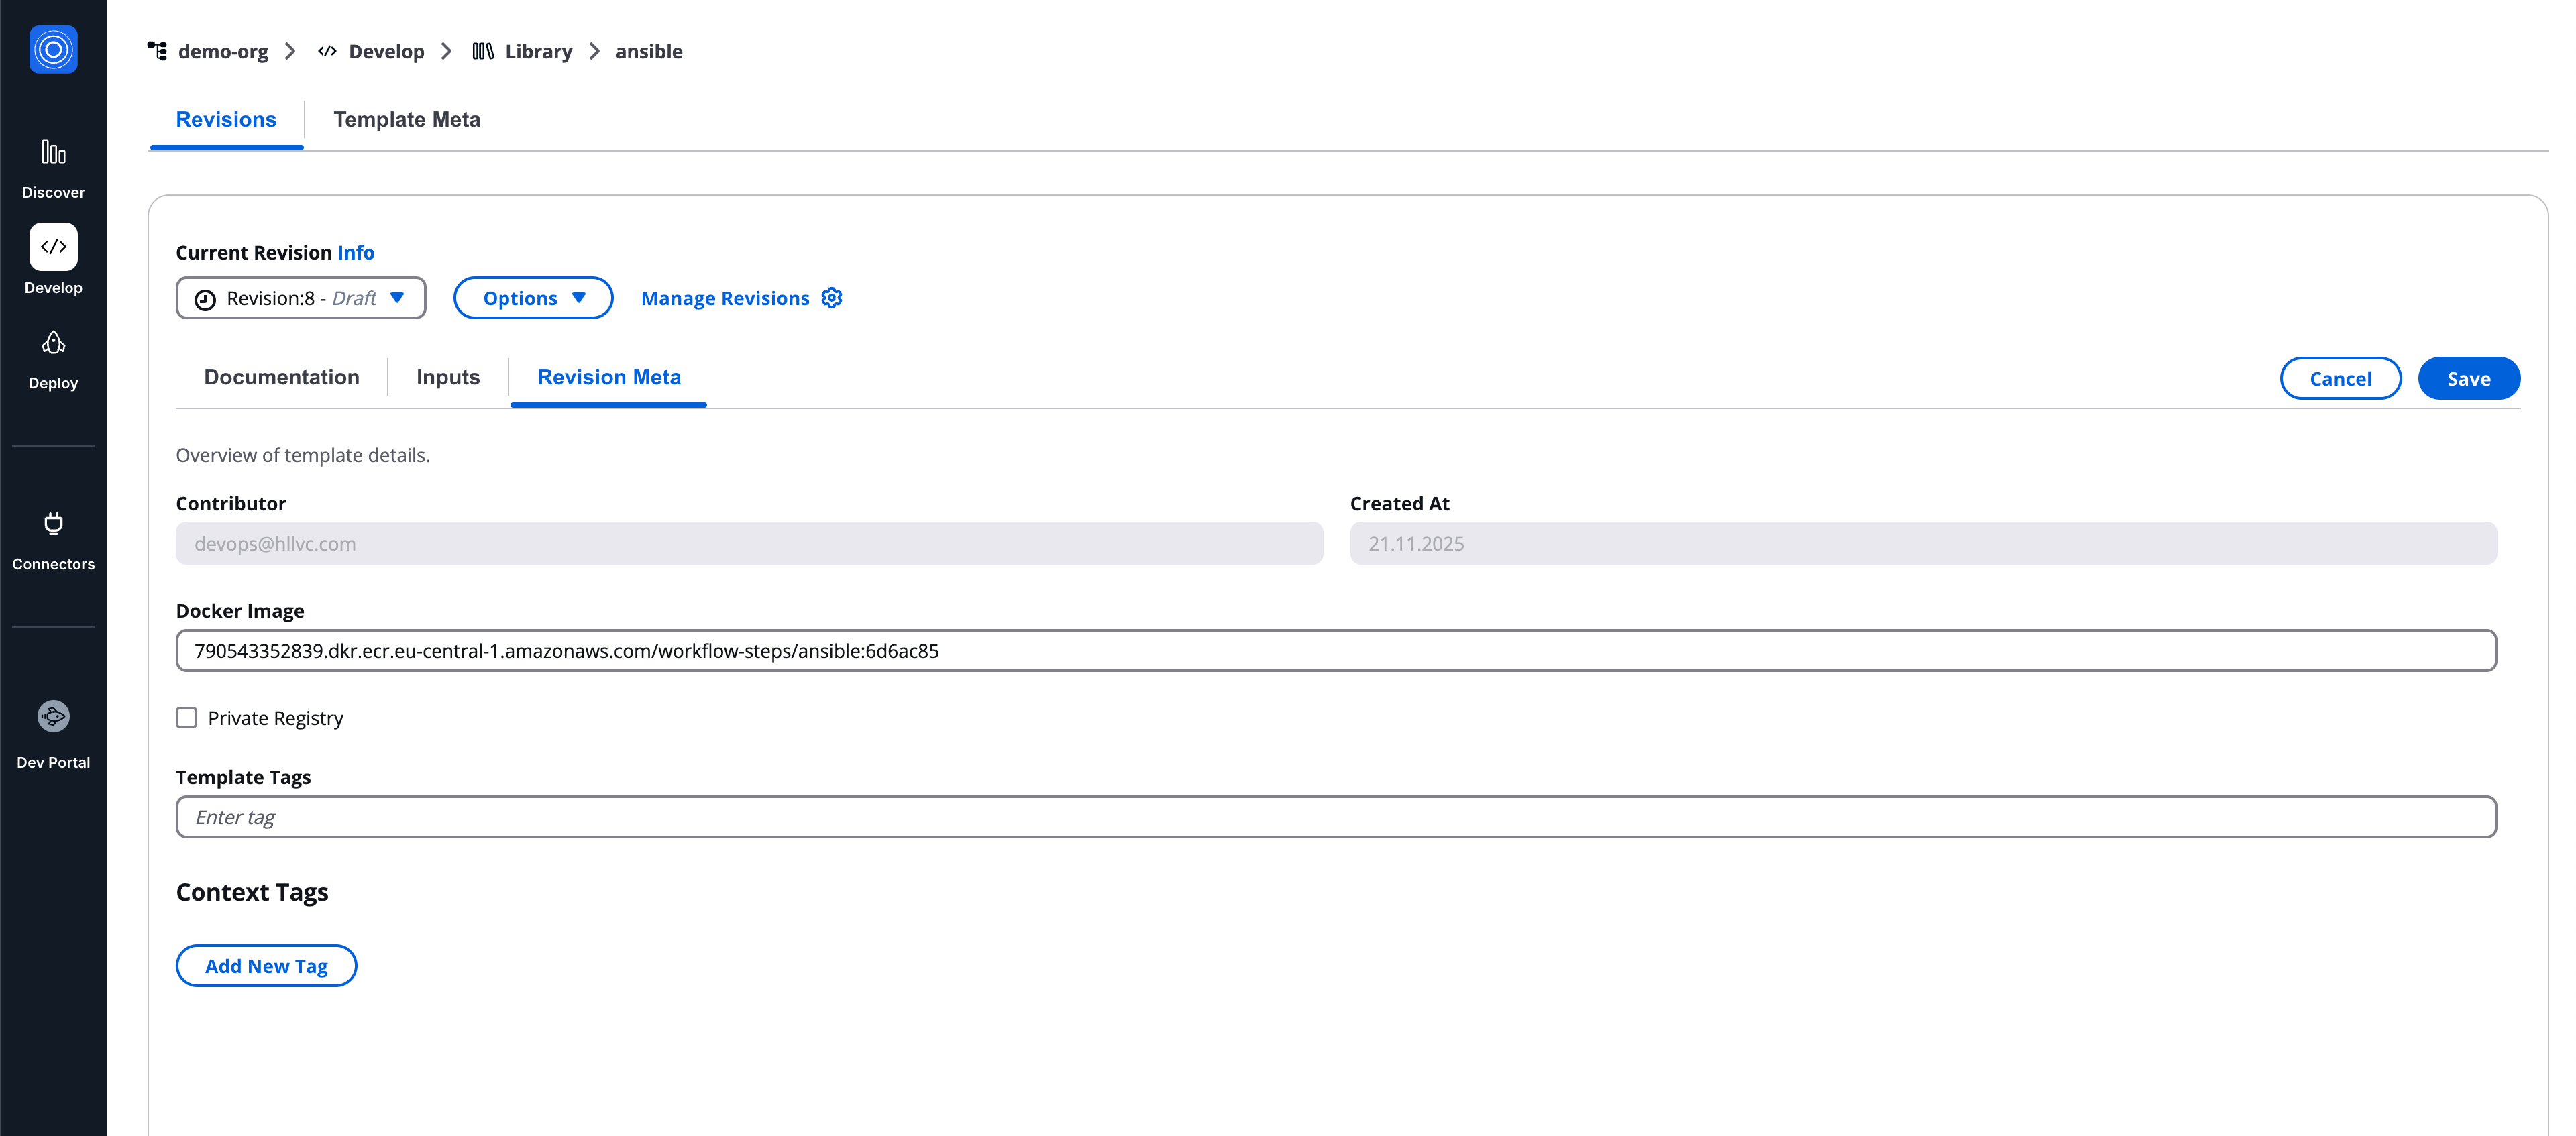
---
# SG noCode Form Builder
## Overview[](#overview "Direct link to Overview")
The Form Builder interface is organized into three main areas that work together to define and preview the form:
* **JSON Schema Panel (Left Column)**
* **Form Preview (Center Column)**
* **Fields Palette (Add Fields button)**
Users may switch between **View Mode** and **Edit Mode** depending on their permissions or configuration needs.
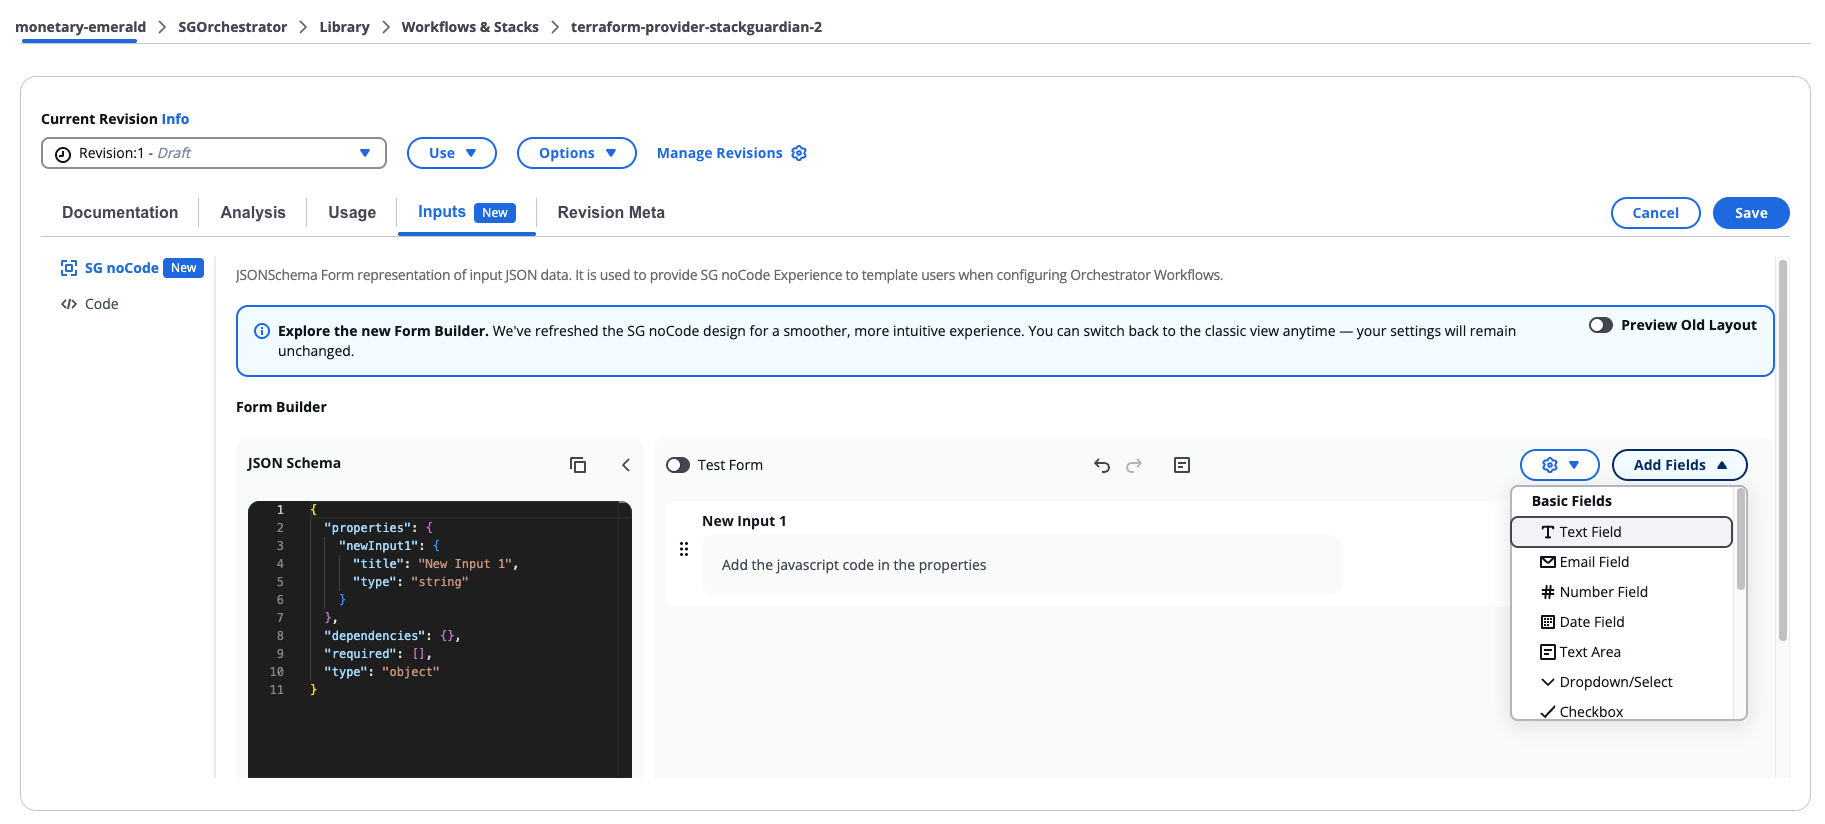
*SG noCode Form Builder*
## Builder Modes[](#builder-modes "Direct link to Builder Modes")
### View Mode[](#view-mode "Direct link to View Mode")
View Mode displays the form without allowing structural modifications. Users can:
* Inspect form fields
* Review layout and labels
* View conditional indicators
* Validate field structure
This mode is typically used by users who have **read-only access** or who only need to review the form configuration.
### Edit Mode[](#edit-mode "Direct link to Edit Mode")
Edit Mode enables full editing capabilities within the builder. When activated, the full layout becomes interactive. Users can:
* Add or remove fields
* Reorder fields
* Modify field configuration
* Edit the underlying schema
* Configure conditional logic
* Test form behavior
## JSON Schema Panel[](#json-schema-panel "Direct link to JSON Schema Panel")
The **JSON Schema Panel** displays the underlying schema that defines the form structure. This schema represents the authoritative configuration used by the platform to render and validate the form. Users can:
* Scroll through the schema
* Expand the panel for detailed editing
* Collapse the panel to focus on the visual editor
* Modify the schema directly
Changes made in the schema are reflected in the **Form Preview**.
Direct editing of the schema is typically used by advanced users who need to implement configurations not available through the visual editor.
## Form Preview[](#form-preview "Direct link to Form Preview")
The **Form Preview** displays a live rendering of the form while it is being built. The preview allows users to interact with fields and manage the layout in real time. Available actions include:
* Adding new fields
* Reordering fields
* Editing field settings
* Removing fields
* Entering Test Mode
Each field is represented as a **field card** containing configuration controls. Field cards include:
* **Settings icon** – opens the field configuration modal
* **Delete icon** – removes the field from the form
* Indicators showing whether the field is:
* Required
* Disabled
* Controlled by conditional logic
The preview updates immediately when changes are made.
## Fields Palette[](#fields-palette "Direct link to Fields Palette")
The **Fields Palette** provides the components that can be added to the form.
Fields can be dragged into the preview area and positioned anywhere within the form.
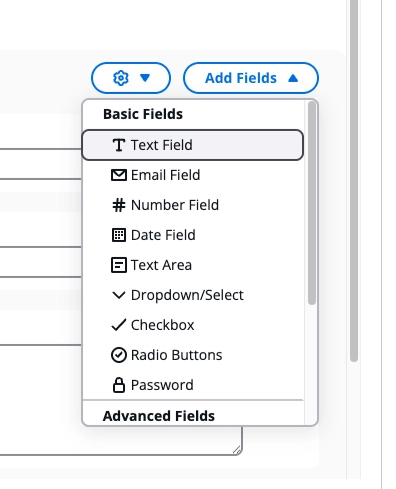
*Fields Palette*
### Basic Fields[](#basic-fields "Direct link to Basic Fields")
Basic fields represent standard input types. Available fields include:
* Text Field
* Email Field
* Number Field
* Date Field
* Text Area
* Dropdown/Select
* Checkbox
* Radio Buttons
* Password
### Advanced Fields[](#advanced-fields "Direct link to Advanced Fields")
Advanced fields support more complex data input or dynamic behavior. Examples include:
* Section
* Multiselect
* Array
* Async Select
* Autosuggest
#### Section[](#section "Direct link to Section")
Sections allow grouping related fields into logical blocks within the form.
**Additional properties:**
Sections support an optional **Allow additional properties** setting, accessible from the **Basic** tab in the Section Settings modal. When enabled, users can add their own key-value pairs at runtime in addition to, or instead of, the defined properties.
When enabled, the following options are available:
* **Value Type** — the type of each dynamic value: String, Number, Integer, Boolean, or Section. If Section is selected, the section itself must be configured.
* **Min Properties** — the minimum number of key-value pairs the user must provide
* **Max Properties** — the maximum number of key-value pairs allowed
* **Key Pattern** — an optional regex the key name must match (for example, ^\[A-Z\_]$)
* **Key Placeholder** — placeholder text shown in the key input field
#### Array[](#array "Direct link to Array")
The Array field allows users to input a list of items of the same type. It is configured through the Configuration tab in the field settings, which includes:
* **Item Type** — the type of each item in the array: String, Number, Integer, Boolean, or Section. If Section is selected, the section itself must be configured by adding fields and any other required configuration.
* **Item Label** — the label shown for each item
* **Min Items** — the minimum number of items allowed
* **Max Items** — the maximum number of items allowed
* **Unique Items** — when enabled, duplicate values are not allowed
### Custom Components[](#custom-components "Direct link to Custom Components")
The builder supports custom components that extend form functionality. Available options include:
* Custom Code
* Custom Code Frontend
These components allow developers to integrate custom logic or UI behavior into the form.
### Custom Code Widgets[](#custom-code-widgets "Direct link to Custom Code Widgets")
The builder supports custom code components that allow developers to extend form functionality.
Custom Code alert
When a form contains a Custom Code Widget, an alert appears in the Form Builder asking you to acknowledge the custom code before proceeding. This ensures you have the opportunity to review the code before using it.
Before acknowledging, you can open the widget settings to inspect the code, but all other actions are disabled. Select **Acknowledge Custom Code** to enable full access to the form.
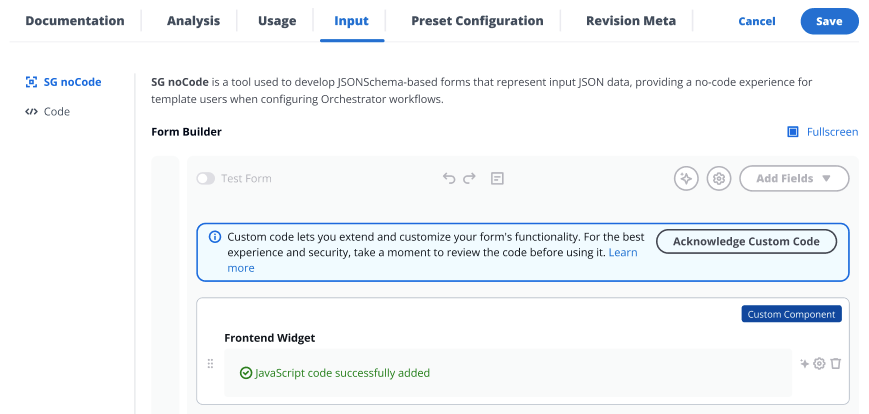
*Custom Code alert*
### Custom Code Widget[](#custom-code-widget "Direct link to Custom Code Widget")
The CustomCode widget enables dynamic and context-aware customization of form fields in real-time. By executing custom JavaScript (JS) code in a **Node.js v20** runtime environment, it allows users to fetch, process, and populate form data dynamically.
**Key Features:**
1. **Dynamic Data Fetching**: Fetch data from APIs or other sources in real-time.
2. **Custom JavaScript Support**: Users can write custom JS code to handle data processing and form updates.
3. **Runtime Environment**: Executes in a **Node.js v20** environment with pre-configured capabilities.
4. **Contextual Awareness**: Leverages variables like `sg_context` for details such as `org`, `wfgrp`, `stack`, and `wf`.
**How it works:**
Users provide custom JavaScript code in the `apiSchema.handler` configuration. This code is executed to process data and dynamically update the `jsonSchema` and `uiSchema` of the form.
#### UI Schema Properties[](#ui-schema-properties "Direct link to UI Schema Properties")
1. **API Schema** - The `apiSchema` key in the UI schema is used to define the logic required for dynamic behavior. It allows you to pass custom JavaScript code, specify when it should run, and provide cloud configuration to support it.
1. **handler** - JavaScript code to be executed based on the trigger. Typically used to fetch dynamic options or perform actions on selection.
2. **triggerType** - The `triggerType` key defines when the JavaScript code should be executed. It supports the following values:
* **onLoadItems** – Executes the JavaScript code when the options dropdown is opened. Applicable only to `select` and `multiselect` fieldTypes.
* **onSelection** – Executes the JavaScript code when an option is selected from the dropdown or after value has been passed in case of `string` fieldType. The onSelection trigger in the string field Custom Code widget functions behaves like an onblur event. That is , this trigger activates when the user clicks away from or leaves the field, rather than when text is selected within the field.
3. **Deployment Platform Config** - Cloud providers can be passed and then used inside Javascript code using `deploymentPlatformConfig`.
2. **Field Type** – The `fieldType` key in the UI schema determines the type of input field to render. It supports the following values:
* **select** – Renders a single-select dropdown input. This is the default `fieldType` and is commonly used for selecting one item from a list.
* **multiselect** – Renders a multi-select dropdown input, allowing users to choose multiple options.
* **string** – Renders a basic text input field.
#### Accessible Variables in JS Code[](#accessible-variables-in-js-code "Direct link to Accessible Variables in JS Code")
* **`fetch`** - The standard JavaScript Fetch API, used for making network requests.
* **`SDK`** - The `SDK` object provides access to classes and methods exported by the following JavaScript cloud SDKs:
* `@azure/identity`
* `@azure/arm-resources`
* `@aws-sdk/client-ec2`
* `@aws-sdk/client-ssm`
These SDKs can be used within your JavaScript code to interact with Azure and AWS services programmatically.
* **`sg_context`** - Provides contextual information and user metadata.
* **`viewContext`** - Contains contextual identifiers related to the current form or view. Keys may include:
* `org`
* `wfgrp`
* `stack`
* `wf`
* `template`
* `templateType`
* `currentDeploymentPlatformConfig` - Provides configuration details for the selected cloud connector, if any.
* **`user`** - Contains information about the current user, such as:
* `email`
* `role`
* **`token`** - The user's ID token (JWT). Can be used to authenticate API requests to StackGuardian’s backend or other secured endpoints.
* **`deploymentPlatformConfig`** - Provides configuration details for the selected cloud connector, if any. These are the AWS and Azure deployment platform configurations that can be accessed:
* **`AWS`**: integrationId, profileName, awsDefaultRegion, awsAccessKeyId, awsSecretAccessKey
* **`AZURE`**: integrationId, profileName, armClientSecret, armClientId, armSubscriptionId, armTenantId
* **`jsonSchema`** - This can be used to access current jsonSchema.
* **`uiSchema`** - This can be used to access current uiSchema.
* **`formData`** - Contains the current values of all form fields. Use this to read the value of other fields in the same form and create inter-field dependencies. Example: `sg_context.formData.myFieldName`
* **`formSource`** - Indicates the context in which the form is being rendered — i.e., whether the user is creating or updating a resource, and which type of resource. Use this to conditionally show fields, change options, or adjust defaults based on the operation. See [formSource example](#formsource-example). Possible values:
* `WORKFLOW_CREATE` – User is creating a new workflow
* `WORKFLOW_UPDATE` – User is updating an existing workflow
* `TEMPLATE_CREATE` – User is creating a new template
* `TEMPLATE_UPDATE` – User is updating an existing template
* `POLICY_UPDATE` – User is updating a policy
* **`triggerInfo`** - Use this to access information about the trigger of code execution. `triggerInfo` will always contain `triggerType` (`onSelection` or `onLoadItems`). `valueSelected` is only present when `triggerType` is `onSelection`, and indicates the value selected by the user. It will be absent (undefined) when `triggerType` is `onLoadItems`.
- Form GUI
- Form JSON Schema
- UI Schema
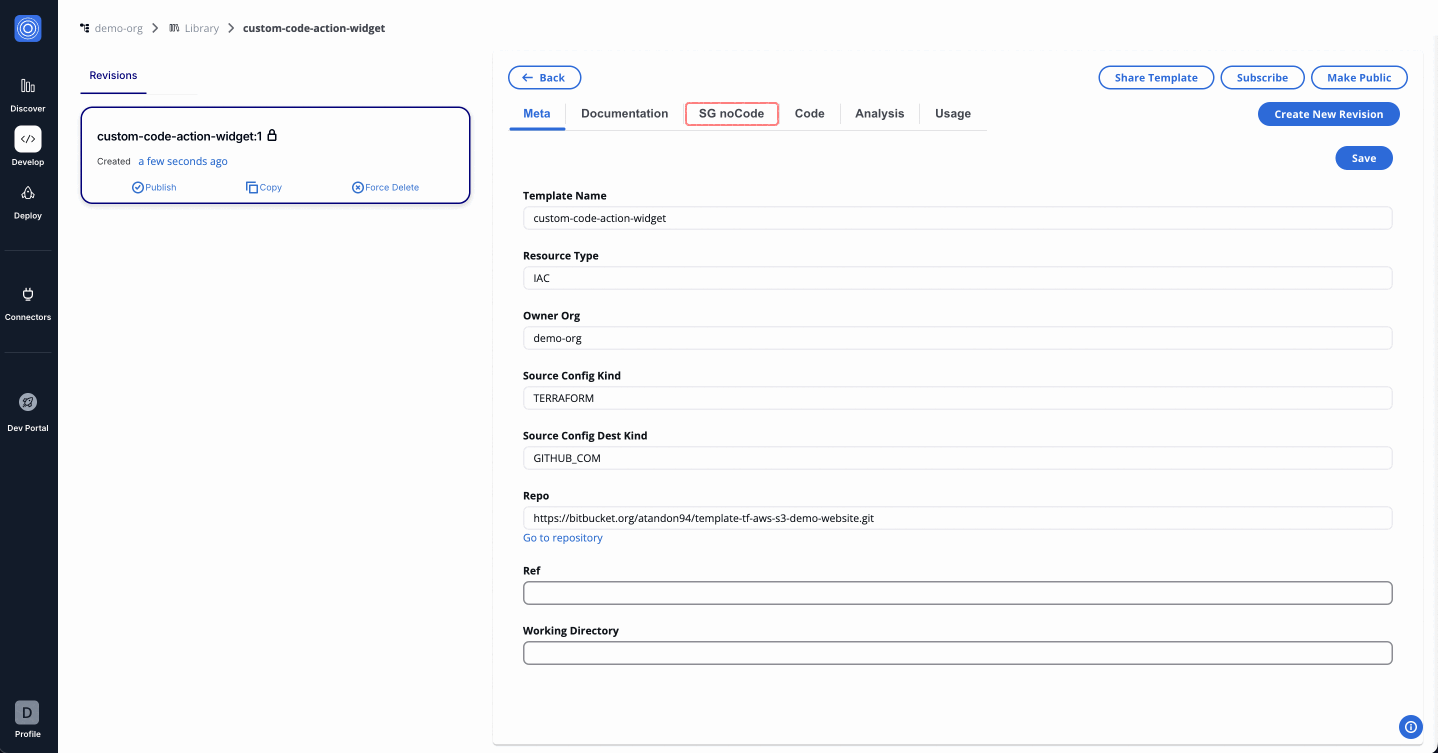
```
{
"$schema": "http://json-schema.org/schema#",
"type": "object",
"properties": {
"workflow_output": {
"title": "Workflow Outputs",
"type": "string"
}
}
}
```
```
{
"workflow_output": {
"ui:widget": "CustomCodeWidget",
"ui:title": "Workflow Outputs",
"apiSchema": {
"triggerType": ["onLoadItems"],
"handler": "// Base API URL\n" +
"const baseUrl = 'https://testapi.qa.stackguardian.io';\n" +
"\n" +
"// Extract params from sg_context\n" +
"let orgName = sg_context?.viewContext?.org || 'demo-org';\n" +
"let wfGrpName = sg_context?.viewContext?.wfgrp || 'tf-init-richard-test-cases';\n" +
"let stackName = sg_context?.viewContext?.stack || '';\n" +
"let stackId = stackName ? `/stacks/${stackName}` : '';\n" +
"let token = sg_context?.token;\n" +
"\n" +
"let finalOptions = [];\n" +
"\n" +
"// API URL to fetch workflows\n" +
"let apiUrl = `${baseUrl}/api/v1/orgs/${orgName}/wfgrps/${wfGrpName}${stackId}/wfs/listall/`;\n" +
"const api_response = await fetch(apiUrl, {\n" +
" headers: {\n" +
" Authorization: `${token}`\n" +
" }\n" +
"});\n" +
"\n" +
"// Parse JSON response\n" +
"let listallWfs = await api_response.json();\n" +
"\n" +
"// Iterate over workflows to fetch outputs\n" +
"for (let i = 0; i < listallWfs.msg.length; i++) {\n" +
" try {\n" +
" let item = listallWfs.msg[i];\n" +
" let wfName = item.ResourceName;\n" +
" let wfOutputUrl = `${baseUrl}/api/v1/orgs/${orgName}/wfgrps/${wfGrpName}${stackId}/wfs/${wfName}/outputs/`;\n" +
" let outputResponse = await fetch(wfOutputUrl, {\n" +
" headers: {\n" +
" Authorization: `${token}`\n" +
" }\n" +
" });\n" +
" let wfData = await outputResponse.json();\n" +
" let wfOutputs = wfData?.data?.outputs || {};\n" +
"\n" +
" Object.keys(wfOutputs).forEach(key => {\n" +
" finalOptions.push({\n" +
" label: `${wfGrpName}.${stackName}.${wfName}.${key}.value`,\n" +
" value: `${wfGrpName}.${stackName}.${wfName}.${key}.value`\n" +
" });\n" +
" });\n" +
" } catch (e) {\n" +
" console.log(e);\n" +
" }\n" +
"}\n" +
"\n" +
"// Update jsonSchema and uiSchema\n" +
"let modifiedUISchema = { workflow_output: { 'ui:widget': 'select' } };\n" +
"let modifiedJsonSchema = { type: 'object', properties: {} };\n" +
"modifiedJsonSchema.properties['workflow_output'] = {\n" +
" type: 'string',\n" +
" title: 'Workflow Outputs',\n" +
" enum: finalOptions.map(item => item.value)\n" +
"};\n" +
"return { jsonSchema: modifiedJsonSchema, uiSchema: modifiedUISchema };"
}
}
}
```
JavaScript Code Example
The code dynamically fetches workflow outputs based on the context (org, workflow group, and stack) and populates a dropdown field in the form with those outputs.
```
// Base API URL
const baseUrl = 'https://testapi.qa.stackguardian.io';
// Extract params from sg_context
let orgName = sg_context?.viewContext?.org || 'demo-org';
let wfGrpName = sg_context?.viewContext?.wfgrp || 'tf-init-richard-test-cases';
let stackName = sg_context?.viewContext?.stack || '';
let stackId = stackName ? `/stacks/${stackName}` : '';
let token = sg_context?.token;
let finalOptions = [];
// API URL to fetch workflows
let apiUrl = `${baseUrl}/api/v1/orgs/${orgName}/wfgrps/${wfGrpName}${stackId}/wfs/listall/`;
const api_response = await fetch(apiUrl, {
headers: {
Authorization: `${token}`,
},
});
// Parse JSON response
let listallWfs = await api_response.json();
// Iterate over workflows to fetch outputs
for (let i = 0; i < listallWfs.msg.length; i++) {
try {
let item = listallWfs.msg[i];
let wfName = item.ResourceName;
let wfOutputUrl = `${baseUrl}/api/v1/orgs/${orgName}/wfgrps/${wfGrpName}${stackId}/wfs/${wfName}/outputs/`;
// Fetch output
let outputResponse = await fetch(wfOutputUrl, {
headers: {
Authorization: `${token}`,
},
});
let wfData = await outputResponse.json();
let wfOutputs = wfData?.data?.outputs || {};
// Populate dropdown options
Object.keys(wfOutputs).forEach((key) => {
finalOptions.push({
label: `${wfGrpName}.${stackName}.${wfName}.${key}.value`,
value: `${wfGrpName}.${stackName}.${wfName}.${key}.value`,
});
});
} catch (e) {
console.error(e);
}
}
// Update jsonSchema and uiSchema
let modifiedUISchema = { workflow_output: { 'ui:widget': 'select' } };
let modifiedJsonSchema = { type: 'object', properties: {} };
modifiedJsonSchema.properties['workflow_output'] = {
type: 'string',
title: 'Workflow Outputs',
enum: finalOptions.map((item) => item.value),
};
return { jsonSchema: modifiedJsonSchema, uiSchema: modifiedUISchema };
```
#### Context Inputs[](#context-inputs "Direct link to Context Inputs")
Context Inputs let you set example values for the context variables available in your JavaScript code. Use them to test and debug your code directly within the builder. The following context variables are available:
* **viewContext** — contextual identifiers for the current form:
* `org` — the organization name
* `wfgrp` — the workflow group name
* `stack` — the Stack name
* `wf` — the Workflow name
* `template` — the template name
* `templateType` — the template type
* `currentDeploymentPlatformConfig` — the selected cloud connector, used for testing your JavaScript only
* **user** — information about the current user: `Email` and `Role`
* **formSource** — the context in which the form is being rendered (for example, `Workflow Update`)
* **formData** — the current form data, expressed as a JSON object
### Custom Frontend Widget[](#custom-frontend-widget "Direct link to Custom Frontend Widget")
The CustomCodeFrontend widget enables dynamic and context-aware customization of form fields in real-time, allowing users to fetch, process, and populate form data dynamically. Unlike the CustomCode widget, where the JavaScript code is executed in a backend Lambda environment, this widget executes the JavaScript directly in the user's browser.
This is useful for scenarios where users need to dynamically adjust the form fields based on real-time data, such as fetching workflow outputs from the StackGuardian API.
note
The CustomCodeFrontend widget does not make use of Cloud Connectors (Azure, AWS, GCP) to fetch data from Cloud Providers. For these use cases, the CustomCodeWidget should be used.
**Key Features:**
1. **Dynamic Data Fetching**: Fetch data from APIs or other sources in real-time.
2. **Custom JavaScript Support**: Users can write custom JavaScript to handle data processing and form updates.
3. **Contextual Awareness**: Leverages variables like `sg_context` for details such as `org`, `wfgrp`, `stack`, and `wf`.
**How it works:**
Users provide custom JavaScript code in the `apiSchema.handler` configuration. This code is executed directly in the frontend (in the user's browser) to process data and dynamically update the `jsonSchema` and `uiSchema` of the form.
#### UI Schema Properties[](#ui-schema-properties-1 "Direct link to UI Schema Properties")
1. **API Schema** - The `apiSchema` key in the UI schema is used to define the logic required for dynamic behavior. It allows you to pass custom JavaScript code, specify when it should run, and provide cloud configuration to support it.
1. **handler** - JavaScript code to be executed based on the trigger. Typically used to fetch dynamic options or perform actions on selection.
2. **triggerType** - The `triggerType` key defines when the JavaScript code should be executed. It supports the following values:
* **onLoadItems** – Executes the JavaScript code when the options dropdown is opened. Applicable only to `select` and `multiselect` fieldTypes.
* **onSelection** – Executes the JavaScript code when an option is selected from the dropdown or after value has been passed in case of `string` fieldType.
2. **Field Type** – The `fieldType` key in the UI schema determines the type of input field to render. It supports the following values:
* **select** – Renders a single-select dropdown input. This is the default `fieldType` and is commonly used for selecting one item from a list.
* **multiselect** – Renders a multi-select dropdown input, allowing users to choose multiple options.
* **string** – Renders a basic text input field.
#### Accessible Variables in JS Code[](#accessible-variables-in-js-code-1 "Direct link to Accessible Variables in JS Code")
* **`fetch`** - The standard JavaScript Fetch API, used for making network requests.
* **`sg_context`** - Provides contextual information and user metadata.
* **`viewContext`** - Contains contextual identifiers related to the current form or view. Keys may include:
* `org`
* `wfgrp`
* `stack`
* `wf`
* `template`
* `templateType`
* **`user`** - Contains information about the current user, such as:
* `email`
* `role`
* **`token`** - The user's ID token (JWT). Can be used to authenticate API requests to StackGuardian’s backend or other secured endpoints.
* **`jsonSchema`** - This can be used to access current jsonSchema.
* **`uiSchema`** - This can be used to access current uiSchema.
* **`formData`** - Contains the current values of all form fields. Use this to read the value of other fields in the same form and create inter-field dependencies. Example: `sg_context.formData.myFieldName`
* **`formSource`** - Indicates the context in which the form is being rendered — i.e., whether the user is creating or updating a resource, and which type of resource. Use this to conditionally show fields, change options, or adjust defaults based on the operation. See [formSource example](#formsource-example). Possible values:
* `WORKFLOW_CREATE` – User is creating a new workflow
* `WORKFLOW_UPDATE` – User is updating an existing workflow
* `TEMPLATE_CREATE` – User is creating a new template
* `TEMPLATE_UPDATE` – User is updating an existing template
* `POLICY_UPDATE` – User is updating a policy
* **`triggerInfo`** - Use this to access information about the trigger of code execution. `triggerInfo` will always contain `triggerType` (`onSelection` or `onLoadItems`). `valueSelected` is only present when `triggerType` is `onSelection`, and indicates the value selected by the user. It will be absent (undefined) when `triggerType` is `onLoadItems`.
- Form GUI
- Form JSON Schema
- UI Schema
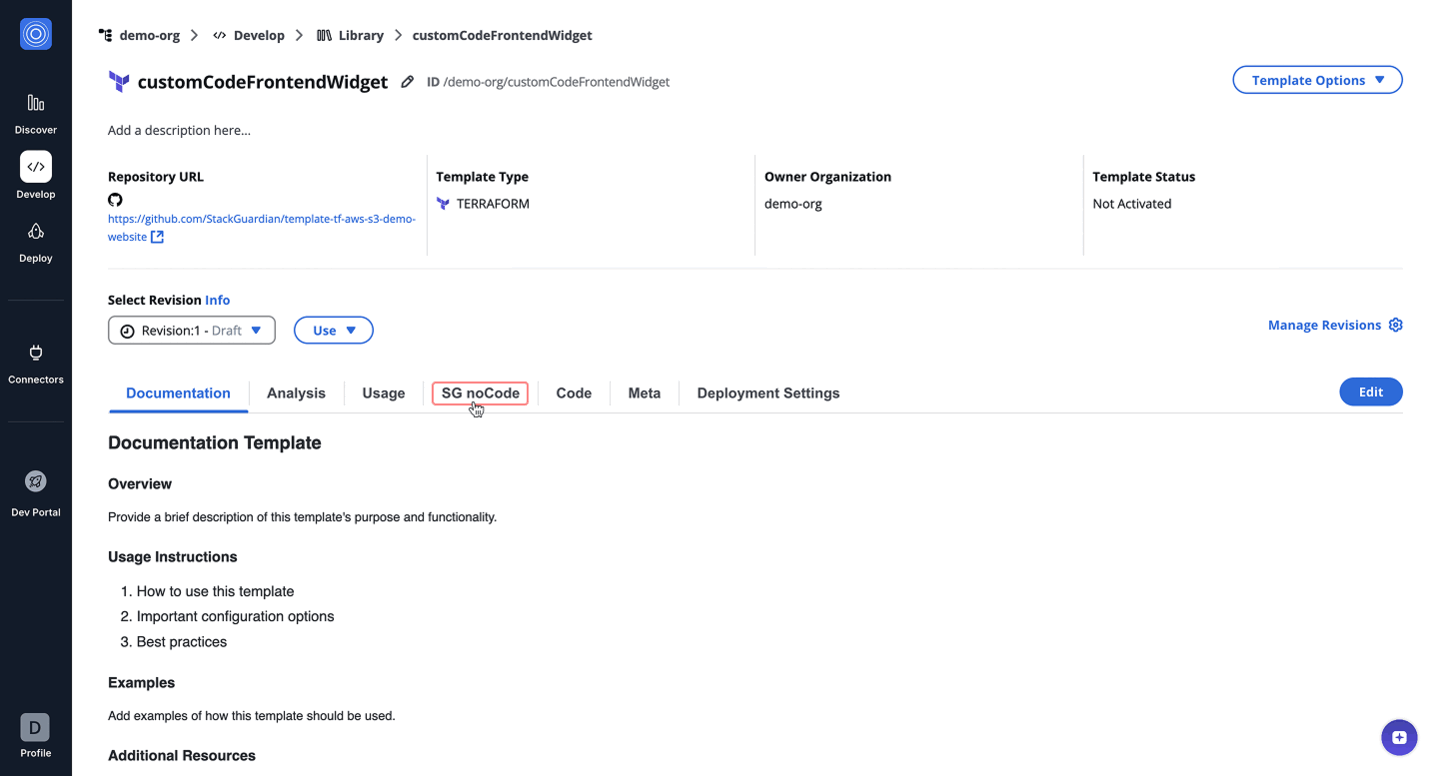
```
{
"$schema": "http://json-schema.org/schema#",
"type": "object",
"properties": {
"workflows": {
"type": "string",
"title": "Workflow List",
"description": "Select your workflow",
"enum": [
"CUSTOM-TEdH",
"CUSTOM-4sg7",
"test-26-May",
"CUSTOM-gitlab",
"CUSTOM-github",
"aws-s3-demo-website-0OH2-Copy",
"aws-s3-demo-website-0OH2"
]
},
"outputs": {
"title": "Workflow Outputs",
"type": "string"
}
}
}
```
```
{
"workflows": {
"ui:widget": "select"
},
"outputs": {
"ui:widget": "CustomCodeFrontendWidget",
"apiSchema": {
"triggerType": [
"onLoadItems"
],
"handler": "// Base API URL\nconst baseUrl = \"https://testapi.qa.stackguardian.io\";\n\n// Extract org and wfgrp from sg_context\nlet orgName = sg_context?.viewContext?.org || 'demo-org';\nlet wfGrpName = sg_context?.viewContext?.wfgrp || 'demo-wf-group-1';\n\n// Extract token from sg_context\nlet token = sg_context?.token;\n\nlet outputs_ = [{value:\"default\"}];\n\nconst outputsUrl = `${baseUrl}/api/v1/orgs/${orgName}/wfgrps/${wfGrpName}/wfs/${sg_context.formData.workflows}/outputs/`;\n\nconst outputsResponse = await fetch(outputsUrl, {\n headers: {\n Authorization: token\n }\n });\n\nconst outputsData = await outputsResponse.json();\nconst url = outputsData?.data?.outputs_signed_url || \"\";\n\nlet res;\nif(url){\n try{\n const res_ = await fetch(url);\n const outputsData = await res_.json();\n res = outputsData;\n }\n catch(err){\n res_={}\n }\n \n}\n\nconst keys = Object.keys(res||{});\nkeys?.forEach((op) => {\n outputs_.push({value : op})\n})\n\n// Define the modified JSON Schema\nlet modifiedJsonSchema = {\n ...sg_context.jsonSchema,\n properties: {\n ...sg_context.jsonSchema?.properties,\n outputs: {\n type: 'string',\n title: 'Choose Wf Outputs',\n description: 'Select wf otuputs',\n \"default\": sg_context.formData?.workflows,\n enum: outputs_?.length > 0 ? outputs_.map(item => item.value) : [] // Unique enum values\n }\n }\n};\n\n// Create UI Schema\nconst modifiedUISchema = {\n ...sg_context.uiSchema\n};\n\n\n\n// Return the schemas\nreturn {\n jsonSchema: modifiedJsonSchema,\n uiSchema: modifiedUISchema\n};"
}
}
}
```
JavaScript Code Example
The code dynamically fetches workflow outputs based on the selected workflow (read from `sg_context.formData.workflows`) and populates a dropdown with those output keys.
```
// Base API URL
const baseUrl = 'https://testapi.qa.stackguardian.io';
// Extract params from sg_context
let orgName = sg_context?.viewContext?.org || 'demo-org';
let wfGrpName = sg_context?.viewContext?.wfgrp || 'tf-init-richard-test-cases';
let stackName = sg_context?.viewContext?.stack || '';
let stackId = stackName ? `/stacks/${stackName}` : '';
let token = sg_context?.token;
let finalOptions = [];
// API URL to fetch workflows
let apiUrl = `${baseUrl}/api/v1/orgs/${orgName}/wfgrps/${wfGrpName}${stackId}/wfs/listall/`;
const api_response = await fetch(apiUrl, {
headers: {
Authorization: `${token}`,
},
});
// Parse JSON response
let listallWfs = await api_response.json();
// Iterate over workflows to fetch outputs
for (let i = 0; i < listallWfs.msg.length; i++) {
try {
let item = listallWfs.msg[i];
let wfName = item.ResourceName;
let wfOutputUrl = `${baseUrl}/api/v1/orgs/${orgName}/wfgrps/${wfGrpName}${stackId}/wfs/${wfName}/outputs/`;
// Fetch output
let outputResponse = await fetch(wfOutputUrl, {
headers: {
Authorization: `${token}`,
},
});
let wfData = await outputResponse.json();
let wfOutputs = wfData?.data?.outputs || {};
// Populate dropdown options
Object.keys(wfOutputs).forEach((key) => {
finalOptions.push({
label: `${wfGrpName}.${stackName}.${wfName}.${key}.value`,
value: `${wfGrpName}.${stackName}.${wfName}.${key}.value`,
});
});
} catch (e) {
console.error(e);
}
}
// Update jsonSchema and uiSchema
let modifiedUISchema = { workflow_output: { 'ui:widget': 'select' } };
let modifiedJsonSchema = { type: 'object', properties: {} };
modifiedJsonSchema.properties['workflow_output'] = {
type: 'string',
title: 'Workflow Outputs',
enum: finalOptions.map((item) => item.value),
};
return { jsonSchema: modifiedJsonSchema, uiSchema: modifiedUISchema };
```
#### formSource Example[](#formsource-example "Direct link to formSource Example")
The following example shows how to use `formSource` to offer different `environment` options depending on whether the user is creating or updating a workflow. On create, only safe environments are shown. On update, `production` becomes available and the current value is preserved as the default.
```
const isUpdate = sg_context.formSource === 'WORKFLOW_UPDATE';
const environmentOptions = isUpdate
? ['dev', 'staging', 'production'] // allow production only on update
: ['dev', 'staging']; // restrict to safe envs on create
return {
jsonSchema: {
...sg_context.jsonSchema,
properties: {
...sg_context.jsonSchema.properties,
environment: {
type: 'string',
title: 'Environment',
enum: environmentOptions,
default: isUpdate ? sg_context.formData?.environment : 'dev',
},
},
},
uiSchema: sg_context.uiSchema,
};
```
### Testing Custom Code widgets[](#testing-custom-code-widgets "Direct link to Testing Custom Code widgets")
The Custom Code Widget and Frontend Widget include several tools for testing your JavaScript code directly within the builder.
**Trigger** defines when the JavaScript code is executed. The following options are available:
* on Dropdown Opened — executes the code when the options dropdown is opened
* on Selection — executes the code when an option is selected
The **Console** displays `console.log` outputs and errors produced when your code runs. Select **Run** to execute the code and **Clear** to reset the console output.
The **Javascript Templates** button provides a set of predefined code templates to use as a starting point.
**Preview** renders a live preview of the widget output, letting you validate the result before saving.
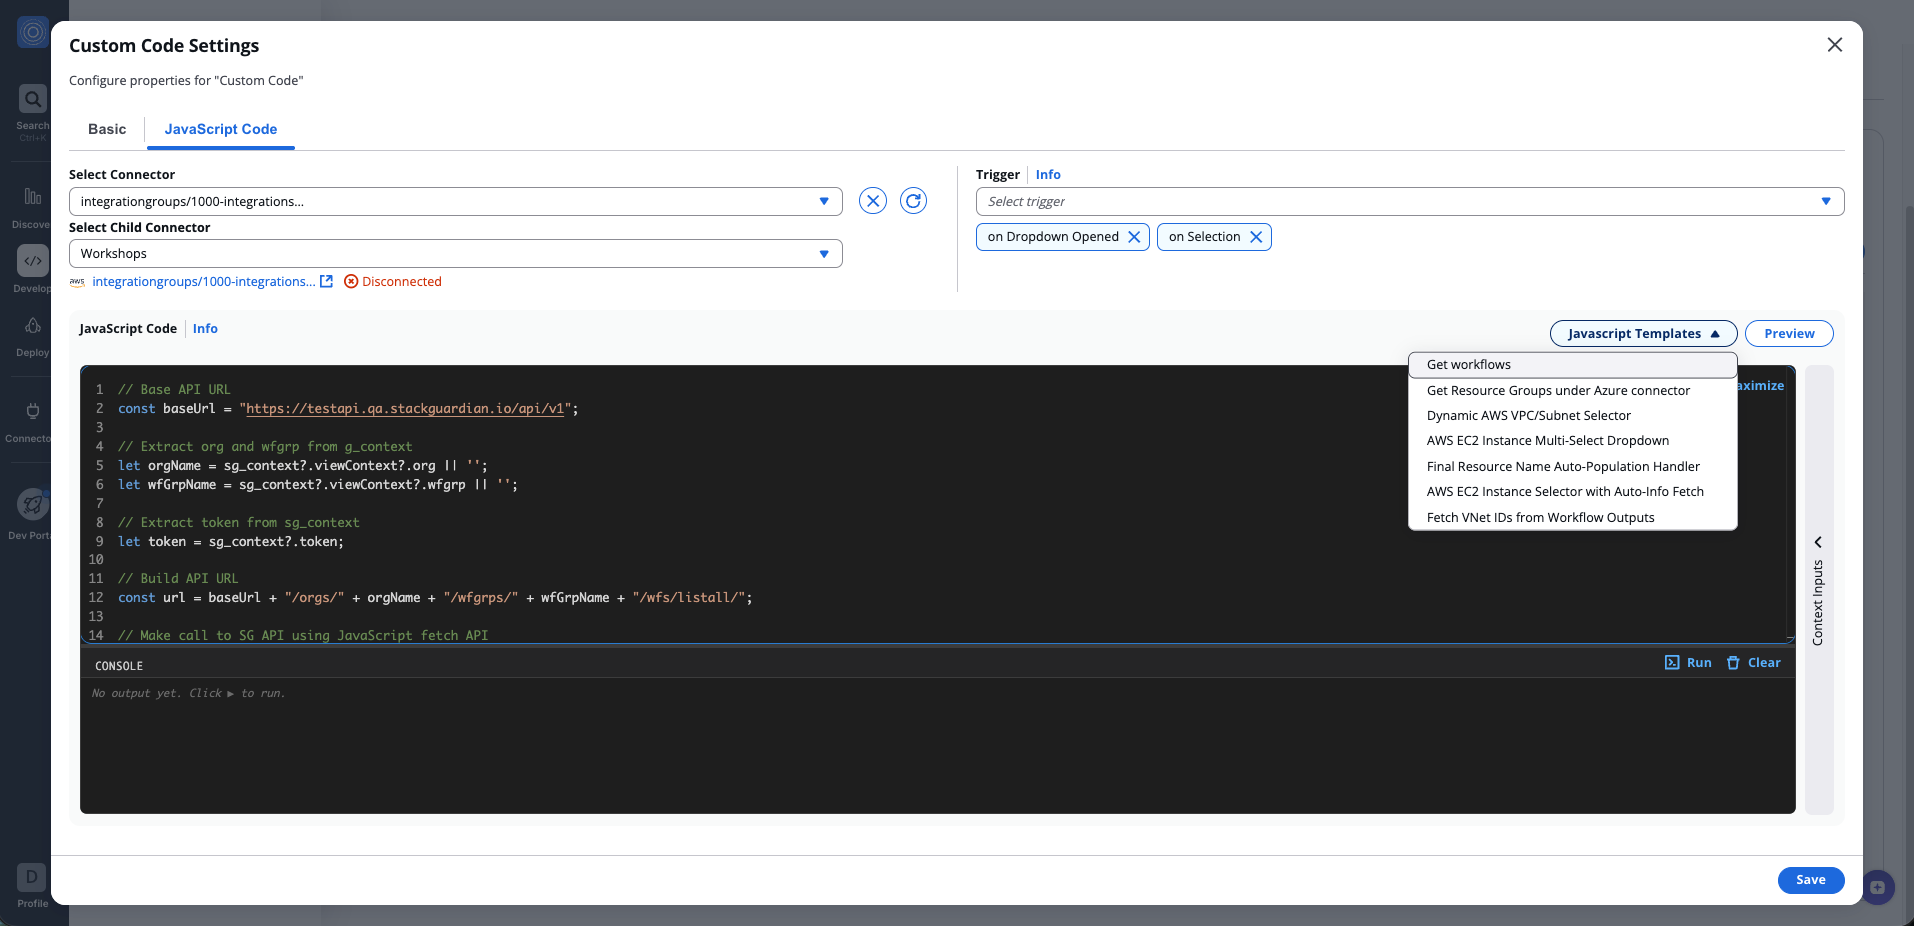
*Testing Custom Code widgets*
## Field Configuration[](#field-configuration "Direct link to Field Configuration")
Each field can be configured through the **Field Settings modal**, accessed via the settings icon on the field card.
The configuration modal allows editing the field's behavior and appearance.
Available settings vary based on field type and may include:
* Label
* Placeholder
* Help Text
* Required state
* Disabled state
* Conditional Logic
Selecting **Save** applies the changes to both:
* the visual field
* the underlying schema
Closing the modal without saving discards the changes.
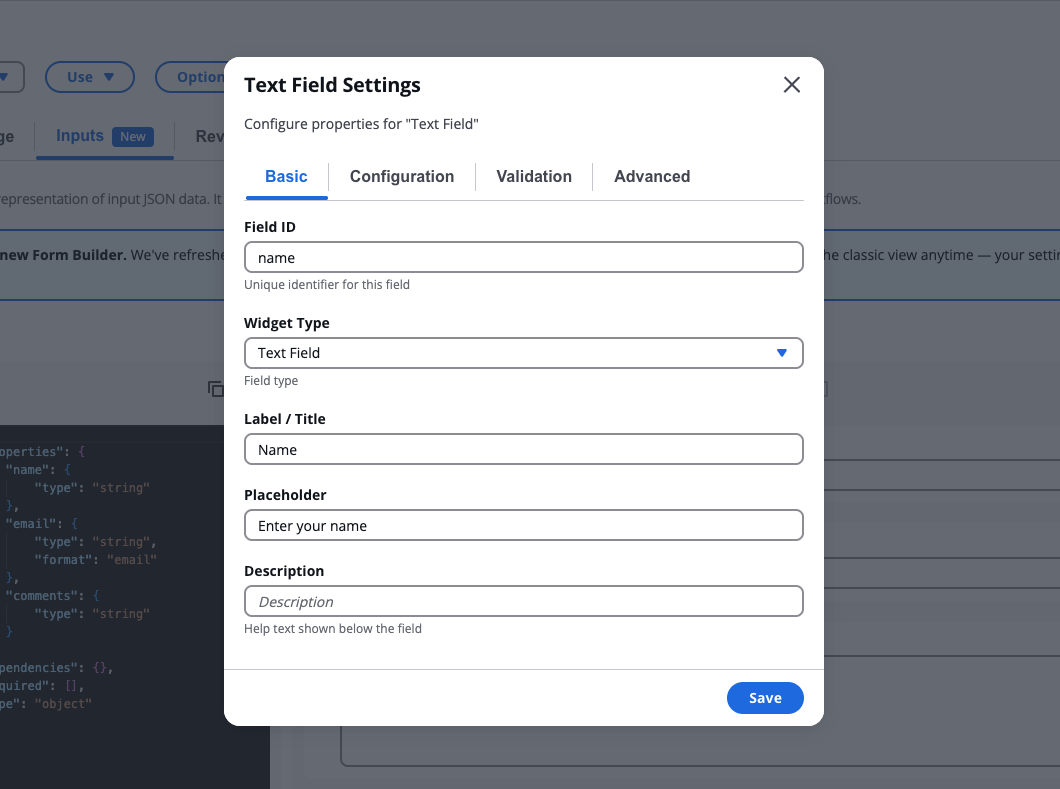
*Field Configuration*
### Advanced Mode[](#advanced-mode "Direct link to Advanced Mode")
Advanced Mode allows direct editing of the form configuration using:
* JSON Schema
* UI Schema
This mode is intended for advanced users who need to configure behaviors not supported by the visual editor.
Advanced Mode can be used to:
* Modify unsupported fields
* Define custom validation rules
* Adjust UI rendering behavior
* Implement advanced schema structures
Changes made in Advanced Mode are applied when the form is saved.
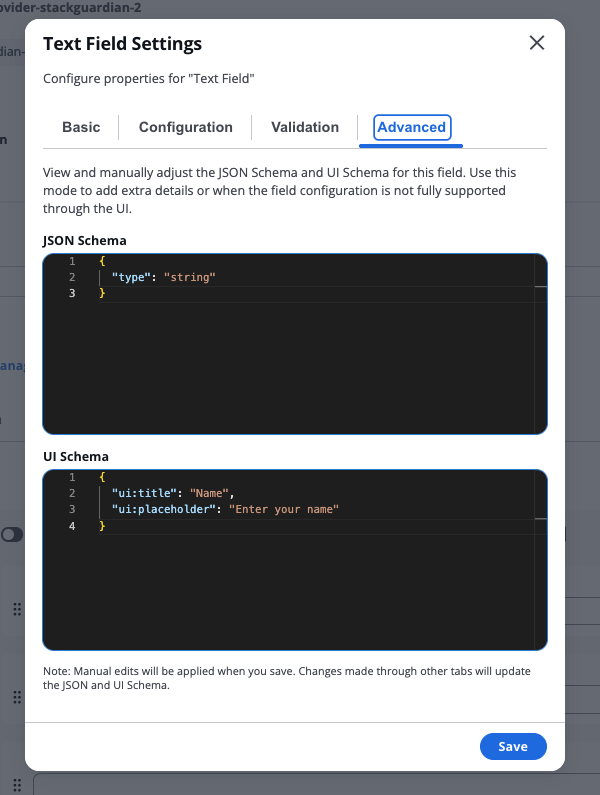
*Advanced Mode*
## Test Mode[](#test-mode "Direct link to Test Mode")
**Test Mode** allows users to interact with the form and validate its behavior before deployment. When Test Mode is activated:
* The **Fields Palette** is replaced with a **Form Data panel**
* Users can enter values into the form
* Conditional logic is evaluated in real time
Test Mode allows users to:
* Validate field behavior
* Inspect output values
* Verify conditional logic
* Test custom widgets
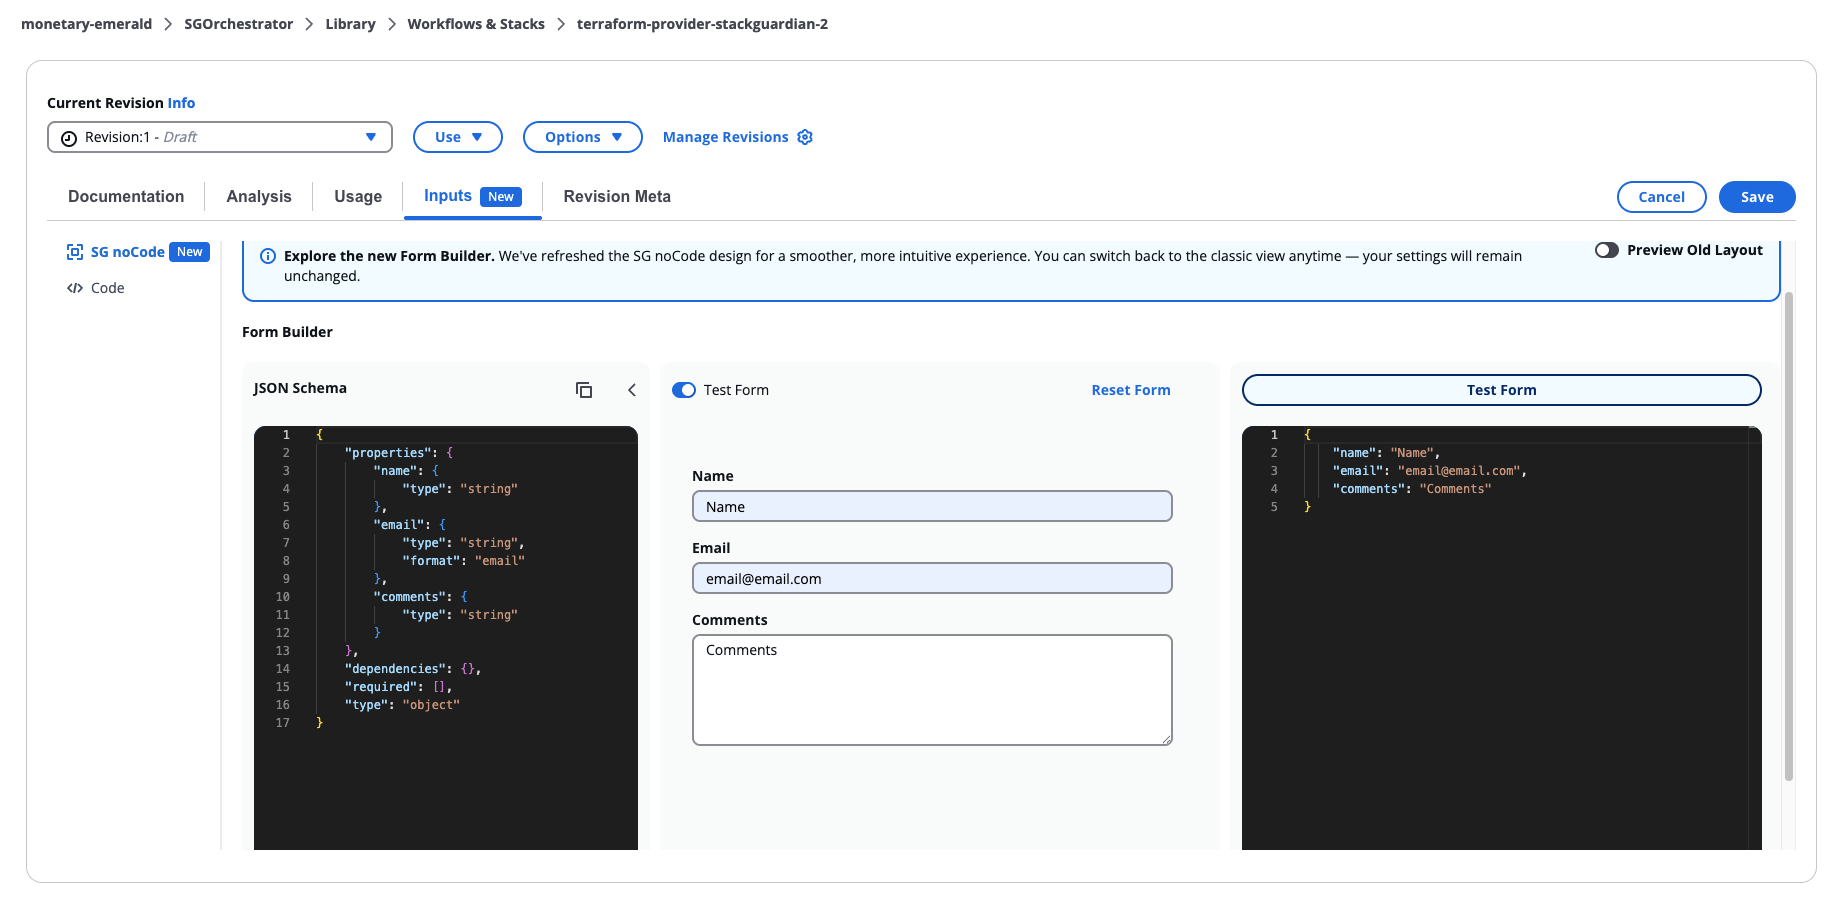
*Test Mode*
## Generate schema[](#generate-schema "Direct link to Generate schema")
The Form Builder can automatically generate a form schema using the **Generate schema** menu, accessible from the toolbar.
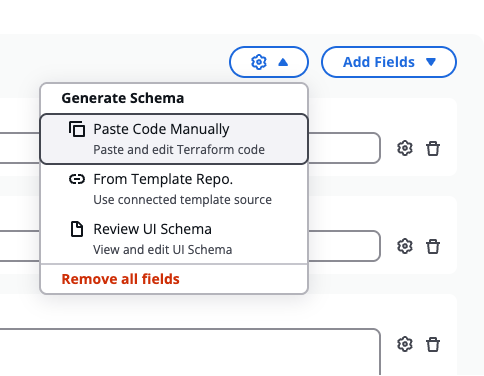
*Generate schema*
### Paste code manually[](#paste-code-manually "Direct link to Paste code manually")
Paste and edit Terraform code directly into the builder. If the code contains valid variable definitions, the builder generates form fields automatically.

*Paste code manually*
### From template repository[](#from-template-repository "Direct link to From template repository")
Generates a form schema based on the connected template repository. During generation, the system clones the repository, scans Terraform files, extracts variable definitions, and converts them into form fields.
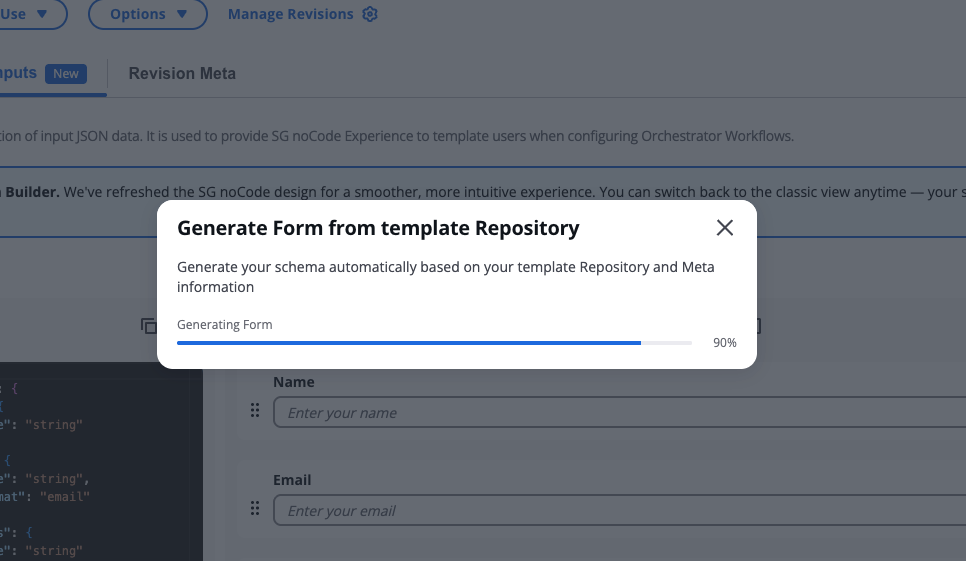
*From template repository*
#### Freeform field[](#freeform-field "Direct link to Freeform field")
Some field configurations cannot be fully supported by the visual editor. This can occur when generating a schema or when manually editing the JSON schema directly.
In the form, freeform fields are marked with a **Freeform Field** badge and display the following message: "This field must be edited manually in Advanced Mode using the JSON and UI Schema." To edit them, open the field settings and select the **Advanced** tab, where you can modify the JSON Schema and UI Schema directly.
#### Terraform parsing limitations[](#terraform-parsing-limitations "Direct link to Terraform parsing limitations")
The Terraform parser supports most standard variable definitions. However, some Terraform constructs may not be supported. Examples include:
* Complex validation expressions
* Advanced Terraform functions
* Dynamically generated variables
If unsupported syntax is detected, the generation process may fail.
Users may resolve this by simplifying the Terraform configuration or manually editing the schema.
### Review UI schema[](#review-ui-schema "Direct link to Review UI schema")
Opens the JSON Schema and UI Schema editors, allowing you to view and edit the underlying schema directly. This is the same editor used when modifying unsupported fields in Advanced Mode.
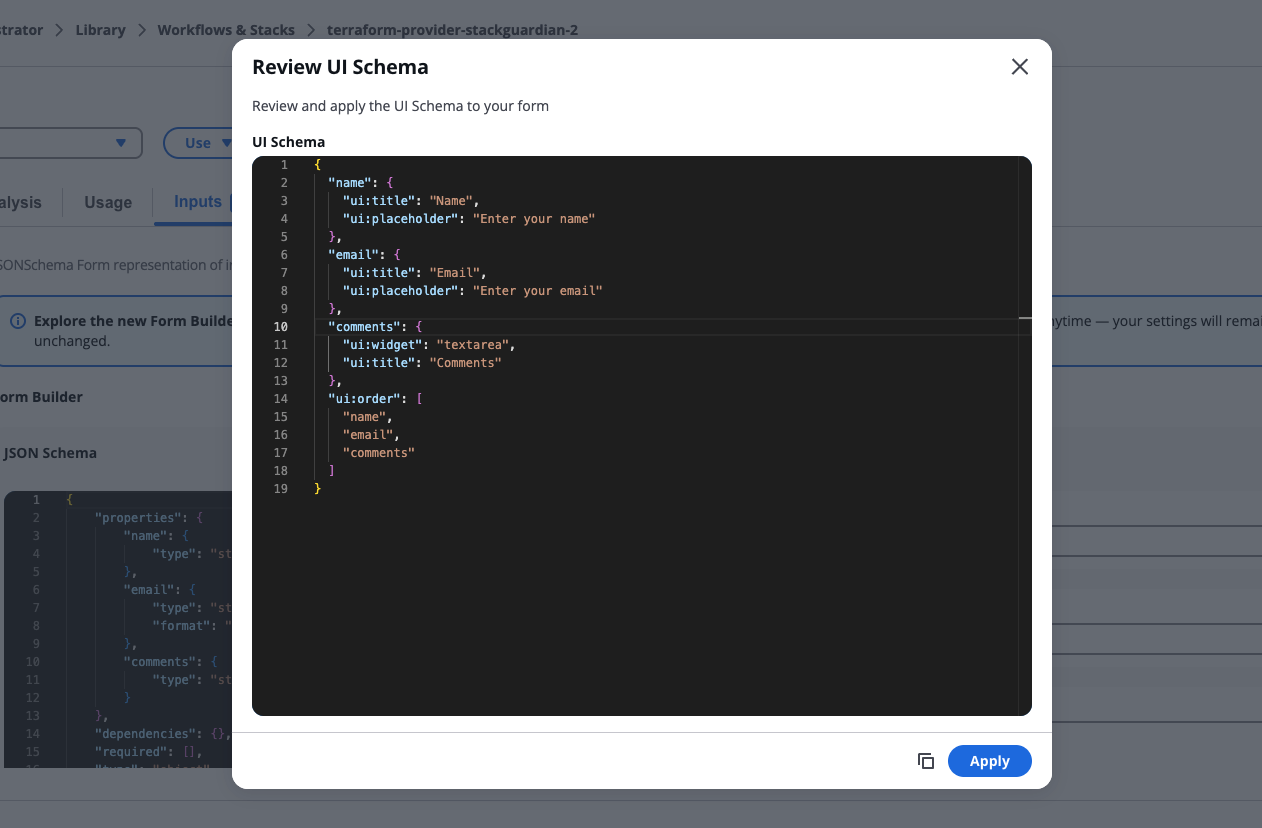
*Review UI Schema*
## Form settings & conditions[](#form-settings--conditions "Direct link to Form settings & conditions")
**Form settings & conditions** let you manage your form's basic information and configure conditional rules. To open **Form settings & conditions**, select **Form settings** from the toolbar.
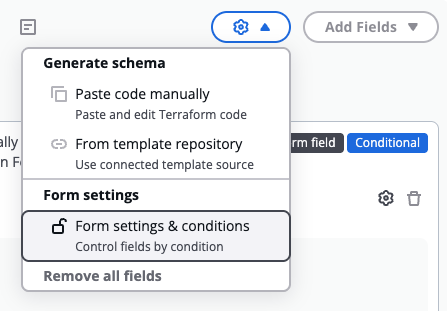
*Form settings & conditions*
The modal has three tabs: **Basic**, **Conditions**, and **Advanced**.
### Basic[](#basic "Direct link to Basic")
The **Basic** tab contains general form-level settings:
* **Form title** — the display title for the form
* **Form description** — help text shown below the form title
### Conditions[](#conditions "Direct link to Conditions")
The **Conditions** tab lets you define rules that control how the form reacts to user input. Each rule follows the shape: if a field meets a condition, then run a list of actions — and optionally an else list of actions if the condition is not met.
Rules are evaluated independently, meaning multiple rules can be active at the same time. Any field referenced by a rule shows a blue **Conditional** badge on its card in the form builder.
Each rule contains an **If** row (trigger field, operator, and value), a **Then** branch (one or more actions), and an optional Else branch enabled via **Add Else branch**. A single action can target multiple fields at once.
Available operators depend on the trigger field's type. Available actions depend on the target field's type.
Rules built through the visual editor are fully editable. Rules written directly in the JSON schema that use structures the editor doesn't support appear as read-only cards, where you can view the raw JSON and switch to the **Advanced** tab to edit them.
When saving, the builder validates all rules. If anything is missing or a referenced field no longer exists, saving is blocked and the offending input is highlighted in red.
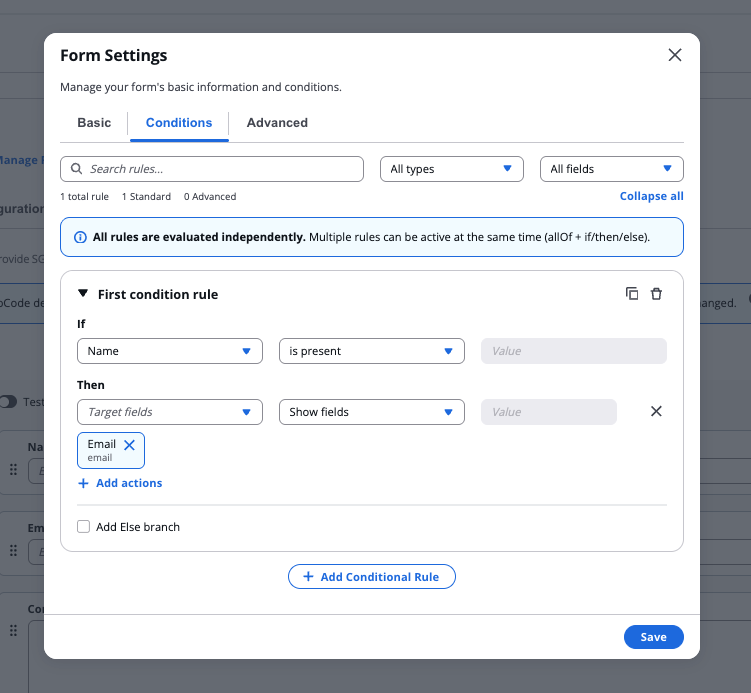
*Conditions tab*
### Advanced[](#advanced "Direct link to Advanced")
The Advanced tab provides direct access to the JSON Schema and UI Schema for the form. Use this mode to add extra details or when the form configuration is not fully supported through the visual editor.
Changes made in other tabs update the JSON and UI Schema automatically. Manual edits apply when you save.
## Error Handling[](#error-handling "Direct link to Error Handling")
During schema generation or import, several types of errors may occur. Common errors include:
**Repository Configuration Errors**
* Invalid repository URL
* Missing repository access permissions
* Authentication failures
**Repository Retrieval Errors**
* Failed to retrieve Git credentials
* Failed to clone repository
* Network access issues
**Terraform Parsing Errors**
* No `.tf` files found
* Empty Terraform files
* No `variable` blocks detected
* Unsupported Terraform expressions
**Schema Validation Errors**
* Invalid JSON syntax
* Unsupported schema structure
* Missing required schema fields
When errors occur, descriptive messages are displayed to help users resolve the issue.
---
# Library
## Overview[](#overview "Direct link to Overview")
The **Library** provides a central hub for managing Infrastructure as Code (IAC) resources. It supports seamless creation and governance of templates, groups, and policies for streamlined cloud automation and compliance. It facilitates teamwork through features like access control, template sharing, and publishing. It ensures secure and efficient collaboration on cloud infrastructure projects.
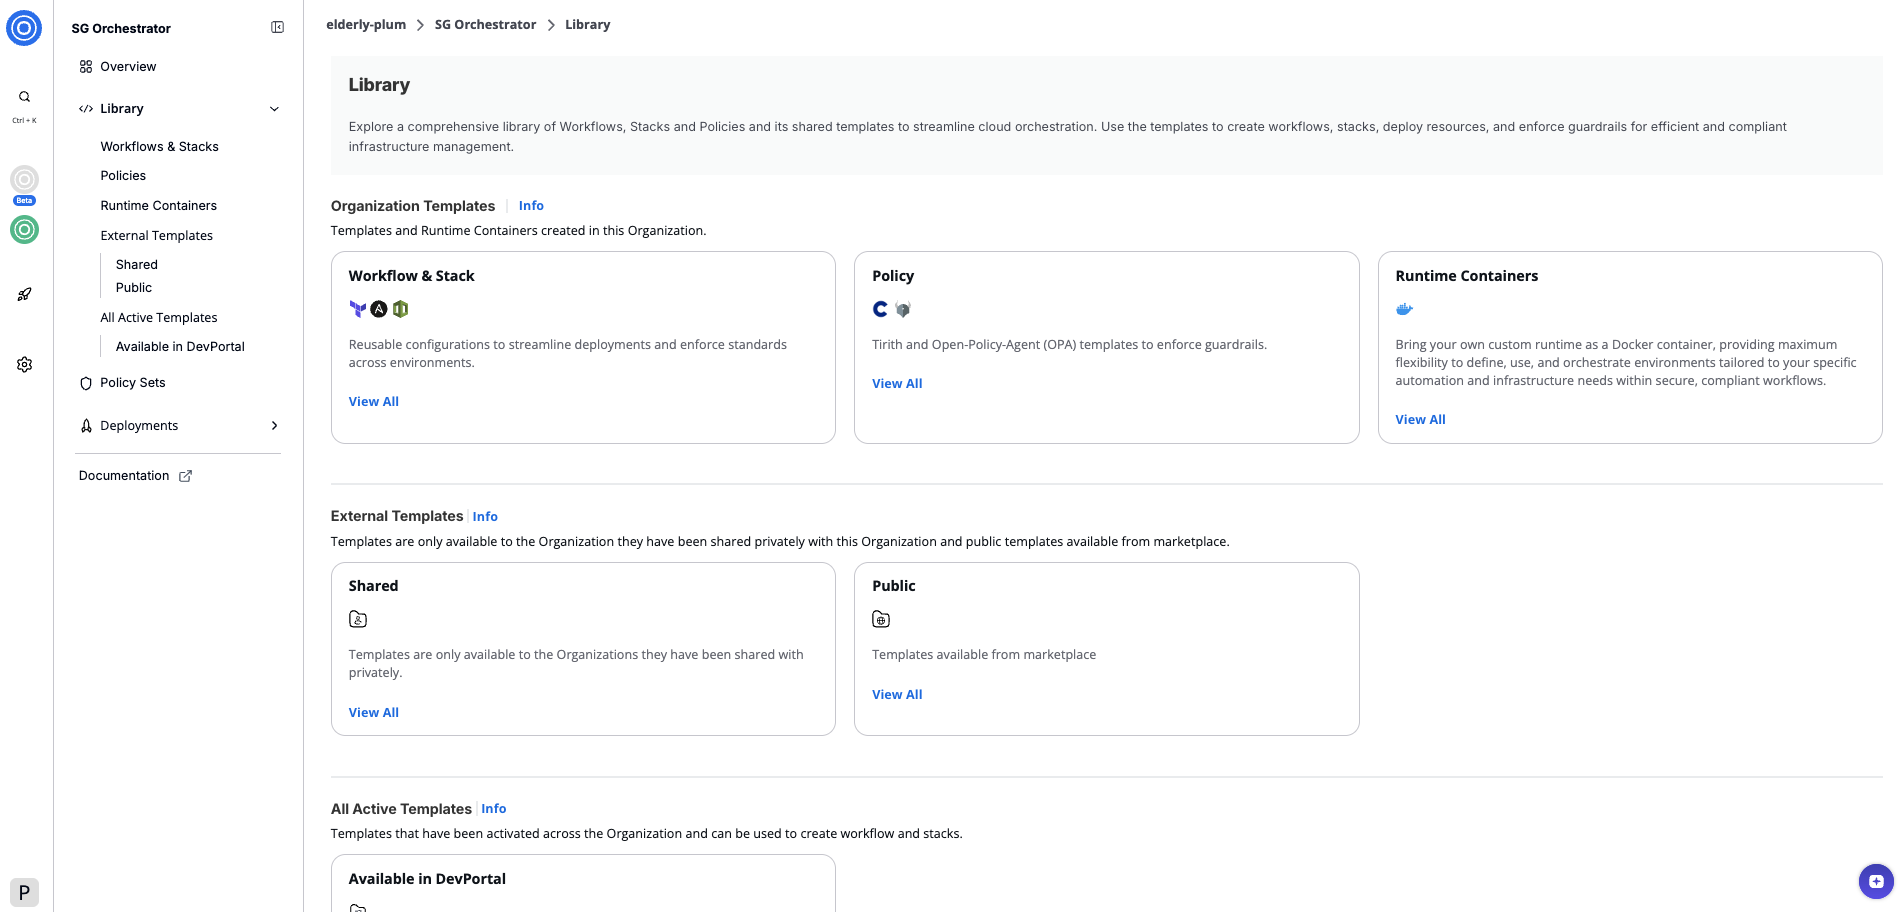
*Library Overview*
## Workflows & Stacks Templates[](#workflows--stacks-templates "Direct link to Workflows & Stacks Templates")
[**Workflow Templates**](/docs/develop/library/iac_stack_templates/#iac-template) are automated blueprints for provisioning cloud infrastructure. They support rapid deployment with features like version control, JSON-based configurations, and customizable settings for infrastructure components.
[**Stack Templates**](/docs/develop/library/iac_stack_templates/#stack-template) combine multiple templates into cohesive workflows, simplifying the management of complex infrastructure setups. They enable efficient deployment of multi-tier applications and support template customization and revision management.
## Policies Templates[](#policies-templates "Direct link to Policies Templates")
[**Policies Templates**](/docs/develop/library/iac_policies/) enforce compliance and governance by defining rules for infrastructure configurations. These policies ensure adherence to organizational standards and best practices for cloud security, cost, and operations.
## Runtime Containers[](#runtime-containers "Direct link to Runtime Containers")
[**Runtime Containers**](/docs/develop/library/workflow_step/) enable the integration of personalized automation within workflows, providing flexibility and efficiency in cloud infrastructure management and automation.
## External Templates[](#external-templates "Direct link to External Templates")
External Templates are templates not owned by the organization but made available for use. They may be shared publicly or privately with the organization, enabling users to leverage pre-existing configurations for infrastructure setup, governance policies, and runtime management.
### Shared Templates[](#shared-templates "Direct link to Shared Templates")
External Templates refer to templates that are not originally created or owned by the current organization but are shared with current organization to use or made public for general use.
### Public Templates[](#public-templates "Direct link to Public Templates")
Public Templates refer to templates that are made available through a centralized template marketplace or catalog.
## All Active Templates[](#all-active-templates "Direct link to All Active Templates")
Active Templates are templates currently in use within the organization. These can include both organizational and external templates that have been activated for use across the organization's workflows, stacks
### Manage Template Revision[](#manage-template-revision "Direct link to Manage Template Revision")
The [**Manage Template Revision**](/docs/develop/library/manage_template_revisions/) guides through creating, modifying, publishing, and programmatically deploying template versions. This enables auditability, collaboration, and automation across IAC resources in StackGuardian.
### NoCode Template Builder[](#nocode-template-builder "Direct link to NoCode Template Builder")
The [**NoCode Template Builder**](/docs/develop/library/nocode_template_builder/) provides a visual interface for creating templates without extensive coding. It leverages JSON Schema-based forms and custom UI widgets, enabling users to design workflows and infrastructure with ease.
---
# Runtime containers
## Overview[](#overview "Direct link to Overview")
**Runtime containers** define the core runtime of any workflow executed on the StackGuardian platform. These runtime containers enable users to modularize and automate complex cloud infrastructure tasks while ensuring consistency, versioning, and extensibility.
Each runtime container is a Docker image stored in a container registry and is pulled by the StackGuardian workflow engine during execution. Runtime containers facilitate data flow between different components, enabling seamless integration of multiple tools and technologies. They can be templated for repeated use, similar to workflow and policy templates, and leverage StackGuardian’s no-code support to provide an intuitive user experience for configuring inputs.

## Key features[](#key-features "Direct link to Key features")
* **Templating & Reusability:** Runtime Containers can be created as reusable templates with version control, ensuring consistency across different workflows.
* **No-Code Integration:** Inputs can be accepted through a user-friendly form, making workflow execution accessible to users without deep technical knowledge.
* **Flexible Execution:** Runtime Containers run in isolated Docker containers, with required data mounted as volumes and exposed as environment variables.
* **Seamless Integration:** Runtime Containers can reference outputs from other steps or external tools, enabling dynamic workflows that interconnect different technologies.
* **Approval Mechanism:** Steps can trigger user approvals based on configured rules, enhancing governance and security.
* **Customizable Containers:** Any Linux-based Docker container can be used as a runtime container, allowing migration of existing CI/CD pipelines into StackGuardian.
## How runtime containers work[](#how-runtime-containers-work "Direct link to How runtime containers work")
1. **Execution environment:**
* Runtime Containers are defined as Docker images stored in a container registry.
* The StackGuardian workflow engine pulls the required image and creates a container when a workflow runs.
* Various data inputs are mounted as volumes or passed as environment variables, including source code, authentication context, and user-defined variables.
2. **Interfacing with Inputs & Outputs:**
* Inputs are accepted through standard interfaces like mounted files and environment variables.
* Outputs (artifacts) can be stored and referenced across workflows and stacks.
* This allows seamless chaining of steps, such as deploying infrastructure and using its outputs to configure subsequent deployments.
3. **Execution flow:**
* Multiple runtime containers can exist within a single workflow, executing sequentially.
* Runtime Containers exit codes play a crucial role in determining the subsequent actions within a workflow. These codes enable seamless integration with policies, ensuring robust decision-making. Supported exit codes include:
* **0**: Represents successful execution of the runtime container.
* **1**: Indicates an error or failure occurred during the execution of the runtime container.
* **11**: Specifies that user approval is required before proceeding to the next step in the workflow. This is particularly useful when approval needs to be conditionally triggered based on the context available during the runtime container execution. Alternatively, if approval is always required before a step's execution, you can configure the workflow to request approval beforehand by enabling the "Approval Required" option in the runtime container settings.
* Approvals can be required at specific steps before proceeding.
## Example use cases[](#example-use-cases "Direct link to Example use cases")
To help understand how runtime containers function in real-world scenarios, here are some examples:
Security Scanning with Wiz/Orca/Snyk
* A runtime container generates a Terraform plan.
* The next step calls Wiz/Orca/Snyk to scan the plan for security vulnerabilities.
* Based on the scan results, the workflow either proceeds with applying changes, requests manual approval, or stops the deployment.
No-Code Terraform Backend Configuration
* A runtime container uses StackGuardian's no-code form to accept Terraform backend configurations from a user.
* The step injects these configurations into the Terraform code before execution.
Infrastructure as Code Deployments
* A runtime container handles Azure Bicep or AWS CloudFormation deployments.
* These steps can be chained to create cloud infrastructure across multiple environments.
Service Management Integration
* A runtime container calls Jira or ServiceNow APIs to create or update CMDB records.
* This ensures cloud infrastructure changes are automatically reflected in ITSM systems.
Kubernetes Management with Helm
* A Helm runtime container manages Kubernetes deployments.
* It can take output from a previous Terraform runtime container that created an EKS cluster and use it to deploy applications.
Triggering External Workflows
A runtime container triggers a GitHub Actions workflow to perform additional CI/CD tasks outside StackGuardian.
Trigger Notifications
A runtime container is used to send out notifications to collaboration tools (like MS teams and Slack) or via email (SMTP). It can take output from previous runtime containers to enrich the information shared.
## Revisions tab[](#revisions-tab "Direct link to Revisions tab")
When viewing the Revisions tab, you can access the following tabs:
### Documentation[](#documentation "Direct link to Documentation")
View and edit the template's documentation, including an overview section that explains the template's purpose and functionality.
### Usage[](#usage "Direct link to Usage")
Shows workflows that use this template for quick reference. Search by workflow name to find specific implementations.
### Inputs[](#inputs "Direct link to Inputs")
Configure how users interact with your template when creating workflows.
* **SG noCode:** Design a form-based interface using the form builder. Users can configure workflow inputs through a visual form without writing code. Toggle "Preview Old Layout" to switch between the new and classic form builder views.
* **Code:** View and edit the JSONSchema form representation of input JSON data. This provides the underlying structure for the SG noCode form builder.
## Template meta tab[](#template-meta-tab "Direct link to Template meta tab")
Overview of template details, including:
* Contributor information
* Creation date
* Docker image configuration
* Private registry settings
* Template tags for organization
* Context tags (key-value pairs)
## Writing a Docker image for your runtime containers[](#writing-a-docker-image-for-your-runtime-containers "Direct link to Writing a Docker image for your runtime containers")
Before creating a runtime containers template on the StackGuardian platform, you need to create your own Docker image with the desired runtime inside it. You can use the example repository provided by StackGuardian as a template to get started: [StackGuardian Runtime containers template](https://github.com/StackGuardian/sg-wf-step-template).
Ensure your Docker image includes all necessary dependencies and scripts required for your runtime container, and be pushed to a container registry for use in your runtime container template configuration documented below.
## Runtime containers execution[](#runtime-containers-execution "Direct link to Runtime containers execution")
During execution, StackGuardian introduces environment variables and mounts data volumes which contain any code fetched from your repository. These environment variables and mounted volumes provide the necessary context and inputs for the runtime container to execute correctly.
### Environment variables[](#environment-variables "Direct link to Environment variables")
StackGuardian injects any user-provided environment variables and cloud authentication context using Deployment Platform Configuration and other environment variables such as:
* `SG_MOUNTED_IAC_SOURCE_CODE_DIR`: Directory where source code is mounted from a Version Control System.
* `BASE64_WORKFLOW_STEP_INPUT_VARIABLES`: Base64-encoded runtime container parameters provided in the **Runtime containers tab** of the **Workflow settings**.
* `SG_MOUNTED_ARTIFACTS_DIR`: Directory for storing workflow artifacts/outputs, persisted across runs.
* `BASE64_IAC_INPUT_VARIABLES`: Base64-encoded infrastructure variables provided in the Source and Parameters tab of the **Workflow settings**.
For a complete list, refer to [StackGuardian environment variables](https://docs.stackguardian.io/docs/deploy/workflows/workflow_components/deployment_environment/#stackguardian-environment-variables).
### Workflow input data[](#workflow-input-data "Direct link to Workflow input data")
To customize the behavior of a runtime container, configuration data is encoded in Base64 and stored in the environment variable **`BASE64_WORKFLOW_STEP_INPUT_VARIABLES`**. Decode it within your Docker container using the following shell command:
```
workflowStepInputParams=$(echo "${BASE64_WORKFLOW_STEP_INPUT_VARIABLES}" | base64 -d -i)
```
Decode the Base64 string in **`BASE64_WORKFLOW_STEP_INPUT_VARIABLES`** to access JSON in **`workflowStepInputParams`**. Use this for your workflow logic.
note
Ensure your Docker environment supports Base64 decoding and JSON parsing.
## Persist data between runtime containers and workflows[](#persist-data-between-runtime-containers-and-workflows "Direct link to Persist data between runtime containers and workflows")
The structure and purpose of different directories involved when your workflow is run is outlined below. Only artifact dir content are persisted across workflow run, all other contents of the workspace root directory are cleaned after and before starting a new workflow run.
1. **StackGuardian Workspace Root Directory:**
* *Path*: `/mnt/sg_workspace`
* The root directory serves as the base directory for workflow files, like the code fetched from your git repo, generated artifact in the runtime (e.g. terraform plans, state files etc.).
2. **User Directory:**
* *Path*: `/mnt/sg_workspace/user/{repository-name}`
* The user directory contains the version control system (VCS) repository of the user, named after the repository's name. This directory includes all the files from the user's repository.
* Since we create a new container for each runtime container, you can mount this directory across runtime containers to use the facts generated in one step inside another.
3. **Artifacts Directory:**
* *Path*: `/mnt/sg_workspace/artifacts`
* The artifacts directory is the location where all artifacts generated by the runtime containers are stored. The contents of this directory are persisted between workflow runs. For example, Terraform workflows use this artifacts directory to persist state files between workflow runs.
* Placing a file named `sg.outputs.json` at the following path `/mnt/sg_workspace/artifacts` will allow you to see its JSON content in the Outputs tab of that workflow. This also makes the JSON available to be referenced across workflows.
* The outputs can be any valid JSON and are referenceable in other workflows using the workflow output referencing string or provided through the Workflow Outputs API.
* [Referencing Outputs In Other Workflows](/docs/deploy/workflows/workflow_components/outputs/)
* [Workflow Outputs API Documentation](/api/#tag/Workflows/operation/Workflows%20Outputs)
* [Stack Workflow Outputs API Documentation](/api/#tag/Stack-Workflows/operation/Stack%20Workflow%20Outputs)
> **`cmdOverrides`**: Use Command Overrides to specify custom instructions that will execute when the user job begins, overriding the default commands of the Docker image in the runtime container. The syntax can be a simple string or an array format, like `"executable parameter1 parameter2"` or `["executable", "parameter1", "parameter2"]`.
## Create a runtime container template[](#create-a-runtime-container-template "Direct link to Create a runtime container template")
Follow the instructions below to create your template.
1. Select the Template Type:
* In **Library** > **Runtime Containers**, click **Create Template**.
* Choose "**Runtime Containers (Preview)**" for creating a runtime container template.
2. Fill in the Input Template Details:
* **Template Name**: Provide a unique name for the template (e.g., `Customer-Workflow-Setup`).
* **Template ID**: Auto-generated from the Template Name. You can customize it using only letters, numbers, underscores (\_), or dashes (-). This cannot be changed after creation.
* **Owner Org**: Specify the owning organization (e.g., `demo-org`).
* **Description and Template**: You have the option to include these.
3. Configure Runtime Containers
* **Source Config Kind**: Select the kind of source configuration (e.g., `DOCKER_IMAGE`).
* **Source Destination Kind**: Choose the destination type (e.g., `CONTAINER_REGISTRY`).
4. Docker Image Configuration
* **Docker Image**: Enter the URI of the Docker image.
* **Private Registry**: Specify if the Docker registry is private.
* **Docker Image Username**: Provide the Docker registry username.
* **Authentication Method**: Choose a method for private registry authentication, like `/secrets/some-vault-secret`.
5. Template Inputs
* Specify template inputs using either a **FORM** or **JSON** format.
* For a *No-Code* approach, implement inputs with a **Form JSON Schema**.
* *Example* This schema specifies inputs for running Terraform, including configuration and variables file paths.
```
{
{
"type": "object",
"required": ["configPath", "variableFile"],
"properties": {
"configPath": {
"type": "string",
"title": "Terraform Config Path",
"default": "main.tf",
"description": "Path to the Terraform configuration file."
},
"variableFile": {
"type": "string",
"title": "Terraform Variables File",
"default": "terraform.tfvars",
"description": "Path to the Terraform variables file."
},
"terraformOptions": {
"type": "string",
"title": "Terraform Options",
"description": "Additional options for Terraform command."
}
}
}
}
```
* After configuring the inputs, click **Create** to save the template.
* Subscribe to use the runtime container template in your organization.
note
After the template has been created, the user must **Subscribe** to it before they can begin utilizing it.
### Create and manage template revisions[](#create-and-manage-template-revisions "Direct link to Create and manage template revisions")
All template types in StackGuardian support versioned revisions for controlled deployment and collaboration. You can select, clone, publish, deprecate versions and more. Visit the [Manage Template Revision](/docs/develop/library/manage_template_revisions/) guide.
---
# Overview
## Develop[](#develop "Direct link to Develop")
StackGuardian offers a streamlined environment where developers can orchestrate *infrastructure as code* (IaC) templates and *define policies*. This section includes a **library** or marketplace filled with Workflow Templates and Stack Templates appropriate for organizational needs, alongside **policies**, their types, and a no-code builder for quick policy creation.
It is tailored to help new users grasp the essential components of cloud infrastructure management within StackGuardian, emphasizing the integration and functionality of Templates, Groups, Workflows, and Stacks.
### Workflow Groups, Workflows, and Stacks[](#workflow-groups-workflows-and-stacks "Direct link to Workflow Groups, Workflows, and Stacks")
**Workflow Groups** allow for the organization of multiple workflows and stacks, which can be crucial for managing complex infrastructures involving numerous resources and dependencies.
**Workflows** are automated sequences that deploy and manage infrastructure using Workflow Templates. They define the necessary steps to provision, update, or decommission infrastructure components efficiently.
A **Stack** is a collection of resources that are managed and provisioned together based on the defined workflows. Stacks help in maintaining consistency, repeatability, and scalability in infrastructure deployment.
### Workflow Templates and Stack Templates[](#workflow-templates-and-stack-templates "Direct link to Workflow Templates and Stack Templates")
**Workflow Templates** are fundamental building blocks in StackGuardian, enabling developers to define and manage cloud infrastructure programmatically. These templates can be grouped into **Stack Templates**, which organize multiple templates into a cohesive unit, enhancing manageability and reusability.
Deploying an individual *Workflow Template* triggers a workflow within the development environment, effectively managing specific tasks or resources. In contrast, deploying a *Stack Template*, *which includes multiple templates*, structures the deployment as a Stack. This arrangement creates a network of **interconnected** workflows, where the output of one workflow becomes the input for one of the following workflows.
### Summary[](#summary "Direct link to Summary")
* **Policy Management**: The **Policies** tab provides a comprehensive interface for creating and managing policies, ensuring the infrastructure remains secure and compliant. For more information on policy management, visit [**Policies Detail**](/docs/develop/policies/create_policy/).
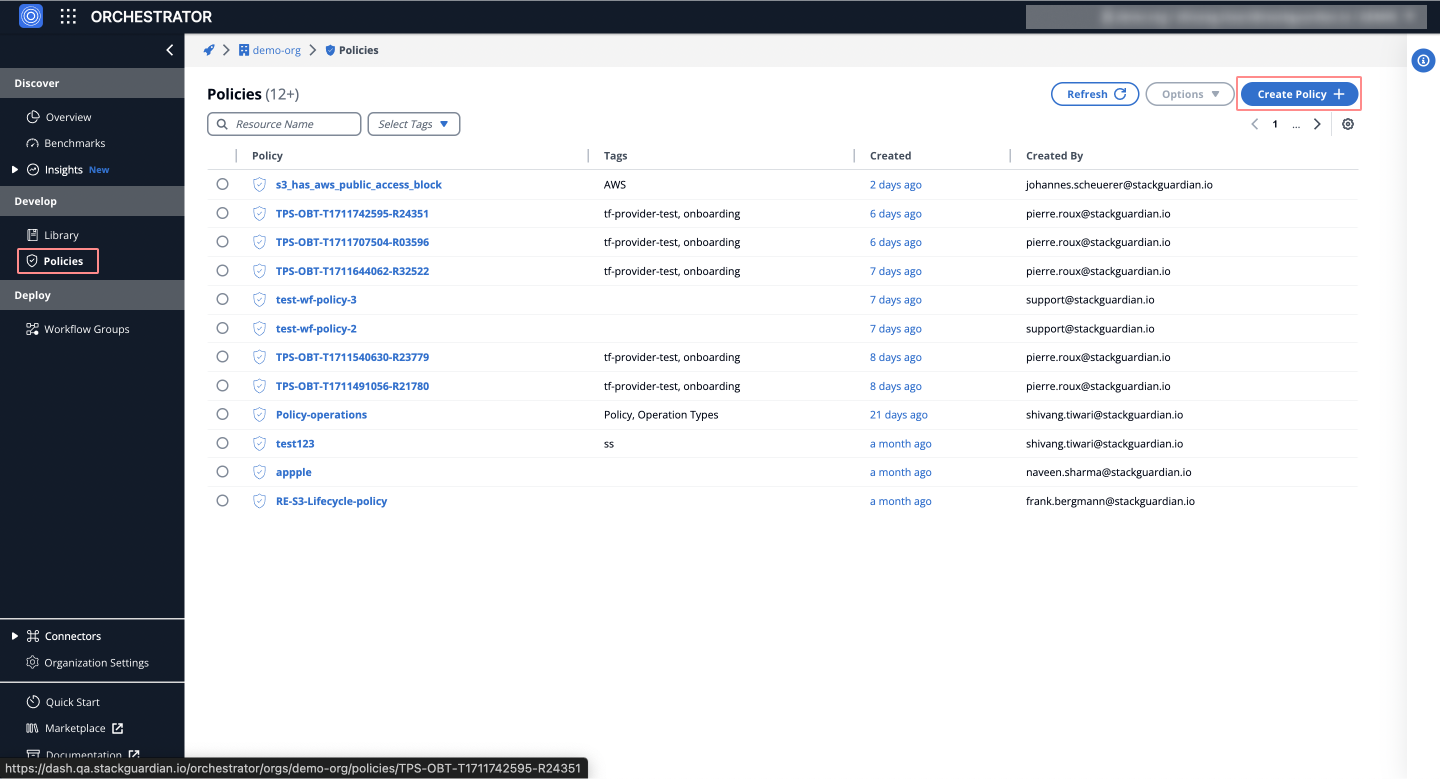
* **Library**: Acts as a dynamic resource for both managing a wide range of **private** templates tailored to your organization's needs. It facilitates the comprehensive creation and categorization of various template types, such as *Workflow Templates*, *Stack Templates*, *IaC Policies*, *Workflow Steps*, and *Terraform IaC*. For detailed instructions on managing and crafting these templates, please consult the **Library Guide**.
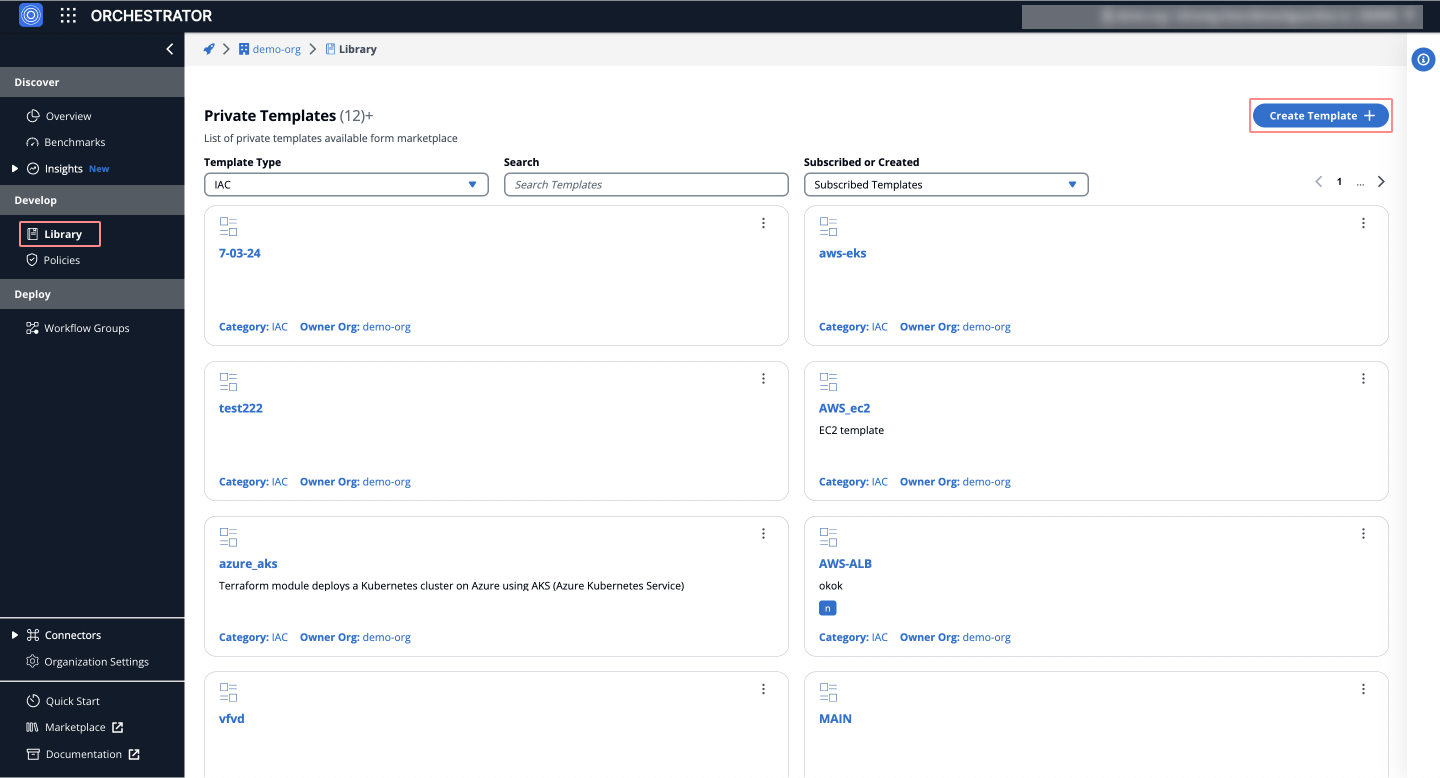
---
# Create Policy
## Overview[](#overview "Direct link to Overview")
With StackGuardian, compliance for your workflows and Infrastructure as Code (IaC) is straightforward and flexible. Create custom policies tailored to your needs.
## Creating and Implementing Policies[](#creating-and-implementing-policies "Direct link to Creating and Implementing Policies")
### Step 1: Create Your First Policy[](#step-1-create-your-first-policy "Direct link to Step 1: Create Your First Policy")
1. Go to the **Policy Sets** tab, located under **Develop** tab.
2. Click **Create Policy +**.
3. Create your Policy by informing:
* **Policy Name**
* **Policy ID**: Auto-generated from the Policy Name. You can customize it using only letters, numbers, underscores (\_), or dashes (-). This cannot be changed after creation.
* **Description**
* **Tags**
### Step 2: Structuring Your Policy Rules[](#step-2-structuring-your-policy-rules "Direct link to Step 2: Structuring Your Policy Rules")
After selecting your policy:
1. Visit the **Rules** section.
2. Add a new rule with the following steps:
* Name the rule with a valid slug and choose `Marketplace Policy Template`.
* Find [**/stackguardian/aws-best-practices-all**](https://app.stackguardian.io/marketplace/IAC_POLICY/stackguardian/aws-best-practices-all) in the `Policy Template` field and select the latest version.
* Set `Action on pass` to `PASS` and `Action on fail` to `WARN`.
* Save your configuration.
### Defining Actions and Approval Process[](#defining-actions-and-approval-process "Direct link to Defining Actions and Approval Process")
Specify what **Actions** to take based on policy evaluation:
* **Pass:** The policy is compliant.
* **Warn:** There may be issues with the policy.
* **Fail:** The policy is non-compliant.
* **Approval Required:** Manual approval is necessary.
For policies requiring **Approval**, define the approval process:
* Choose the number of approvers from a pre-defined list, ranging from **one** to **all**.
### Step 3: Policy Deployment[](#step-3-policy-deployment "Direct link to Step 3: Policy Deployment")
To apply your policy:
1. Return to the **Meta** tab.
2. In the **Scope** section, select the Workflow or Workflow Group to associate with this policy.
Keep track of active policies in the **Overview** section of your Workflow.
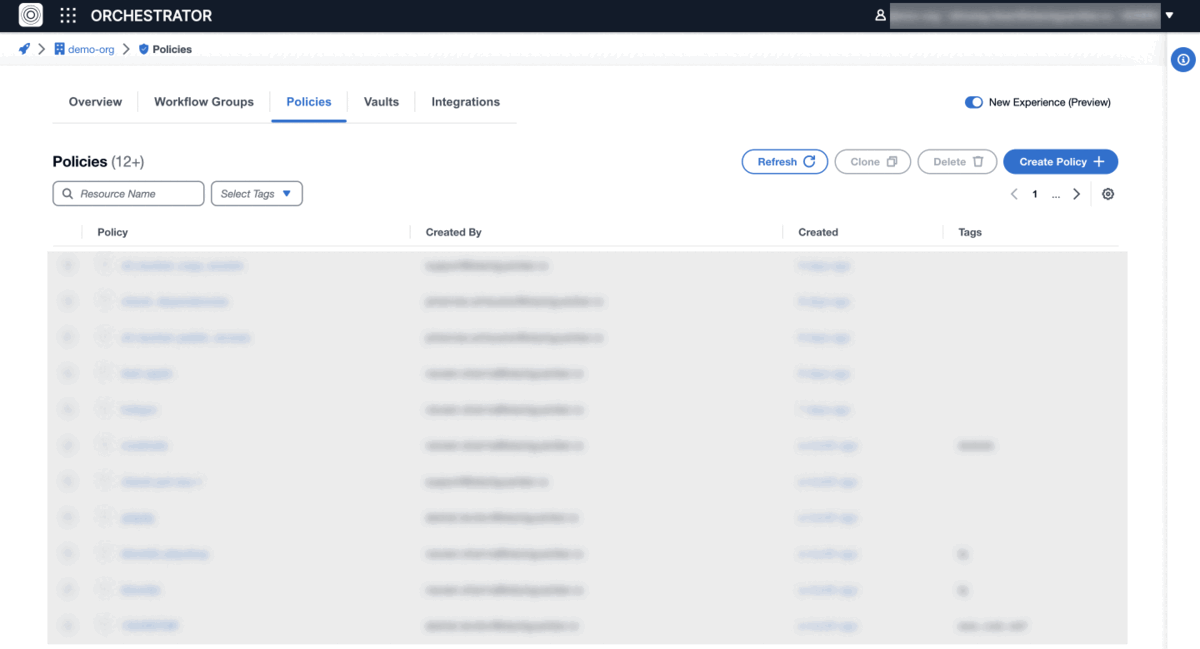
*Fig:* Create & Enforce New Policy (aws-best-practices)
info
Now you're all set to [**launch your workflow**](/docs/deploy/workflows/workflow_components/run/) with robust policy enforcement.
---
# NoCode Policy Builder
In the following documentation, we will explore the utilization of StackGuardian's **NoCode Policy Builder** for *crafting policies*. Additionally, we will delve into the various **provider** types, **operation** types, **conditions**, and understand the significance of the error **tolerance** value, along with guidelines for its application.
## Setting Rules[](#setting-rules "Direct link to Setting Rules")
Following the steps below will enable you to create a new policy and set rules:
1. Navigate through **Orchestrator** > **Policies** > **Create Policy**.
2. **Scope Selection**: Determine the policy's scope in the "Meta" tab.
* **Organization Wide**: Apply the policy across the entire organization.
* **Workflow Groups**: Choose workflow groups from the dropdown to apply policies to particular operational areas.
* **Connectors**: For specific *AWS Accounts*, *Azure Subscriptions*, or *GCP Projects*, select the corresponding connector from the dropdown to apply the policy. "**Save**" after selection.
3. Next, click on the "**Rules**" tab and click on "*Add new Policy Rule*".
4. Uncheck "**Marketplace Policy Template**" and from the "**Source Config Kind**" dropdown, select *Tirith (StackGuardian Policy Framework)* and "**sourceConfigDestKind**" as inline.
5. Scroll down and select the "**No Code**" option to enable StackGuardian's *NoCode Policy Builder*.
6. Choose "**Select Provider**," click "**Add Evaluator**," and provide a unique *Evaluator Id*.
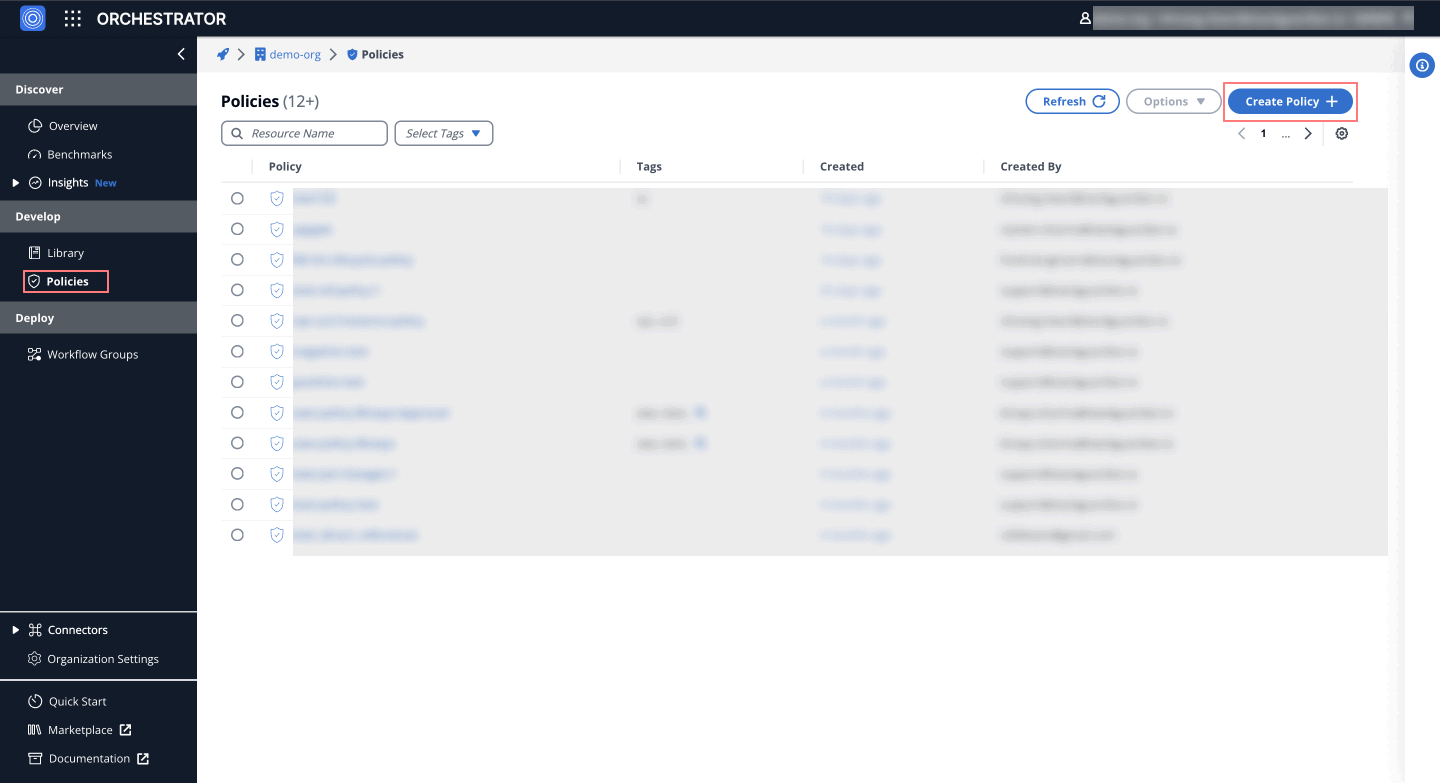
## Select Provider[](#select-provider "Direct link to Select Provider")
StackGuardian offers *4 types* of Providers:
1. [**Terraform Plan**](#terraform-plan): Define and enforce infrastructure configurations using declarative code.
2. [**InfraCost**](#infracost): Monitor and manage your cloud spending across multiple services.
3. [**SG Workflow (JSON)**](#sg-workflow-json): Automate and validate JSON-based workflows and processes.
4. [**Kubernetes**](#kubernetes): Manage and scale containerized applications using Kubernetes resources.
Let's discuss each of these *providers* and the *operations* associated with each of them.
### Terraform Plan[](#terraform-plan "Direct link to Terraform Plan")
* **Operation Type**: Specify the operation to evaluate Terraform configurations. There are several options:
a) **`Check for terraform resource attribute`**: Verify specific attributes of Terraform resources.
b) **`Check for terraform action`**: Check if a resource is being created, deleted (or no-op)
c) **`Check for terraform resource count`**: Assess the number of specific resources.
d) **`Check for terraform resource direct references`**: Make sure one resources is referenced by another resource (i.e. *bucket is referenced by lifecycle-policy*)
e) **`Check for terraform resource direct dependencies`**: Check for dependencies between resources.
note
Select the *Cloud Provider* and *Terraform Resource Type* as per the operation types. For direct references, you can use the 'to' or 'by' reference dropdown.
* **Condition Type**: Choose how to compare values, with options like *Equals*, *NotEquals*, *GreaterThan*, and *LessThan*. Additional types provide greater flexibility in defining conditions.
* **Condition Value**: Input the expected value for comparison in conditions. ***For Example***: For a *GreaterThan* condition type, you might set a condition value like '*10*'.
* **Error Tolerance Value**: Determines which values need to be set at deployment, and which can be skipped:
* **`0`**: All values (*Resource Type, Resource Attribute and Condition value*) need to be set correctly in the deployment otherwise the policy fails
* **`1`**: If the specified *Resource Type* is **not present**, the policy will be skipped
* **`2`**: If the *Resource Type* or the *Resource Attribute* is **not configured**, the policy will be skipped
* **Final Expression**: Combine different conditions and operations using logical operators. ***Example***: Combine evaluations using "**&&**" (AND), "**||**" (OR), and "**!**" (NOT) for comprehensive checks: "*check\_id\_1 && check\_id\_2 || !check\_id\_3*".
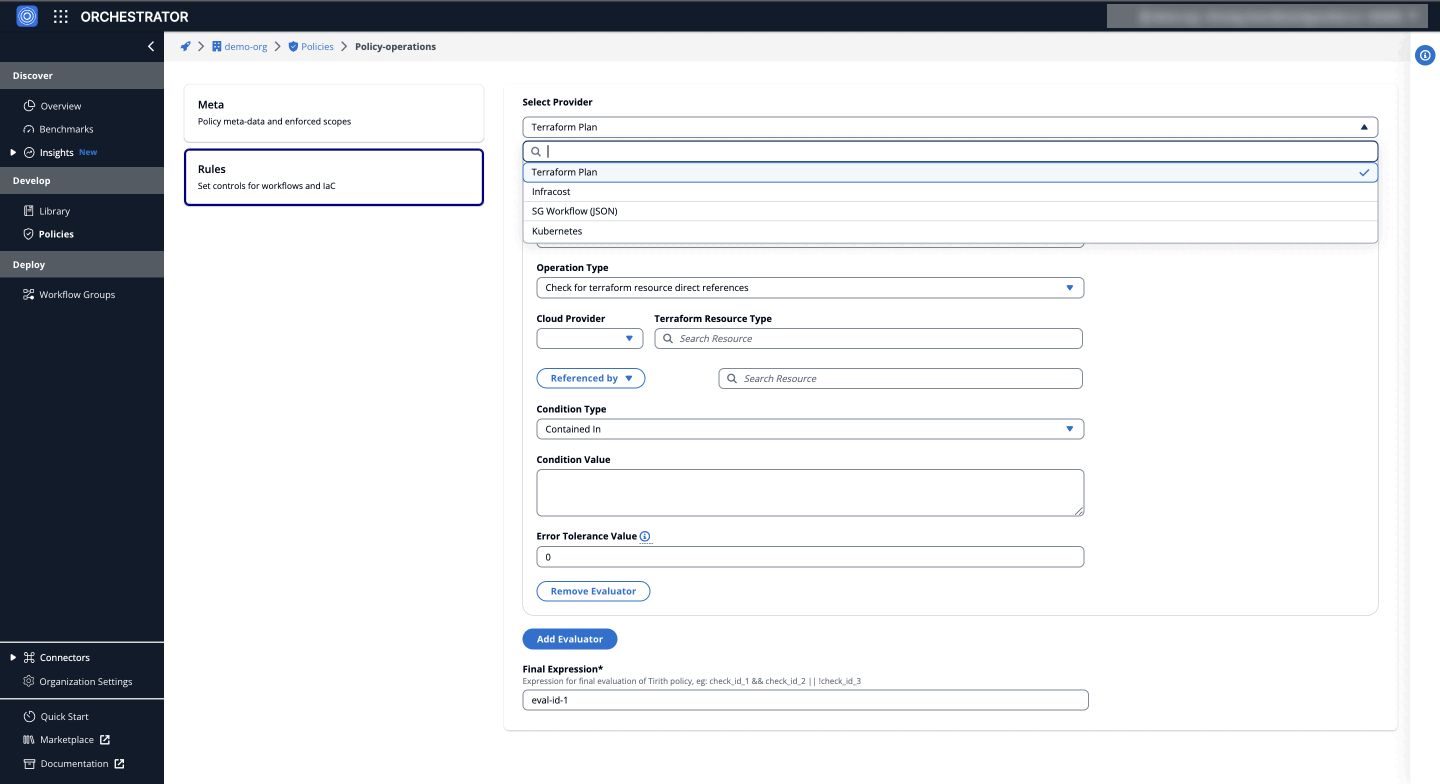
### InfraCost[](#infracost "Direct link to InfraCost")
* **Operation Type**: Define the cost analysis operation, such as *Total Monthly Cost* or *Total Hourly Cost*.
* **Cloud Provider**: Specify the cloud provider for which the policy applies, e.g., *AWS, Azure, GCP*.
* **Resource Type**: Use the ALL ()\* operator for broad policy application across resources, or select specific ones for targeted analysis.
* **Condition Type**: Set the comparison method, with choices like *Equals*, *NotEquals*, *GreaterThan*, and *LessThan*. ***Example***: Use "**GreaterThan**" to trigger alerts when costs exceed a certain threshold.
* **Condition Value**: Specify the benchmark figure for cost evaluations. ***Example***: For "**GreaterThan**", set a condition value like "*$1000*" to monitor excessive spending.
* **Final Expression**: Construct a logical formula combining different conditions and operations. ***Example***: "*total\_monthly\_cost > $1000 && total\_hourly\_cost < $50*" evaluates whether monthly costs are too high while maintaining lower hourly expenses.
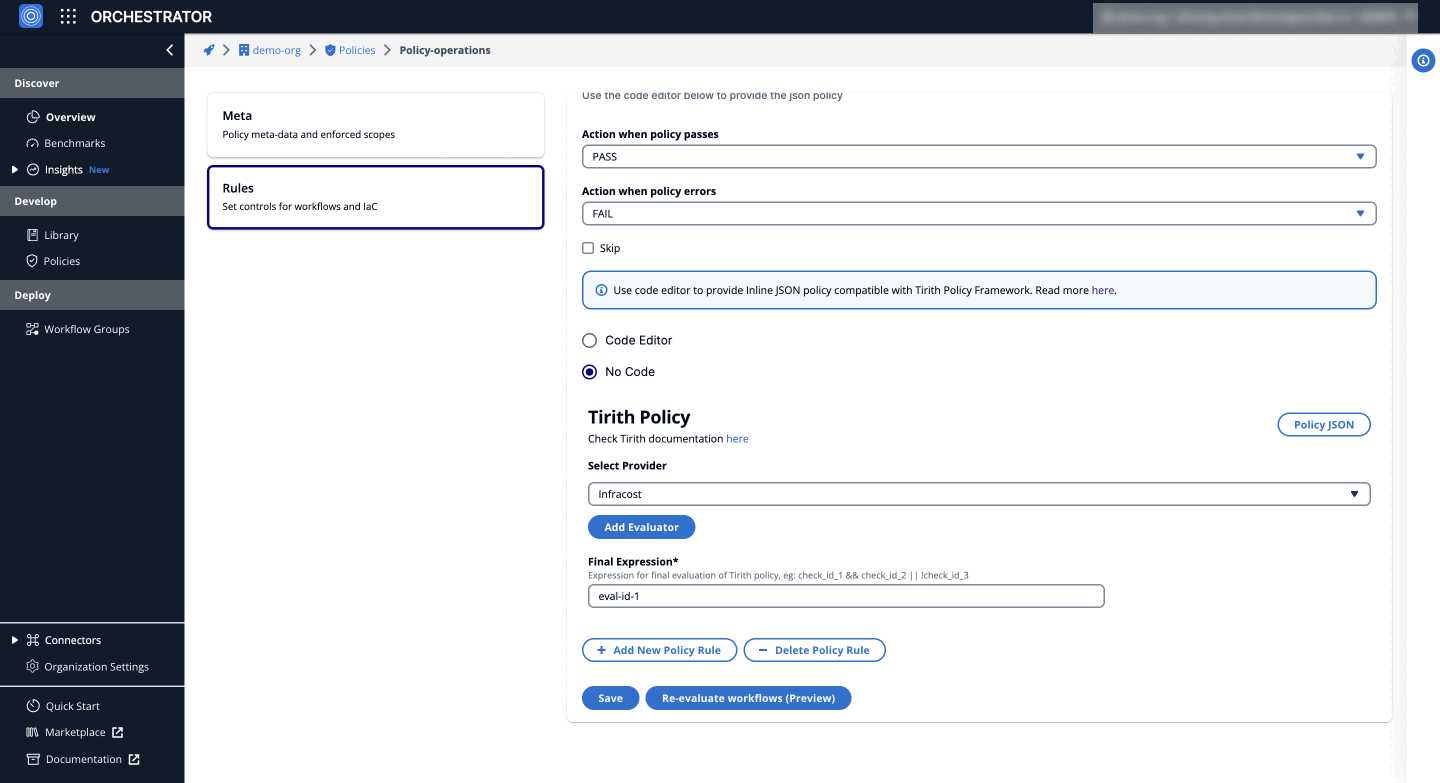
### SG Workflow (JSON)[](#sg-workflow-json "Direct link to SG Workflow (JSON)")
**Operation Type**: Focuses on retrieving specific values within JSON structures, as demonstrated by the "Get Value" operation.
**Workflow Attribute**: Delve into specific JSON workflow attributes. ***Example***, "`TerraformConfig.driftCheck`" is targeted to verify the activation status of *Terraform Drift*.
**Condition Type**: Set up conditions to assess the workflow attributes. ***Example***: An "Equals" condition is used to check if "TerraformConfig.driftCheck" is set to `true`, indicating that Terraform Drift activation is required.
**Condition Value**: Specify the precise value that the condition must meet. ***Example***: For ensuring Terraform Drift is active, the condition value is set to `true`.
**Final Expression**: Combine multiple conditions and operations using logical expressions to define complex policy rules. Instead of crafting a single condition, evaluators like "eval-id-1" can be logically combined with others using "**&&**" (AND), "**||**" (OR), and "**!**" (NOT). ***Example***: If you have two evaluators, `evaluator1` for checking drift activation and `evaluator2` for another condition, a possible expression could be "evaluator1 && evaluator2", ensuring both conditions must be true for the policy to apply.
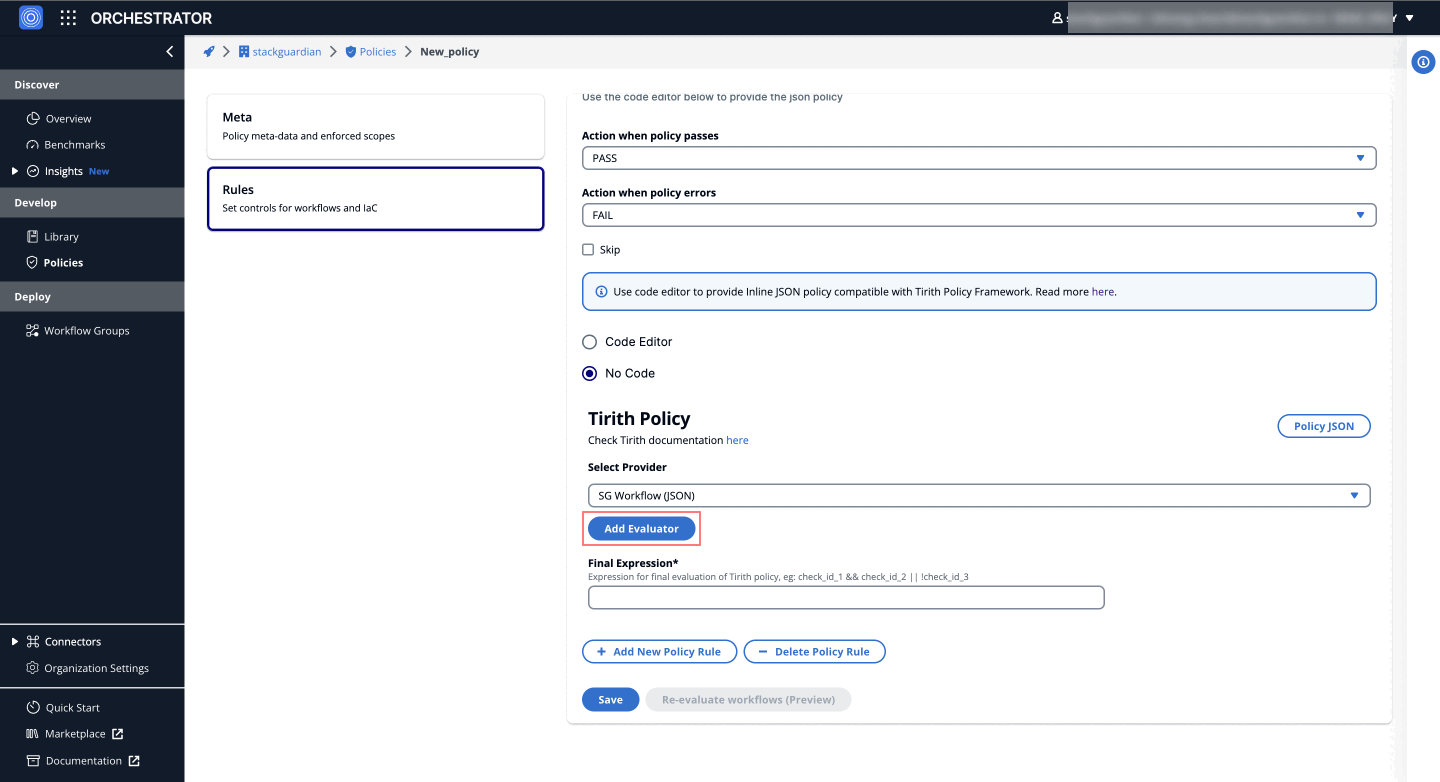
### Kubernetes[](#kubernetes "Direct link to Kubernetes")
* **Operation Type**: Specifies the action on Kubernetes resource attributes, notably as an "*Attribute*."
* **Kubernetes Kind**: Relates to "*Pod*" resources specifically.
* **Attribute**: Example: `spec.containers.*.livenessProbe`, which ensures all containers have defined liveness probes.
* **Condition Type**: Illustrates various condition types, with an example: "*Contains*," to check for the presence of certain settings.
* **Condition Value**: Specify the expected condition value, e.g., "null," to verify that every container has a liveness probe configured.
* **Final Expression**: Example: `!kinds_have_null_liveness_probe`, which represents the policy rule to enforce the existence of liveness probes in Pods for standard compliance.
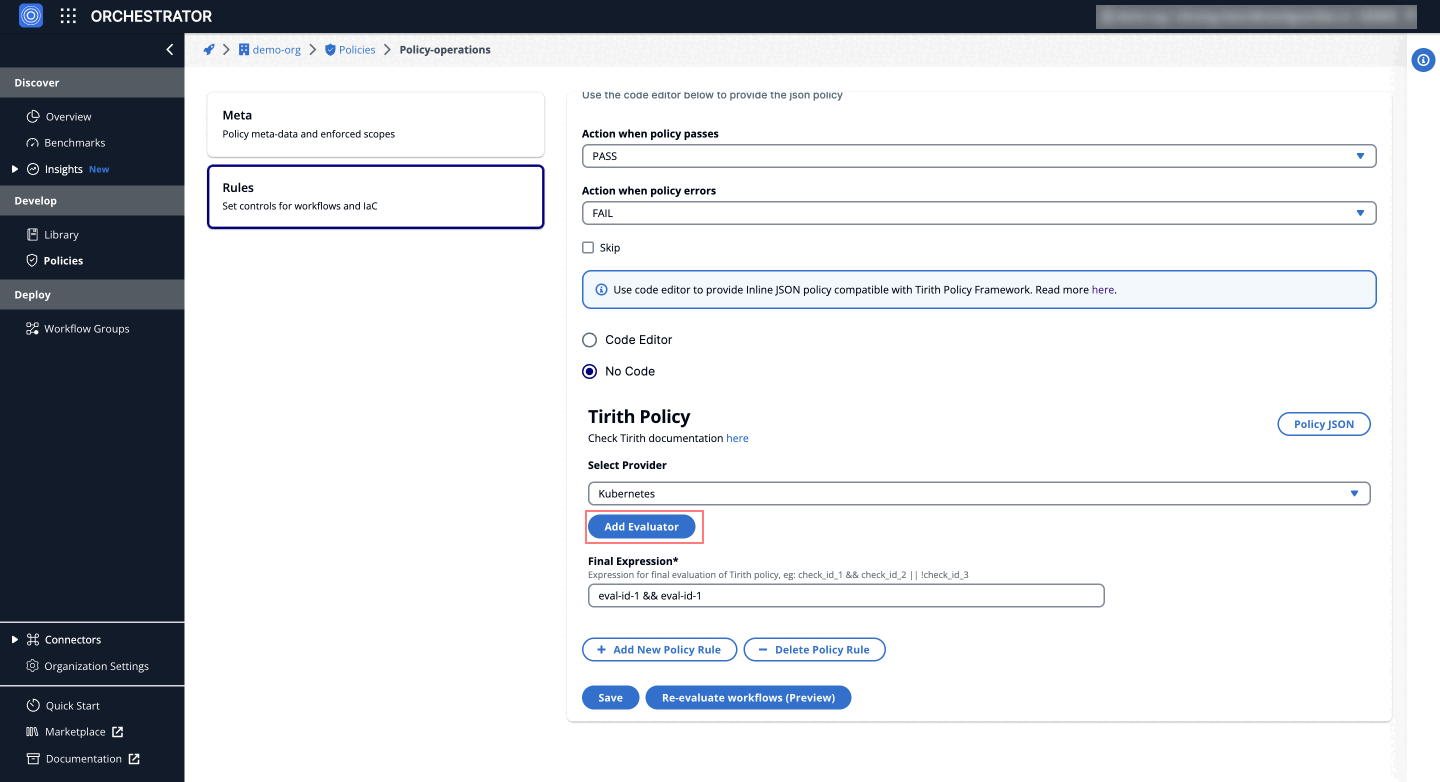
---
# Policy Types
Policies within the StackGuardian platform serve as a set of rules or guardrails, enforceable on workflows or cloud infrastructure. These policies facilitate a self-service model with granular control.
### Custom Policy Frameworks[](#custom-policy-frameworks "Direct link to Custom Policy Frameworks")
For specialized policy requirements:
* [**Tirith (StackGuardian Policy Framework)**](#tirith-stackguardian-policy-framework), Explore a JSON-based framework designed for IaC & workflow compliance.
* [**Open Policy Agent**](https://www.openpolicyagent.org/docs/latest/), Utilize detailed policy definitions using the Rego language.
Discover more about StackGuardian policies [**here**](/docs/develop/overview/).
### Types of Enforceable Policies[](#types-of-enforceable-policies "Direct link to Types of Enforceable Policies")
StackGuardian's Tirith engine supports a variety of policies for efficient and secure cloud infrastructure management:
#### 1. Infrastructure Policies[](#1-infrastructure-policies "Direct link to 1. Infrastructure Policies")
* Enforce Terraform best practices and configurations. **Example:** Enforce VPCs to use default tenancy.
#### 2. Workflow and Stack Policies[](#2-workflow-and-stack-policies "Direct link to 2. Workflow and Stack Policies")
* Enforce custom compliance and guardrail rules for Workflows and Stacks with approval processes for security and efficiency. **Example:** Approval required for changes to production environments.
* Workflow and Stack policies can also be used in conjunction with Context Tags to reference the attributes of a dependent Workflow or Stack in the policy. **Example:** Block the execution of a Workflow/Stack until a certain Workflow/Stack has a `COMPLETED` status.
> **Tip:** A policy with an evaluator that uses a `${curr_workflow` reference will only apply to Workflows. Similarly, if `${curr_stack` is used, it will only apply to Stacks. Generic policies (without these `curr_` references) will be applied to both Workflows and Stacks, depending on the Policy Enforcement configuration.
[🔗 Click here to view an example of a **Workflow Policy** using Context Tags.](#workflow-policy-using-context-tags)
[🔗 Click here to view an example of a **Stack Policy** using Context Tags.](#stack-policy-using-context-tags)
#### 3. Cost Control Policies (Upcoming)[](#3-cost-control-policies-upcoming "Direct link to 3. Cost Control Policies (Upcoming)")
* Implement budget limits and dynamic cost optimization. **Example:** Limit EC2 monthly costs to under $100
#### 4. Security and Compliance Policies[](#4-security-and-compliance-policies "Direct link to 4. Security and Compliance Policies")
* Apply security measures and meet compliance standards (e.g., CIS, PCI DSS). **Example:** Ensure all security groups block inbound SSH from the public internet.
#### 5. Tagging and Resource Management Policies[](#5-tagging-and-resource-management-policies "Direct link to 5. Tagging and Resource Management Policies")
* Require consistent tagging for all resources for better management. **Example:** Enforce 'Environment' and 'Owner' tags on all resources.
#### 6. Drift Detection and Continuous Compliance[](#6-drift-detection-and-continuous-compliance "Direct link to 6. Drift Detection and Continuous Compliance")
* Detect and correct configuration drifts to maintain continuous compliance. **Example:** Alert on unapproved changes to infrastructure.
Access or subscribe to policies via the [**StackGuardian Marketplace**](https://app.stackguardian.io/marketplace?tab=IAC_POLICY), or create customized policies using the Open Policy Agent or the StackGuardian Policy Framework.
### Policy Structure and Configuration[](#policy-structure-and-configuration "Direct link to Policy Structure and Configuration")
#### Scope Configuration[](#scope-configuration "Direct link to Scope Configuration")
Under Meta tab, you can find **Scope** configuration, which tells StackGuardian where you want to enforce this policy. We automatically determine the type of the policy and enforce it on the workflow or infrastructure configuration as appropriate.
> Tip: You can use 200+ of cloud best practice policies already available in the Marketplace or create new ones too.

Each policy comprises multiple rules that, upon evaluation, influence a workflow run. These are determined by **"Action when policy passes"** and **"Action when policy errors"** settings, with the option to bypass certain rules if needed.

### Implementing Policies[](#implementing-policies "Direct link to Implementing Policies")
#### Marketplace Policy Templates[](#marketplace-policy-templates "Direct link to Marketplace Policy Templates")
Easily adopt Marketplace templates by subscribing to them within the StackGuardian Marketplace, allowing for a simplified policy application process.
#### Open Policy Agent Integration[](#open-policy-agent-integration "Direct link to Open Policy Agent Integration")
On StackGuardian you will find first class support for [**Open Policy Agent**](https://openpolicyagent.org) and you can source your Rego configuration from a GitHub or git based repository.
Follow these steps to configure an OPA policy inside a rule:
1. Uncheck Marketplace Policy Template and choose Source Config Kind as ***"Open Policy Agent***.
2. Select version control system where you have stored your Rego policies, either ***"github.com*** or ***"git (other)***".
* Provide Repository URL and optionally git reference and working directory, unless you want to use the defaults configured in your repo.
* If you have a private repository, you can either use a secret stored in your StackGuardian Vault by specifying ***"/secrets/some-vault-secret***" or github\_com integration by exactly specifying ***"/integrations/github\_com***" in the **Authentication method\***" field. In case you are using `git (other)`, StackGuardian will use the value of the specified secret to build a git URL with authentication information. For Bitbucket for example, the specified vault secret should have the secret value in the following format **USERNAME:APP\_PASSWORD** which will result in the following git URL `https://USERNAME:APP_PASSWORD@bitbucket.org/username/reposlug.git` that StackGuardian will use to fetch the policy configuration.
3. Under Additional Config, you can optionally provide OPA Deciding Query, which StackGuardian will use to decide the final policy result. This query should return a boolean which is currently supported. It can be provided in the following format: ***"`.`"***. *OPA Deciding Query* use to be a required attribute but now it is optional. We will keep on supporting `OPA Deciding Query` like before.
4. Finally, you can optionally use the Code Editor to pass JSON that StackGuardian will pass to *OPA runtime* as policy data. This enables you to template your Rego policies and reuse them to build different policies.

#### Tirith: StackGuardian Policy Framework[](#tirith-stackguardian-policy-framework "Direct link to Tirith: StackGuardian Policy Framework")
The Tirith Policy Framework by StackGuardian offers a user-friendly alternative to OPA for policy enforcement, directly integrating with code editors and planning support for git-based policy management. Designed for simplicity, Tirith facilitates the scanning of Terraform and CloudFormation configurations, making policy definition and enforcement straightforward without delving into complexities. This approach ensures easy compliance with infrastructure policies. For more details, visit the [**GitHub**](https://github.com/StackGuardian/policy-framework) repository.
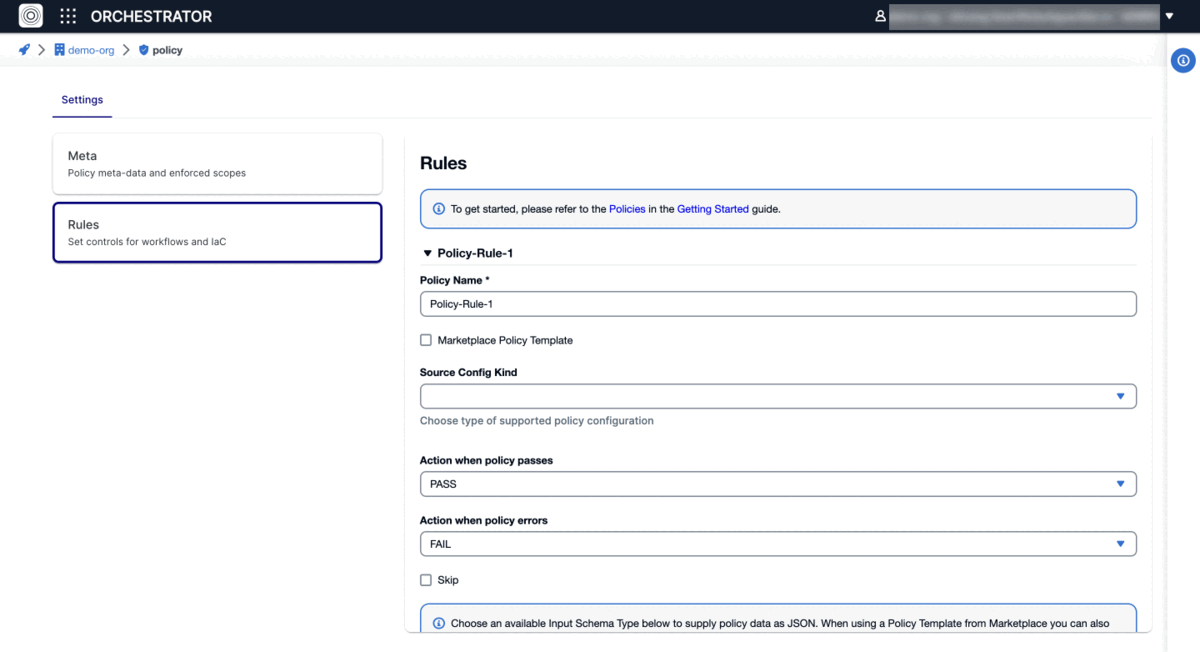
### Examples[](#examples "Direct link to Examples")
#### Prevent accidental delete of VPC[](#prevent-accidental-delete-of-vpc "Direct link to Prevent accidental delete of VPC")
Set VPC default tenancy and safeguard EC2 instances against deletion
#### Using Code-Editor[](#using-code-editor "Direct link to Using Code-Editor")
```
{
"meta": {
"required_provider": "stackguardian/terraform_plan",
"version": "v1"
},
"evaluators": [
{
"description": "",
"condition": {
"type": "NotEquals",
"value": "delete",
"error_tolerance": 1
},
"id": "eval-id-1",
"provider_args": {
"operation_type": "action",
"terraform_resource_attribute": "",
"terraform_resource_type": "aws_vpc"
}
}
],
"eval_expression": "eval-id-1"
}
```
#### Using No-Code[](#using-no-code "Direct link to Using No-Code")
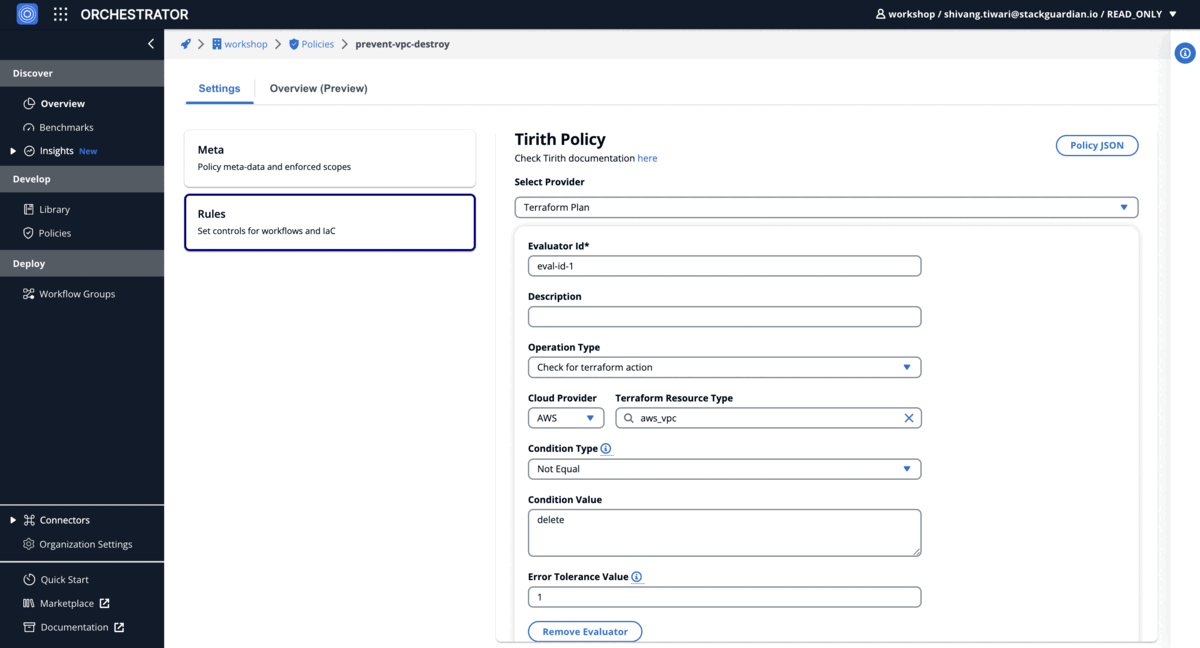
#### Cost control policy (Terraform)[](#cost-control-policy-terraform "Direct link to Cost control policy (Terraform)")
EC2 instance cost is lower than 100 USD per month
#### Using Code-Editor[](#using-code-editor-1 "Direct link to Using Code-Editor")
```
{
"meta": {
"required_provider": "stackguardian/infracost",
"version": "v1"
},
"evaluators": [
{
"provider_args": {
"operation_type": "total_monthly_cost",
"resource_type": ["aws_ec2"]
},
"condition": {
"type": "LessThanEqualTo",
"value": 100
},
"id": "ec2_cost_below_100_per_month"
}
],
"eval_expression": "ec2_cost_below_100_per_month"
}
```
#### Using No-Code[](#using-no-code-1 "Direct link to Using No-Code")
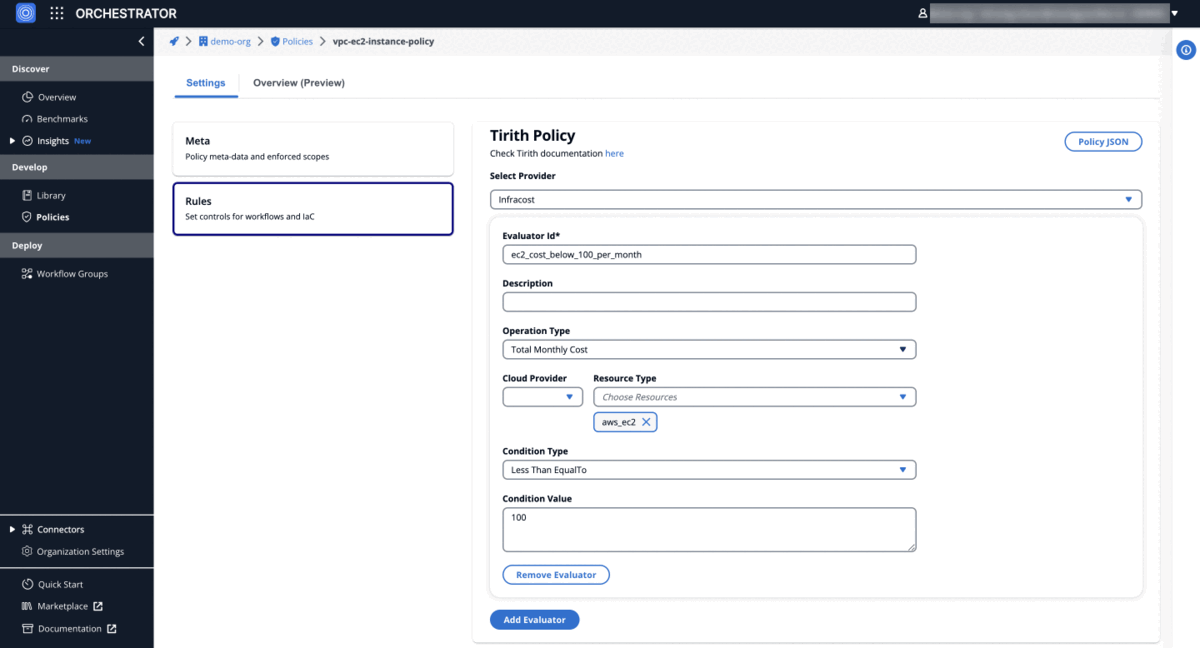
#### Scheduling Policy[](#scheduling-policy "Direct link to Scheduling Policy")
Ensure enabled cron jobs for destroy action workflows
#### Using Code-Editor[](#using-code-editor-2 "Direct link to Using Code-Editor")
```
{
"meta": {
"required_provider": "stackguardian/json",
"version": "v1"
},
"evaluators": [
{
"description": "Cron job exists for the workflow",
"condition": {
"type": "IsNotEmpty",
"value": "",
"error_tolerance": 0
},
"id": "eval-id-1",
"provider_args": {
"operation_type": "get_value",
"key_path": "UserSchedules.*.cron"
}
},
{
"description": "Action must be destroy",
"condition": {
"type": "ContainedIn",
"value": [["destroy"]],
"error_tolerance": 0
},
"id": "eval-id-2",
"provider_args": {
"operation_type": "get_value",
"key_path": "UserSchedules.*.inputs.TerraformAction.action"
}
},
{
"description": "Schedule must be enabled",
"condition": {
"type": "ContainedIn",
"value": [["ENABLED"]],
"error_tolerance": 0
},
"id": "eval-id-3",
"provider_args": {
"operation_type": "get_value",
"key_path": "UserSchedules.*.state"
}
}
],
"eval_expression": "eval-id-1 && eval-id-2 && eval-id-3"
}
```
#### Using No-Code[](#using-no-code-2 "Direct link to Using No-Code")
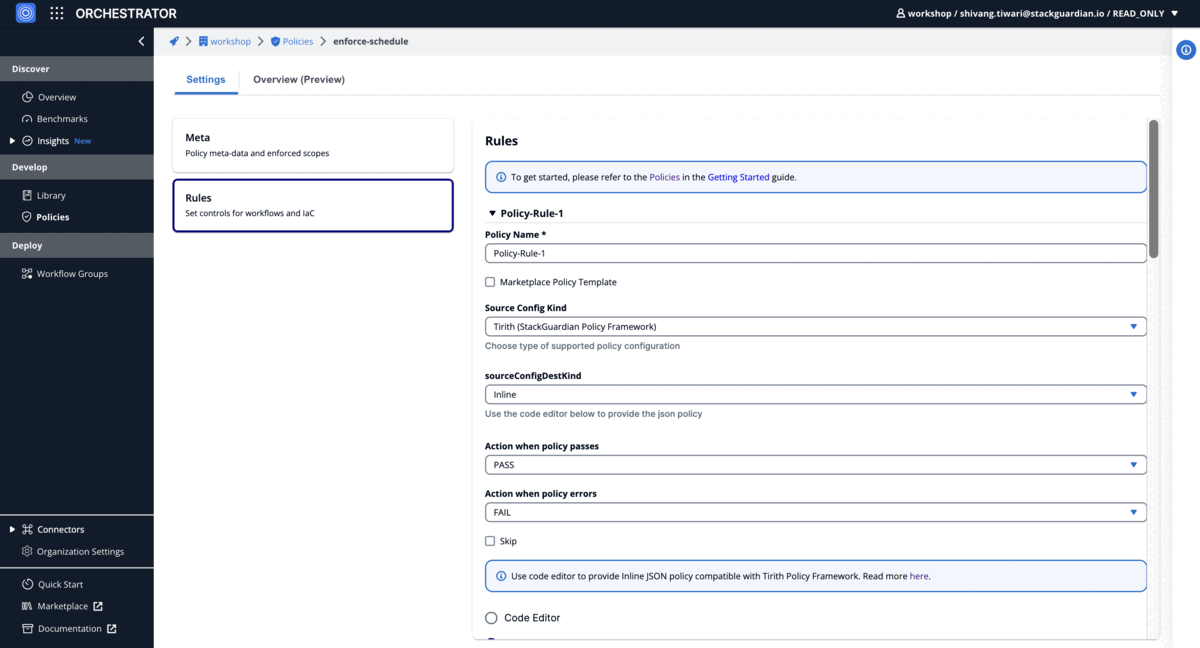
#### Tagging Policy[](#tagging-policy "Direct link to Tagging Policy")
Validate 'costcenter:workshop' tag on AWS EKS node groups
#### Using Code-Editor[](#using-code-editor-3 "Direct link to Using Code-Editor")
```
{
"meta": {
"required_provider": "stackguardian/terraform_plan",
"version": "v1"
},
"evaluators": [
{
"description": "",
"condition": {
"type": "Contains",
"value": {
"costcenter": "workshop"
},
"error_tolerance": 1
},
"id": "eval-id-1",
"provider_args": {
"operation_type": "attribute",
"terraform_resource_attribute": "tags",
"terraform_resource_type": "aws_eks_node_group"
}
}
],
"eval_expression": "eval-id-1"
}
```
#### Using No-Code[](#using-no-code-3 "Direct link to Using No-Code")
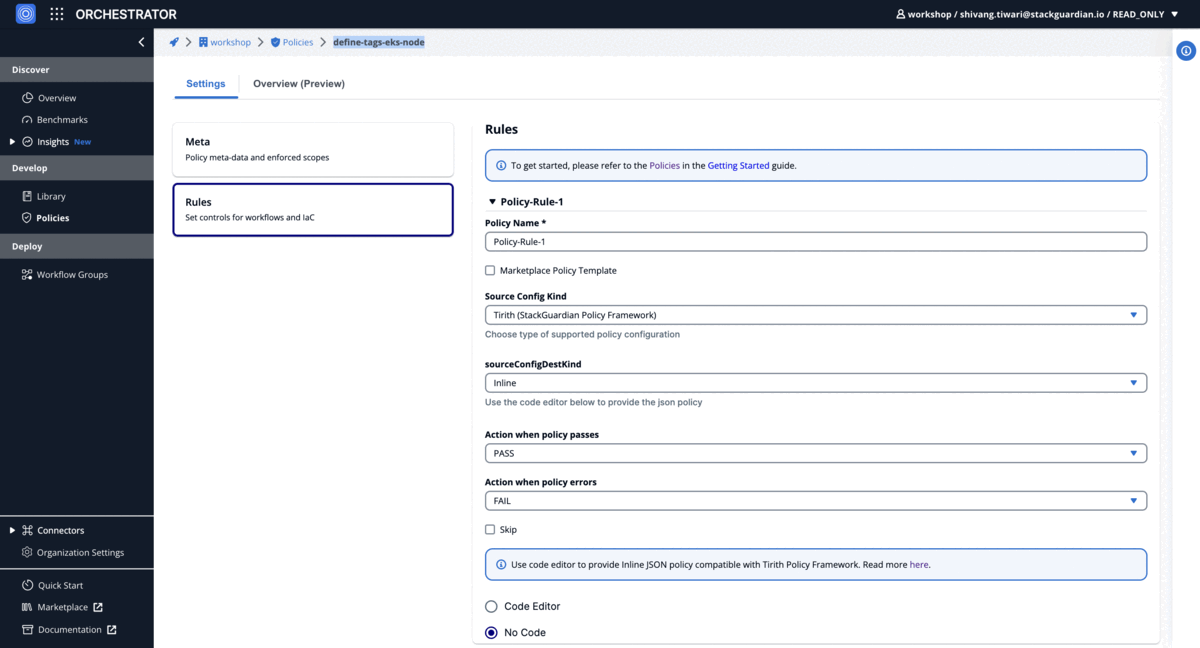
#### Workflow Policy Using Context Tags[](#workflow-policy-using-context-tags "Direct link to Workflow Policy Using Context Tags")
Use a Workflow Policy to restrict execution of a production Workflow until the staging Workflow has completed successfully for an apply action with the same template group ID and revision.
This policy uses Context Tags to reference a dependent Workflow and checks for several conditions:
* The dependent Workflow must have a status of `COMPLETED`.
* The dependent Workflow must have performed an `apply` action.
* The dependent Workflow’s `iacTemplateId` must be less than or equal to that of the current workflow.
To reference another workflow, use the `${workflow::...}` syntax. For example, you can reference a workflow directly by using `${workflow::workflowGroupName.workflowName}` where you replace `workflowGroupName` and `workflowName` with the actual values.
In this scenario, the current workflow has a context tag named `depWf`, which stores a reference to another workflow. You can access attributes of the current workflow using `${curr_workflow.attrs...}` within a workflow reference string.
Workflow reference strings are evaluated from the innermost key outward. For example: `${workflow::${curr_workflow.attrs.ContextTags.depWf}.attrs.LatestWfrunStatus}`
This expression works as follows:
1. It first retrieves the value of the context tag named `depWf` from the current workflow.
2. It then uses this value to reference the dependent workflow.
3. Finally, it fetches the `LatestWfrunStatus` attribute from the dependent workflow.
This allows you to create dynamic policies that depend on the state or attributes of other workflows, enabling advanced automation and governance scenarios.
#### Using Code-Editor[](#using-code-editor-4 "Direct link to Using Code-Editor")
```
{
"evaluators": [
{
"provider_args": {
"operation_type": "get_value",
"key_path": "${workflow::${curr_workflow.attrs.ContextTags.depWf}.attrs.LatestWfrunStatus}"
},
"condition": {
"type": "Equals",
"value": "COMPLETED"
},
"id": "dependent_workflow_completed"
},
{
"provider_args": {
"operation_type": "get_value",
"key_path": "${workflow::${curr_workflow.attrs.ContextTags.depWf}.attrs.LatestTerraformAction}"
},
"condition": {
"type": "Equals",
"value": "apply"
},
"id": "dependent_workflow_applied"
},
{
"provider_args": {
"operation_type": "get_value",
"key_path": "VCSConfig.iacVCSConfig.iacTemplateId"
},
"condition": {
"type": "LessThanEqualTo",
"value": "${workflow::${curr_workflow.attrs.ContextTags.depWf}.attrs.VCSConfig.iacVCSConfig.iacTemplateId}"
},
"id": "staging_template_version_greater_equal"
}
],
"meta": {
"required_provider": "stackguardian/json",
"version": "v1"
},
"eval_expression": "dependent_workflow_completed && dependent_workflow_applied && staging_template_version_greater_equal"
}
```
#### Stack Policy Using Context Tags[](#stack-policy-using-context-tags "Direct link to Stack Policy Using Context Tags")
Use a Stack Policy to restrict execution of a Production stack until a Staging Stack has completed successfully with the same template group ID and revision.
This policy uses Context Tags to reference a dependent Stack and checks for several conditions:
* The template group ID (the template revision) of the current stack must be equal to that of the dependent stack.
* The dependent Stack must have a status of `COMPLETED`.
* The resource name of the Stack must contain `prod-`.
To reference another stack, use the `${stack::...}` syntax. For example, you can reference a stack directly by using `${stack::workflowGroupName.stackName}` where you replace `workflowGroupName` and `stackName` with the actual values.
In this scenario, the current stack has a context tag named `depStack`, which stores a reference to another stack. You can access attributes of the current stack using `${curr_stack.attrs...}` within a stack reference string.
Stack reference strings are evaluated from the innermost key outward. For example: `${stack::${curr_stack.attrs.ContextTags.depStack}.attrs.LatestWfStatus}`
This expression works as follows:
1. It first retrieves the value of the context tag named `depStack` from the current stack.
2. It then uses this value to reference the dependent stack.
3. Finally, it fetches the `LatestWfStatus` attribute from the dependent stack.
This allows you to create dynamic policies that depend on the state or attributes of other stacks, enabling advanced automation and governance scenarios.
#### Using Code-Editor[](#using-code-editor-5 "Direct link to Using Code-Editor")
```
{
"evaluators": [
{
"description": "",
"id": "current_template_version_matches_dependent_stack",
"provider_args": {
"operation_type": "get_value",
"key_path": "TemplateGroupId"
},
"condition": {
"type": "Equals",
"value": "${stack::${curr_stack.attrs.ContextTags.depStack}.attrs.TemplateGroupId}",
"error_tolerance": 0
}
},
{
"provider_args": {
"operation_type": "get_value",
"key_path": "${stack::${curr_stack.attrs.ContextTags.depStack}.attrs.LatestWfStatus}"
},
"condition": {
"type": "Equals",
"value": "COMPLETED"
},
"id": "dependent_stack_completed"
},
{
"provider_args": {
"operation_type": "get_value",
"key_path": "ResourceName"
},
"condition": {
"type": "Contains",
"value": "prod-"
},
"id": "resource_name_contains_prod"
}
],
"meta": {
"required_provider": "stackguardian/json",
"version": "v1"
},
"eval_expression": "resource_name_contains_prod && current_template_version_matches_dependent_stack && dependent_stack_completed"
}
```
---
# workflow-policies
---
# Custom Benchmark
**Custom Benchmarks** in StackGuardian allow users to define and implement their **unique checks** aligned with specific *business requirements*, *industry standards*, or *internal protocols*. Users have the flexibility to create benchmarks that are bespoke to their organizational needs, going beyond the predefined options.
### Create a Custom Benchmark[](#create-a-custom-benchmark "Direct link to Create a Custom Benchmark")
Creating and enforcing a custom benchmark is a straightforward process. Follow these enhanced steps for a seamless experience:
#### Step 1: Navigate to Connectors's Tab[](#step-1-navigate-to-connectorss-tab "Direct link to Step 1: Navigate to Connectors's Tab")
After completing the connector process with AWS or Azure, proceed to `Orchestrator > Connectors`. Scroll to find all your integrated platforms.
#### Step 2: Select Connector[](#step-2-select-connector "Direct link to Step 2: Select Connector")
Click on the specific connector (AWS or Azure) where you want to apply a custom benchmark.
#### Step 3: Create Benchmark[](#step-3-create-benchmark "Direct link to Step 3: Create Benchmark")
In the pop-up modal displaying all benchmarks, click on “Create Benchmark (Preview)” at the bottom.
* **Check Name:** E.g., "Security Audit"
* **Description:** E.g., "A comprehensive check for cloud security."
#### Step 4: Configure Benchmark[](#step-4-configure-benchmark "Direct link to Step 4: Configure Benchmark")
Your new custom check will appear with other pre-existing checks. Select it and update the details under its settings:
* **Benchmark Status:** Toggle to activate or deactivate.
* **Name and Description:** Amend if needed.
* **Runtime Source:** Specify where the runtime data of your benchmark is sourced.
* **Source Destination Kind:** E.g., GitHub.
* **Repository URL:** The URL where the benchmark’s codes are stored.
* **Reference (Optional):** Provide if necessary.
* **Is Private Source Check:** Toggle if it’s a private source.
* **Authentication Method:** It ensures secure access to private benchmarks with specific *credentials*.
* **Working Dir:** Indicate the path to the directory containing the IaC configuration if it’s not at the root of the repository. E.g., `infra/app1/aws/ec2`.
#### Step 5: Save Benchmark[](#step-5-save-benchmark "Direct link to Step 5: Save Benchmark")
Click the **"Save Benchmark"** button to finalize the setup.
### Example Configurations for Custom Benchmarks:[](#example-configurations-for-custom-benchmarks "Direct link to Example Configurations for Custom Benchmarks:")
#### a) Cost Optimization:[](#a-cost-optimization "Direct link to a) Cost Optimization:")
1. Fork the open repository from [**turbot/steampipe**](https://github.com/turbot/steampipe) to your repo. For cost, utilize [**steampipe-mod-aws-thrifty**](https://github.com/turbot/steampipe-mod-aws-thrifty).
2. Modify the '.pp' files in the 'controls' folder as per need. Remove or alter controls to fit your requirements.
3. In StackGuardian’s Connectors tab, click on the account and select '*Create Benchmark (Preview)*'. Input the URL of your modified repository.
4. After saving and running the discovery, the customized cost benchmark will be available *(allow up to 15 minutes for results to display)*.
#### b) Security Enhancement:[](#b-security-enhancement "Direct link to b) Security Enhancement:")
1. Similar to cost optimization, fork and modify the [**steampipe-mod-aws-compliance**](https://github.com/turbot/steampipe-mod-aws-compliance) repository.
2. Navigate to StackGuardian’s Connectors tab, initiate '*Create Benchmark (Preview)*', and input the modified repository’s URL.
3. Specify a particular benchmark (e.g., **SOC 2** or **PCI-DSS**) in the 'checks' section using the format `benchmark.`.
4. Post-save and discovery run, the customized security benchmark becomes visible.
#### c) Setting up benchmark from scratch[](#c-setting-up-benchmark-from-scratch "Direct link to c) Setting up benchmark from scratch")
1. Create repository for benchmark. Needs to contain the file **mod.pp** to be recognized as benchmark repository. (like )
2. Add files with .pp ending that hold the controls and query commands (i.e. custom.pp).
3. Within the .pp file you have 3 constructs
* **query** uses SQL to query the Cloud provider for specific resources and attributes
* **control** references a query and provides a title and description to the query for better understanding
* **benchmark** provides the title for the overall benchmark and lists the controls, that it contains as so called **children**
### Enforce a Benchmark[](#enforce-a-benchmark "Direct link to Enforce a Benchmark")
#### 1. Select a Benchmark[](#1-select-a-benchmark "Direct link to 1. Select a Benchmark")
Choose from the list of benchmarks - COST, CIS, Custom, etc.
#### 2. Access Settings[](#2-access-settings "Direct link to 2. Access Settings")
On the right of the selected benchmark, click the **“Settings”** button.
#### 3. Enable Benchmark[](#3-enable-benchmark "Direct link to 3. Enable Benchmark")
Switch the “Benchmark Status” to **'Enabled'**.
#### 4. Save and Apply[](#4-save-and-apply "Direct link to 4. Save and Apply")
Hit the **“Save Benchmark”** button to apply the enforcement to the selected connector.
By following these steps, both standard and custom benchmarks can be effectively created and enforced, ensuring a tailored approach to optimizing and securing cloud services.
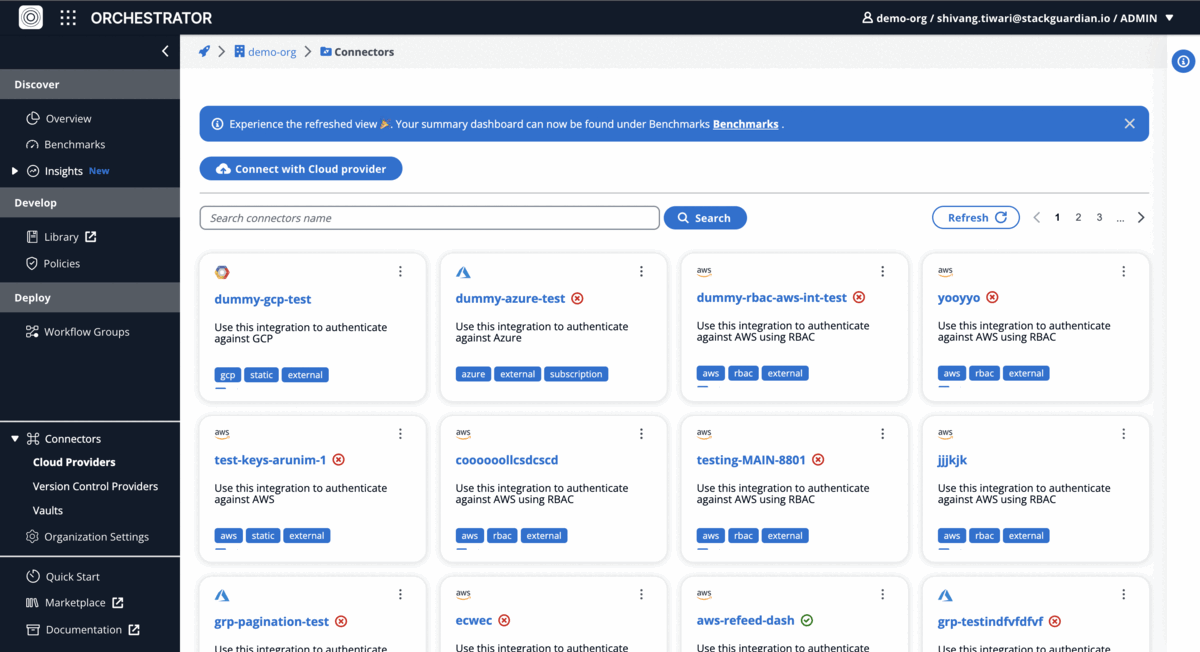
Create and enforce **Custom Benchmark**
---
# Compliance Dashboard
The **Compliance Dashboard** in the Insights Module delivers a detailed analysis of your cloud infrastructure's compliance posture. It synthesizes complex compliance data into clear, actionable insights, helping teams ensure regulatory compliance and mitigate risks.
### Compliance Dashboard[](#compliance-dashboard "Direct link to Compliance Dashboard")
The Compliance Dashboard is a key feature of the Insights module, aimed at identifying compliance gaps and facilitating a focused approach to achieving and maintaining compliance across cloud environments.
#### a) Compliance Checks[](#a-compliance-checks "Direct link to a) Compliance Checks")
Summarizes compliance checks, indicating both passed and failed assessments across cloud connectors, with a total count of checks and outcomes.
#### b) Failed Compliance Checks by Cloud & Severity[](#b-failed-compliance-checks-by-cloud--severity "Direct link to b) Failed Compliance Checks by Cloud & Severity")
Shows the distribution of failed compliance checks across clouds (AWS, Azure, GCP) and severity levels (high, medium, low), aiding in targeted compliance efforts.
#### c) Failed Compliance Checks by Severity[](#c-failed-compliance-checks-by-severity "Direct link to c) Failed Compliance Checks by Severity")
Details the total number of failed compliance checks by severity, highlighting critical areas requiring immediate attention.
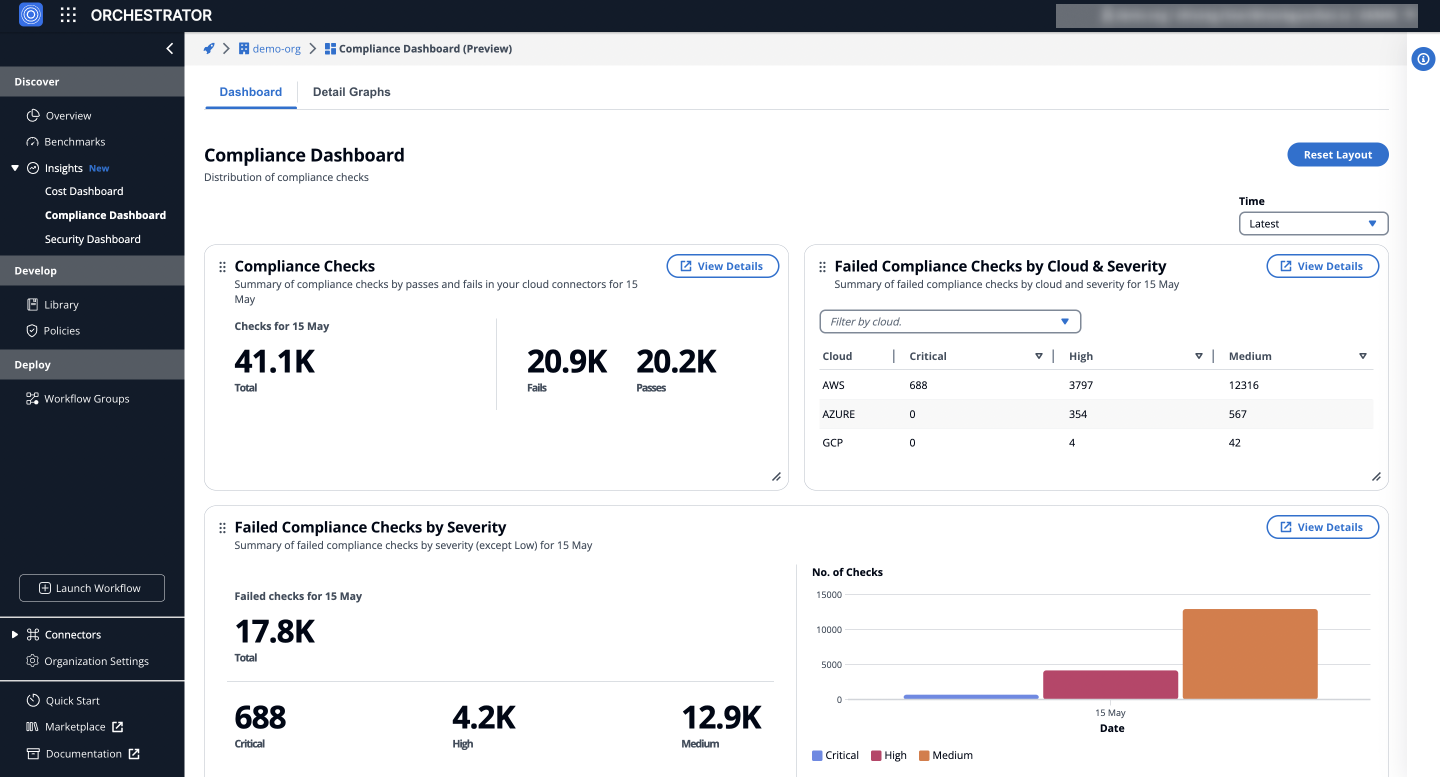
Insights: **Compliance dashboard**
#### d) Failed Compliance Checks by Cloud[](#d-failed-compliance-checks-by-cloud "Direct link to d) Failed Compliance Checks by Cloud")
Provides insights into failed compliance checks per cloud provider, helping identify which cloud environments might be falling short in compliance.
#### e) Failed Compliance Checks by Account[](#e-failed-compliance-checks-by-account "Direct link to e) Failed Compliance Checks by Account")
Outlines failed compliance checks by account, pinpointing specific accounts that may be affecting overall compliance posture negatively.
#### f) Top 10 Failed Compliance Checks[](#f-top-10-failed-compliance-checks "Direct link to f) Top 10 Failed Compliance Checks")
Lists the top 10 failed compliance checks, identifying the most common compliance issues across the cloud infrastructure.
#### g) Top 10 Accounts Failed Compliance Checks[](#g-top-10-accounts-failed-compliance-checks "Direct link to g) Top 10 Accounts Failed Compliance Checks")
Highlights the top 10 accounts with the highest number of *failed compliance checks*, indicating areas for compliance improvement and risk reduction.
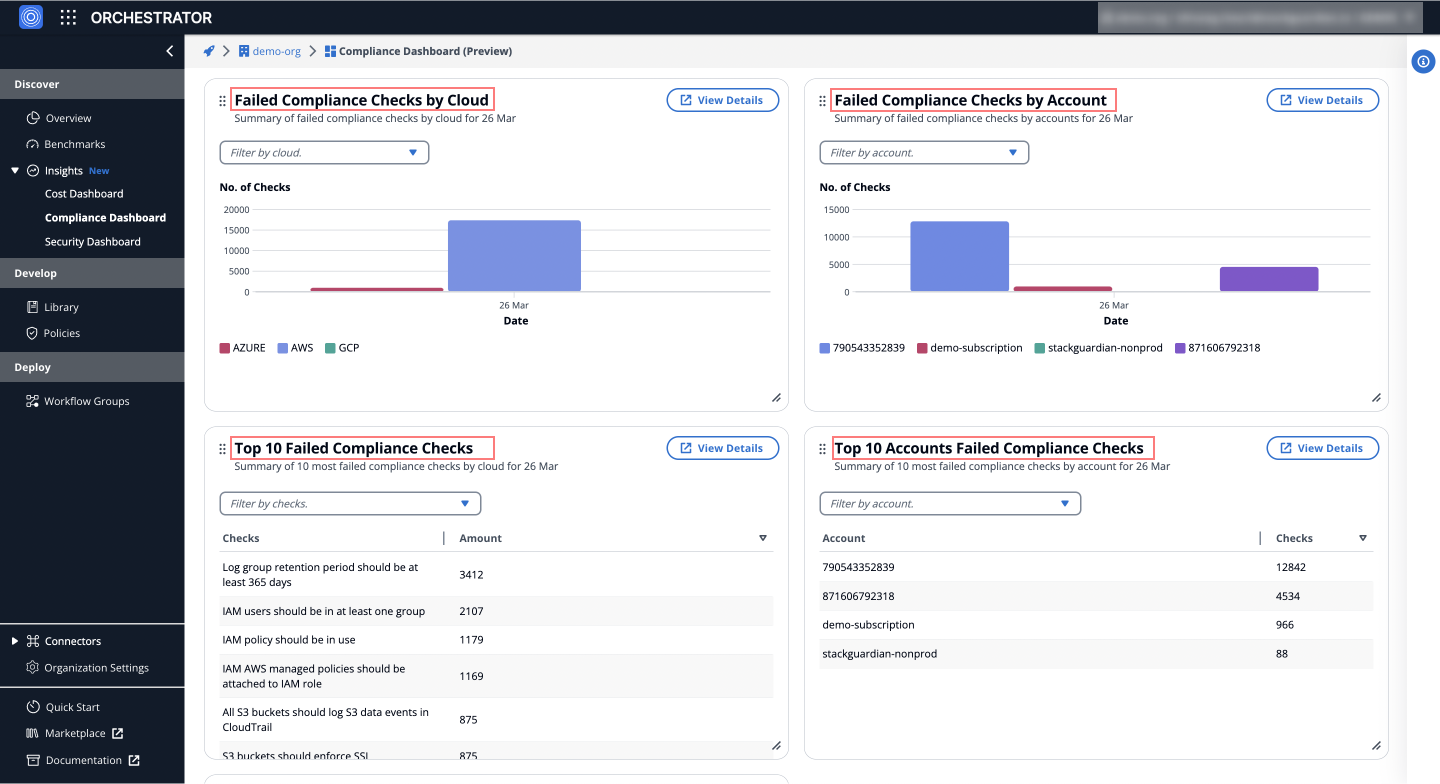
Insights: **Compliance dashboard**
#### h) Compliance Benchmarks[](#h-compliance-benchmarks "Direct link to h) Compliance Benchmarks")
Displays compliance benchmark checks, categorized by standards (AWS GDPR, Azure HIPAA, etc.), offering a standards-based evaluation of cloud compliance.
Regional Compliance
Compliance benchmark requirements may vary based on your deployment region:
* **EU Deployments**: Focus on GDPR compliance and EU-specific regulations
* **US Deployments**: Prioritize HIPAA, FedRAMP, and US state/federal regulations as applicable
Work with your StackGuardian representative to configure benchmarks that match your organization's regional compliance requirements.
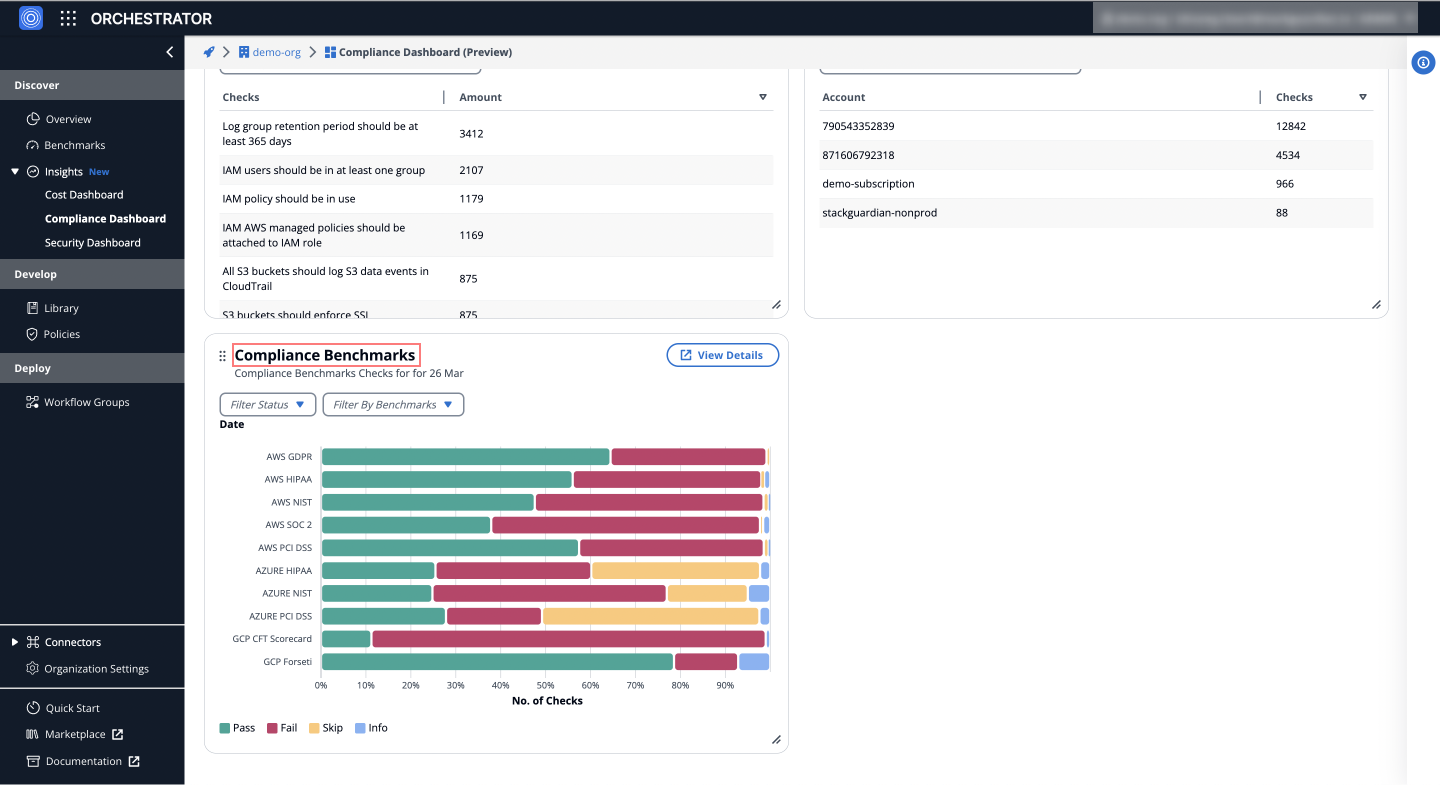
Insights: **Compliance dashboard**
#### g) Compliance benchmark[](#g-compliance-benchmark "Direct link to g) Compliance benchmark")
Tracks adherence to standards like AWS GDPR, AWS HIPAA, and more, categorizing checks into pass, fail, skip, and info for easy identification and remediation.
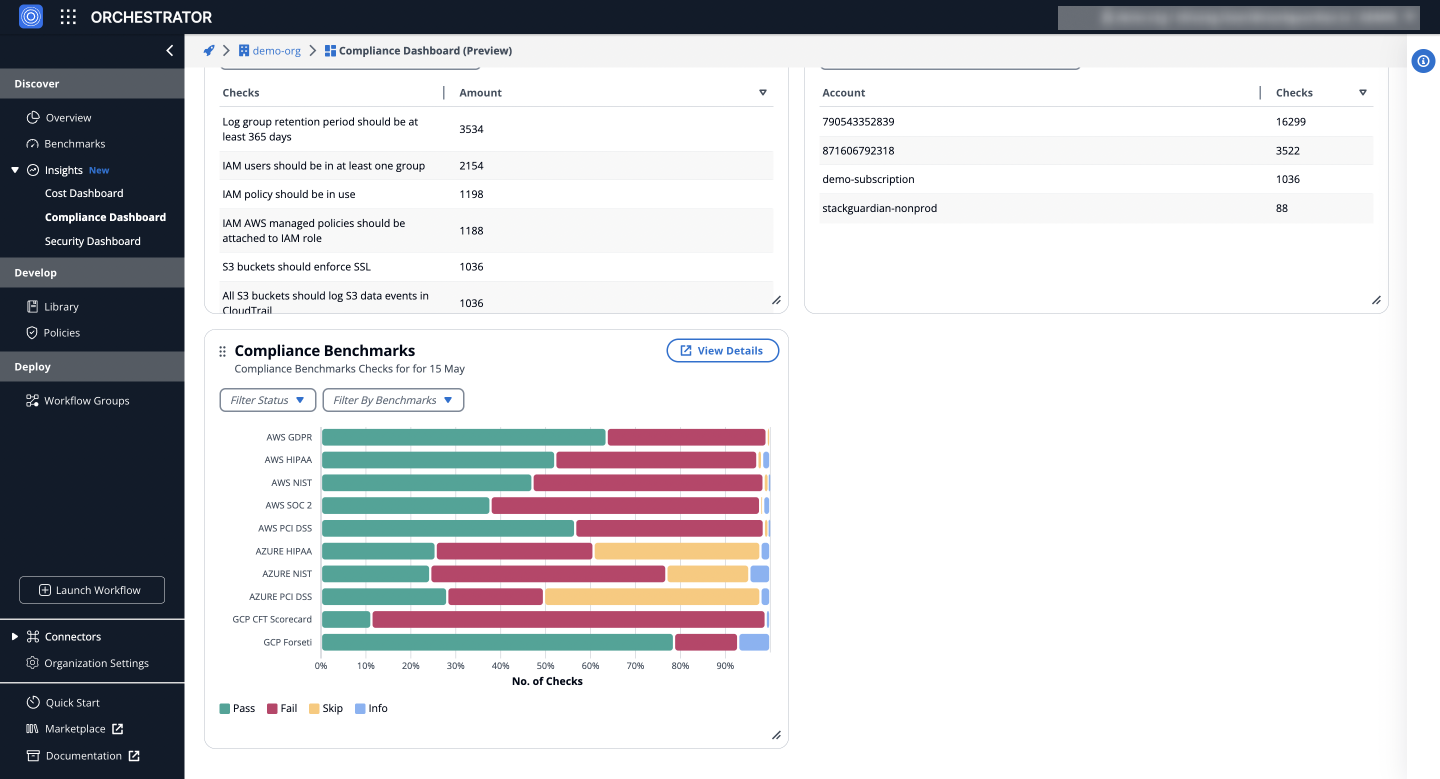
Insights: **Compliance dashboard**
### Detail Graphs[](#detail-graphs "Direct link to Detail Graphs")
Provides an in-depth analysis of compliance checks over time, utilizing the filter panel to customize views by severity (Critical, High, Medium, Low), cloud provider (AWS, Azure, GCP), account, benchmarks and check status. It includes distribution analysis and a detailed breakdown of failed compliance checks, helping users identify trends and prioritize efforts.
#### Distribution of Failed Compliance Checks Over Time[](#distribution-of-failed-compliance-checks-over-time "Direct link to Distribution of Failed Compliance Checks Over Time")
Visually represents the distribution of failed compliance checks over time, allowing users to analyze trends and identify periods with higher failure rates for timely interventions and optimizations.
#### Detailed Breakdown[](#detailed-breakdown "Direct link to Detailed Breakdown")
The detailed breakdown section displays failed compliance checks by severity (Critical, High, Medium, Low) for each day within the selected time frame, based on the applied filters, allowing users to pinpoint specific issues and prioritize efforts.
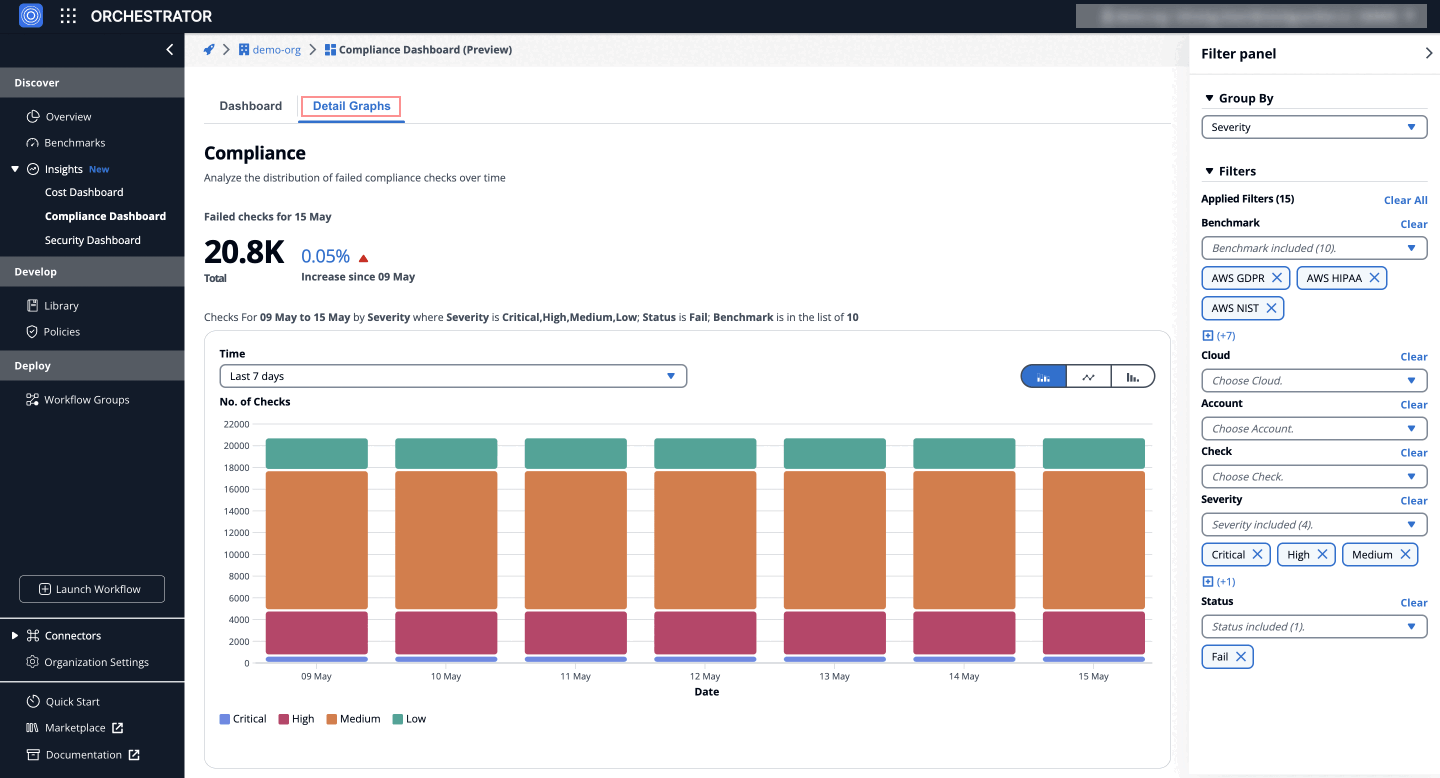
Insights: **Detailed Breakdown of Failed Compliance Checks**
### Detail Checks[](#detail-checks "Direct link to Detail Checks")
To explore a specific day's failed checks:
1. **Navigate** to the **Compliance Dashboard** > **Detail Graphs** > **Detailed Breakdown** table.
2. **Click on the counts** under the **date column** for one of the severities (e.g., High, Medium).
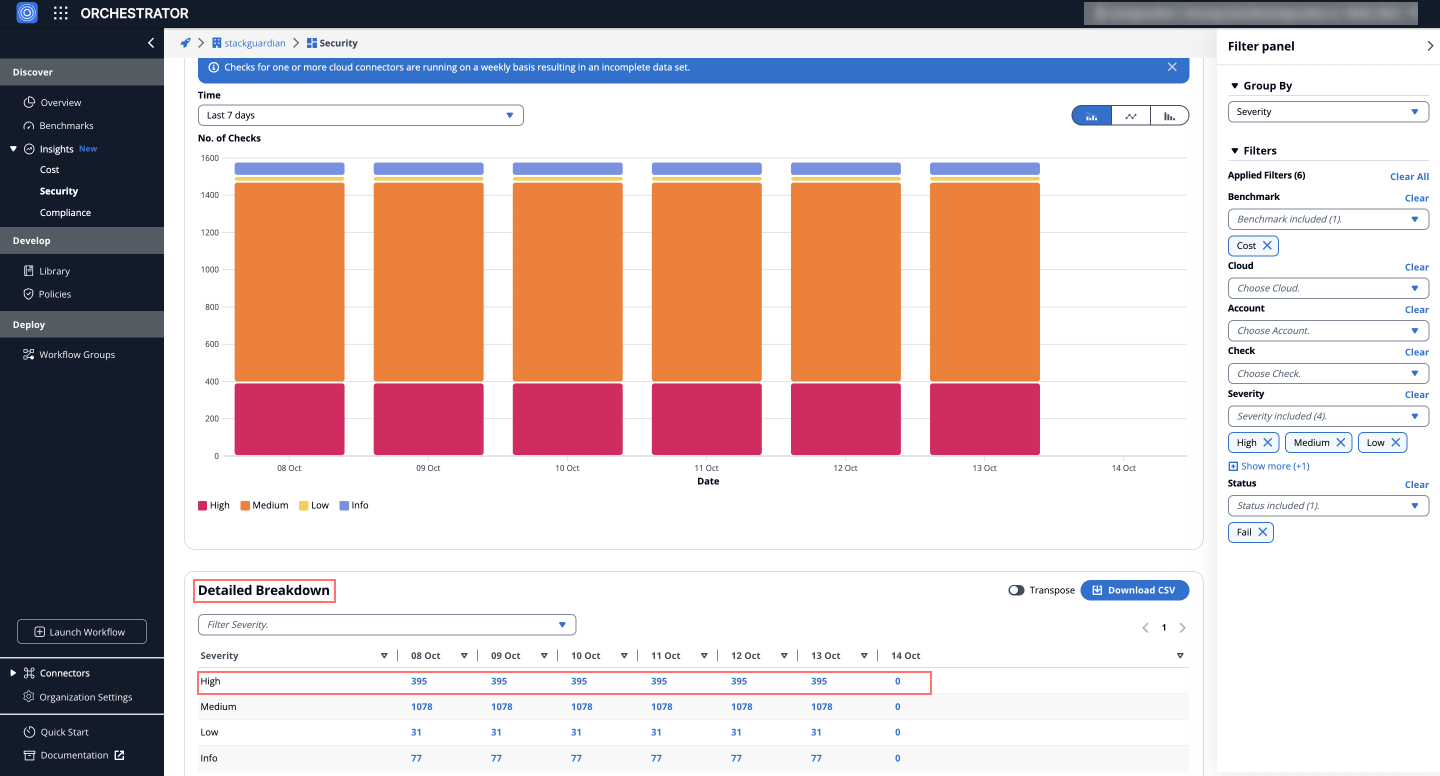
This will redirect you to the **Detail Checks** tab, which lists the failed checks with **severities for that date**, providing detailed insights into the issues.
#### Failed Check Details[](#failed-check-details "Direct link to Failed Check Details")
On the **Detail Checks** tab, clicking on a specific failed check provides a detailed **tabular view** that lists the **reasons**, **resource**, **status** and more for the corresponding cloud account.

This view allows users to pinpoint the affected resources and understand exactly what needs to be done to bring them back into compliance.
---
# Cost Dashboard
The **Insights Module** serves as a simplified yet powerful analytics dashboard, offering a clear view into your cloud infrastructure. It processes complex data to provide straightforward, actionable information, helping teams to enhance their cloud operations and reduce unnecessary costs.
### Cost Dashboard[](#cost-dashboard "Direct link to Cost Dashboard")
This feature is a component of the Insights module that offers visibility into your cloud spending. It highlights inefficient areas by showcasing failed checks categorized by severity. This allows for an in-depth analysis and optimization of cloud expenditure, ensuring cost-effectiveness across your cloud resources.
#### a) Cost Checks[](#a-cost-checks "Direct link to a) Cost Checks")
Provides a summary of cost checks by passes and fails in your cloud connectors, offering a total count of checks performed and their outcomes.
#### b) Failed Cost Checks by Cloud & Severity[](#b-failed-cost-checks-by-cloud--severity "Direct link to b) Failed Cost Checks by Cloud & Severity")
Illustrates the distribution of failed cost checks across different clouds (AWS, Azure, etc.) and their severity levels (high, medium, low), facilitating targeted improvements.
#### c) Failed Cost Checks by Severity[](#c-failed-cost-checks-by-severity "Direct link to c) Failed Cost Checks by Severity")
Displays the total number of failed cost checks categorized by their severity, emphasizing areas that require immediate attention.
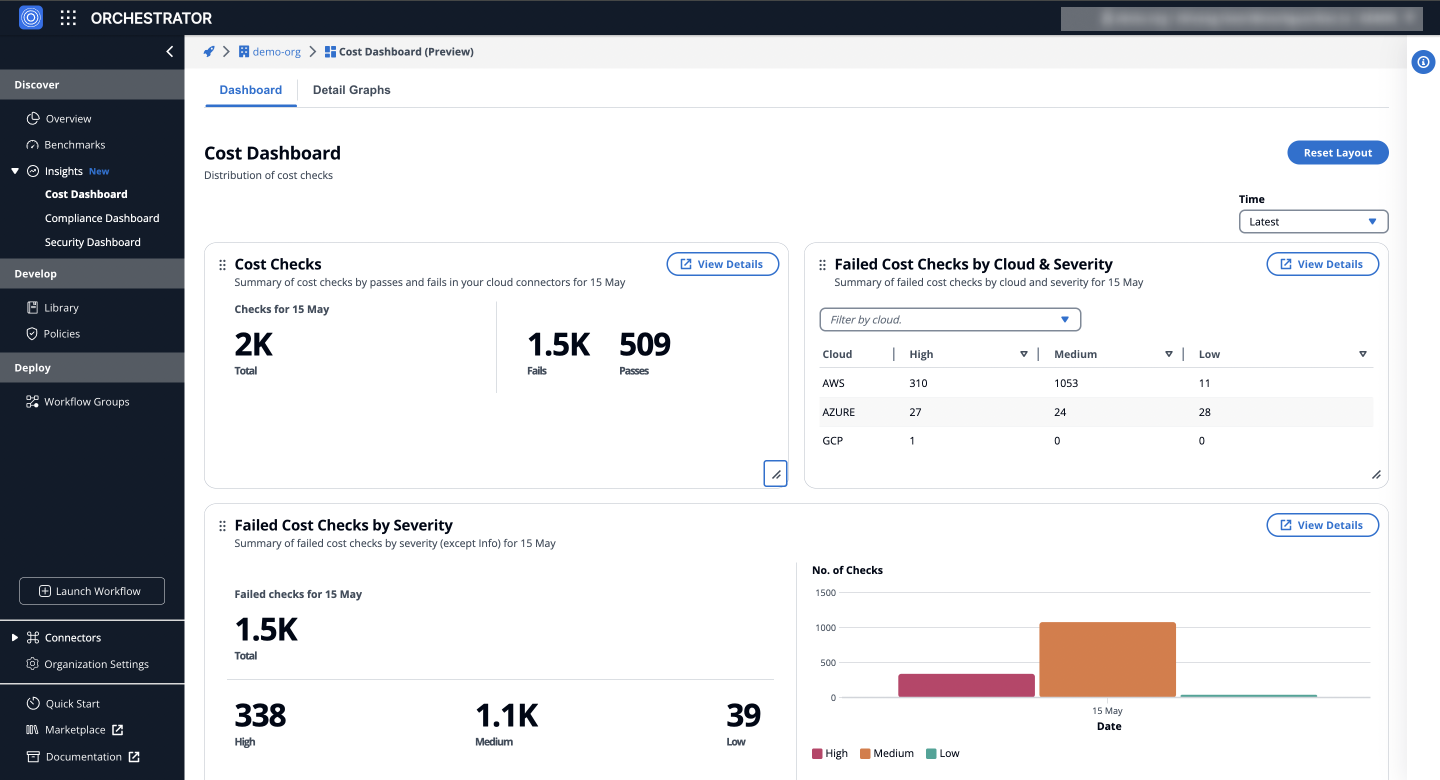
Insights: **Cost dashboard**
#### d) Failed Cost Checks by Cloud[](#d-failed-cost-checks-by-cloud "Direct link to d) Failed Cost Checks by Cloud")
Summarizes failed cost checks per cloud provider, enabling insights into which cloud environments might be incurring higher costs due to misconfigurations or inefficiencies.
#### e) Failed Cost Checks by Account[](#e-failed-cost-checks-by-account "Direct link to e) Failed Cost Checks by Account")
Details failed cost checks by account, helping identify specific accounts that may be contributing disproportionately to cloud spend inefficiencies.
#### f) Top 10 Failed Cost Checks[](#f-top-10-failed-cost-checks "Direct link to f) Top 10 Failed Cost Checks")
Lists the 10 most failed cost checks, pinpointing the common areas of cost wastage or mismanagement across the cloud infrastructure.
#### g) Top 10 Accounts Failed Cost Checks[](#g-top-10-accounts-failed-cost-checks "Direct link to g) Top 10 Accounts Failed Cost Checks")
Highlights the top 10 accounts with the most failed cost checks, indicating potential targets for cost optimization and efficiency improvements.
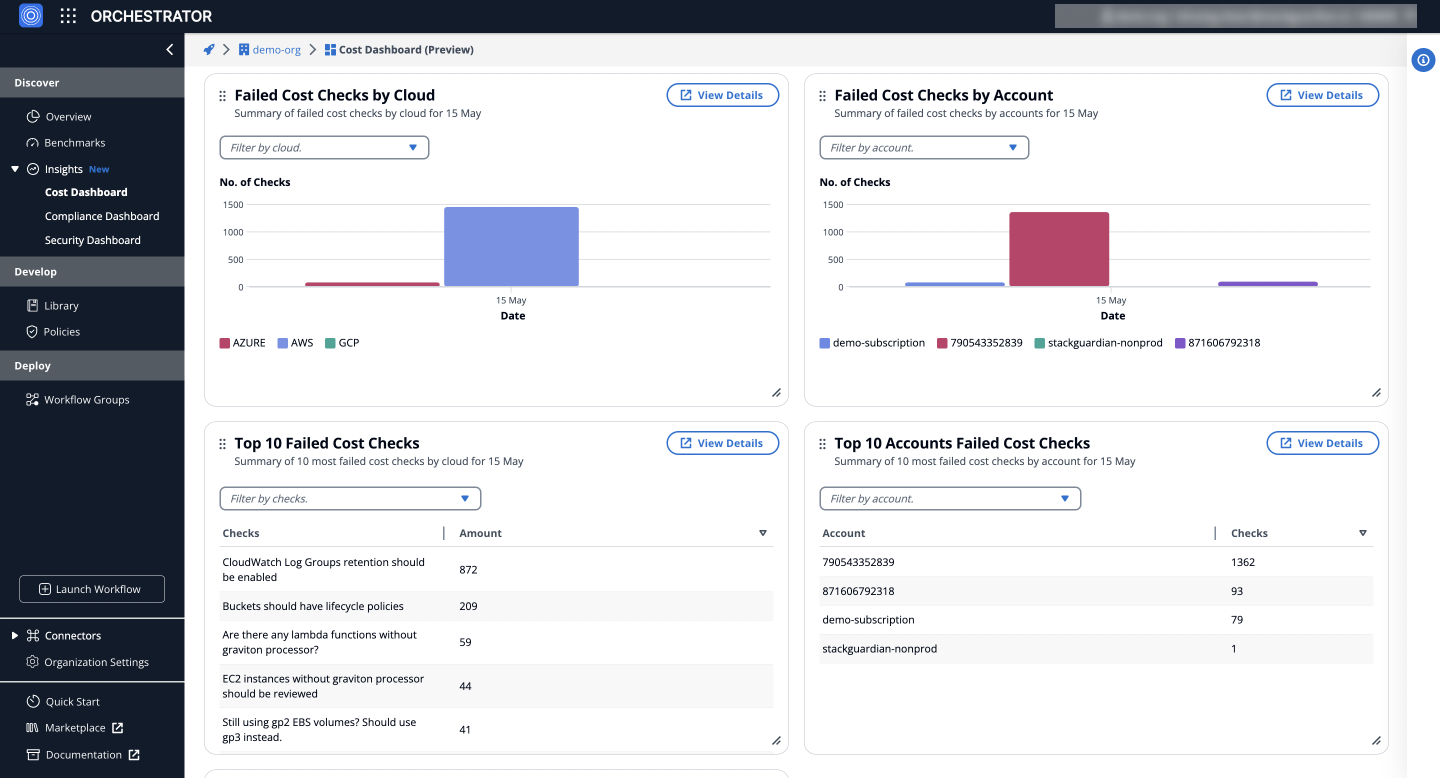
Insights: **Cost dashboard**
#### g) Cost benchmark[](#g-cost-benchmark "Direct link to g) Cost benchmark")
Visualizes cost check performance across AWS, Azure, and GCP, highlighting areas for potential cost optimization.
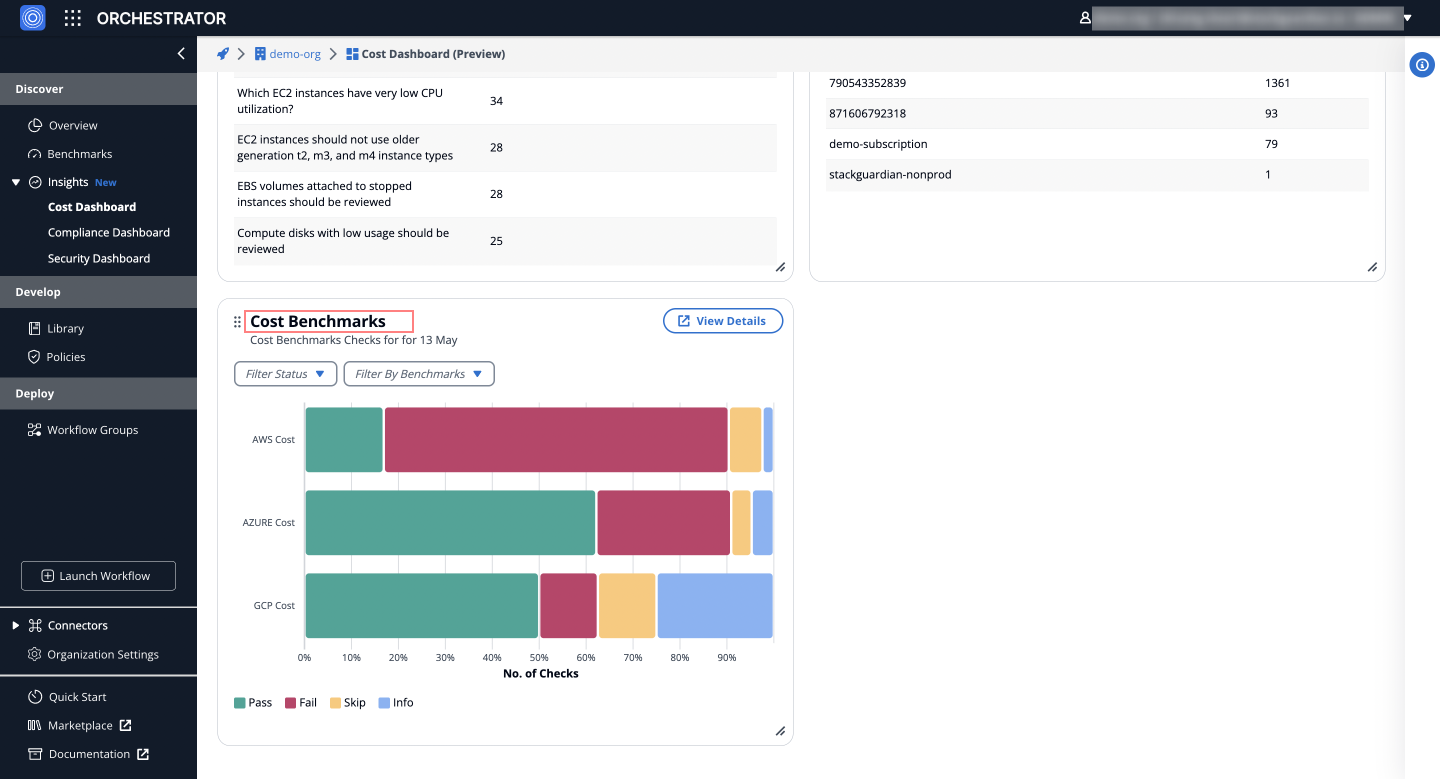
### Detail Graphs[](#detail-graphs "Direct link to Detail Graphs")
Provides an in-depth analysis of cost checks over time, using the filter panel to customize views by severity, cloud provider, account, benchmarks and check status. It includes distribution analysis and a detailed breakdown of failed cost checks, helping users identify trends and prioritize efforts.
#### Distribution of Failed Cost Checks Over Time[](#distribution-of-failed-cost-checks-over-time "Direct link to Distribution of Failed Cost Checks Over Time")
Visually represents the distribution of failed cost checks over time, allowing users to analyze trends and identify periods with higher failure rates for timely interventions and optimizations.
#### Detailed Breakdown of Failed Cost Checks[](#detailed-breakdown-of-failed-cost-checks "Direct link to Detailed Breakdown of Failed Cost Checks")
The **Detailed Breakdown** section, as shown in the screenshot, displays the **failed cost checks by severity** (High, Medium, Low, Info) for each day within the selected time frame. This breakdown is based on the filters applied, allowing users to identify and **prioritize specific issues** effectively.
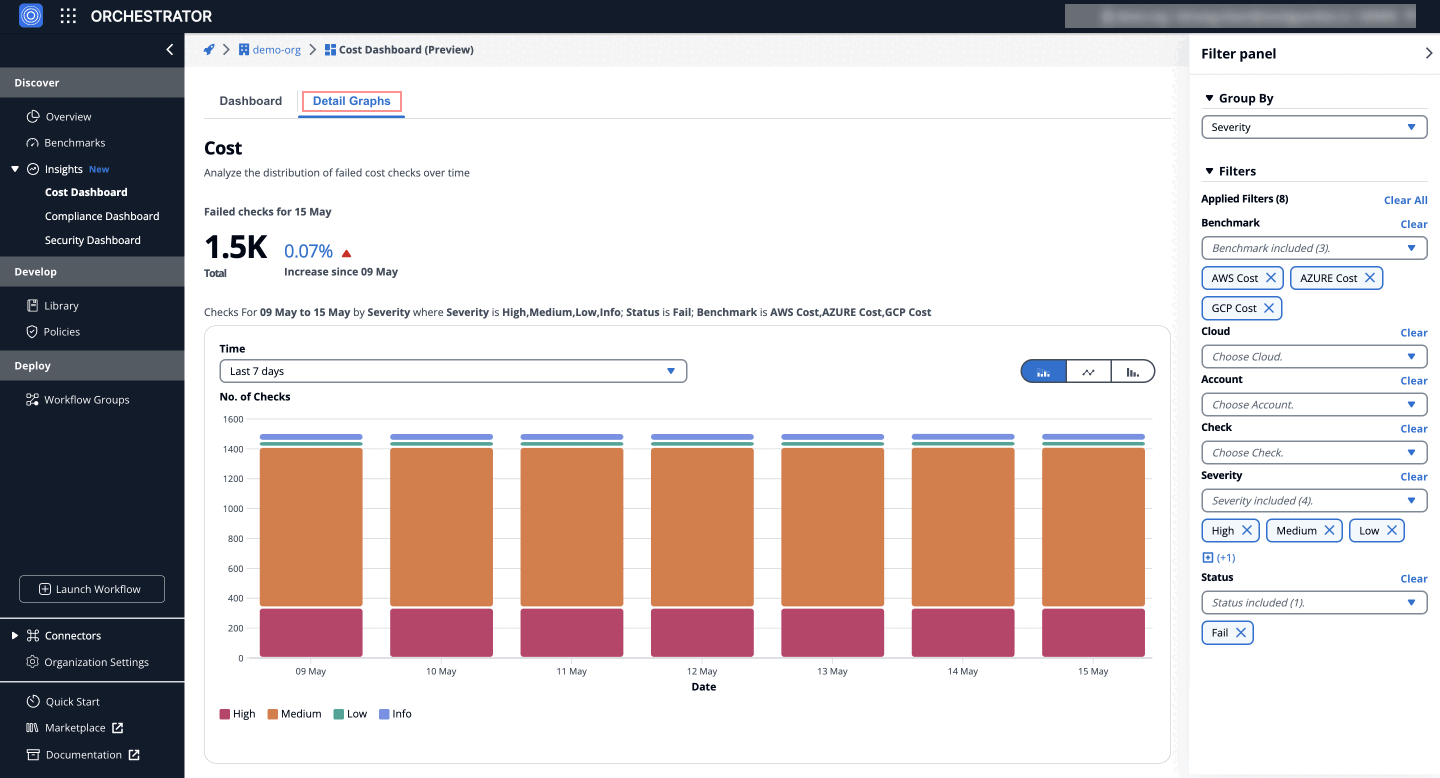
Insights: **Detailed Breakdown of Failed Cost Checks**
### Detail Checks[](#detail-checks "Direct link to Detail Checks")
To explore a specific day's failed checks:
1. **Navigate** to the **Cost Dashboard** > **Detail Graphs** > **Detailed Breakdown** table.
2. **Click on the counts** under the **date column** for one of the severities (e.g., High, Medium).

This will redirect you to the **Detail Checks** tab, which lists the failed checks with **severities for that date**, providing detailed insights into the issues.
#### Failed Check Details[](#failed-check-details "Direct link to Failed Check Details")
On the **Detail Checks** tab, clicking on a specific failed check provides a detailed **tabular view** that lists the **reasons**, **resource**, **status** and more for the corresponding cloud account.

This view allows users to pinpoint the affected resources and understand exactly what needs to be done to bring them back into compliance.
---
# Overview
## Overview[](#overview "Direct link to Overview")
**Benchmarks** serve as a unified dashboard to monitor and enhance your organization's cloud infrastructure across three critical areas: **Cost**, **Compliance**, and **Security**. It provides actionable insights into the overall health of your cloud environment, helping teams address inefficiencies, risks, and vulnerabilities effectively.
## Key Dashboards[](#key-dashboards "Direct link to Key Dashboards")
### Cost Dashboard[](#cost-dashboard "Direct link to Cost Dashboard")
[Cost Dashboard](/docs/discover/insights/cost_dashboard/) tracks cloud expenditures and highlights inefficiencies to optimize budgets:
* **Cost Checks**: Summary of passed and failed checks.
* **Failed Cost Checks**: Analysis by severity, cloud provider, and account.
* **Top 10 Failed Checks**: Identifies recurring cost inefficiencies for optimization.
### Security Dashboard[](#security-dashboard "Direct link to Security Dashboard")
[Security Dashboard](/docs/discover/insights/security_dashboard/) evaluates the security posture of your cloud infrastructure:
* **Security Checks**: Summary of passed/failed checks across accounts.
* **Failed Security Checks by Severity**: Highlights critical vulnerabilities.
* **Top 10 Security Gaps**: Guides prioritization of remediation efforts.
### Compliance Dashboard[](#compliance-dashboard "Direct link to Compliance Dashboard")
[Compliance Dashboard](/docs/discover/insights/compliance_dashboard/) monitors compliance adherence to standards such as AWS GDPR or Azure HIPAA:
* **Compliance Checks**: Overview of passed/failed compliance checks.
* **Failed Checks by Cloud and Severity**: Pinpoints regulatory gaps.
* **Top 10 Compliance Issues**: Focus on critical compliance violations.
These dashboards empower teams to proactively address inefficiencies, ensure compliance, and fortify security, enabling streamlined cloud operations.
## Advanced Features[](#advanced-features "Direct link to Advanced Features")
* **Detail Graphs**: Analyze trends over time for failed checks across cost, compliance, and security.
* **Interactive Breakdown**: Navigate specific failed checks to identify root causes and prioritize fixes.
* **Benchmarks**: Evaluate against industry standards, providing a roadmap for improvement.
---
# Security Dashboard
The **Security Dashboard** within the Insights Module offers a comprehensive overview of your cloud infrastructure's security posture. It utilizes complex data analytics to present clear, actionable insights, enabling teams to fortify their cloud operations against potential threats.
### Security Dashboard Features[](#security-dashboard-features "Direct link to Security Dashboard Features")
This feature is an integral part of the Insights module, designed to offer a panoramic view of your cloud security. It focuses on identifying security gaps by showcasing failed checks, thereby facilitating a targeted approach towards strengthening security defenses.
#### a) Security Checks[](#a-security-checks "Direct link to a) Security Checks")
Offers a summary of security checks, including both passes and fails across your cloud connectors, providing a comprehensive count of checks conducted and their outcomes.
#### b) Failed Security Checks by Cloud & Severity[](#b-failed-security-checks-by-cloud--severity "Direct link to b) Failed Security Checks by Cloud & Severity")
Illustrates the distribution of failed security checks across various clouds (AWS, Azure, GCP, etc.) and their severity levels (high, medium, low), enabling pinpointed security enhancements.
#### c) Failed Security Checks by Severity[](#c-failed-security-checks-by-severity "Direct link to c) Failed Security Checks by Severity")
Displays the total number of failed security checks categorized by severity, highlighting the areas that necessitate urgent attention.
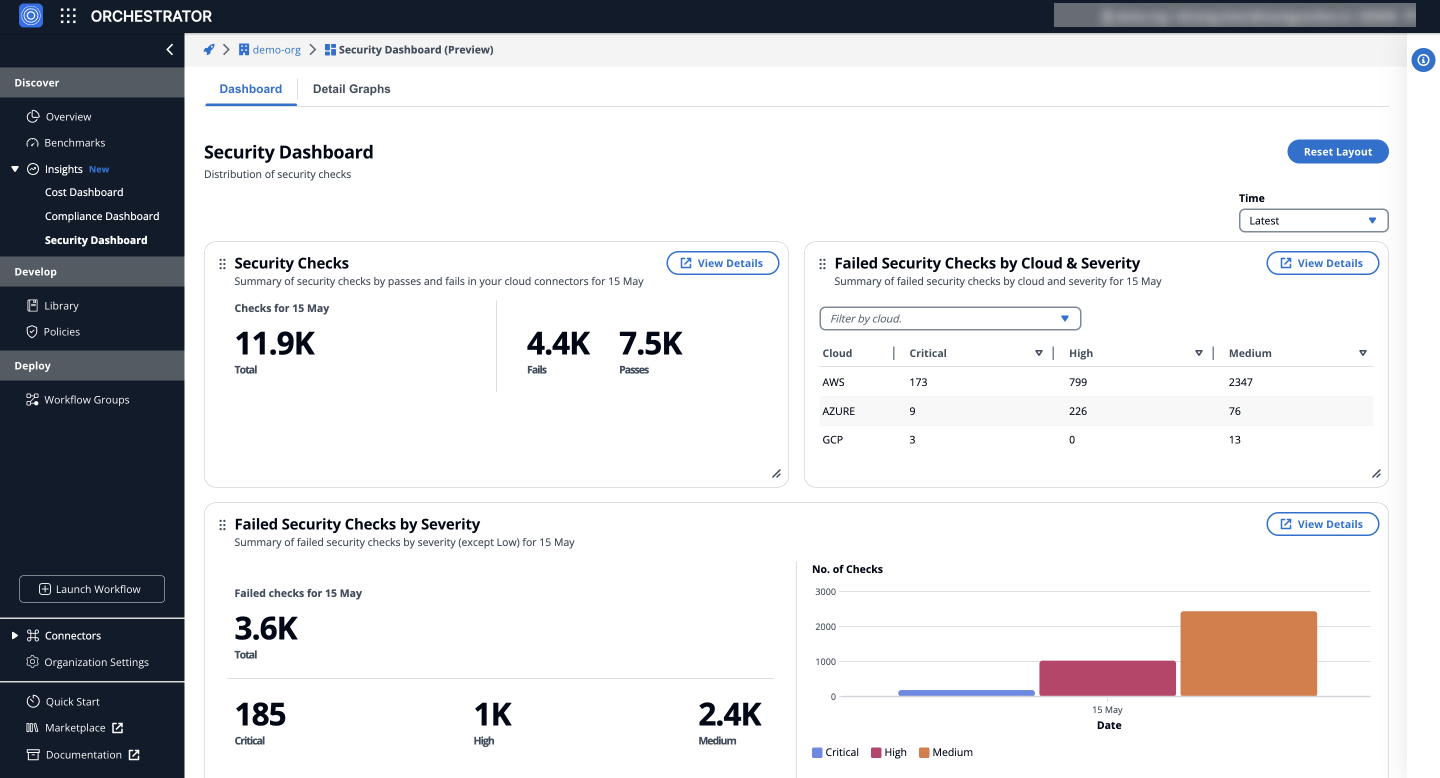
Insights: **Security dashboard**
#### d) Failed Security Checks by Cloud[](#d-failed-security-checks-by-cloud "Direct link to d) Failed Security Checks by Cloud")
Summarizes failed security checks per cloud provider, offering insights into which cloud environments may be more vulnerable or exposed to threats due to misconfigurations or lapses in security practices.
#### e) Failed Security Checks by Account[](#e-failed-security-checks-by-account "Direct link to e) Failed Security Checks by Account")
Details failed security checks by account, aiding in identifying specific accounts that might be disproportionately vulnerable or at risk.
#### f) Top 10 Failed Security Checks[](#f-top-10-failed-security-checks "Direct link to f) Top 10 Failed Security Checks")
Lists the 10 most failed security checks, pinpointing common vulnerabilities or lapses in security measures across the cloud infrastructure.
#### g) Top 10 Accounts Failed Security Checks[](#g-top-10-accounts-failed-security-checks "Direct link to g) Top 10 Accounts Failed Security Checks")
Highlights the top 10 accounts with the most failed security checks, suggesting potential focal points for security improvement and risk mitigation.
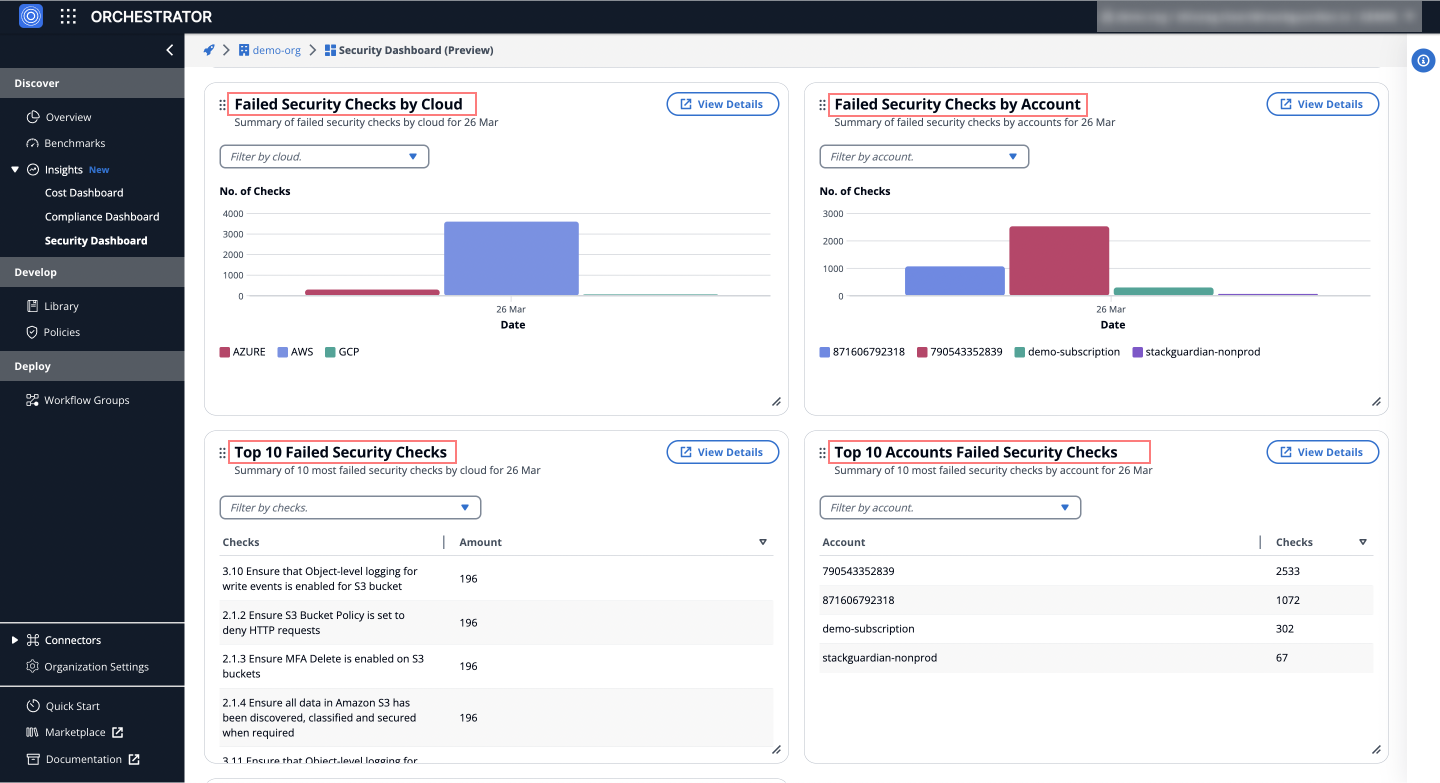
Insights: **Security dashboard**
#### h) Security Benchmarks[](#h-security-benchmarks "Direct link to h) Security Benchmarks")
Presents security benchmark checks for your cloud infrastructure, categorized by compliance standards (AWS CIS, Azure CIS, etc.), facilitating a standards-based assessment of your cloud security posture.
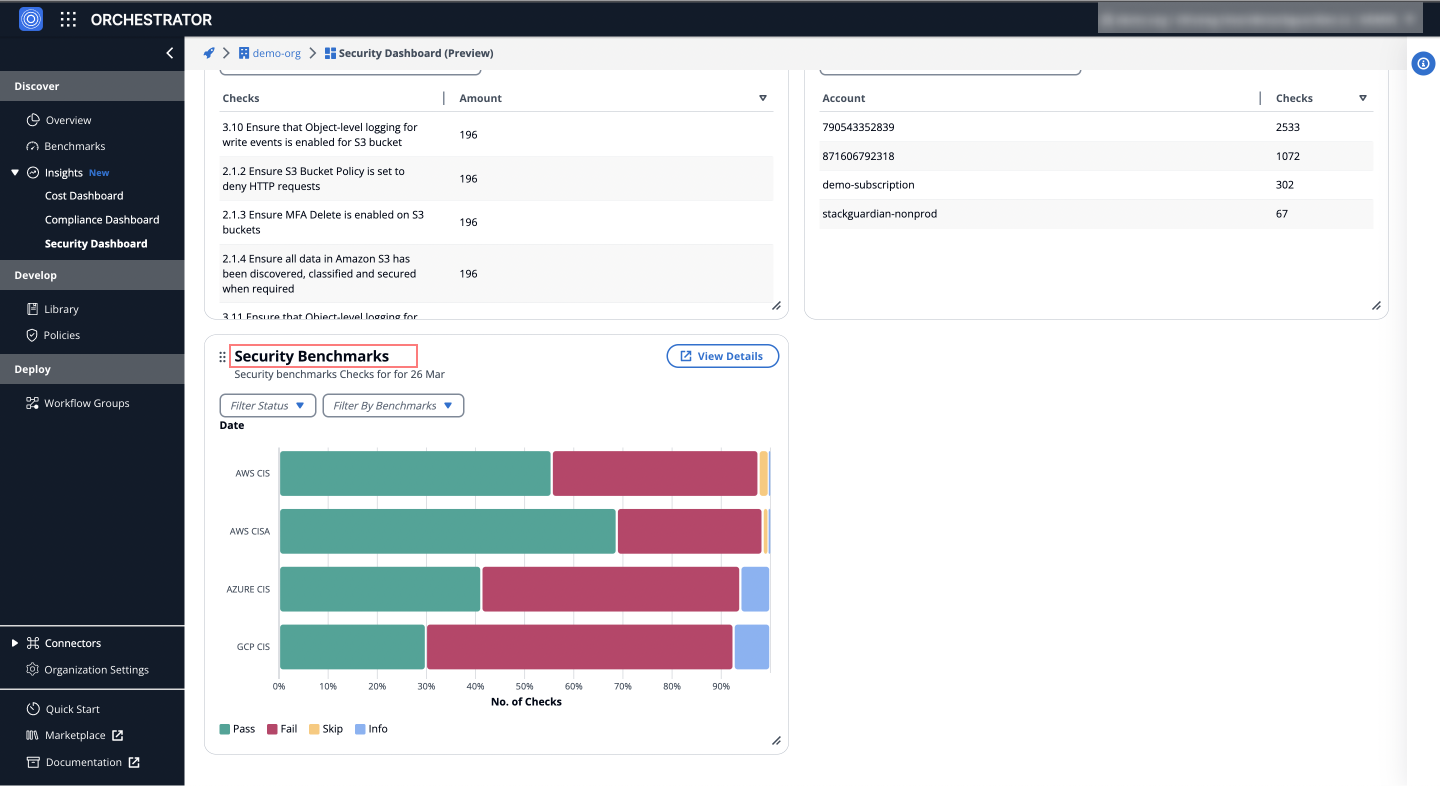
Insights: **Security dashboard**
#### g) Security benchmark[](#g-security-benchmark "Direct link to g) Security benchmark")
Categorizes checks for AWS CIS, AWS CISA, AZURE CIS, and GCP CIS into pass, fail, skip, and info, aiding in the swift identification and resolution of security issues.
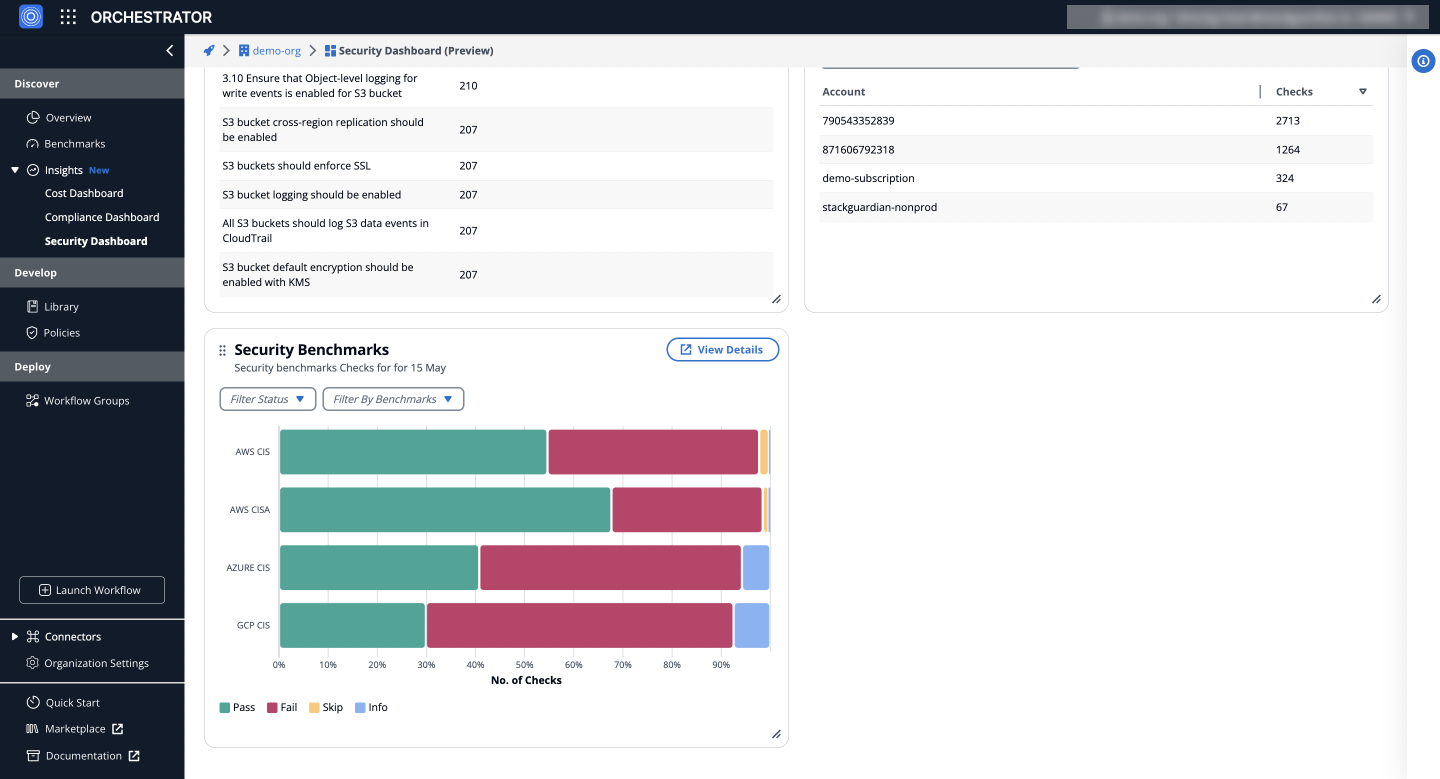
Insights: **Security dashboard**
### Detail Graphs[](#detail-graphs "Direct link to Detail Graphs")
Provides an in-depth analysis of security checks over time, utilizing the filter panel to customize views by severity (Critical, High, Medium, Low), cloud provider (AWS, Azure, GCP), account, benchmarks and check status. It includes distribution analysis and a detailed breakdown of failed security checks, helping users identify trends and prioritize efforts.
#### Distribution of Failed Security Checks Over Time[](#distribution-of-failed-security-checks-over-time "Direct link to Distribution of Failed Security Checks Over Time")
Visually represents the distribution of failed security checks over time, grouped by severity (Critical, High, Medium, Low). Users can analyze trends and identify periods with higher failure rates for timely interventions and optimizations.
#### Detailed Breakdown[](#detailed-breakdown "Direct link to Detailed Breakdown")
The detailed breakdown section displays failed security checks by severity (Critical, High, Medium, Low) for each day within the selected time frame, based on the applied filters, allowing users to pinpoint specific issues and prioritize efforts.
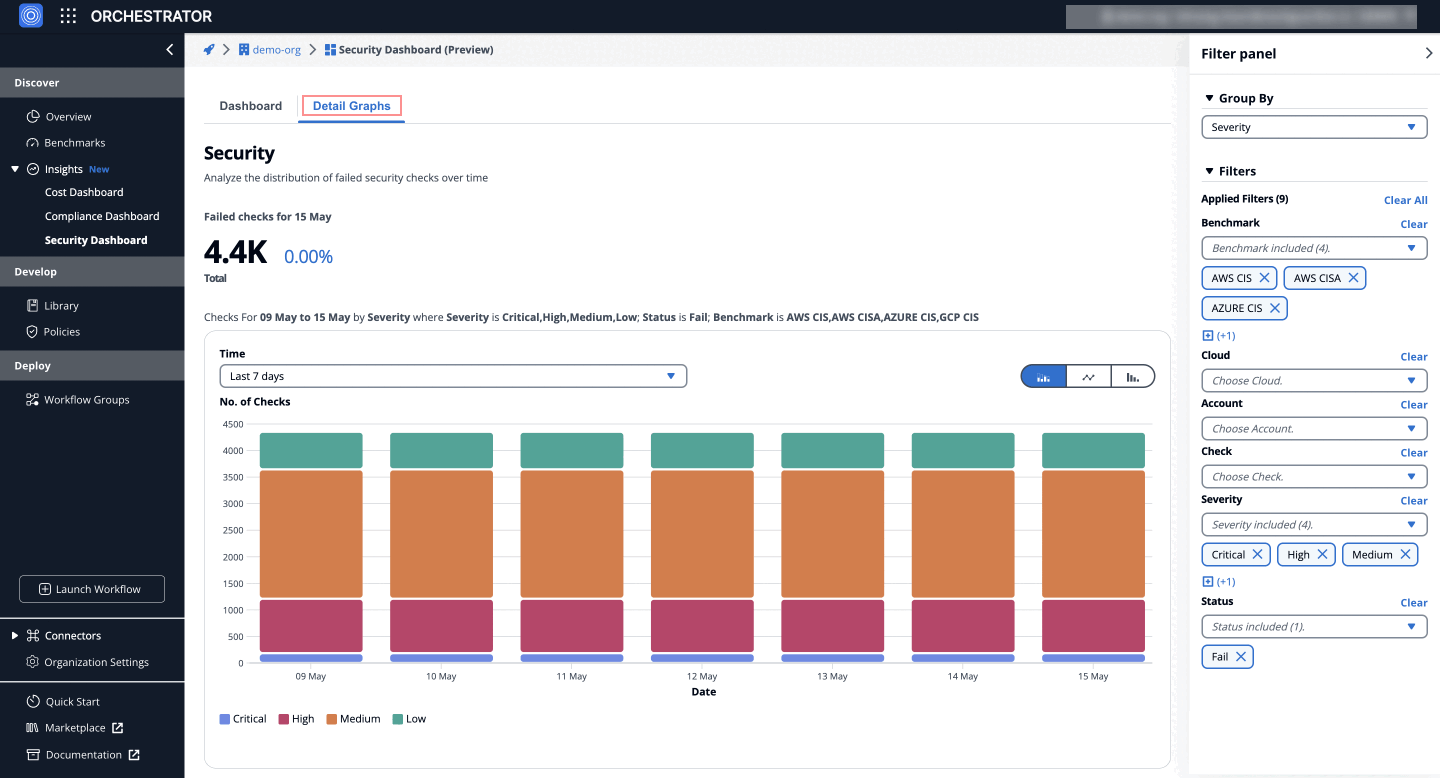
Insights: **Detailed Breakdown of Failed Security Checks**
### Detail Checks[](#detail-checks "Direct link to Detail Checks")
To explore a specific day's failed checks:
1. **Navigate** to the **Security Dashboard** > **Detail Graphs** > **Detailed Breakdown** table.
2. **Click on the counts** under the **date column** for one of the severities (e.g., High, Medium).

This will redirect you to the **Detail Checks** tab, which lists the failed checks with **severities for that date**, providing detailed insights into the issues.
#### Failed Check Details[](#failed-check-details "Direct link to Failed Check Details")
On the **Detail Checks** tab, clicking on a specific failed check provides a detailed **tabular view** that lists the **reasons**, **resource**, **status** and more for the corresponding cloud account.

This view allows users to pinpoint the affected resources and understand exactly what needs to be done to bring them back into compliance.
---
# Email Notification
## Overview[](#overview "Direct link to Overview")
The **Email Notification** allow users to sign up for weekly progress in regards to cost, security and compliance benchmarks. Regularly tracking these metrics helps to gain visibility and identify systematic misconfigurations.
## Accessing Email Notifications[](#accessing-email-notifications "Direct link to Accessing Email Notifications")
Go to **SGCode** > **Benchmarks** > **Settings** and select **Email Notification - Insights**.
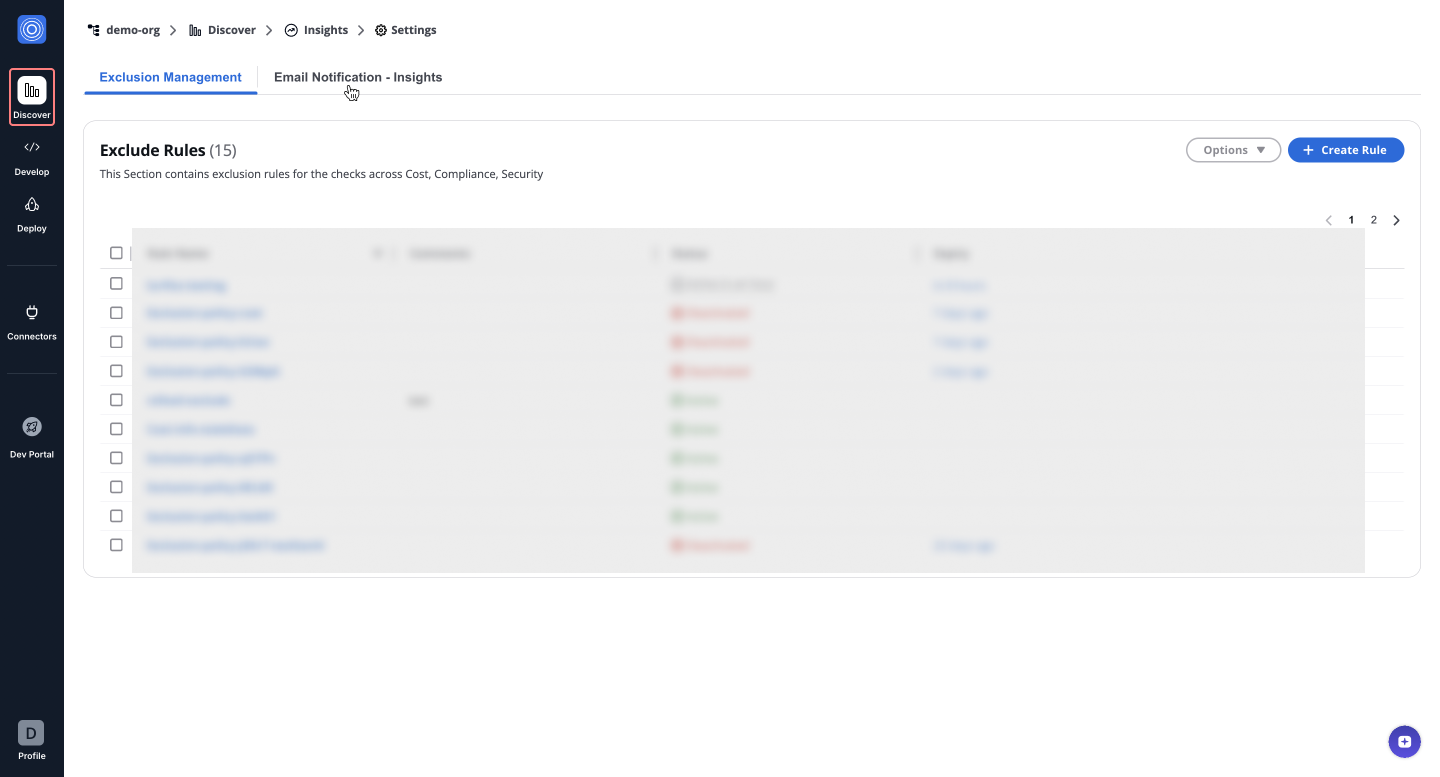
## Adding a new recipient[](#adding-a-new-recipient "Direct link to Adding a new recipient")
1. Click **Add Recipients**.
2. Select an email from the dropdown in the pop-up.
3. Click **Confirm** to add the recipient.
note
After adding, assign notification types (**Cost**, **Security**, **Compliance**). By default, all categories are selected, ensuring recipients receive relevant updates.
## Modifying or removing recipients[](#modifying-or-removing-recipients "Direct link to Modifying or removing recipients")
1. Toggle **Cost**, **Security**, or **Compliance** to update notification preferences.
2. Click **Save** to apply changes.
3. To remove a recipient, select their email and click **Delete**.
info
Changes apply immediately, and recipients will receive updates based on the new settings.
---
# Exclusion Management
## Overview[](#overview "Direct link to Overview")
The **Exclusion Management** allows organizations to ignore specific findings from Insight reports, ensuring reports are tailored, more focused, and actionable. This is particularly useful for excluding irrelevant findings, enhancing decision-making efficiency.
## How it helps[](#how-it-helps "Direct link to How it helps")
Organizations often encounter findings that are irrelevant to their goals. The Exclusion Management addresses this by enabling users to define rules that filter out unnecessary findings. These exclusions ensure:
* **Removes irrelevant findings** – Reduces report clutter.
* **Enhances report accuracy** – Focuses on important insights.
* **Provides flexible control** – Temporarily or permanently exclude findings.
* **Improves efficiency** – Enables teams to act on key findings faster.
## Steps to Create Exclusion Rules[](#steps-to-create-exclusion-rules "Direct link to Steps to Create Exclusion Rules")
Let’s create an exclusion rule with an example. Follow these steps:
Rules Activation
The **Exclusion Rule** will be applied every time the finding aggregation runs, which occurs **every 4 hours**.
1. Navigate to **SGCode** > **Benchmarks** > **Settings** > **Exclusion Management**:

2. Click on **+ Create Rule** and configure the following filters:
* **Benchmarks**: Select benchmarks like *Cost*, *AWS CIS*, etc.
* **Cloud**: Choose the cloud platform (e.g., *Azure*).
* **Check**: Define specific checks to exclude (e.g., *Unused disk should be removed*).
* **Status**: Select the status (e.g., *Fail*).
3. Click **Next: Configure** to proceed.
4. (Optional) Specify an **Exclude Until** date. If left empty (null), the findings are excluded **permanently**.
5. Click **Create** to finalize the rule.
## Example: Excluding Cost Benchmarks[](#example-excluding-cost-benchmarks "Direct link to Example: Excluding Cost Benchmarks")
A rule named **"Exclusion-policy-cost"** excludes cost-related findings from **SGCode** > **Benchmarks** > **Cost** > **Detail Graphs**, resulting in cleaner, focused reports. Similar rules can be created for **Security** and **Compliance** dashboards. By leveraging this system, organizations can streamline their insights, focus on key issues, and drive better outcomes. 🚀
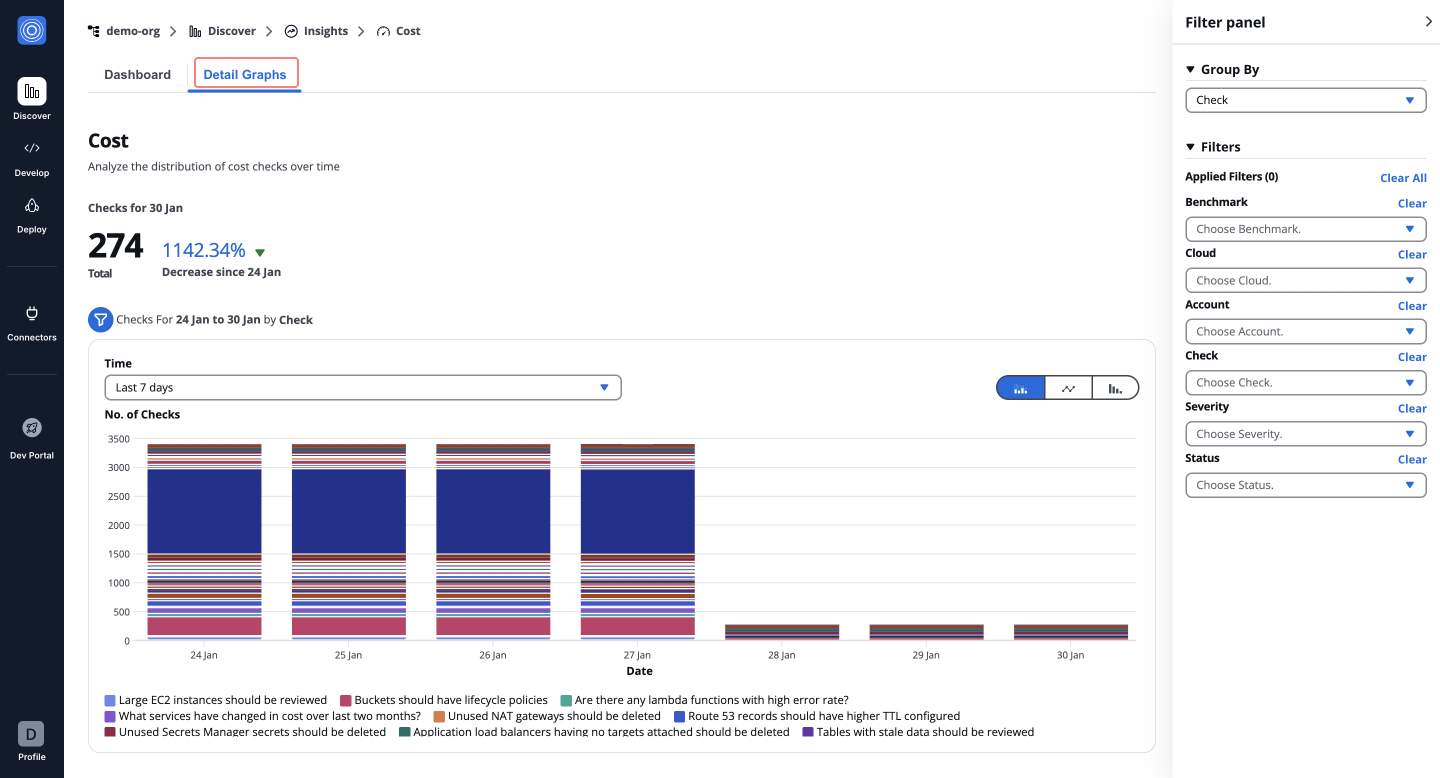
---
# Quick start: Codify Infrastructure
Auto-discover your cloud resources and convert them into version-controlled IaC in minutes.
## Overview[](#overview "Direct link to Overview")
This guide walks you through the Codify infrastructure onboarding path in StackGuardian. By the end, you'll have connected your cloud provider and a Git repository, and you'll have generated and published your first infrastructure code.
**Prerequisites**:
* An AWS cloud account with the necessary credentials
* A GitHub or GitLab account with at least one repository
## Step 1: Choose your onboarding path[](#step-1-choose-your-onboarding-path "Direct link to Step 1: Choose your onboarding path")
When you first sign in, StackGuardian asks what you'd like to do first. Select **Codify infrastructure** to auto-discover and convert your existing cloud resources to IaC.
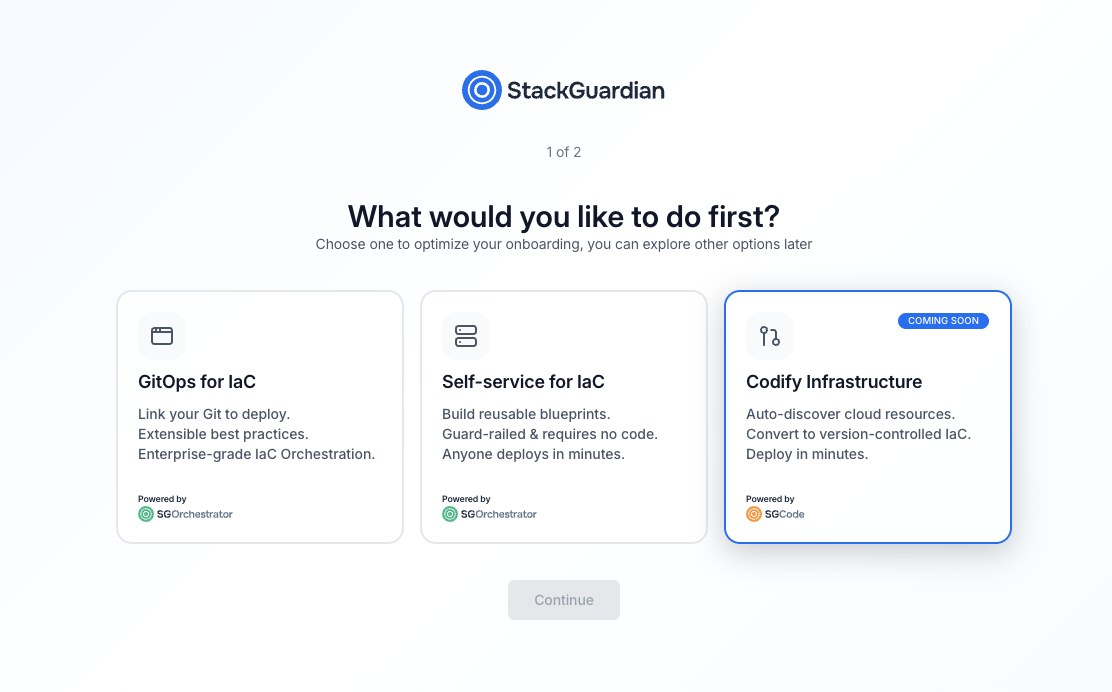
*Choose your onboarding path*
The three available paths are:
* **GitOps for IaC** — Link your Git repositories to deploy infrastructure using version-controlled code
* **Self-service for IaC** — Build reusable blueprints that teams can deploy without writing code
* **Codify infrastructure** — Auto-discover and convert existing cloud resources to IaC
Select **Codify infrastructure**, then select **Continue**.
## Step 2: Set up your organization[](#step-2-set-up-your-organization "Direct link to Step 2: Set up your organization")
Enter a name for your organization. This is the workspace where your projects, connectors, and generated code will live.

*Set up your organization*
| Field | Required | Description |
| ----------------- | -------- | -------------------------------------------------------------------------------------- |
| Organization name | Yes | A unique identifier for your organization. Use lowercase letters and hyphens. |
| Invite teammates | No | Enter one or more email addresses to invite collaborators. You can also do this later. |
Select **Get started** when you're ready.
## Step 3: Connect and scan your cloud[](#step-3-connect-and-scan-your-cloud "Direct link to Step 3: Connect and scan your cloud")
After setup, you'll land on the SGCode overview page. The **Getting Started with SGCode** checklist guides you through three steps: connecting your cloud, browsing resources and codifying, and connecting your Git repository.

*Connect and scan your cloud*
To connect your cloud provider:
1. Select **Connect & scan your Cloud** in the checklist.
2. In the dialog, select your cloud provider — AWS is currently supported. Azure support is coming soon.
3. Select an authentication method — RBAC (role-based access control) or OIDC (OpenID Connect).
4. Enter a connector name. Optionally, add a description and tags.
5. Enter your AWS Role ARN in the format `arn:aws:iam:::role/`.
6. Copy the pre-filled External ID for the role — you'll need this when setting up the trust relationship in AWS.
7. Select **Connect & scan**.
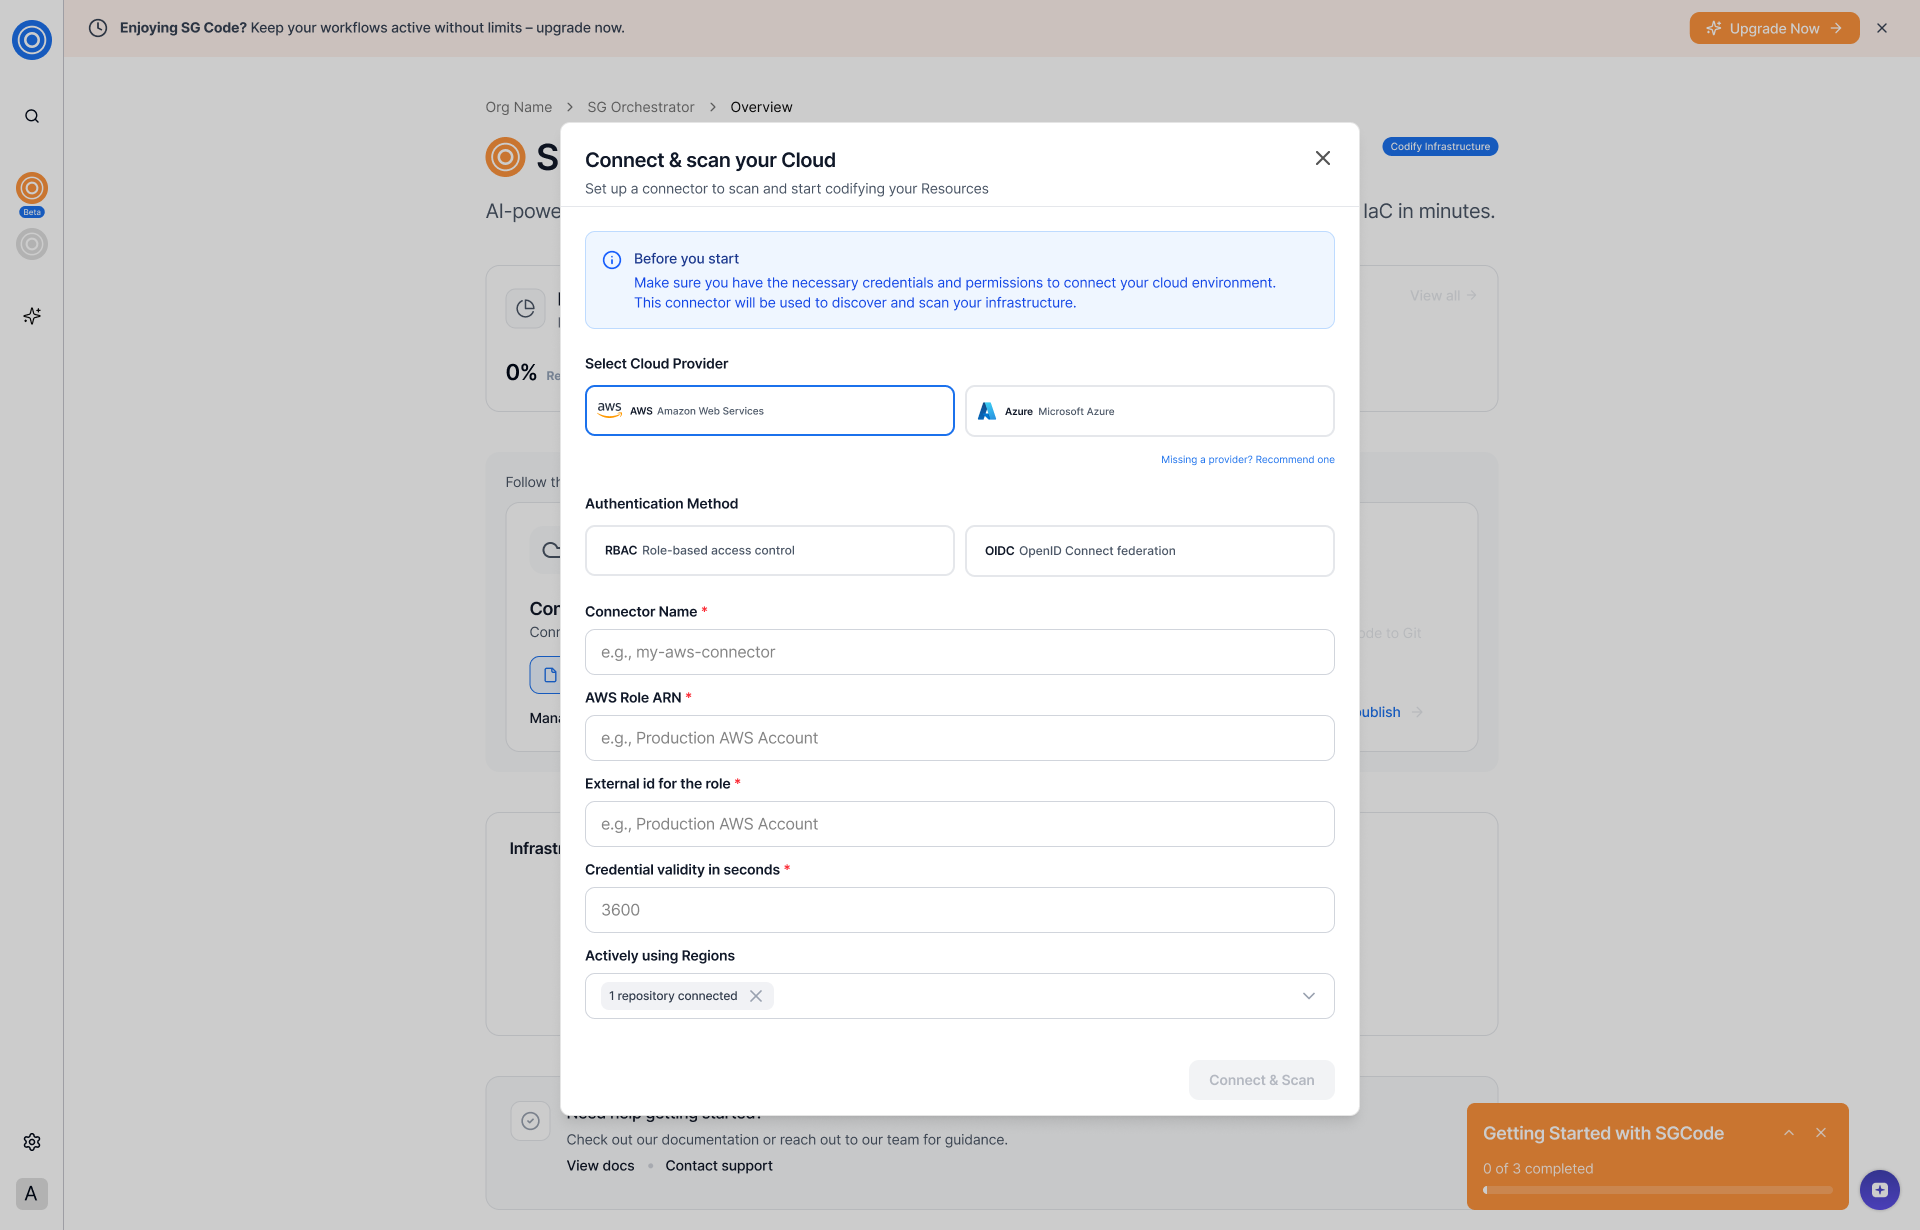
*Connect and scan your cloud*
note
Before you start: Ensure you have the necessary credentials from your cloud provider. You can find setup guides in the StackGuardian documentation.
### AWS Role ARN[](#aws-role-arn "Direct link to AWS Role ARN")
To authenticate with AWS, StackGuardian uses an IAM role with a cross-account trust relationship. You'll need to:
* Create an IAM role in your AWS account.
* Add StackGuardian as a trusted entity using the external ID shown in the form.
* Attach the permissions your connectors need (for example, read-only access for discovery).
* Copy the role ARN from AWS and paste it into the **AWS Role ARN** field.
Once connected, the scan starts automatically. The scan may take a few minutes — SGCode scans all resources across your connected cloud account and shows a live progress indicator.
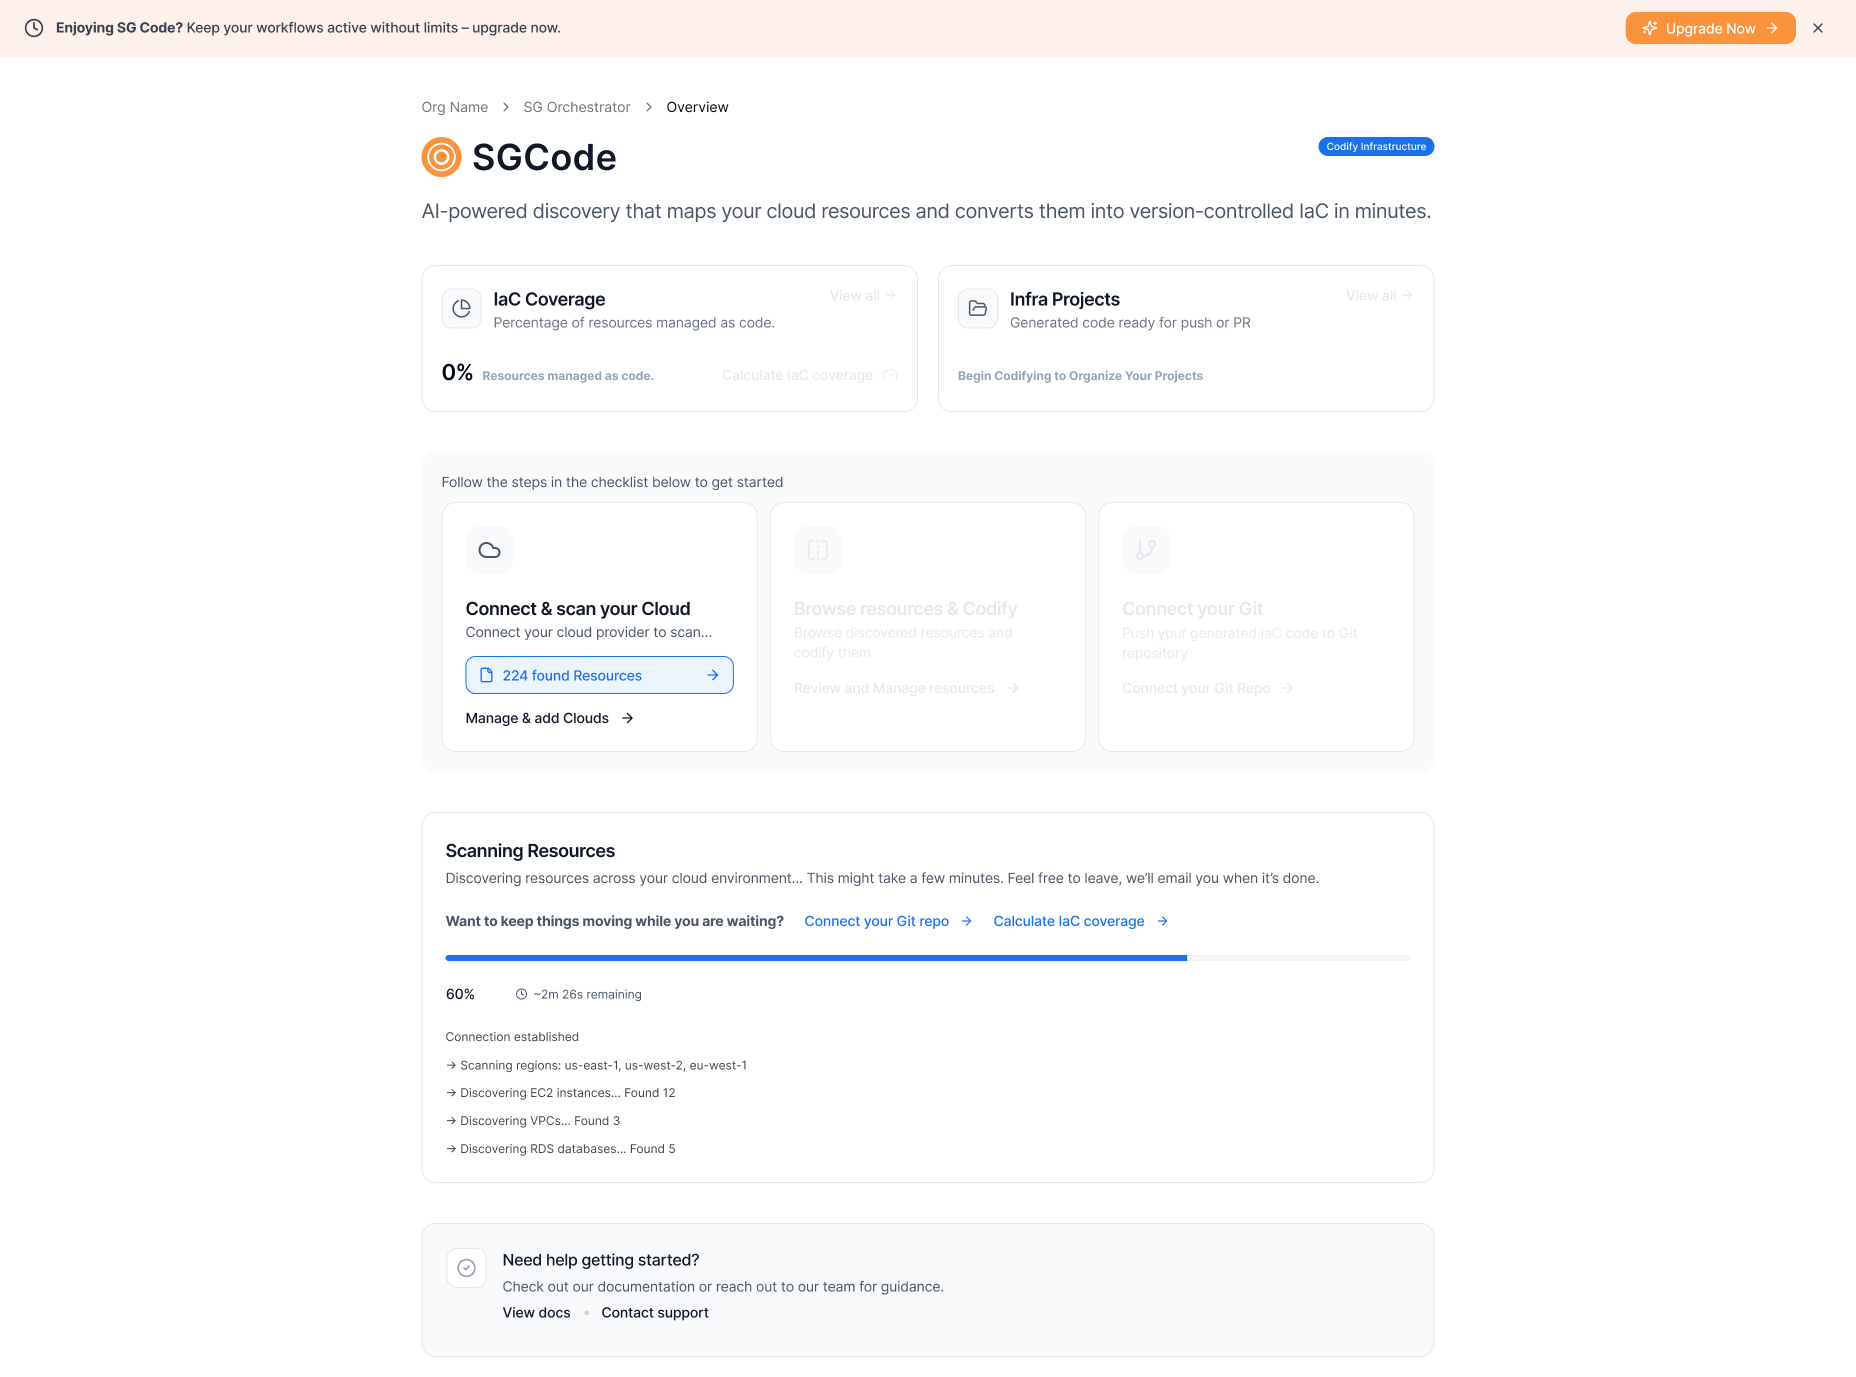
*Connect in progress*
You can leave this page while the scan runs. SGCode notifies you when it's done.
## Step 4: Browse resources and codify[](#step-4-browse-resources-and-codify "Direct link to Step 4: Browse resources and codify")
Once the scan is complete, the checklist updates to show the number of resources found. Select **Browse resources & Codify** to proceed.
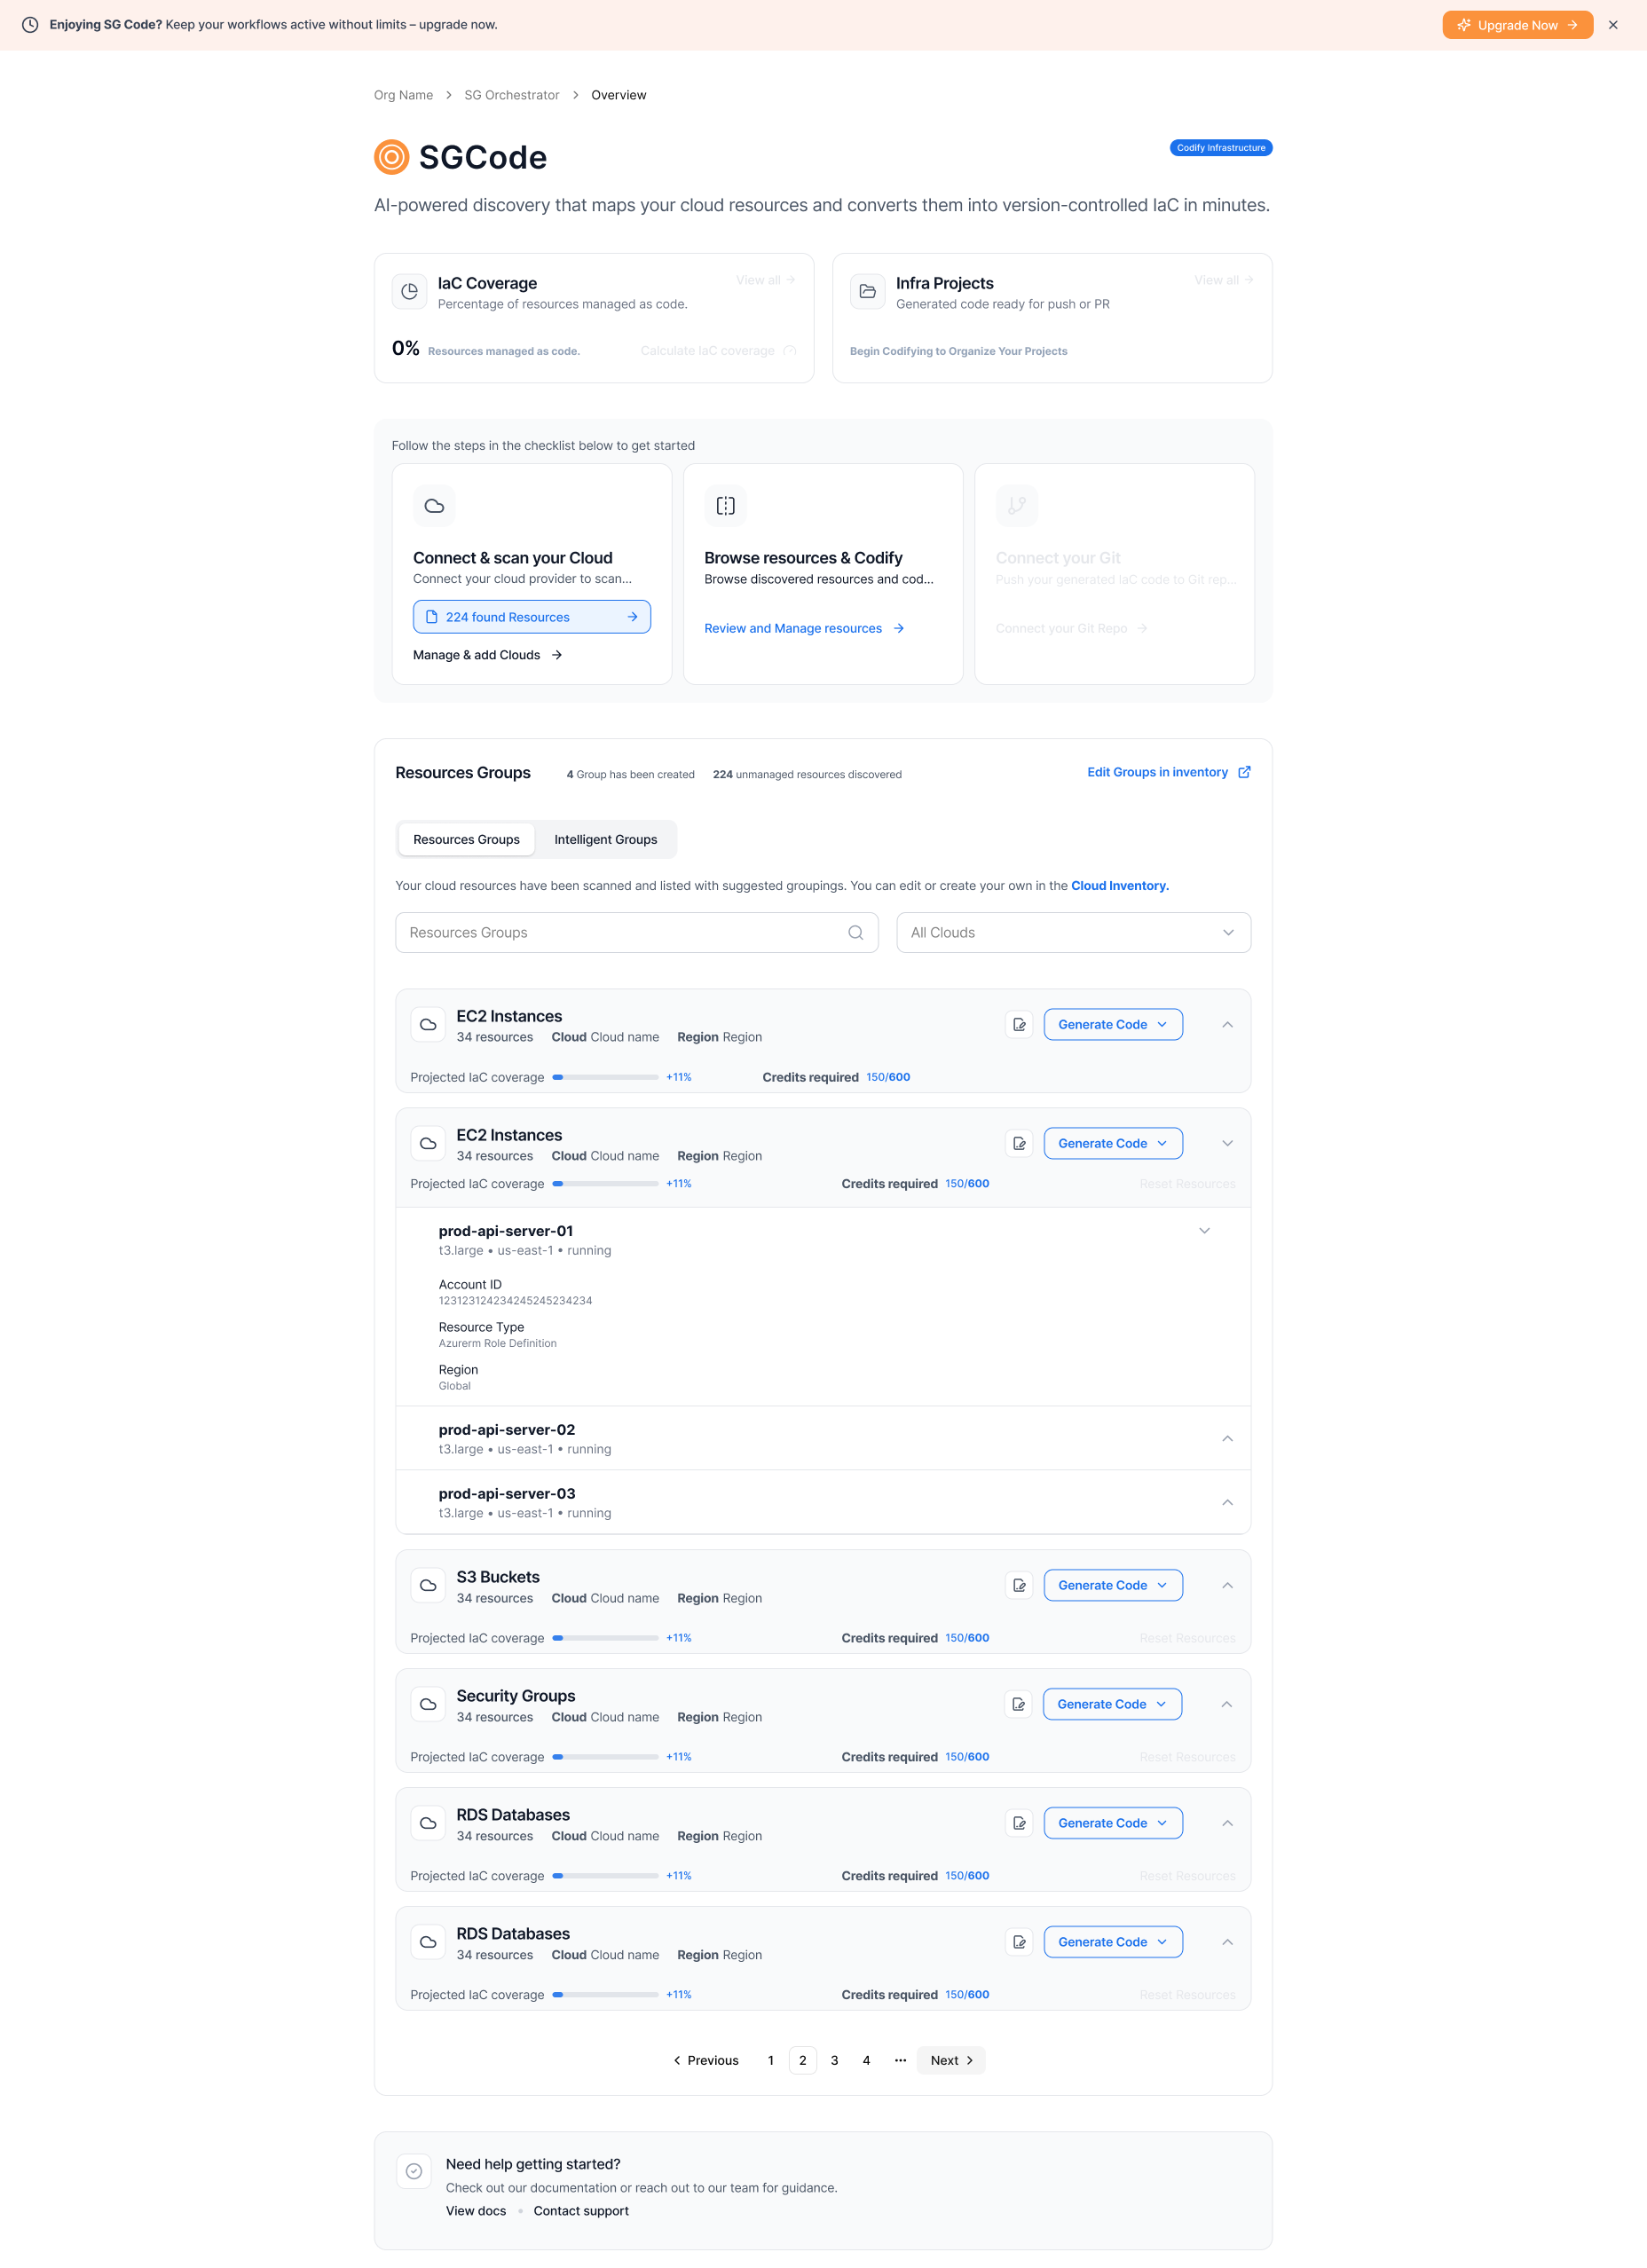
*Browse resources and codify*
SGCode groups your discovered resources into suggested resource groups based on resource type. Each group shows the resource type, the number of resources, the projected IaC coverage increase, and a **Generate Code** button.
note
You can edit or create your own groups in Cloud Inventory. Select **Edit Groups in inventory** to go there. When working directly in Cloud Inventory, use the **Codify for** button in the bottom bar instead of **Generate Code**.
To generate code:
1. Select the IaC tool using the dropdown next to **Generate Code** — choose between **Terraform** and **OpenTofu**.
2. Select **Generate Code** on one or more groups to start code generation.
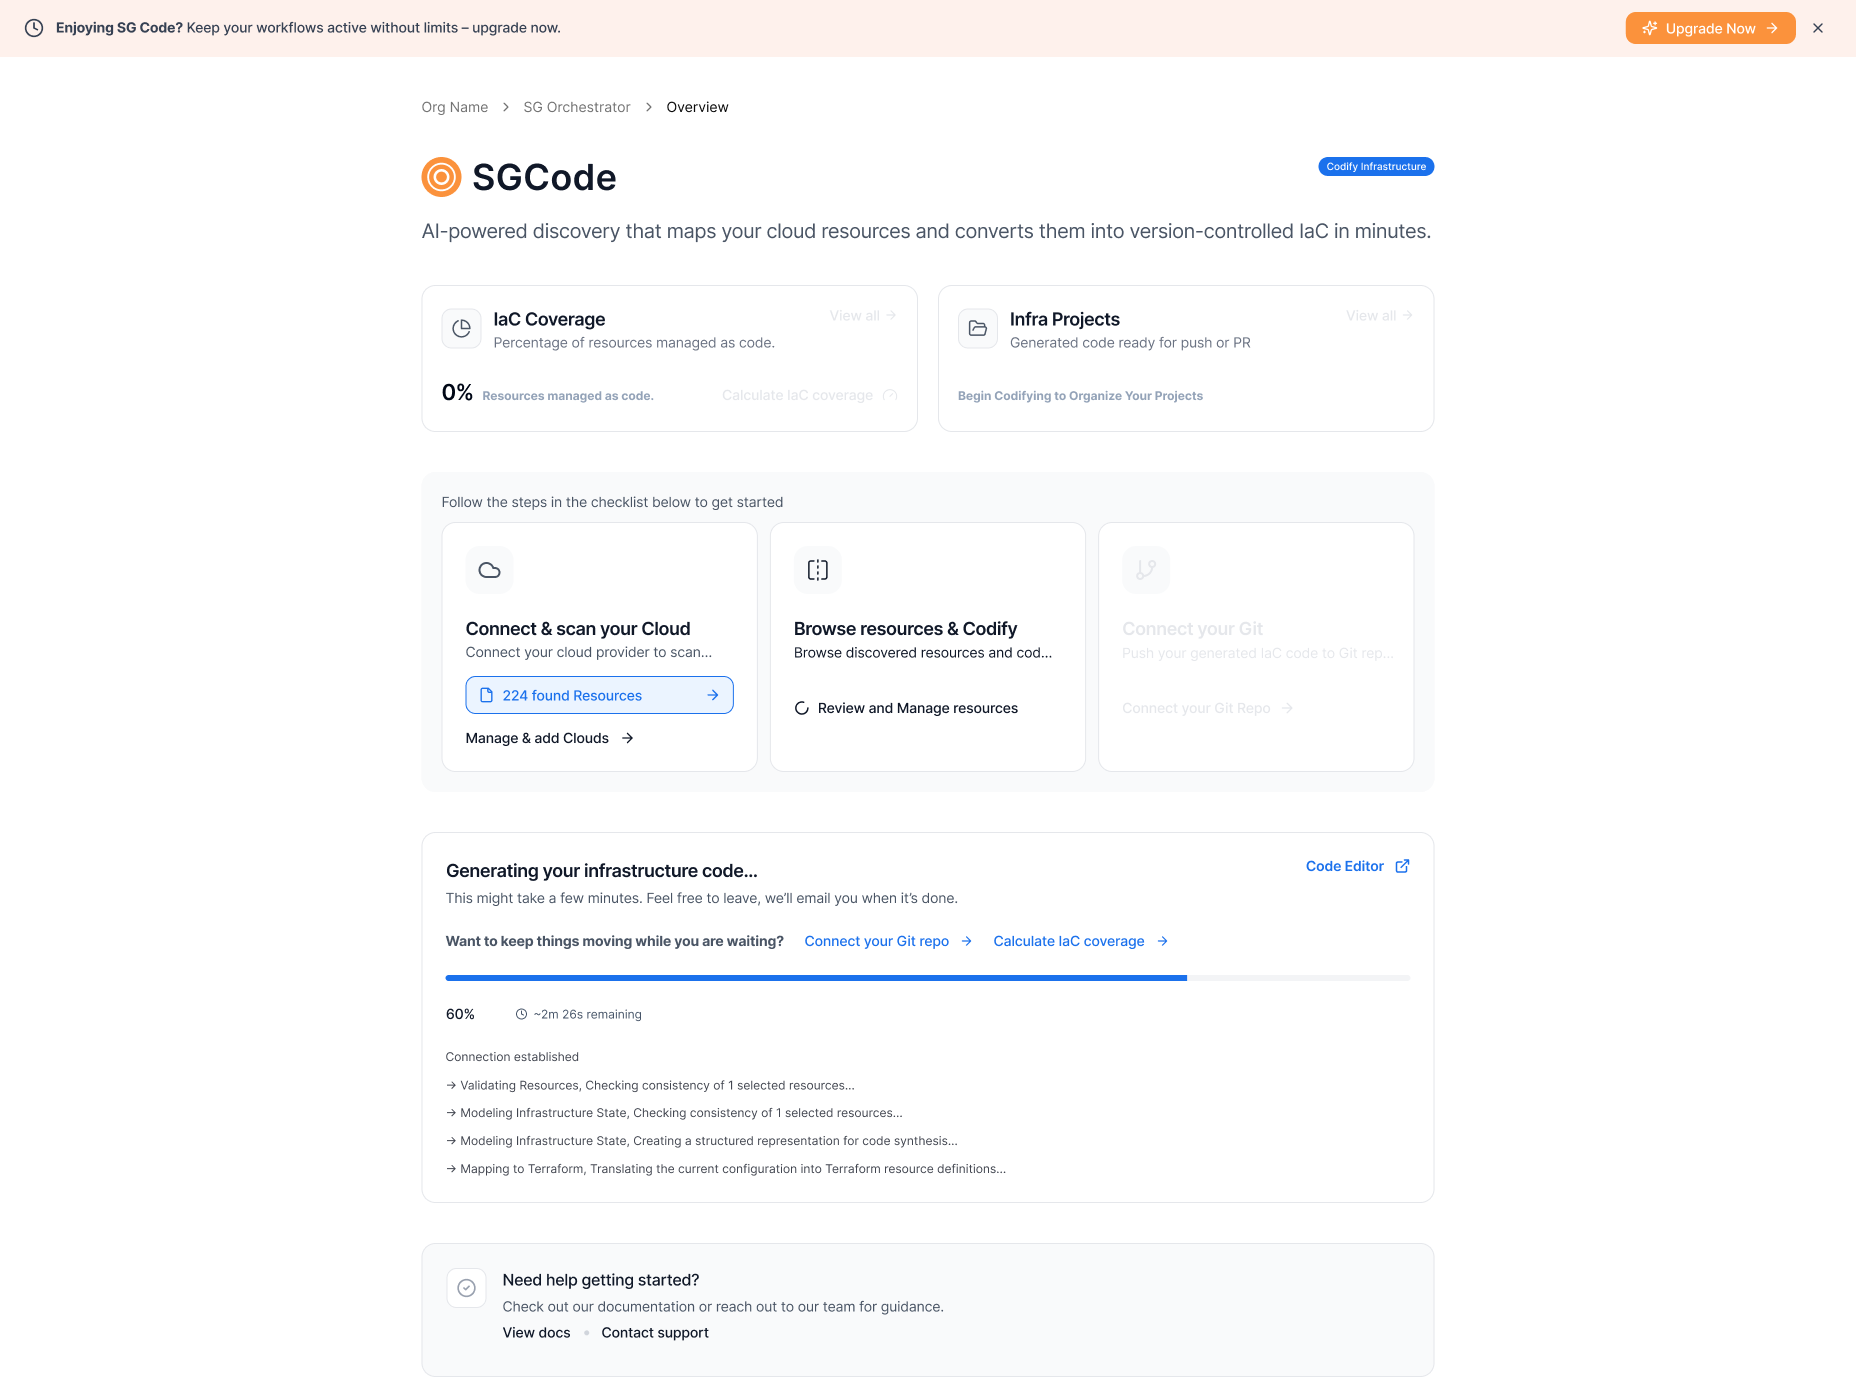
*Code generation in progress*
Code generation typically takes a few minutes. SGCode runs an internal validation cycle — it generates the code, runs a plan to check for errors, and if errors are found, regenerates the code automatically before delivering the final result. You can leave this page while generation runs.
When generation is complete, a summary confirms the number of resources codified, lines of code generated, and files generated.
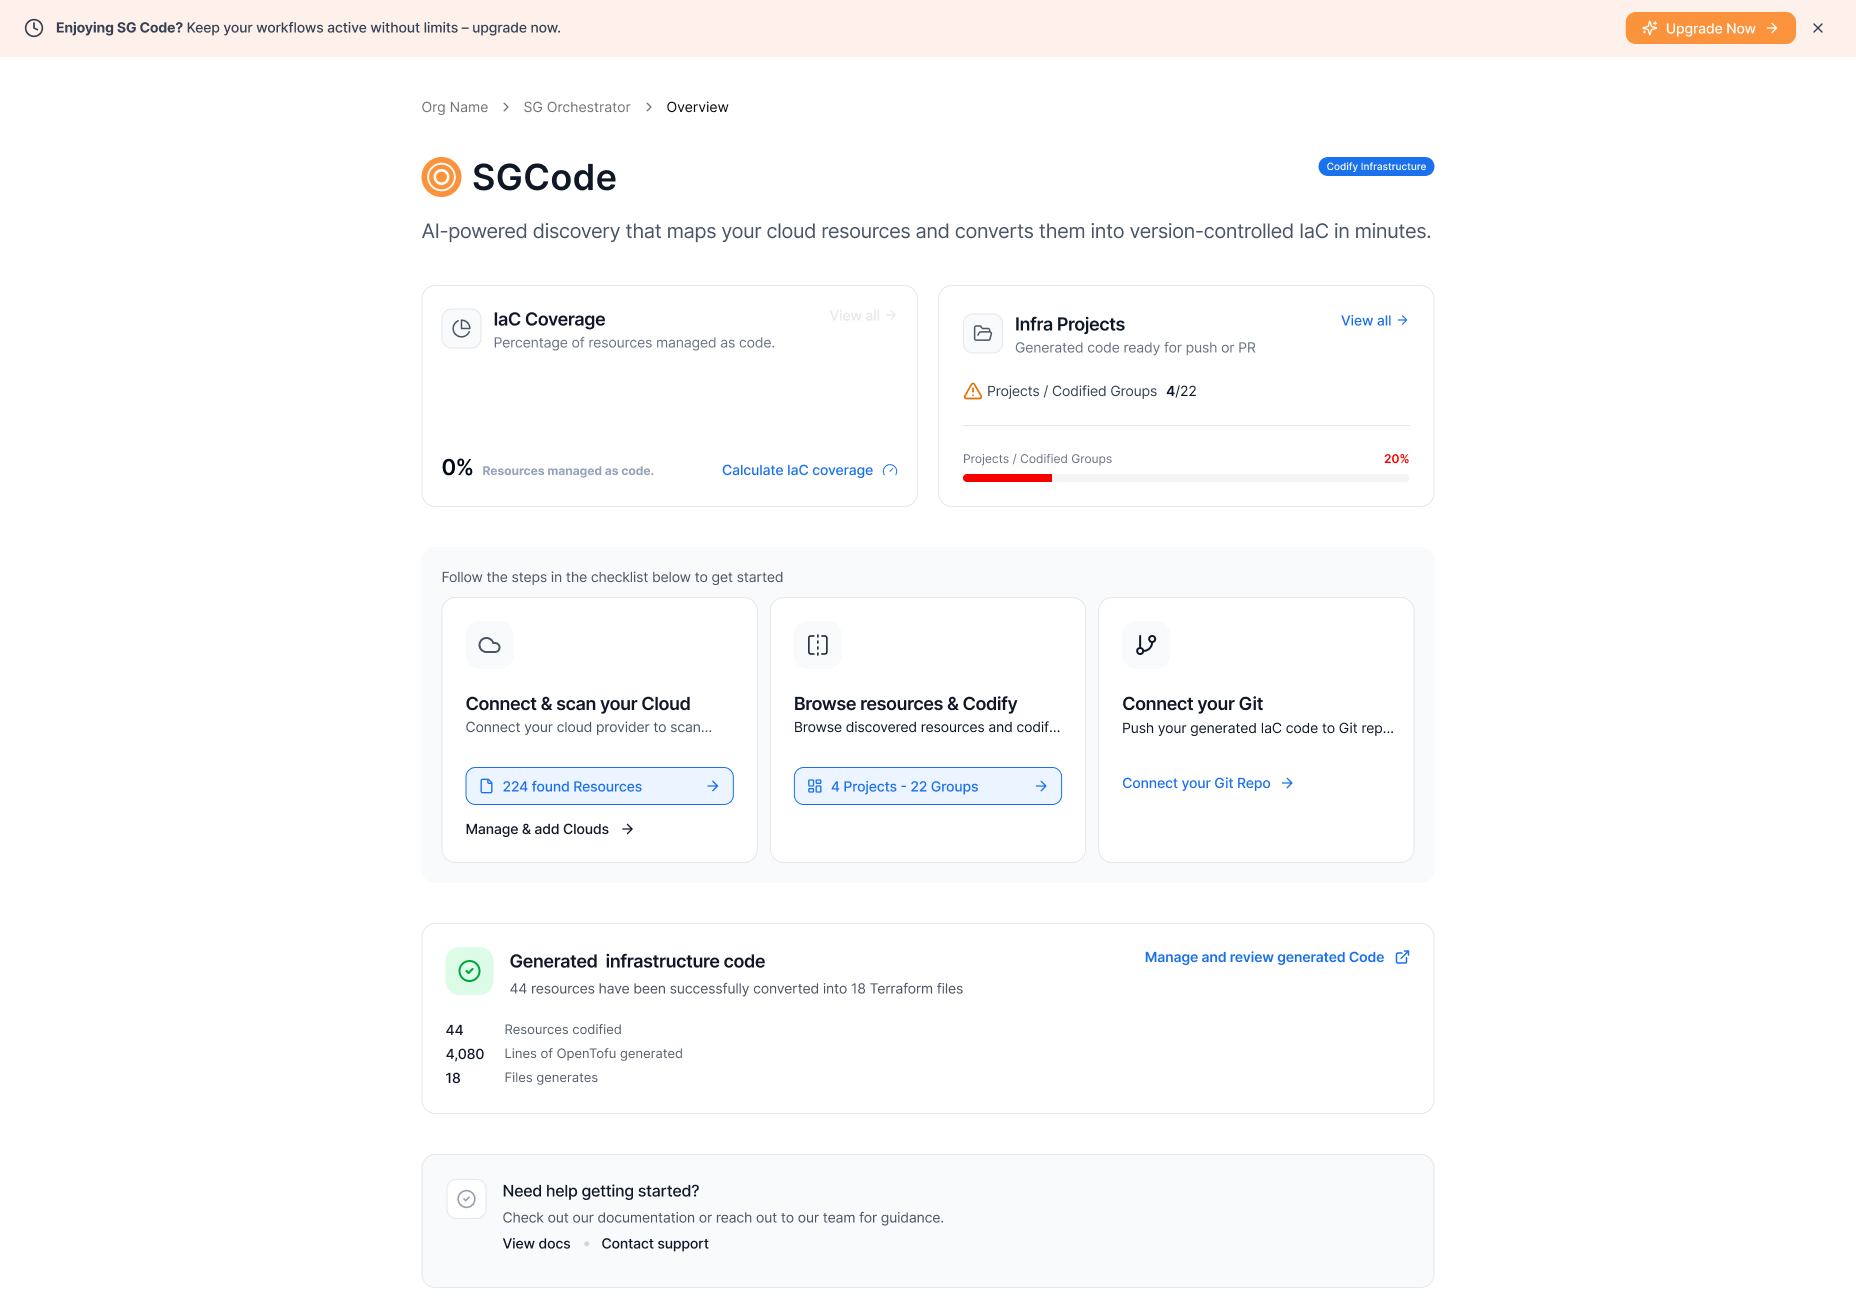
*Generated infrastructure code summary*
Select **Manage and review generated code** to open the Code Workbench and inspect the output, or continue to Step 5 to push the code directly to your repository.
## Step 5: Connect your Git and publish[](#step-5-connect-your-git-and-publish "Direct link to Step 5: Connect your Git and publish")
With your code generated, the next step is to push it to a repository. Select **Connect your Git** in the checklist.
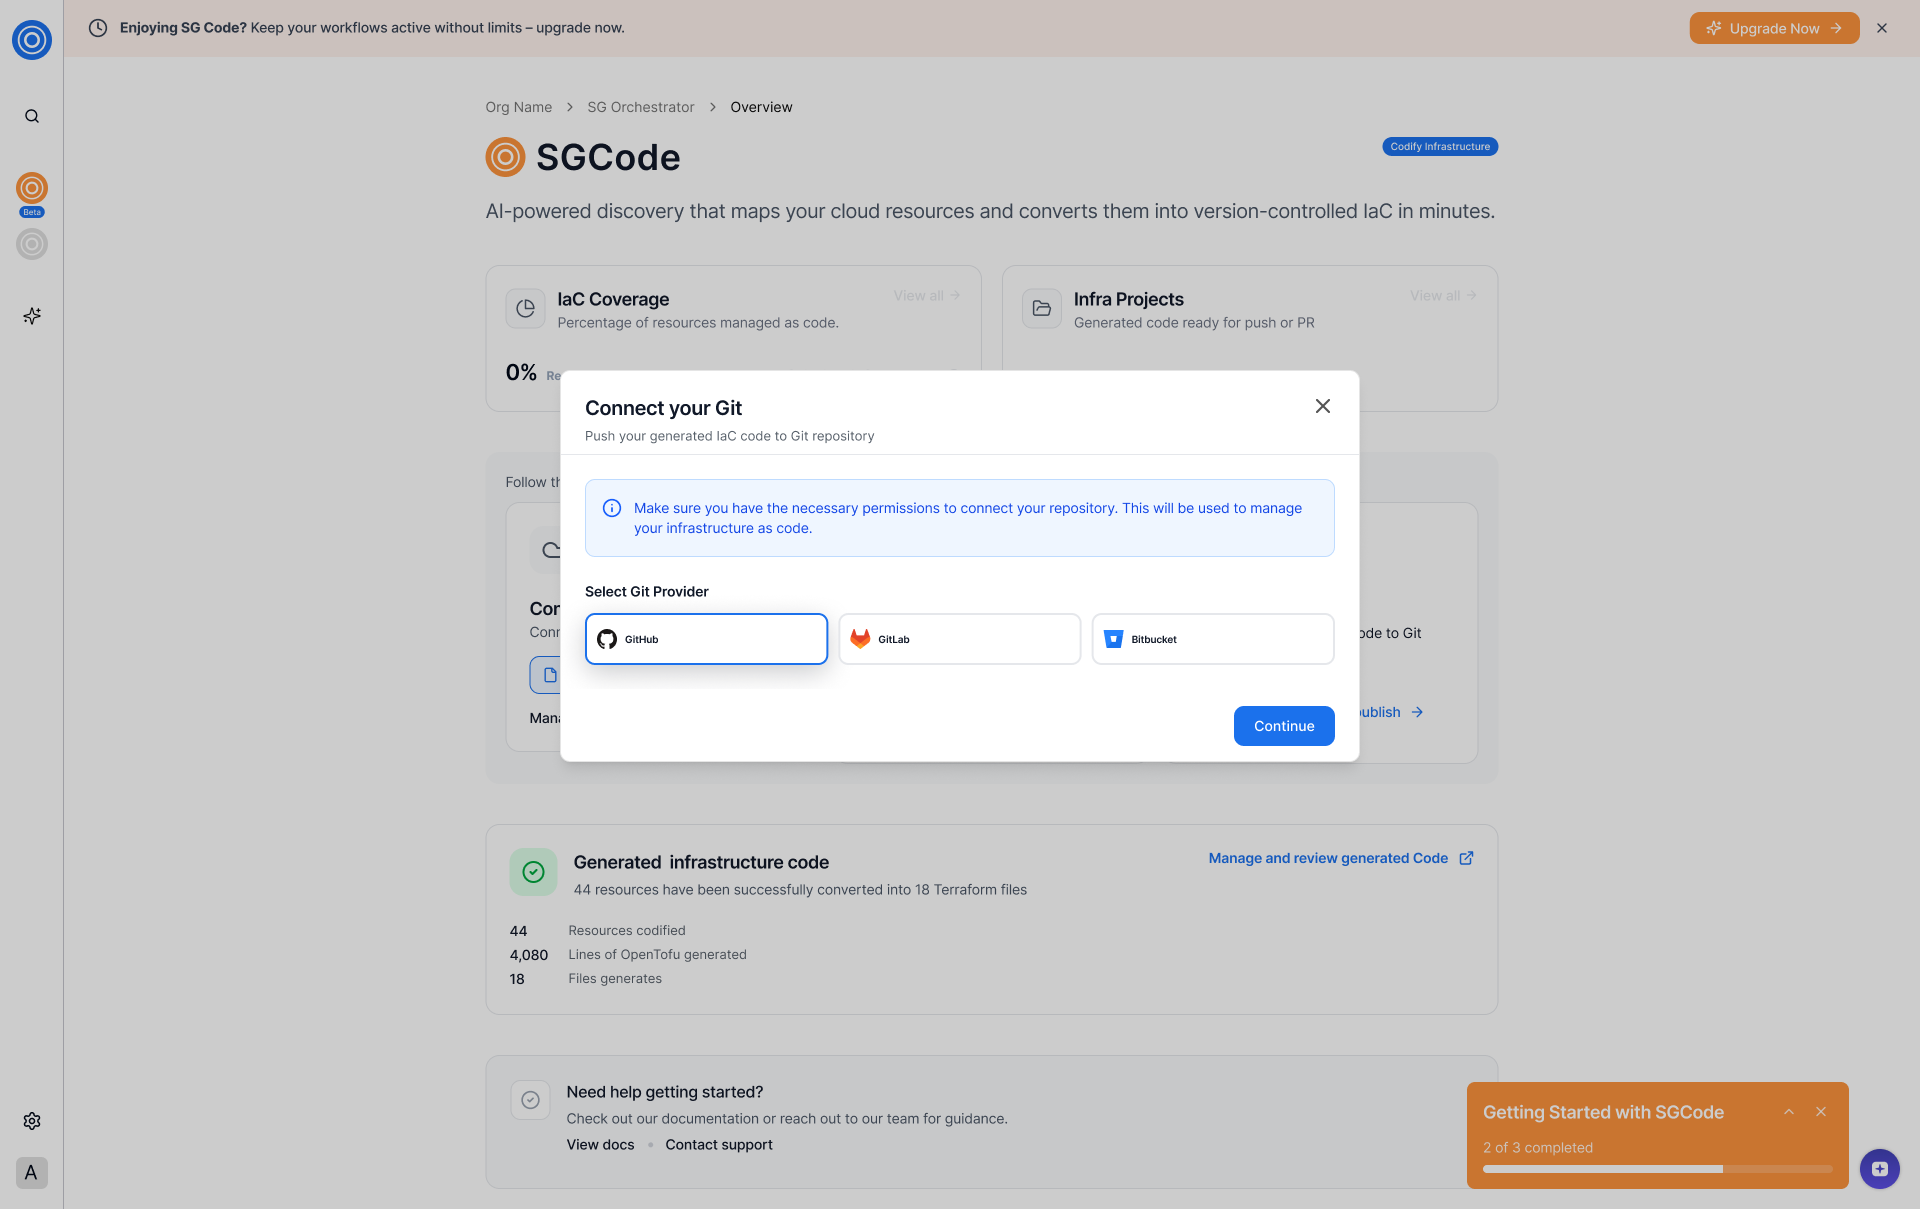
*Connect your Git and publish*
To connect your Git repository and publish:
1. Select your Git provider — GitHub or GitLab.
2. Follow the authorization flow. StackGuardian redirects you to your Git provider to grant access.
3. Select the account and repository where you want to push the generated code.
4. Select **Publish to Git Repo**.
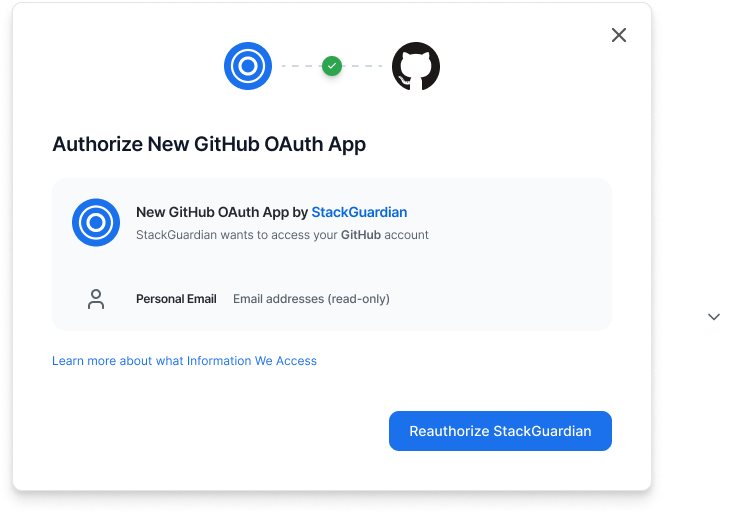
*Publish to Git Repo*
SGCode creates a new branch, commits the generated files, and pushes the changes to your repository.
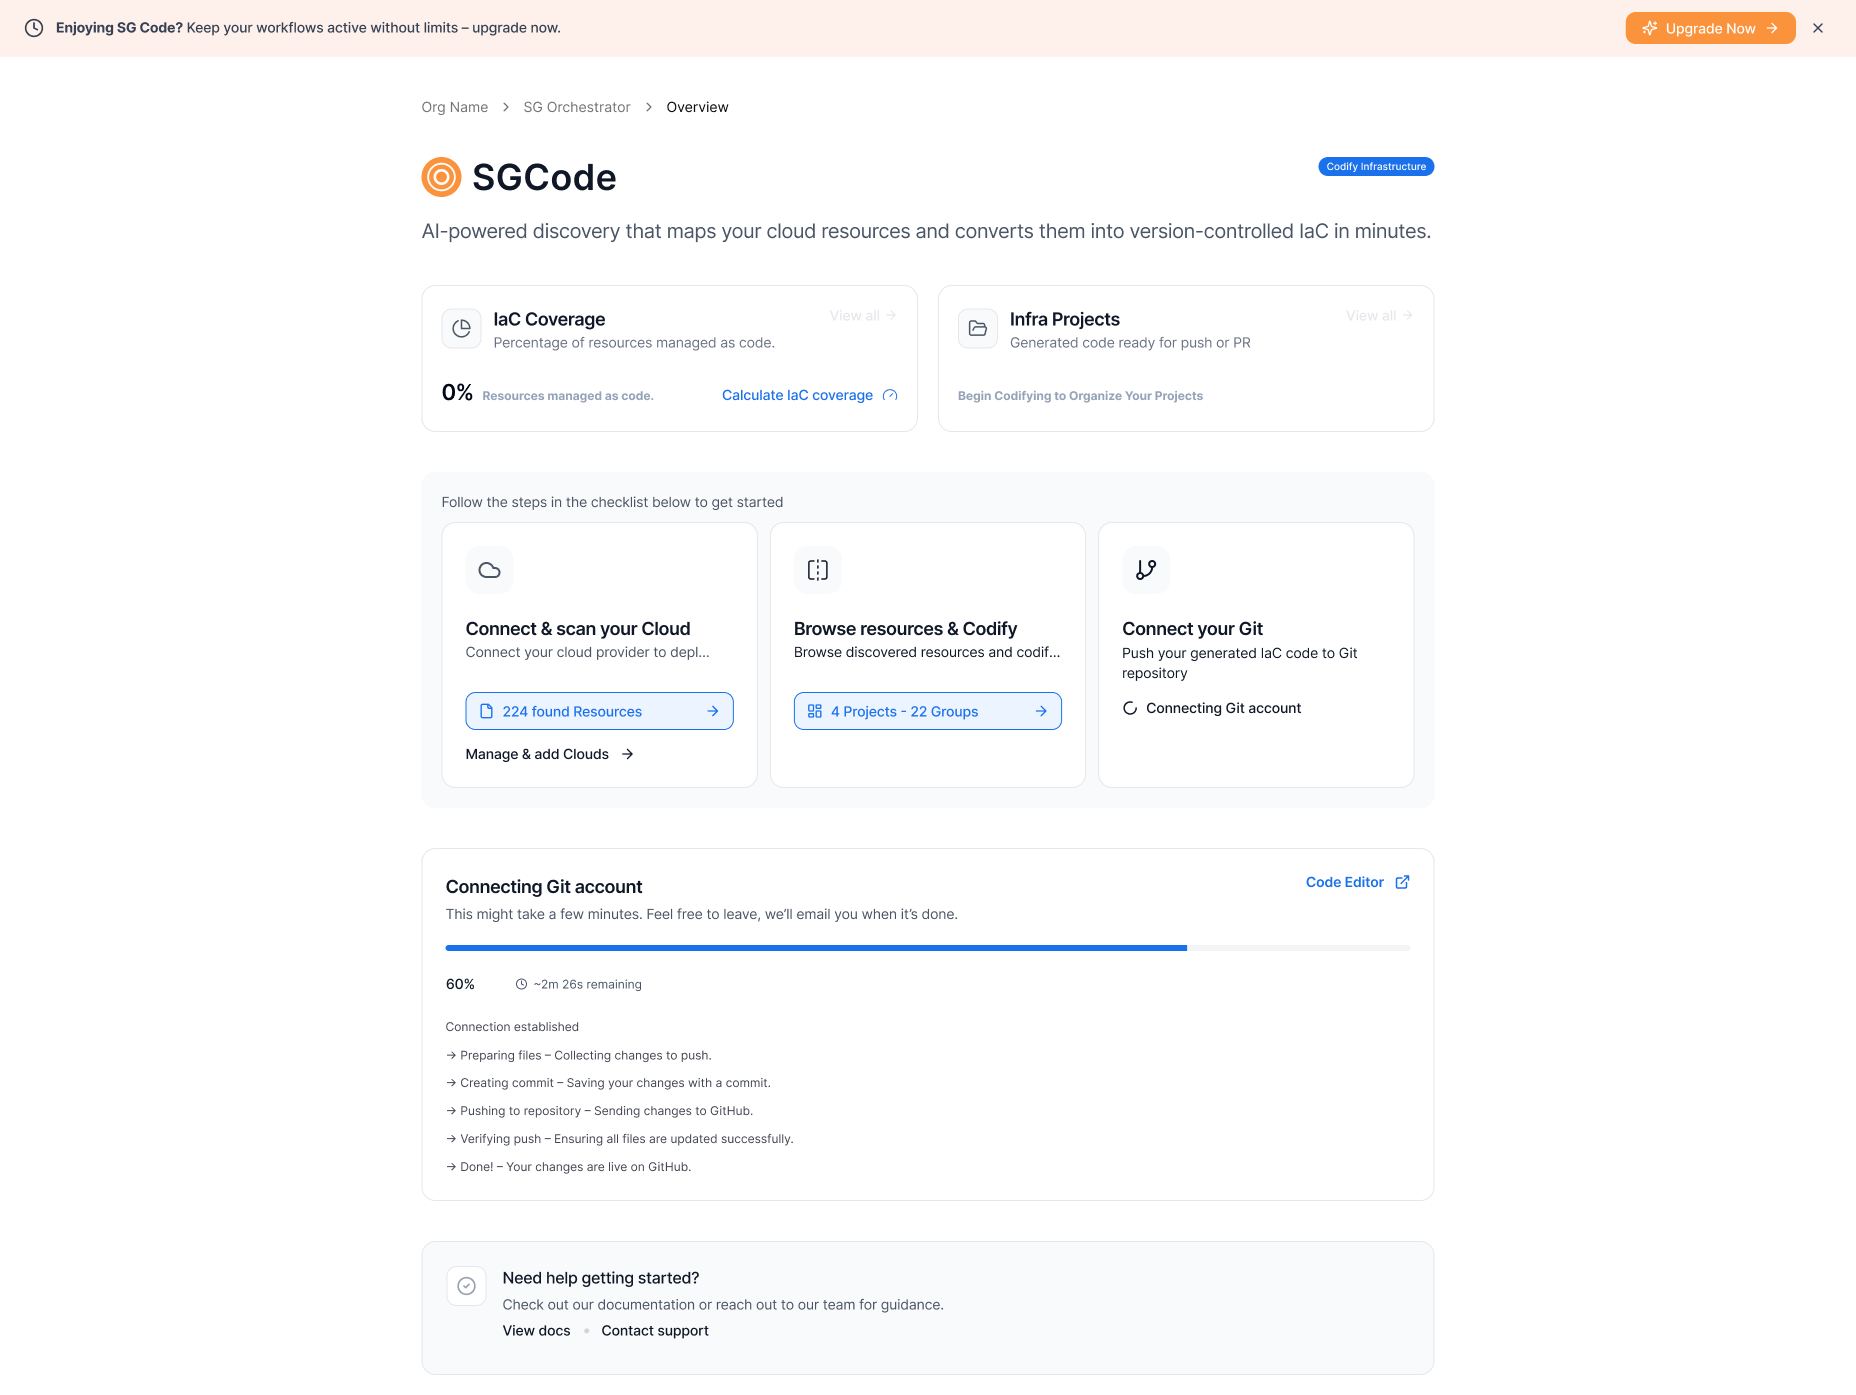
*Publish to Git in progress*
When the push is complete, the checklist updates to **3 of 3 completed**.
## Next steps[](#next-steps "Direct link to Next steps")
Now that your environment is set up, you can:
* Codify more resources to increase your IaC coverage — select **Codify more Resources** to continue in [Cloud Inventory](/docs/sg-code/cloud-inventory/)
* Review and edit your generated code in the [Infra Projects](/docs/sg-code/infra-projects/)
* Explore the full [Cloud Inventory](/docs/sg-code/cloud-inventory/) reference — including filtering, grouping, resource details, dependency management, and pull request workflows
---
# Quick start: GitOps for IaC
Deploy your first workflow in minutes by connecting Git and a cloud provider.
## Overview[](#overview "Direct link to Overview")
This guide walks you through the GitOps for IaC onboarding path in StackGuardian. By the end, you'll have connected your Git repositories and a cloud provider, and you'll be ready to deploy your first workflow.
**Prerequisites:**
* A GitHub or GitLab account with at least one IaC repository
* A cloud provider account (AWS or Azure) with the necessary credentials
## Step 1: Choose your onboarding path[](#step-1-choose-your-onboarding-path "Direct link to Step 1: Choose your onboarding path")
When you first sign in, StackGuardian asks what you'd like to do first. Select **GitOps for IaC** to connect your Git repositories and deploy infrastructure using version-controlled code.
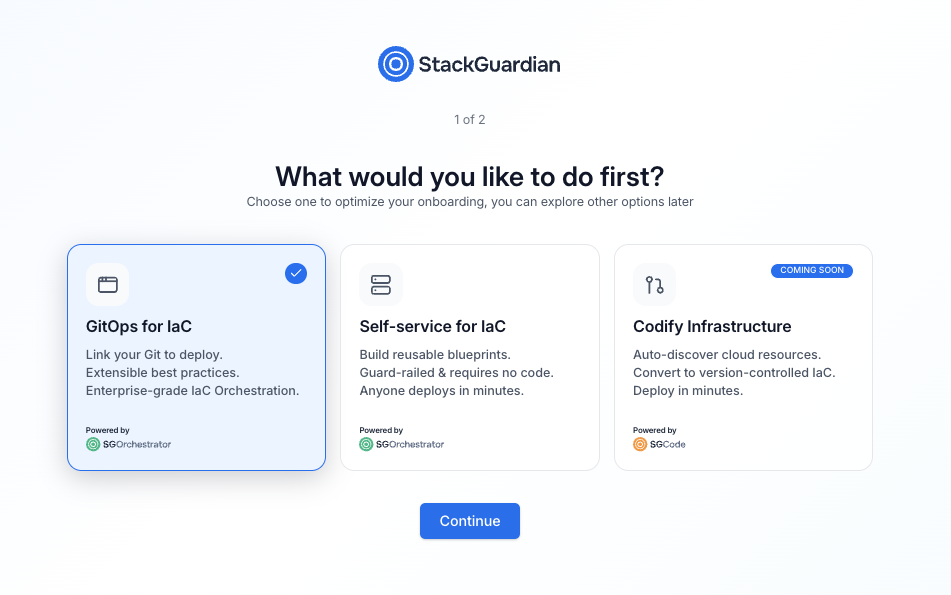
*Onboarding path selection screen*
The three available paths are:
* **GitOps for IaC** — Link your Git repositories to deploy infrastructure using version-controlled code
* **Self-service for IaC** — Build reusable blueprints that teams can deploy without writing code
* **Codify infrastructure** — Auto-discover and convert existing cloud resources to IaC (coming soon)
Select **GitOps for IaC**, then select **Continue**.
note
You can switch to a different path at any time from the SGOrchestrator overview page.
## Step 2: Set up your organization[](#step-2-set-up-your-organization "Direct link to Step 2: Set up your organization")
Enter a name for your organization. This is the workspace where your workflows, stacks, and connectors will live.

*Organization setup screen*
| Field | Required | Description |
| ----------------- | -------- | -------------------------------------------------------------------------------------- |
| Organization name | Yes | A unique identifier for your organization. Use lowercase letters and hyphens. |
| Invite teammates | No | Enter one or more email addresses to invite collaborators. You can also do this later. |
Select **Get started** when you're ready.
## Step 3: Connect your Git repository[](#step-3-connect-your-git-repository "Direct link to Step 3: Connect your Git repository")
After setup, you'll land on the SGOrchestrator overview page. The **Getting Started with Orchestrator** panel in the bottom-right corner guides you through three steps: connecting Git, connecting a cloud provider, and deploying.
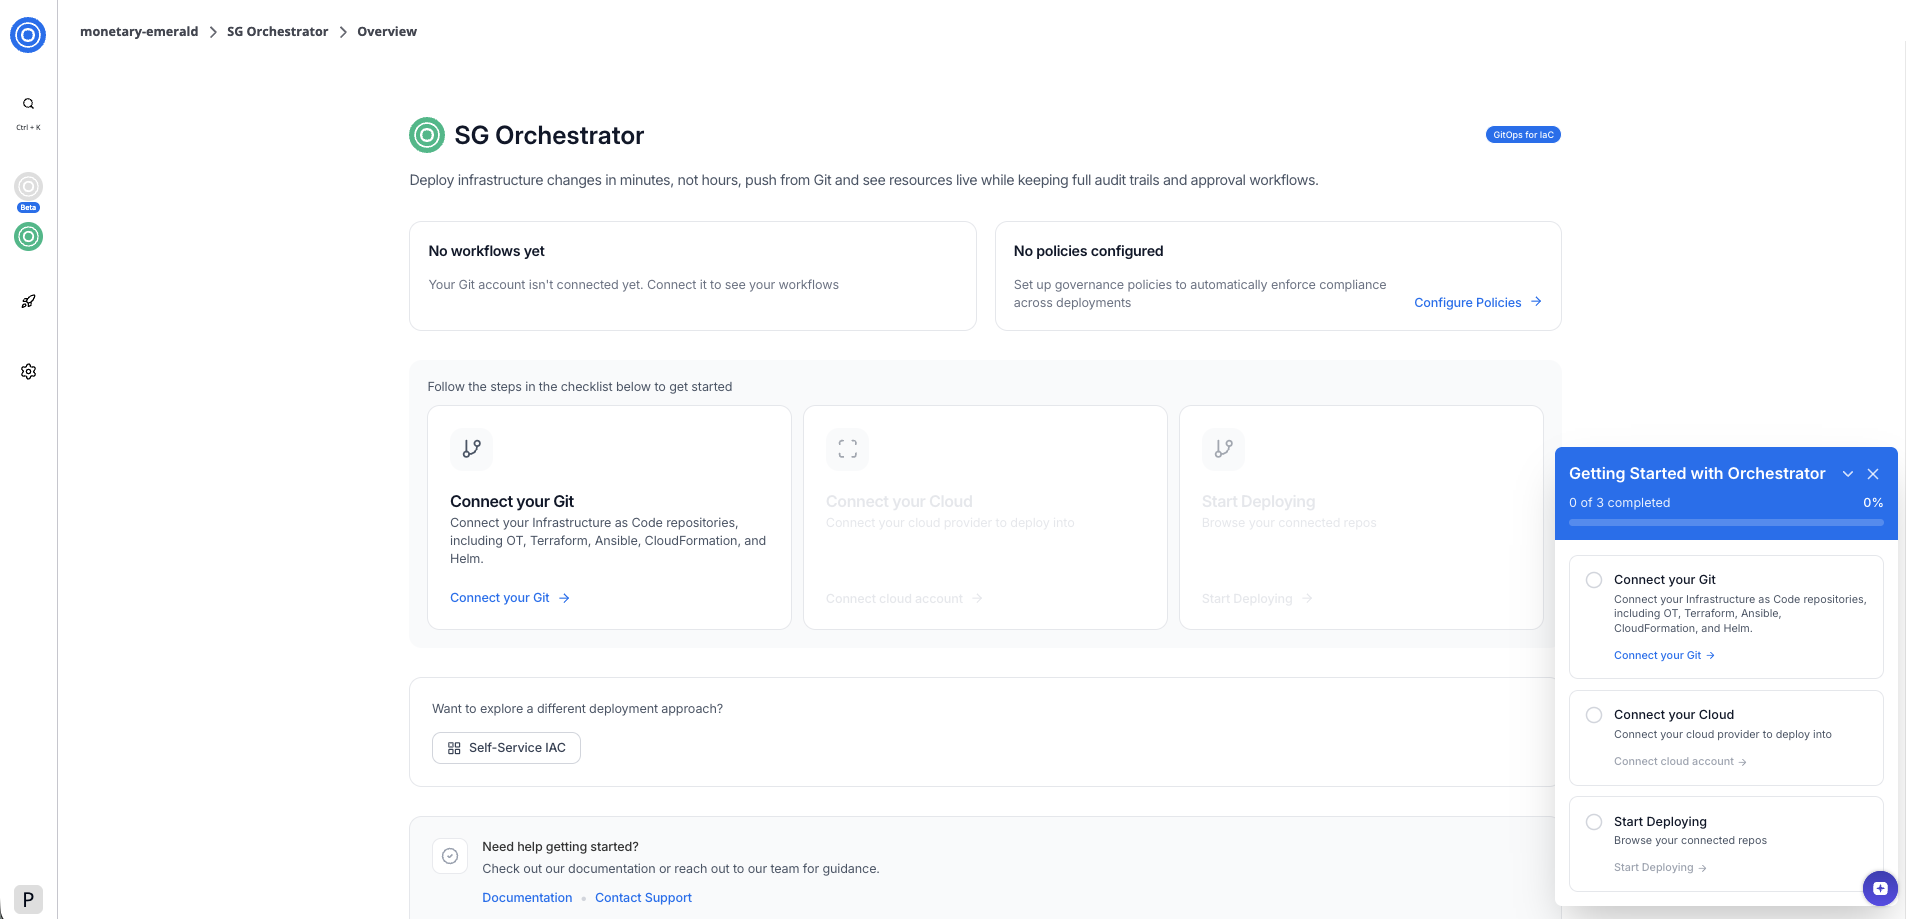
*SGOrchestrator overview page*
To connect your Git repository:
1. Select **Connect your Git** in the checklist or the overview card.
2. In the dialog, select your Git provider — [**GitHub**](/docs/connectors/vcs/githubcom/) or [**GitLab**](/docs/connectors/vcs/gitlabcom/).
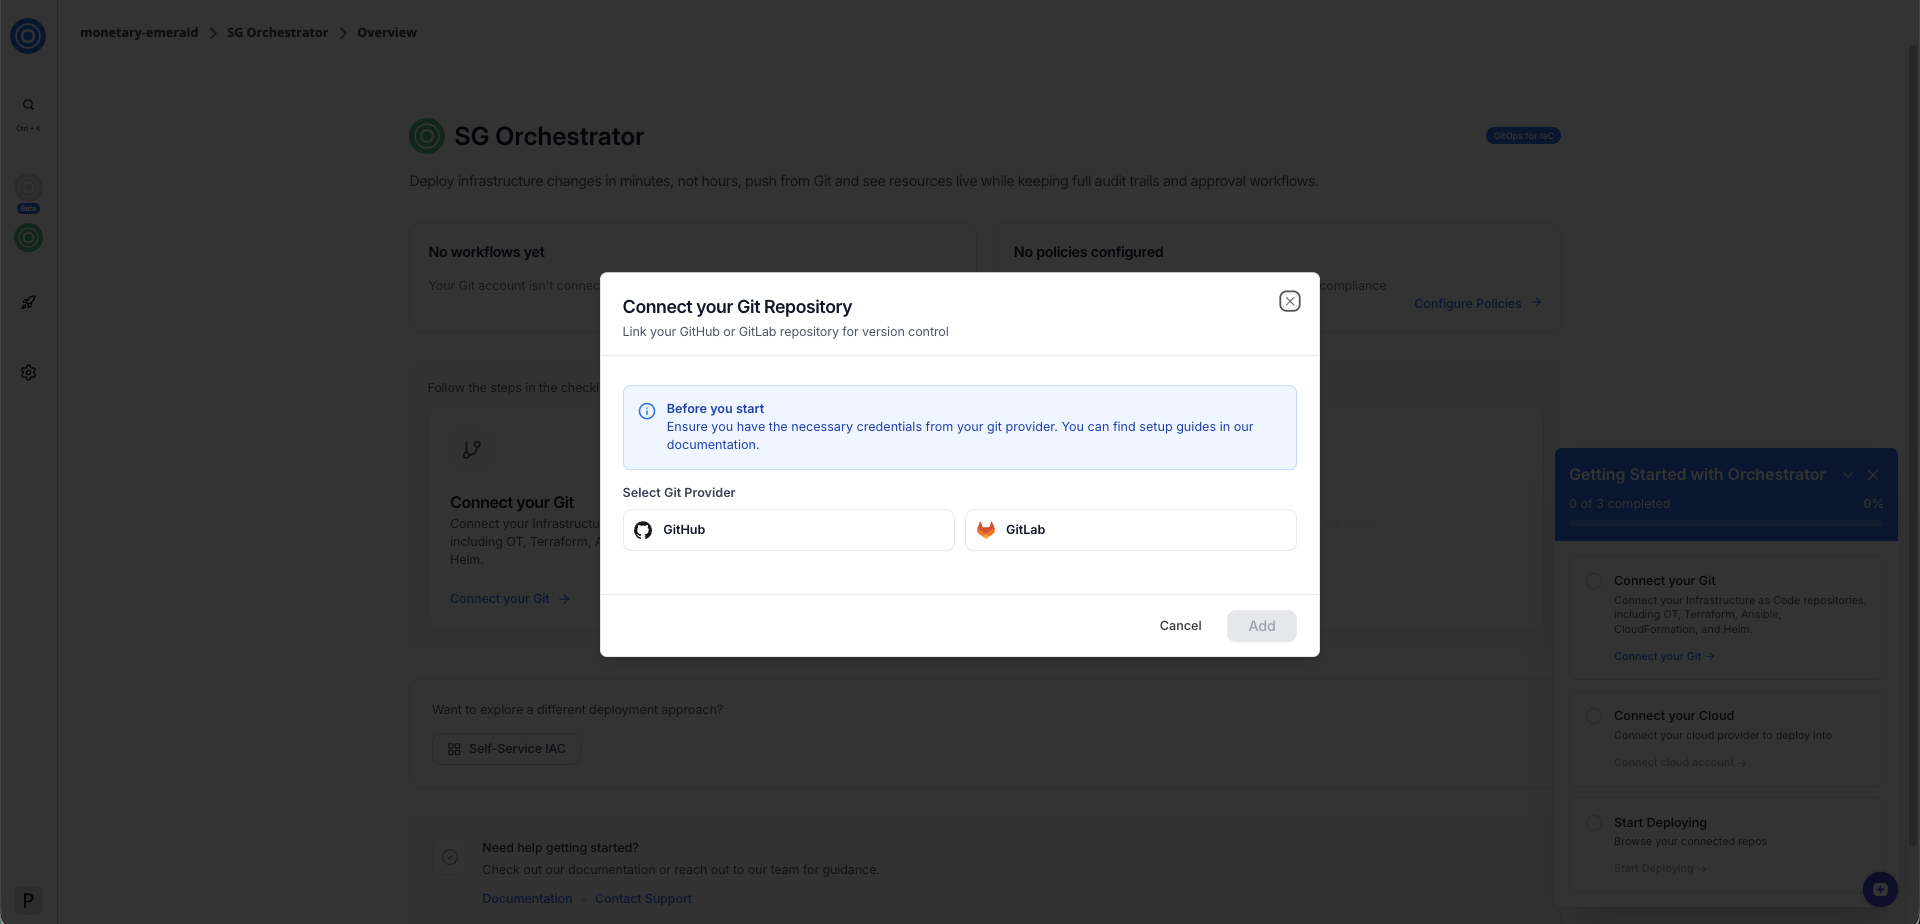
*Connect your Git repository dialog*
3. Follow the authorization flow. StackGuardian redirects you to your Git provider to grant access.
4. Select the account or organization where you want to install the StackGuardian app.
Once authorized, you'll return to the overview page. The **Connect your Git** card shows a confirmation that one version control system is connected.
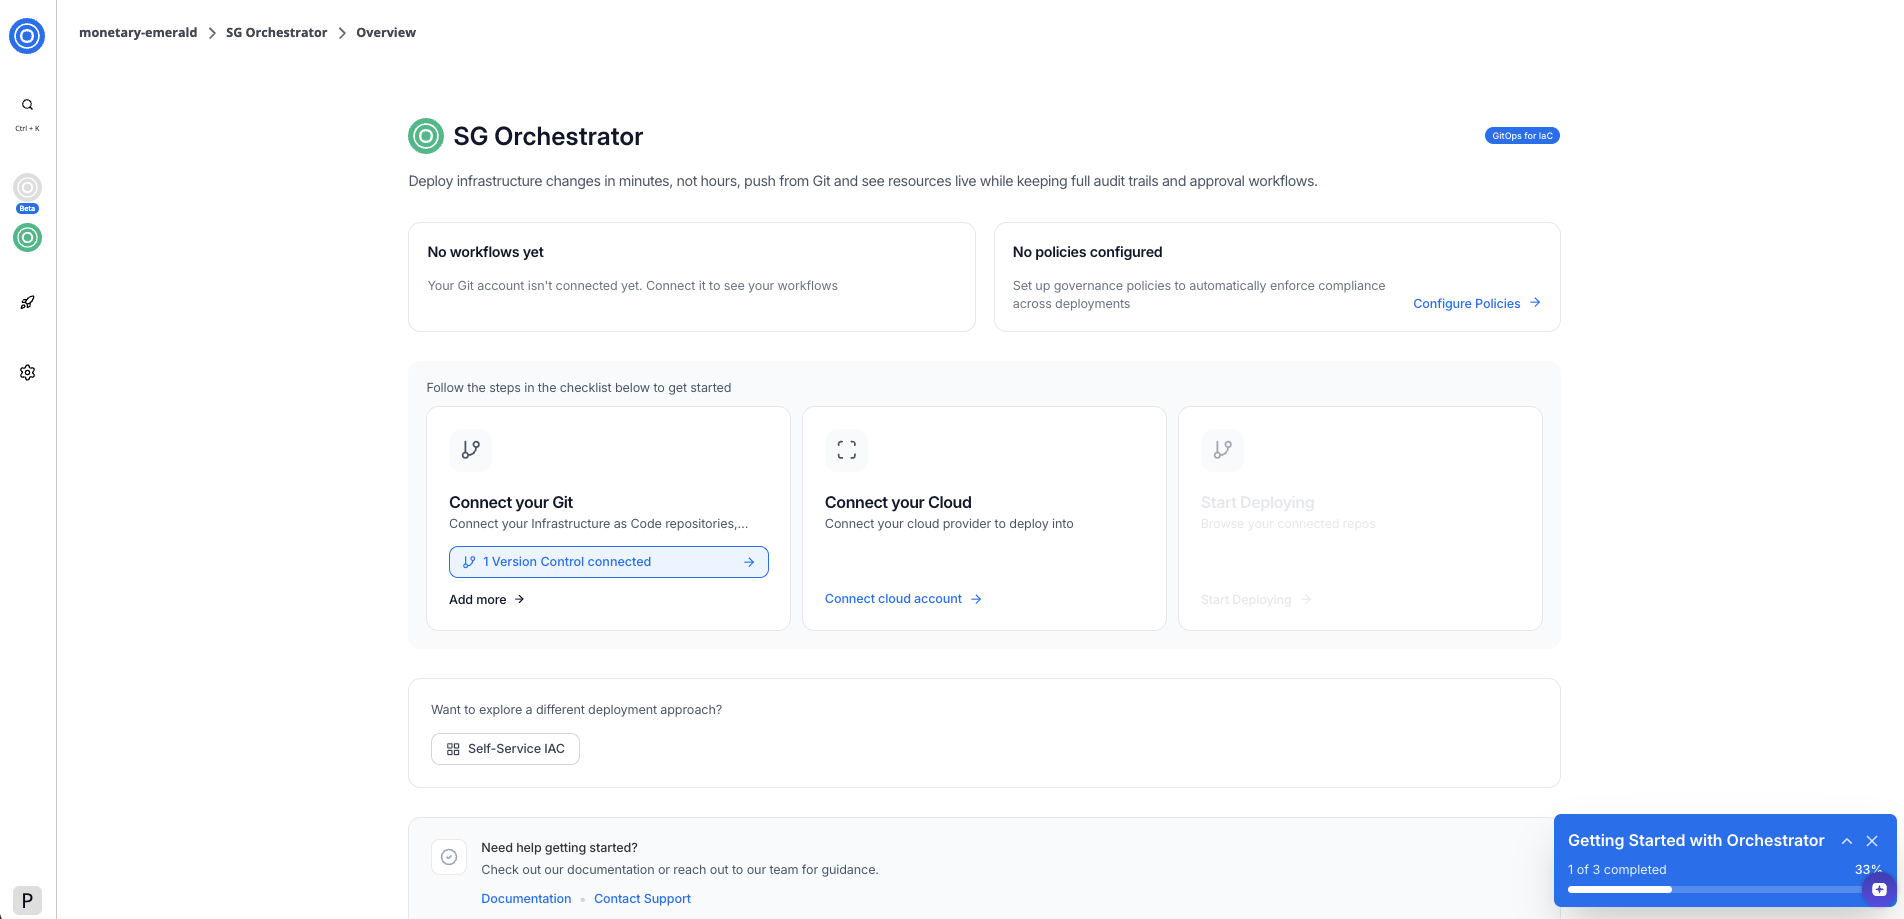
*SGOrchestrator overview page*
## Step 4: Connect your cloud provider[](#step-4-connect-your-cloud-provider "Direct link to Step 4: Connect your cloud provider")
With your Git repository connected, the next step is to link a cloud provider. This allows StackGuardian to deploy your infrastructure into your cloud account.
To connect your cloud provider:
1. Select **Connect cloud account** in the overview card.
2. In the dialog, select your cloud provider — [**AWS**](/docs/connectors/csp/aws/) or [**Azure**](/docs/connectors/csp/azure/).
3. Select an authentication method — **RBAC** (role-based access control) or **OIDC** (OpenID Connect).
4. Enter a connector name. Optionally, add a description and tags.
5. Enter your **AWS Role ARN** in the format `arn:aws:iam:::role/`.
6. Copy the pre-filled **External ID for the role** — you'll need this when setting up the trust relationship in AWS.
7. Select **Add Connector**.
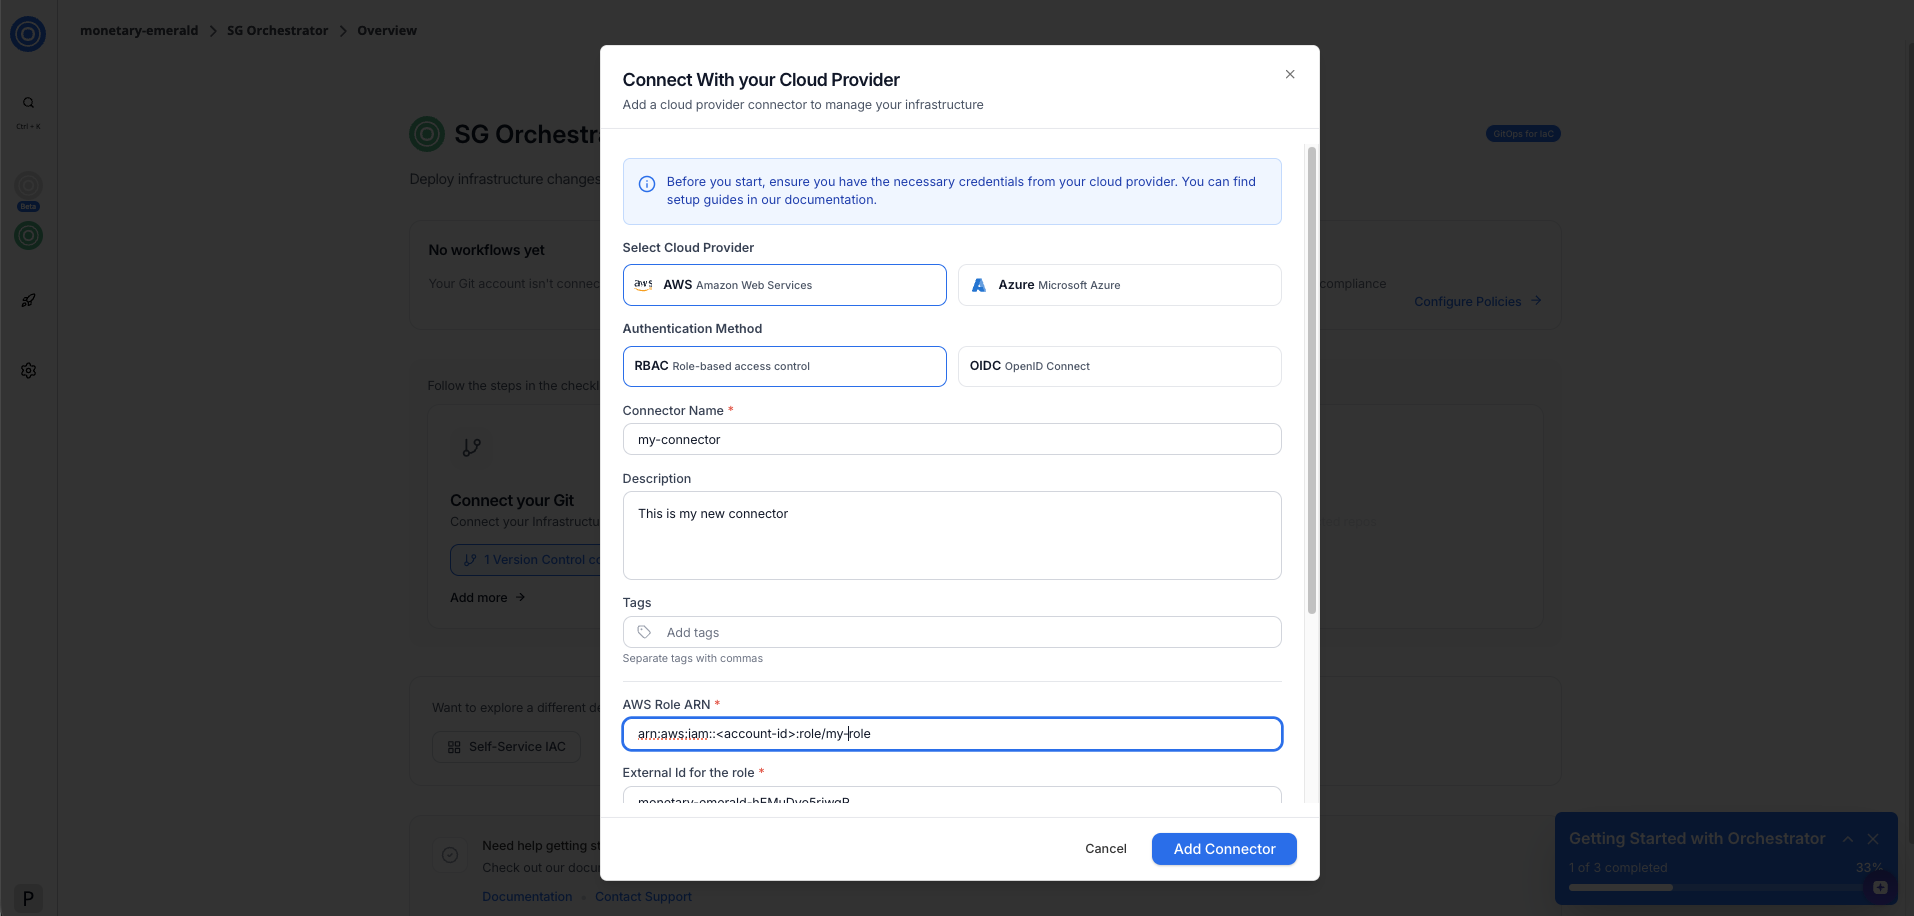
*Connect with your cloud provider dialog showing*
### AWS Role ARN[](#aws-role-arn "Direct link to AWS Role ARN")
To authenticate with AWS, StackGuardian uses an IAM role with a cross-account trust relationship. You'll need to:
* Create an IAM role in your AWS account.
* Add StackGuardian as a trusted entity using the external ID shown in the form.
* Attach the permissions your workflows need (for example, `AdministratorAccess` for full access).
* Copy the role ARN from AWS and paste it into the **AWS Role ARN** field.
Once connected, the **Connect your Cloud** card shows a confirmation and a **Manage integrations** button.
## Step 5: Start deploying[](#step-5-start-deploying "Direct link to Step 5: Start deploying")
With both Git and your cloud provider connected, the checklist shows 2 of 3 complete. The **Start Deploying** step is now active.

*SGOrchestrator overview page*
Select **Start Deploying** to browse your connected repositories and create your first workflow.
## Next steps[](#next-steps "Direct link to Next steps")
Now that your environment is set up, you can:
* [Create a workflow](/docs/deploy/workflows/create_workflow/overview/) from one of your connected repositories
* Explore [Self-service for IaC](/docs/sg-orchestrator/overview/) to build reusable deployment blueprints
---
# Quick start: Self-service for IaC
Let developers provision infrastructure themselves using reusable, guard-railed templates — no tickets, no waiting.
## Overview[](#overview "Direct link to Overview")
This guide walks you through the Self-service for IaC onboarding path in StackGuardian. By the end, you'll have connected your IaC repositories and a cloud provider, and you'll be ready to build your first deployment template.
**Prerequisites:**
* A GitHub or GitLab account with at least one IaC repository
* A cloud provider account (AWS or Azure) with the necessary credentials
## Step 1: Choose your onboarding path[](#step-1-choose-your-onboarding-path "Direct link to Step 1: Choose your onboarding path")
When you first sign in, StackGuardian asks what you'd like to do first. Select **Self-service for IaC** to build reusable blueprints that anyone can deploy without writing code.
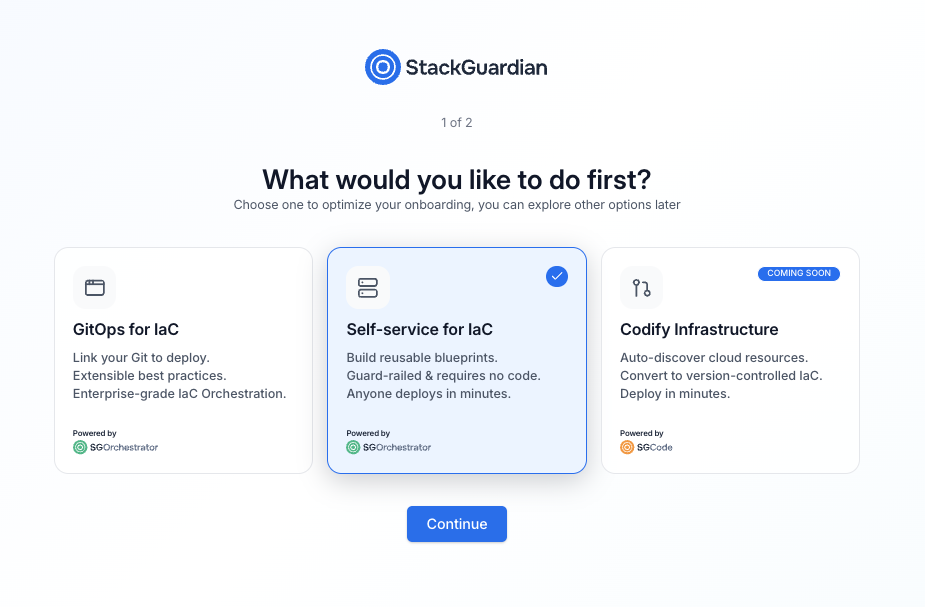
*Onboarding path selection screen*
The three available paths are:
* **GitOps for IaC** — Link your Git repositories to deploy infrastructure using version-controlled code
* **Self-service for IaC** — Build reusable blueprints that teams can deploy without writing code
* **Codify infrastructure** — Auto-discover and convert existing cloud resources to IaC (coming soon)
Select **Self-service for IaC**, then select **Continue**.
note
You can switch to a different path at any time from the SGOrchestrator overview page.
## Step 2: Set up your organization[](#step-2-set-up-your-organization "Direct link to Step 2: Set up your organization")
Enter a name for your organization. This is the workspace where your workflows, stacks, templates, and connectors will live.
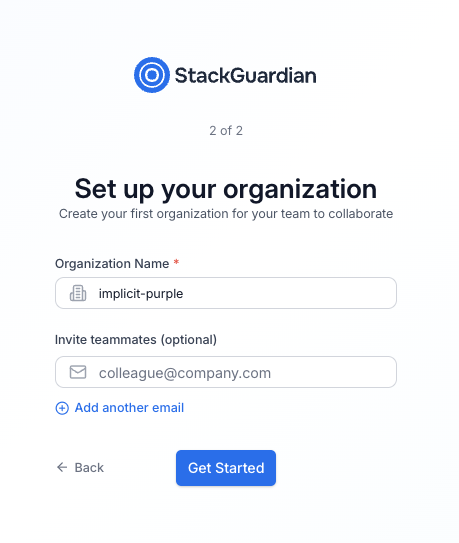
*Organization setup screen*
| Field | Required | Description |
| ----------------- | -------- | -------------------------------------------------------------------------------------- |
| Organization name | Yes | A unique identifier for your organization. Use lowercase letters and hyphens. |
| Invite teammates | No | Enter one or more email addresses to invite collaborators. You can also do this later. |
Select **Get started** when you're ready.
## Step 3: Connect your tools[](#step-3-connect-your-tools "Direct link to Step 3: Connect your tools")
After setup, you'll land on the SGOrchestrator overview page. The **Getting Started with Orchestrator** panel in the bottom-right corner guides you through three steps: connecting your tools, connecting a cloud provider, and building templates.
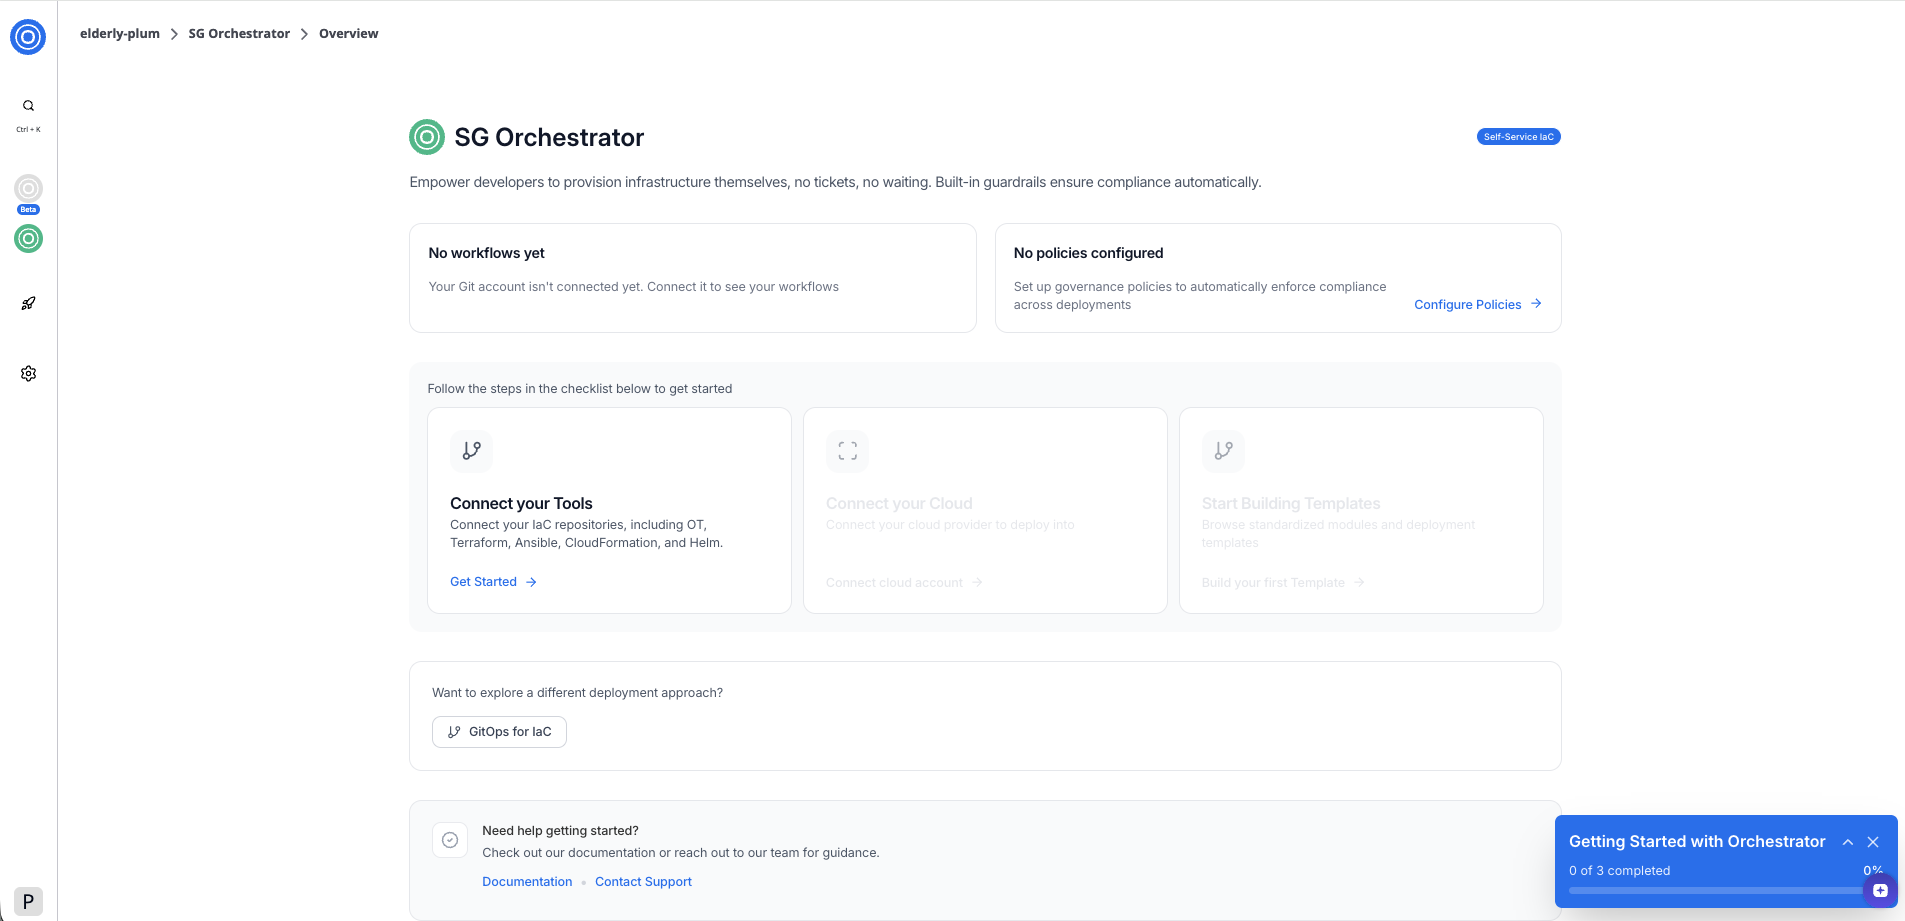
*SGOrchestrator overview page in Self-service for IaC mode*
To connect your IaC repositories:
1. Select **Get Started** in the **Connect your Tools** card.
2. In the dialog, select your Git provider — **GitHub** or **GitLab**.
3. Follow the authorization flow. StackGuardian redirects you to your Git provider to grant access.
4. Select the account or organization where you want to install the StackGuardian app.
Once authorized, you'll return to the overview page. The **Connect your Tools** card shows a confirmation that one version control system is connected.

*SGOrchestrator overview page*
## Step 4: Connect your cloud provider[](#step-4-connect-your-cloud-provider "Direct link to Step 4: Connect your cloud provider")
With your tools connected, the next step is to link a cloud provider. This allows StackGuardian to deploy your templates into your cloud account.
To connect your cloud provider:
1. Select **Connect cloud account** in the overview card.
2. In the dialog, select your cloud provider — **AWS** or **Azure**.
3. Select an authentication method — **RBAC** (role-based access control) or **OIDC** (OpenID Connect).
4. Enter a connector name. Optionally, add a description and tags.
5. Enter your **AWS Role ARN** in the format `arn:aws:iam:::role/`.
6. Copy the pre-filled **External ID for the role** — you'll need this when setting up the trust relationship in AWS.
7. Select **Add Connector**.
Before you start
Ensure you have the necessary credentials from your cloud provider.
### AWS Role ARN[](#aws-role-arn "Direct link to AWS Role ARN")
To authenticate with AWS, StackGuardian uses an IAM role with a cross-account trust relationship. You'll need to:
* Create an IAM role in your AWS account.
* Add StackGuardian as a trusted entity using the external ID shown in the form.
* Attach the permissions your templates need (for example, `AdministratorAccess` for full access).
* Copy the role ARN from AWS and paste it into the **AWS Role ARN** field.
Once connected, the **Connect your Cloud** card shows a confirmation and a **1 Cloud Connected** button. The checklist shows 2 of 3 complete and the **Start Building Templates** step becomes active.
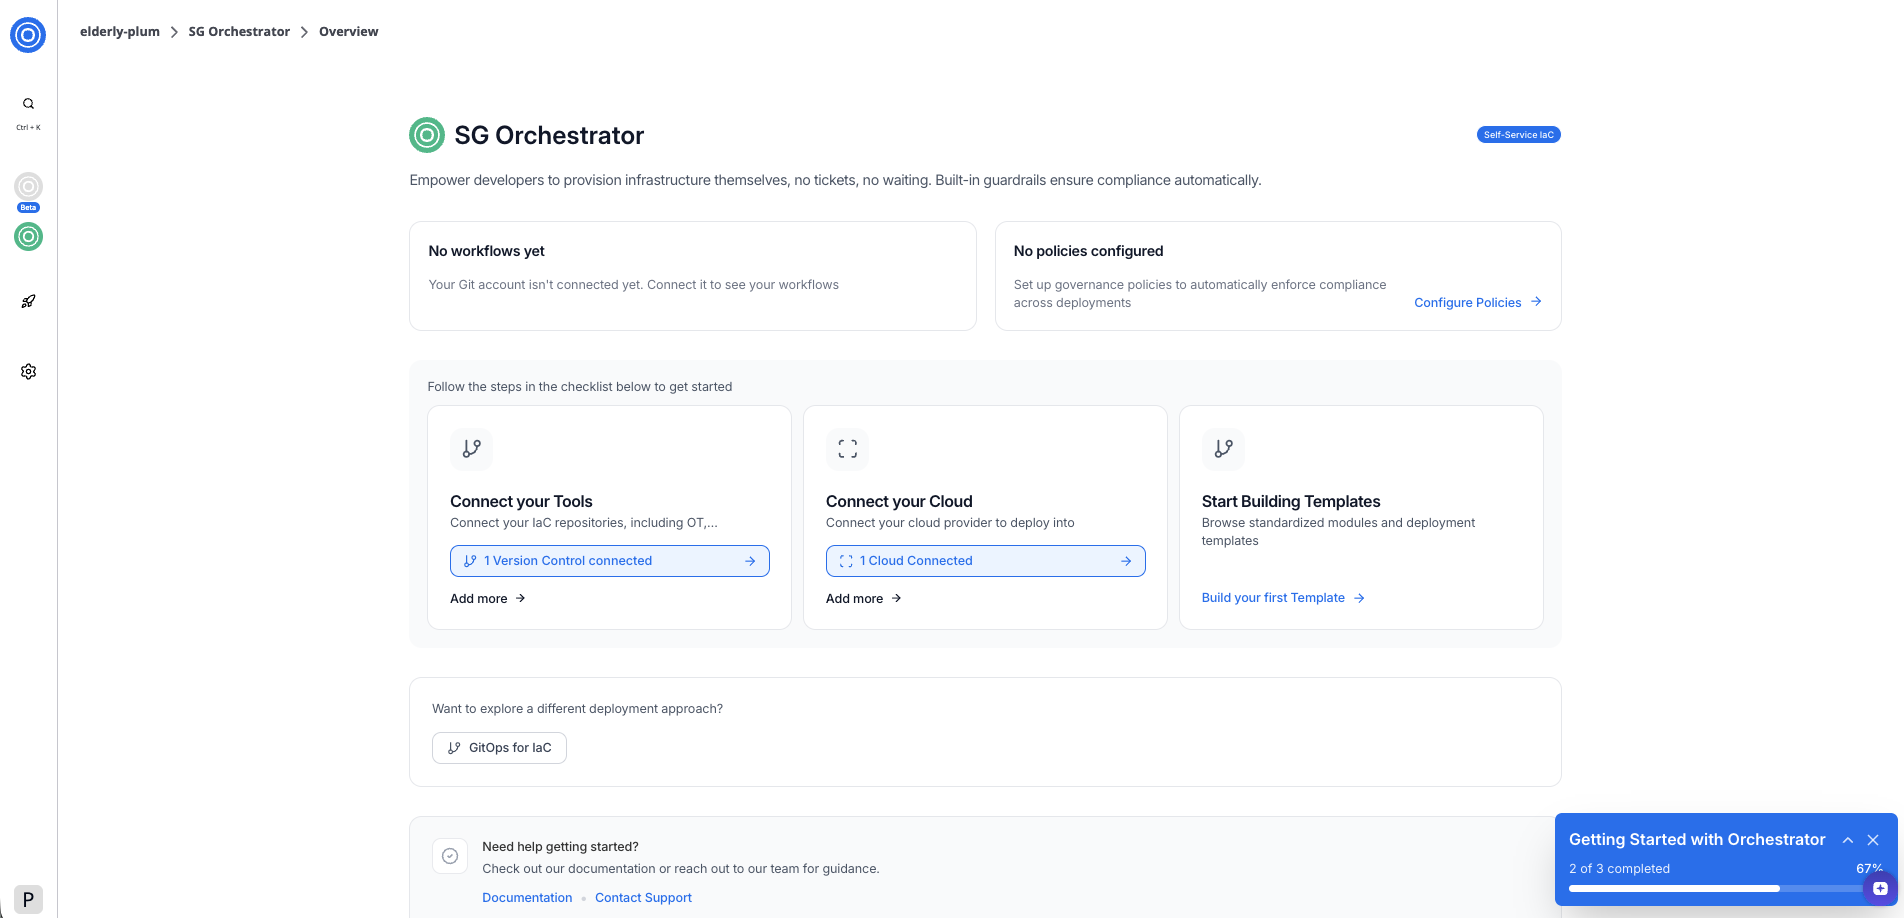
*SGOrchestrator overview page*
## Step 5: Build your first template[](#step-5-build-your-first-template "Direct link to Step 5: Build your first template")
With both your tools and cloud provider connected, select **Build your first Template** to browse your connected repositories and create a reusable deployment template.
## Next steps[](#next-steps "Direct link to Next steps")
Now that your environment is set up, you can:
* [Build a template](/docs/develop/library/overview/) from one of your connected repositories
* Explore [GitOps for IaC](/docs/develop/library/overview/) to deploy infrastructure directly from Git
---
# Kyro Bot
## Overview[](#overview "Direct link to Overview")
We’re excited to introduce **Kyro Bot** — StackGuardian's secure, intelligent knowledge assistant. Designed to help users quickly find answers, understand features, and explore platform capabilities, Kyro leverages advanced AI models while ensuring enterprise-grade privacy.
With real-time access to StackGuardian’s official documentation and a context-aware interface, Kyro transforms how users interact with the platform.
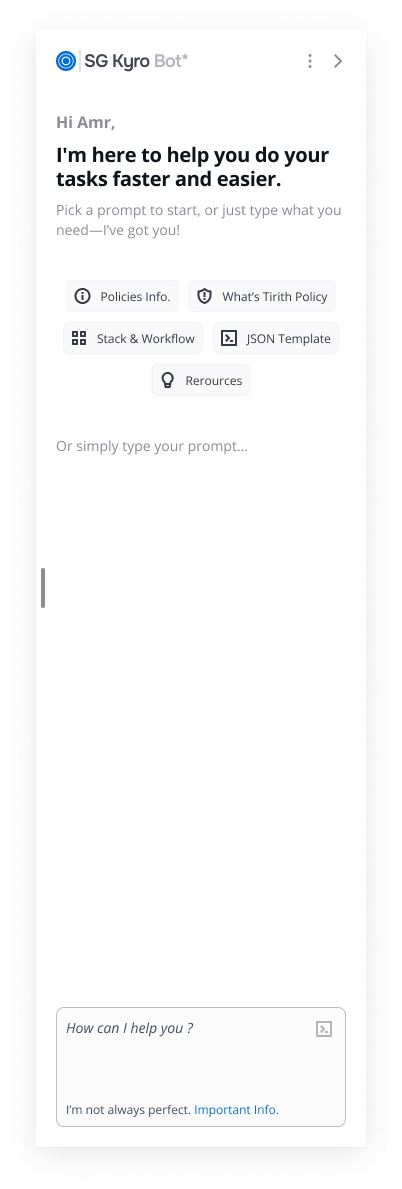
***
## Key Features[](#key-features "Direct link to Key Features")
### 1. Instant Answers with Source References[](#1-instant-answers-with-source-references "Direct link to 1. Instant Answers with Source References")
Kyro Bot provides precise, reliable responses to user queries — each answer includes **direct links to the relevant documentation pages**, ensuring full transparency and credibility.
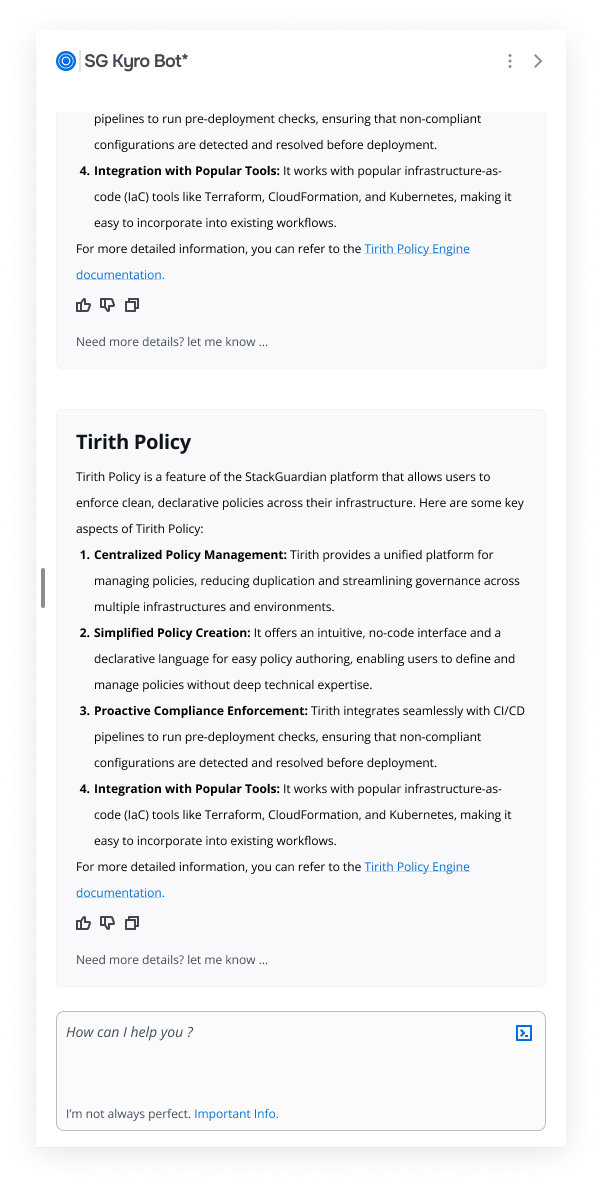
***
### 2. Contextual Prompt Suggestions[](#2-contextual-prompt-suggestions "Direct link to 2. Contextual Prompt Suggestions")
Depending on your current location within the StackGuardian platform, Kyro intelligently suggests **relevant follow-up questions** — helping users discover helpful insights faster.

***
### 3. Persistent Conversation History[](#3-persistent-conversation-history "Direct link to 3. Persistent Conversation History")
Users can now **access previous Kyro conversations**, allowing them to build on past interactions and revisit earlier discussions at any time for a smoother experience.
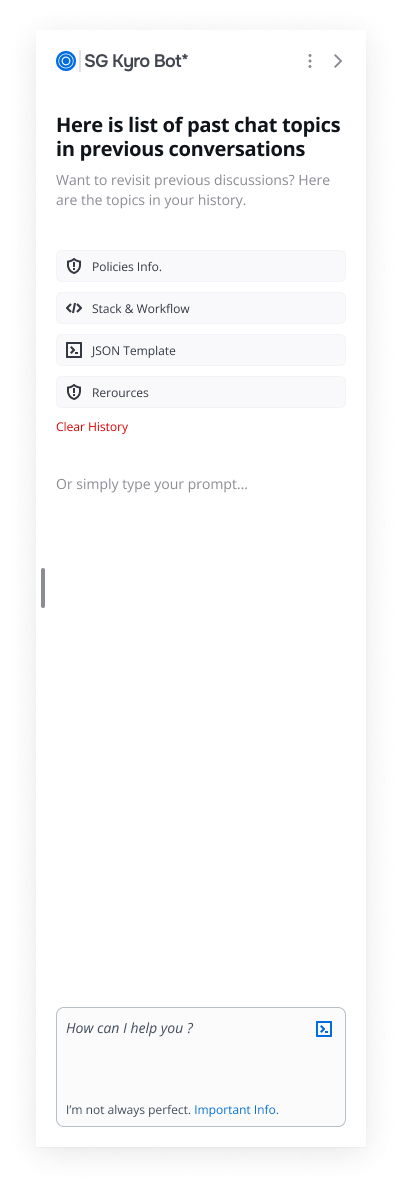
***
### 4. Organization Privacy & Security[](#4-organization-privacy--security "Direct link to 4. Organization Privacy & Security")
Kyro is built with security at its core:
* **No user data is accessed or stored**
* Responses are **exclusively generated from official StackGuardian documentation**
* Compliant with strict **enterprise privacy standards**
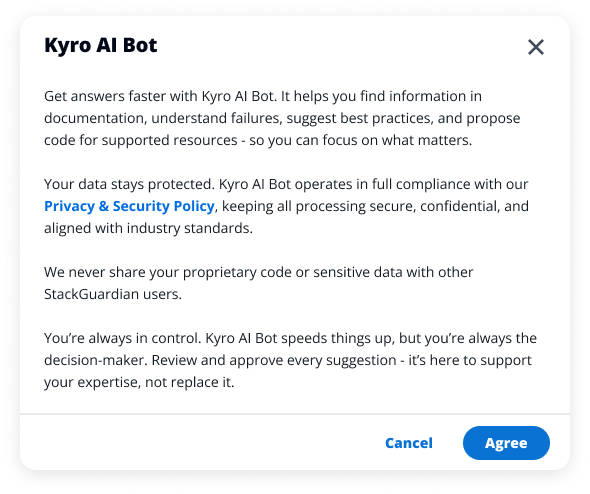
***
### 5. **Simple and Seamless Access**[](#5-simple-and-seamless-access "Direct link to 5-simple-and-seamless-access")
Once enabled by your organization’s administrator, Kyro Bot can be launched by clicking the **AI button** in the **bottom-right corner** of any page within the platform.
Users can:
* Ask about StackGuardian concepts, APIs, and platform features
* Receive clear, structured responses tailored to their queries
* Explore linked documentation for deeper understanding
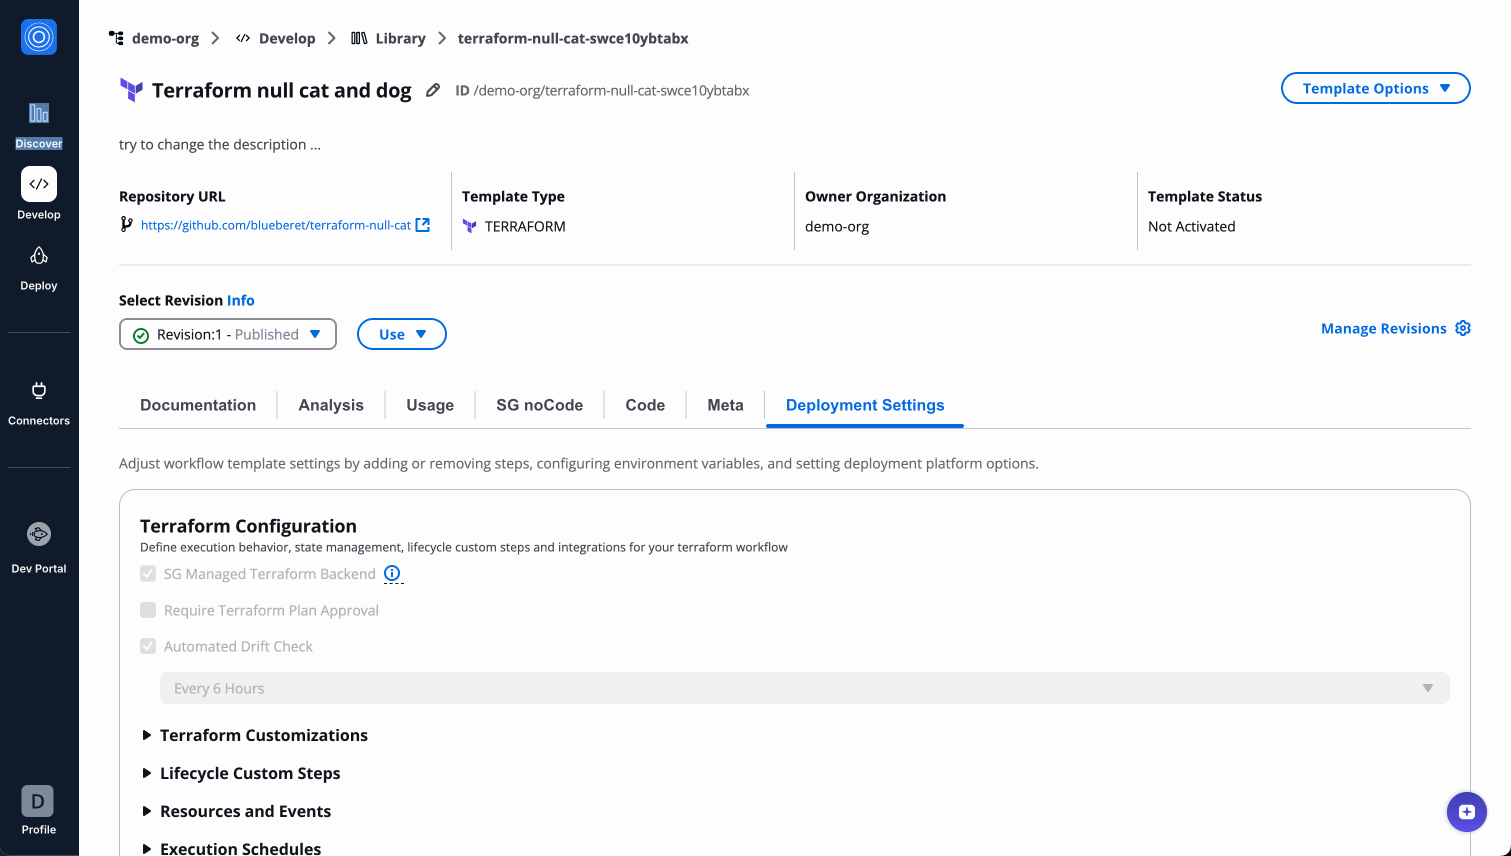
***
### 6. Sample Questions to Get Started[](#6-sample-questions-to-get-started "Direct link to 6. Sample Questions to Get Started")
Kyro is ready to assist you with both basic and advanced queries. Try asking:
* “How do I create a stack?”
* “How do I create an exclusion rule?”
* “How to trigger a deployment via API?”
You can ask follow-ups, troubleshoot issues, or explore features — Kyro is your personalized StackGuardian expert, always on hand.
***
### 7. Enabling Kyro Bot (Admins Only)[](#7-enabling-kyro-bot-admins-only "Direct link to 7. Enabling Kyro Bot (Admins Only)")
By default, Kyro Bot is disabled and must be enabled by an organization administrator.
To enable:
1. Go to **Organization Settings > AI Settings**
2. Locate the **Kyro AI Bot** toggle
3. Switch the toggle **ON**
4. Accept the **Terms & Conditions**
Once enabled, Kyro will be accessible to **all users** in the organization.
info
Kyro Bot does not access personal or project data. All answers come solely from official documentation.
***
### 8. For Non-Admins: Request Access[](#8-for-non-admins-request-access "Direct link to 8. For Non-Admins: Request Access")
If Kyro Bot isn't enabled yet:
* You’ll see a message indicating it’s unavailable.
* You can select one or more organization admins to request enablement.
* An email notification will be sent to those admins.
***
### Why Enable Kyro Bot?[](#why-enable-kyro-bot "Direct link to Why Enable Kyro Bot?")
Kyro Bot is designed for secure, efficient knowledge support:
* Instant answers with linked documentation
* No access to private data
* Organization-level privacy protections
Whether you're learning the platform or diving deep into advanced topics, Kyro provides a safe, reliable, and powerful way to interact with StackGuardian.
---
# Terms of Use for StackGuardian AI Services
## 1. Overview of StackGuardian AI Services[](#1-overview-of-stackguardian-ai-services "Direct link to 1. Overview of StackGuardian AI Services")
StackGuardian AI ("AI Services") refers to artificial intelligence and machine learning features integrated into the StackGuardian platform. These capabilities may assist with tasks such as generating content, answering questions, providing recommendations, and automating workflows. For purposes of these AI Terms, “Customer Data” means all data, content, prompts, queries, inputs, or other information submitted by or on behalf of the Customer through the AI Services.
## 2. AI Model Provider[](#2-ai-model-provider "Direct link to 2. AI Model Provider")
StackGuardian AI is currently powered by Microsoft Azure OpenAI Services. By using the AI Services, you agree to the data handling, privacy, and security terms of Microsoft Azure Cognitive Services:
* [Azure OpenAI Service Data, Privacy, and Security](https://learn.microsoft.com/en-us/legal/cognitive-services/openai/data-privacy?tabs=azure-portal)
StackGuardian may engage additional or alternative third-party AI providers in the future. Any such providers will be subject to the same privacy, security, and compliance obligations under these AI Terms and the Agreement.
### Third-Party Provider Dependencies[](#third-party-provider-dependencies "Direct link to Third-Party Provider Dependencies")
The AI Services depend on third-party AI model providers. StackGuardian is not liable for:
* Service interruptions, degradations, or failures caused by third-party AI providers
* Changes to third-party provider terms, policies, or capabilities that affect AI Services
* Discontinuation or modification of third-party AI models or services
* Third-party provider data processing practices beyond StackGuardian's control
StackGuardian will use commercially reasonable efforts to maintain AI Services availability but makes no guarantees regarding third-party provider performance or continuity.
## 3. Activation and Consent[](#3-activation-and-consent "Direct link to 3. Activation and Consent")
The AI Services are disabled by default for all organizations. Enabling them requires:
* An authorized administrator to opt in through the StackGuardian dashboard.
* Explicit acceptance of these AI Terms on behalf of the organization.
Use of the AI Services is entirely optional, and the StackGuardian platform remains fully functional without them.
## 4. Acceptance of AI Terms[](#4-acceptance-of-ai-terms "Direct link to 4. Acceptance of AI Terms")
**THESE AI TERMS, TOGETHER WITH THE AGREEMENT, GOVERN THE CUSTOMER'S USE OF THE AI SERVICES.**
By enabling or using the AI Services, you confirm that you have read, understood, and accepted these AI Terms, and agree to be bound by them.
If you do not agree to these AI Terms, you must not enable or use the AI Services.
## 5. Supplemental Agreement[](#5-supplemental-agreement "Direct link to 5. Supplemental Agreement")
These AI Terms supplement and are incorporated by reference into the StackGuardian Master Services Agreement or any other applicable governing Terms & Conditions (collectively, the "Agreement"). If there is a conflict between these AI Terms and the Agreement, these AI Terms will govern your use of the AI Services.
## 6. Intellectual Property & Customer Data[](#6-intellectual-property--customer-data "Direct link to 6. Intellectual Property & Customer Data")
* All intellectual property related to the AI Services, including models, algorithms, and infrastructure, is owned by StackGuardian and its licensors or providers.
* All content and data submitted by the Customer through the AI Services ("Customer Data") remains the exclusive property of the Customer.
### Right to Use[](#right-to-use "Direct link to Right to Use")
StackGuardian grants the Customer a limited, revocable, non-exclusive, non-transferable, and non-sublicensable license to use the AI Services, subject to compliance with these AI Terms, the Agreement, and applicable law.
## 7. Acceptable Use Policy[](#7-acceptable-use-policy "Direct link to 7. Acceptable Use Policy")
You agree that you will not:
* Reverse-engineer, decompile, modify, or misuse any AI output or underlying technology.
* Use the AI Services for illegal, deceptive, or fraudulent activities.
* Submit personal, regulated, or sensitive data without proper authorization.
* Attempt unauthorized access to any StackGuardian system or related infrastructure.
* Violate third-party intellectual property rights or applicable data protection laws.
* Abuse the AI Services by generating excessive, automated, or malicious requests that may degrade performance.
## 8. Data Usage & Training[](#8-data-usage--training "Direct link to 8. Data Usage & Training")
* Customer Data is not used to train or improve any underlying AI models unless you provide express written consent.
* Customer Data is processed solely to deliver the AI Services, in accordance with our Privacy Policy, applicable law, and the privacy and security standards of our current and future third-party AI providers.
* Data processing complies with Microsoft's Azure OpenAI policies and the policies of any additional or alternative providers engaged by StackGuardian, ensuring high privacy and security standards.
## 9. Customer Responsibilities[](#9-customer-responsibilities "Direct link to 9. Customer Responsibilities")
The Customer is solely responsible for:
* Ensuring that all Customer Data submitted to the AI Services complies with applicable laws and regulations, including data protection and privacy laws.
* Obtaining all necessary rights, licenses, and consents to submit such data.
* Not submitting any data that is confidential, proprietary, or subject to third-party rights without appropriate authorization.
## 10. Accuracy and Limitations[](#10-accuracy-and-limitations "Direct link to 10. Accuracy and Limitations")
* AI output may sometimes be inaccurate, incomplete, or biased.
* AI-generated content and suggestions are assistive only, and YOU ARE SOLELY RESPONSIBLE FOR VERIFYING AND VALIDATING ALL OUTPUT BEFORE RELYING ON IT.
* STACKGUARDIAN DISCLAIMS ALL LIABILITY FOR ANY ACTIONS OR DECISIONS TAKEN BASED ON AI-GENERATED OUTPUT.
* STACKGUARDIAN MAKES NO WARRANTIES, EXPRESS OR IMPLIED, REGARDING THE ACCURACY, COMPLETENESS, RELIABILITY, OR FITNESS FOR PURPOSE OF ANY AI-GENERATED CONTENT.
## 11. Access, Suspension, and Termination[](#11-access-suspension-and-termination "Direct link to 11. Access, Suspension, and Termination")
* Access to the AI Services is at StackGuardian's sole discretion.
* We may suspend, limit, or revoke access at any time, with or without notice, if misuse is detected or these AI Terms are violated.
* StackGuardian reserves the right to update, modify, or discontinue the AI Services or these AI Terms at any time.
## 12. Disclaimers and Limitations of Liability[](#12-disclaimers-and-limitations-of-liability "Direct link to 12. Disclaimers and Limitations of Liability")
All disclaimers, limitations of liability, and indemnities in the Agreement also apply to the AI Services. StackGuardian makes no warranties regarding the accuracy, availability, or reliability of AI-generated output.
***
**By enabling or using StackGuardian AI Services, you acknowledge and agree to these Terms of Use.**
---
# Responsible AI Usage
StackGuardian's AI features are designed to enhance your productivity while maintaining the highest standards of security and reliability. Understanding how to use AI responsibly ensures you get the best results while maintaining control over your decisions.
***
## Key Principles for Responsible Use[](#key-principles-for-responsible-use "Direct link to Key Principles for Responsible Use")
### 1. Always Review and Verify[](#1-always-review-and-verify "Direct link to 1. Always Review and Verify")
**🔍 Review Every Suggestion**
* Carefully examine all code, configurations, and recommendations provided by StackGuardian AI
* Verify that suggestions align with your specific requirements and constraints
* Test any code or configurations in a safe environment before implementation
**📋 Cross-Reference with Documentation**
* Use the provided source links to verify information in the official documentation
* Ensure suggestions are current and applicable to your specific use case
* When in doubt, consult the primary documentation sources
### 2. Understand AI Limitations[](#2-understand-ai-limitations "Direct link to 2. Understand AI Limitations")
**⚠️ AI Can Make Mistakes**
* StackGuardian AI, like all AI systems, can occasionally provide incorrect or incomplete information
* Always apply your professional judgment and expertise when evaluating suggestions
* Be especially cautious with critical systems or production environments
**🎯 Context Matters**
* StackGuardian AI provides general guidance based on documentation and best practices
* Your specific environment, requirements, and constraints may require different approaches
* Adapt suggestions to fit your particular situation and organizational policies
### 3. Maintain Security Best Practices[](#3-maintain-security-best-practices "Direct link to 3. Maintain Security Best Practices")
**🔒 Protect Sensitive Information**
* Never share sensitive credentials, API keys, or proprietary information in conversations
* Be mindful of what information you include in your questions
* Follow your organization's data handling and security policies
**🛡️ Validate Security Recommendations**
* Review all security-related suggestions with your security team
* Ensure compliance with your organization's security standards
* Test security configurations in controlled environments
***
## Best Practices for Effective Use[](#best-practices-for-effective-use "Direct link to Best Practices for Effective Use")
### Ask Clear, Specific Questions[](#ask-clear-specific-questions "Direct link to Ask Clear, Specific Questions")
* Provide context about your specific use case or environment
* Include relevant details that help StackGuardian AI understand your needs
* Break complex questions into smaller, focused queries
### Use AI as a Starting Point[](#use-ai-as-a-starting-point "Direct link to Use AI as a Starting Point")
* Treat suggestions as a foundation to build upon, not final solutions
* Combine AI assistance with your expertise and judgment
* Iterate and refine based on your specific requirements
***
## When to Seek Additional Help[](#when-to-seek-additional-help "Direct link to When to Seek Additional Help")
While StackGuardian AI features are powerful assistants, there are times when you should seek additional support:
* **Complex Architecture Decisions**: Consult with your team or StackGuardian support for major architectural choices
* **Production Issues**: For critical production problems, contact StackGuardian support directly
* **Custom Requirements**: When you have unique or highly specialized requirements not covered in standard documentation
* **Compliance Questions**: For regulatory or compliance-related questions specific to your industry
***
## Providing Feedback[](#providing-feedback "Direct link to Providing Feedback")
Your feedback helps improve StackGuardian AI for everyone. Use the built-in feedback tools to share your experience.
---
# MCP Server
## Overview[](#overview "Direct link to Overview")
The StackGuardian MCP Server connects AI tools directly to the StackGuardian Platform. This gives AI agents, assistants, and chatbots the ability to query workflows, retrieve stack information, and analyze deployments through natural language.
Built for platform engineers and developers who want AI-powered assistance for their StackGuardian operations.
Performance tip
The StackGuardian MCP Server works well with all AI models. However, premium models deliver exceptional results with minimal prompting. Free and entry-level models perform reliably for standard queries and may simply need slightly more detailed instructions for complex tasks.
## What you can do[](#what-you-can-do "Direct link to What you can do")
* **Workflow management**: View workflow runs, check execution status, and fetch logs for troubleshooting.
* **Stack operations**: Query stack information, check deployment status, and retrieve configuration details.
* **Infrastructure insights**: Monitor deployment runs, analyze failures, and get comprehensive visibility into your infrastructure state.
* **Organization intelligence**: Access organization settings, retrieve connectors, and understand team structure.
## Prerequisites[](#prerequisites "Direct link to Prerequisites")
Before you begin:
1. A StackGuardian account with API access
2. A compatible MCP host application
3. The following configuration parameters:
* **API Token (SG\_API\_TOKEN)**: Your [StackGuardian API key](/docs/profile/api_keys/#steps-to-generate-an-api-key)
* **Organization name (SG\_ORG)**: Your StackGuardian organization identifier
note
The API key inherits permissions from your user role. Ensure you have the necessary access rights for the operations you want to perform.
## Installation[](#installation "Direct link to Installation")
All installation methods require the same three configuration parameters. Replace these placeholder values with your actual credentials:
* `SG_API_TOKEN`: Your StackGuardian API token
* `SG_ORG`: Your organization name
**ChatGPT**
**Prerequisites**
* ChatGPT Plus, Pro, Team, or Enterprise subscription
* Your StackGuardian API token (`SG_API_TOKEN`)
* Your StackGuardian organization name (`SG_ORG`)
**Installation**
**Step 1: Enable developer mode**
1. Log in to [ChatGPT](https://www.google.com/url?sa=i\&source=web\&rct=j\&url=https://chatgpt.com/\&ved=2ahUKEwiwhoCHhMKSAxXJT2cHHcbtCyYQy_kOegYIAQgLEAE\&opi=89978449\&cd\&psig=AOvVaw3jzvtEwAL7f_zWk-amz4Bu\&ust=1770369928662000)
2. Click your profile icon (bottom-left) > **Settings**
3. Go to **Apps & Connectors**
4. Scroll to **Advanced** settings and toggle on **Developer mode**
**Step 2: Create the connector**
1. In **Apps & Connectors**, click **Create App**
2. Configure:
* **Name**: `StackGuardian`
* **Description**: (Optional)
* **MCP Server URL**:
* For EU Region: `https://api.app.stackguardian.io/mcp?SG_API_TOKEN=&SG_ORG=`
* For US Region: `https://api.us.stackguardian.io/mcp?SG_API_TOKEN=&SG_ORG=`
* **Authentication**: None
3. Check **I trust this application**
4. Click **Create**
*Integration with ChatGPT*
**Codex CLI**
Add this configuration to your Codex CLI MCP settings:
```
[mcp_servers.StackGuardian]
command = "npx"
args = [
"-y",
"mcp-remote",
"https://api.app.stackguardian.io/mcp",
"--header",
"SG_API_TOKEN: ",
"--header",
"SG_ORG: ",
]
startup_timeout_sec = 60
tool_timeout_sec = 120
```
For US Region, use `https://api.us.stackguardian.io/mcp` as URL.
note
GPT Codex connects to MCP servers through commands rather than direct URLs, which requires `npx`. Ensure Node.js and npm are installed on your system.
**Claude Code**
After installing Claude Code, run this command in your terminal to add the StackGuardian MCP server:
```
claude mcp add --transport http StackGuardian https://api.app.stackguardian.io/mcp \
--header "SG_API_TOKEN: " \
--header "SG_ORG: "
```
For US Region, use `https://api.us.stackguardian.io/mcp` as URL.
**Claude Web/Desktop**
Connect your StackGuardian tools to Claude (Web or Desktop) using the MCP.
**Prerequisites**
* Claude Pro, Team, or Enterprise account
* Your StackGuardian API token (`SG_API_TOKEN`)
* Your StackGuardian organization name (`SG_ORG`)
**Installation**
**Step 1: Enable developer mode**
1. Open [Claude.ai](http://claude.ai/) or Claude Desktop
2. Click your profile icon (bottom-left) > **Settings**
3. Select the **Developer** tab
4. Developer features activate automatically
**Step 2: Add the connector**
1. In **Settings**, go to **Connectors**
2. Click **Add custom connector**
3. Configure:
* **Name**: `StackGuardian MCP`
* **Remote URL**:
* For EU Region: `https://api.app.stackguardian.io/mcp?SG_API_TOKEN=&SG_ORG=`
* For US Region: `https://api.us.stackguardian.io/mcp?SG_API_TOKEN=&SG_ORG=`
4. Click **Add**
*Integration with Claude Web/Desktop*
**Gemini CLI**
After installing Gemini CLI, run this command in your terminal to add the StackGuardian MCP server:
```
gemini mcp add StackGuardian https://api.app.stackguardian.io/mcp \
--transport http \
--header "SG_API_TOKEN: " \
--header "SG_ORG: " --scope user
```
For US Region, use `https://api.us.stackguardian.io/mcp` as URL.
**VSCode Copilot**
Integrate StackGuardian into VSCode with GitHub Copilot Chat using the Model Context Protocol (MCP).
**Prerequisites**
* VS Code `1.99` or later
* GitHub Copilot extension (any plan, including free)
* Your StackGuardian API token (`SG_API_TOKEN`)
* Your StackGuardian organization name (`SG_ORG`)
**Installation**
**Step 1: Configure the MCP server**
Create `.vscode/mcp.json` in your project root, or run `MCP: Open User Configuration` from the Command Palette for a global config:
```
{
"servers": {
"stackguardian": {
"command": "npx",
"args": [
"-y",
"mcp-remote",
"https://api.app.stackguardian.io/mcp?SG_API_TOKEN=&SG_ORG="
]
}
}
}
```
For the US region, use `https://api.us.stackguardian.io/mcp?SG_API_TOKEN=&SG_ORG=` as the URL.
**Step 2: Start the MCP server**
A **Start** button will appear at the top of the `mcp.json` file after saving. Click it to start the server and discover available tools.
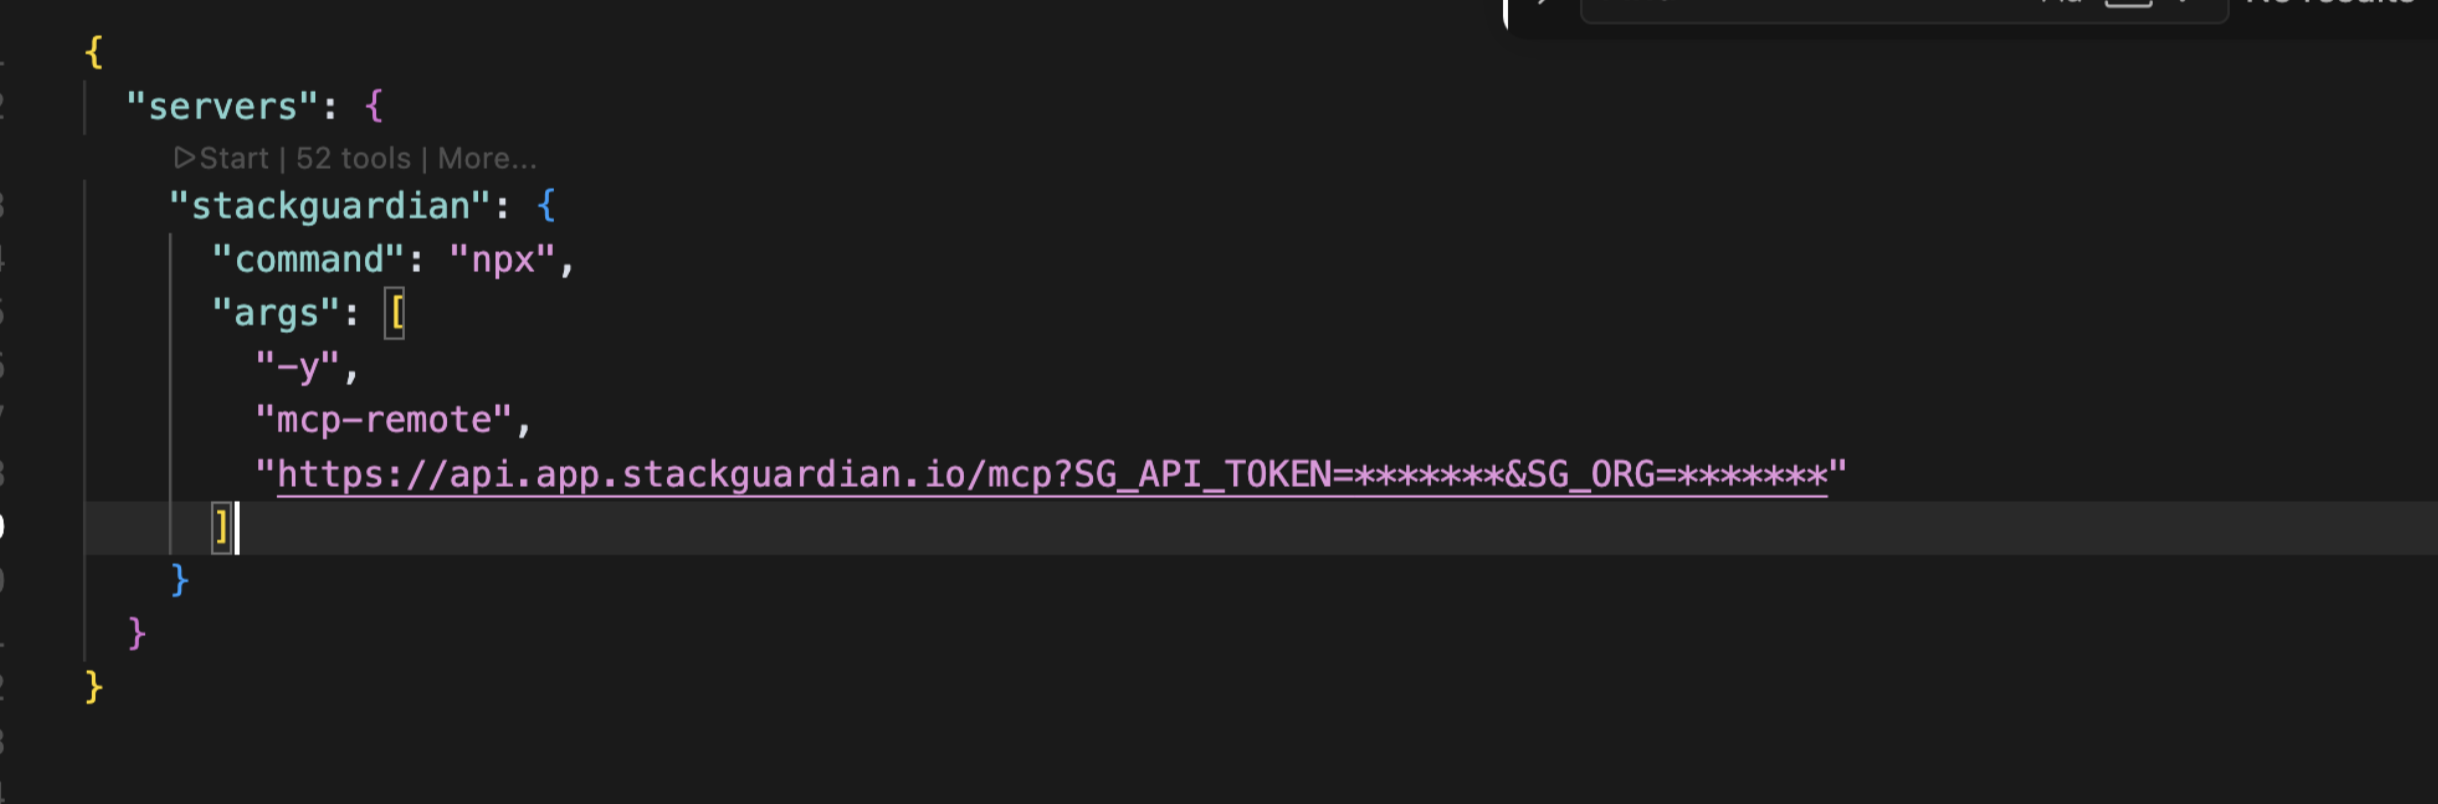
*Start the MCP server*
**Step 3: Access via Copilot Chat**
1. Open Copilot Chat (`Ctrl+Alt+I` on Windows/Linux or `Cmd+Ctrl+I` on macOS)
2. Switch to **Agent mode** from the mode dropdown
3. Click the tools icon (🛠) to verify StackGuardian tools are listed
MCP tools are only available in **Agent mode**. They will not appear in Ask or Edit mode.
## Use cases[](#use-cases "Direct link to Use cases")
* *"Why did workflow run #1247 fail? Help me to figure out what happened."*
* *"What's the status of my latest workflow run?"*
* *"What's the current status of all stacks in the engineering organization?"*
* *“Which workflows are still using template empty-tf-resource revision Revision: 2”*
* *“How healthy are the workflows in the mcp-testing workflow group?”*
## Security and permissions[](#security-and-permissions "Direct link to Security and permissions")
The MCP server respects the permissions associated with your API key. If your key doesn't have access to certain resources, those operations will fail with a permission error.
---
# Access management
## Overview[](#overview "Direct link to Overview")
*Access Management* within StackGuardian Orchestrator allows administrators to control user access levels within the organization. The interface provides options to *assign roles* to **users** or **groups**, define *custom roles*, and *manage login methods*.
## Role-Based Access Control (RBAC)[](#role-based-access-control-rbac "Direct link to Role-Based Access Control (RBAC)")
RBAC is a method of regulating access to resources based on the roles of individual users within an enterprise. In StackGuardian, RBAC allows for granular control over the actions that users and groups can perform, which is crucial for large organizations with complex access control requirements.
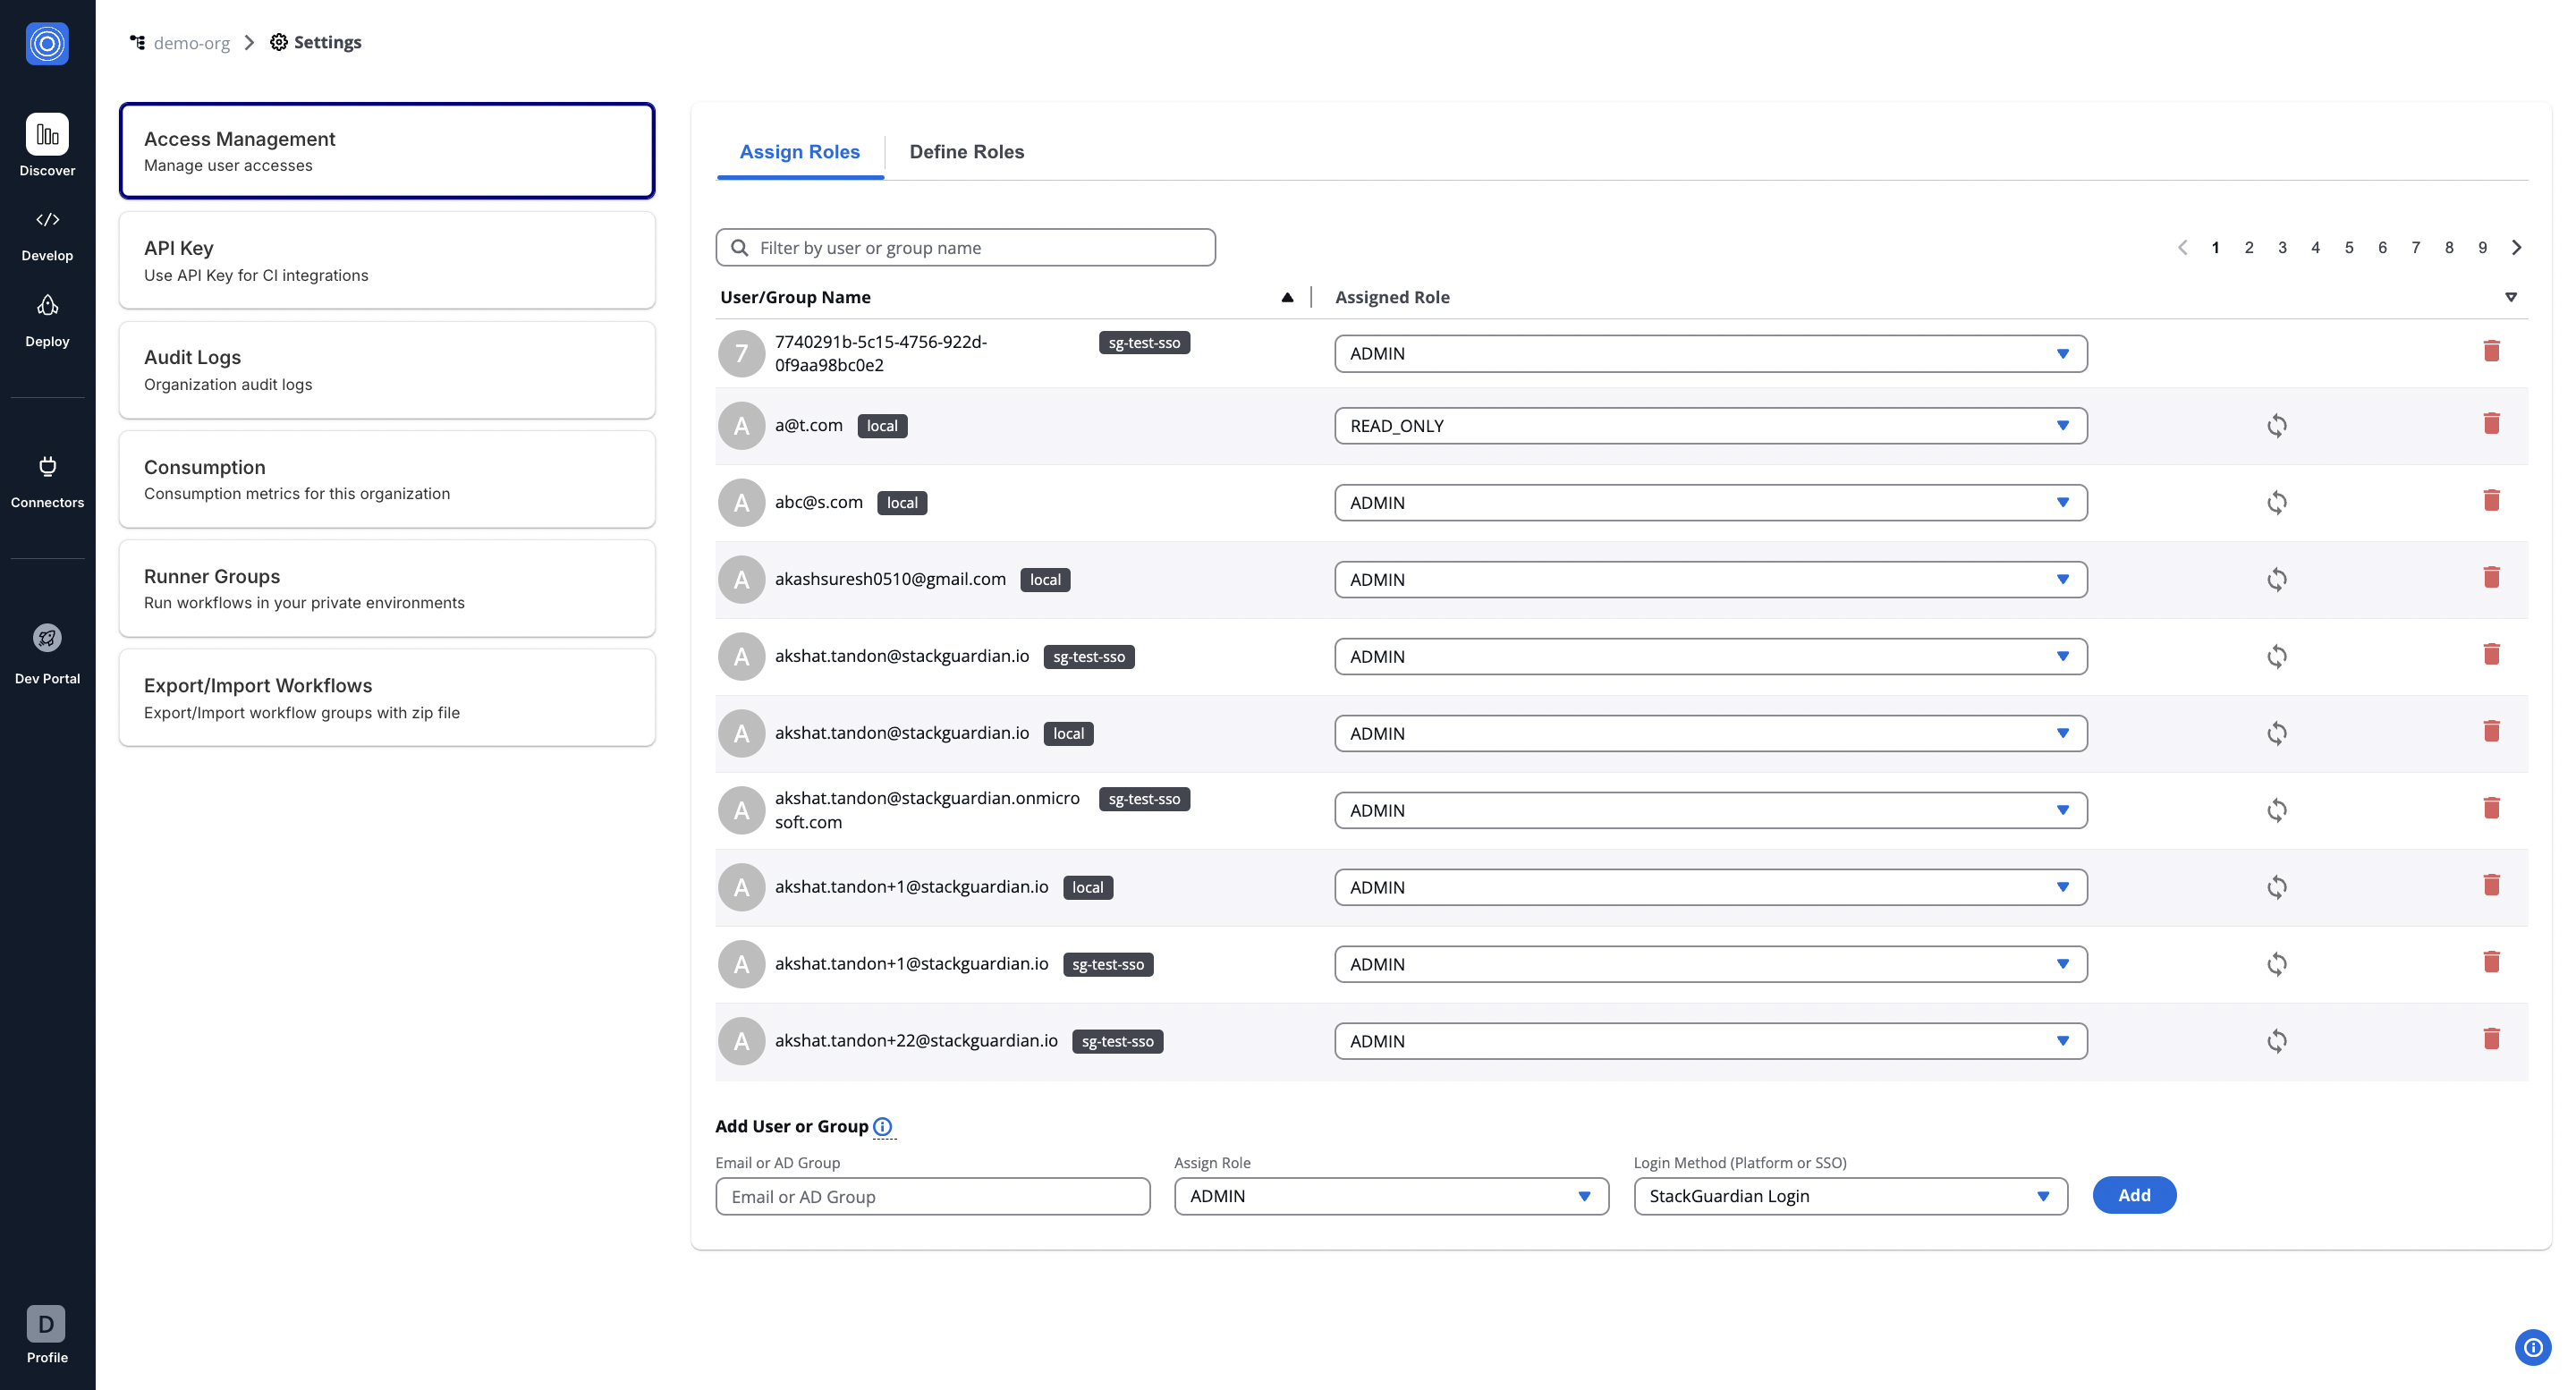
## Use Case[](#use-case "Direct link to Use Case")
Consider a scenario in a large organization where different teams need different levels of access to workflows, Connectors, and policies. With StackGuardian RBAC, you can create a role named `DevOps` that has permissions to `Create`, `Update`, and `Delete` workflows, but only `Read` access to secrets.
## Add Users and Assign Roles[](#add-users-and-assign-roles "Direct link to Add Users and Assign Roles")
Navigate to ***Orchestrator*** > ***Organization settings*** tab on the left.
To add a new user to your organization, follow these steps:
1. In the **"Add User or Group"** section, enter the email ID or AD group. For example, **.
2. Assign a Role from the dropdown that reflects the user's function within the organization. Please note that, by default, you can assign a maximum of 5 roles per user within an organization. To increase this limit, please open a [**support ticket**](https://support.stackguardian.io/ticket).
3. Select the Login Method, which can be a direct login or [**Single Sign-On (SSO)**](/docs/organisation_settings/sso_saml/azure/), depending on your setup.
4. Click on the **Add** button to finalize the addition of the new user.
After adding, the user will appear in the list above, where you can modify their access or remove them as needed.
## Pre Defined Roles[](#pre-defined-roles "Direct link to Pre Defined Roles")
| Role | Description | Permissions & Descriptions |
| ------------------------------- | ------------------------------------------------------------------------------------------------------ | --------------------------------------------------------------------------------------------------------------------------------------------------------------------------------------------------------------------------------------------------------------------------------------------------------------------------------------------------------- |
| **ADMIN (Administrator)** | Full access to all settings and features across the platform. | All permissions including management and configuration of all aspects. |
| **READ\_ONLY (Read Only)** | View access to all organizational settings and configurations, without the ability to modify anything. | Only view access to settings, no modifications allowed. |
| **DEV (Developer)** | Focused on development activities. | - **Create**, **view**, and **manage** organization settings.
- Generate and view reports.
- Manage secrets and policies.
- View and manage workflows within workflow groups.
- Manage Connector groups and Connectors.
- Execute, view, and manage workflows and their runs.
- Handle stack configurations and operations. |
| **SEC (Security Specialist)** | Specialized in security with access tailored to manage security settings and sensitive data. | - Create and manage organization reports.
- Manage secrets and policies.
- View workflows and their outputs.
- Authenticate and manage Connector settings.
- Limited management of workflow configurations.
- Oversee security aspects of stack operations. |
| **OPS (Operations Specialist)** | Geared towards operations management. | - Manage organization settings and secrets.
- Create, update, and delete policies.
- Full management of workflow groups, workflows, and their runs.
- Manage Connector groups and Connectors.
- Handle operational aspects of workflow configurations.
- Supervise and operate stacks and stack runs. |
| **Custom Roles** | Customizable roles to fit specific organizational needs, with permissions assigned as needed. | Custom permissions based on organizational requirements. |
note
You can create ***custom roles*** to fit unique requirements of your organization in the "**Define Role**" tab.
## Custom Roles[](#custom-roles "Direct link to Custom Roles")
In the *StackGuardian Orchestrator*, defining roles is crucial for managing and customizing access levels across your organization. The **Define Roles** tab allows for the **creation** of roles that cater to specific responsibilities and access requirements within your organization. Navigate inside the role created for further configurations.
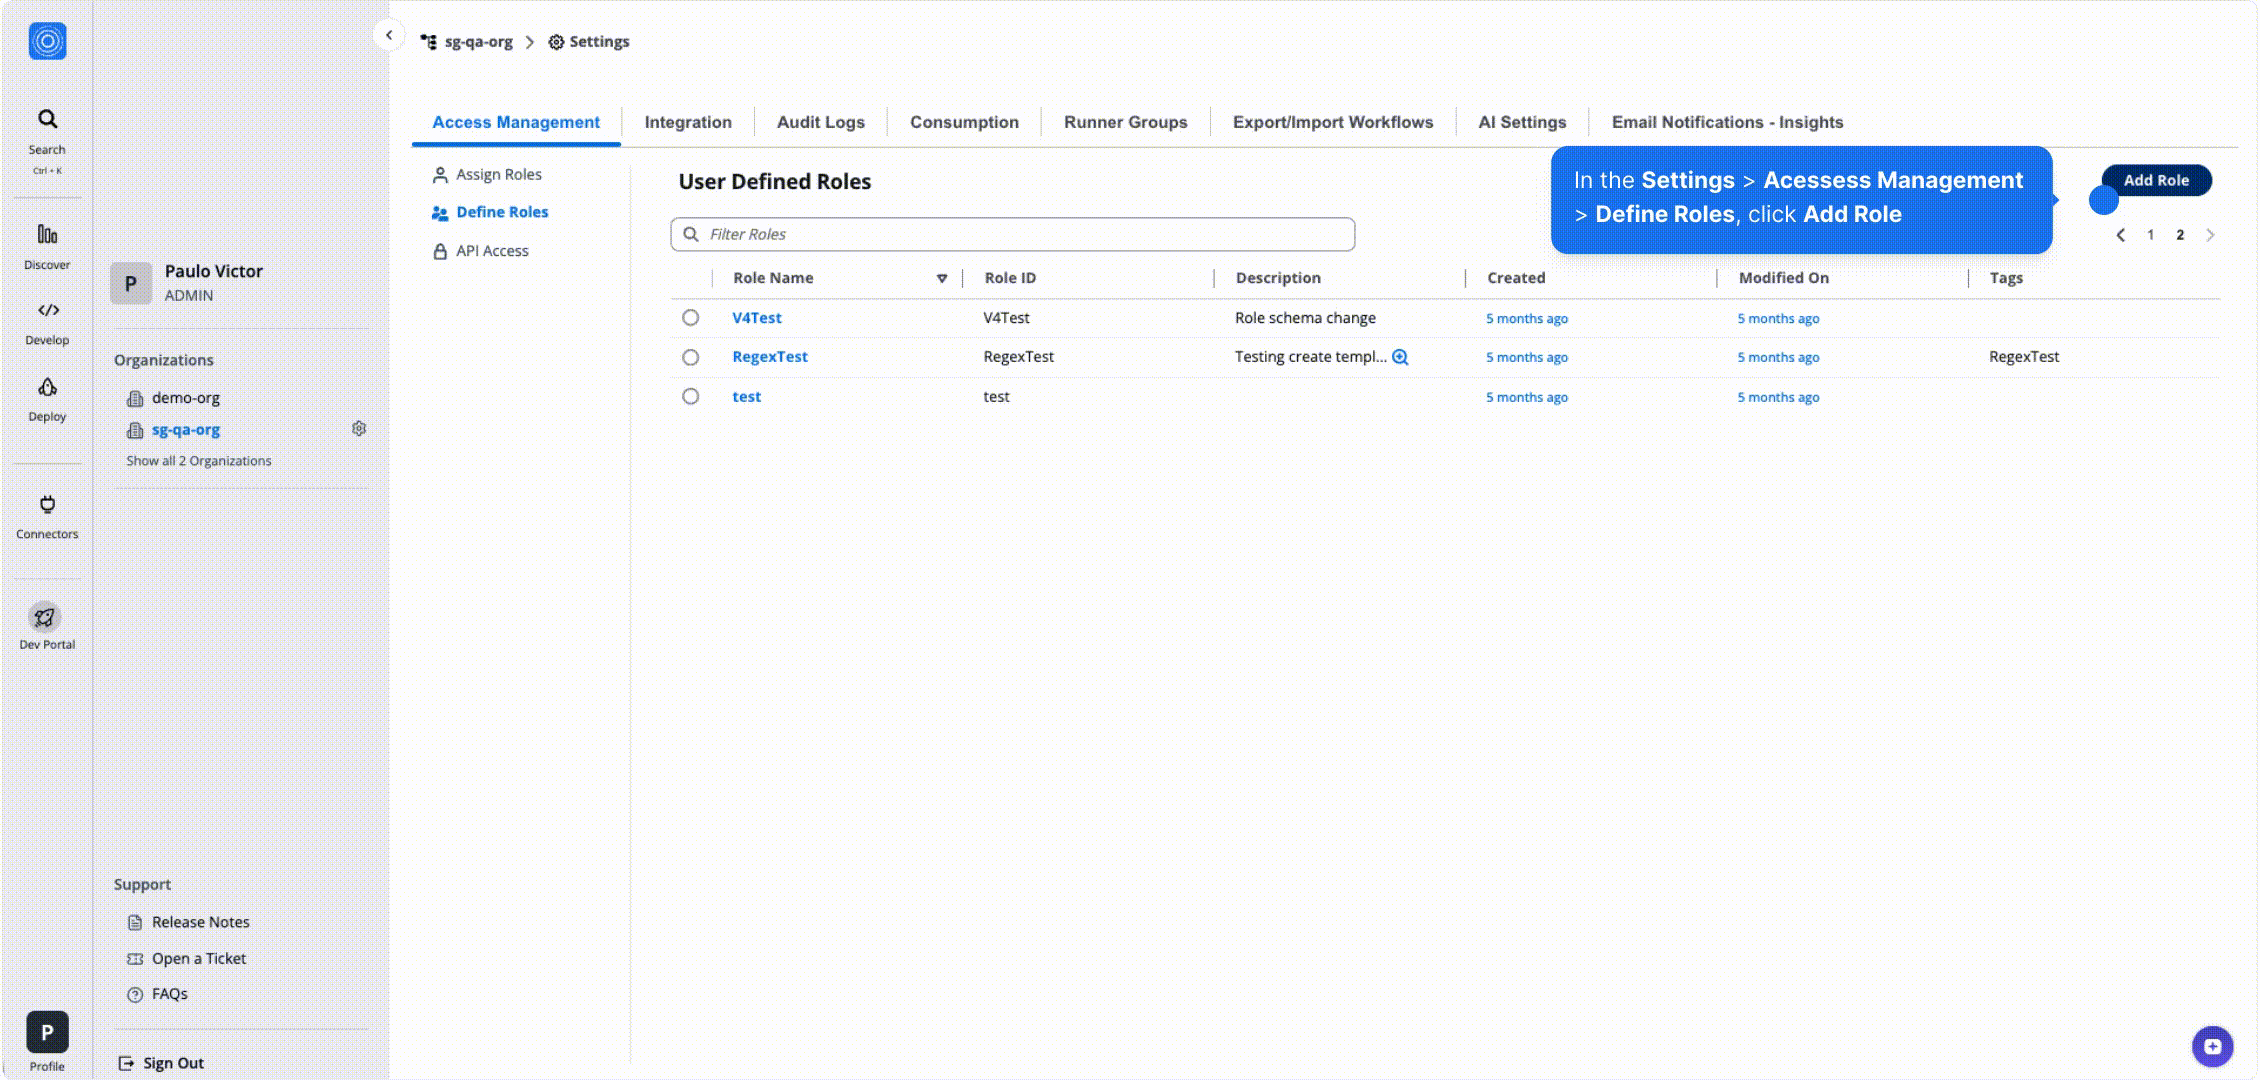
*Create a Role*
## Permissions Overview[](#permissions-overview "Direct link to Permissions Overview")
Tailor permissions to meet the specific needs of roles, team members, and access levels for efficient access control. Below is an outline of other permission categories:
* **Workflows & Stacks Permissions**: Manage user interactions with Workflow Groups, Workflows, and Stacks. This could range from viewing lists to creating, updating, or deleting workflows and stacks.
Workflow Permissions
| **Permission** | **Description** |
| ------------------------------------------------ | -------------------------------------------------------- |
| **Get Workflow** | View the list of workflows within workflow groups. |
| **Create Workflow** | Create new workflows within any workflow group. |
| **Update Workflow** | Edit existing workflows in any workflow group. |
| **Delete Workflow** | Remove workflows from any workflow group. |
| **Get Workflow Outputs** | View outputs generated by workflows. |
| **Get Workflow Run** | Access details of workflow execution runs. |
| **Run Workflow** | Execute workflows within a group. |
| **Cancel Workflow Run** | Cancel running workflows if needed. |
| **Get Workflow Run Logs** | Retrieve logs for workflow execution runs. |
| **Resume Workflow Run** | Resume paused or stopped workflow executions. |
| **Get Workflow Runfact** | Fetch run-related facts for workflows. |
| **Get Workflow Artifact** | Fetch artifacts of a workflow. |
| **Create Update Delete Workflow Artifact** | Upload, update, or delete artifacts on a Workflow. |
| **Get Stack** | View details of stacks in the organization. |
| **Create Stack** | Add new stacks for managing infrastructure. |
| **Delete Stack** | Remove stacks as required. |
| **Run Stack** | Execute stacks for deployment or configuration. |
| **Get Stack Run** | Access details about stack runs. |
| **Get Stack Outputs** | View outputs generated by stack runs. |
| **Get Stack Workflow** | Access workflows associated with a stack. |
| **Update Stack Workflow** | Edit workflows tied to specific stacks. |
| **Delete Stack Workflow** | Remove workflows from stacks. |
| **Get Stack Workflow Outputs** | View outputs from stack-related workflows. |
| **Get Stack Workflow Artifact** | Fetch artifacts of a stack workflow. |
| **Create Update Delete Stack Workflow Artifact** | Upload, update, or delete artifacts on a Stack Workflow. |
| **Get Stack Workflow Run** | View details of stack workflow runs. |
| **Get Stack Workflow Runfact** | Fetch facts for stack workflow runs. |
| **Resume Stack Workflow Run** | Resume paused stack workflow executions. |
| **Get Stack Workflow Run Logs** | Retrieve logs for stack workflow execution runs. |
* **Connectors Permissions**: Control access to Connectors, Connector Groups.
Connectors Permissions
| **Permission** | **Description** |
| -------------------------------- | ------------------------------------------------------ |
| **Get Connector** | View the list of connector within an organization. |
| **Create Connector** | Create new connectors within an organization. |
| **Update Connector** | Edit existing connectors in an organization. |
| **Delete Connector** | Remove connectors from an organization. |
| **Get Connector Group** | View the list of connector groups within organization. |
| **Create Connector Group** | Create new connector groups within an organization. |
| **Update Connector Group** | Edit existing connector groups in an organization. |
| **Delete Connector Group** | Remove connector groups from an organization. |
| **Get Connector Group Child** | View the list of connectors within a connector group. |
| **Update Connector Group Child** | Edit existing connectors within a connector group. |
| **Delete Connector Group Child** | Remove connectors from a connector group. |
* **Policy & Secrets Permissions**: Manage permissions related to Policies and Secrets, enabling users to access, update, or create new policies and secrets.
Policy & Secrets Permissions
| **Permission** | **Description** |
| ----------------- | ------------------------------------------------- |
| **Get Secret** | View the list of secrets within an organization. |
| **Create Secret** | Create new secrets within an organization. |
| **Update Secret** | Edit secrets workflows in an organization. |
| **Delete Secret** | Remove secrets from an organization. |
| **Get Policy** | View the list of policies within an organization. |
| **Create Policy** | Create new policies within an organization. |
| **Update Policy** | Edit existing policies in an organization. |
| **Delete Policy** | Remove policies from an organization. |
* **Template Library Permissions**: Manage permissions related to Templates, enabling users to access, update, or create new templates.
Template Library Permissions
| **Permission** | **Description** |
| --------------------------------- | -------------------------------------------------- |
| **Get Templates** | View the list of templates within an organization. |
| **Create Templates** | Create new templates. |
| **Update Templates** | Edit existing templates in an organization. |
| **Delete Templates** | Remove templates from an organization. |
| **Manage Template Revision** | Create, publish, or deprecate Template revisions. |
| **Activate/Deactivate Templates** | Activate or deactivate templates for use. |
* **Roles & Others Permissions**: Provide or restrict access to additional administrative functions like Role management, API Token generation, viewing Audit logs, and generating Organization Reports.
Roles & Others Permissions
| **Permission** | **Description** |
| ------------------------- | ---------------------------------------------------------------------------------------------------------------------------------------- |
| **Get Role** | View the list of roles within an organization. |
| **Create Role** | Create new roles within an organization. |
| **Update Role** | Edit existing roles in an organization. |
| **Delete Role** | Remove roles from an organization. |
| **Get API Access** | View the list of API Access tokens. |
| **Create API Access** | Create new API Access token. |
| **Update API Access** | Edit existing API Access tokens. |
| **Delete API Access** | Remove API Access token from an organization. |
| **Get Runner Group** | View the list of runner groups within an organization. |
| **Create Runner Group** | Create new runner groups within an organization. |
| **Update Runner Group** | Edit existing runner groups in an organization. |
| **Create User API Token** | Create new User API Tokens |
| **Delete User API Token** | Remove existing User API Tokens |
| **Get Audit Logs** | Get Audit logs of an organization |
| **Get Benchmarks** | Get discovery benchmarks |
| **Org Report** | Get Org Report |
| **Update Role Binding** | Update Role Binding object ***(Will be deprecated. Please check [migration guide](#migration-guide-update-role-binding--update-user))*** |
| **Invite User** | Invite a user into an organization |
| **Update User** | Update user role in an organization |
| **Delete User** | Delete a user from an organization |
Required Permission for User Management Delegation
To delegate user management tasks (invite/update/delete users), the custom role created must include the `getRole` permission with the specific roles that this custom role will be authorized to assign to users.
The `getRole` permission is also required for deleting users. You can only delete users whose roles are a subset of your`getRole` permission scope. For example, if Alice has roles X, Y, and Z, and Bob's custom role has `getRole` permission for only X and Y, Bob cannot delete Alice because role Z is outside his permission scope.
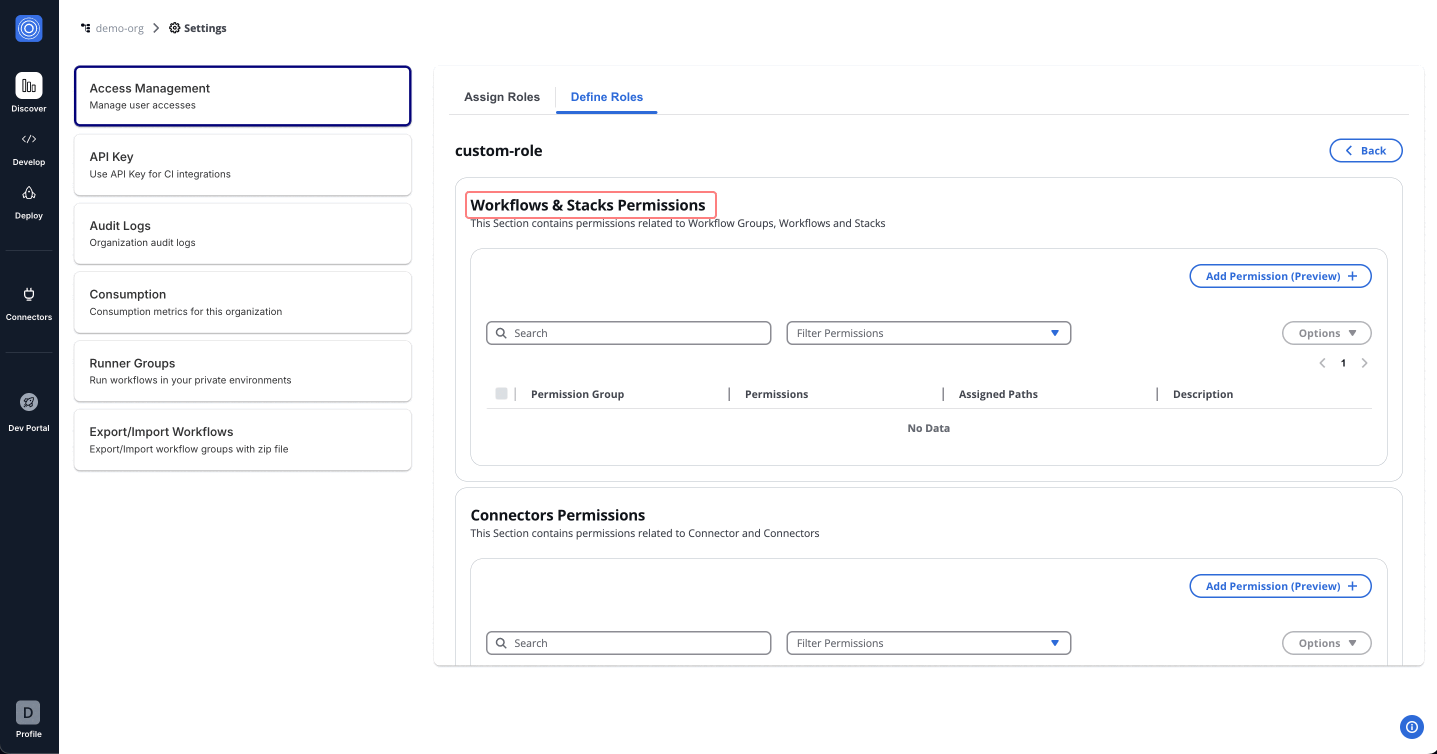
info
For example, an **Admin Role** can be set up by selecting **All** permissions under each category. This provides unrestricted access, suitable for administrative users who require full control over the platform.
## Assign Permissions[](#assign-permissions "Direct link to Assign Permissions")
To set up and assign roles for a **DevOps** team member, follow the steps below to assign permissions effectively:
### Step 1: Add Permissions[](#step-1-add-permissions "Direct link to Step 1: Add Permissions")
1. In the *Admin Portal*, access the newly established **DevOps** role.
2. Navigate to **Workflows & Stacks Permissions**.
3. Click "**Add Permission (Preview)**" and proceed with the following steps:
Use the dropdown menu to view and assign permissions. You can either assign all permissions for admin access or selectively choose specific permissions. Start with the foundational permissions such as **Get Workflow**.
Workflow Permissions
| **Permission** | **Description** |
| ------------------------------------------------ | -------------------------------------------------------- |
| **Get Workflow** | View the list of workflows within workflow groups. |
| **Create Workflow** | Create new workflows within any workflow group. |
| **Update Workflow** | Edit existing workflows in any workflow group. |
| **Delete Workflow** | Remove workflows from any workflow group. |
| **Get Workflow Outputs** | View outputs generated by workflows. |
| **Get Workflow Run** | Access details of workflow execution runs. |
| **Run Workflow** | Execute workflows within a group. |
| **Cancel Workflow Run** | Cancel running workflows if needed. |
| **Get Workflow Run Logs** | Retrieve logs for workflow execution runs. |
| **Resume Workflow Run** | Resume paused or stopped workflow executions. |
| **Get Workflow Runfact** | Fetch run-related facts for workflows. |
| **Create Update Delete Workflow Artifact** | Upload, update, or delete artifacts on a Workflow. |
| **Get Stack** | View details of stacks in the organization. |
| **Create Stack** | Add new stacks for managing infrastructure. |
| **Delete Stack** | Remove stacks as required. |
| **Run Stack** | Execute stacks for deployment or configuration. |
| **Get Stack Run** | Access details about stack runs. |
| **Get Stack Outputs** | View outputs generated by stack runs. |
| **Get Stack Workflow** | Access workflows associated with a stack. |
| **Update Stack Workflow** | Edit workflows tied to specific stacks. |
| **Delete Stack Workflow** | Remove workflows from stacks. |
| **Get Stack Workflow Outputs** | View outputs from stack-related workflows. |
| **Create Update Delete Stack Workflow Artifact** | Upload, update, or delete artifacts on a Stack Workflow. |
| **Get Stack Workflow Run** | View details of stack workflow runs. |
| **Get Stack Workflow Runfact** | Fetch facts for stack workflow runs. |
| **Resume Stack Workflow Run** | Resume paused stack workflow executions. |
| **Get Stack Workflow Run Logs** | Retrieve logs for stack workflow execution runs. |
### Step 2: Assign Paths[](#step-2-assign-paths "Direct link to Step 2: Assign Paths")
1. After assigning permissions, move to the **Assigned Paths** to add nested resources.
2. Use the dropdown to select *workflow groups*, *stacks* and *workflows* created under your organization.
3. Once done, click "**Add (Preview)**".
## How Regex Works in Path Assignments[](#how-regex-works-in-path-assignments "Direct link to How Regex Works in Path Assignments")
StackGuardian supports full match regex patterns when assigning paths under permissions. This allows flexible control over nested resources like workflow groups, stacks, and individual workflows.
note
We perform **full string matching**, which means the pattern must match the entire path, not just a part of it. You **don't need** to use `^` (start anchor) and `$` (end anchor) in your regex patterns as they are automatically applied.
### Syntax Guide:[](#syntax-guide "Direct link to Syntax Guide:")
* Use regex to dynamically match multiple path options.
* `.*` matches any character(s), allowing flexibility across different path names.
* Avoid using overly generic patterns to prevent unintended access.
### Example Pattern:[](#example-pattern "Direct link to Example Pattern:")
For workflow group permissions, you can use regex patterns to control access and naming restrictions. The behavior differs between `Create Workflow Group` and `Create Nested Workflow Group` permissions.
info
**Important:** For **Get permissions** (like viewing workflows), the regex processing works differently. When you specify a path like `a/b/c`, it automatically grants access to that path AND all its parent paths (`a`, `a/b`, and `a/b/c`) because you need to traverse through parent groups to access the target.
### Pattern 1: Create root workflow groups with name restrictions (Create Workflow Group and other create resources permissions that work on the root level (Policies, Connector, etc))[](#pattern-1-create-root-workflow-groups-with-name-restrictions-create-workflow-group-and-other-create-resources-permissions-that-work-on-the-root-level-policies-connector-etc "Direct link to Pattern 1: Create root workflow groups with name restrictions (Create Workflow Group and other create resources permissions that work on the root level (Policies, Connector, etc))")
* **Regex pattern:** `team-a-.*`
* **What it does:** Limits creation of root-level workflow groups to names matching the pattern (no hierarchy involved)
* **✅ Will allow creating:**
* `team-a-frontend` *(matches the team-a- prefix)*
* `team-a-backend-api` *(matches the team-a- prefix)*
* `team-a-123` *(matches the team-a- prefix)*
* **❌ Won't allow creating:**
* `team-b-frontend` *(doesn't match team-a- prefix)*
* `frontend-team-a` *(team-a not at the start)*
* `other-project` *(completely different pattern)*
### Pattern 2: Create nested workflow groups in parent group only (Create Nested Workflow Group permission)[](#pattern-2-create-nested-workflow-groups-in-parent-group-only-create-nested-workflow-group-permission "Direct link to Pattern 2: Create nested workflow groups in parent group only (Create Nested Workflow Group permission)")
* **Regex pattern:** `parent_wfgrp/name-pattern.*`
* **What it does:** Allows creating workflow groups directly under `parent_wfgrp` with names matching the pattern
* **✅ Will allow creating:**
* `parent_wfgrp/name-pattern-dev` *(matches the name pattern)*
* `parent_wfgrp/name-pattern123` *(matches the name pattern)*
* **❌ Won't allow creating:**
* `parent_wfgrp/other-name` *(doesn't match name pattern)*
* `parent_wfgrp/child/name-pattern-test` *(nested too deep)*
### Pattern 3: Create nested workflow groups in any sub-group (Create Nested Workflow Group permission)[](#pattern-3-create-nested-workflow-groups-in-any-sub-group-create-nested-workflow-group-permission "Direct link to Pattern 3: Create nested workflow groups in any sub-group (Create Nested Workflow Group permission)")
* **Regex pattern:** `parent_wfgrp/.*/name-pattern.*`
* **What it does:** Allows creating workflow groups in any sub-group under `parent_wfgrp` with names matching the pattern
* **✅ Will allow creating:**
* `parent_wfgrp/team1/name-pattern-frontend` *(in sub-group, matches pattern)*
* `parent_wfgrp/team2/name-pattern-backend` *(in different sub-group, matches pattern)*
* **❌ Won't allow creating:**
* `parent_wfgrp/team1/other-pattern` *(doesn't match name pattern)*
* `parent_wfgrp/name-pattern-direct` *(directly under parent, not in sub-group)*
### Pattern 4: Create in specific nested path with name restrictions (Create Nested Workflow Group permission)[](#pattern-4-create-in-specific-nested-path-with-name-restrictions-create-nested-workflow-group-permission "Direct link to Pattern 4: Create in specific nested path with name restrictions (Create Nested Workflow Group permission)")
* **Regex pattern:** `company/team/project/service-.*`
* **What it does:** Allows creating workflow groups only under the specific path with service-prefixed names
* **✅ Will allow creating:**
* `company/team/project/service-api` *(exact path, matches service- prefix)*
* `company/team/project/service-database` *(exact path, matches service- prefix)*
* **❌ Won't allow creating:**
* `company/team/project/component-ui` *(doesn't match service- prefix)*
* `company/other-team/project/service-api` *(wrong path)*
### Pattern 5: Access to specific nested path (Get Workflow Group permission)[](#pattern-5-access-to-specific-nested-path-get-workflow-group-permission "Direct link to Pattern 5: Access to specific nested path (Get Workflow Group permission)")
* **Regex pattern:** `company/team/project`
* **What it does:** For Get permissions, grants access to the specified path AND all parent paths
* **✅ Will match:**
* `company` *(parent path - needed for navigation)*
* `company/team` *(parent path - needed for navigation)*
* `company/team/project` *(the target path)*
* **❌ Won't match:**
* `company/team/project/feature` *(child paths)*
* `company/other-team` *(sibling paths)*
### Pattern 6: Access to specific user or group (Invite User permission)[](#pattern-6-access-to-specific-user-or-group-invite-user-permission "Direct link to Pattern 6: Access to specific user or group (Invite User permission)")
* **Regex pattern:** `.*@example\.io`
* **What it does:** For Invite user, grants access to all email-based users whose address ends with @example.io.
* **✅ Will match:**
* `abc@example.io`
* `user@example.io`
* **❌ Won't match:**
* `user@gmail.com`
* `abc@mail.com`
info
You can test your regex patterns live using [**regex101.com**](https://regex101.com).
## Delete Permission[](#delete-permission "Direct link to Delete Permission")
To remove assigned permissions, follow these steps:
1. Navigate to the permission list.
2. Use **Options** > **Delete** to remove permissions individually or collectively.

## Assigning a Custom Role[](#assigning-a-custom-role "Direct link to Assigning a Custom Role")
After creating a custom role, it becomes available under the "**Assign role**" tab. To assign this role:
1. Navigate to the **Assign Role** tab.
2. Select the User/Group name to whom you want to assign the permissions.
3. From the **Assign Role** dropdown, search for and select the name of the custom role created (e.g., `_custom_role_`).
## Migration Guide: Update Role Binding → Update User[](#migration-guide-update-role-binding--update-user "Direct link to Migration Guide: Update Role Binding → Update User")
1. The Update Role Binding permission will be deprecated and removed in April 2026.
2. Open any role currently using Update Role Binding permission.
3. Remove **Update Role Binding** from the role.
4. Add the **Update User** permission as the replacement (Available in the same ***Roles & Others Permissions*** section)
5. Review and add Entity Type, Login Method, or Email/Group RegEx prefixes.
6. Save the updated role configuration.
---
# API access
## Overview[](#overview "Direct link to Overview")
The **API Access** feature provides organizations with a secure and centralized way to manage programmatic access to the platform. Located under **Access Management → API Access**, this functionality allows administrators to create, manage, and monitor API Access tied to organizational roles and permissions.
The design focuses on **security, visibility, and control**, ensuring that API access can be provisioned, audited, and revoked with ease.
## Prerequisites[](#prerequisites "Direct link to Prerequisites")
To create an API Access, your role needs these least privilege [permissions](/docs/organisation_settings/access_management/#permissions-overview) assigned to your role:
* `createApiAccess` - Allows you to create new API Access entries. This permission includes regex pattern matching for the field Access Name to control naming conventions.
* `getRole` - Allows you to view and assign roles to API Access. Without this permission, you cannot assign roles during API Access creation or editing.
## Key Features[](#key-features "Direct link to Key Features")
* `createApiAccess` - Allows you to create new API Access entries. This permission includes regex pattern matching for the field Access Name to control naming conventions.
* `getRole` - Allows you to view and assign roles to API Access. Without this permission, you cannot assign roles during API Access creation or editing.
## Key Features[](#key-features-1 "Direct link to Key Features")
## 1. API Access Table[](#1-api-access-table "Direct link to 1. API Access Table")
All created API Access are displayed in a centralized table view, including:
* **Access Name**
* **Access ID**
* **Description**
* **Tags**
* **Type** (currently only API Key)
* **Expiration Date**
* **Status** (Active, Expired)
From this view, users can:
* **Click Access Name** → open detailed API Access view.
* **Bulk-select** multiple API Access → perform mass deletion.
* **Single-select** an API Access → delete, regenerate or edit.
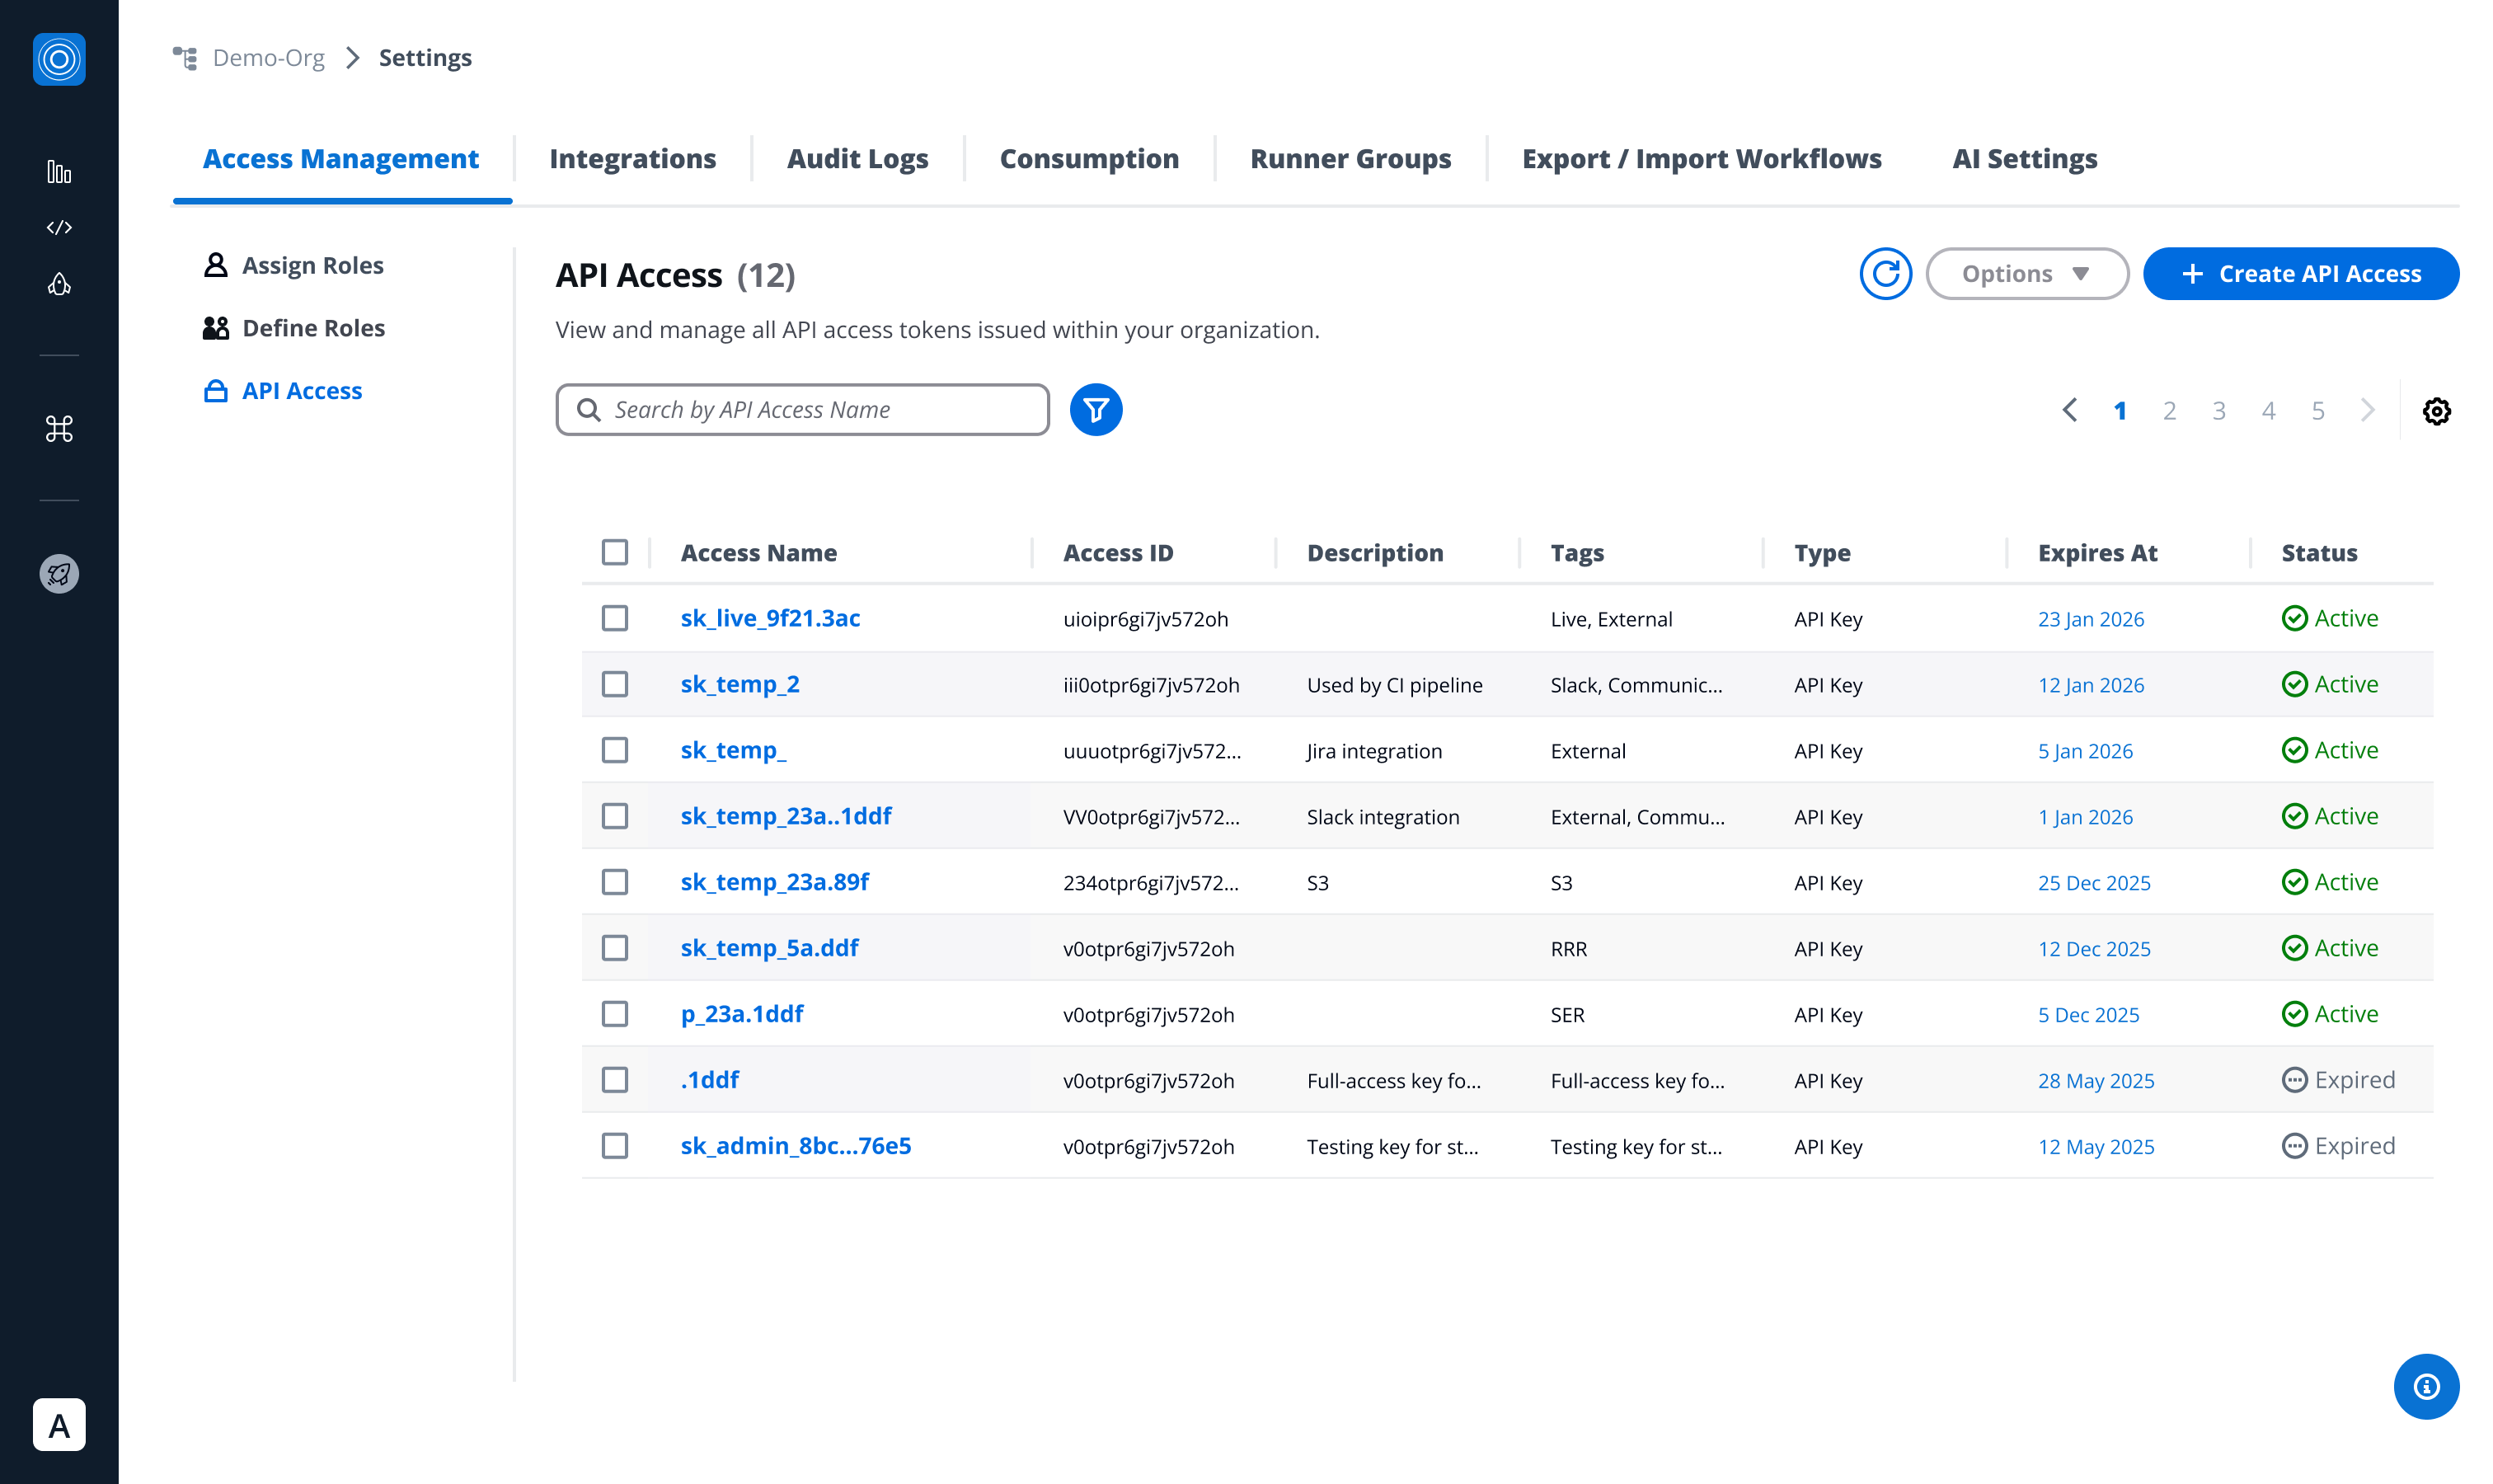
## 2. Detailed API Access View[](#2-detailed-api-access-view "Direct link to 2. Detailed API Access View")
Clicking on an API Access name opens a detailed panel with:
* **Access Name & Description**
* **Tags**
* **Created By** (user identity)
* **Created At** (timestamp)
* **Role Assignment**
* **Status** (Active, Expired)
* **Expiration Date** (with timestamp)
This enables admins to quickly audit access credentials and their usage.
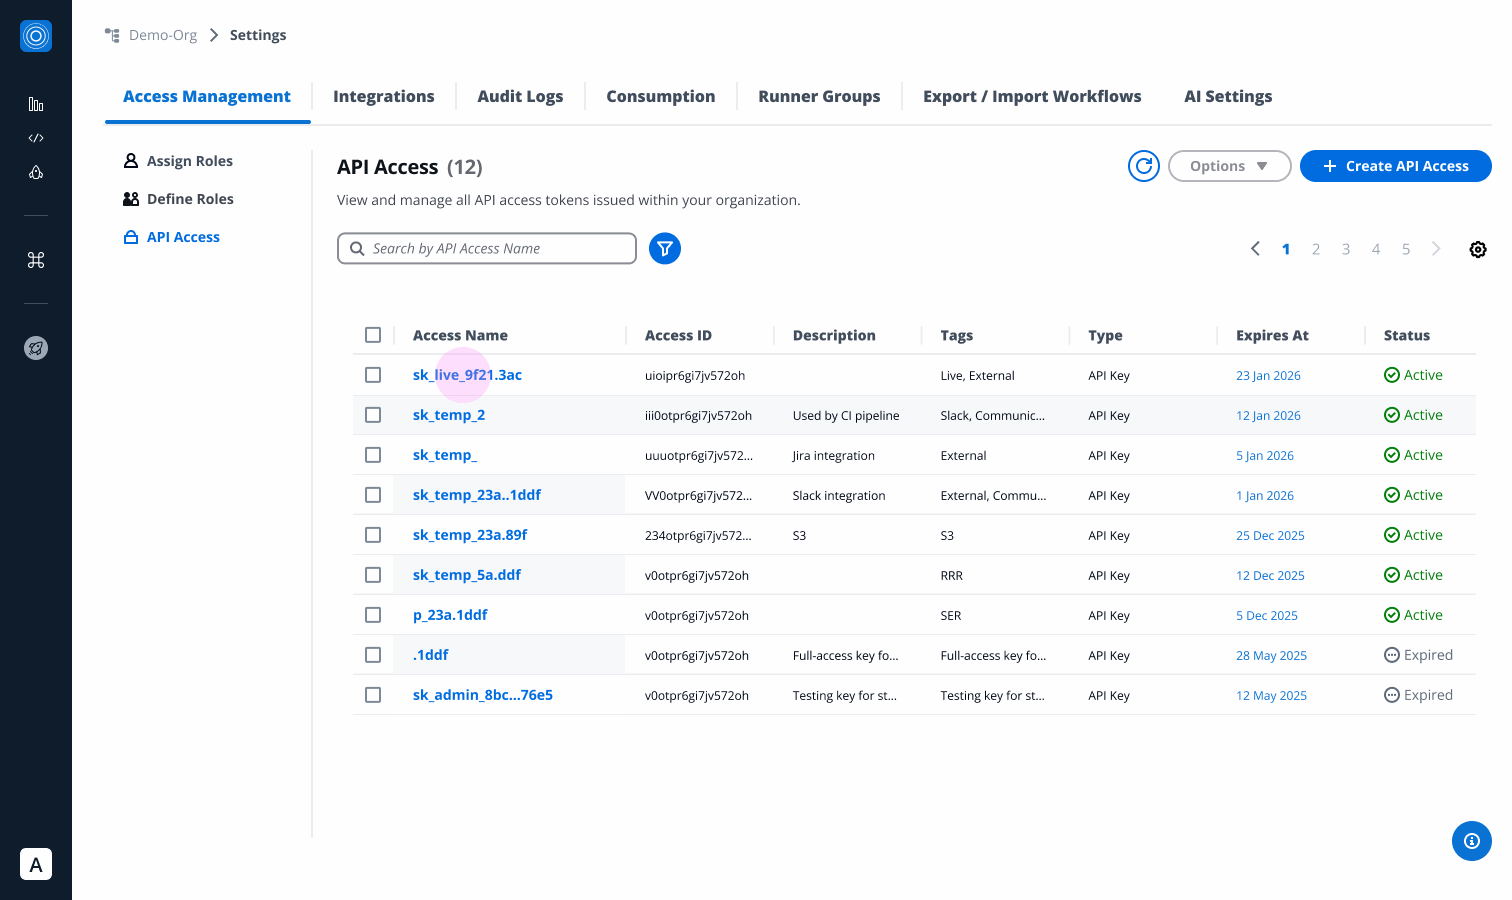
## 3. API Access Creation[](#3-api-access-creation "Direct link to 3. API Access Creation")
When creating a new API Access entry, users can provide:
* **Access Name** *(required)*
* **Access ID**: Auto-generated from the Access Name. You can customize it using only letters, numbers, underscores (\_), or dashes (-). This cannot be changed after creation.
* **Description** *(optional)*
* **Tags** *(optional metadata for search & organization)*
* **Type** *(required)*
* **Expiration Date** *(required)*
* **Roles** (permissions granted to the API key)
Upon creation:
* A secure **API token** is generated.
* Users can **copy** or **hide** the token for security.
* A success banner confirms creation, and the token details appear in the **API Access table**.
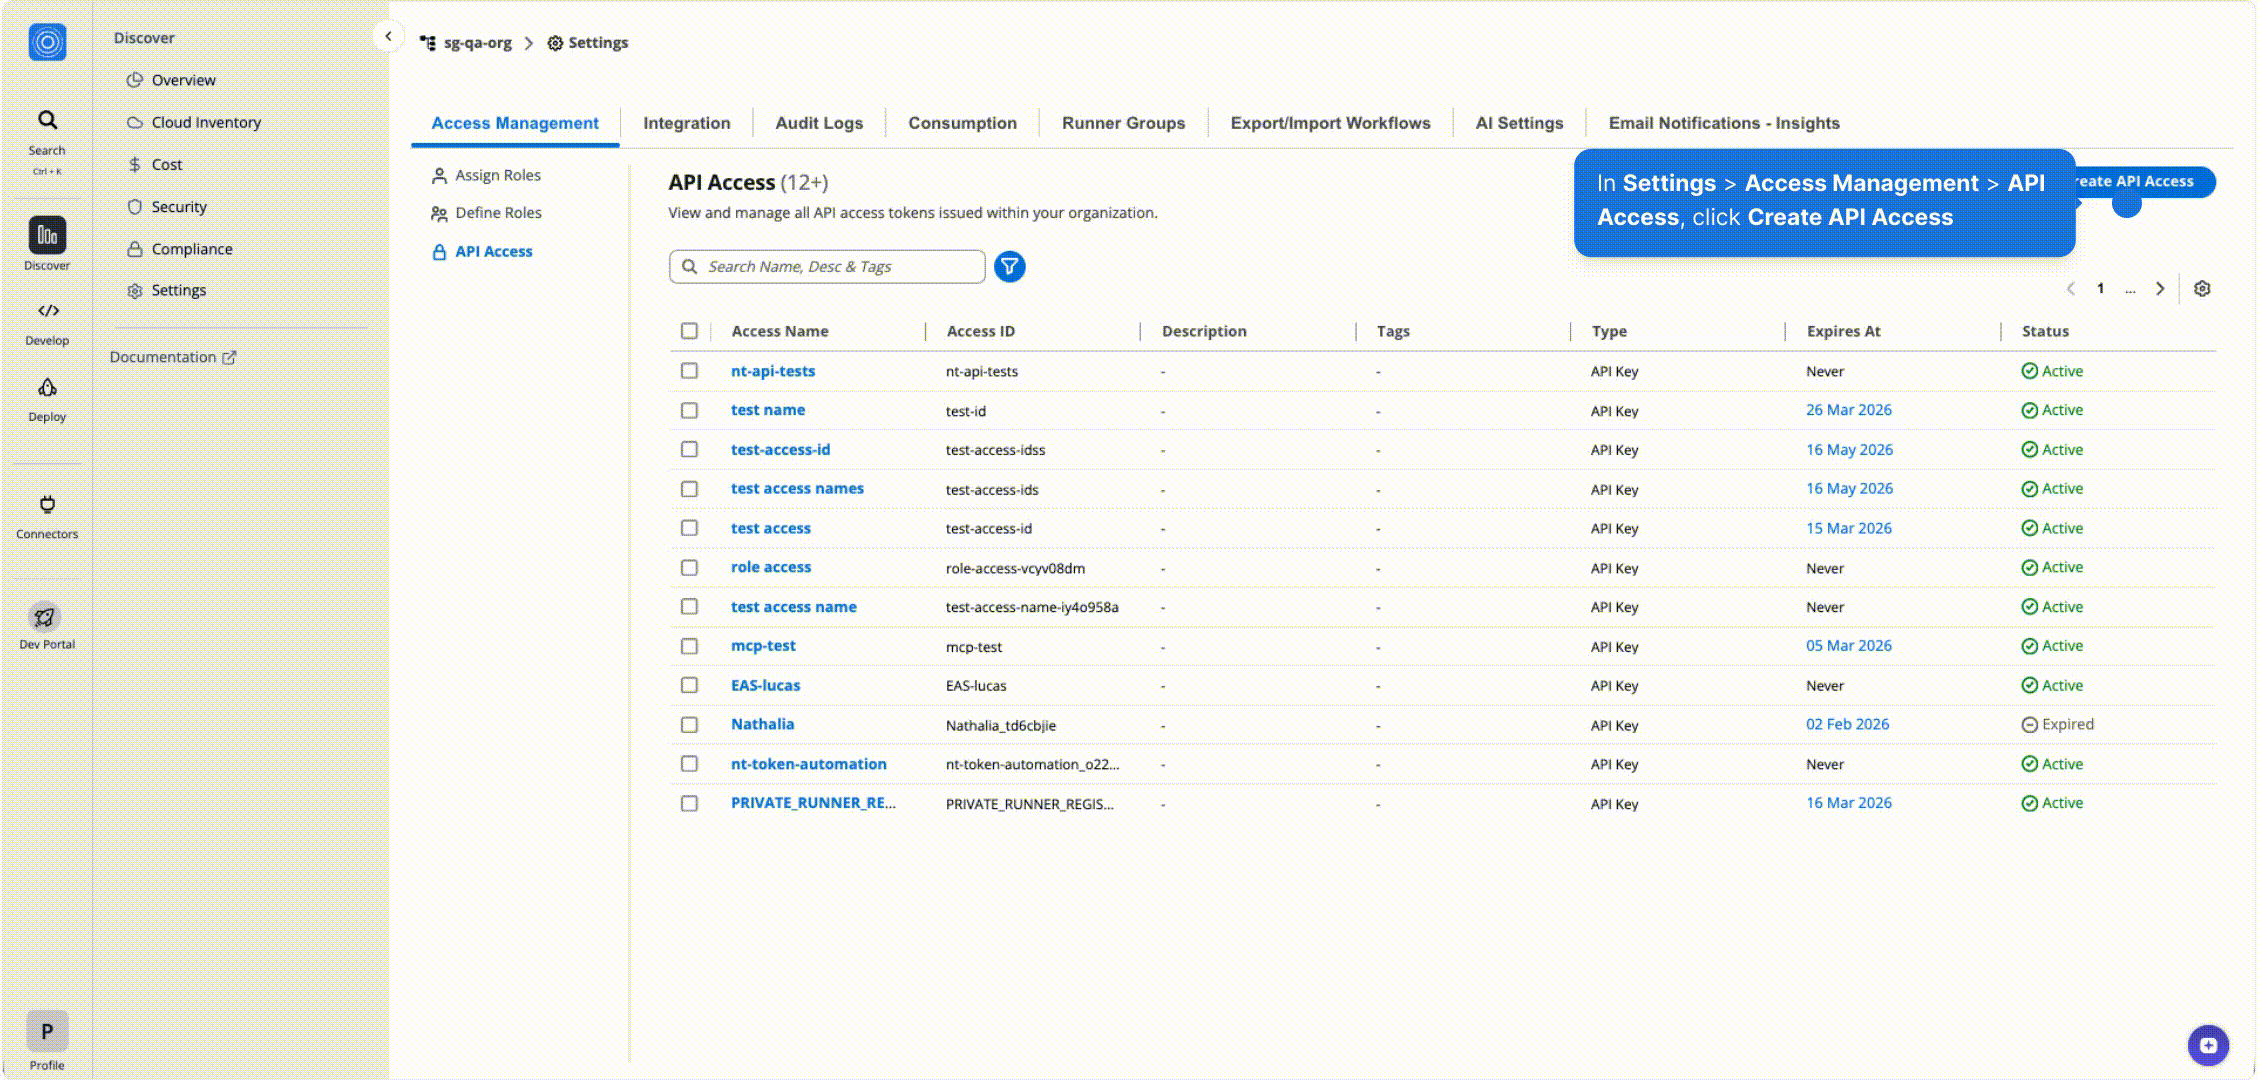
*Create API Access*
## 4. Regeneration[](#4-regeneration "Direct link to 4. Regeneration")
When managing **API Access**, users are provided with the option to **regenerate tokens** for enhanced security and compliance in the “options” button.
* **Generates a new token** that fully replaces the existing one.
* Requires assigning a **new expiration date** at the time of regeneration.
* Designed to support **key rotation** and uphold **security best practices**.

## 5. Deletion[](#5-deletion "Direct link to 5. Deletion")
Users can choose to permanently remove one or more API Access, ensuring full control over access.
* **Permanently deletes** the selected API Access.
* **Immediately revokes** all associated access.
* Supports both **single-key removal** and **bulk deletion** through multi-select.
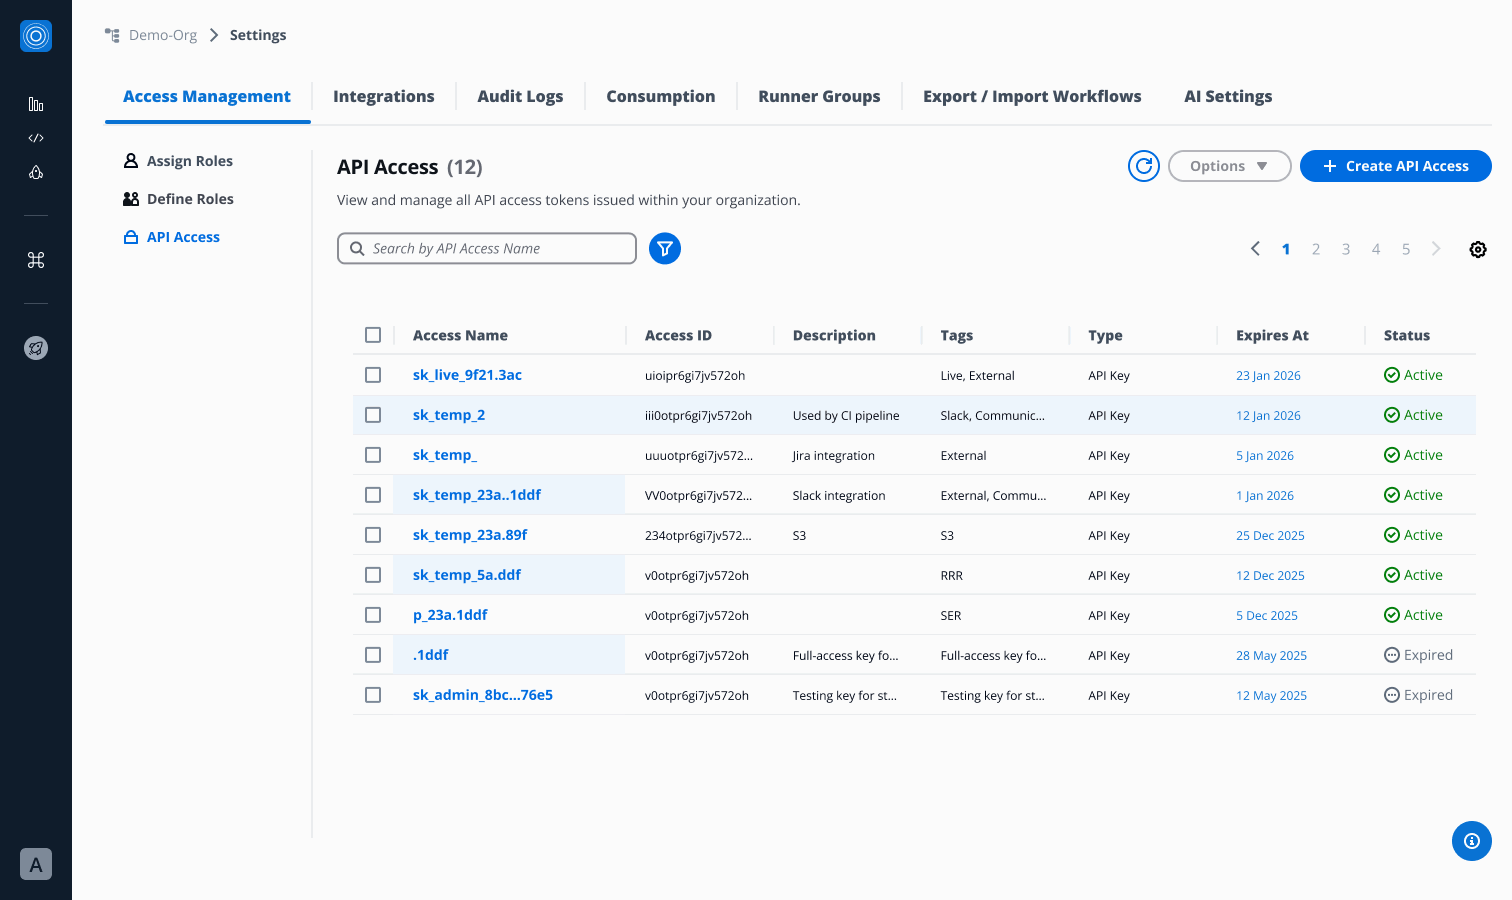
### 6. Editing[](#6-editing "Direct link to 6. Editing")
Through **API Access**, users can update key details to keep access information clear and organized.
* **Edit the name** to maintain consistency and readability.
* **Update the description** for better context and documentation.
* **Manage tags** to improve searchability and categorization.
* **Adjust assigned roles** to ensure proper permissions.
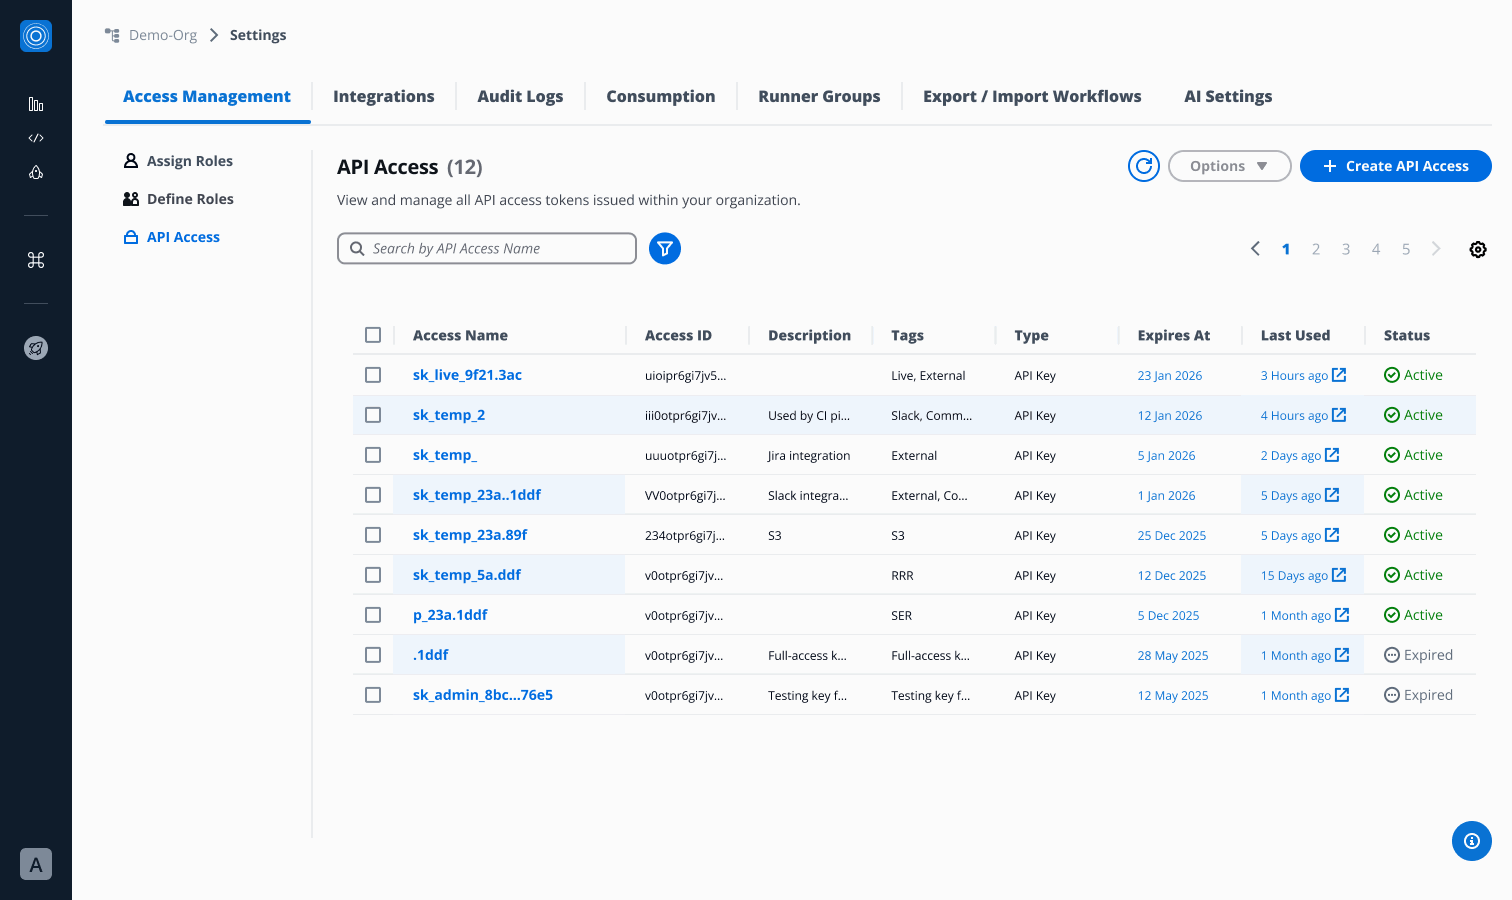
### 7. Filtering[](#7-filtering "Direct link to 7. Filtering")
The **Filter Panel** (accessible via filter icon) enables:
* **Status Filter** → Active / Expired
* **Role Filter** → by assigned role
* **Tag Search** → searchable metadata
This helps organizations efficiently manage API Access at scale.
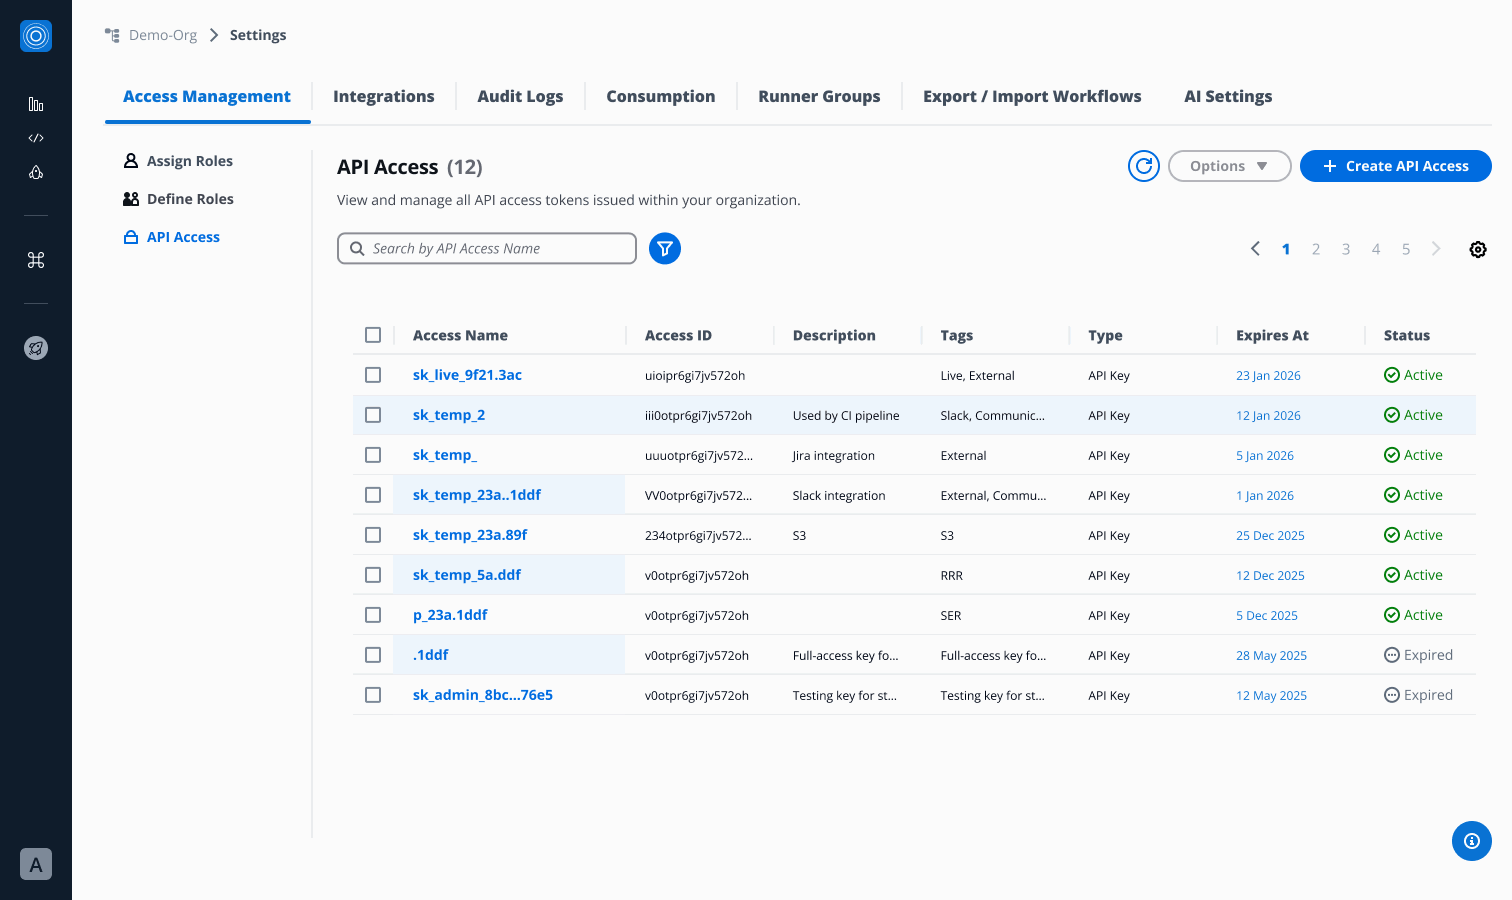
### 8. Email Notifications[](#8-email-notifications "Direct link to 8. Email Notifications")
API Access authors are notified in advance before their access expires:
* **30 days before**
* **7 days before**
* **1 day before**
* **Upon expiration**
These notifications improve visibility and prevent unexpected outages caused by expired keys.
---
# Audit logs
## Overview[](#overview "Direct link to Overview")
StackGuardian’s **Audit Logs** provide a user-friendly and consistent **centralised stream record** of all **user and system activities** across the platform, as well as **monitor activity**, **investigate issues** and **ensure compliance** with **security**.
Audit Logs ensure that organizations can track **who did what, when, and how**, while maintaining strong access control. **Only organization administrators** have **full visibility and management** of Audit Logs, ensuring sensitive activity data remains protected.
## Key Features[](#key-features "Direct link to Key Features")
* ### Retention Time[](#retention-time "Direct link to Retention Time")
Logs are **only retained for 30 days**. Audit **logs older than 30 days** are **permanently deleted** and **cannot be recovered.**

* ### Access & Permissions[](#access--permissions "Direct link to Access & Permissions")
This section explains who can access Audit logs and what each user role is allowed to do within StackGuardian.
* **Admins**
* Have full access to Audit Logs.
* Can view, filter, export Audit logs and configure Webhooks.
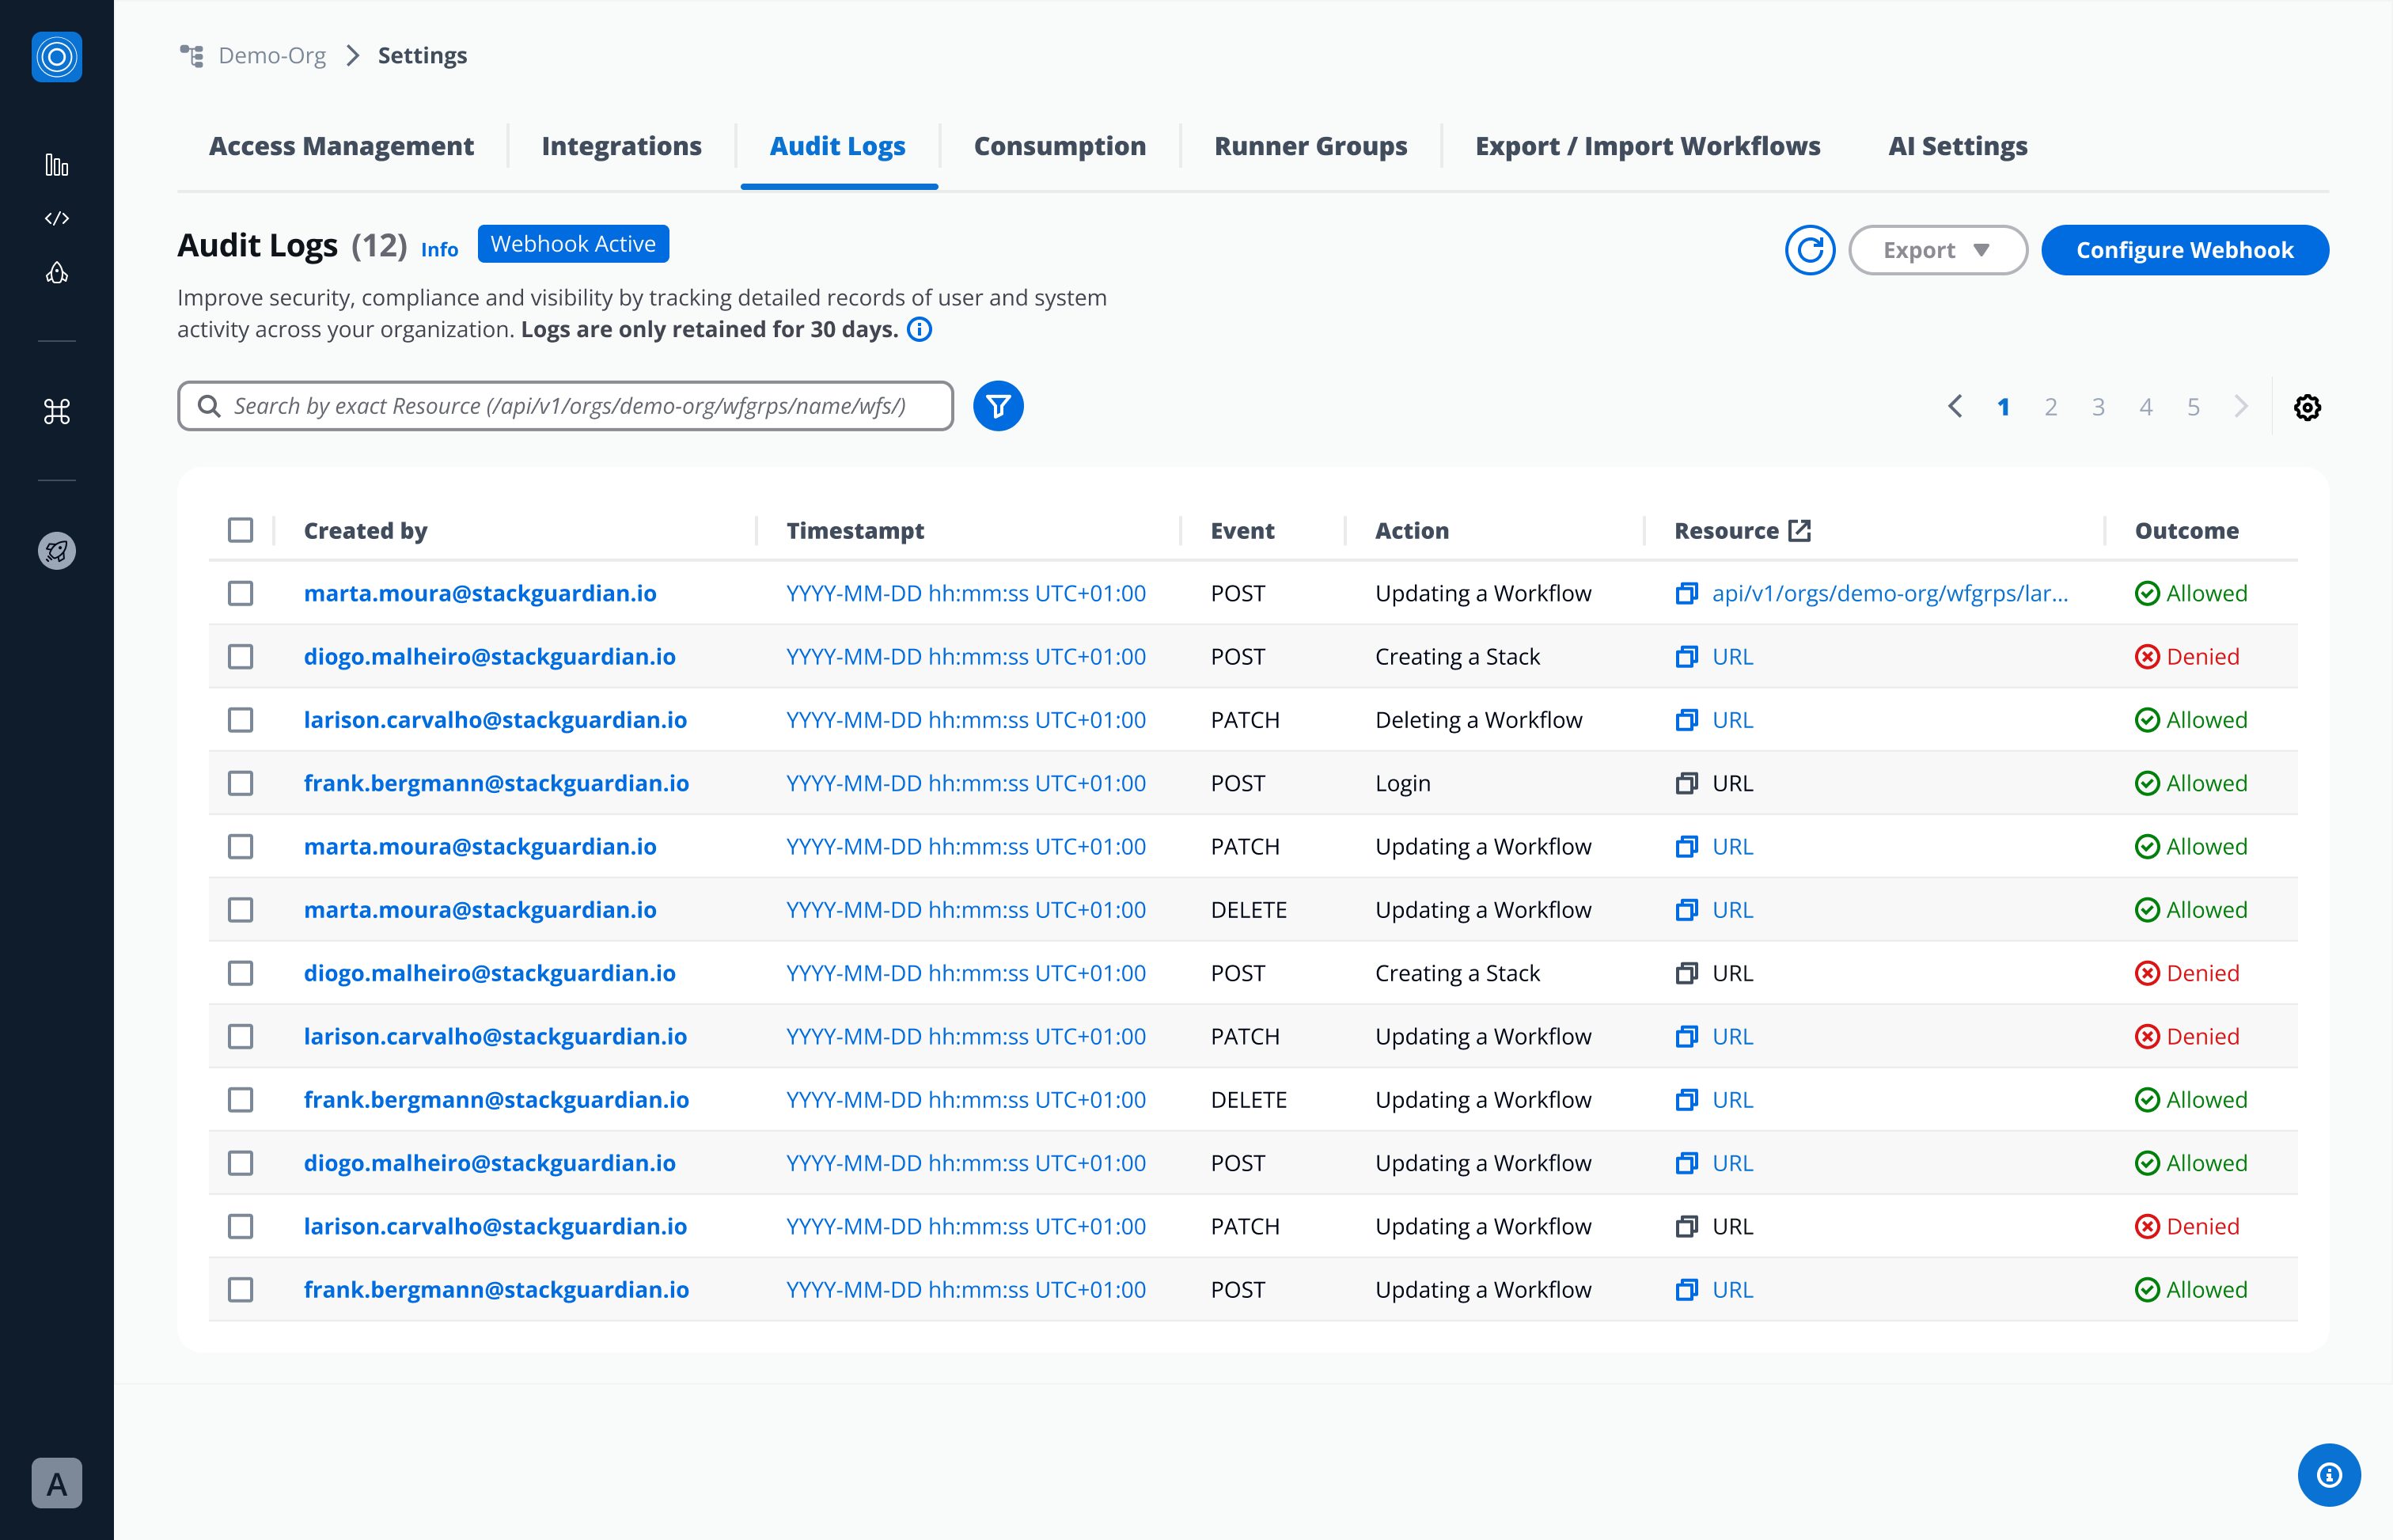
* **Regular Users**
* Do **not** have access by default.
* If granted access by an admin:
* Can **view**, **filter**, and **export** Audit logs.
* Cannot create or configure Webhooks.
**Regular user with no access:**
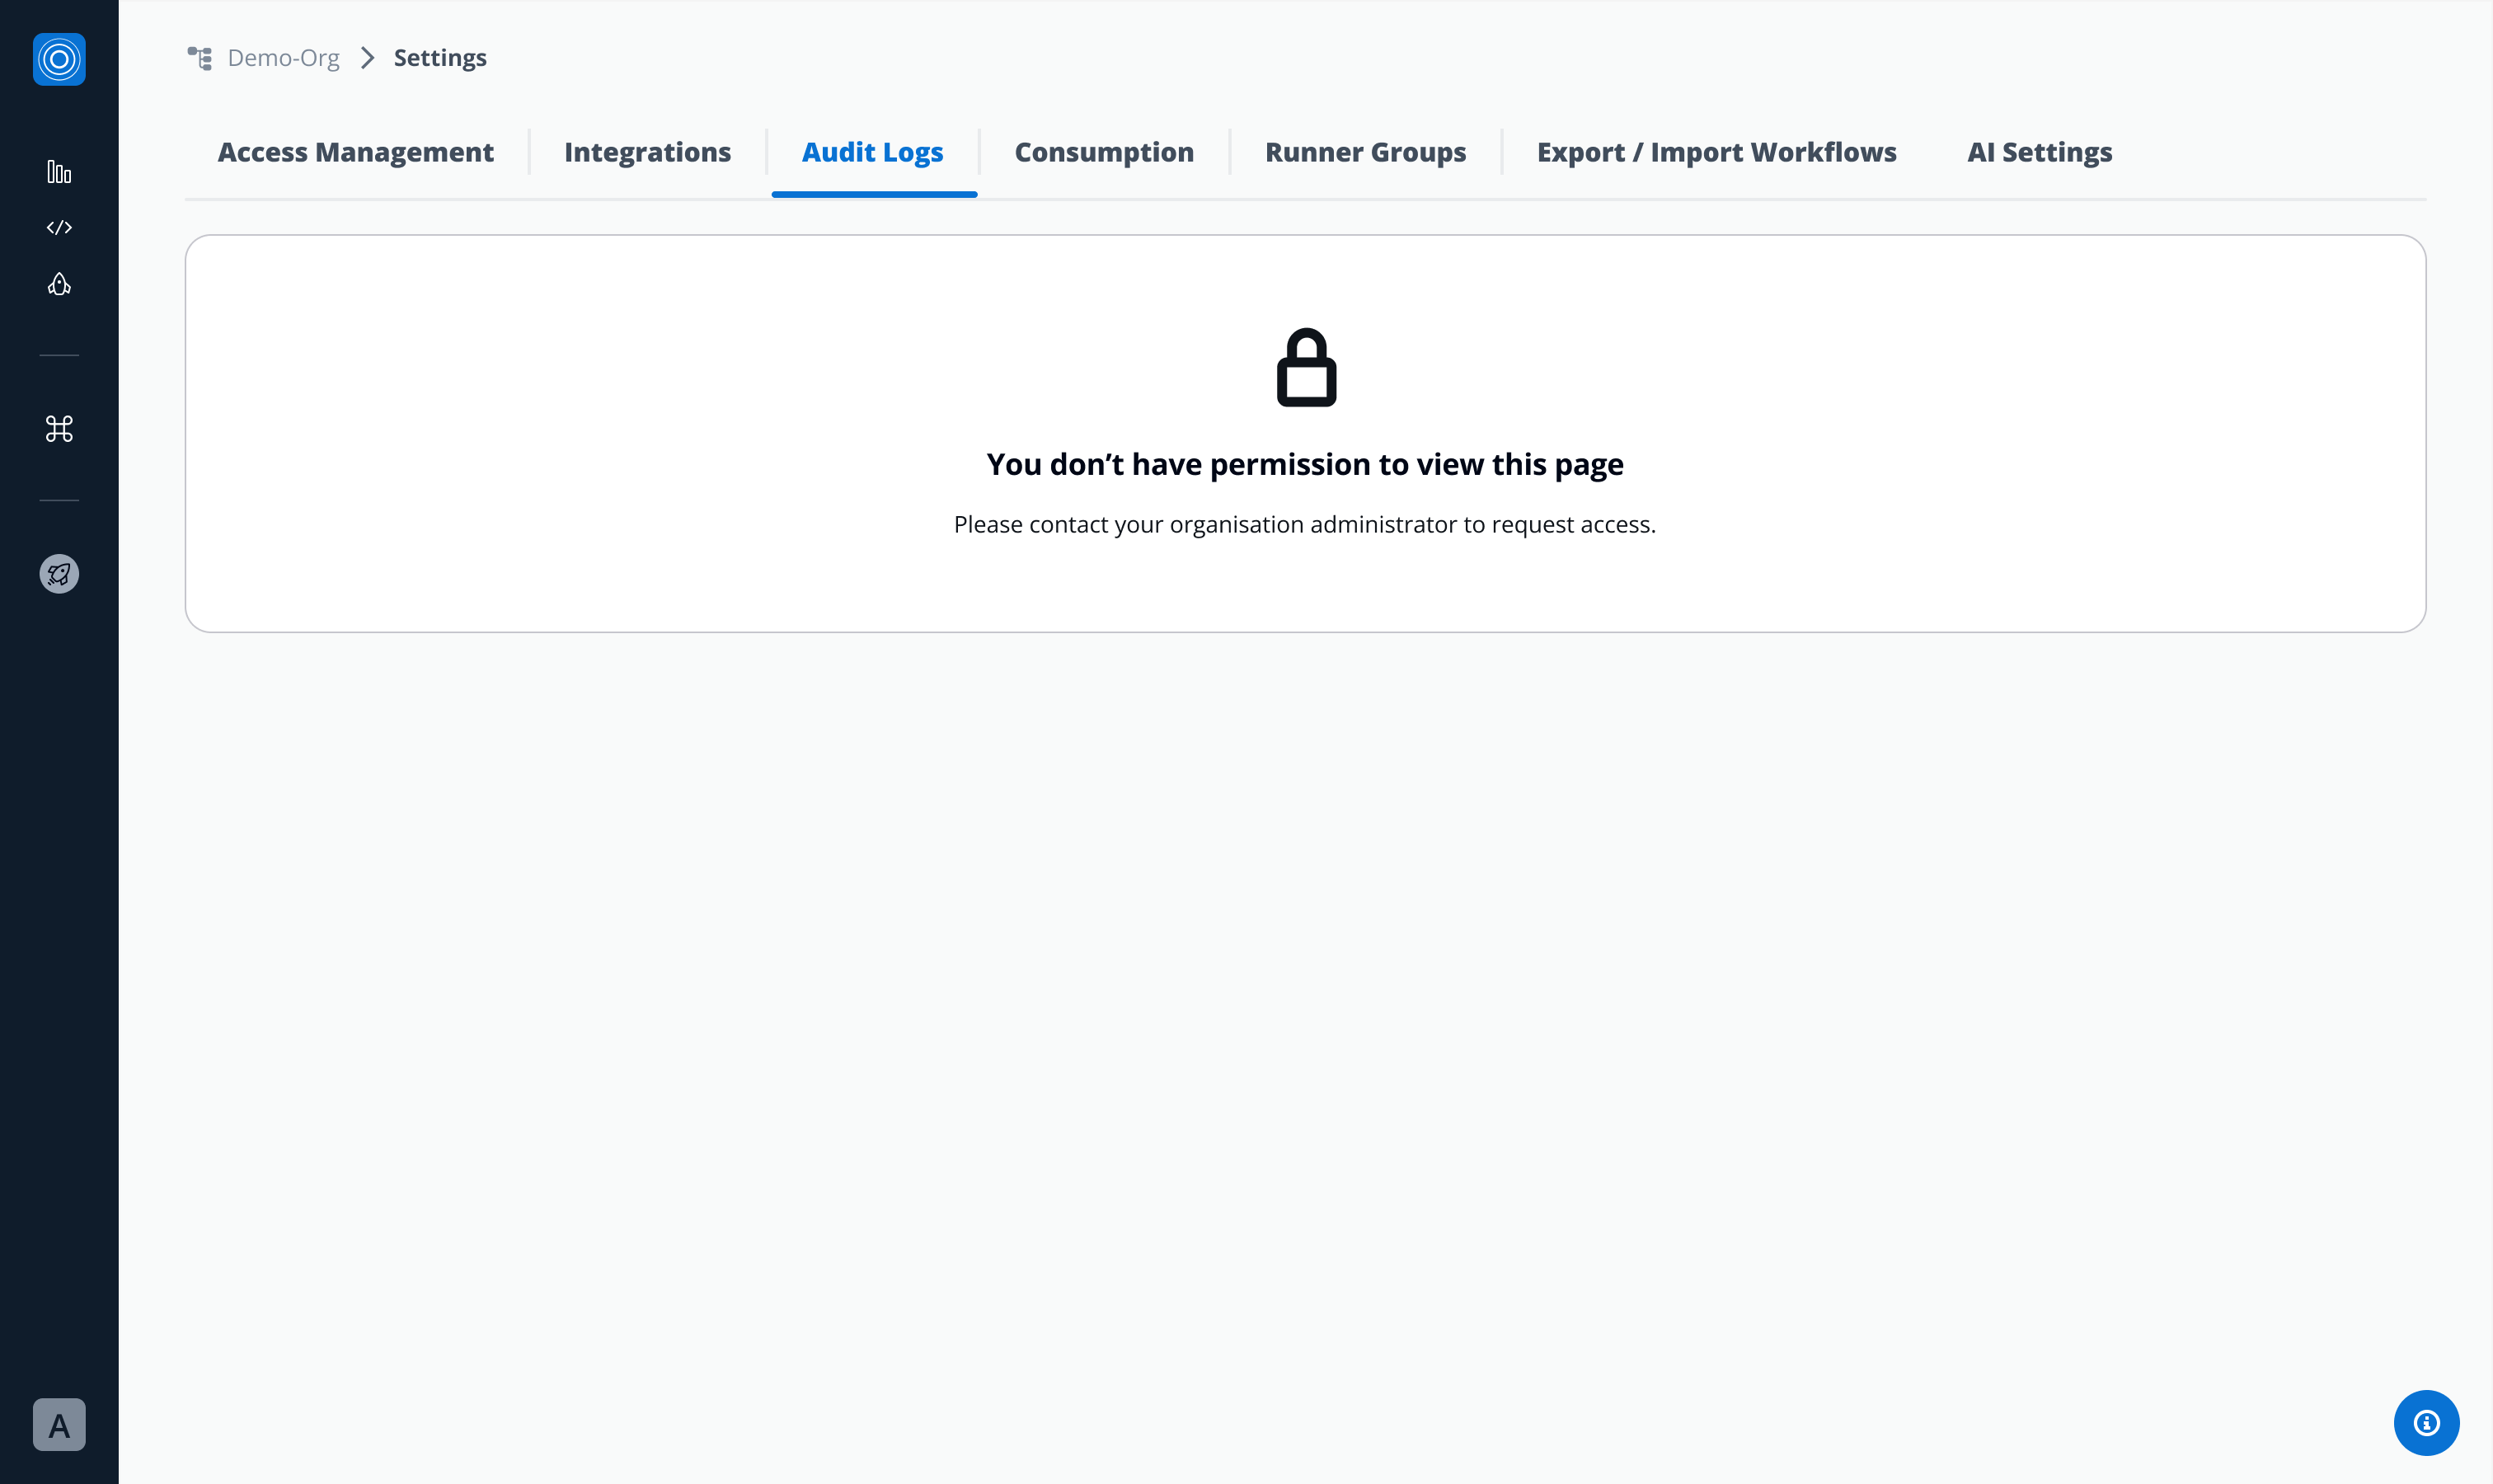
**Regular user, after admins permission granted:**
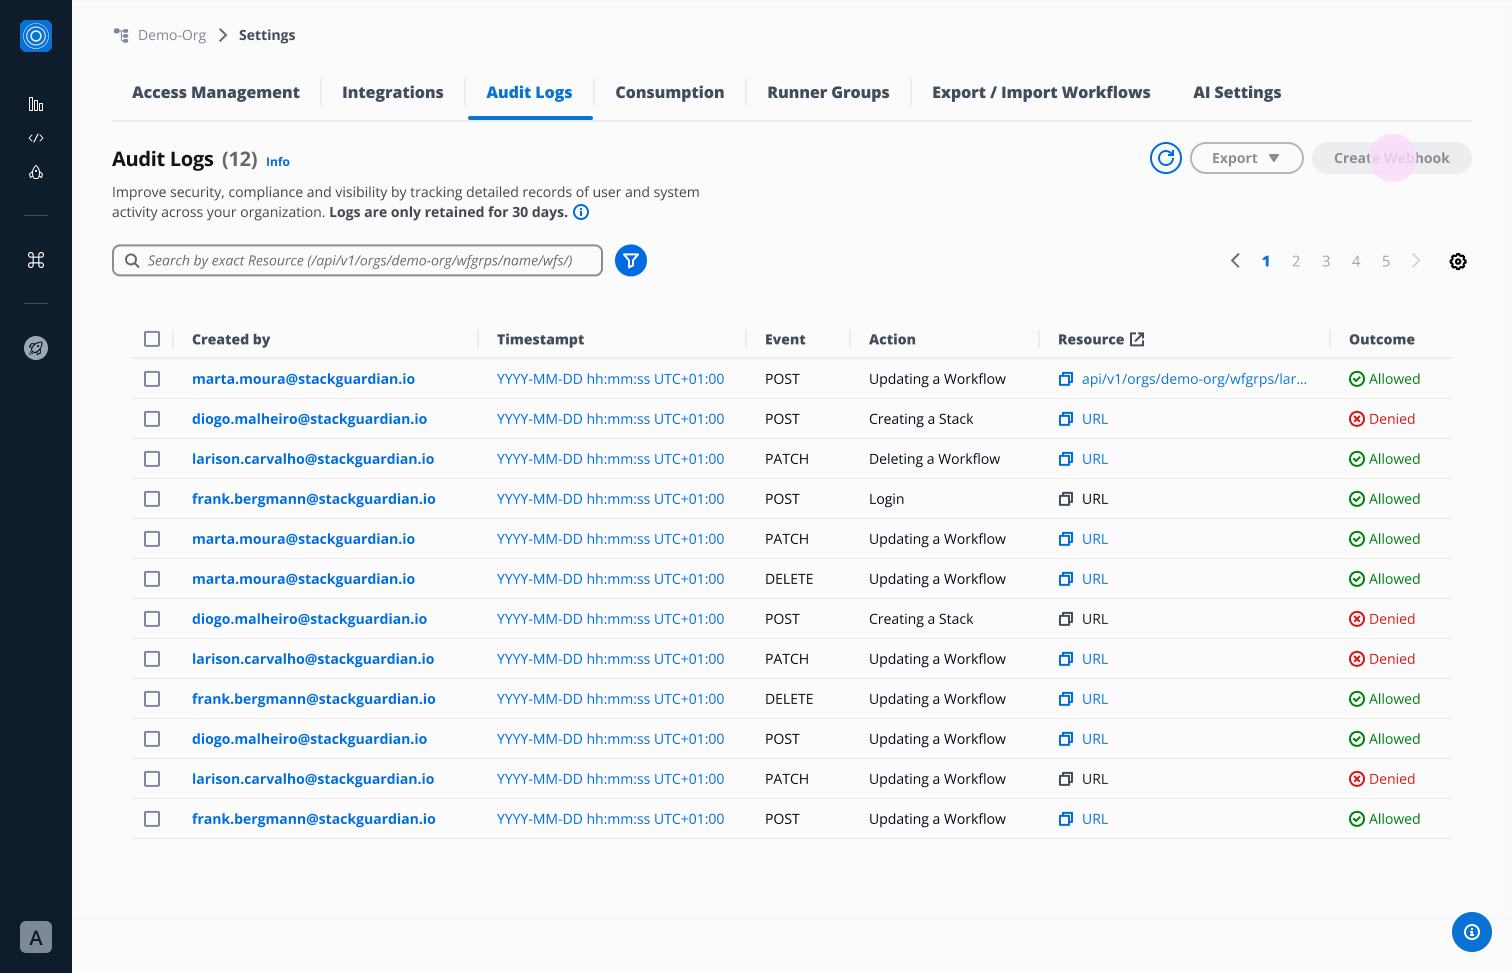
* ### Audit Logs List View Table[](#audit-logs-list-view-table "Direct link to Audit Logs List View Table")
Stack Guardian automatically records all user, admin and system activities.
* Each log entry includes:
* **Created by** → Who performed the action (email)
* **Timestamp** → When the action occurred (YYYY-MM-DD hh:mm
:ss
UTC+01:00)
* **Event type** → POST, PATCH, DELETE
* **Action** → What was done (e.g., template activated, policy updated)
* **Resource Affected** → What was affected, URL of the affected resource
* **Outcome →** If it was Allowed or Denied
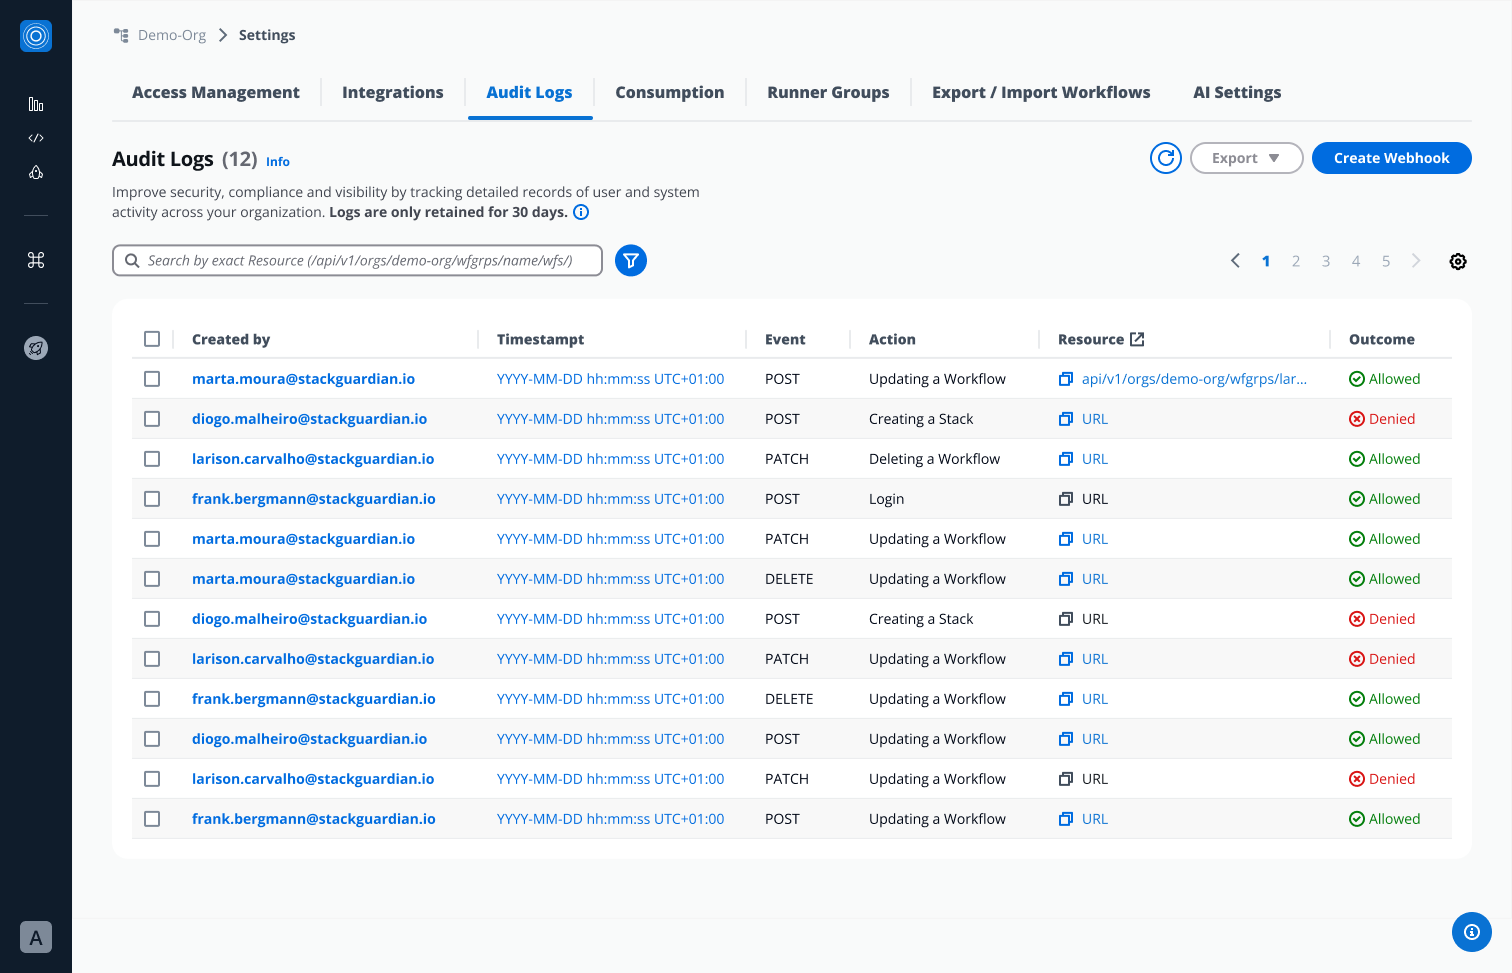
From this view, users can:
* **Click Created by** → open detailed Audit Log view.
* **Click “Timestamp”** from a specific Audit Log → triggers Pop over with more timestamp information (relative time).
* **Copy Resource URL**
* **Click Resource** (when applicable)- lead user to a **specific end point in a new tab.**
* **Bulk-select** multiple Audit Logs → perform mass Export.
* **Single-select** an Audit Log → Export.
* ### Detailed Audit Log View[](#detailed-audit-log-view "Direct link to Detailed Audit Log View")
When you click on a specific Audit Log entry, a detailed modal displays:
* **Meta**:
* **Created by:** Who performed the action (email)
* **Timestamp:** When the action occurred (YYYY-MM-DD hh:mm
:ss
UTC+01:00)
* **Event type:** POST, PATCH, DELETE
* **Action:** What was done (e.g., template activated, policy updated)
* **Resource Affected:** What was affected, URL of the affected resource
* **Outcome:** Allowed or Denied
* **IP Address:** Origin of the request
* **Request Payload**: Body of a request (JSON file)
* **Response Payload**: Body of a response (JSON file)
Users can **copy Request and Response payloads**

* ### Filters & Search[](#filters--search "Direct link to Filters & Search")
The **Filter Panel** (accessible via filter icon) enables:
* **Date and Time Range** → Relative/ Absolute (*maximum sequence of 10 days*)
* **Event Type** → POST, PATCH, DELETE
* **User** → List of all users that appear in Audit Logs
* **Outcome →** Allowed, Denied
*Note*: The Date and Time Range filter must be selected before other filters can be applied. \*\*\*\*
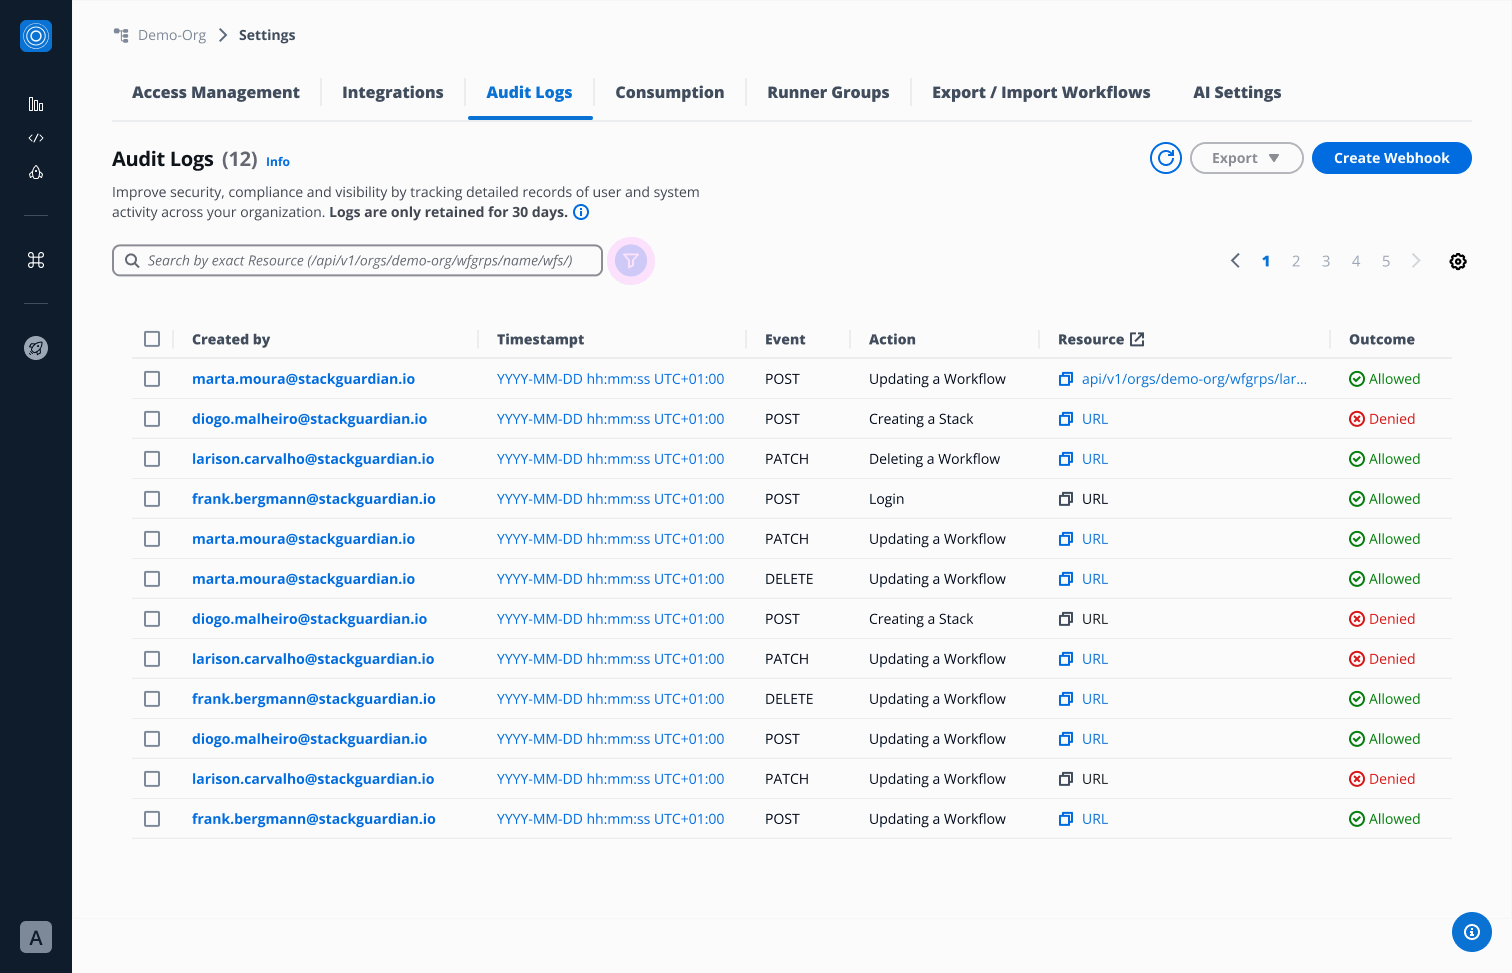
Users can **search** by exact **Resource:**
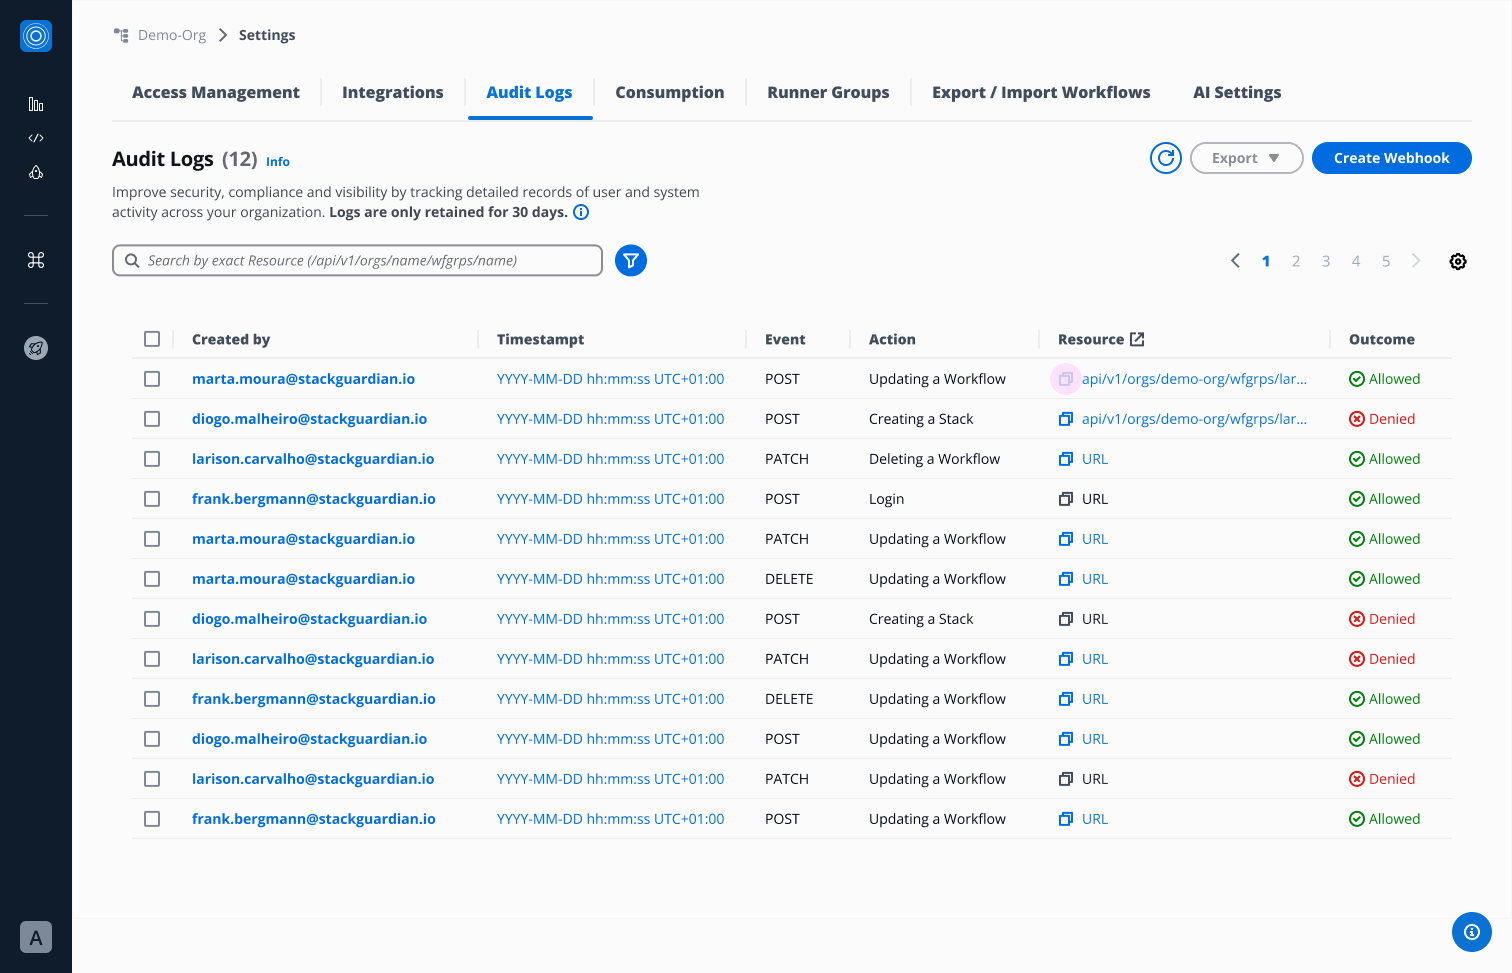
* ### Export[](#export "Direct link to Export")
Users can select one or multiple Audit Logs and export into:
* JSON file
* CSV file
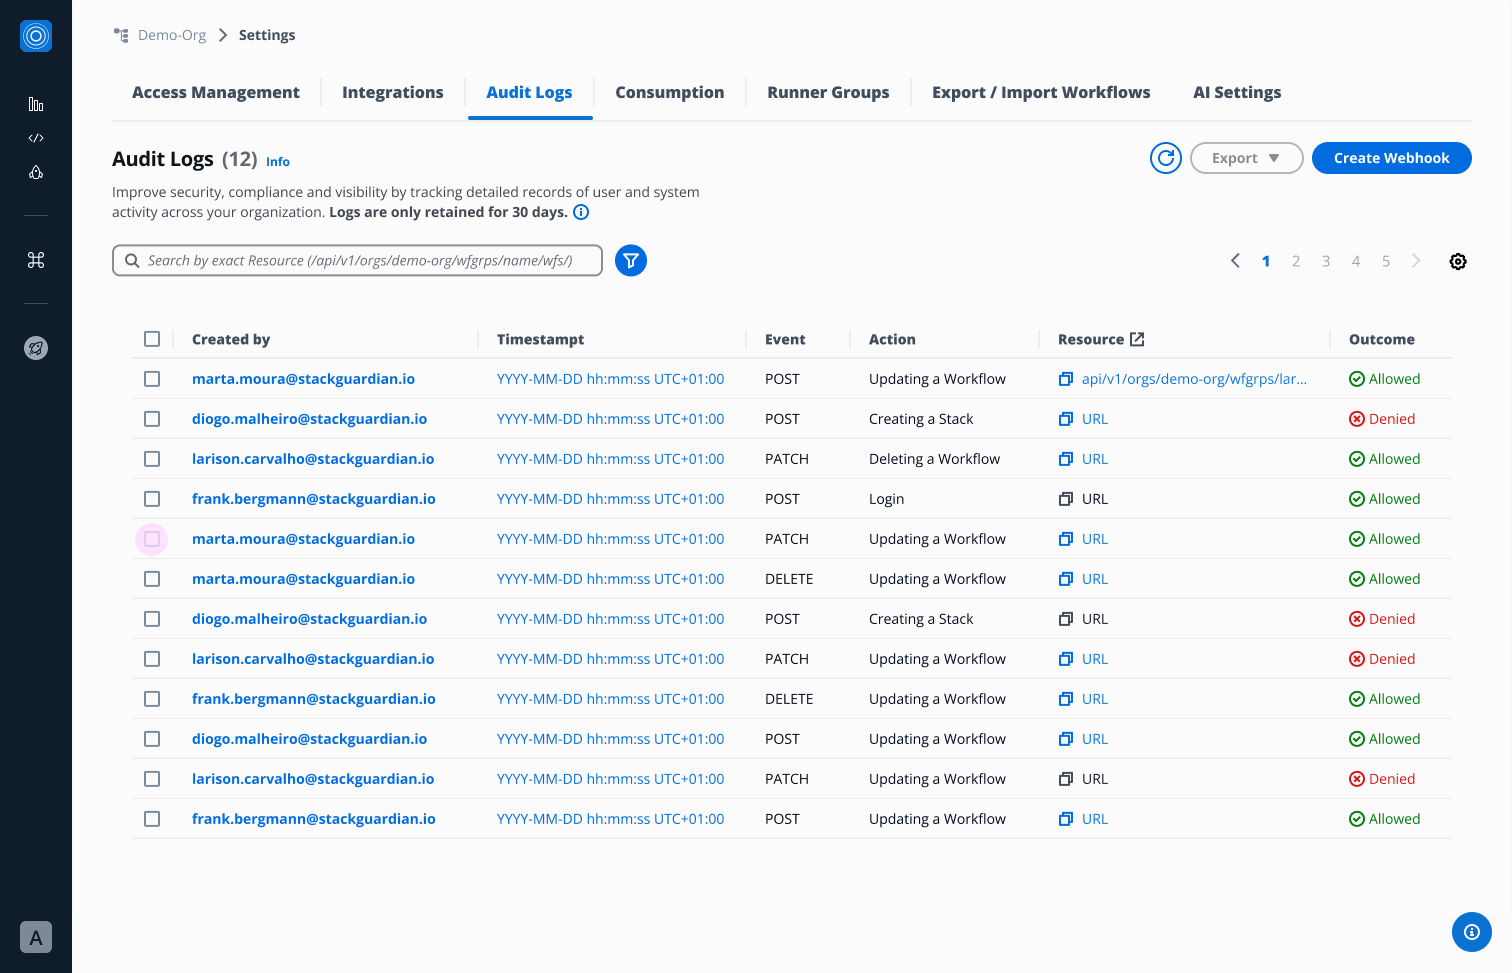
## Webhook[](#webhook "Direct link to Webhook")
Admins can create and configure webhook to stream logs in real time to external SIEM systems or other monitoring tools. Whenever a new log entry is generated, the webhook is automatically triggered, ensuring instant delivery to the configured external systems.
### Configuration[](#configuration "Direct link to Configuration")
* **Endpoint URL** - The URL where you would like to receive the audit logs payload.
* **Secret** - StackGuardian signs each outgoing webhook request with an HMAC SHA-256 signature using this secret value as the key. This allows you to verify that the request truly originated from StackGuardian and that it's payload has not been tampered with in transit. The signature is sent in the `X-Sg-Signature-256` header. For example: `X-Sg-Signature-256: sha256=`
info
The Secret parameter is optional but recommended and is used to validate the received payload. You can learn more about it in the [Validating Webhook Deliveries Using the Webhook Secret](#validating-webhook-deliveries-using-the-webhook-secret) section.
* **Headers (Optional)**
* Key - Name of the header
* Value - Value of the header
### Create Webhook[](#create-webhook "Direct link to Create Webhook")
Click on **Create Webhook** button, fill all the required configuration details and you are all set to go.
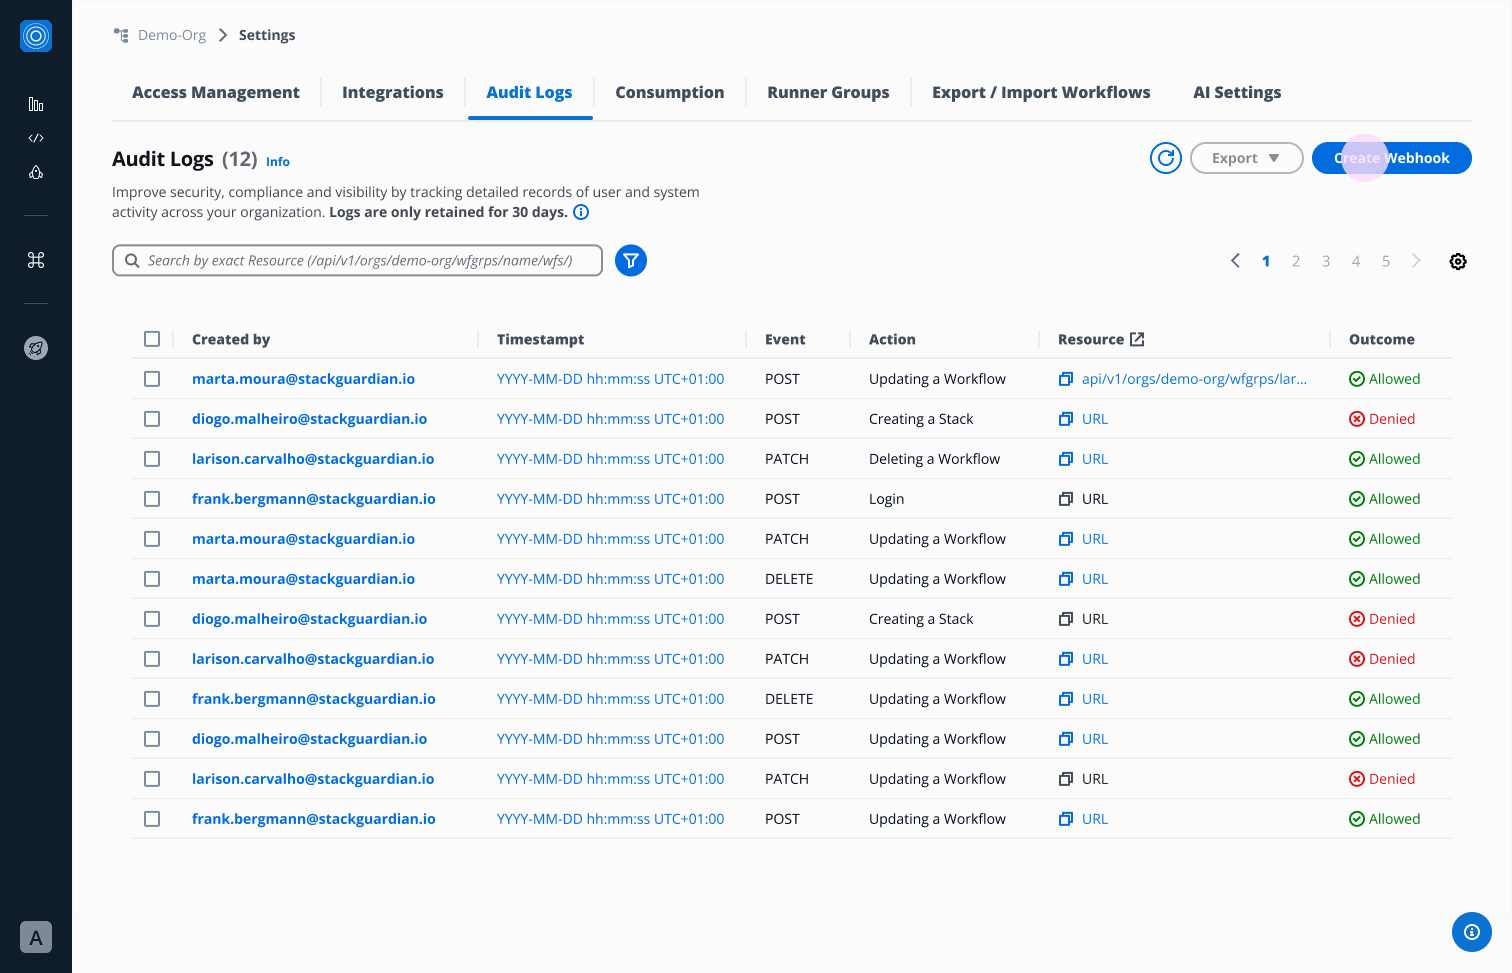
### Webhook Payload Example[](#webhook-payload-example "Direct link to Webhook Payload Example")
When StackGuardian sends a request to your configured endpoint, the request body contains details about the event that occurred. To help you understand what to expect, below are some sample payloads.
#### Example: User Sign-In (SG\_SIGN\_IN)[](#example-user-sign-in-sg_sign_in "Direct link to Example: User Sign-In (SG_SIGN_IN)")
```
{
"timestamp": 1757410496427,
"message": {
"id": "b831d3a7-e450-4acc-b524-78c8c17768a2",
"date_created": "2025-09-09T09:34:56",
"action": "SG_SIGN_IN",
"actor": {
"type": "user",
"user": {
"principalEmail": "user@stackguardian.io"
}
},
"effect": "Deny",
"sourceIp": "2106:9140:11:e7e:8c35:afe9:d781:aefb",
"timestamp": 1757410496427,
"user_name": "0067e754-6701-4072-9530-da736f5b1fde",
"user_pool_id": "region",
"company": null,
"new_device_used": false
}
}
```
#### Example: Deny action[](#example-deny-action "Direct link to Example: Deny action")
```
{
"timestamp": 1757411994648,
"message": {
"id": "b831d3a7-e450-4acc-b524-78c8c17768a3",
"date_created": "2025-09-09T09:59:54",
"action": "PATCH/api/v1/orgs/demo-org/wfgrps/policy-resolution-test/wfs/failing-aws-s3-demo-website-5swa/",
"actor": {
"type": "user",
"user": {
"principalEmail": "user@stackguardian.io"
}
},
"effect": "DENY",
"sourceIp": "158.1140.117.0",
"timestamp": 1757411994
}
}
```
#### Example: Delete action[](#example-delete-action "Direct link to Example: Delete action")
```
{
"timestamp": 1757412835493,
"message": {
"id": "b831d3a7-e450-4acc-b524-78c8c17768a4",
"date_created": "2025-09-09T10:13:55",
"action": "DELETE/api/v1/orgs/demo-org/wfgrps/workflow-delete-test/wfs/terraform-aws-vpc-stripped-new-cot6/",
"actor": {
"type": "user",
"user": {
"principalEmail": "user@stackguardian.io"
}
},
"effect": "Allow",
"sourceIp": "60.243.160.178",
"timestamp": 1757412835,
"request_body": {},
"request_method": "DELETE",
"query_params": {},
"response": "Workflow terraform-aws-vpc-stripped-new-cot6 deleted"
}
}
```
#### Example: POST action[](#example-post-action "Direct link to Example: POST action")
```
{
"timestamp": 1757412855196,
"message": {
"id": "b831d3a7-e450-4acc-b524-78c8c17768a5",
"date_created": "2025-09-09T10:14:15",
"action": "POST/api/v1/orgs/demo-org/wfgrps/workflow-delete-test/wfs/terraform-aws-vpc-stripped-new-d7kw/wfruns/",
"actor": {
"type": "user",
"user": {
"principalEmail": "user@stackguardian.io"
}
},
"effect": "Allow",
"sourceIp": "60.243.160.178",
"timestamp": 1757412855,
"request_body": {
"TerraformAction": {
"action": "destroy"
},
"EnableChaining": true
},
"request_method": "POST",
"query_params": {},
"response": {
"OrgId": "/orgs/demo-org",
"SubResourceId": "/wfgrps/workflow-delete-test/wfs/terraform-aws-vpc-stripped-new-d7kw/wfruns/ov9wr8nru04v",
"CreatedAt": 1757412854960,
"Comments": {
"1757412854960": {
"comment": "Workflow Run initiated",
"createdBy": "user@stackguardian.io"
}
},
"Statuses": {
"pre_0_step": [
{
"name": "QUEUED",
"createdAt": 1757412854960
}
]
},
"LatestStatusKey": "pre_0_step",
"ContextTags": {}
}
}
}
```
#### Example: PATCH action[](#example-patch-action "Direct link to Example: PATCH action")
```
{
"timestamp": 1757411989818,
"message": {
"id": "4e35d725-6e0b-4d58-a5e3-d72e48a393c2",
"date_created": "2025-09-09T09:59:49",
"action": "PATCH/api/v1/orgs/demo-org/roles/patch-wf-bugfix/",
"actor": {
"type": "user",
"user": {
"principalEmail": "user@stackguardian.io"
}
},
"effect": "Allow",
"sourceIp": "158.140.167.0",
"timestamp": 1757411989,
"request_body": {
"AllowedPermissions": {
"PATCH/api/v1/orgs/demo-org/wfgrps//stacks//wfs//": {
"name": "UpdateStackWorkflow",
"paths": {
"": [".*", ".*/.*"],
"": [".*", ".*"],
"": [".*", ".*"]
}
}
}
}
}
}
```
### Configure/ Disable Webhook:[](#configure-disable-webhook "Direct link to Configure/ Disable Webhook:")
Click on **Configure Webhook** button and modify or disable Webhook.
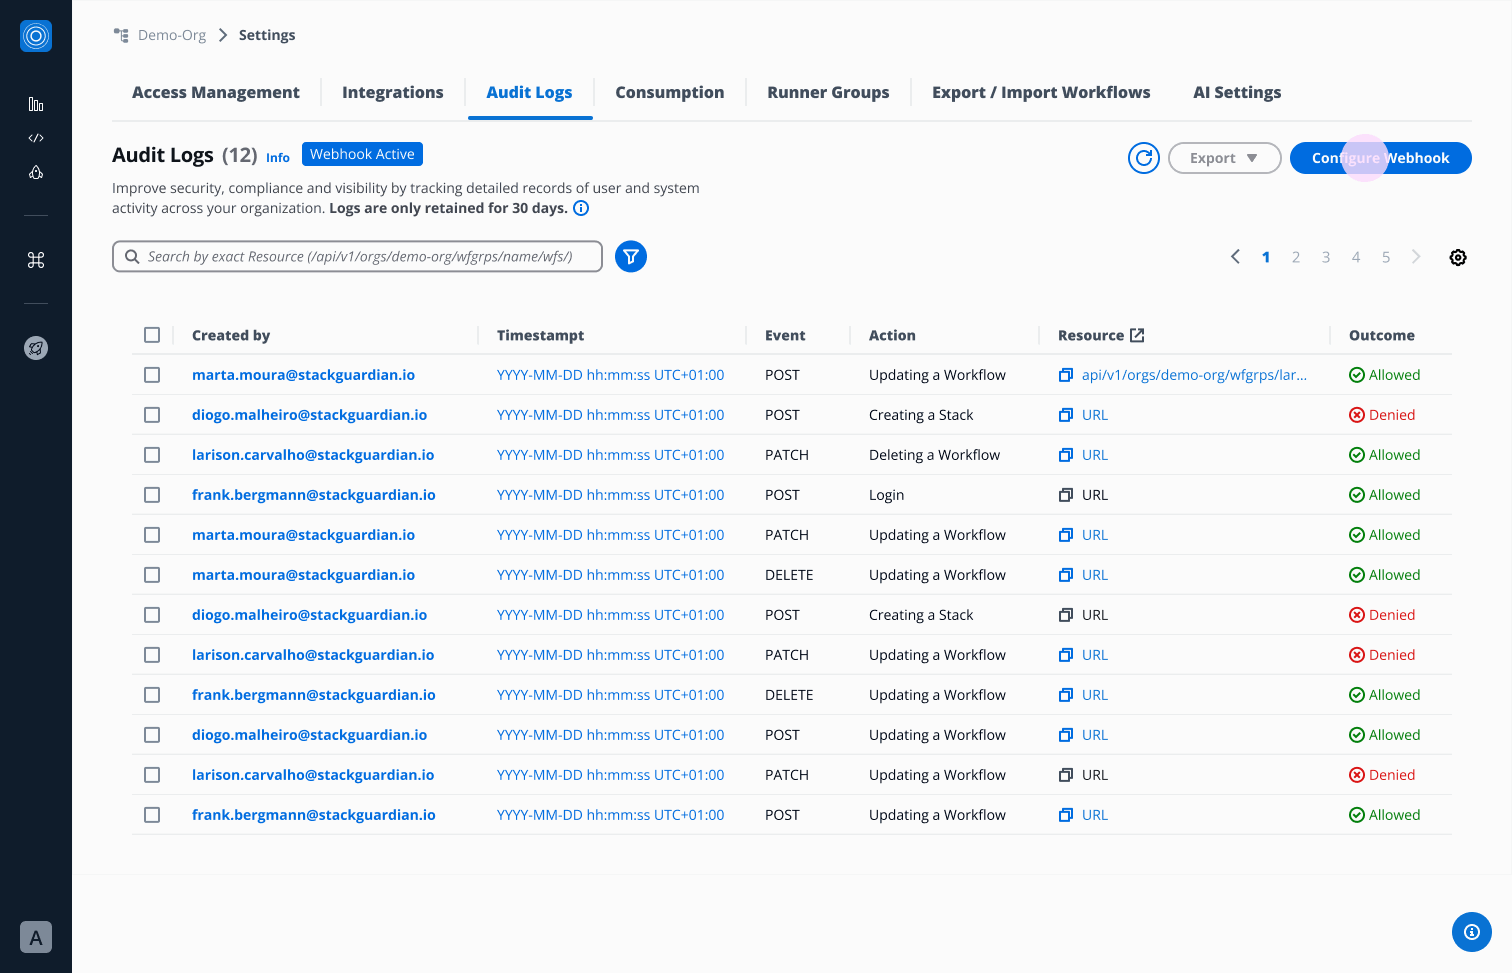
## Validating Webhook Deliveries Using the Webhook Secret[](#validating-webhook-deliveries-using-the-webhook-secret "Direct link to Validating Webhook Deliveries Using the Webhook Secret")
When you configure a webhook in StackGuardian with a **secret** (optional but recommended), every delivery sent to your endpoint will include a signature header:
```
X-Sg-Signature-256: sha256=
```
This signature allows you to verify that:
1. The request **came from StackGuardian**, not an attacker.
2. The payload **was not tampered with** in transit.
Validating webhook signatures is strongly recommended before you process any incoming webhook data. Doing so prevents wasted processing on spoofed requests and protects against man-in-the-middle attacks.
### 1. Configure Your Webhook Secret[](#1-configure-your-webhook-secret "Direct link to 1. Configure Your Webhook Secret")
1. Create a **Vault Secret** in StackGuardian to store your secret token.
2. Go to your organization setting’s **Audit Logs Tab → Create/Configure Webhook**.
3. For the **Secret** field, select the secret you created from the dropdown and save your changes.
### 2. How StackGuardian Signs Requests[](#2-how-stackguardian-signs-requests "Direct link to 2. How StackGuardian Signs Requests")
* StackGuardian takes the **raw audit log webhook payload**.
* It computes an **HMAC-SHA256 digest** using your secret token as the key.
* The computed digest is sent in the `X-Sg-Signature-256` header in this format:
```
X-Sg-Signature-256: sha256=
```
### 3. How to Validate the Signature[](#3-how-to-validate-the-signature "Direct link to 3. How to Validate the Signature")
On your server:
1. **Read the raw request body** exactly as received (before parsing JSON).
2. **Compute the HMAC-SHA256** of that body using your webhook secret (the same one as you configured in StackGuardian).
3. Format it as:
```
sha256=
```
4. **Compare** your computed digest to the value in the `X-Sg-Signature-256` header.
* Always use a **constant-time comparison** function to avoid timing attacks.
5. If they match → the request is authentic.
If they don’t match → reject the request.
### 4. Example (Python)[](#4-example-python "Direct link to 4. Example (Python)")
```
def verify_signature(secret: str, body: bytes, signature_header: str) -> bool:
"""
Verify the StackGuardian webhook signature.
:param secret: The webhook secret token
:param body: The raw request body (bytes)
:param signature_header: The value of the X-Sg-Signature-256 header
:return: True if the signature is valid, False otherwise
"""
# Compute expected signature
expected_hmac = hmac.new(secret.encode(), body, hashlib.sha256).hexdigest()
expected_signature = f"sha256={expected_hmac}"
# Ensure both are bytes for constant-time comparison
try:
return hmac.compare_digest(expected_signature.encode(), signature_header.encode())
except Exception:
return False
```
### 5. Security Best Practices[](#5-security-best-practices "Direct link to 5. Security Best Practices")
* **Always validate signatures** before processing the payload.
* **Never log your webhook secret** or include it in error messages.
* Ensure you are comparing against the **raw request body**, not a parsed or reformatted version.
* If you have configured a secret but the `X-Sg-Signature-256` header is **missing or invalid**, reject the request immediately as the request might have been tampered with.
With these checks in place, you can be confident that your webhook listener only processes requests that truly come from **StackGuardian**.
---
# Beta features
## Overview[](#overview "Direct link to Overview")
Beta features give your organization early access to new StackGuardian functionality before it reaches general availability. Features in this program can change or be discontinued.
important
Only organization admins can enable or disable beta features.
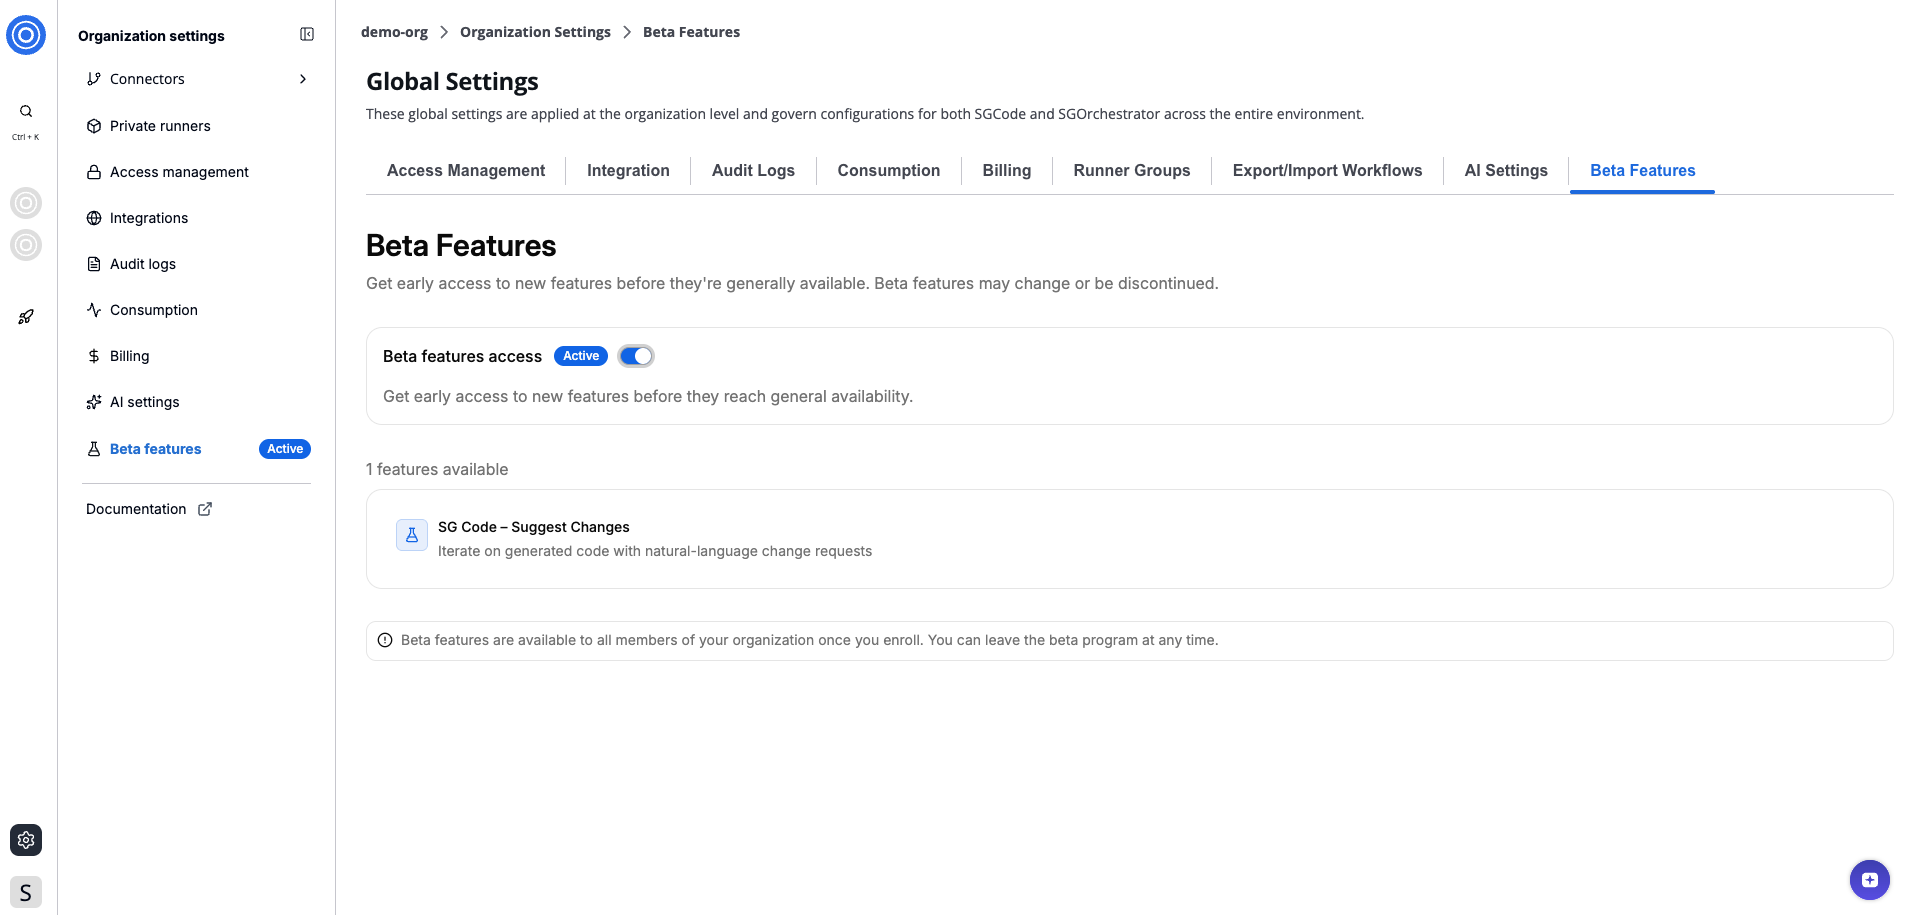
*Beta features*
## Enable or disable beta features[](#enable-or-disable-beta-features "Direct link to Enable or disable beta features")
1. Go to **Organization settings** > **Beta features**.
2. Under **Beta features access**, toggle the switch on or off.
When enabled, the status badge updates to **Active** and all members of your organization get access to beta features. When disabled, the badge updates to **Inactive** and access is removed for all members.
## Available beta features[](#available-beta-features "Direct link to Available beta features")
The **features available** section lists all beta features available.
Features enrolled in the beta program are marked with a badge both in the list and directly on the feature itself within the platform.
---
# Billing tab
The **Billing** section in Global Settings lets you manage your plan, monitor credit usage, and maintain payment and billing details for your organization.
To access **Billing**, go to **Organization Settings** and select the **Billing** tab.
Billing has three sub-tabs: **Getting Started**, **Overview**, and **Invoices**.
## Getting started[](#getting-started "Direct link to Getting started")
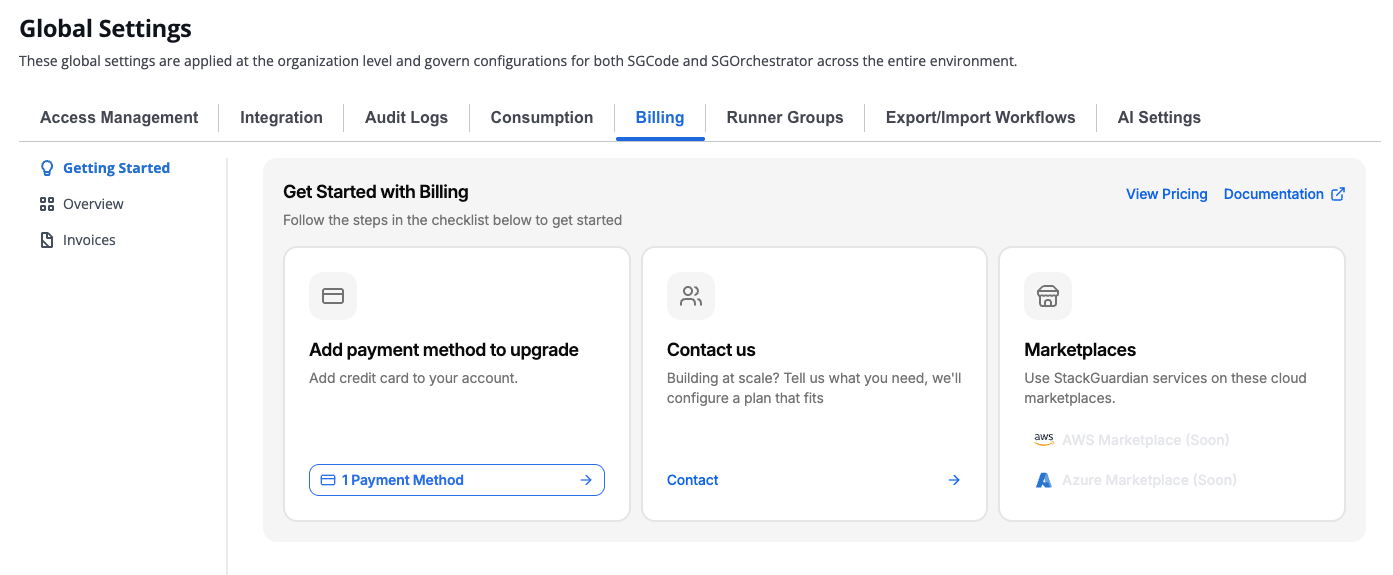
*Getting Started tab*
The **Getting Started** tab guides you through the steps required to activate billing for your organization.
### Add payment method to upgrade[](#add-payment-method-to-upgrade "Direct link to Add payment method to upgrade")
To activate billing, complete the following steps in order:
1. **Add billing email** — Add a billing email address. This can differ from your StackGuardian login email.
2. **Add billing address** — Add a billing address.
3. **Add payment method** — Add a payment method. StackGuardian charges this at the end of each billing period based on your usage.
Each step becomes available after the previous one is complete.
### Contact us[](#contact-us "Direct link to Contact us")
If you're building at scale, contact the StackGuardian team to discuss a custom plan.
### Marketplaces[](#marketplaces "Direct link to Marketplaces")
You can subscribe to StackGuardian through the following cloud marketplaces:
* AWS Marketplace (coming soon)
* Azure Marketplace (coming soon)
## Overview[](#overview "Direct link to Overview")
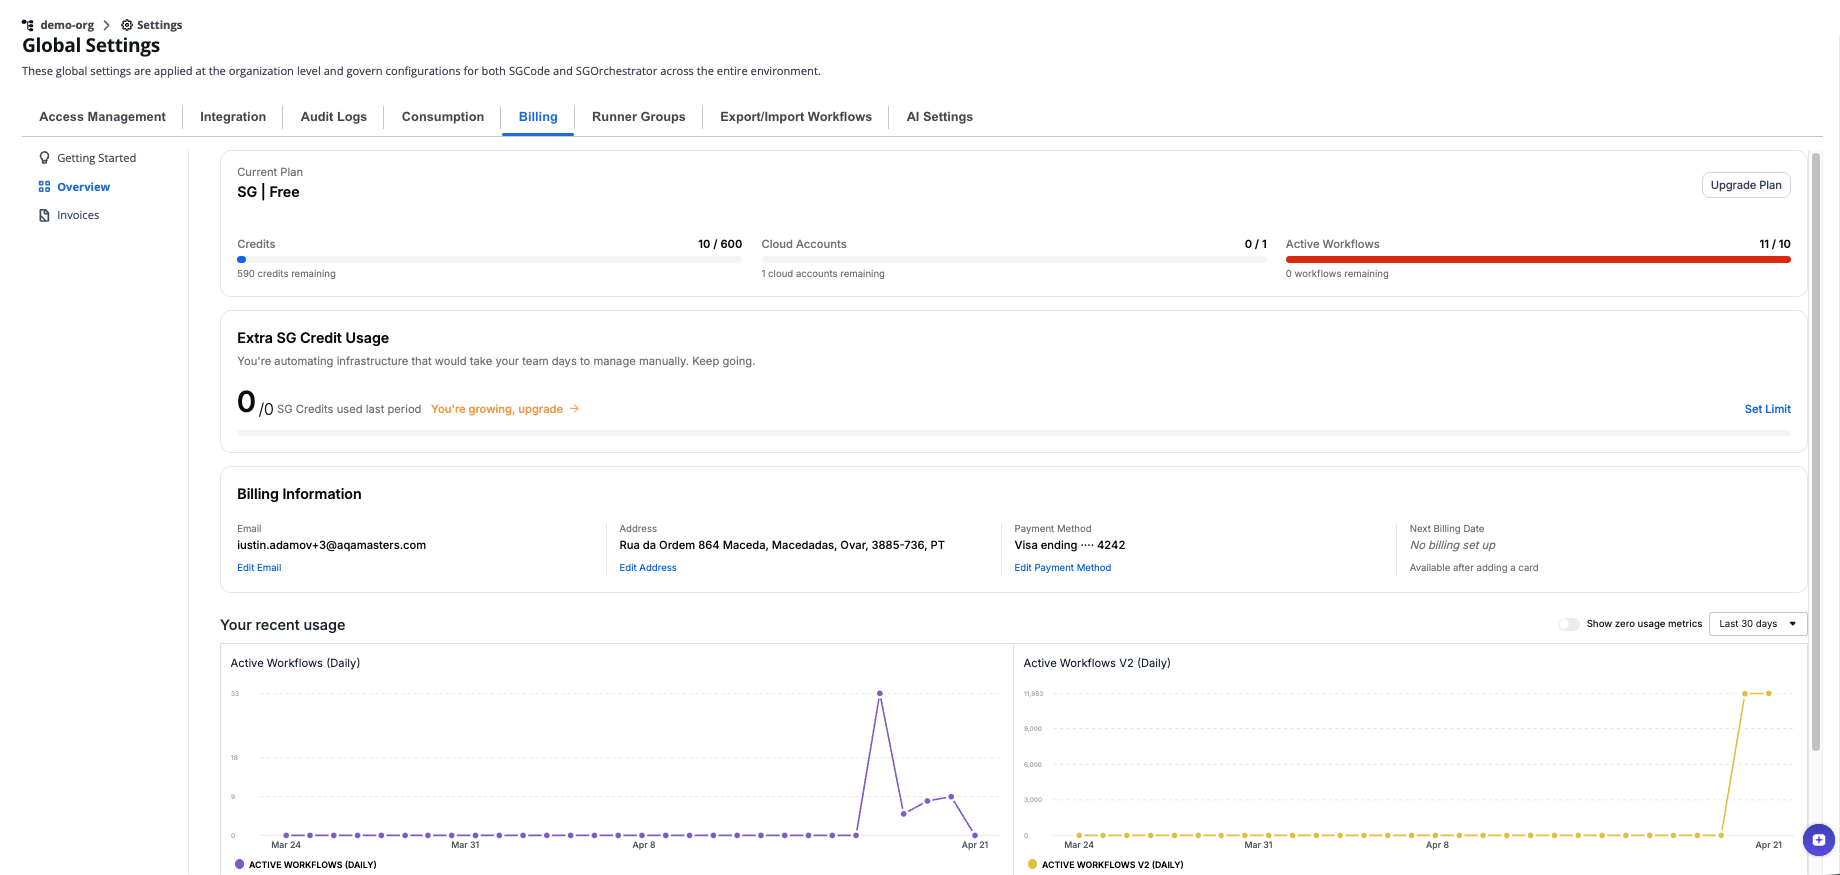
*Overview tab showing the current plan*
The **Overview** tab displays your current plan, credit consumption, billing information, and recent usage data.
### Current plan[](#current-plan "Direct link to Current plan")
The **Current Plan** section shows your active plan and key usage metrics:
| Metric | Description |
| ---------------- | ---------------------------------------------------------- |
| Credits | SGCredits consumed against your plan allowance this period |
| Cloud Accounts | Number of Cloud Accounts connected |
| Active Workflows | Number of active Workflows |
Select **Upgrade Plan** to move to a higher plan.
### Extra SGCredit Usage[](#extra-sgcredit-usage "Direct link to Extra SGCredit Usage")
The **Extra SGCredit Usage** section shows credits consumed beyond your plan allowance. You can set a spending cap to control costs.
Select **Set Limit** to open the limit control.
Enter the maximum number of SGCredits you want to allow per month. Set the value to **0** to remove the limit.
### Billing information[](#billing-information "Direct link to Billing information")
The **Billing Information** section shows the details used to generate your invoices.
| Field | Description |
| ----------------- | ------------------------ |
| Email | Billing email address |
| Address | Billing address |
| Payment Method | Default payment method |
| Next Billing Date | Date of your next charge |
Select **Add billing email**, **Add billing address**, or **Add payment method** to complete or update each field.
#### Payment methods[](#payment-methods "Direct link to Payment methods")
You can add multiple payment methods. One must be set as the default. The default payment method cannot be removed — set another method as default first, then remove it.
Supported payment methods:
* Card
* Naver Pay
* Kakao Pay
* Bancontact
* Klarna
* Amazon Pay
**To add a payment method:**
1. Select **Add payment method**.
2. In the **Add a new payment method** modal, select a payment method type.
3. Enter your **Cardholder name**.
4. Select **Add Payment Method** to save.
### Your recent usage[](#your-recent-usage "Direct link to Your recent usage")
The **Your recent usage** section displays a usage chart. Use the time range selector to view data for the last 30 days or a custom period. Toggle **Show zero usage metrics** to include metrics with no recorded usage.
## Invoices[](#invoices "Direct link to Invoices")
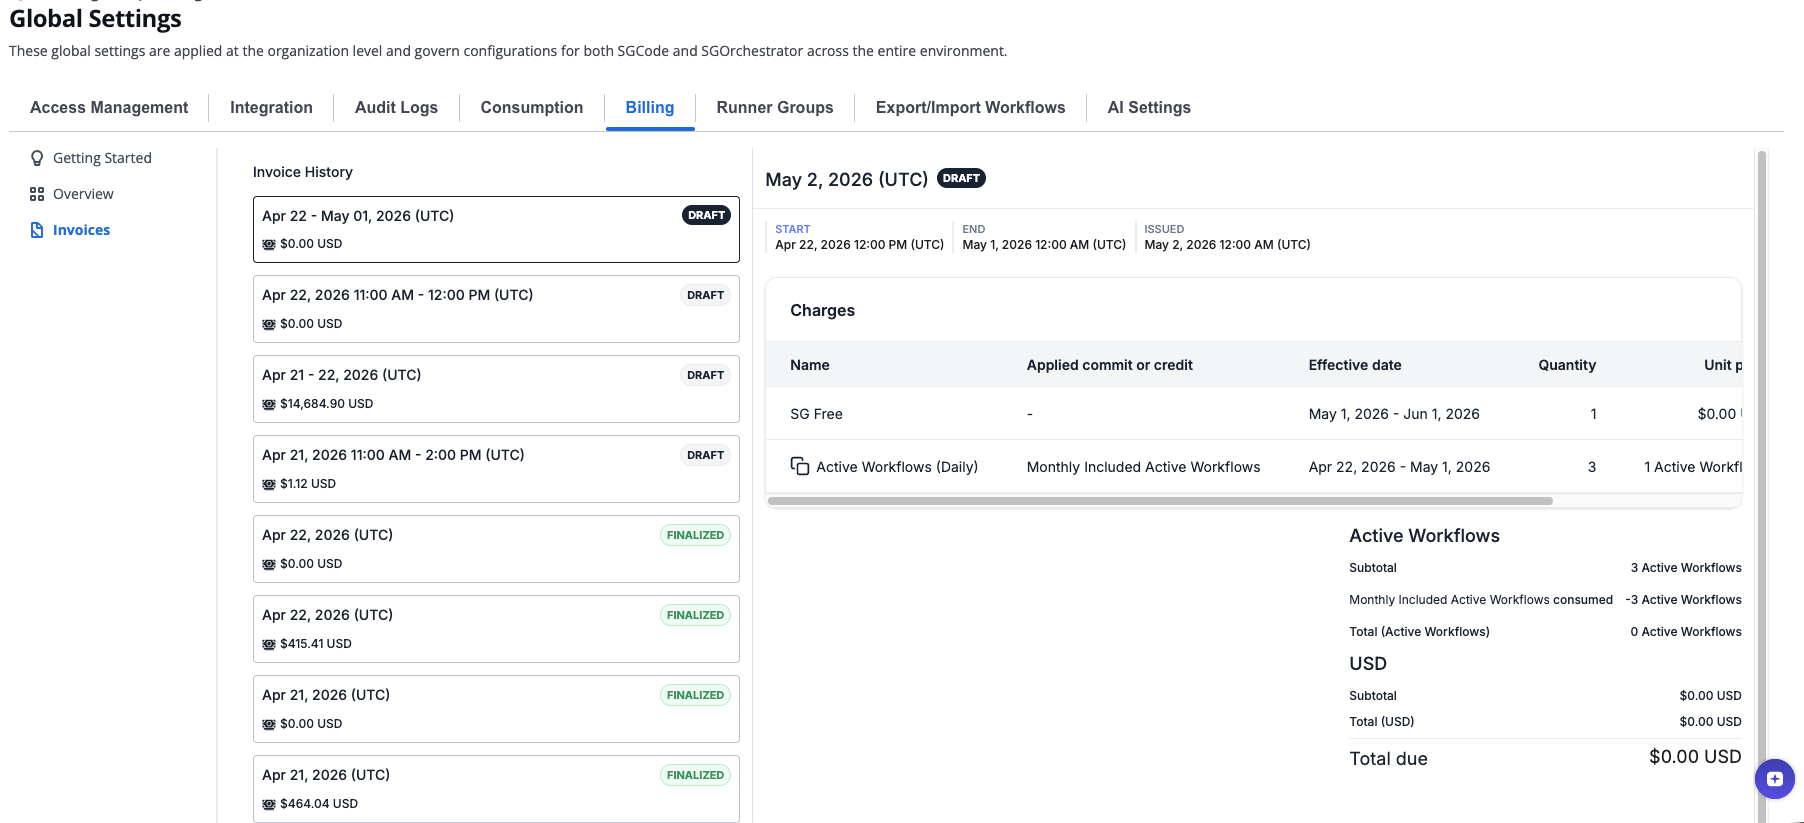
*Invoices tab*
The **Invoices** tab shows your billing history. Select an invoice in the **Invoice History** list to view its details.
Each invoice includes:
* Start, end, and issued dates (UTC)
* A breakdown of charges by product and quantity
* Subtotal and total due in USD
The invoice statuses are:
| Status | Meaning |
| --------- | ------------------------------------------------------ |
| Draft | Invoice is being calculated and has not been finalized |
| Finalized | Invoice is confirmed and ready for payment |
---
# Consumption
The *Consumption* section provides detailed metrics on the usage of workflow runs and minutes within your organization. It includes monthly and daily statistics to help you monitor and manage resources effectively. Regularly tracking these metrics aids in efficient resource management and cost control.
To access the Consumption metrics, go to **Orchestrator** > **Organization Settings** and select **Consumption**.

## Workflow Run Metrics[](#workflow-run-metrics "Direct link to Workflow Run Metrics")
### Monthly Consumed Workflow Run Metrics[](#monthly-consumed-workflow-run-metrics "Direct link to Monthly Consumed Workflow Run Metrics")
* **Connector Discovery Runs**: Tracks the number of runs executed to discover connectors.
* **Terraform Drift Runs**: Monitors the runs performed to identify drift in Terraform configurations.
* **Workflow Runs**: Indicates the total number of workflow executions.
* **Total Runs**: Represents the cumulative runs for all activities.
These metrics provide insight into the different types of workflow runs executed in the selected month.
## Workflow Run Minutes[](#workflow-run-minutes "Direct link to Workflow Run Minutes")
### Monthly and Daily Consumed Workflow Run Minutes[](#monthly-and-daily-consumed-workflow-run-minutes "Direct link to Monthly and Daily Consumed Workflow Run Minutes")
* **Minutes Consumed This Month**: Displays the total workflow run minutes consumed in the current month.
* **Minutes Consumed Today**: Shows the workflow run minutes consumed on the current day.
This section highlights the total workflow run minutes consumed in the current month and on the current day.
## Subscription Details[](#subscription-details "Direct link to Subscription Details")
* **Subscription Expiration Date**: Specifies the date when the current subscription will expire.
Ensure your subscription is active to avoid any disruption in the service.
---
# Infracost Integration
## Infracost Integration[](#infracost-integration "Direct link to Infracost Integration")
StackGuardian allows you to integrate your own Infracost API key for cost analysis of Terraform and OpenTofu Workflow runs. By bringing your own key (BYOK), you can connect to your organization's Infracost account directly, rather than using the default StackGuardian managed key.
### How to Set Up Infracost Integration[](#how-to-set-up-infracost-integration "Direct link to How to Set Up Infracost Integration")
1. **Obtain Your Infracost API Key**
* You will need an Infracost API key. This key is used for authenticating API requests from StackGuardian for cost estimation. If you do not have an API key, generate one from your Infracost account.
2. **Add Your API Key to StackGuardian**
* Go to your organization settings in the StackGuardian platform.
* Find the **Integrations** section and go to **Infracost Integration**.
* Enable the toggle for Infracost integration across the organization.
* Enter your Infracost API key in the provided field.
* Click **Save**.
All subsequent Terraform and OpenTofu Workflow runs will now use this Infracost API key for cost analysis.
info
Once saved, the Infracost API key cannot be retrieved again from the Organization settings.
info
If `INFRACOST_API_KEY` is set in the environment variables for a workflow, it will override the API key set in the Organization settings.
### Frequently Asked Questions[](#frequently-asked-questions "Direct link to Frequently Asked Questions")
**Can I switch back to the default StackGuardian Infracost key?**
Yes, if you disable the Infracost integration in the Organization settings, the default StackGuardian Infracost key will be used.
**Will my Infracost API key be secure?**
StackGuardian encrypts and stores your Infracost API key securely. Once set, it cannot be viewed again from the Organization settings. StackGuardian only accesses your Infracost API key while executing Terraform and OpenTofu workflow runs.
**Why are my Infracost estimations in my workflow runs failing?**
* If Infracost integration is enabled at the organization level, first check if the API key is correct and valid.
* If the API key is valid, check if the `INFRACOST_API_KEY` is set in the environment variables for the workflow. If the `INFRACOST_API_KEY` is set in the environment variables for the workflow with the failing runs, check if the value of this environment variable is correct.
* If the API key is correct and valid, and the error still persists, contact StackGuardian support at **** for further assistance.
***
---
# Overview
**Organization Settings** provide secure and efficient management features, such as Single Sign-On (SSO), Access Management with RBAC, and Private Runner Groups.
### Summary[](#summary "Direct link to Summary")
The **Organization Settings** include:
* **Access Management and RBAC**: Control user access within StackGuardian using Role-Based Access Control (RBAC). This feature provides a nuanced access level management system, allowing for the assignment of predefined and custom roles to users or groups. For an in-depth understanding of RBAC and its implementation, check out the [**Access Management Guide**](/docs/organisation_settings/access_management/).

* **Private Runner Groups**: Supports secure and controlled execution of workflows within an organization's own infrastructure. It offers a way to register self-hosted runners that comply with specific organizational policies and requirements. To learn how to configure Private Runners, refer to the [**Private Runners Guide**](/docs/organisation_settings/private_runner/overview/).
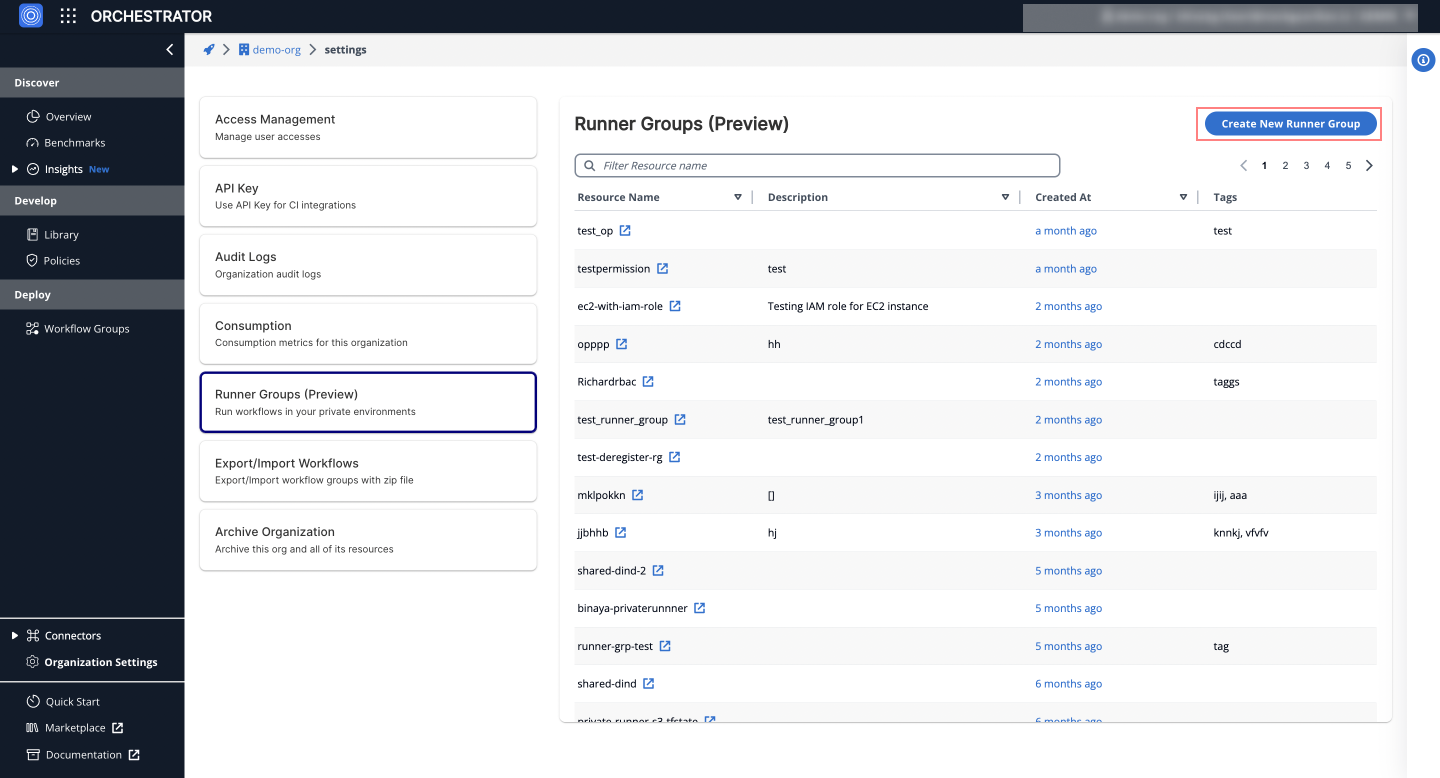
* **SSO**: Single Sign-On through StackGuardian offers a secure, simplified sign-in process aligned with Business and Enterprise needs. It allows for centralized access management and user authentication. For detailed setup instructions, visit [**SSO Configuration Guide**](/docs/organisation_settings/sso_saml/azure/).
---
# Networking
Networking is key to setting up Private Runner Groups on the StackGuardian platform. This document covers the essential networking requirements and endpoints needed for your runners to operate securely and efficiently.
### Networking with SG Runner Groups[](#networking-with-sg-runner-groups "Direct link to Networking with SG Runner Groups")
The following table lists the domains required for communication between StackGuardian and private runner instances. Ensure that traffic is allowed and DNS resolution works for each endpoint.
Region-Specific Configuration
* Replace ***\*** with the specific AWS regions where your StackGuardian deployment is hosted.
* **For EU deployments:** Use `eu-central-1` (primary) and `eu-west-1` (backup)
* Example: **\*.dkr.ecr.eu-central-1.amazonaws.com** and **\*.dkr.ecr.eu-west-1.amazonaws.com**
* **For US deployments:** Use `us-east-2` (primary) and `us-west-2` (backup)
* Example: **\*.dkr.ecr.us-east-2.amazonaws.com** and **\*.dkr.ecr.us-west-2.amazonaws.com**
* These endpoints host workflow runtimes in the form of docker images and other essential services.
* Contact your StackGuardian representative if you're unsure which regions to configure.
#### Required Domains[](#required-domains "Direct link to Required Domains")
| **Domain** | **Purpose** |
| -------------------------------------------- | --------------------------------------------------------------------------------------------------- |
| **\*.stackguardian.io** | Necessary for the registration and de-registration process of private runners. |
| **\*.github.com** | Required during registration for downloading the runner installation script. |
| **\*.docker.io** | Used during the registration process for private runners. |
| **\*.amazonaws.com** | Essential for registration and workflow executions. |
| **\*.dkr.ecr.\.amazonaws.com** | Hosts SG Terraform Docker images used in workflow steps. |
| **ec2messages.\.amazonaws.com** | Required for SSM and ECS Anywhere to connect private runners to the ECS cluster (SG control plane). |
| **\*.s3.\.amazonaws.com** | Required to fetch AWS runtime parameters for workflows. |
| **ecs.\.amazonaws.com** | Essential for connecting private runners to ECS services. |
| **ecs-\*.\.amazonaws.com** | Essential for ECS service connections. |
| **api.ecr.\.amazonaws.com** | Access to Docker images hosted in ECR. |
| **\*.elb.\.amazonaws.com** | Load balancer for AWS Elastic Container Service. |
| **ssm.\.amazonaws.com** | Required for AWS Systems Manager operations. |
| **\*.raw\.githubusercontent.com** | Required for downloading raw scripts or dependencies hosted on GitHub. |
Ubuntu-specific domains
The following domains are required **only if provisioning private runners on Ubuntu OS**. These are needed for the ECS Anywhere setup script to fetch packages and security updates.
| **Domain** | **Purpose** |
| ----------------------------------------- | --------------------------------------------------------------------- |
| **\.ec2.archive.ubuntu.com** | Fetch system packages on Ubuntu OS during private runner provisioning |
| **security.ubuntu.com** | Install security packages |
#### Azure Blob Storage Endpoints[](#azure-blob-storage-endpoints "Direct link to Azure Blob Storage Endpoints")
For setups utilizing Azure Blob Storage, ensure the following endpoints are accessible:
| **Domain** | **Purpose** |
| ------------------------------------------------- | ------------------------------------------------------- |
| **blob.storage.azure.net** | Required for Azure Blob Storage as the storage backend. |
| **\.blob.core.windows.net** | Specific Azure storage endpoints for multiple uses. |
| **azcopyvnextrelease.blob.core.windows.net** | For Azure storage data transfer operations. |
***
#### Outgoing Permissions for Terraform Workflows[](#outgoing-permissions-for-terraform-workflows "Direct link to Outgoing Permissions for Terraform Workflows")
Ensure the following endpoints are accessible for Terraform workflows:
| **Domain** | **Purpose** |
| -------------------------- | ---------------------------------------------------------------------------- |
| **releases.hashicorp.com** | Used for downloading Terraform binaries during deployment processes. |
| **\*.github.com** | Required for downloading the runner installation script during registration. |
| **registry.terraform.io** | Facilitates the retrieval of Terraform modules and providers. |
note
Ensure configuration of firewall settings to allow access to all specified domains, using wildcard domains (e.g., `*.`) where applicable to prevent disruptions.
---
# Overview
**Runner groups** allow you to create dedicated groups of runners for your organization. A private runner is a self-hosted instance that can be registered with StackGuardian to execute tasks and jobs within your organization's environment. This setup provides greater control and flexibility over task execution, allowing you to leverage your own infrastructure for running jobs securely.
Organization admins can also configure execution presets to define default values for execution environment and Terraform settings. These presets auto-populate when users create new workflows or templates, reducing configuration time and enforcing organizational standards.
For example, suppose you want to automate your CI/CD pipeline, including building, testing, and deploying applications. By creating a private runner group and registering your own instances as private runners, you can seamlessly integrate your existing infrastructure and tools, such as Jenkins or GitLab Runners, to efficiently execute the pipeline stages within your secure environment. If you configure execution presets to use your private runner group by default, all new workflows in your organization will automatically use your infrastructure without manual configuration.
## Create a runner group[](#create-a-runner-group "Direct link to Create a runner group")
Permissions and Access Rights
Verify that you have the necessary permissions and access rights within the StackGuardian Platform to create and manage private runners. This may involve administrative privileges or specific roles assigned to your user account.

*Create a Runner Group*
You can configure a runner group with one of the two types of storage backends:
* [**AWS S3 as a Storage Backend**](/docs/organisation_settings/private_runner/setup_private_runner_aws/)
* [**Azure Blob Storage as a Storage Backend**](/docs/organisation_settings/private_runner/setup_private_runner_azure/)
## Execution presets[](#execution-presets "Direct link to Execution presets")
Execution presets define organization-wide default values for execution environment, Terraform, and OpenTofu settings. When users create new workflows or templates, these values auto-populate, reducing manual configuration and ensuring consistency across your organization.
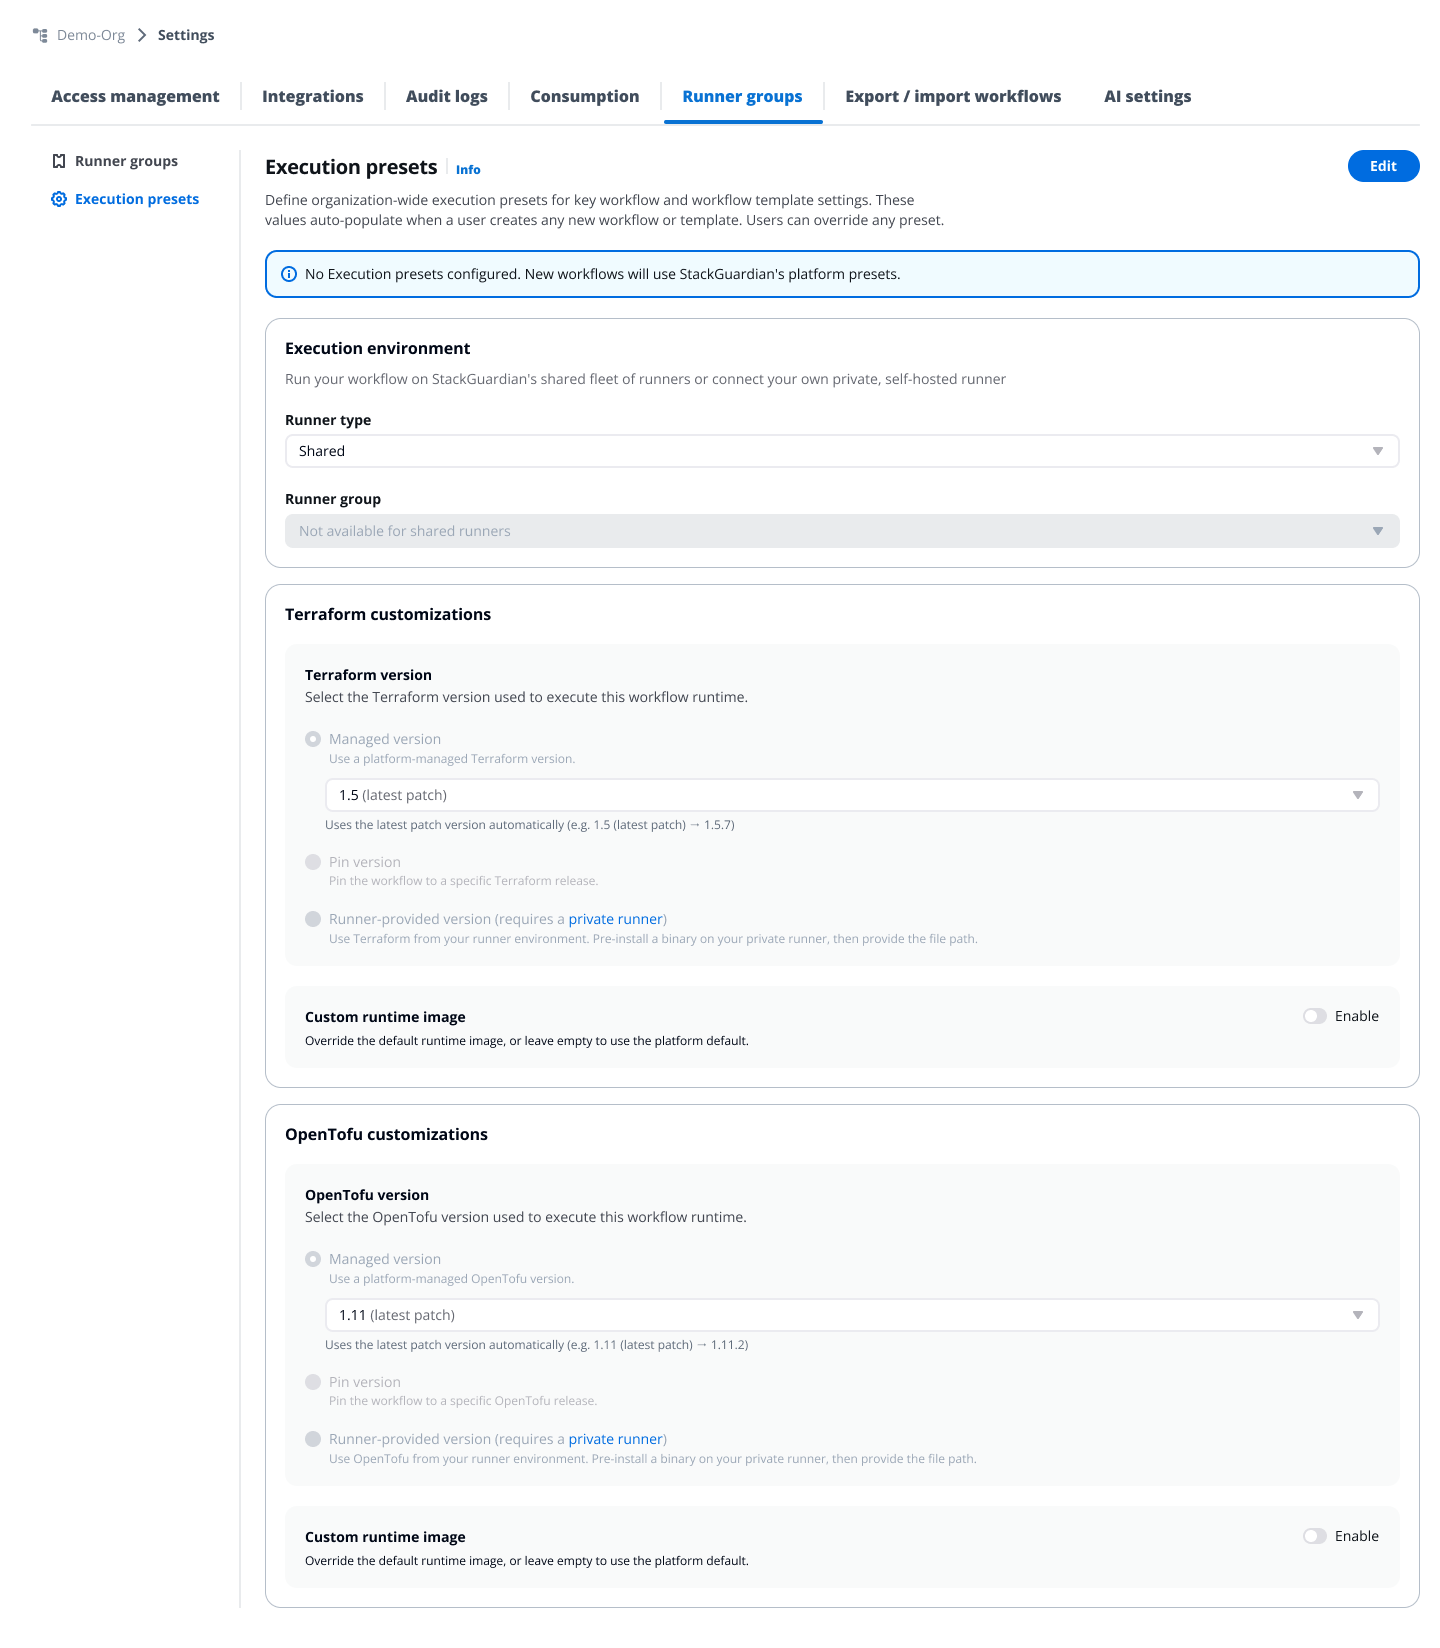
*Execution presets*
StackGuardian applies settings in this order of precedence:
1. **System/Platform presets** — StackGuardian's default values (Shared runner, Managed Terraform version, custom runtime disabled)
2. **Execution presets** — Organization-wide defaults configured by admins (override platform presets)
3. **Template settings** — Configuration defined by template creators (override execution presets)
4. **User** — Workflow creators can customize any setting (highest priority, overrides all previous levels)
Execution presets only apply to workflows and templates created after you define these presets. Workflows and templates that already exist are not affected.
Users can override preset values after creating workflows or templates by editing the workflow settings. Execution presets are defaults, not enforced policies.
[**Execution environment**](/docs/deploy/workflows/workflow_components/execution_environment/)
* **Runner type** — Select Shared or Private
* **Runner group** — If Private is selected, choose which runner group to use by default
[**Terraform/OpenTofu customizations**](/docs/deploy/workflows/workflow_components/terraform_config/##terraformopentofu-version)
* **Terraform/OpenTofu version** — Choose one:
* **Managed version** — StackGuardian automatically uses the latest patch version
* **Pin version** — Lock workflows to a specific Terraform/OpenTofu release
* **Runner-provided version** — Use Terraform/OpenTofu installed on your private runner (requires private runner and optional binary path)
* **Custom runtime image** — Enable to use a custom Docker image for workflow execution
4. Click **Save**
Your execution presets are now active. New workflows and templates will inherit these values.
### Reset to platform defaults[](#reset-to-platform-defaults "Direct link to Reset to platform defaults")
If you want to remove your organization's execution presets and return to StackGuardian's platform defaults:
1. Navigate to **Settings > Runner groups > Execution presets**
2. Click **Edit**
3. Click **Reset to platform defaults**
4. Confirm the action in the dialog
This clears all configured presets. New workflows will use StackGuardian's platform defaults (Shared runner, Managed Terraform version). Existing workflows are not affected.
### How presets apply to workflows and templates[](#how-presets-apply-to-workflows-and-templates "Direct link to How presets apply to workflows and templates")
| Scenario | Behavior |
| --------------------------------------- | ----------------------------------------------------------------------------------------------------------------------------------------------------------------------------------------------------------------------------------------------------------------------------------------- |
| **Creating a workflow template** | The system checks for execution presets and applies those values. If no execution presets are configured, platform defaults are used. Template creators can override any preset value in the template settings. |
| **Creating a workflow from a template** | The workflow inherits the template's execution settings, not the execution presets. Templates have higher precedence than execution presets in the hierarchy. |
| **Runner group protection** | If you select a specific runner group in your execution presets, that runner group cannot be deleted. This prevents configuration errors in new workflows. To delete the runner group, first update your execution presets to use a different runner group or reset to platform defaults. |
---
# Setup Private Runner AWS
This document provides a guide to setting up Private Runner Groups on the StackGuardian platform, focusing on configuring storage backend using *AWS S3* for seamless task execution within your organization's infrastructure.
## Configure a Private Runner Group on AWS[](#configure-a-private-runner-group-on-aws "Direct link to Configure a Private Runner Group on AWS")
### 1. Creating an S3 Bucket[](#1-creating-an-s3-bucket "Direct link to 1. Creating an S3 Bucket")
Before creating a private runner, ensure the following prerequisites are set up:
#### 1.1 Create AWS S3 bucket[](#11-create-aws-s3-bucket "Direct link to 1.1 Create AWS S3 bucket")
Follow the [**AWS S3 bucket**](https://docs.aws.amazon.com/AmazonS3/latest/userguide/create-bucket-overview.html) creation guide to set up an AWS S3 bucket. The [**AWS S3 storage backend**](https://app.stackguardian.io/marketplace/IAC/stackguardian/private-runner-s3-storage-backend?revision=%2Fstackguardian%2Fprivate-runner-s3-storage-backend%3A4\&tab=formPreview) template in StackGuardian can also be used to provision a S3 bucket in your AWS account as well.
#### 1.2 Configuring CORS Policy for S3 Bucket[](#12-configuring-cors-policy-for-s3-bucket "Direct link to 1.2 Configuring CORS Policy for S3 Bucket")
Establishing a **CORS** (*Cross-Origin Resource Sharing*) policy for the S3 bucket associated with the Private Runner is important to ensure that the runner can *securely access* and *interact* with the required resources. CORS facilitates web applications running in one domain (origin) to access resources from another domain. Within the context of Private Runner, the CORS policy enables the runner to make authenticated API requests to the S3 bucket.
* EU Region
* US Region
```
[
{
"ExposeHeaders": [],
"AllowedMethods": ["GET", "HEAD", "PUT"],
"AllowedHeaders": ["*"],
"AllowedOrigins": ["https://app.stackguardian.io"]
}
]
```
```
[
{
"ExposeHeaders": [],
"AllowedMethods": ["GET", "HEAD", "PUT"],
"AllowedHeaders": ["*"],
"AllowedOrigins": ["https://us.stackguardian.io"]
}
]
```
#### 1.3 Create a Role to Access the S3 Bucket[](#13-create-a-role-to-access-the-s3-bucket "Direct link to 1.3 Create a Role to Access the S3 Bucket")
Create an IAM role that will allow the private runner to access the S3 bucket. Follow these steps:
* AWS Permission Policy
* Trust Relationships
**AWS Permission Policy**: Attach the following policy to the role to grant the necessary permissions to access the S3 bucket:
```
{
"Version": "2012-10-17",
"Statement": [
{
"Sid": "VisualEditor0",
"Effect": "Allow",
"Action": [
"s3:DeleteObjectTagging",
"s3:PutObject",
"s3:GetObject",
"s3:DeleteObjectVersion",
"s3:GetObjectVersionTagging",
"s3:PutObjectVersionTagging",
"s3:GetObjectTagging",
"s3:ListBucket",
"s3:PutObjectTagging",
"s3:DeleteObjectVersionTagging",
"s3:DeleteObject"
],
"Resource": ["arn:aws:s3:::", "arn:aws:s3:::/*"]
}
]
}
```
note
Replace **\** with the actual name of your S3 bucket.
* **Trust Relationships**: Configure the trust relationship for the IAM role to allow it to be assumed by the necessary accounts.
```
{
"Version": "2012-10-17",
"Statement": [
{
"Effect": "Allow",
"Principal": {
"AWS": [
"arn:aws:iam::163602625436:root",
"arn:aws:iam::476299211833:root",
"arn:aws:iam:::root"
]
},
"Action": "sts:AssumeRole"
}
]
}
```
note
* Replace **\** with the AWS account ID where the IAM role and the S3 bucket are located.
* The StackGuardian AWS account IDs (`163602625436` and `476299211833`) are the same for both EU and US regions.
#### 1.4 Create the Connector for the Role in StackGuardian[](#14-create-the-connector-for-the-role-in-stackguardian "Direct link to 1.4 Create the Connector for the Role in StackGuardian")
Set up the connector in the StackGuardian platform using the IAM role created in **step 1.3** so the private runner can access the S3 bucket.
### 2. Setting Up Private Runner Group in StackGuardian[](#2-setting-up-private-runner-group-in-stackguardian "Direct link to 2. Setting Up Private Runner Group in StackGuardian")
To use AWS S3 as a storage backend for a **Private Runner Group** in StackGuardian, follow these steps:
**2.1.** Under **Organization Settings** in the StackGuardian platform , navigate to the *Runner Groups* section and click on "**Create New Runner Group**".
**2.2.** In the form, provide the following details:
* **Resource Name**: Give the private runner group a name, e.g., "**CI/CD Pipeline Group**".
* **Resource ID**: Auto-generated from the runner group name. You can customize it using only letters, numbers, underscores (\_), or dashes (-). This cannot be changed after creation.
* **Description**: Briefly explain the group's intention.
* **Add Tag**: Optionally, add tags to categorize or label the runner group.
**2.3.** Under "**Storage Backend Configuration**" dropdown, enter the following details:
* **Type**: Select "**AWS S3**".
* **Auth**: Select the connector previously configured in **point 1.4**
* **Bucket Region**: Select the appropriate region from the dropdown.
* **S3 Bucket Name**: Enter the name of the S3 bucket to be used for storing artifacts and logs.
**2.4.** Click on the "**Create**" button to create your private runner group.
*Setting Up Private Runner Group in StackGuardian*
### 3. Creating the EC2 Instance[](#3-creating-the-ec2-instance "Direct link to 3. Creating the EC2 Instance")
Private runner groups support multiple runner instances and the StackGuardian platform takes care to balance the load between them. In this step, one or multiple instances will be created that become part of the private runner group.
#### 3.1 The IAM Role That Will Be Attached to the Instance[](#31-the-iam-role-that-will-be-attached-to-the-instance "Direct link to 3.1 The IAM Role That Will Be Attached to the Instance")
Create an IAM role specifically as an EC2 Role to be attached to the EC2 instance.
* AWS Permission Policy
* Trust Relationships
```
{
"Version": "2012-10-17",
"Statement": [
{
"Sid": "Statement1",
"Effect": "Allow",
"Action": [
"sts:AssumeRole"
],
"Resource": [
""
]
}
]
}
```
```
{
"Version": "2012-10-17",
"Statement": [
{
"Effect": "Allow",
"Principal": {
"Service": "ec2.amazonaws.com"
},
"Action": "sts:AssumeRole"
}
]
}
```
#### 3.2 Requirements for Private Runner[](#32-requirements-for-private-runner "Direct link to 3.2 Requirements for Private Runner")
For each runner following CPU architectures and operating systems are supported:
* **Architecture:** x86\_64
* **OS:** CentOS/RHEL 7, 8, 9, Ubuntu 20, 22, 24 Amazon Linux 2, 2023
The VM requirements depend on the workloads that will be running inside the workflows. Ensure that the VM meets the following minimum requirements:
* **CPU:** 4 cores
* **Memory:** 8 GB
* **Disc:** 100 GB
**`/var` Directory Storage Allocation**
In a standard deployment, the 100 GB of storage is dynamically assigned, requiring no additional configuration. However, if you are utilizing multiple disks for the private runner instance, please ensure that 80 GB of storage is specifically allocated to the `/var` directory on the VM. This directory is crucial as it is used by Docker and other private runner processes. To maintain optimal performance, we automatically clean up unused images and containers every 4 hours. Allocating 80 GB provides a sufficient buffer to accommodate these operations.
#### 3.3 Creating and Configuring the Private Runner[](#33-creating-and-configuring-the-private-runner "Direct link to 3.3 Creating and Configuring the Private Runner")
Most of the pre-required commands come built-in but you will need to install `docker`, `crontab` and `jq` inside the virtual machine you created using SSH. In addition, for Amazon Linux OS, `gnupg2` and `cronie` libraries are required as well.
#### 3.4 Attaching the IAM Role to the runner[](#34-attaching-the-iam-role-to-the-runner "Direct link to 3.4 Attaching the IAM Role to the runner")
Once the private runner instance(s) are created, please attach the created role from step **3.1** to each runner.
#### 3.5 Registering the runners with SG platform[](#35-registering-the-runners-with-sg-platform "Direct link to 3.5 Registering the runners with SG platform")
Once logged into the SG platform, navigate to **Profile** > **Settings** > **Runner Groups**, open your runner group and click the '**View**' button to see the *connection string* starting with `wget ...`. Use this command while logged into the runner CLI to register your runner. After successful registration your runner(s) will show up in the UI under **Runner Instances**.
---
# Setup Private Runner Azure
This document provides a guide to setting up Private Runner Groups on the StackGuardian platform, focusing on configuring storage backend using *Azure Blob Storage* for seamless task execution within your organization's infrastructure.
## Configure a Private Runner Group in Azure[](#configure-a-private-runner-group-in-azure "Direct link to Configure a Private Runner Group in Azure")
Before you begin creating a private runner, make sure you have the following prerequisites set up:
### 1. Creating an Azure Blob Storage Account[](#1-creating-an-azure-blob-storage-account "Direct link to 1. Creating an Azure Blob Storage Account")
#### 1.1 Create Azure Blob Storage[](#11-create-azure-blob-storage "Direct link to 1.1 Create Azure Blob Storage")
Follow the [**Azure Blob Storage**](https://learn.microsoft.com/en-us/azure/storage/blobs/storage-quickstart-blobs-portal) creation guide to set up your Blob Storage account.
#### 1.2 Configure CORS Policy for Azure Blob Storage:[](#12-configure-cors-policy-for-azure-blob-storage "Direct link to 1.2 Configure CORS Policy for Azure Blob Storage:")
Configure the CORS settings based on your StackGuardian region:
* **EU Region**: Allow all HTTP methods (*GET, DELETE, HEAD, MERGE, POST, OPTIONS, PUT, PATCH*) for `https://app.stackguardian.io`
* **US Region**: Allow all HTTP methods (*GET, DELETE, HEAD, MERGE, POST, OPTIONS, PUT, PATCH*) for `https://us.stackguardian.io`
This ensures that the runner can securely access and interact with the required resources.
#### 1.3 Create a Folder Called “runner”[](#13-create-a-folder-called-runner "Direct link to 1.3 Create a Folder Called “runner”")
Inside your Azure Blob Storage, create a new container named `runner` to store the necessary files and data for the private runner.
#### 1.4 Configure access credentials[](#14-configure-access-credentials "Direct link to 1.4 Configure access credentials")
StackGuardian supports two authentication methods for Azure Blob Storage. Choose the one that fits your setup.
**Managed Identity:**
Assign the following roles to your managed identity on your Azure Blob Storage account:
* [Storage Blob Delegator](https://learn.microsoft.com/en-us/azure/role-based-access-control/built-in-roles/storage#storage-blob-delegator)
* [Storage Blob Data Contributor](https://learn.microsoft.com/en-us/azure/role-based-access-control/built-in-roles/storage#storage-blob-data-contributor)
These roles will be used later when configuring the storage backend on the StackGuardian platform for your private runner.
**Access Key:**
Find your access keys under **Security** > **Networking** in the left navigation bar of your Azure Blob Storage account. These keys will be used when configuring the storage backend on the StackGuardian platform for your private runner.
### 2. Setting Up a Private Runner Group in StackGuardian[](#2-setting-up-a-private-runner-group-in-stackguardian "Direct link to 2. Setting Up a Private Runner Group in StackGuardian")
To create a Storage backend with Azure Blog Storage *Private Runner Group* in StackGuardian, follow these steps:
**2.1.** Under **Organization Settings** in the StackGuardian platform , navigate to the *Runner Groups* section and click on "**Create New Runner Group**".
**2.2.** In the form pop-up, enter the following details:
* **Resource Name**: Enter a name for your private runner group (e.g., "*CI/CD Pipeline Group*").
* **Resource ID**: Auto-generated from the runner group name. You can customize it using only letters, numbers, underscores (\_), or dashes (-). This cannot be changed after creation.
* **Description**: Provide a brief description of the group's purpose.
* **Add Tag**: Optionally, add tags to categorize or label the runner group.
**2.3.** Under "**Storage Backend Configuration**" dropdown, enter the following details:
* **Type**: Select "*Azure Blob Storage*".
* **Storage Account Name**: Enter the name of the storage account.
* **Storage Account Access Key**: Enter the storage account access key, which you create in the Setup **Step 1.4** when creating the Azure Blob Storage.
**2.4.** Click on the "**Create**" button to create your private runner group.

*Setting Up a Private Runner Group in StackGuardian*
### 3. Creating the Virtual Machine[](#3-creating-the-virtual-machine "Direct link to 3. Creating the Virtual Machine")
Private runner groups support multiple runner virtual machines and the StackGuardian platform takes care to balance the load between them. In this step, one or multiple VMs will be created that become part of the private runner group.
#### 3.1 Requirements for Private Runner[](#31-requirements-for-private-runner "Direct link to 3.1 Requirements for Private Runner")
Private runner groups support the following CPU architectures and operating systems:
| Architecture | OS |
| ------------ | ----------------------------------------------------------- |
| x86\_64 | CentOS/RHEL 7, 8, 9, Ubuntu 20, 22, 24 Amazon Linux 2, 2023 |
The VM requirements depend on the workloads that will be running inside the workflows. Ensure that the VM meets the following minimum requirements:
| Type | Description |
| ------ | ----------- |
| CPU | 4 cores |
| Memory | 8 GB |
| Disk | 100 GB |
**`/var` Directory Storage Allocation**
In a standard deployment, the 100 GB of storage is dynamically assigned, requiring no additional configuration. However, if you are utilizing multiple disks for the private runner instance, please ensure that 80 GB of storage is specifically allocated to the `/var` directory on the VM. This directory is crucial as it is used by Docker and other private runner processes. To maintain optimal performance, we automatically clean up unused images and containers every 4 hours. Allocating 80 GB provides a sufficient buffer to accommodate these operations.
#### 3.2 Creating and Configuring the Private Runner[](#32-creating-and-configuring-the-private-runner "Direct link to 3.2 Creating and Configuring the Private Runner")
Most of the pre-required commands come built-in but you will need to install `docker`, `crontab` and `jq` inside the virtual machine you created using SSH. In addition, for Amazon Linux OS, `gnupg2` and `cronie` libraries are required as well.
#### 3.3 Registering the runner with SG platform[](#33-registering-the-runner-with-sg-platform "Direct link to 3.3 Registering the runner with SG platform")
Once logged into the SG platform, navigate to **Profile** > **Settings** > **Runner Groups**, open your runner group and click the '**View**' button to see the *connection string* starting with `wget ...`. Use this command while logged into the VM's CLI to register your runner. After successful registration your runner(s) will show up in the UI under **Runner Instances**.
---
# SSO using OIDC
StackGuardian facilitates a secure and streamlined access management process for Business and Enterprise clients by offering "**Single Sign-On (SSO)**" functionality. This enables IT administrators to centrally manage team access and ensures that sensitive information is kept secure. With SSO, users can access the app with ease through a *single authentication* source.
This guide provides instructions for setting up **OIDC SSO** with StackGuardian using *Azure* as the **Identity Provider** (IdP).
### Step 1: Create a new App Registration in Microsoft Entra ID[](#step-1-create-a-new-app-registration-in-microsoft-entra-id "Direct link to Step 1: Create a new App Registration in Microsoft Entra ID")
1. Sign in to the [**Azure portal**](https://portal.azure.com/).
2. Open the **"Microsoft Entra ID"** service.
3. Navigate to **"App registrations"** and then click **"New registration"**.
4. Enter a *name* for your application and select the *supported account types*.
5. Under redirect URIs, select **"Web"** and enter the appropriate value based on your deployment region:
**For EU Region (Default):**
```
https://stackguardian-sso-prod.auth.eu-central-1.amazoncognito.com/oauth2/idpresponse
```
**For US Region:**
```
https://stackguardian-sso-prod.auth.us-east-2.amazoncognito.com/oauth2/idpresponse
```
Region-Specific Configuration
The redirect URI depends on your StackGuardian deployment region. Contact your StackGuardian representative if you're unsure which region your organization is deployed in.
Create new App registration
6. Click **"Register"** to create the application.
7. Copy and save the following details from the overview page of your new app registration. You will need to share them with your StackGuardian representative at the end of this guide.
* Application (client) ID
* Directory (tenant) ID
### Step 2: Configure the App Registration Authentication[](#step-2-configure-the-app-registration-authentication "Direct link to Step 2: Configure the App Registration Authentication")
1. From the new app registration that you just created, expand **"Manage"** on the left side menu and select **"Authentication"**.
Optional: Add a Secondary Region (Backup)
To add a secondary region (backup) for high availability:
Under **"Platform Configuration"** click on **"Add URI"** under **Web Redirect URIs** and enter the appropriate value based on your deployment region:
**For EU Region:**
```
https://stackguardian-prod-sso-alt.auth.eu-west-1.amazoncognito.com/oauth2/idpresponse
```
**For US Region:**
```
https://stackguardian-prod-sso-alt.auth.us-west-2.amazoncognito.com/oauth2/idpresponse
```
Optional: Configure Single Sign-Out
To configure Single Sign-Out, set the **Front-Channel Logout URL** based on your deployment region:
**For EU Region:**
```
https://stackguardian-sso-prod.auth.eu-central-1.amazoncognito.com/logout
```
**For US Region:**
```
https://stackguardian-sso-prod.auth.us-east-2.amazoncognito.com/logout
```
2. Under **"Implicit grant and hybrid flows"** select **"ID tokens"**.
3. Click **"Save"** to save the changes.
### Step 3: Configure the App Registration Token Configuration[](#step-3-configure-the-app-registration-token-configuration "Direct link to Step 3: Configure the App Registration Token Configuration")
1. From the new app registration that you just created, expand **"Manage"** on the left side menu and select **"Token configuration"**.
2. Click on **"Add optional claim"**.
3. In the new popup that opens, select the **"Token Type"** as **"ID"**.
4. Select the following Claims:
* email
* family\_name
* given\_name
* preferred\_username
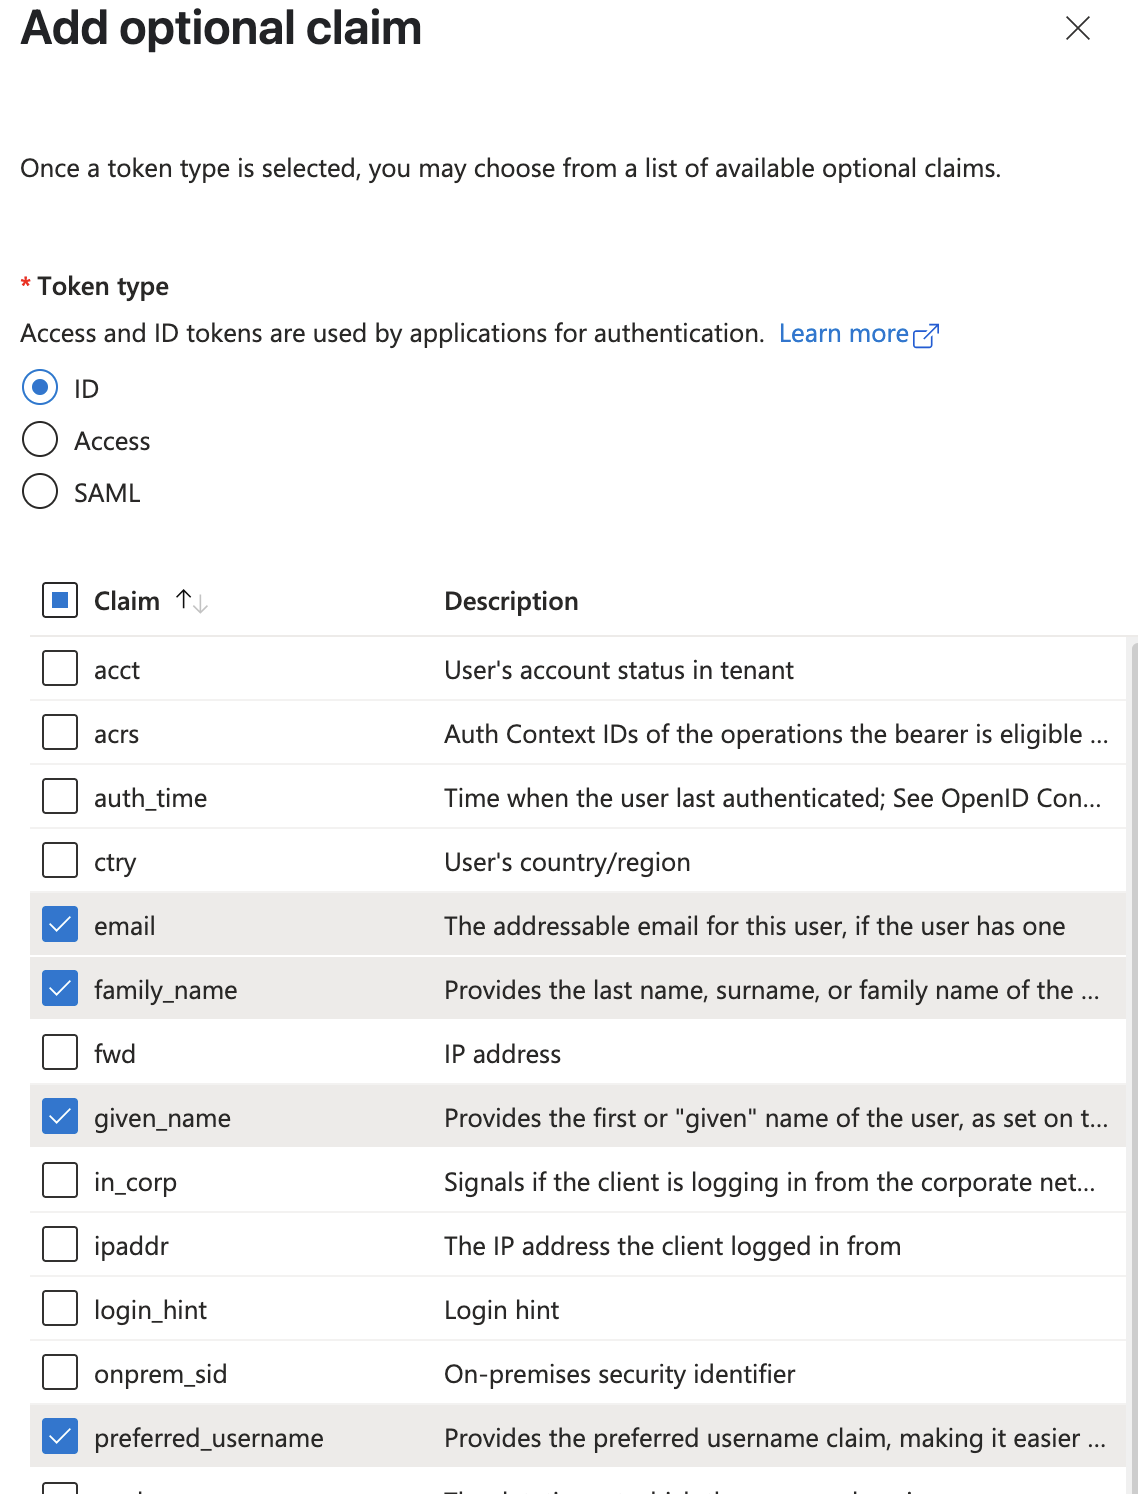
Add optional claims
5. Click **"Add"** to add the claims.
6. If you get a popup asking to turn on Microsoft Graph email, profile permission, check the box and click **"Add"**.
7. Now click on **"Add group claims"**
8. Select the checkboxes for the group types that you want to include in the tokens. If you are unsure, select all the boxes.
9. Under **"Customize token properties by type**", expand **"ID"** and select **"sAMAccountName"**.
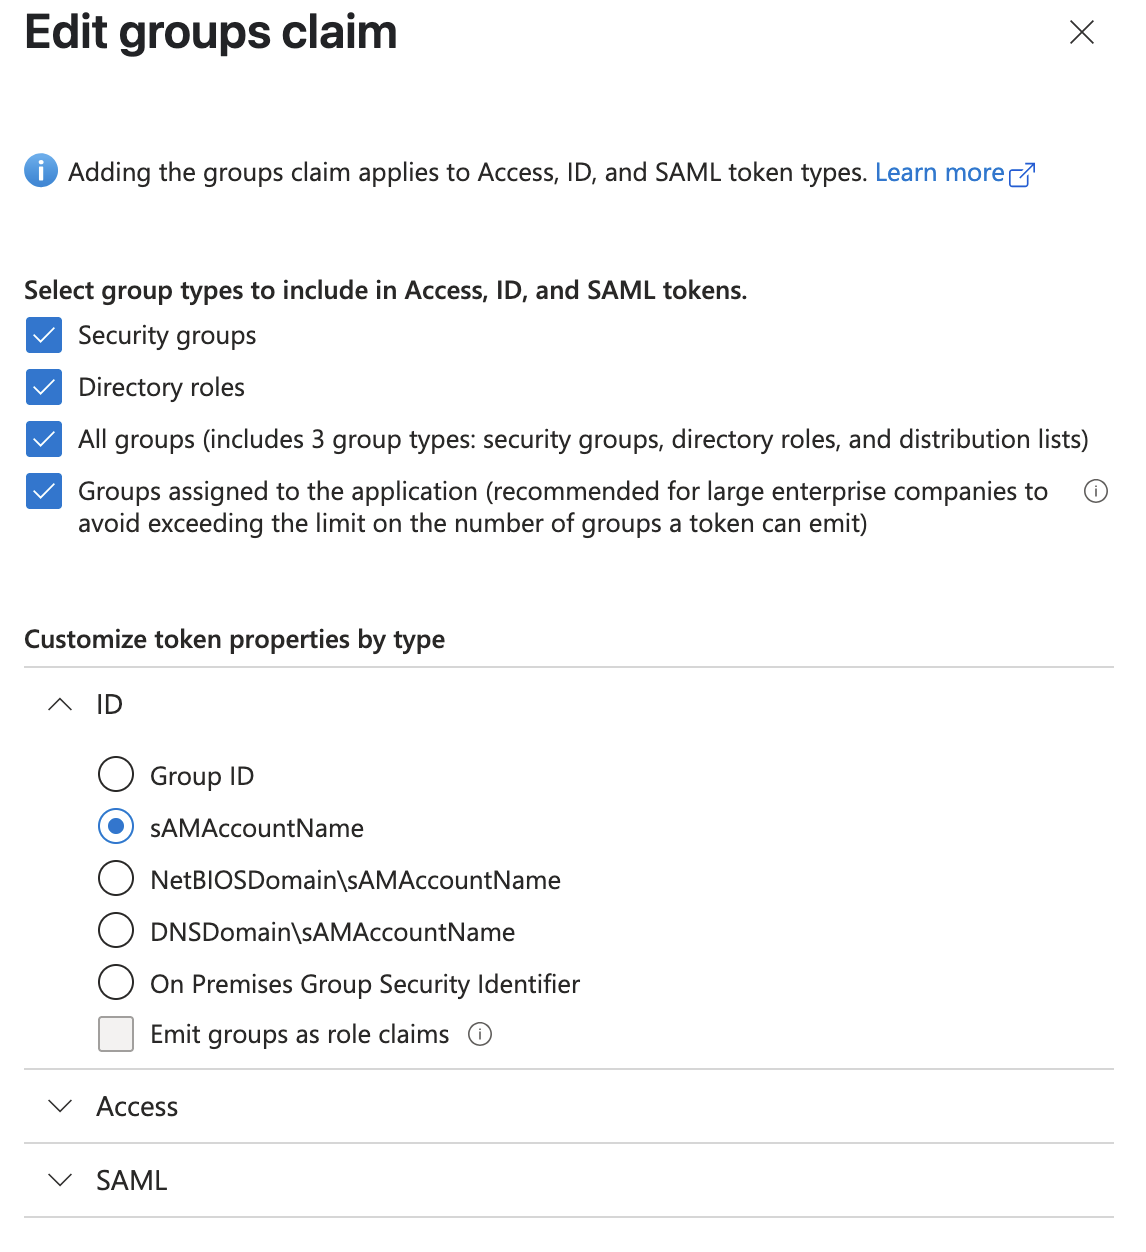
Add group claims
10. Click **"Add"** to add the group claim.
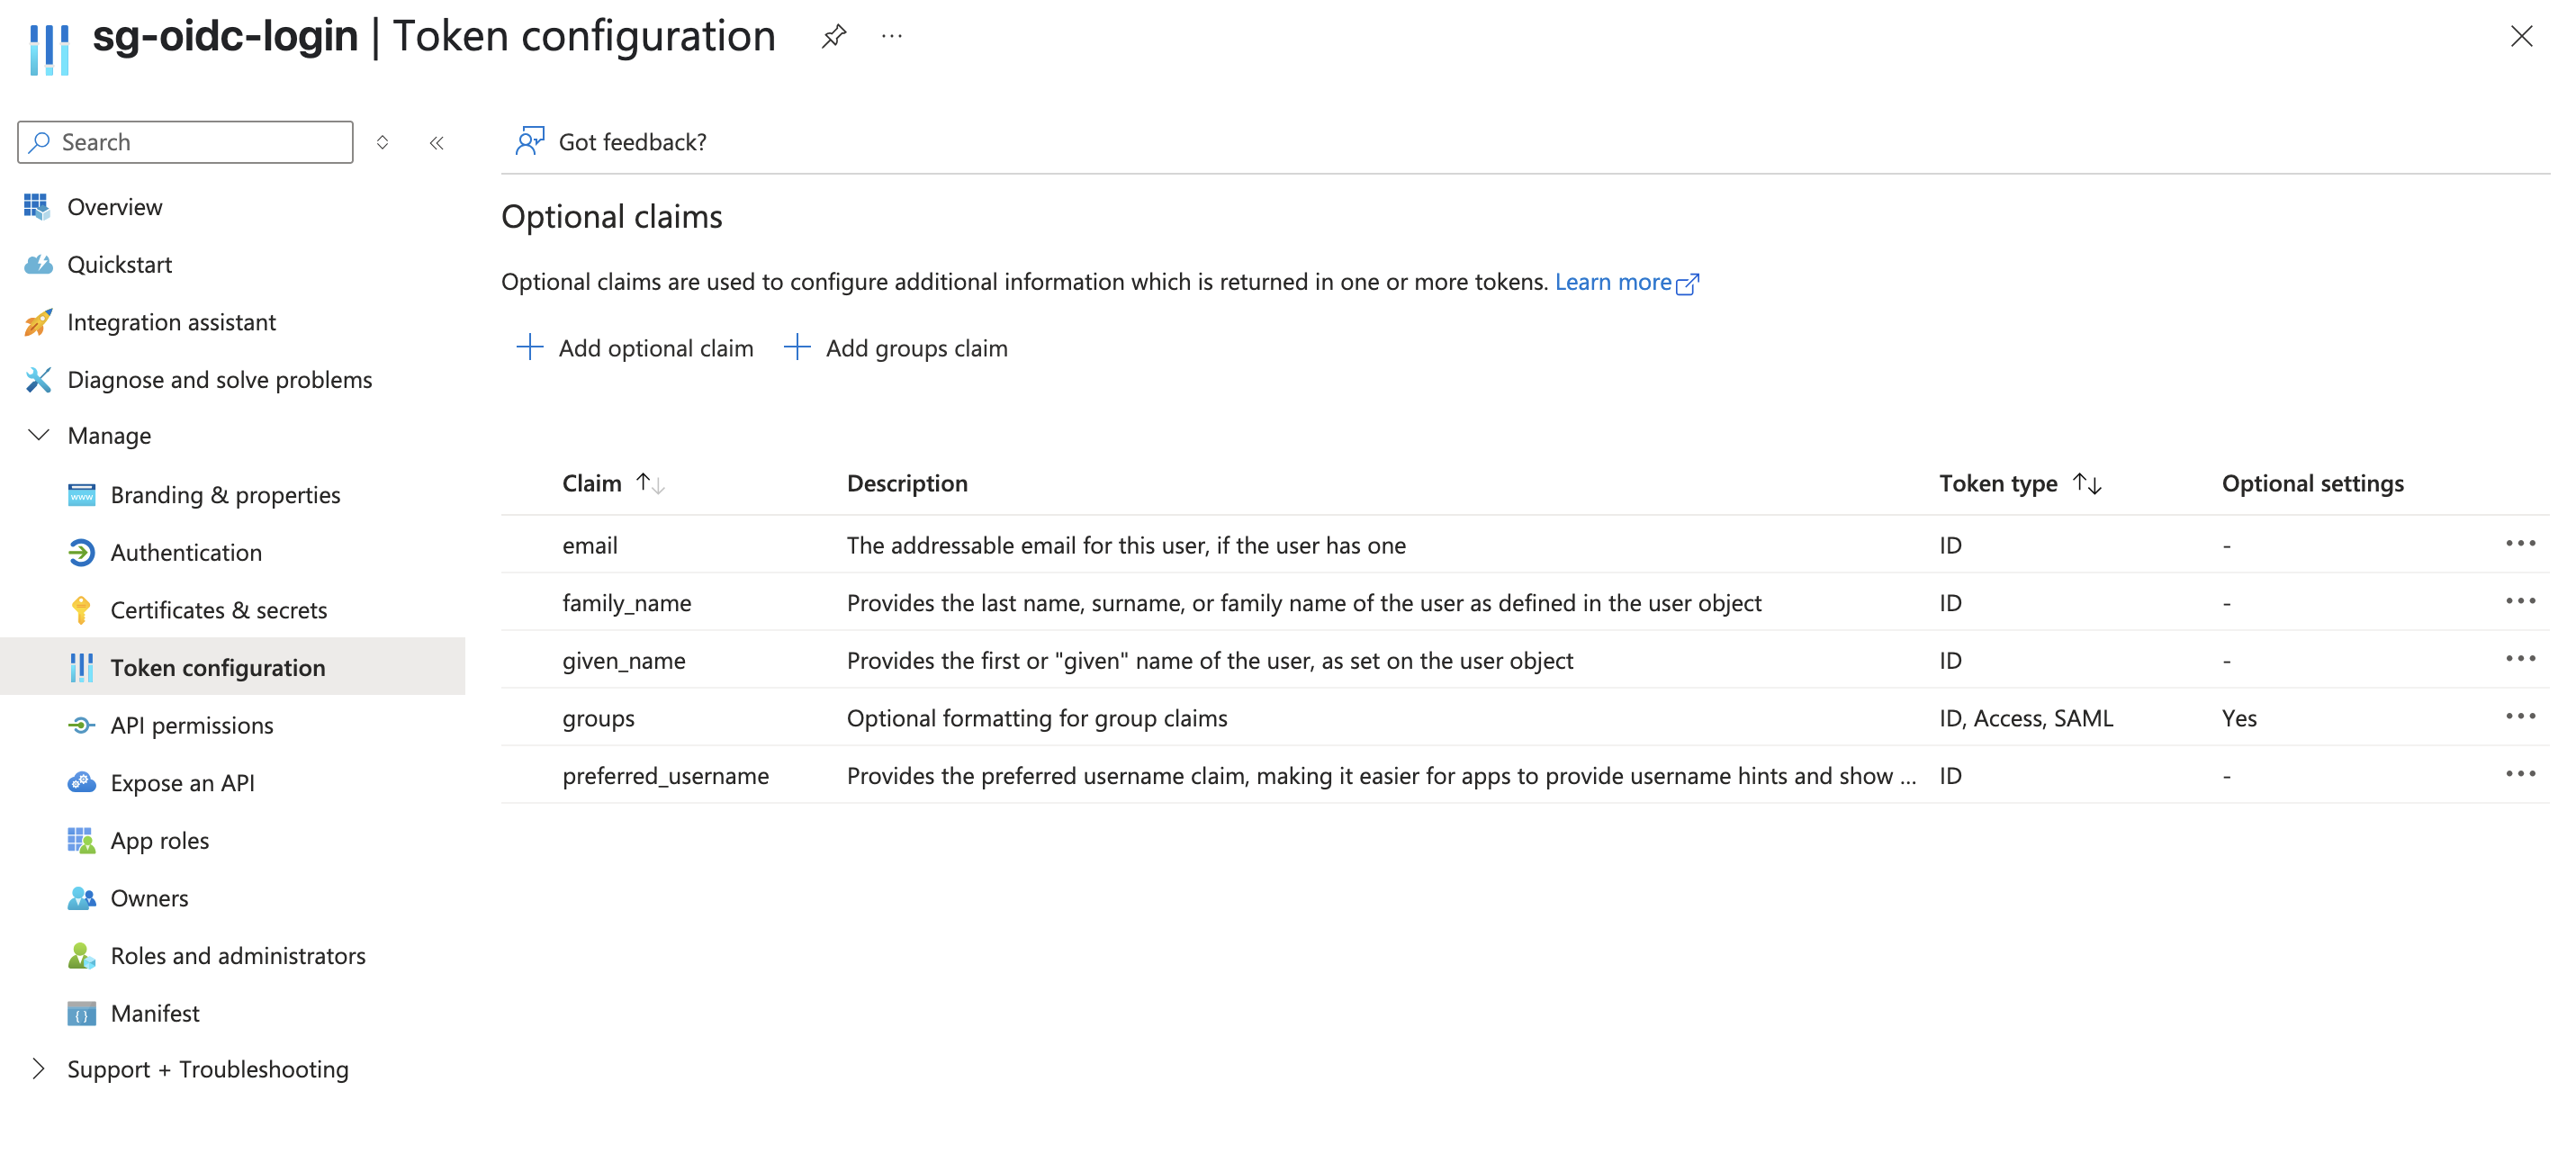
Final token configuration
### Step 4: Create a new Client Secret for the App Registration[](#step-4-create-a-new-client-secret-for-the-app-registration "Direct link to Step 4: Create a new Client Secret for the App Registration")
1. From your app registration, expand **"Manage"** on the left side menu and select **"Certificates & secrets"**.
2. Click on **"New client secret"**.
3. Enter a *description* for your client secret and select your desired value for *Expires*. If you are unsure, select the default *180 days (6 months)*.
4. Click **"Add"** to create the client secret.
5. Copy the *Value* of the client secret and save it in a secure location. The value will not be visible again. You will need to share this with your StackGuardian representative at the end end of this guide.
### Step 5: Assign users to StackGuardian[](#step-5-assign-users-to-stackguardian "Direct link to Step 5: Assign users to StackGuardian")
1. Go to *Microsoft Entra ID* and select **"Enterprise Applications"**.
2. Select **"All applications"** and find your application in the list and open it. It will have the same name as your App registration.
3. Expand the **"Manage"** section on the left side menu and select **"Users and groups"**.
4. Click on **"Add user/group"**.
5. Select the Users and Role on page that opens, and click **"Assign"**

Assign users and groups to your application
### Step 6: Share the Client and Application Data with StackGuardian[](#step-6-share-the-client-and-application-data-with-stackguardian "Direct link to Step 6: Share the Client and Application Data with StackGuardian")
1. Share the following details that you gathered while following this guide with your StackGuardian representative:
* Directory (tenant) ID ([From Step 1: Create a new app registration](#step-1-create-a-new-app-registration-in-microsoft-entra-id))
* Application (client) ID ([From Step 1: Create a new app registration](#step-1-create-a-new-app-registration-in-microsoft-entra-id))
* Client Secret ([From Step 4: Create a new Client Secret for the App Registration](#step-4-create-a-new-client-secret-for-the-app-registration))
Once everything is successfully setup on StackGuardian, you will be notified to test the connectivity.
## Inviting SSO Users or Groups[](#inviting-sso-users-or-groups "Direct link to Inviting SSO Users or Groups")
To invite SSO users or groups, use the following API endpoint. The process involves sending a payload with the user or group information. Below is the format of the payload:
**API endpoint:** `https://api.app.stackguardian.io/api/v1/orgs/{org}/invite_user/`
```
{
"userId": "/user.email@stackguardian.io",
"resendInvite": false,
"role": "ADMIN"
}
```
* Replace **"\"** with the appropriate SSO group name from the dropdown options visible to the user.
* Replace **""** with the actual email address of the user.
You can refer to the API documentation [**here**](https://docs.stackguardian.io/api/#tag/Organizations/operation/orgs_invite_user_create) for more details on how to use the endpoint.
---
# SSO using SAML
StackGuardian facilitates a secure and streamlined access management process for Business and Enterprise clients by offering **Single Sign-On (SSO)** functionality. This enables IT administrators to centrally **manage** team access and **ensures** that sensitive information is kept **secure**. With SSO, users can access the app with ease through a *single authentication* source.
This guide provides instructions for setting up **SAML SSO** with StackGuardian using *Azure* as the **Identity Provider** (IdP).
### Step 1: Create a new application integration[](#step-1-create-a-new-application-integration "Direct link to Step 1: Create a new application integration")
1. Sign in to the [**Azure portal**](https://portal.azure.com/).
2. Navigation to **"Microsoft Entra ID"** service.
3. Navigate to **"Enterprise Applications"** and then select **“All Applications”**.
4. Add a *new application* to use with StackGaurdian Platform, select **“New application”**.
5. In the *Microsoft Entra Gallery*, Click on **“Create your own application”**.
6. Now Enter the **name** of your application and under the purpose, use **"Integrate any other application you don't find in the gallery (Non-gallery)"**.
7. **Create** and wait until the application is added, this might take a few seconds.
Create a **new application**
### Step 2: Create SAML Integration[](#step-2-create-saml-integration "Direct link to Step 2: Create SAML Integration")
1. Navigate to the application’s integration page, under *Getting Started* click on **“Set up single sign on”**.
2. Under the *Select a single sign-on method* page, select **SAML**.
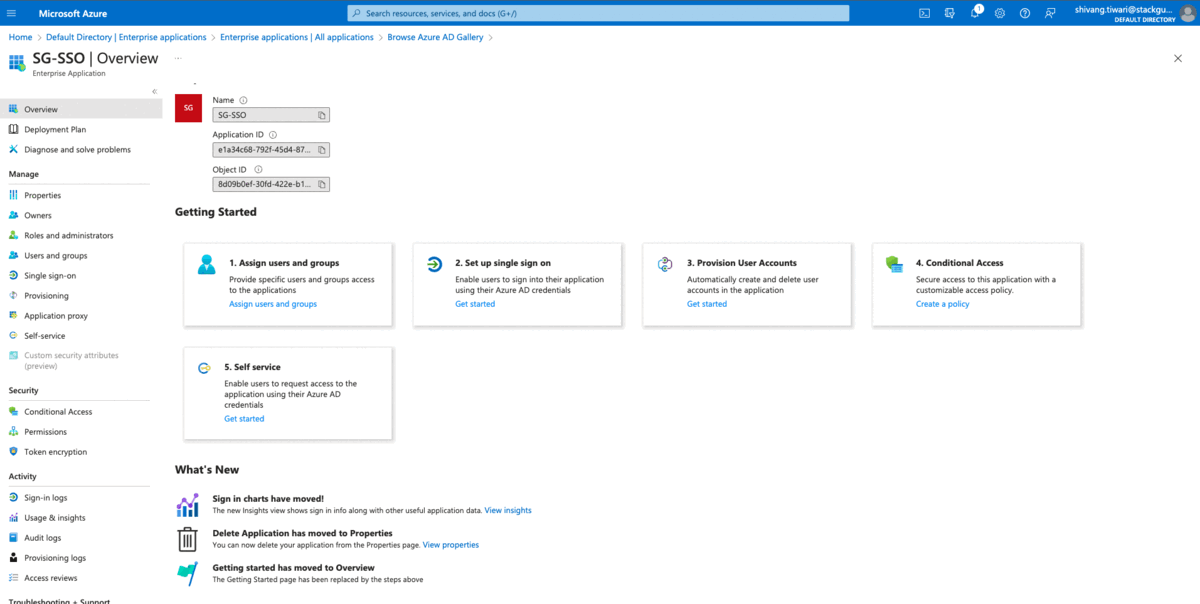
Create **SAML Integration**
### Step 3: SAML Settings[](#step-3-saml-settings "Direct link to Step 3: SAML Settings")
1. Go to the *Basic SAML Configuration* section.
2. Click on the **Edit button** to edit the SAML Configuration.
3. Next, find the field labelled "**Identifier (EntityID)**" and enter the appropriate value based on your deployment region:
**For EU Region (Default):**
```
urn:amazon:cognito:sp:eu-central-1_xut85XJiL
```
**For US Region:**
```
urn:amazon:cognito:sp:us-east-2_XXXXXXXXX
```
Region-Specific Configuration
The Entity ID depends on your StackGuardian deployment region. Contact your StackGuardian representative for the correct Entity ID if you're deploying in the US region.
4. In the Configuration modal, look for the field labelled **"Reply URL"** known as *Assertion Consumer Service (ACS) URL* and enter the appropriate value based on your deployment region:
**For EU Region (Default):**
```
https://stackguardian-sso-prod.auth.eu-central-1.amazoncognito.com
```
**For US Region:**
```
https://stackguardian-sso-prod.auth.us-east-2.amazoncognito.com
```
5. **Save** the changes made.
### For the secondary region (backup):[](#for-the-secondary-region-backup "Direct link to For the secondary region (backup):")
1. Repeat the first two steps mentioned above.
2. Next, find the field labeled "**Identifier (EntityID)**" and enter the appropriate value for the secondary region based on your deployment:
**For EU Region (Default):**
```
urn:amazon:cognito:sp:eu-west-1_5Z9H1Co4q
```
**For US Region:**
```
urn:amazon:cognito:sp:us-west-2_XXXXXXXXX
```
Region-Specific Configuration
Contact your StackGuardian representative for the correct secondary region Entity ID if you're deploying in the US region.
3. In the Configuration modal, look for the field labeled "**Reply URL**," and enter the appropriate value for the secondary region:
**For EU Region (Default):**
```
https://stackguardian-prod-sso-alt.auth.eu-west-1.amazoncognito.com
```
**For US Region:**
```
https://stackguardian-prod-sso-alt.auth.us-west-2.amazoncognito.com
```
4. **Save** the changes made for the secondary region.
High Availability Configuration
By configuring the SAML settings with the provided information for 2 regions, we will setup redundancy with one primary region and one secondary region. This setup ensures that if the primary region experiences any *issues* or *downtime*, the secondary region will serve as a backup, **maintaining service continuity**.
For EU deployments: Primary is eu-central-1, Secondary is eu-west-1 For US deployments: Primary is us-east-2, Secondary is us-west-2
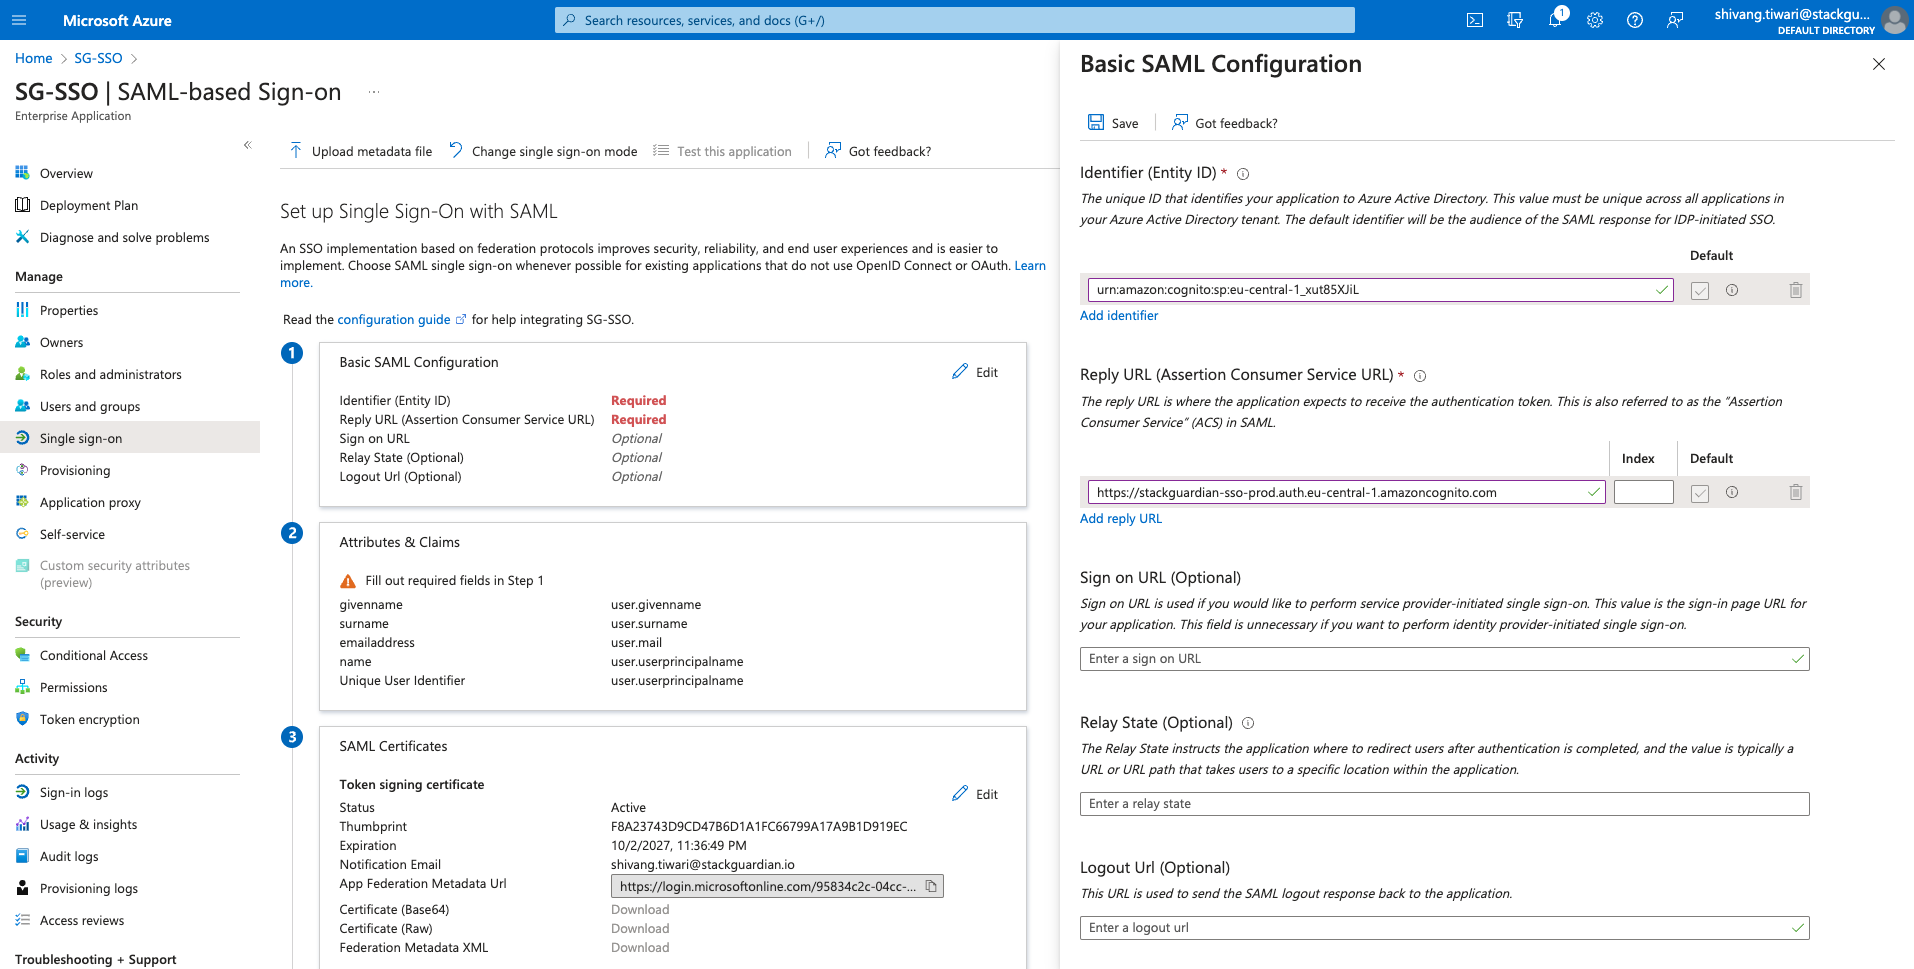
SAML **settings**
### Step 4: Configure Attributes & Claims[](#step-4-configure-attributes--claims "Direct link to Step 4: Configure Attributes & Claims")
1. Click on the **"Edit"** button for *User Attributes & Claims*.
2. Click on **"Add a Group Claim".**
3. On the popover, select **"All groups"** and **"Group ID"** under *source attribute* and *save* the **Group Claim**.
| Claim Attributes | Values |
| ---------------- | ---------------------- |
| groups | user.groups \[All] |
| emailAddress | user.mail |
| givenname | user.givenname |
| name | user.userprincipalname |
| surname | user.surname |
The other values are *pre-configured* by default. You can refer to the values above for each claim attribute.
Group Claim Limit
Configure a **GROUP ID** filter to limit sent groups to those that match your organization’s naming convention (i.e. 'stackguardian'), ensuring only relevant groups are sent. This helps when the group claim *exceeds* **2048** characters, avoiding issues by sending a smaller subset of groups.
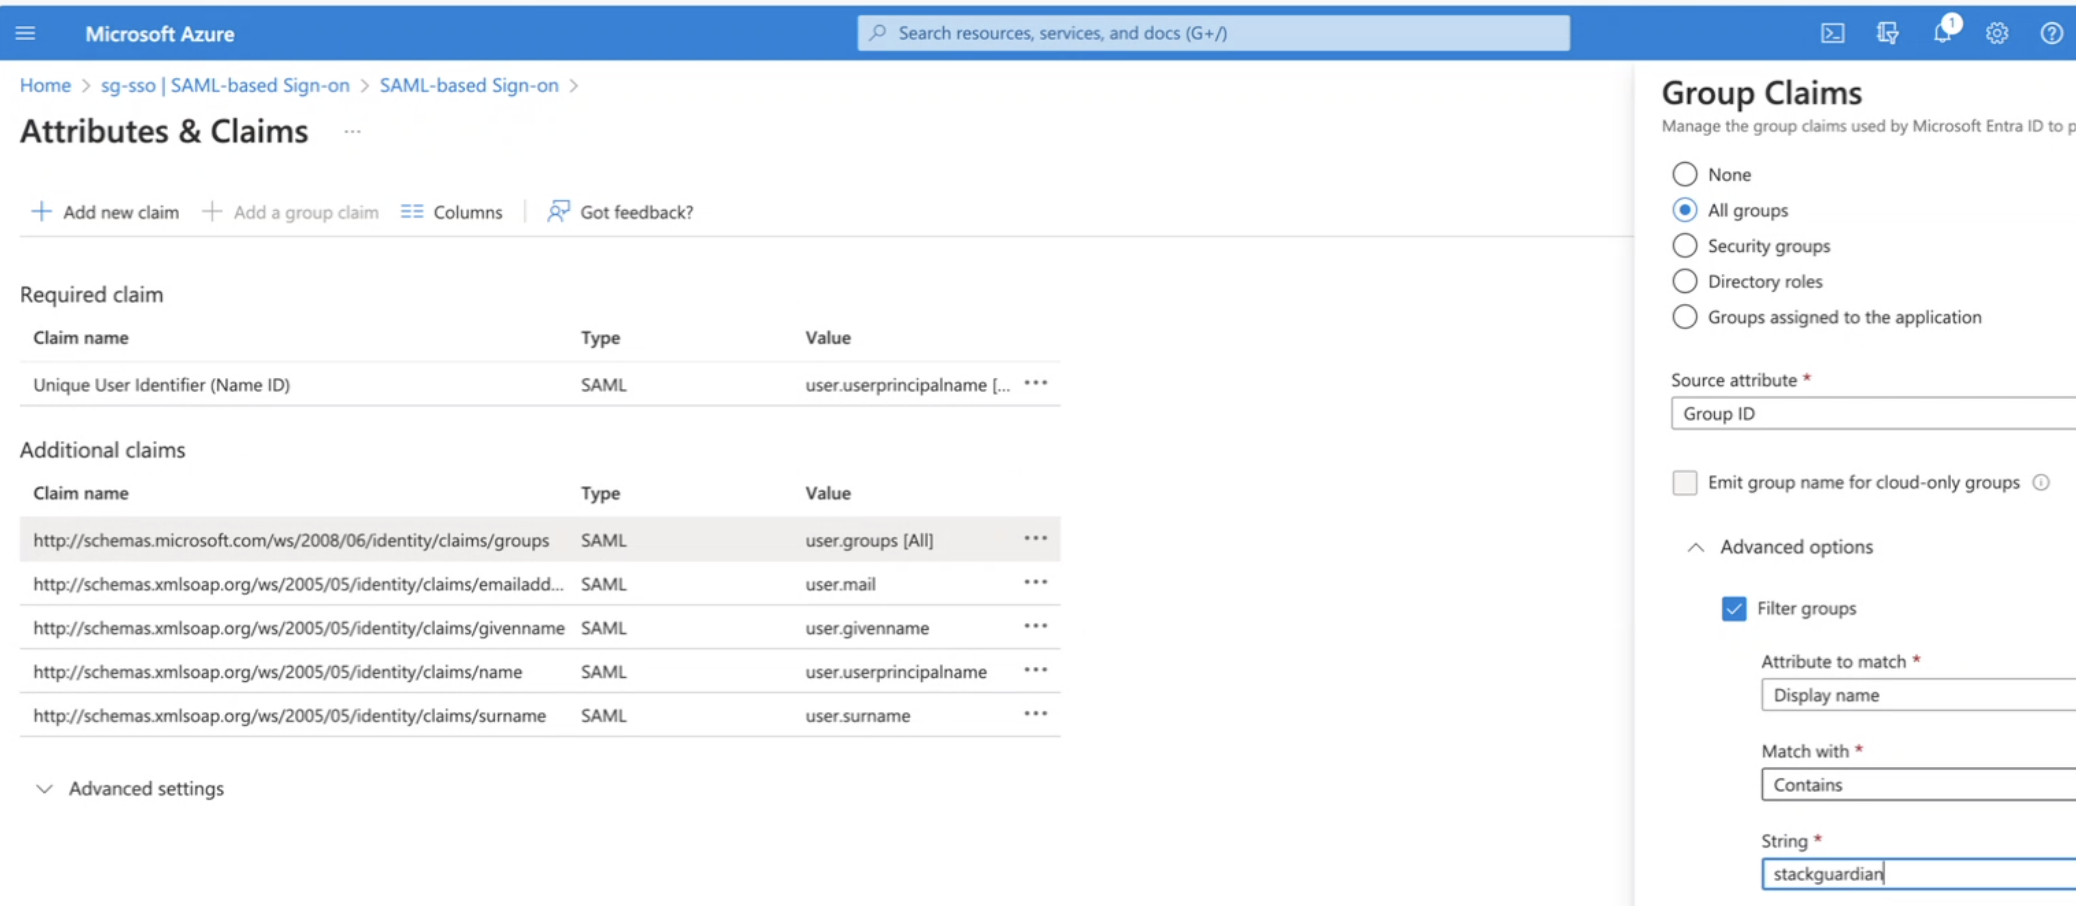
Attributes & Claims **Config**
### Step 5: Assign users to StackGuardian[](#step-5-assign-users-to-stackguardian "Direct link to Step 5: Assign users to StackGuardian")
1. Go to *Microsoft Entra ID* and select **"Enterprise Applications"**.
2. Select **"All applications"** and find your application in the list.
3. Under the Getting Started section of the app's overview page, click **"Assign users and groups"**.
4. Click **"Add user/group"**, select the users from the Users list in the dialog box, select a role if needed from the dropdown, and click **"Assign”**
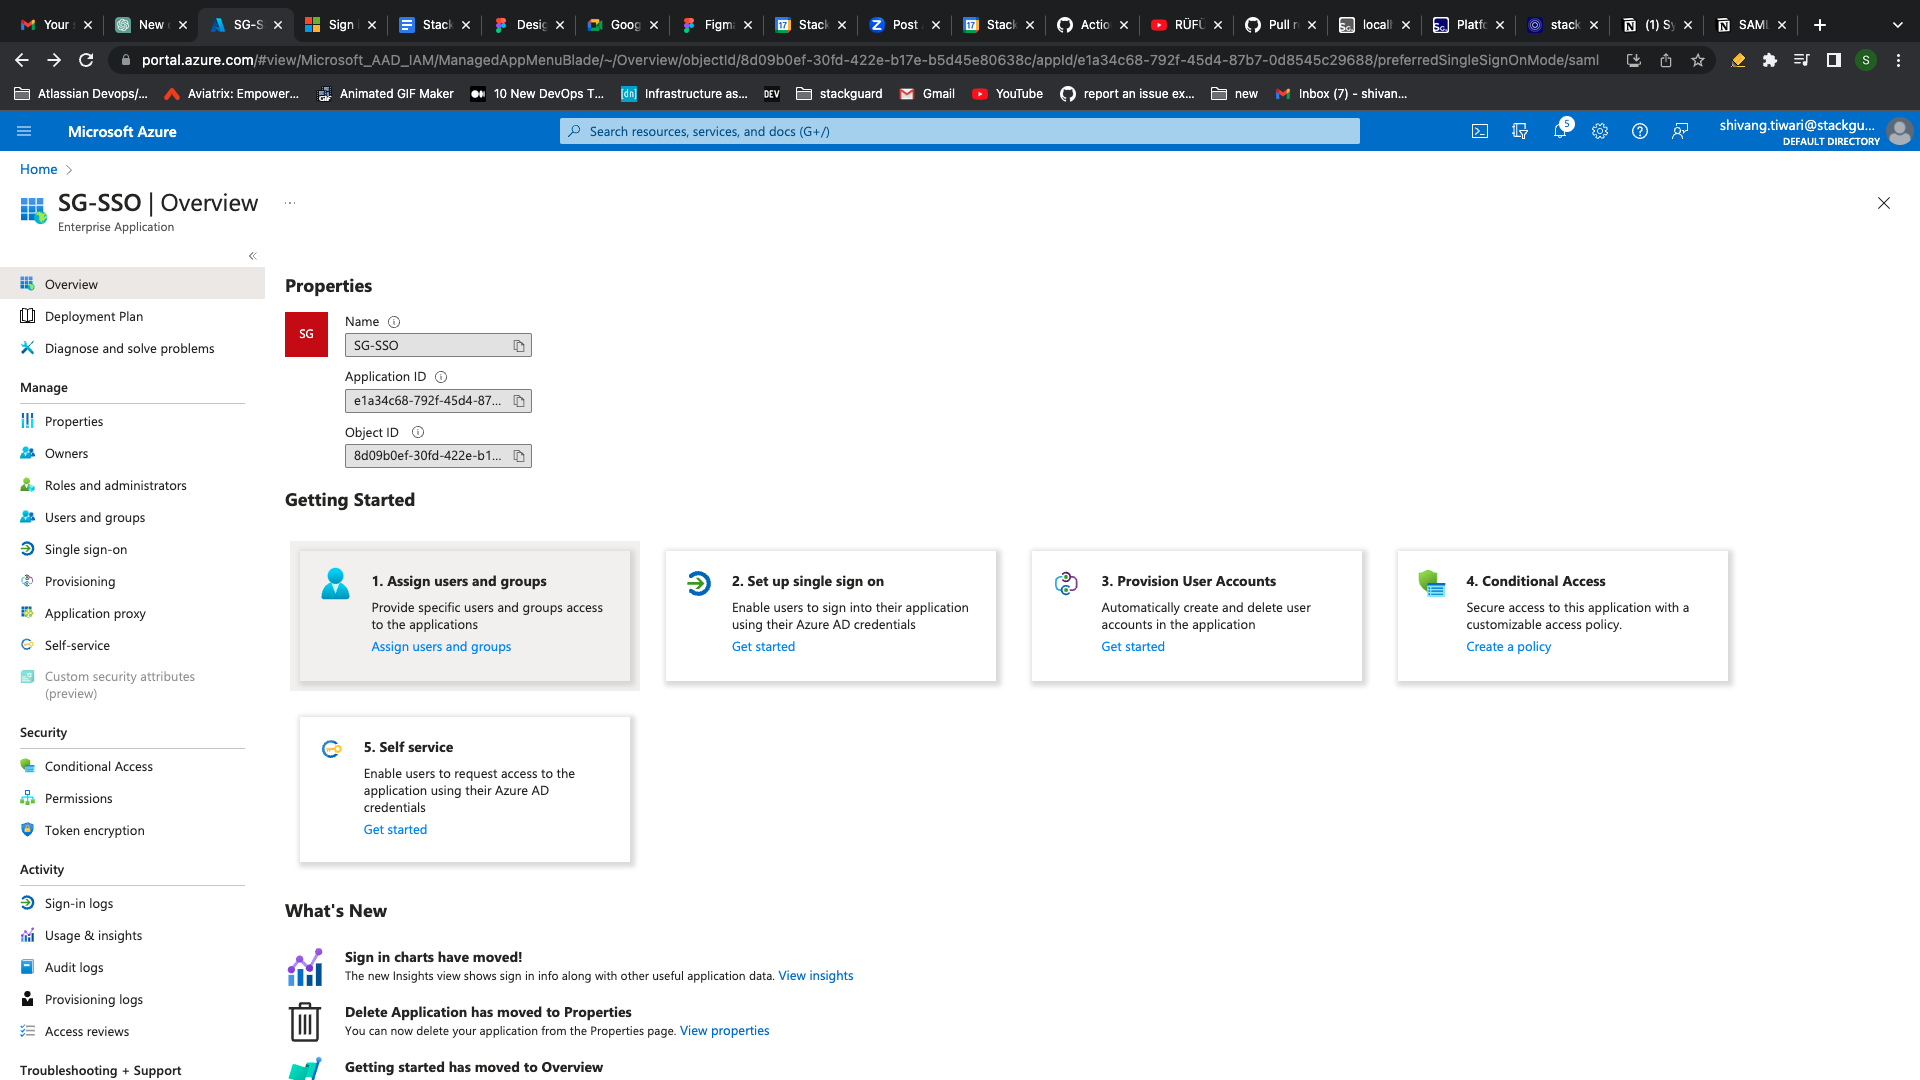
**Assign** users
### Step 6: Share App Federation Metadata Url with StackGuardian[](#step-6-share-app-federation-metadata-url-with-stackguardian "Direct link to Step 6: Share App Federation Metadata Url with StackGuardian")
1. Go to *Microsoft Entra ID* and select **"Enterprise Applications"**.
2. Select **"All applications"** and find your application in the list.
3. Under the Getting Started section of the app's overview page, click **"Set up single sign on"**.
4. Under **"SAML Certificates"**, copy and share **"App Federation Metadata Url** along with your **"StackGuardian org name"** and **"your AD users' domain name"** with StackGuardian representative.
Once everything is successfully setup on StackGuardian, you will be notified to test the connectivity.
## Inviting SSO Users or Groups[](#inviting-sso-users-or-groups "Direct link to Inviting SSO Users or Groups")
To invite SSO users or groups, use the following API endpoint. The process involves sending a payload with the user or group information. Below is the format of the payload:
**API endpoint:** `https://api.app.stackguardian.io/api/v1/orgs/{org}/invite_user/`
```
{
"userId": "/user.email@stackguardian.io",
"resendInvite": false,
"role": "ADMIN"
}
```
* Replace **\** with the appropriate SSO group name from the dropdown options visible to the user.
* Replace with the actual email address of the user.
You can refer to the API documentation [**here**](https://docs.stackguardian.io/api/#tag/Organizations/operation/orgs_invite_user_create) for more details on how to use the endpoint.
---
# Scaling Runners
Scaling your runner groups is essential to handle varying workloads efficiently. This document explains how to use the StackGuardian Scaling API to manage scaling operations, allowing you to add or remove runners based on current demands.
### Scaling with StackGuardian API[](#scaling-with-stackguardian-api "Direct link to Scaling with StackGuardian API")
Manage the scaling of runner groups using the StackGuardian Scaling API. This allows you to **scale out** (add more runners) or **scale in** (remove runners) based on the workload.
### Get Active Workflows[](#get-active-workflows "Direct link to Get Active Workflows")
To get details about the workflows using a runner group, use the following API with the parameter `getActiveWorkflows=true`:
* EU Region
* US Region
```
https://api.app.stackguardian.io/api/v1/orgs//runnergroups//?getActiveWorkflows=true
```
```
https://api.us.stackguardian.io/api/v1/orgs//runnergroups//?getActiveWorkflows=true
```
In the response, you will find the following keys describing the number of active workflows:
* **QueuedWorkflowsCount**: Number of workflows queued and ready to run.
* **PendingWorkflowsCount**: Number of workflows pending to be assigned to runners.
* **RunningWorkflowsCount**: Number of workflows currently running.
### Scaling Out[](#scaling-out "Direct link to Scaling Out")
To determine if you need to scale out, sum the `QueuedWorkflowsCount` and `PendingWorkflowsCount`. If this sum is high, consider adding more runners to handle the load.
#### Example of Scaling Out:[](#example-of-scaling-out "Direct link to Example of Scaling Out:")
```
{
"ContainerInstances": [
{
"containerInstanceArn": "exampleArn1",
"status": "ACTIVE",
"runningTasksCount": 1,
"pendingTasksCount": 2
},
{
"containerInstanceArn": "exampleArn2",
"status": "ACTIVE",
"runningTasksCount": 0,
"pendingTasksCount": 3
}
],
"QueuedWorkflowsCount": 0,
"PendingWorkflowsCount": 5,
"RunningWorkflowsCount": 1
}
```
### Scaling In[](#scaling-in "Direct link to Scaling In")
To determine the number of workflows already in the running state, use **RunningWorkflowsCount**. To identify which runner in a runner group is running the workflows, use the **ContainerInstances** key in the response. This will be a list of objects containing details about the runners connected to the runner group.
Use the following keys within `ContainerInstances` to decide whether a runner should be shut down:
* **status**: Indicates if the runner is `ACTIVE` or `DRAINING`.
* **runningTasksCount**: Number of workflows currently running on the runner.
* **pendingTasksCount**: Number of workflows pending on the runner.
If the `RunningWorkflowsCount` is low and certain runners have low `runningTasksCount` and `pendingTasksCount`, you can consider shutting down those runners.
#### Example of Scaling In[](#example-of-scaling-in "Direct link to Example of Scaling In")
```
{
"ContainerInstances": [
{
"containerInstanceArn": "exampleArn",
"status": "ACTIVE",
"runningTasksCount": 0,
"pendingTasksCount": 0
}
]
}
```
---
# **Storage Backend Configuration**
The **Storage Backend Configuration** section lets you define where your runner group stores workflow data — including state files, artifacts, and logs.
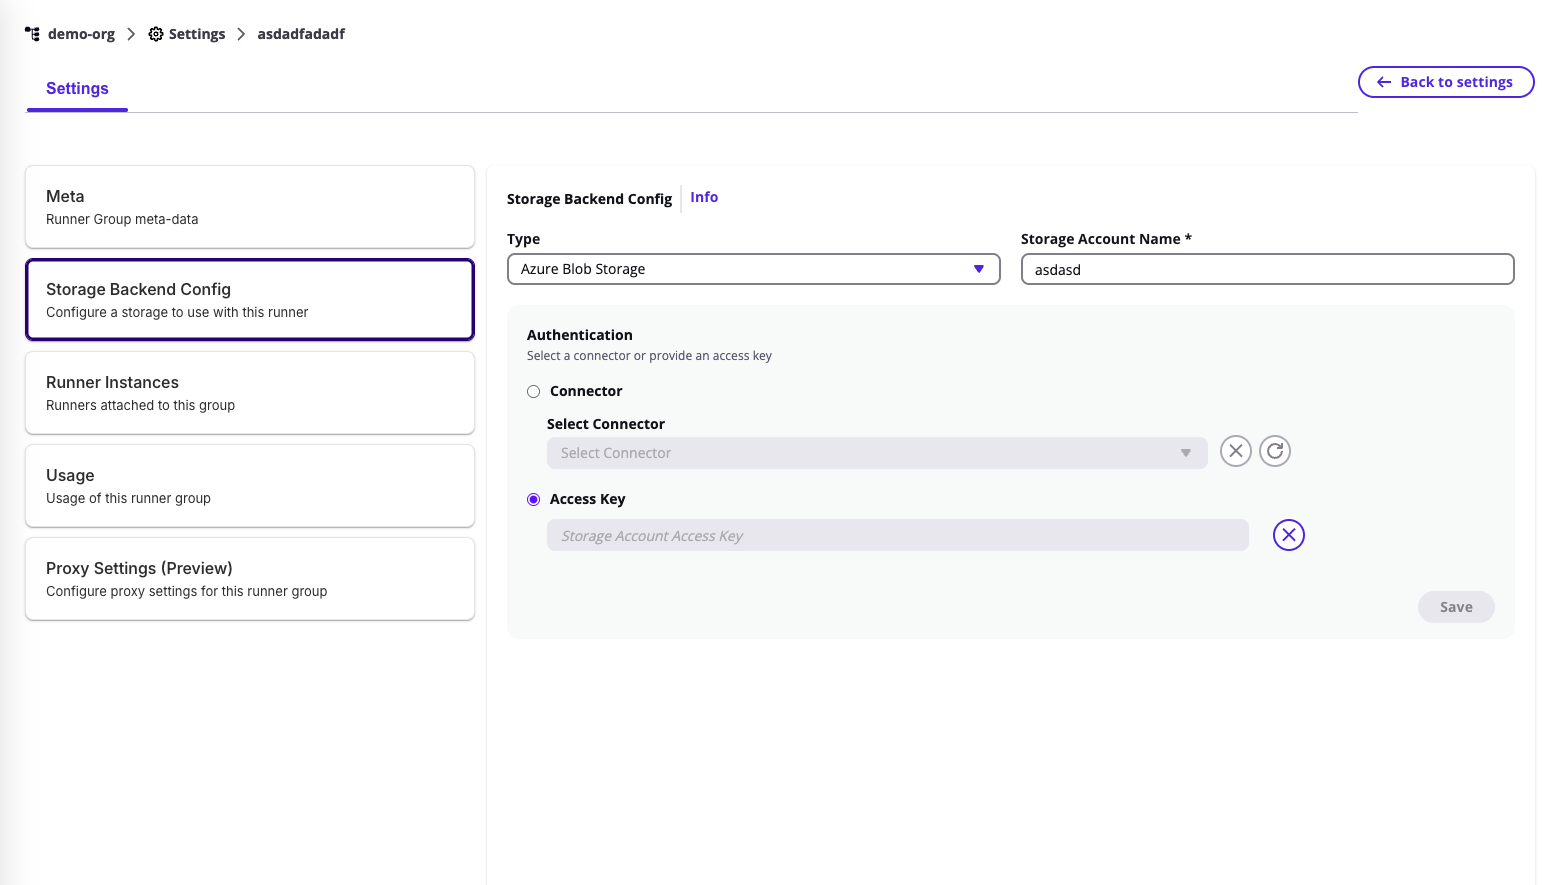
You can configure or update this under **Runner Group → Storage Backend Config**.
***
### **Supported Storage Types**[](#supported-storage-types "Direct link to supported-storage-types")
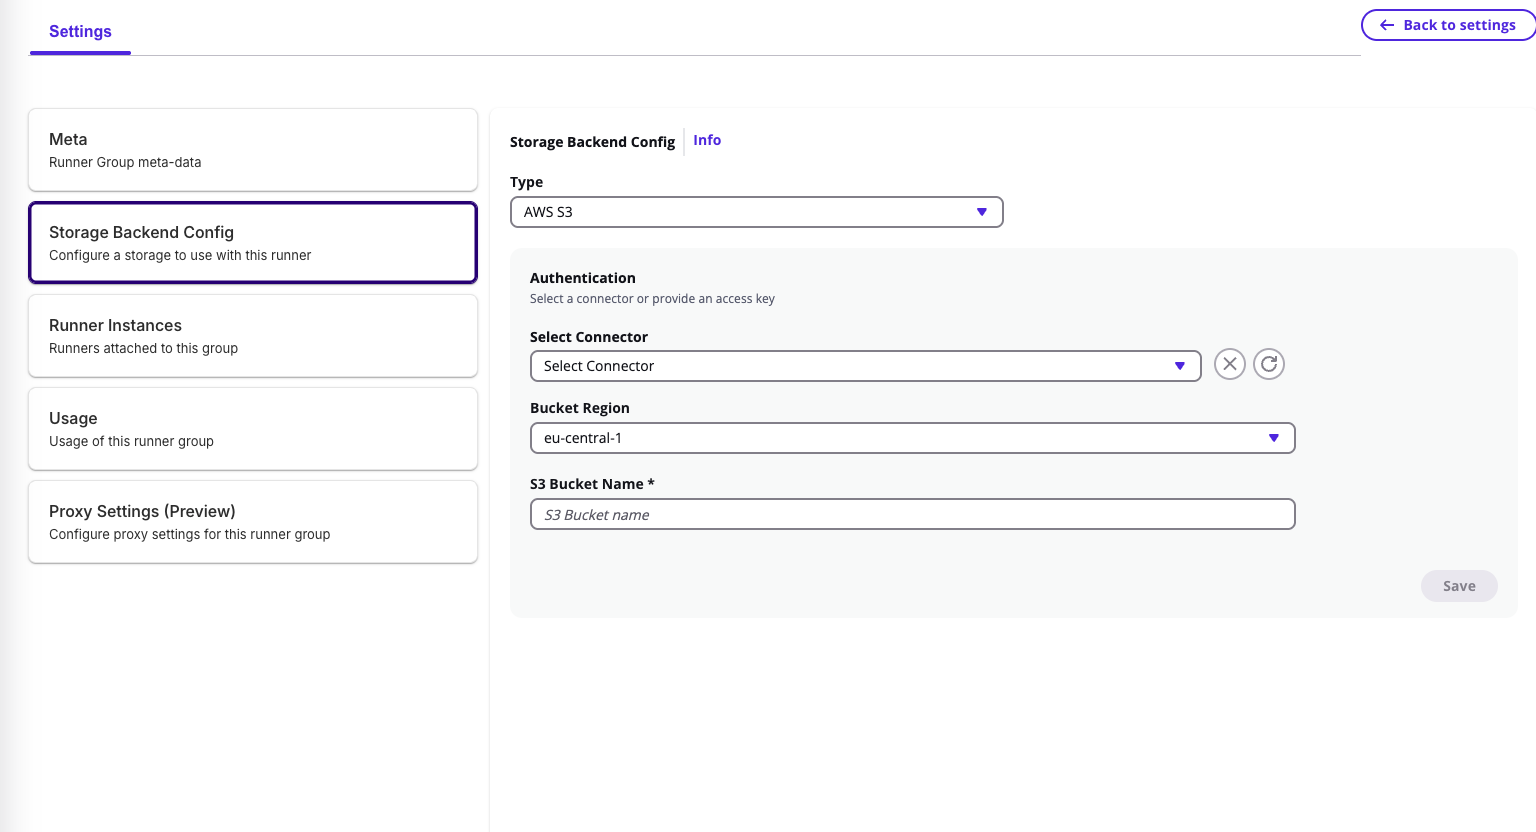
### **1. AWS S3**[](#1-aws-s3 "Direct link to 1-aws-s3")
When selecting **AWS S3** as the backend type:
* **Select Connector** – Choose an existing AWS connector from your integrations for authentication.
* **Select Child Connector** – Choose a specific sub-account or integration under the parent connector.
* **Bucket Region** – Specify the AWS region (e.g., `eu-central-1` for EU, `us-east-2` for US).
* **S3 Bucket Name** – Enter the name of your S3 bucket where workflow data will be stored.
Once configured, click **Save** to apply.
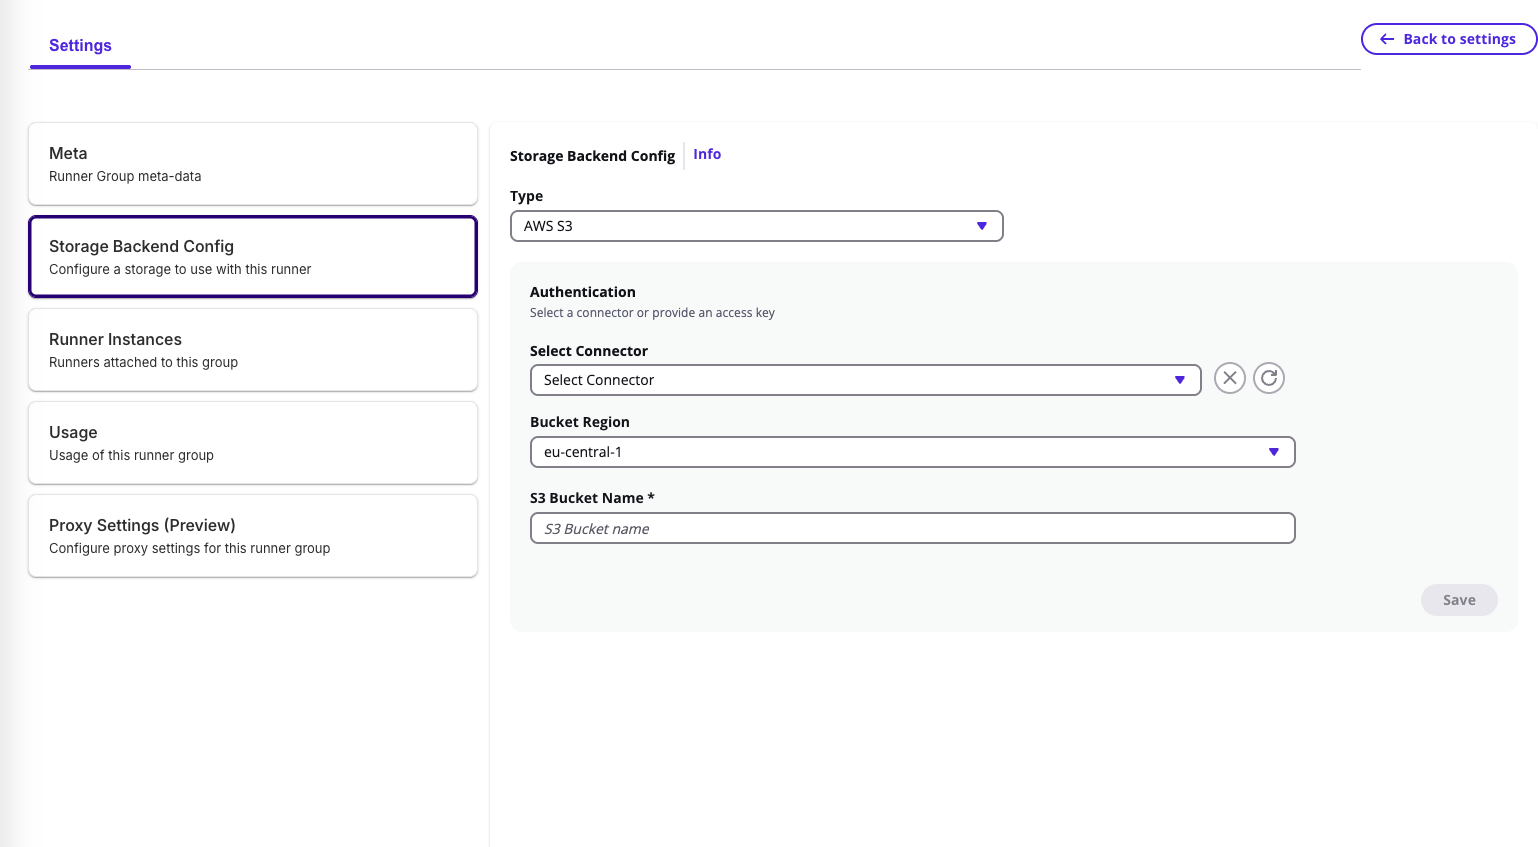
> 🔄 If you switch or edit the authentication connector, a confirmation prompt appears — note that artifacts and workflow data might become temporarily unreachable if the new backend uses a different configuration.
***
### **2. Azure Blob Storage**[](#2-azure-blob-storage "Direct link to 2-azure-blob-storage")
When selecting **Azure Blob Storage** as the backend type:
* **Storage Account Name** – Enter the Azure storage account name.
* **Authentication Method:**
* **Connector** – Use an existing Azure connector from your integration groups.
* **Access Key** – Manually enter the Azure storage access key and click **Add Key**.
After completing authentication, click **Save** to store the configuration.
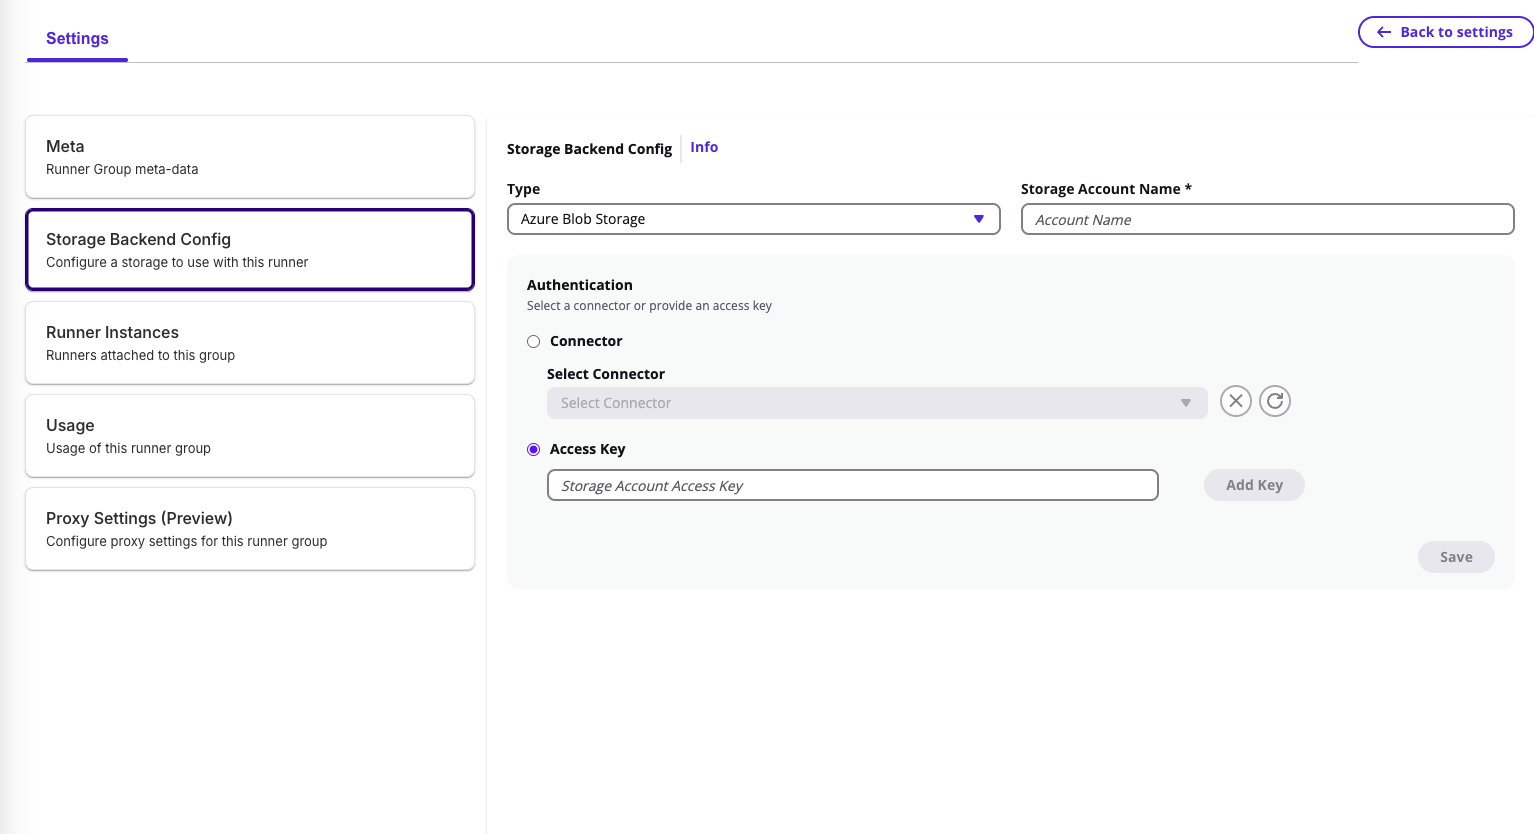
> ⚠️ Changing authentication details or backend type will trigger a confirmation dialog to ensure data accessibility is preserved.
***
💡 *The storage backend defines where all workflow execution data is stored and retrieved — make sure to use a valid, connected integration to prevent interruptions in state or artifact access.*
---
# Core concepts
## Overview[](#overview "Direct link to Overview")
**StackGuardian** organizes your infrastructure around a set of resources that cover the full lifecycle from template to deployment. This page explains each resource and how they relate to each other.
## Workflow Groups, Workflows, and Stacks[](#workflow-groups-workflows-and-stacks "Direct link to Workflow Groups, Workflows, and Stacks")
### Workflow Group[](#workflow-group "Direct link to Workflow Group")
A Workflow Group is a folder-like container for organizing your Stacks and Workflows. Use Workflow Groups to reflect your team structure, environment boundaries, or project hierarchy.
### Workflow[](#workflow "Direct link to Workflow")
A Workflow is a running instance of a Workflow Template. It executes your IaC code against a target environment. You can deploy Workflows standalone or as part of a Stack. In both cases, you pass parameters at deployment time to configure the Workflow for its specific context.
### Stack[](#stack "Direct link to Stack")
A Stack is an instance of a Stack Template. It groups multiple Workflows that belong to the same infrastructure unit and runs them together.
## Workflow Templates and Stack Templates[](#workflow-templates-and-stack-templates "Direct link to Workflow Templates and Stack Templates")
### Workflow Template[](#workflow-template "Direct link to Workflow Template")
A Workflow Template is a reusable definition for a single Workflow. It captures your IaC configuration, parameters, and execution settings so you can deploy consistently across environments without repeating setup.
### Stack Template[](#stack-template "Direct link to Stack Template")
A Stack Template is a collection of Workflow Templates grouped to represent a complete infrastructure unit — for example, a network layer paired with an application layer.
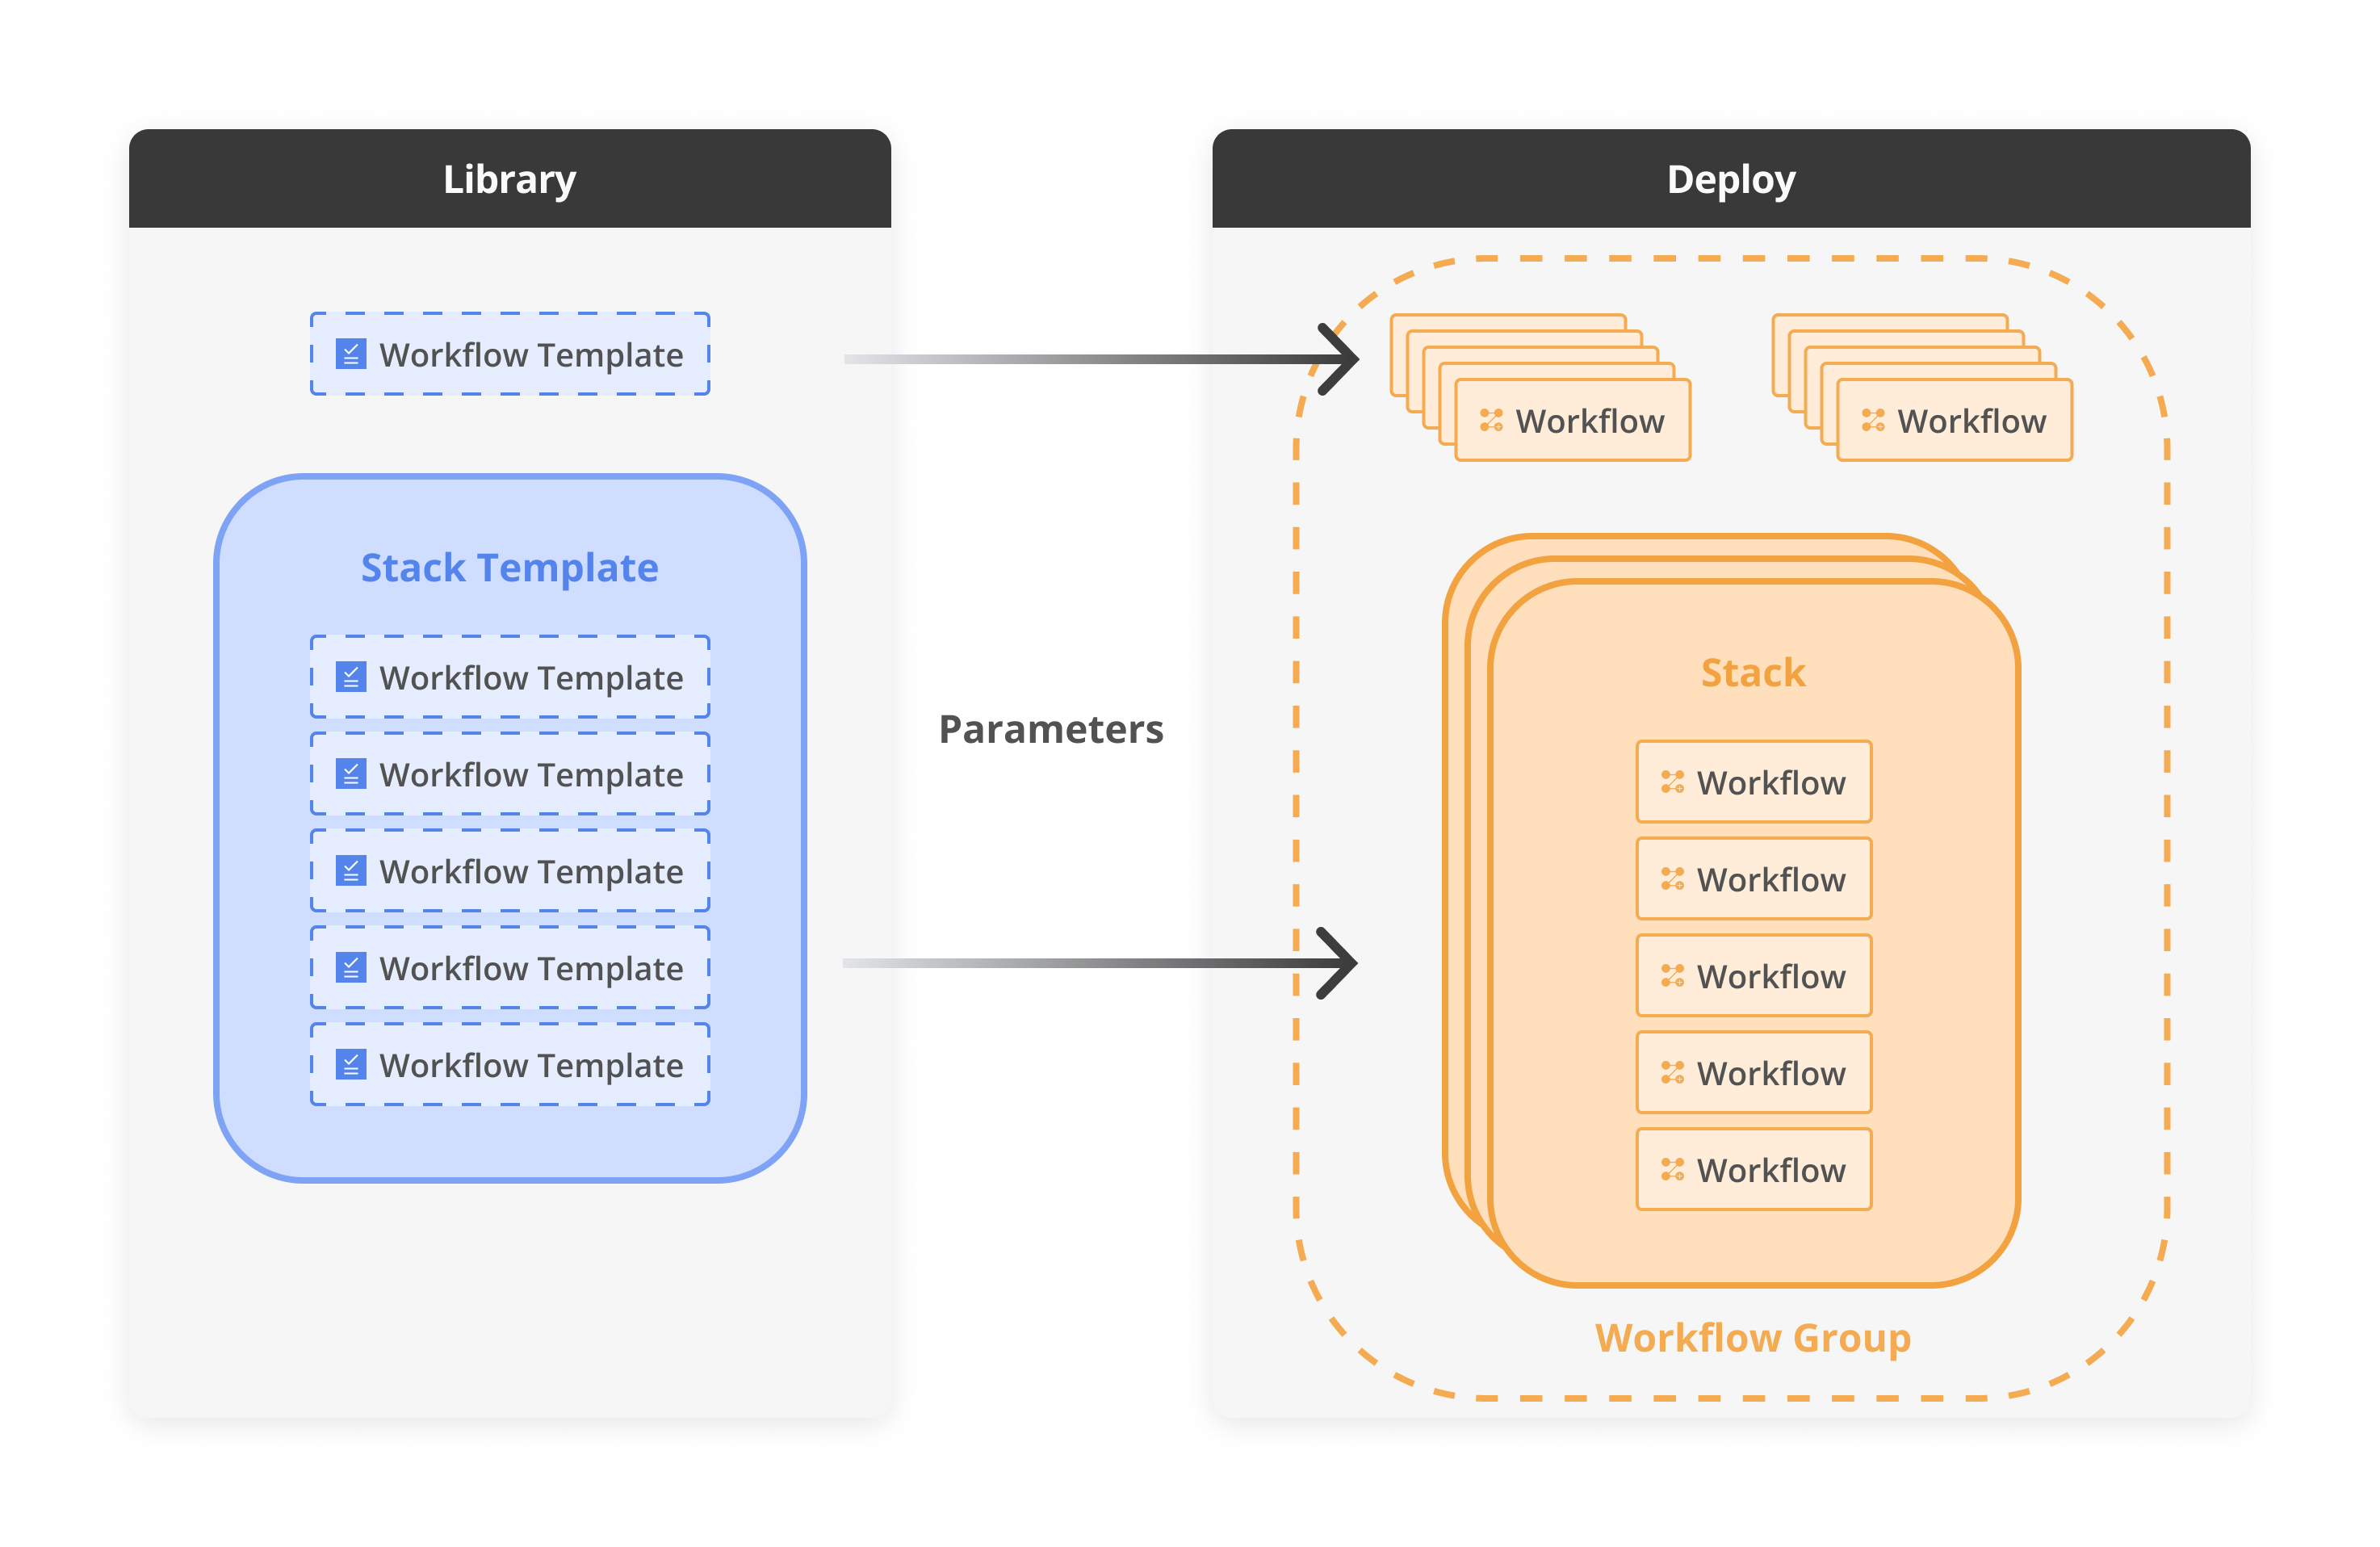
*IaC integration diagram*
Deploying an individual *Workflow Template* triggers a workflow within the development environment, effectively managing specific tasks or resources. In contrast, deploying a *Stack Template*, *which includes multiple templates*, structures the deployment as a Stack. This arrangement creates a network of **interconnected** workflows, where the output of one workflow becomes the input for one of the following workflows.
---
# Overview
[**StackGuardian Platform**](https://app.stackguardian.io) consists of [SGCode](/docs/sg-code/overview/) and [SGOrchestrator](/docs/sg-orchestrator/overview/) which carefully bundles interfaces for various user-groups to efficiently collaborate over Compliant Cloud codification, orchestration, and operations.
The [SGCode](/docs/sg-code/overview/) connects to your cloud accounts, discovers every resource running there, and uses AI to generate Terraform or OpenTofu code that represents those resources — helping engineering teams increase IaC coverage without writing code from scratch.
The [SGOrchestrator](/docs/sg-orchestrator/overview/) provides a No-code interface that allows infrastructure self-service and enables proactive governance and security.
## Why StackGuardian?[](#why-stackguardian "Direct link to Why StackGuardian?")
Empowering collaborative security and efficiency in the Cloud StackGuardian bridges the gap between infrastructure providers, governors, and consumers, streamlining infrastructure provisioning and security compliance. Here’s why teams rely on StackGuardian:

#### Unified Cloud Security & Compliance
Gain a security-first, no-code environment to enforce compliance effortlessly, reducing manual work and minimizing security risks across multi-cloud environments.

#### Empowerment through Collaboration
Enable Infrastructure Admins, Security Teams, and GRC Teams to work together seamlessly, with tools tailored to each team’s skill level, ensuring smoother workflows.
#### Smart Infrastructure Optimization
Avoid over- and under-provisioning with built-in optimization tools, ensuring resource efficiency and cost-effectiveness for any scale.

#### Future-Proof Multi-Cloud Strategy
Implement a sustainable, multi-cloud infrastructure strategy that aligns with industry-standard reference architectures and simplifies your exit strategy options.
---
# Search
## Overview[](#overview "Direct link to Overview")
Our **Search** provides a centralized way to find resources across your StackGuardian organization. Instead of navigating through different sections, you can search for the following resources from anywhere in the platform:
* Workflows
* Stacks
* Workflow Groups
* Cloud Providers
* Templates
* Version Control Providers
* Vaults Secrets
* Policies
* Roles
* Runs
Additionally, you can locate specific Workflow Runs by applying [filters](#filters) to your search results.
To access the **Search**, select the search icon in the top navigation bar, or use the keyboard shortcut `⌘K` (Mac) or `Ctrl+K` (Windows/Linux).
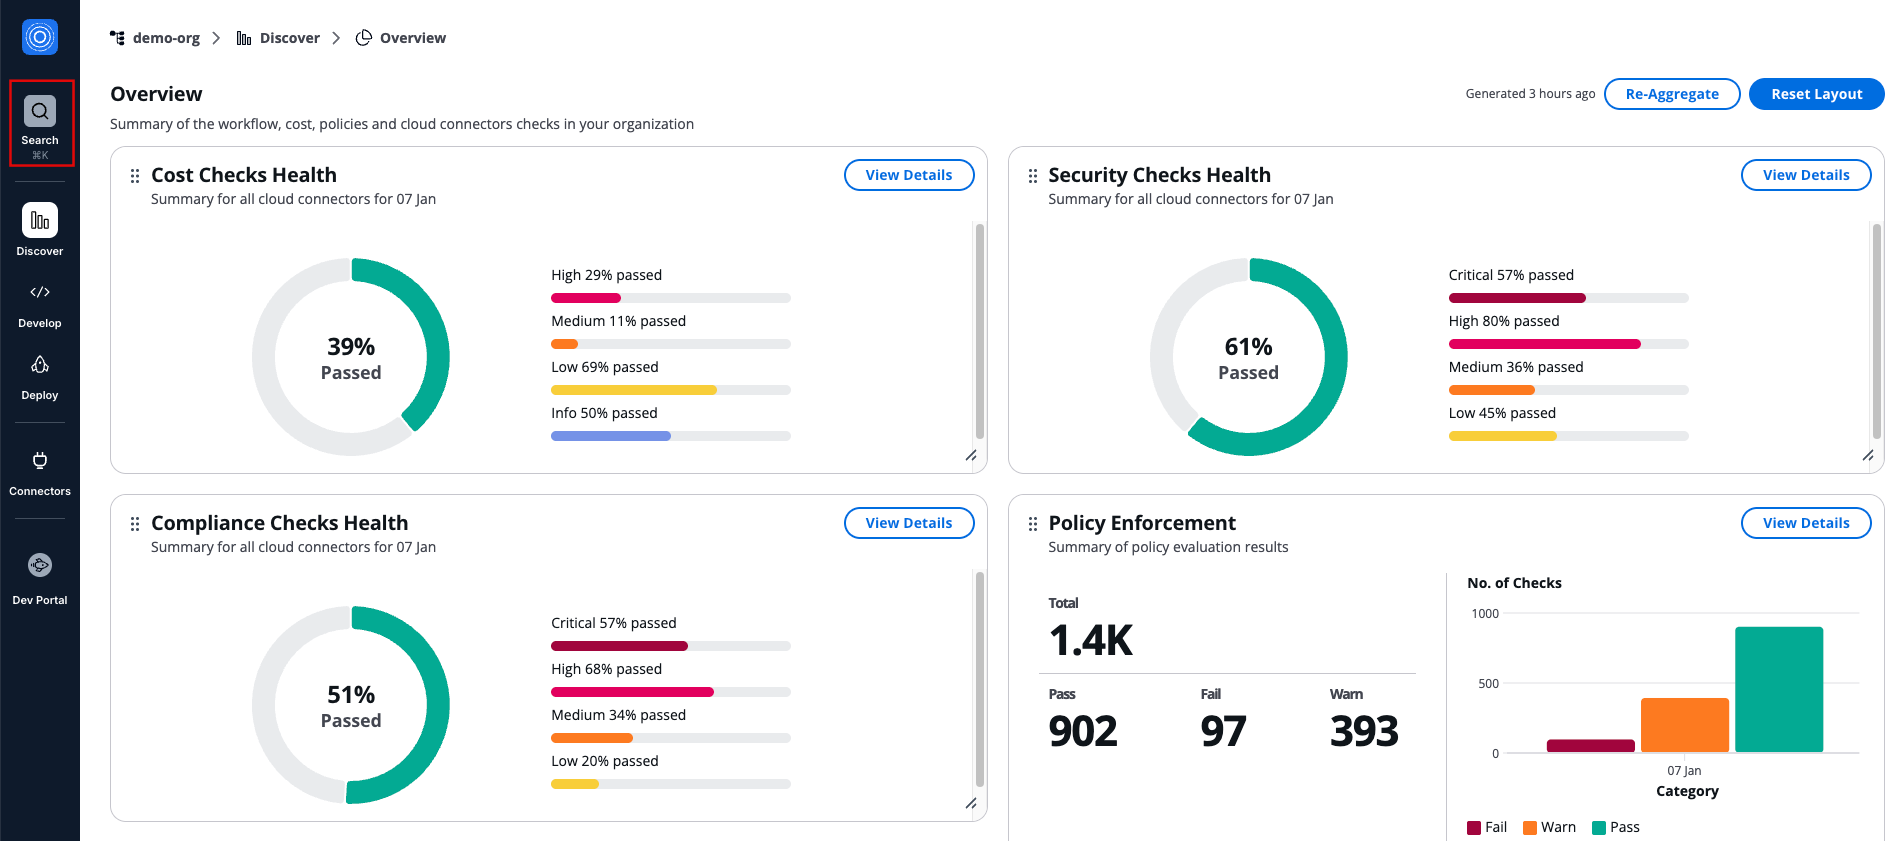
*How to open the Search*
## Search for resources[](#search-for-resources "Direct link to Search for resources")
The search field accepts keywords related to your resources. Search is case insensitive, so you can enter terms in any letter casing.
You can search by the resource name or ID of the following resources: Workflows, Stacks, Workflow Groups, Cloud Providers, Version Control Providers, Vaults Secrets, and Policies.
Enter your search term in the search field. Results appear automatically as you type.
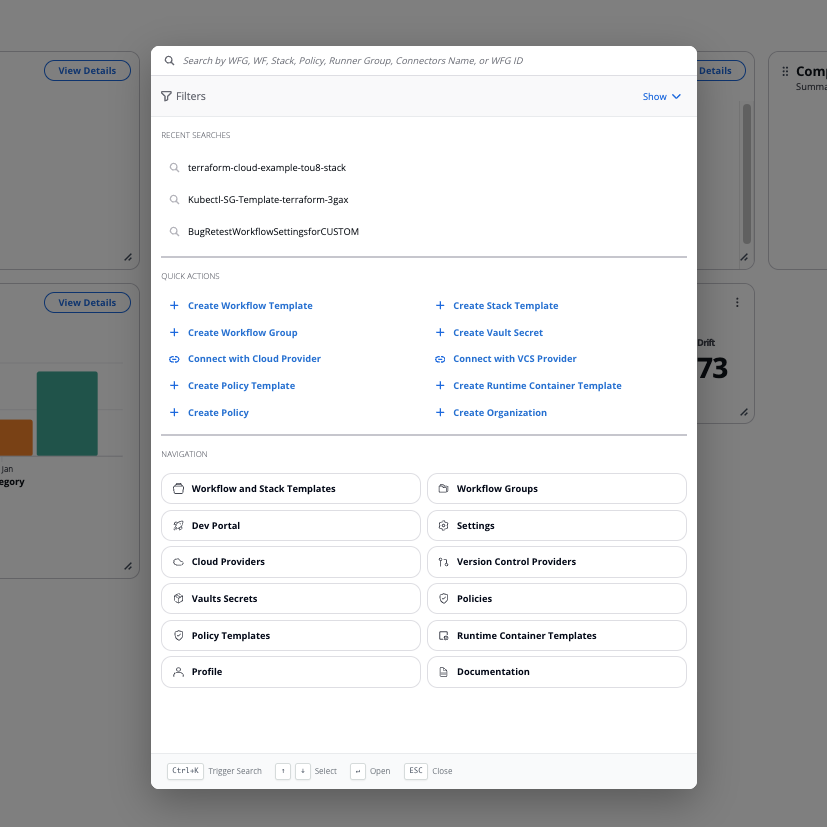
*The Search screen*
tip
Your three most recent searches appear below the search field. Select any recent search to run it again without retyping.
The search looks across your current organization and returns matching resources grouped into categories. Each category shows results ordered by creation date, with the most recently created resources appearing first.
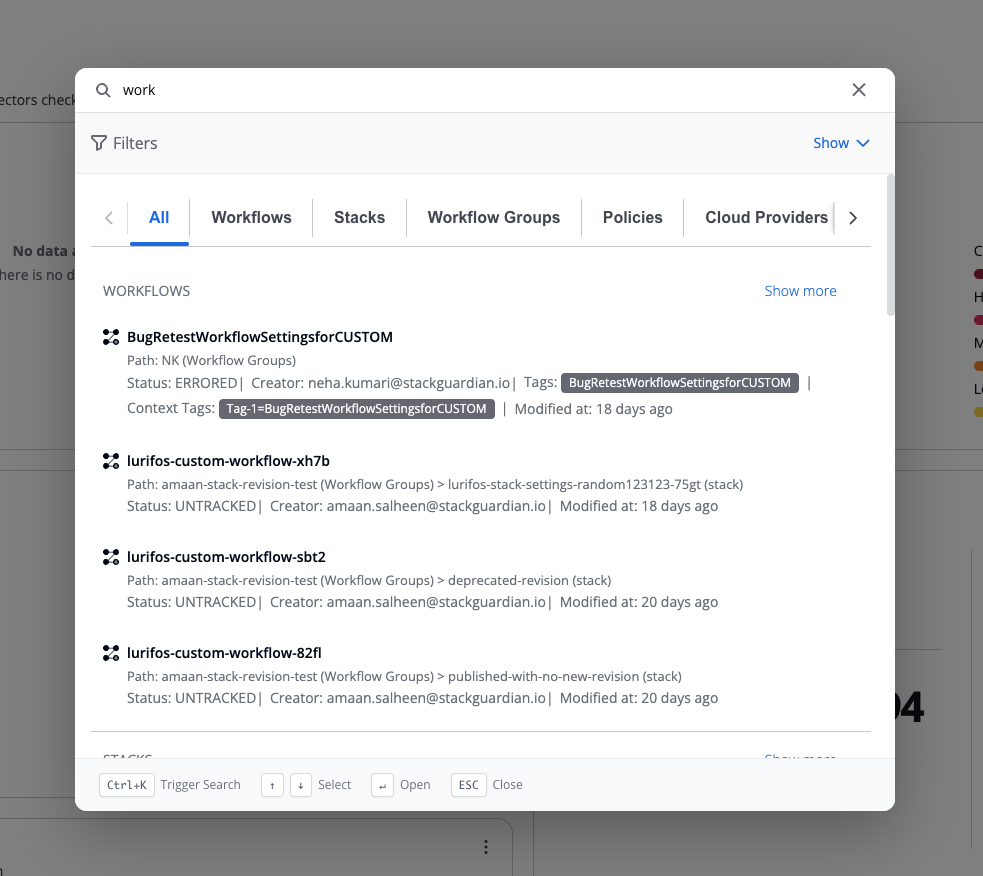
*Search returning some results*
### Quick Actions[](#quick-actions "Direct link to Quick Actions")
The Quick Actions section provides shortcuts to common tasks:
* **Create Workflow Template**
* **Create Stack Template**
* **Create Workflow Group**
* **Connect with Cloud Provider**
* **Connect with VCS Provider**
* **Create Vault Secret**
* **Create Organization**
* **Create Runtime Container Template**
Select any action to navigate directly to that creation flow.
### Navigation[](#navigation "Direct link to Navigation")
The Navigation section offers quick access to key areas of the platform:
* **Workflow and Stack Templates**
* **Workflow Groups**
* **Cloud Providers**
* **Vaults Secrets**
* **Policy Templates**
* **Dev Portal**
* **Profile**
* **Settings**
* **Version Control Providers**
* **Runtime Container Templates**
* **Policies**
* **Documentation** (opens in new tab)
Select any item to navigate directly to that section.
## View and navigate results[](#view-and-navigate-results "Direct link to View and navigate results")
Search results appear in the **All** tab by default, grouped by entity type and sorted by creation date (newest first).
Category tabs appear dynamically based on your search results:
* Only entity types with matching results display as tabs
* When results exist for multiple entity types, you'll see **All** plus tabs for each entity type with results
* When results exist for only one entity type, you'll see both the **All** tab and that specific entity type's tab
Each search result displays metadata specific to its entity type:
Workflow Groups
* Icon
* Name/title
* ID
* Creator
* Tags
* Modified date
Workflows and Stacks
* Icon
* Name/title
* Path - Shows the nesting context with entity type labels (example: "WFG: testing > WFG: lorem ipsum > Stack: test2")
* Status
* Creator
* Tags
* Context Tags
* Modified date
Workflow/Stack Runs
* Icon
* Run ID
* Path
* Workflow name
* Status
* Context Tags
* Modified date
Policies
* Icon
* Name
* Creator
* Tags
* Modified date
Cloud Providers
* Icon
* Name
* Type and subtype
* Tags
Version Control Providers
* Icon
* Name
* Type
* Tags
Vault Secrets
* Icon
* Name
* Creator
* Modified date
Runner Groups
* Name
* Creator
* Tags
* Creation date
By default, each category displays up to 4 results. If more results are available for a category, you'll see a **Show more** link in the top right corner of that category. Select **Show more** to navigate to that entity type's dedicated tab, which displays all matching results for that type.
To open a resource, select any result from the list. This takes you directly to that resource's detail page.
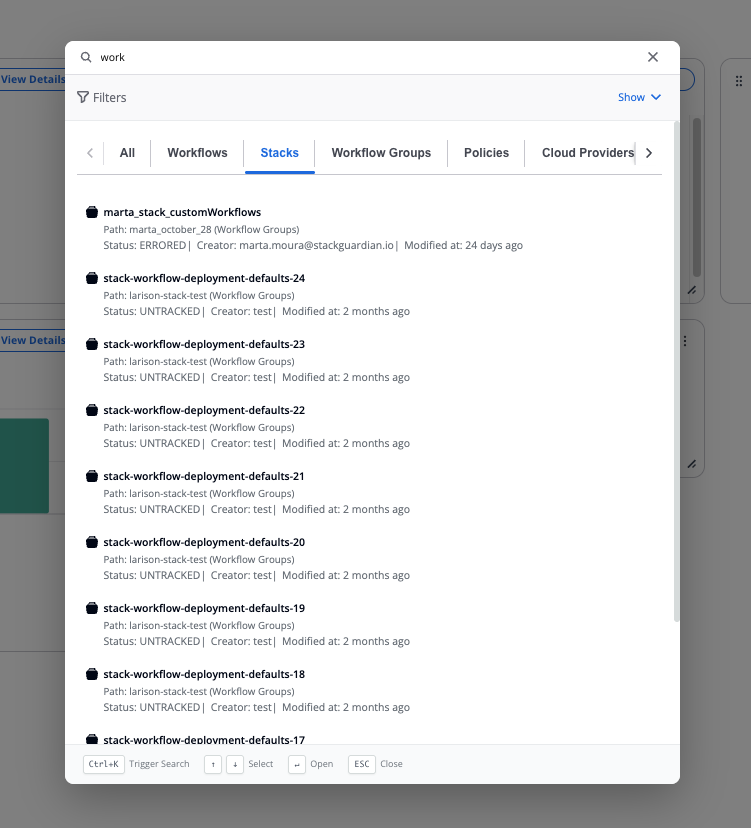
*Search within a specific group*
## Filter results[](#filters "Direct link to Filter results")
The **Search** offers a way to narrow your results by specific attributes. Select **Filters** to expand the filter panel. When you apply multiple filters, results must match all active filters.
When filters are active, a blue badge with a counter appears on the Filters button, showing how many filters are currently applied.
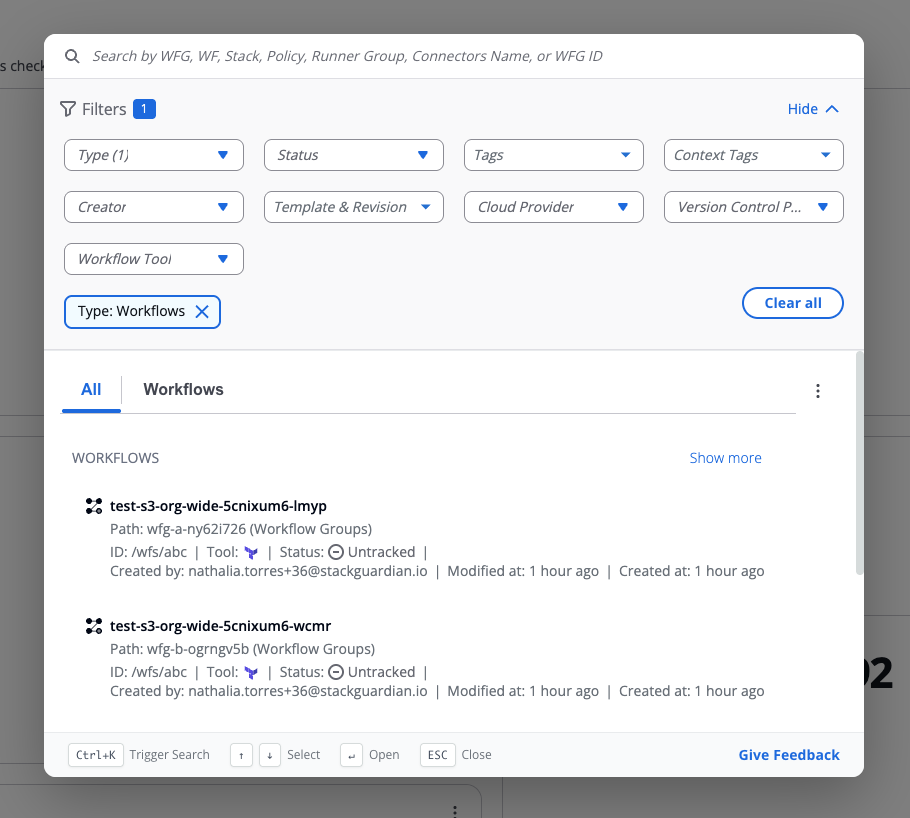
*Filters*
### Available filters[](#available-filters "Direct link to Available filters")
Type
* Select from all available entity type options
* Results include all entity types matching your selection
Status
* Select from available status options using the nested dropdown
* Results include Workflows, Stacks, Workflow Runs, and Runner Groups matching your selection
Workflow Tool
* Select the execution engine for workflows
* Options: Terraform, OpenTofu, and Custom Workflow types
* Results include Workflows matching your selection
Template & Revision
* Select a specific template and its revision number
* Results include resources using the selected template and revision
Cloud Provider
* Select from your connected cloud providers
* Results include resources associated with the selected cloud provider connection
Version Control Provider
* Select from your connected version control providers
* Results include resources associated with the selected version control provider connection
Tags
* Enter tag names in the text field
* Tags search is case sensitive and uses exact matching only
* Results include Workflow Groups, Workflows, Stacks, Workflow Runs, Policies, Cloud Providers, Version Control Providers, and Runner Groups matching the entered tags
Context Tags
* Enter context tag names in the text field
* Search is case sensitive with exact matching for Key and partial or exact matching for Value
* Results include Workflows, Stacks, and Workflow Runs matching the entered context tags
### Manage active filters[](#manage-active-filters "Direct link to Manage active filters")
Active filters appear as chips below the search field, making it easy to see which filters are currently applied. You can combine multiple filters together and use filters alongside search terms to narrow your results.
To remove filters:
* Select the **X** on any filter chip to remove that specific filter
* Select **Clear all** to remove all active filters at once
When you apply a filter, the system retrieves all matching results from the applicable entity types and updates the display instantly.
## Sort results[](#sort-results "Direct link to Sort results")
By default, search results appear sorted by last modified date with the newest items first. You can change the sort order to find resources more quickly. To change sorting, select the sort dropdown in the search results area. Available sort options:
* **Last modified: newest first (default)** — Most recently updated resources appear first
* **Last modified: oldest first** — Least recently updated resources appear first
* **Created: newest first** — Most recently created resources appear first
* **Created: oldest first** — Oldest resources appear first
* **Name (A-Z)** — Resources sorted alphabetically by name
* **Name (Z-A)** — Resources sorted in reverse alphabetical order by name
The selected sort order applies to all result categories in the current search.
---
# Evaluators
StackGuardian Policy Framework provides a library of pre-built evaluators that can be referenced in the policy to evaluates an input against a allowed/disallowed policy data.
## Syntax[](#syntax "Direct link to Syntax")
Policy for each `attribute` of a `resource_type` can have following entries in the evaluators block: `all_of`, `any_of` and `none_of`.
* `all_of`: All of the evaluations defined inside this block should pass for the attribute's policy to evaluate to *pass*
* `any_of`: Any of the evaluations defined inside this block should pass for the attribute's policy to evaluate to *pass*
* `none_of`: None of the evaluations defined inside this block should pass for the attribute's policy to evaluate to *pass*
```
{
"terraform_plan": {
"schema_version": "V1.BETA",
"policies": [
{
"resource_type": "aws_s3_bucket",
"attributes": [
{
"name": "acl",
"evaluators": {
"all_of": [
{
"evaluator_ref": "str_equals_str",
"evaluator_data": "public-read"
}
]
}
},
{
"name": "force_destroy",
"evaluators": {
"all_of": [
{
"evaluator_ref": "bool_equals_bool",
"evaluator_data": false
}
]
}
}
]
}
]
}
}
```
## Evaluator Refs[](#evaluator-refs "Direct link to Evaluator Refs")
Following evaluator refs are currently available:
### str\_equals\_str[](#str_equals_str "Direct link to str_equals_str")
**evaluator\_data type**: string
Evaluates that input data string is equal to policy data string
### str\_contains\_str[](#str_contains_str "Direct link to str_contains_str")
**evaluator\_data type**: string
Evaluates that input data string is contained in policy data string
### str\_in\_list[](#str_in_list "Direct link to str_in_list")
**evaluator\_data type**: list
Evaluates that input data string is contained in policy data list
### equals\_null[](#equals_null "Direct link to equals_null")
**evaluator\_data type**: NA
Evaluates that input data is null
### str\_matches\_regex[](#str_matches_regex "Direct link to str_matches_regex")
**evaluator\_data type**: string
Evaluates that input data string is equal to policy data regex
### bool\_equals\_bool[](#bool_equals_bool "Direct link to bool_equals_bool")
**evaluator\_data type**: boolean
Evaluates that input data boolean is equal to policy data boolean
### cidr\_contains\_cidr\_or\_ip[](#cidr_contains_cidr_or_ip "Direct link to cidr_contains_cidr_or_ip")
**evaluator\_data type**: string
Evaluates that input data string which should be a valid CIDR or IP is contained in policy data string which should be a valid cidr
---
# API Keys
StackGuardian APIs use predictable, resource-oriented URLs, accept JSON-encoded request bodies, and return JSON-encoded responses. The API uses standard HTTP response codes and verbs to indicate success or failure.
**Base URL:** Use this as the base for all API endpoints.
* EU Region
* US Region
```
https://api.app.stackguardian.io/api/v1
```
```
https://api.us.stackguardian.io/api/v1
```
tip
Use the base URL that corresponds to the region where your StackGuardian organization is hosted.
## Authentication[](#authentication "Direct link to Authentication")
Authenticate against the StackGuardian API using an API Key. Generate the API Key in your Organization's settings, then pass it in the `Authorization` HTTP header:
```
Authorization: apikey
```
Understanding API Key permissions
Your API key's permissions depend on your user type and authentication method. There are two types of tokens:
* **User-bound tokens (**`sgu_`**)** - Personal tokens that inherit your user permissions
* **Organization-level tokens (**`sgo_`**)** - Organization-wide tokens for CI/CD and shared automation
**Permission inheritance**
**Local users and individual SSO users**
* ✅ `sgu_` tokens inherit all assigned permissions
* Works as expected
**SSO group members only**
* ❌ `sgu_` tokens won't work
* Use `sgo_` tokens instead
**SSO users with both direct and group permissions**
* ⚠️ `sgu_` tokens inherit **only** direct user permissions
* Group permissions are **not** included
* This causes a mismatch: UI shows combined permissions, but your token only has user permissions
**When to use each type**
**Use** `sgu_` **tokens for:**
* Personal scripts and development
* Local users or SSO users with direct permissions
**Use** `sgo_` **tokens for:**
* CI/CD pipelines
* SSO group members
* Shared team automation
## Steps to Generate an API Key[](#steps-to-generate-an-api-key "Direct link to Steps to Generate an API Key")
Access, generate, and use StackGuardian API key for secure authenticated requests.
### 1. Open the API Key Tab[](#1-open-the-api-key-tab "Direct link to 1. Open the API Key Tab")
To access your API key:
* Click on profile, navigate **Profile Settings → API Key**

### 2. Generate and Copy the API Key[](#2-generate-and-copy-the-api-key "Direct link to 2. Generate and Copy the API Key")
Manage current API key or generate a new one.
#### Viewing an Existing Key[](#viewing-an-existing-key "Direct link to Viewing an Existing Key")
Click the **View** button to reveal currently active API key.
* The key will be masked by default. Once visible, you can use the **Copy** button to copy it securely.
note
Keep the key confidential and store it in a secure password manager.
#### Regenerating the API Key[](#regenerating-the-api-key "Direct link to Regenerating the API Key")
If you want to invalidate the current key and create a new one:
* Click the **Regenerate** button. This action deactivates the existing key and replaces it with a new one.

### 3. Making Requests[](#3-making-requests "Direct link to 3. Making Requests")
Once your key is copied, you can use it to authenticate HTTP requests to the StackGuardian API.
* EU Region
* US Region
```
curl -H "Authorization: apikey " https://api.app.stackguardian.io/api/v1/orgs//
```
```
curl -H "Authorization: apikey " https://api.us.stackguardian.io/api/v1/orgs//
```
info
You can run the command directly in a **Unix-based terminal** (Linux/macOS) or via **Git Bash** or **WSL** on Windows.
## Errors[](#errors "Direct link to Errors")
StackGuardian APIs follow standard HTTP response codes:
| **Status Code** | **Description** |
| ---------------------- | ----------------------------------------------------------- |
| **200 - OK** | Request was successful. |
| **204 - OK** | Request was successful, but no content to return. |
| **400 - Bad Request** | Request was invalid due to missing or incorrect parameters. |
| **401 - Unauthorized** | Invalid or expired API Key. |
| **403 - Forbidden** | Access to the requested resource is not permitted. |
| **404 - Not Found** | Resource does not exist. |
| **5xx - Server Error** | Server encountered an issue. Please report it to support. |
## Reporting Issues[](#reporting-issues "Direct link to Reporting Issues")
If you encounter any issues:
* Raise a support [**ticket**](https://support.stackguardian.io/ticket)
* Connect with us on [**Slack**](https://join.slack.com/t/stackguardian-ol78820/shared_invite/zt-2ksag36j9-OjmXqQmyXudgYrV6FmesIQ)
---
# Multi-Factor Authentication (MFA)
*Multi-Factor Authentication (MFA)* adds an extra layer of protection to your StackGuardian account. Once enabled, signing in requires both your password and a one-time code from an authenticator app.
info
This feature is only available for **Local** users, not for users who sign in with Google.
## Enabling MFA[](#enabling-mfa "Direct link to Enabling MFA")
To enable MFA, follow these steps:
### 1. Install an Authenticator App[](#1-install-an-authenticator-app "Direct link to 1. Install an Authenticator App")
Install a time-based one-time password (TOTP) compatible app on your mobile device or desktop:
* [**Google Authenticator**](https://play.google.com/store/apps/details?id=com.google.android.apps.authenticator2)
* [**Authy**](https://authy.com/)
* [**Duo Mobile**](https://duo.com/product/multi-factor-authentication-mfa)
### 2. Activate MFA in StackGuardian[](#2-activate-mfa-in-stackguardian "Direct link to 2. Activate MFA in StackGuardian")
1. Navigate to **Profile → Settings → Security**.
2. Toggle the **Activate Multi-Factor Authentication (MFA)** switch to begin the setup.
### 3. Register Your Device[](#3-register-your-device "Direct link to 3. Register Your Device")
You’ll now be prompted to register a device:
* **Enter a Device Name** (e.g., `StackGuardian`)
* Click **Show QR Code** to generate your MFA setup
* A QR code and secret key will be shown
You can now:
* **Scan the QR code** using your authenticator app, or
* **Manually enter the secret key** into the app (use "Show Secret Key" → Copy)
### 4. Verify Your Setup[](#4-verify-your-setup "Direct link to 4. Verify Your Setup")
1. Enter the verification code shown in your app into the input field labeled **Enter Code**.
2. Click **Verify** to complete the setup.
## Disabling MFA[](#disabling-mfa "Direct link to Disabling MFA")
To disable MFA entirely:
1. Turn off the **Activate MFA** toggle.
2. Confirm the action by entering the code from the auth app.
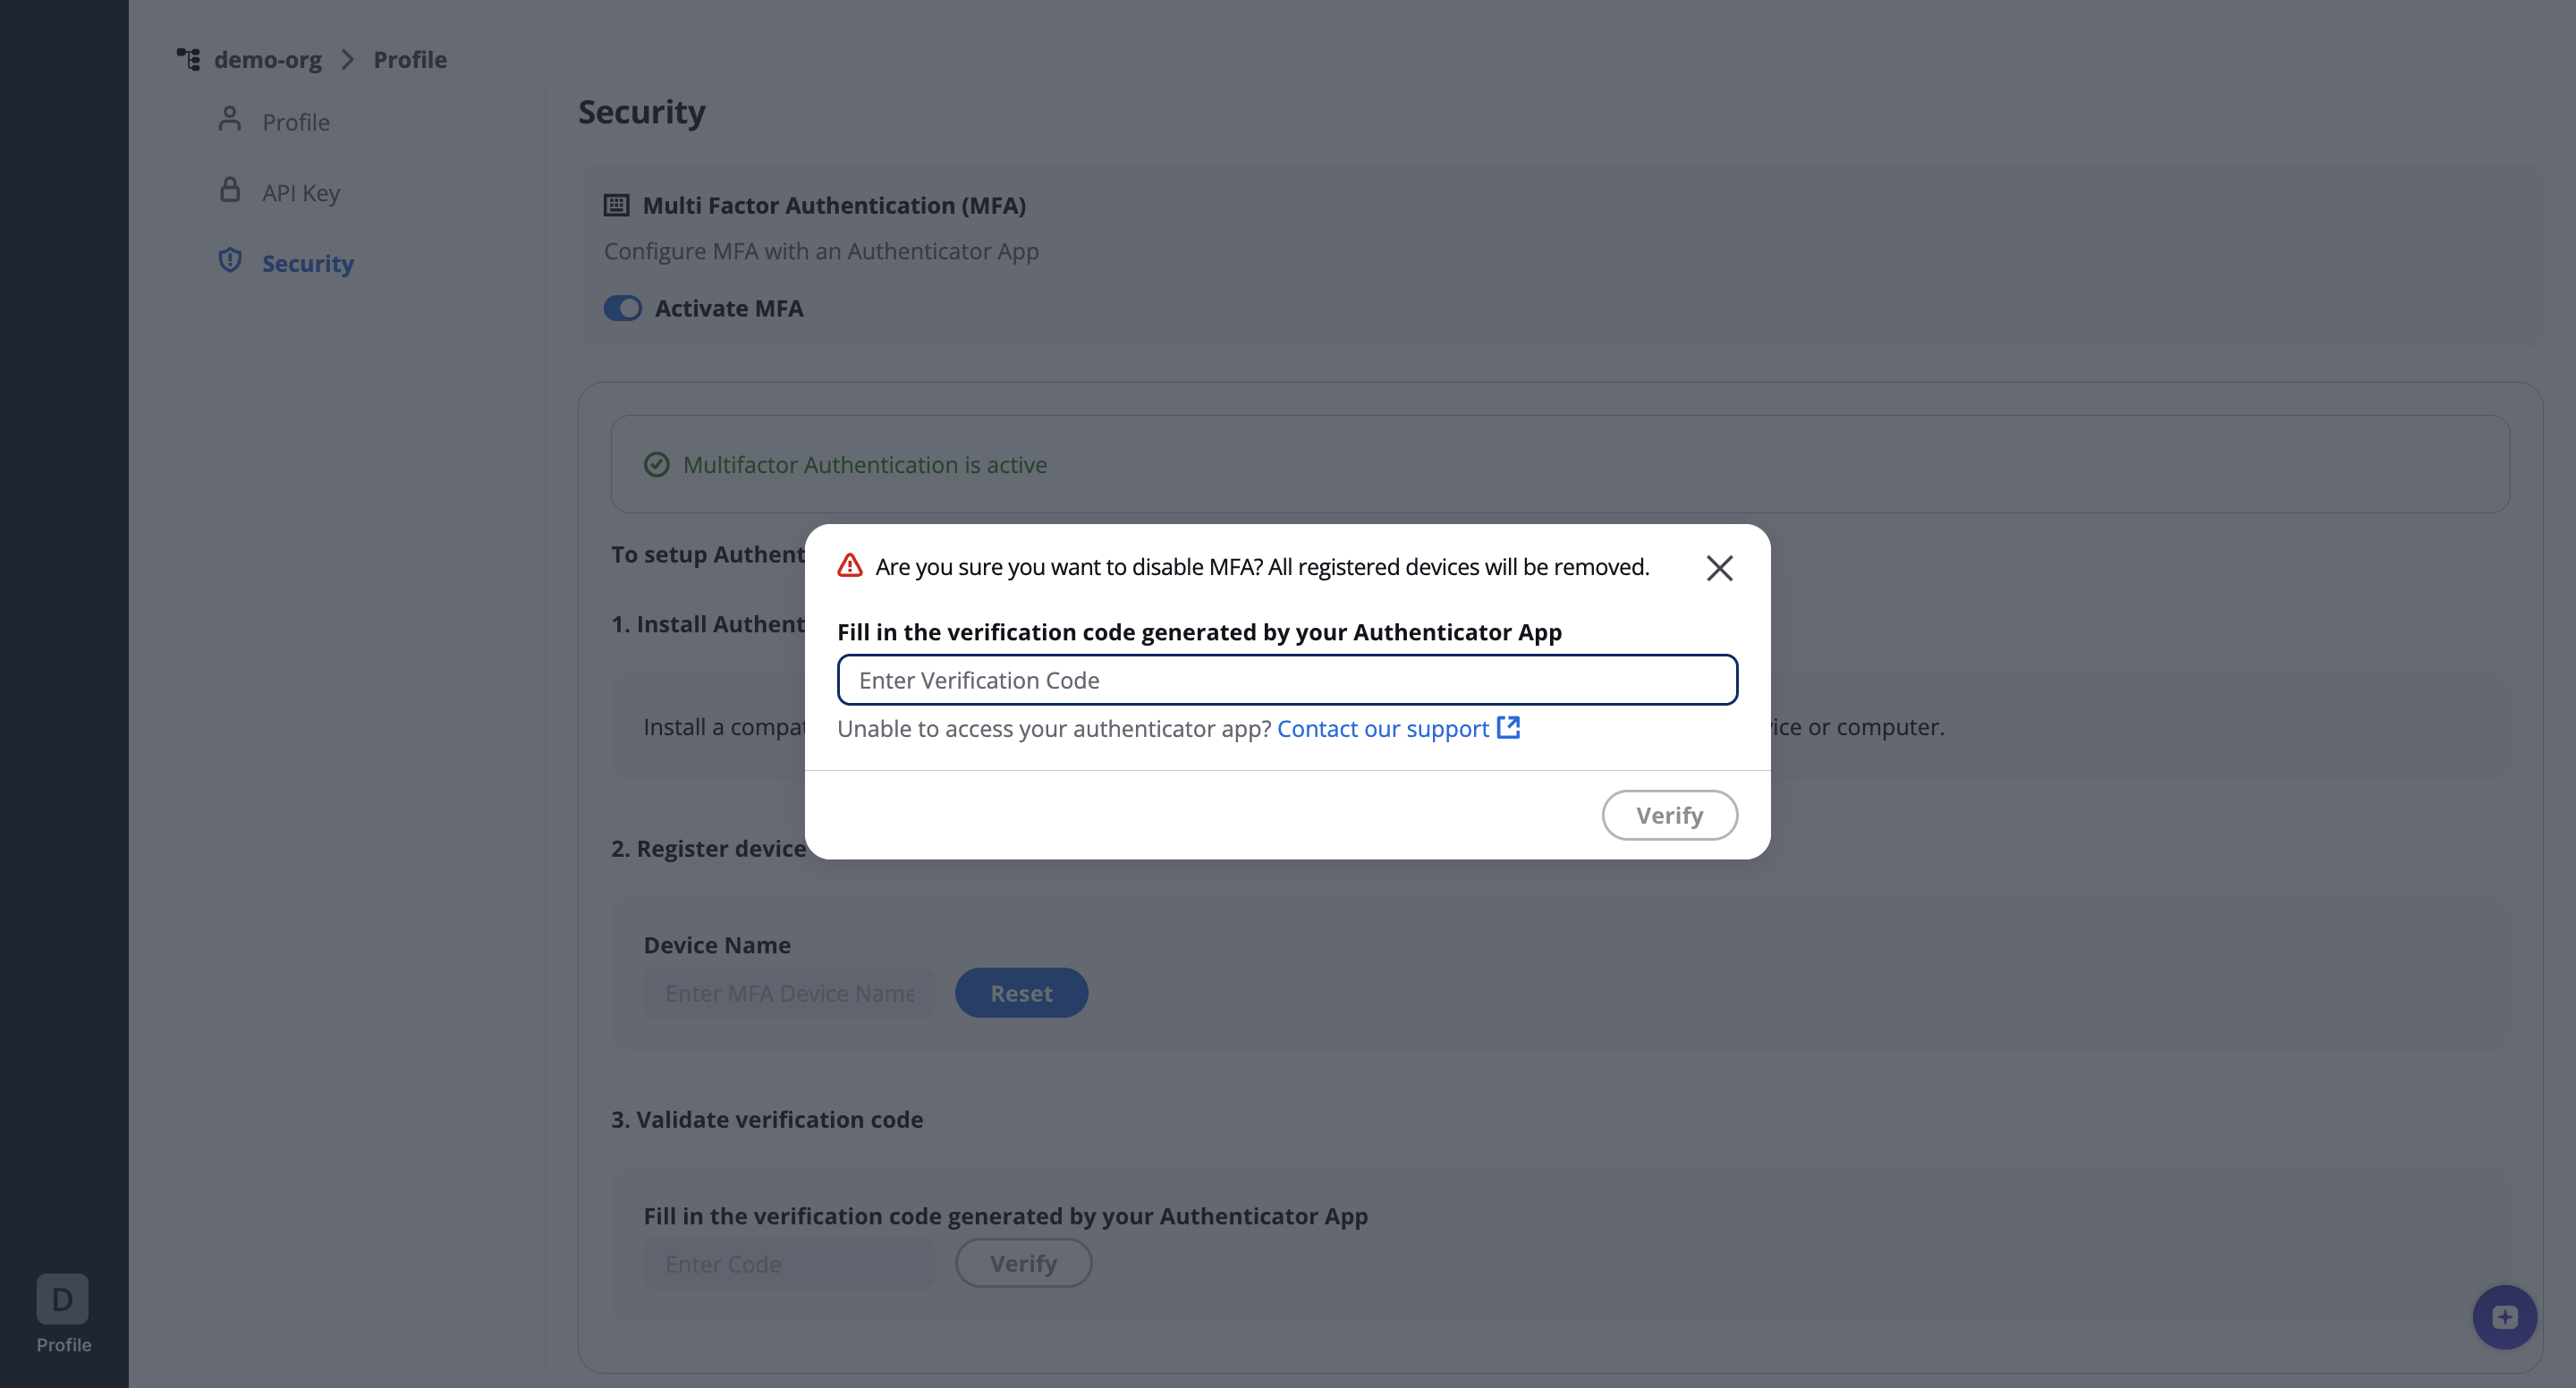
## Lost Device or Can't Access Authenticator App?[](#lost-device-or-cant-access-authenticator-app "Direct link to Lost Device or Can't Access Authenticator App?")
If you lose access to your registered authenticator app:
* Contact your **StackGuardian administrator**, or
* Raise a support [**ticket**](https://support.stackguardian.io/ticket)
Our team will guide you through identity verification and assist in re-enabling MFA.
---
# Cloud Inventory
## Overview[](#overview "Direct link to Overview")
**Cloud Inventory** is your starting point in [SGCode](/docs/sg-code/overview/). It displays all resources discovered across your connected cloud accounts and lets you take action on them.
To open the **Cloud Inventory**:
1. Select **SGCode** on the sidebar
2. Select **Cloud Inventory** from the sidebar or the menu
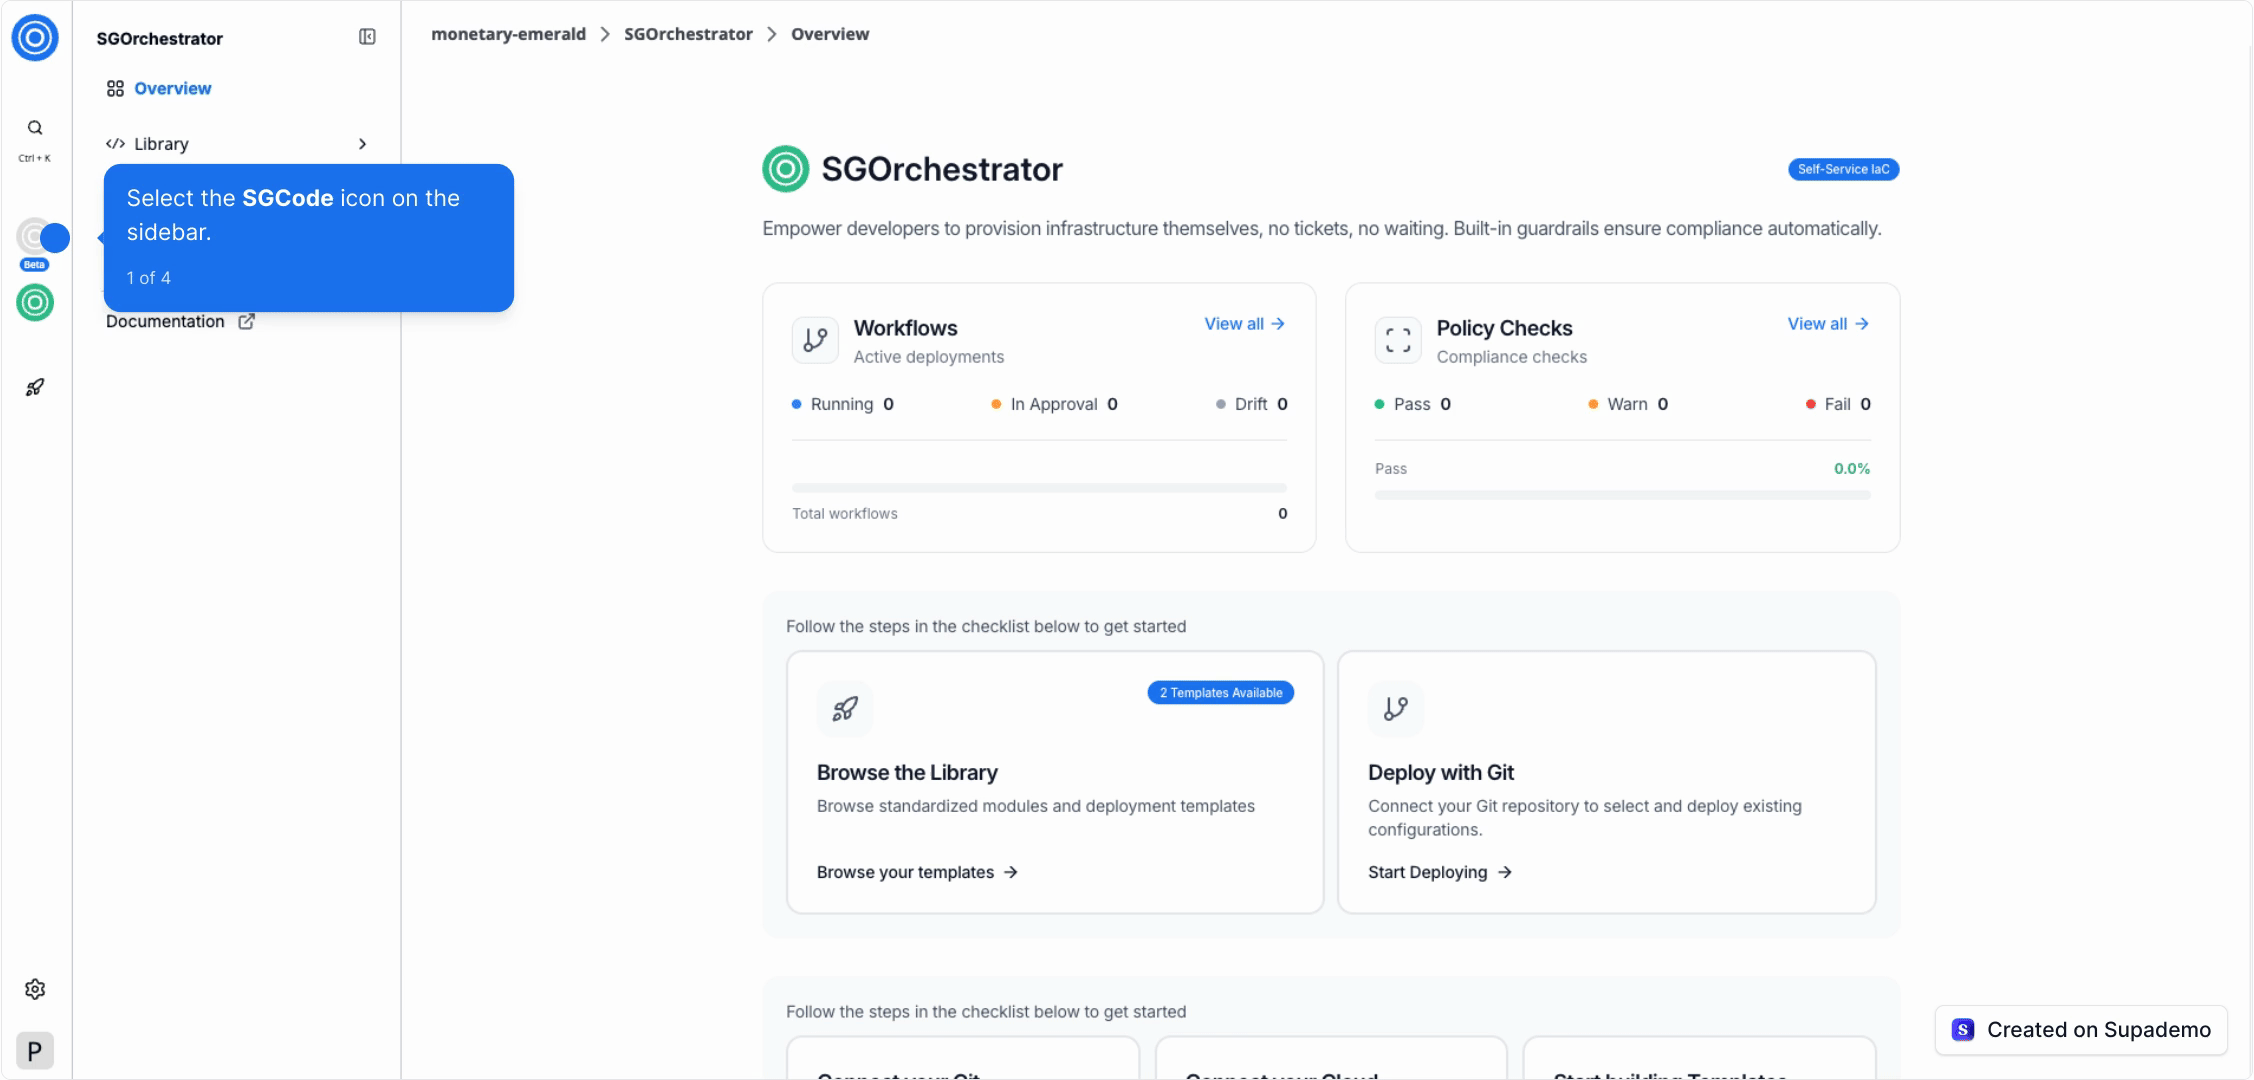
*Cloud Inventory*
The top of the page shows three key metrics:
* **Total Resources** — the total number of resources discovered across your connected cloud accounts. Select **View Cloud Providers** to manage your connections.
* **Infra Projects** — the number of infrastructure-as-code projects generated from your cloud resources. Select **View All** to see them.
* **IaC Coverage** — the percentage of your resources managed as code. Select **View State Backends** to manage your [state backends](/docs/sg-code/state-backends/).
Use the **Options** dropdown in the table toolbar to configure a module for your selection:
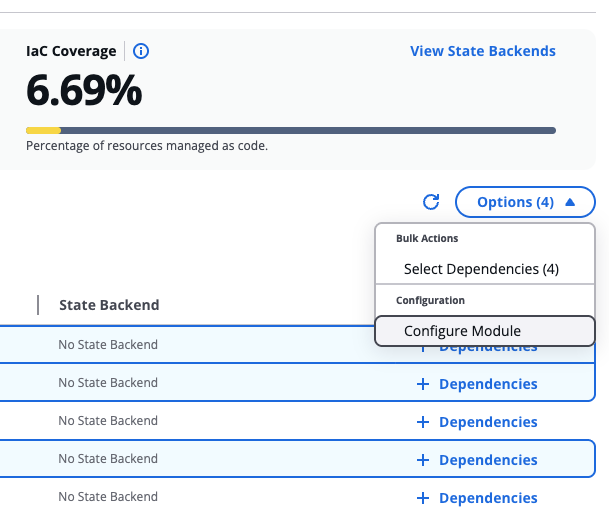
*Options dropdown*
## Resource list[](#resource-list "Direct link to Resource list")
The resources list shows every resource found across your connected cloud accounts.
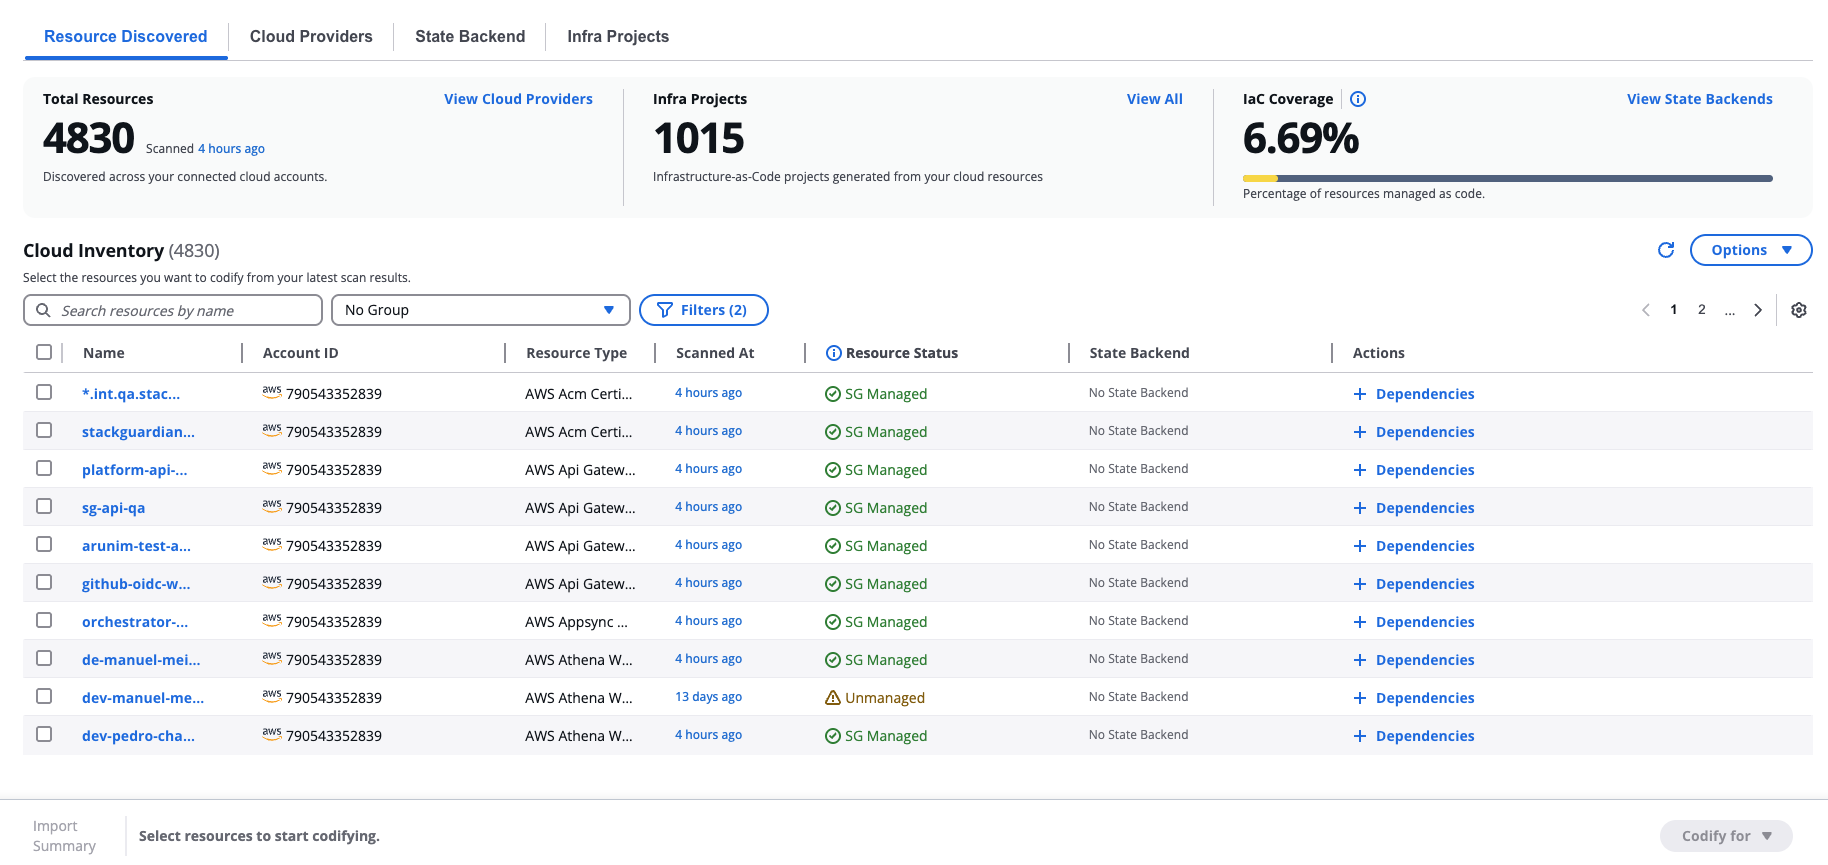
*Resource list*
The table displays each resource's name, account ID, resource type, when it was last scanned, its resource status, and its linked state backend.
**Resource status** values:
* **SG Managed** — Resource is managed through StackGuardian workflows.
* **Unmanaged** — Resource is not tracked by any IaC state file.
* **Externally Managed** — Resource is managed by IaC but not through StackGuardian.
* **SG Drifted** — StackGuardian-managed resource has drifted from its expected state.
* **SG State Only** — Resource exists in StackGuardian state but no longer exists in the cloud. These resources cannot be codified.
* **External State Only** — Resource exists in an external IaC state but no longer exists in the cloud. These resources cannot be codified.
* **Codifying** — Your code is ready. Open the workbench, review, and hit "Create & Plan" — we'll raise a PR and start managing this resource automatically.
Use the **Search resources by name** field to find a specific resource. Use the **Filters** button to filter results by resource type, account, or other attributes.
To group resources, use the **Group by** dropdown next to the search field. Available groupings are: **No Group**, **Group by Resource Type**, **Group by Cloud Provider**, **Group by Region**, **Group by Account**, and **Group by Tag**. When grouping by tag, resources are grouped by tag key only. To filter by a specific tag value, use the **Filters** panel instead.
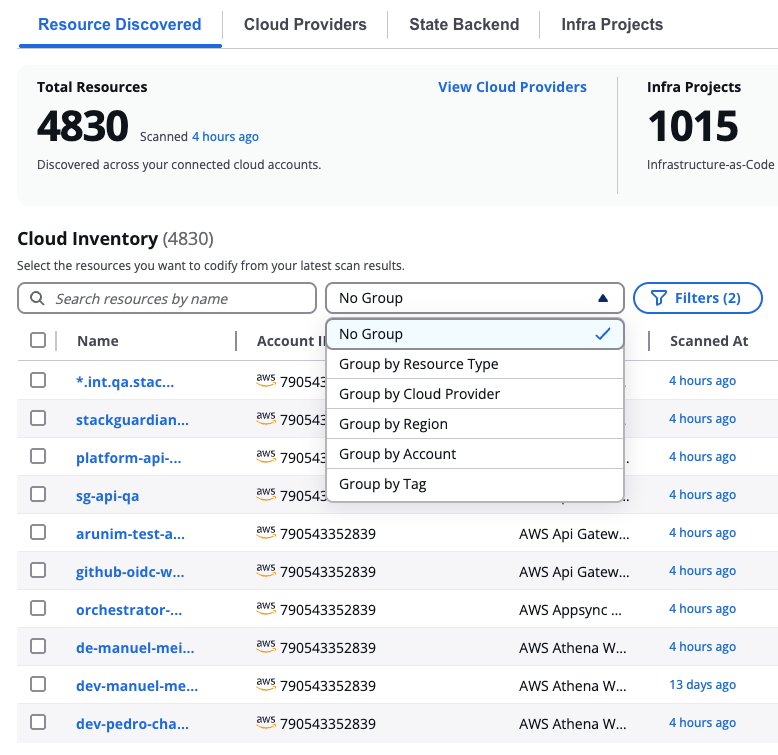
*Group by dropdown*
### Resource Details[](#resource-details "Direct link to Resource Details")
To view the details of a specific resource, select its name in the table. The **Resource Details** modal opens with two tabs:
**Overview**
Shows the resource's key attributes: Resource Name, Resource ID, Account ID, Integrations, Region, Tags, Resource Status, Resource Type, Service, Scanned At, State Backend, and IaC Source.
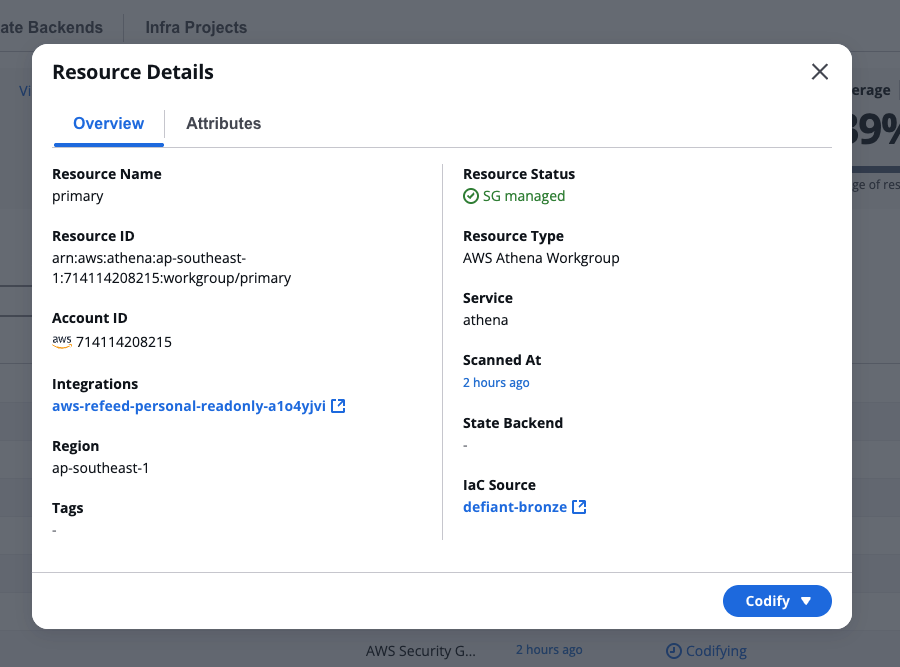
*Resource Details*
**Attributes**
Shows the raw JSON attributes for the resource as discovered from your cloud account. Select **Copy JSON** to copy the full attribute payload.
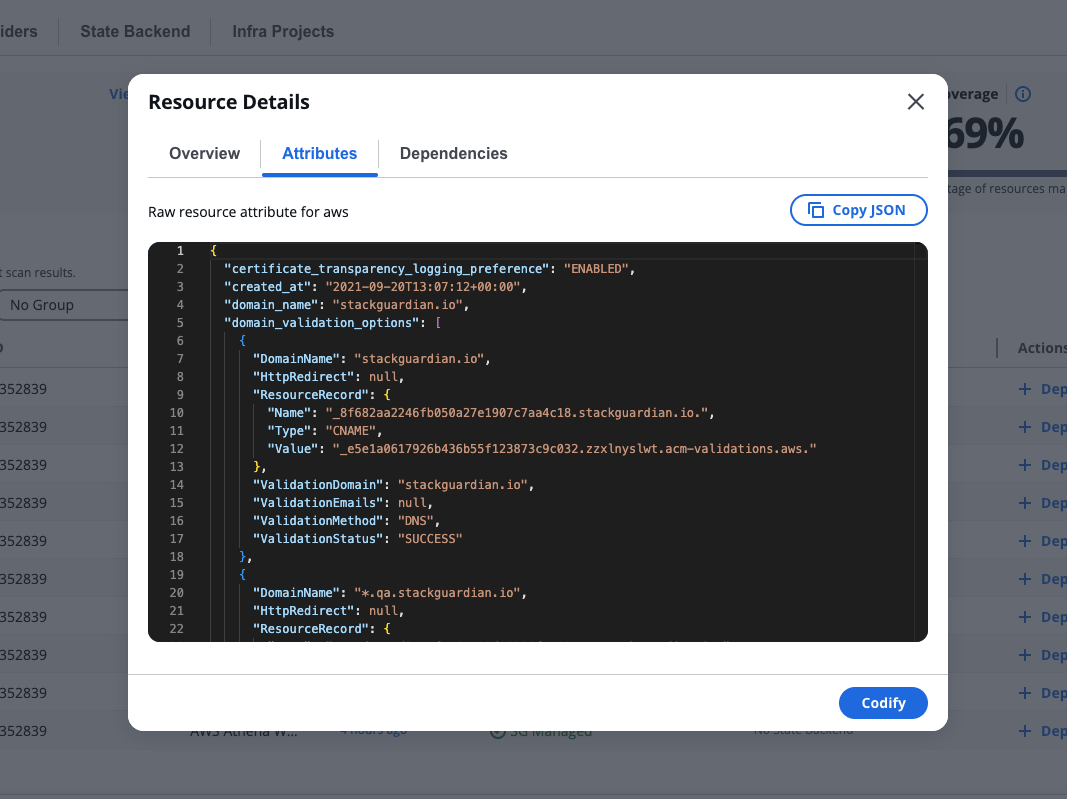
*Resource Attributes*
## Select resources to codify[](#select-resources-to-codify "Direct link to Select resources to codify")
In the **Resource Discovered** tab, select one or more resources from the table using the checkboxes. The row highlights in blue when selected.
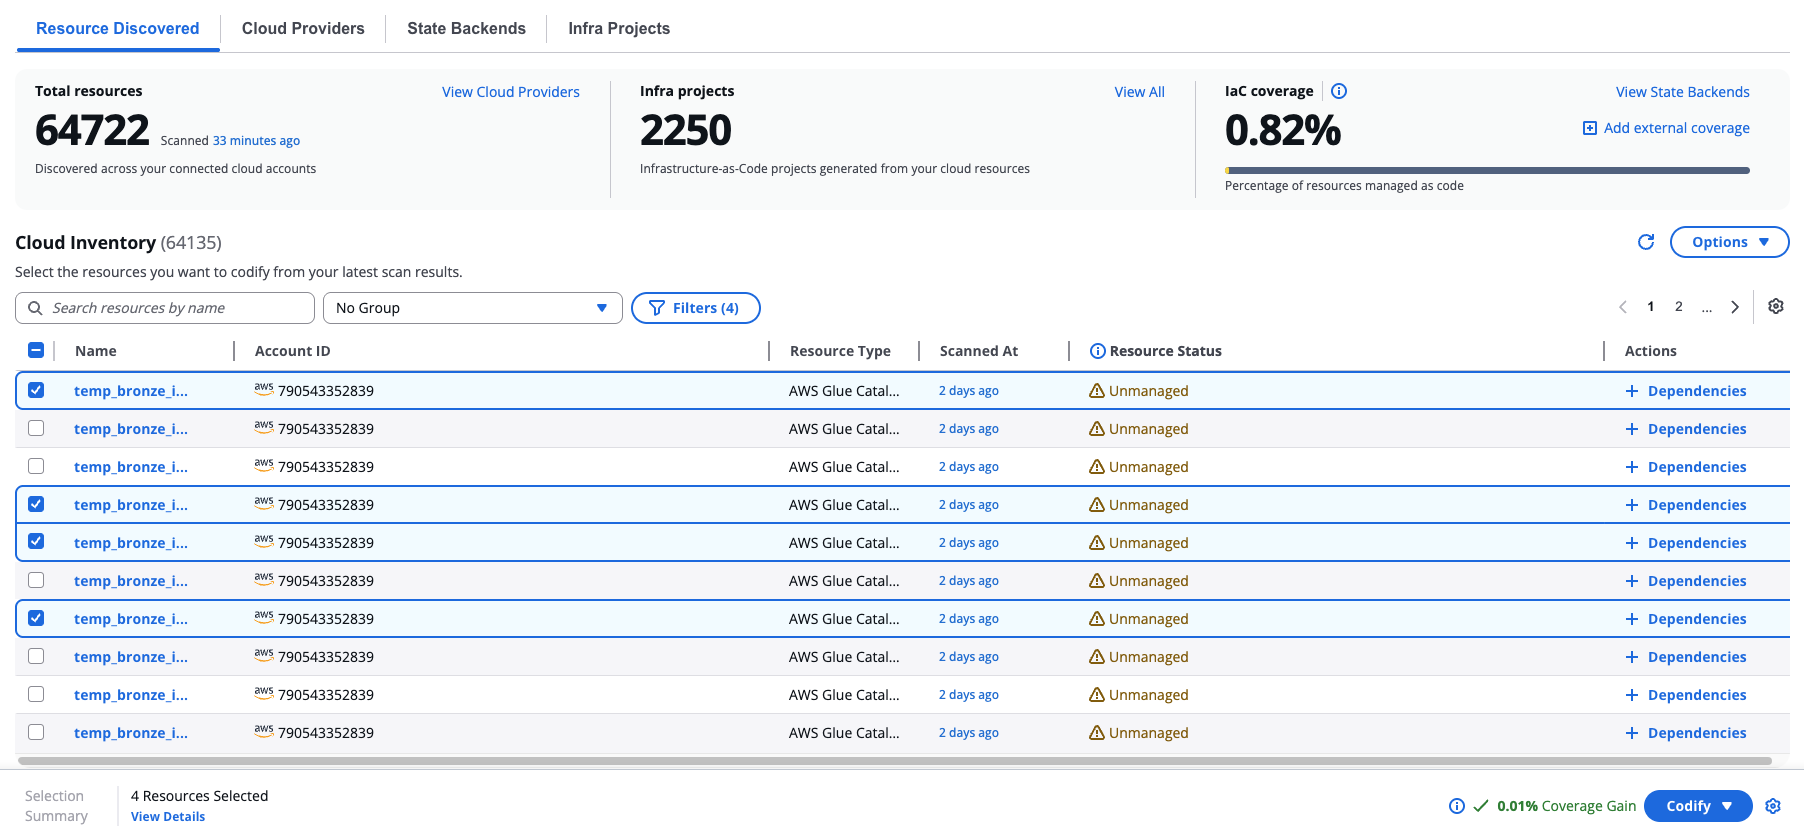
*Select resources to codify*
When you select resources, a bottom bar appears showing:
* **Import Summary** and the number of resources selected
* **View Details** — review your full selection before proceeding
* A projected **Coverage Gain** percentage showing how much your IaC coverage will increase
* **Codify** — the button to start code generation. Use the dropdown next to it to choose between **Terraform** and **OpenTofu**.
You can add dependencies for a single resource inline by selecting **+ Dependencies** in its Actions column, or by opening the resource's **Dependencies** tab in the Resource Details modal.
### Configure Module[](#configure-module "Direct link to Configure Module")
Before selecting resources to codify, you can optionally import a module. Importing a module creates a new grouping filter for your discovered resources based on the selected template. This helps you organise and manage resources that match specific infrastructure patterns.
To import a module, select **Import Module** from the **Options** dropdown.
Expand **Imported Modules** and select a source type:
* **Git Repository**
Connect to an existing Git repository that contains your Terraform module.
Complete the following fields:
* **Version Control**— select your version control connector
* **Repository**— enter the repository URL
* **Branch, Tag or Commit** — specify the branch, tag, or commit (for example, `main`, `v1.0`, `0c708f`)
* **Working Dir** — specify the directory containing the module (for example, `/`, `infra`, `modules/vm`)
* **Git Sparse Checkout Config** — optional sparse checkout configuration
* **Enable git core.autocrlf** — optional checkbox for line ending handling
Select **Analyze** to validate and import the module.
* **Templates**
Select this option to import a module from StackGuardian's template library.
## Code generation[](#code-generation "Direct link to Code generation")
After selecting **Codify**, SGCode creates a new project and opens the Code Workbench. The platform generates Terraform or OpenTofu code for your selected resources — this typically takes a few minutes depending on the number of resources selected.
During generation, a progress bar shows the current status. SGCode runs an internal validation cycle: it generates the code, runs a plan to check for errors, and if errors are found, regenerates the code automatically before delivering the final result. If the validation finds no errors, the progress bar moves quickly to completion. If errors are found and a fix is attempted, the progress bar moves more slowly toward the end.
As generation runs, files begin appearing in the file tree and code starts rendering progressively in the editor. Editing is locked during this time, but you can browse the files as they appear. Once generation is complete, editing unlocks automatically.
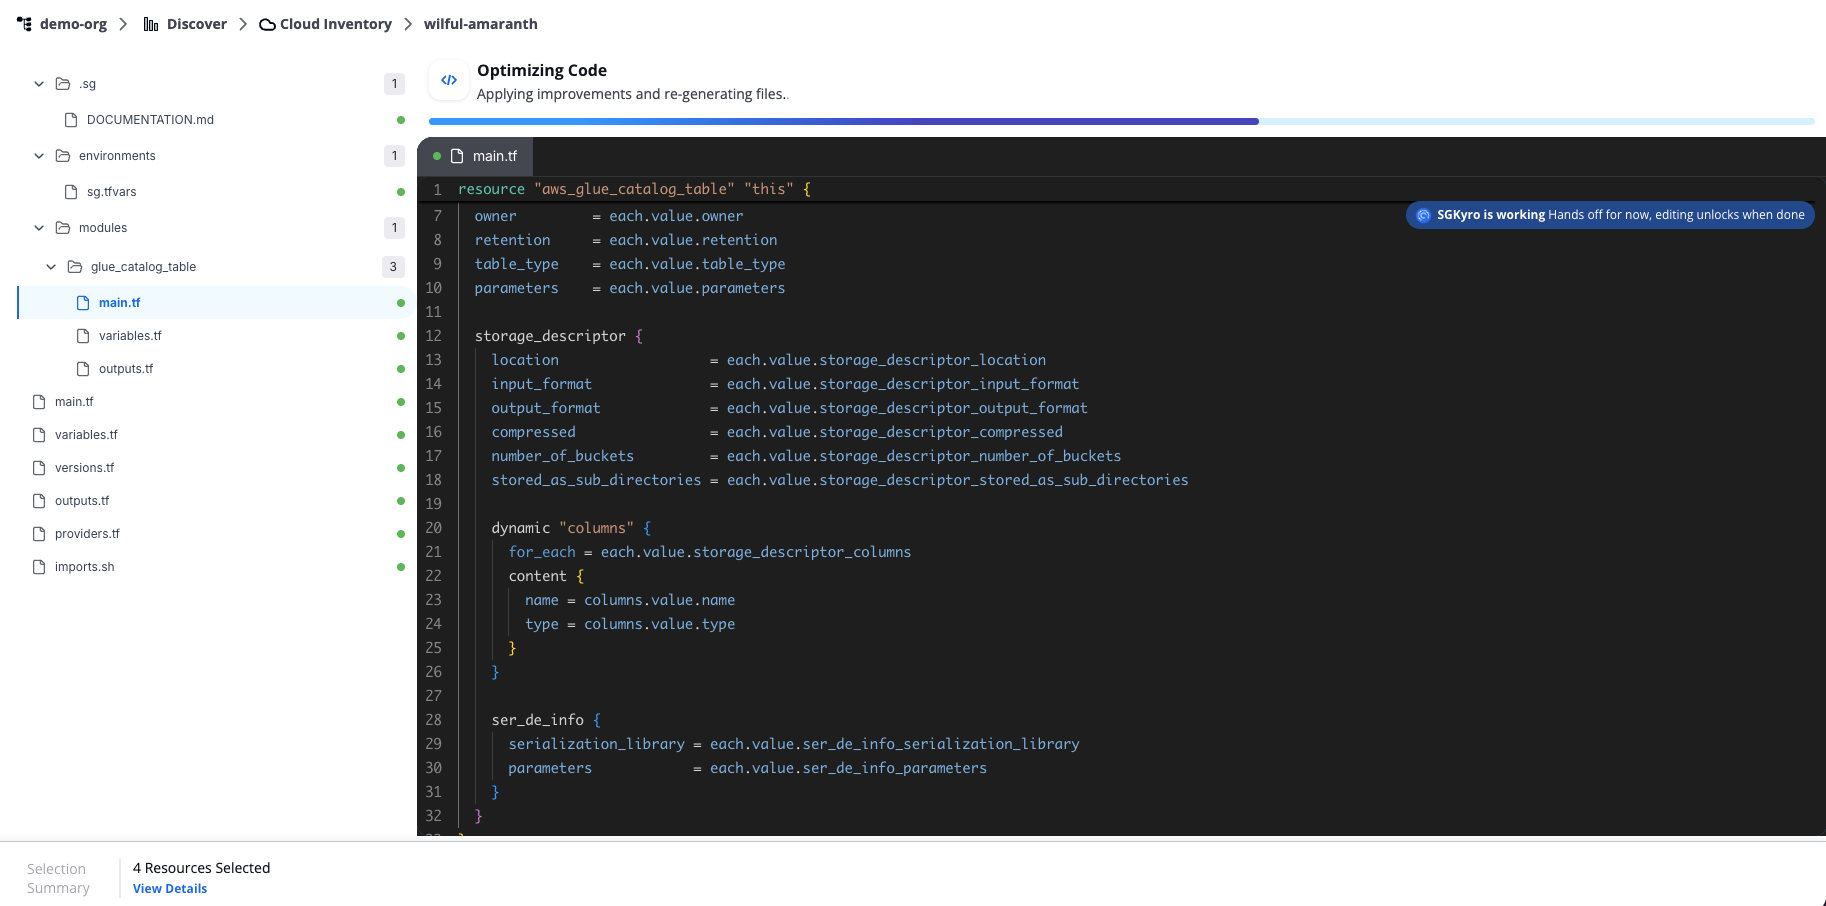
*Code generation*
You can navigate away from this page while generation runs. To return to a session, open the **Infra Projects** tab and select the project name to reopen it in the **Code Workbench**.
Each project is assigned an auto-generated name (for example, `clean-blue`). To rename it, select the pencil icon next to the name.
Azure resource casing differences
Azure's API can return inconsistent casing for some resource properties across different requests. The Terraform azurerm provider does not normalize these values for all resource types, so codification may show casing differences (e.g., `resourceGroup` vs `ResourceGroup`) even though the infrastructure is functionally identical.
If you see diffs where only casing varies: retry the workflow or manually update the generated file to match the casing shown.
## Code workbench[](#code-workbench "Direct link to Code workbench")
When generation is complete, the Code workbench displays the generated files in a file tree on the left and a code editor on the right.

*Code workbench*
The header shows the project name, last modified time, and the current PR status.
The file tree may include files such as `main.tf`, `variables.tf`, `outputs.tf`, `providers.tf`, `versions.tf`, `terraform.tfvars`, and `imports.sh`, depending on the resources you selected.
Review the generated code carefully before proceeding. AI-generated code should always be validated before deployment.
### Editing the code[](#editing-the-code "Direct link to Editing the code")
You can edit the code directly in the editor. Use **Cmd+S** (or select **Save**) to save your changes. An asterisk on a file tab indicates unsaved changes. Use the undo and redo buttons in the toolbar to manage edits.
Select the three-dot menu on a file or folder in the file tree to access additional options: **Rename**, **New File**, **New Folder**, **Copy Path**, and **Delete File**.
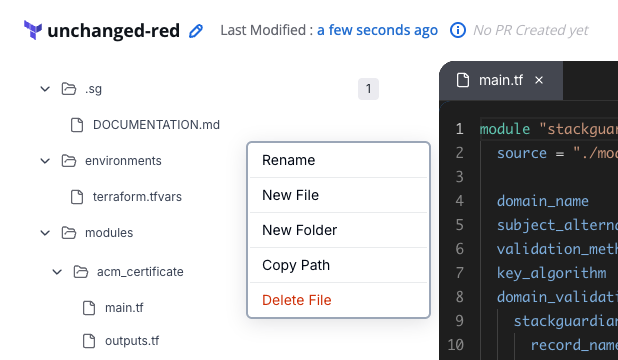
*Editing the code*
### Plan logs, Summary, and Issues[](#plan-logs-summary-and-issues "Direct link to Plan logs, Summary, and Issues")
The bottom panel contains three tabs:
* Plan logs
* Summary
* Issues
The **Plan logs** shows the logs for the selected run. Use the **Run history** panel on the left to switch between previous runs.
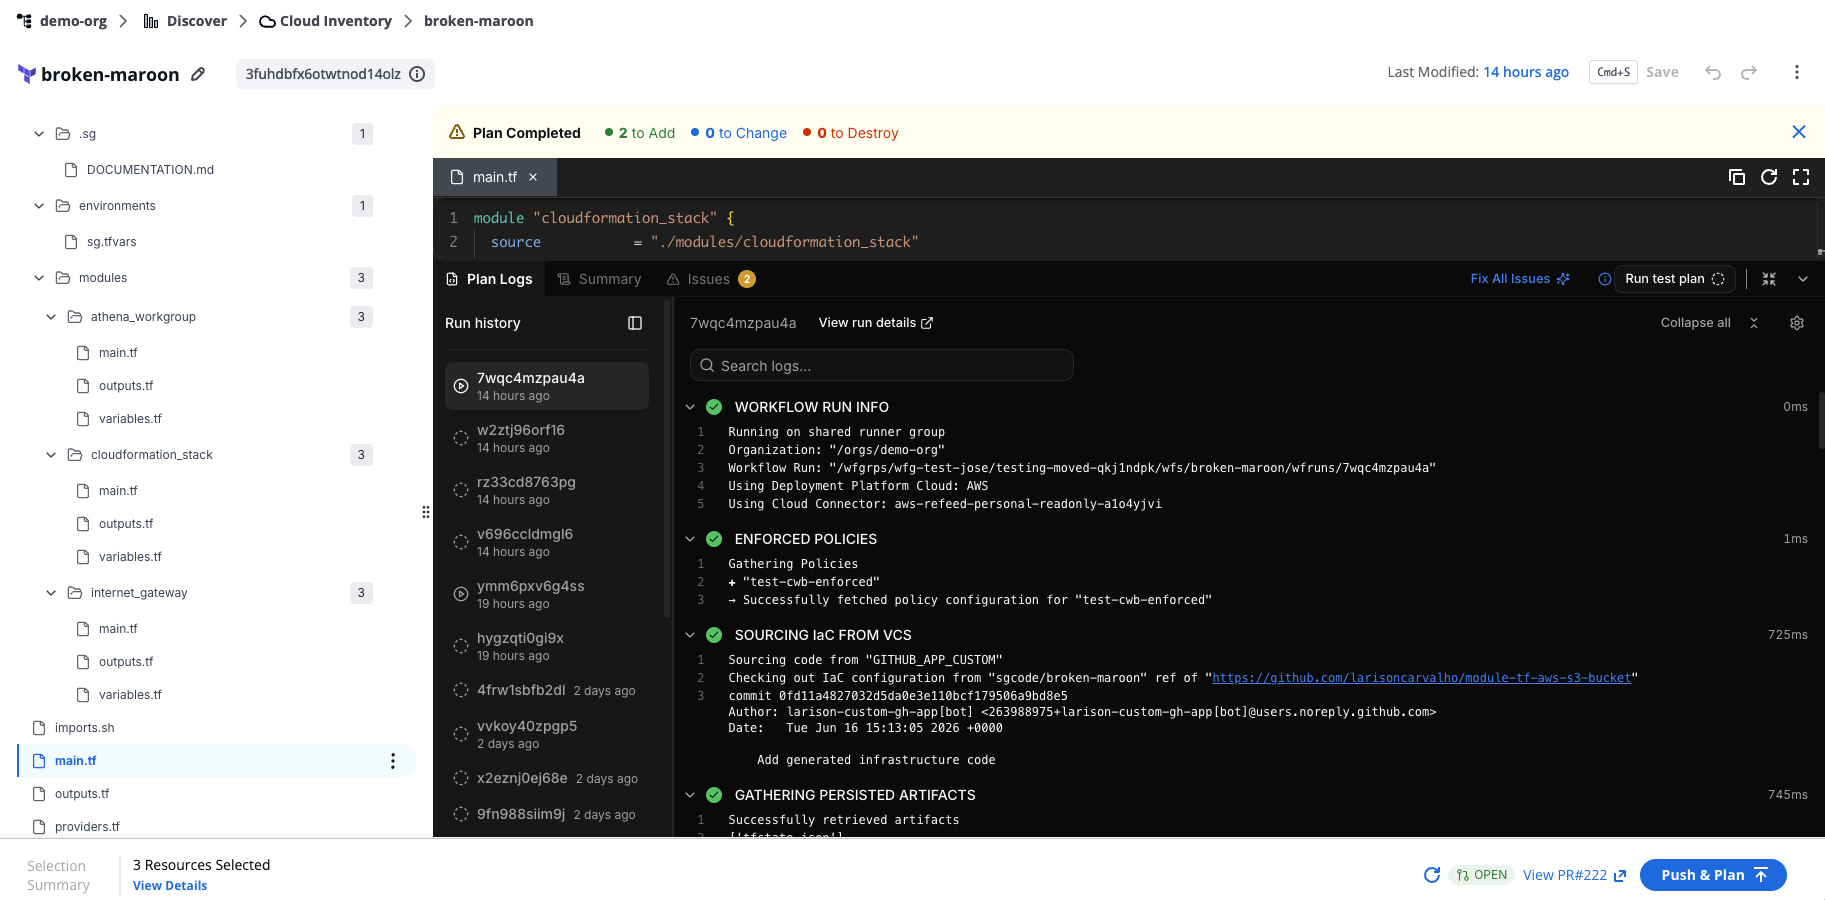
*Plan logs tab*
### Run history[](#run-history "Direct link to Run history")
The **Run history** panel lists all previous runs for the current project, ordered from most recent to oldest. Each entry shows the run ID and how long ago it ran.
Select any run in the list to load its logs in the **Plan Logs** tab. The active run is highlighted.
Runs triggered by Run test plan are labelled **Test plan** in the run header. These runs don't affect your infrastructure and aren't counted as regular workflow runs.
### Log settings[](#log-settings "Direct link to Log settings")
Select the settings icon in the top-right corner of the **Plan Logs** tab to access log display options:
* **Show timestamps** — toggle timestamps on or off for each log line. Timestamps are shown by default.
* **Download raw logs** — download the full log output as a file.
* **View raw logs** — open the full log output in a new browser tab, without accordion grouping.
The **Summary** tab shows the plan results, generated resources, outputs, cost estimation, and policy check results for the most recent plan run.
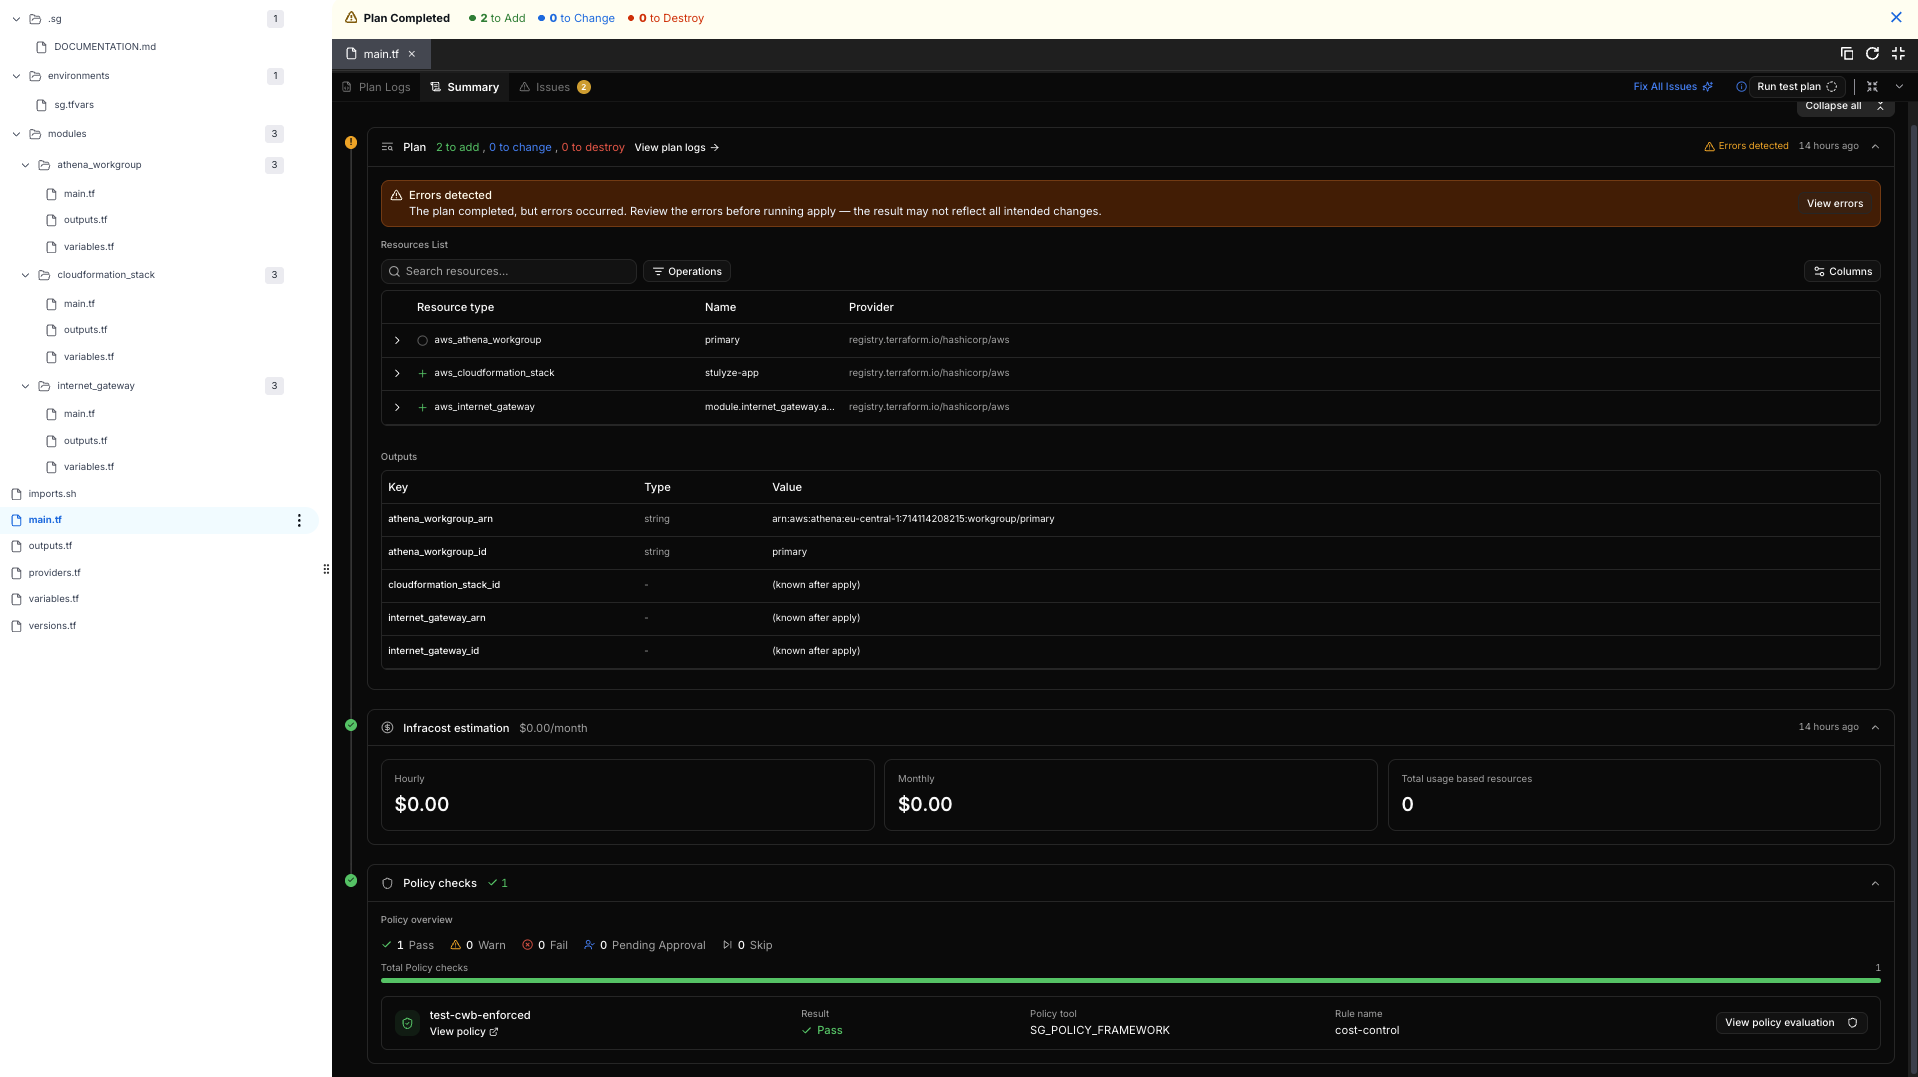
*Summary tab*
### Plan[](#plan "Direct link to Plan")
The **Plan** section shows how many resources the run adds, changes, and destroys, along with a timestamp for when the plan ran. Select **View plan logs** to open the **Plan Logs** tab for this run.
If the plan completes with errors, an **Errors detected** banner appears above the resources list. Select **View errors** to review them before running apply, since the result may not reflect all intended changes.
The **Resources List** shows the resource type, name, and provider for each resource in the plan. Use the search field to find a specific resource, the **Operations** filter to narrow the list by operation type, and **Columns** to choose which columns are visible.
The **Outputs** table lists each output value defined in the plan, along with its type. Values for resources that haven't been created yet show as **(known after apply)**.
### Infracost estimation[](#infracost-estimation "Direct link to Infracost estimation")
The **Infracost estimation** section shows the estimated hourly and monthly cost of the plan, along with the total number of usage-based resources.
### Policy checks[](#policy-checks "Direct link to Policy checks")
The **Policy checks** section shows the result of every policy rule evaluated against the plan: **Pass**, **Warn**, **Fail**, **Pending Approval**, or **Skip**. Each row lists the policy name, result, policy tool, and rule name. Select **View policy evaluation** to see more detail for a specific policy rule.
The **Issues** tab shows errors detected in the generated code, each with a file reference and a description. If issues are present, a **Fix All Issues (\[n])** button appears. Select it to let SGCode attempt an automatic fix.
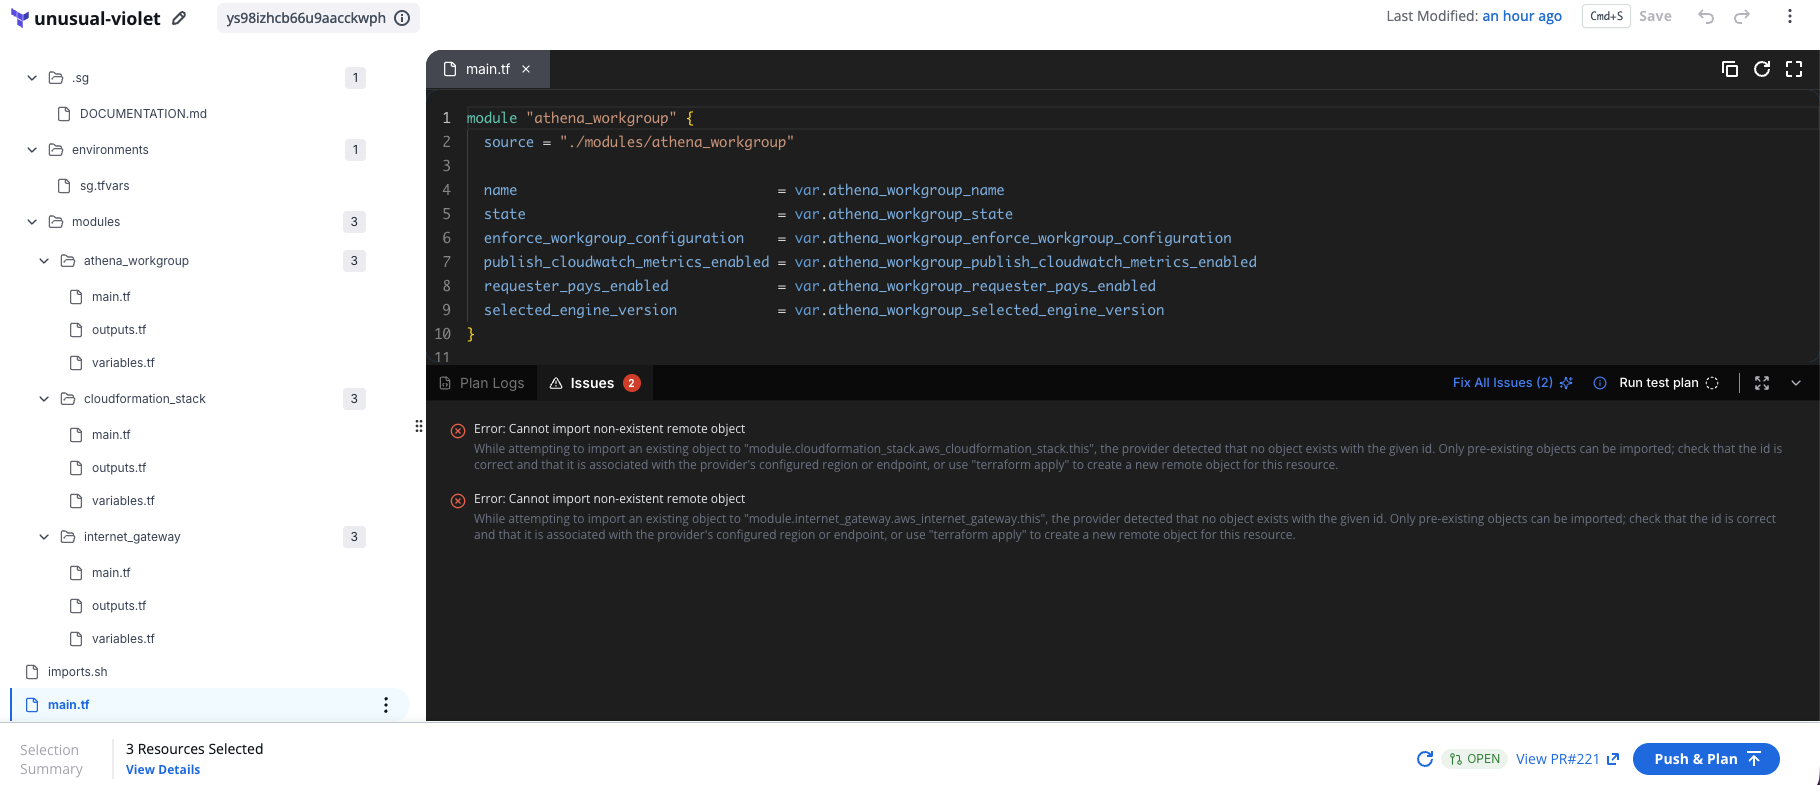
*Issues tab*
### Reviewing fixes with diff view[](#reviewing-fixes-with-diff-view "Direct link to Reviewing fixes with diff view")
When you select **Fix all issues**, SGCode attempts to resolve the detected errors and opens a **diff view** showing the original code on the left and the proposed changes on the right. A file counter shows how many files were affected (for example, **FILE 1 OF 1**).
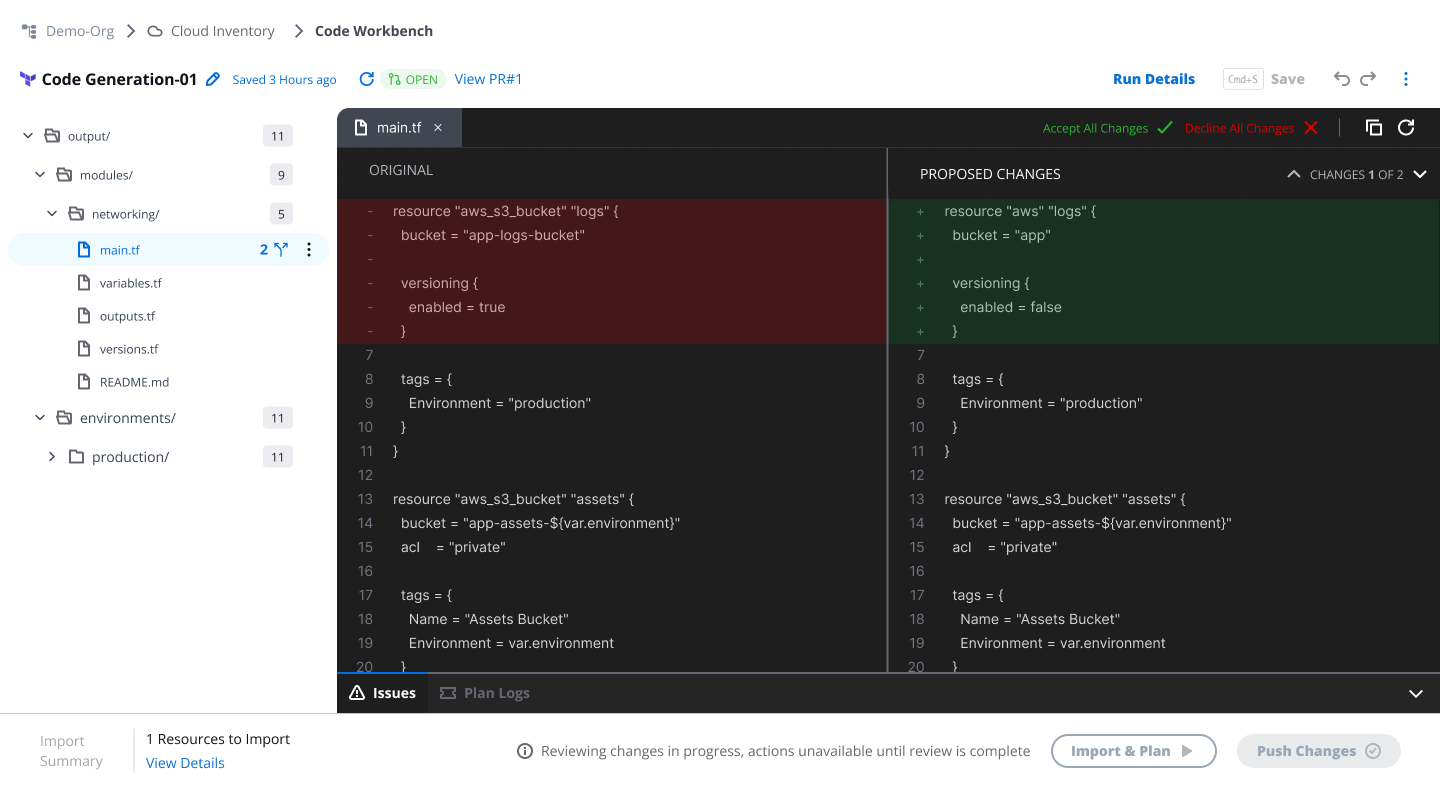
*Reviewing fixes with diff view*
Review the proposed changes and select:
* **Accept Changes** — apply the fix to the file
* **Decline Changes** — discard the fix and keep the original code
### Run test plan[](#run-test-plan "Direct link to Run test plan")
Select **Run test plan** in the top-right corner of the bottom panel to validate your code at any point during editing — without pushing changes, opening a pull request, or triggering a deployment.
Use **Run test plan** to:
* Check that your generated or edited code produces a valid Terraform plan
* Verify that your code passes policy checks before committing anything
* Iterate quickly on code changes without creating a pull request for each attempt
A test plan runs the plan against your current workbench code in isolation. No changes are pushed, no pull request is created or updated, and the run is not stored permanently. It appears in the Run history panel labelled **Test plan** for the duration of your session.
Test plan runs do not count as workflow runs and have no effect on your infrastructure.
## Create PR & Plan[](#create-pr--plan "Direct link to Create PR & Plan")
When you're ready to validate your generated code, select **Create PR & Plan** in the bottom bar of the Code Workbench.
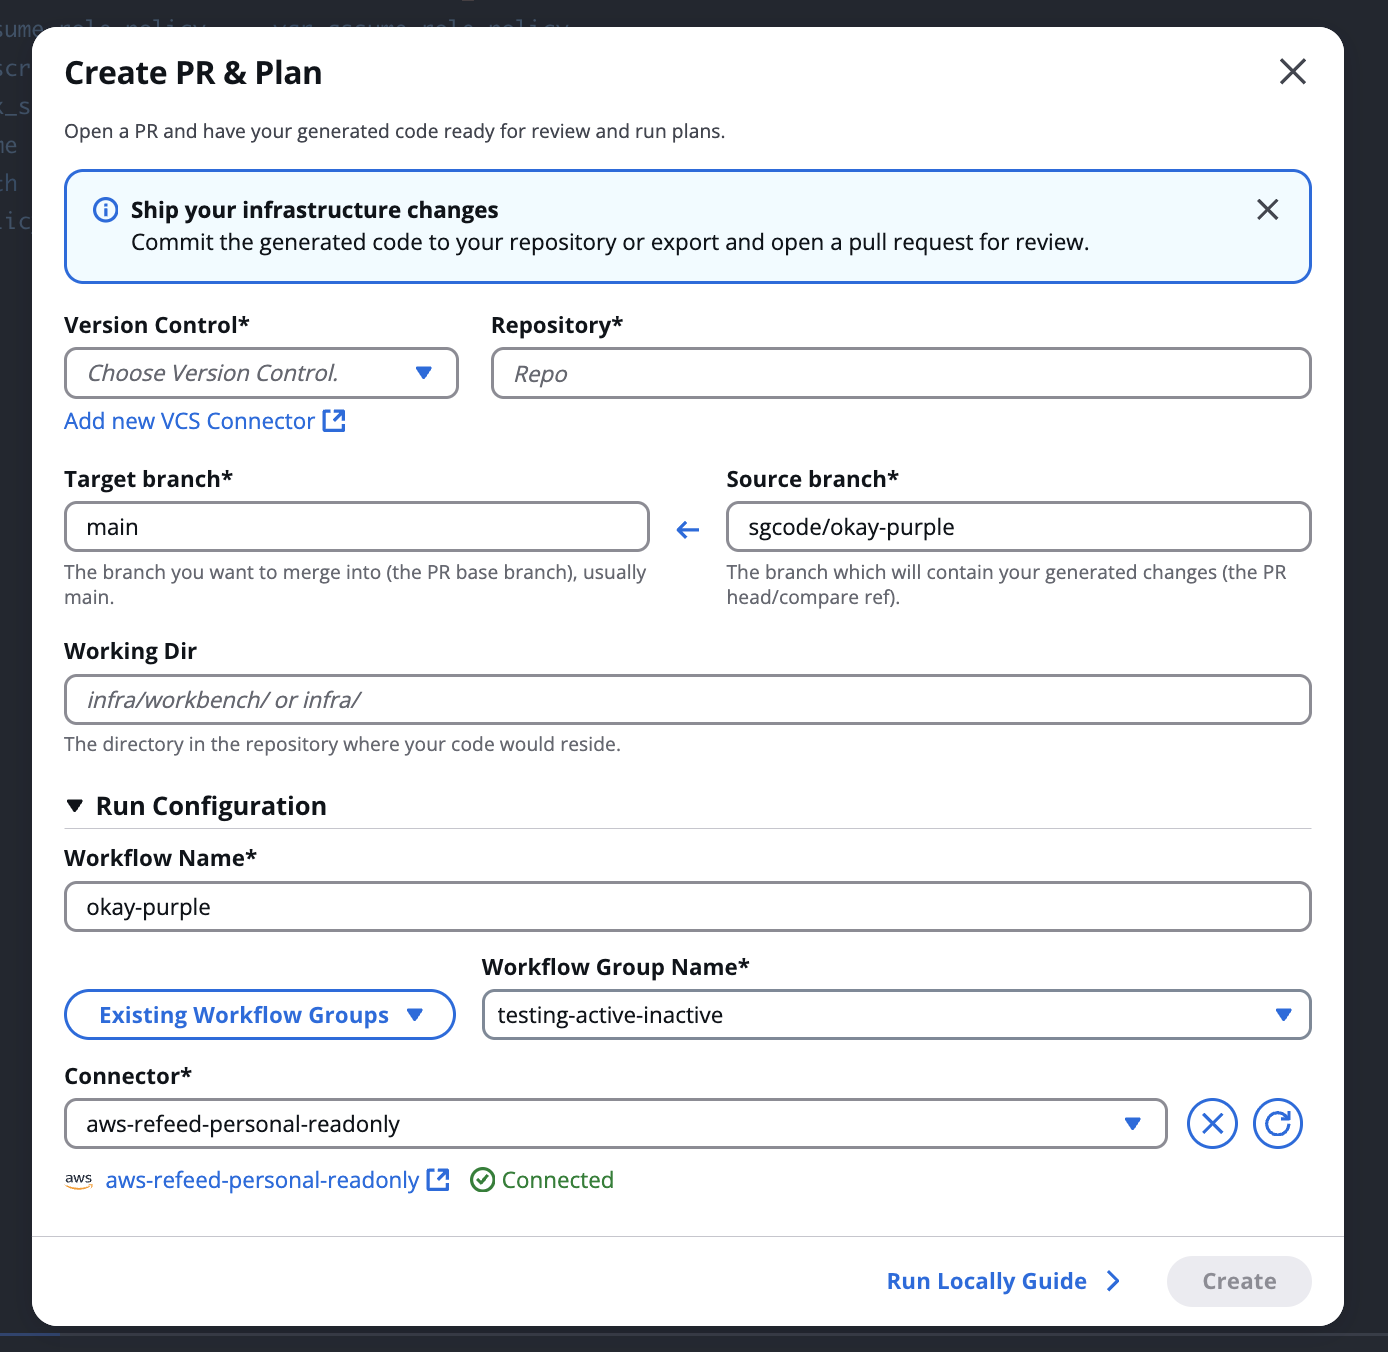
*Create PR & Plan*
This opens the **Create PR & Plan** modal, which creates a pull request and runs a Terraform plan in a single step.
Complete the following fields:
* **Version Control** — select your version control connector. Select **Add new VCS Connector** if you haven't connected one yet.
* **Repository**— search for and select the target repository.
* **Target branch** — the branch to merge into. Usually `main`.
* **Source branch** — the branch SGCode will create to push your generated changes. Must be a new branch name that doesn't already exist in the repository.
* **Working Dir** — the directory in the repository where SGCode will place the newly generated code.
Expand **Run Configuration** to review or adjust the workflow settings:
* **Workflow Name** — defaults to the project name
* **Existing Workflow Groups / Workflow Group Name** — select or specify the workflow group
* **Connector** — select a connected cloud provider connector
Select **Create** to create the pull request and start the plan. A workflow is created automatically.
NOTES
* A pull request is required to run a plan.
* Pull request management — including merging and closing — happens in your version control system.. SGCode does not merge pull requests.
### Run locally guide[](#run-locally-guide "Direct link to Run locally guide")
If you prefer to manage your code outside the platform, select Run Locally Guide in the modal for an alternative path:
1. Download your code as a ZIP, extract it, and push it to your repository
2. Set up a Workflow in StackGuardian to remotely test and maintain the code
3. Inject the OpenTofu/Terraform cloud block config to connect your code to the StackGuardian Workflow
4. Run `terraform login app.stackguardian.io` to authenticate your local environment
5. Run `terraform plan` locally and connect to the StackGuardian Workflow
## Push & Plan[](#push--plan "Direct link to Push & Plan")
Once a pull request is open, the bottom bar updates to show the PR status and the **Push & Plan** button.
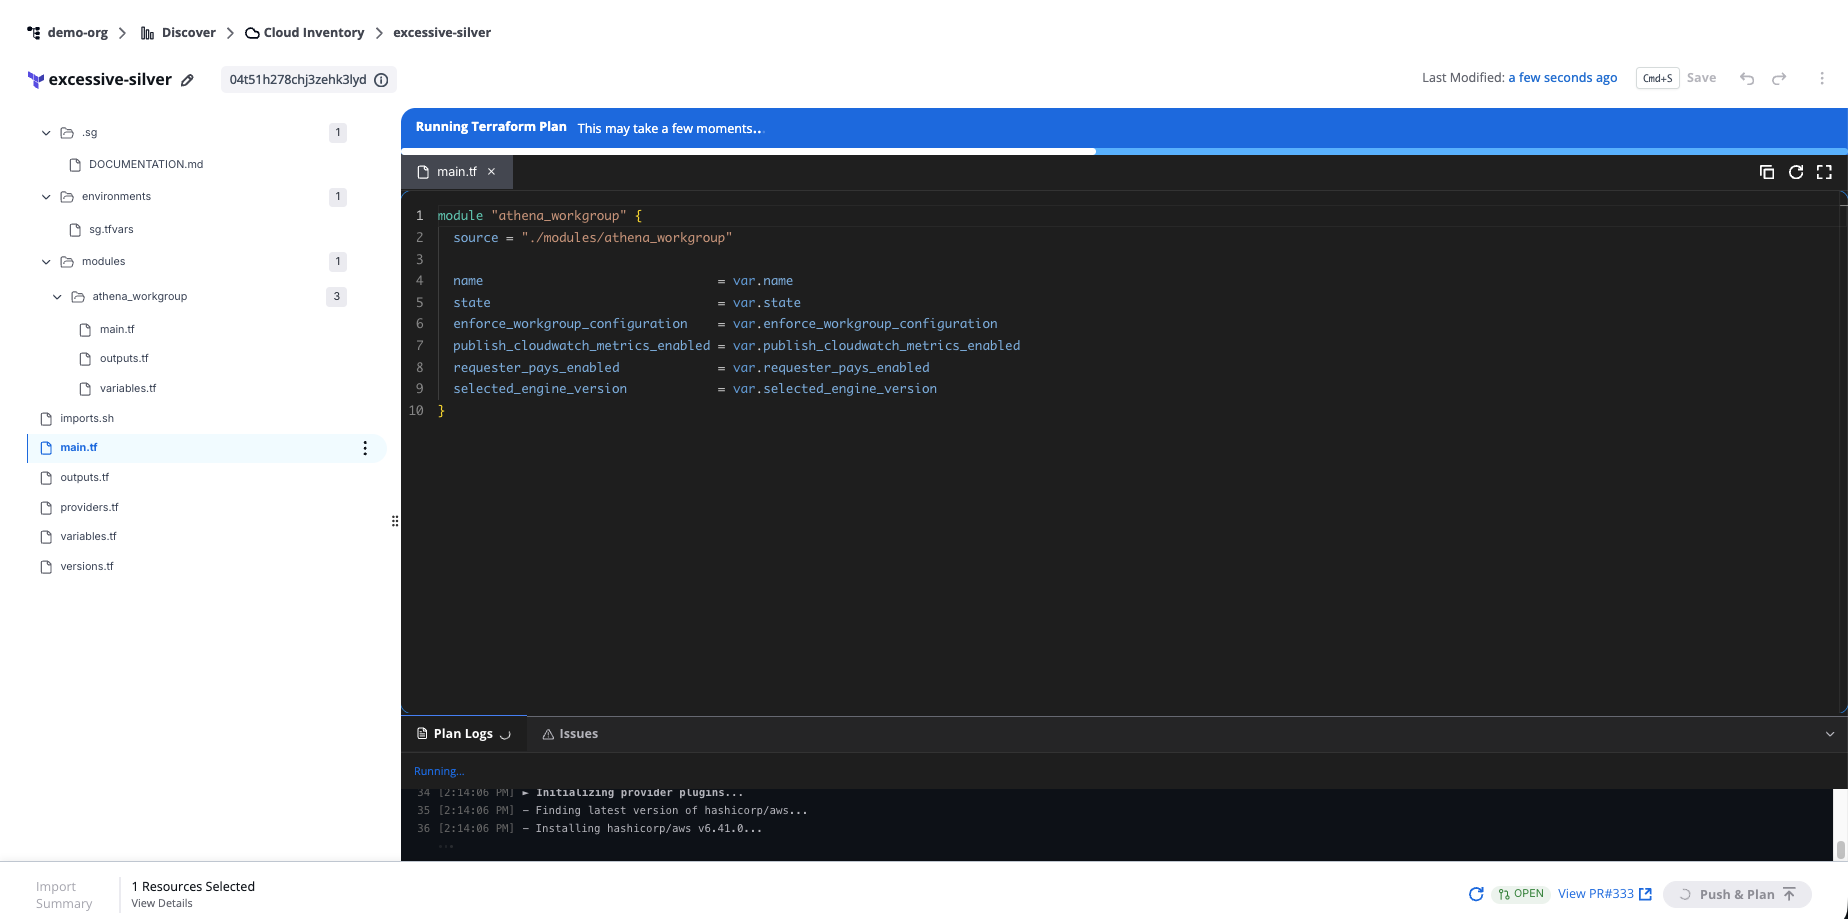
*Push & Plan*
Select **Push & Plan** to push any new changes to the open pull request and run the plan again.
While the plan runs, the status bar shows "Running Terraform Plan" with the message "This may take a few moments, open run details to follow progress." Plan logs stream live in the Plan Logs tab.
### Plan completed[](#plan-completed "Direct link to Plan completed")
When the plan finishes, the results appear in the **Plan Logs** tab. If the plan shows changes (for example, **3 to Change**), it means the generated code differs from what's currently deployed in your cloud account.
Select **Fix all issues** to let SGCode attempt to reconcile the differences automatically. The diff view opens showing the proposed changes. Review and select **Accept Changes** or **Decline Changes**, then run the plan again to verify.
Repeat until the plan shows **0 to Add, 0 to Change, 0 to Destroy** — or until you're satisfied with the changes.
## Push changes[](#push-changes "Direct link to Push changes")
If you make further edits to the code after creating a pull request, select **Push Changes** in the bottom bar to commit the latest changes to the open pull request.
Only one active pull request per project is supported at a time. To create a new pull request, close or merge the existing one in the version control system first.
## IaC coverage[](#iac-coverage "Direct link to IaC coverage")
IaC coverage is the percentage of your discovered cloud resources managed as code. SGCode displays this metric at the top of the Cloud Inventory page and updates it as you codify more resources.
When coverage is low, a risk indicator appears — for example, **High Risk: Codify Resources** — to guide you toward the next action.
When you select resources to codify, the bottom bar shows a projected **Coverage Gain** so you can see the impact before you start generation.
---
# Infra Projects
## Overview[](#overview "Direct link to Overview")
The **Infra Projects** lists all your code generation sessions. Each time you codify a set of resources, SGCode creates a new project and adds it here.
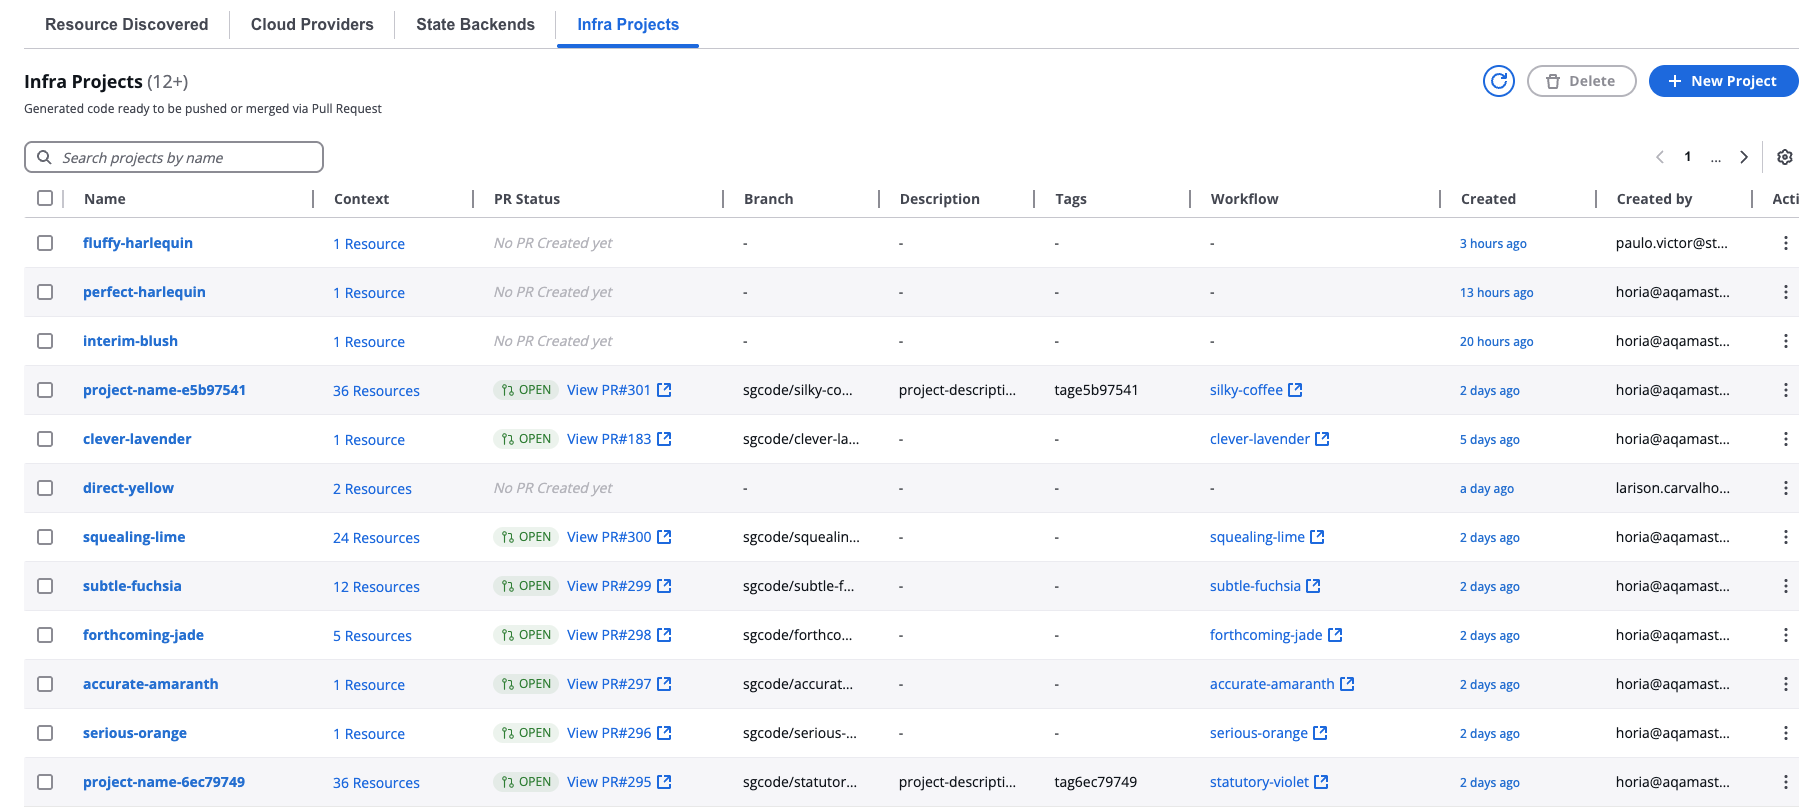
*Generated code ready to be pushed or merged via Pull Request*
The table displays each project's name, the number of resources codified, PR status, branch, description, tags, linked workflow, and creation date. **PR Status** values:
* **Open** — the project has an active open pull request
* **Blank** — no pull request has been created yet
Select a project name to open it in the Code Workbench. Select the workflow link in the **Workflow** column to navigate directly to the associated StackGuardian workflow. To delete one or more projects, select the checkboxes and select **Delete**. To edit a project's name, description, or tags, use the actions menu on the project row.
---
# Overview
**SGCode** connects to your cloud accounts, discovers every resource running there, and uses AI to generate Terraform or OpenTofu code that represents those resources — helping engineering teams increase IaC coverage without writing code from scratch.
The core loop is: discover resources, generate code, review it, create a pull request, and run a plan. Repeat to progressively bring unmanaged infrastructure under version control.
## What SGCode does[](#what-sgcode-does "Direct link to What SGCode does")
Most organizations have a significant gap between the infrastructure running in their cloud accounts and the infrastructure they have code for. Resources get created manually, outside of any IaC pipeline, and over time the gap grows.
SGCode closes that gap by:
* **Scanning your cloud accounts** — connecting to AWS or Azure and discovering every resource across your accounts, regardless of how it was created
* **Generating accurate IaC code** — using AI to produce Terraform or OpenTofu code that reflects the real state of your infrastructure, including dependencies between resources
* **Integrating with your Git workflow** — publishing generated code as pull requests to your existing repositories, so your team can review, approve, and merge it using the tools they already use
* **Tracking your progress** — measuring IaC coverage as a percentage of your total resources, so you can demonstrate improvement over time
## Key features[](#key-features "Direct link to Key features")
**Cloud Inventory**
A real-time inventory of all resources discovered across your connected cloud accounts. From here you select resources to codify, manage your cloud provider connections, link Terraform state backends, and access your code generation sessions. See [Cloud Inventory](/docs/sg-code/cloud-inventory/).
**Infra Projects**
Each time you codify a set of resources, SGCode creates an Infra Project — a persistent code generation session. Each project tracks the resources codified, the generated code, and optionally the associated pull request and linked workflow. You can return to a project at any time to resume editing in the Code Workbench. See [Infra Projects](/docs/sg-code/infra-projects/).
**State Backends**
State Backends is where you connect your existing Terraform state files to SGCode. When you add a state backend, SGCode reads your existing Terraform state files and compares them against your discovered resources — showing you which resources already have code so you don't generate code for infrastructure that's already managed. This is what drives the **Externally Managed** and **SG Managed** resource status labels in Cloud Inventory. See [State Backends](/docs/sg-code/state-backends/).
**Benchmarks**
A unified dashboard to monitor and improve your organization's cloud infrastructure across three areas: Cost, Compliance, and Security. Benchmarks provides actionable insights into the overall health of your cloud environment, helping teams address inefficiencies, risks, and vulnerabilities. See [Benchmarks](/docs/discover/insights/overview/).
## Get started[](#get-started "Direct link to Get started")
If this is your first time using SGCode, see [Getting started with SGCode](/docs/getting-started/codify-infrastructure/) for a step-by-step walkthrough of the full setup and your first codification.
If you're already set up, go to [Cloud Inventory](/docs/sg-code/cloud-inventory/) to start discovering and codifying resources.
---
# State Backends
## Overview[](#overview "Direct link to Overview")
**State backends** let SGCode compare your discovered resources against existing Terraform state files. This shows you which resources already have code, so you don't generate code for infrastructure that's already managed.
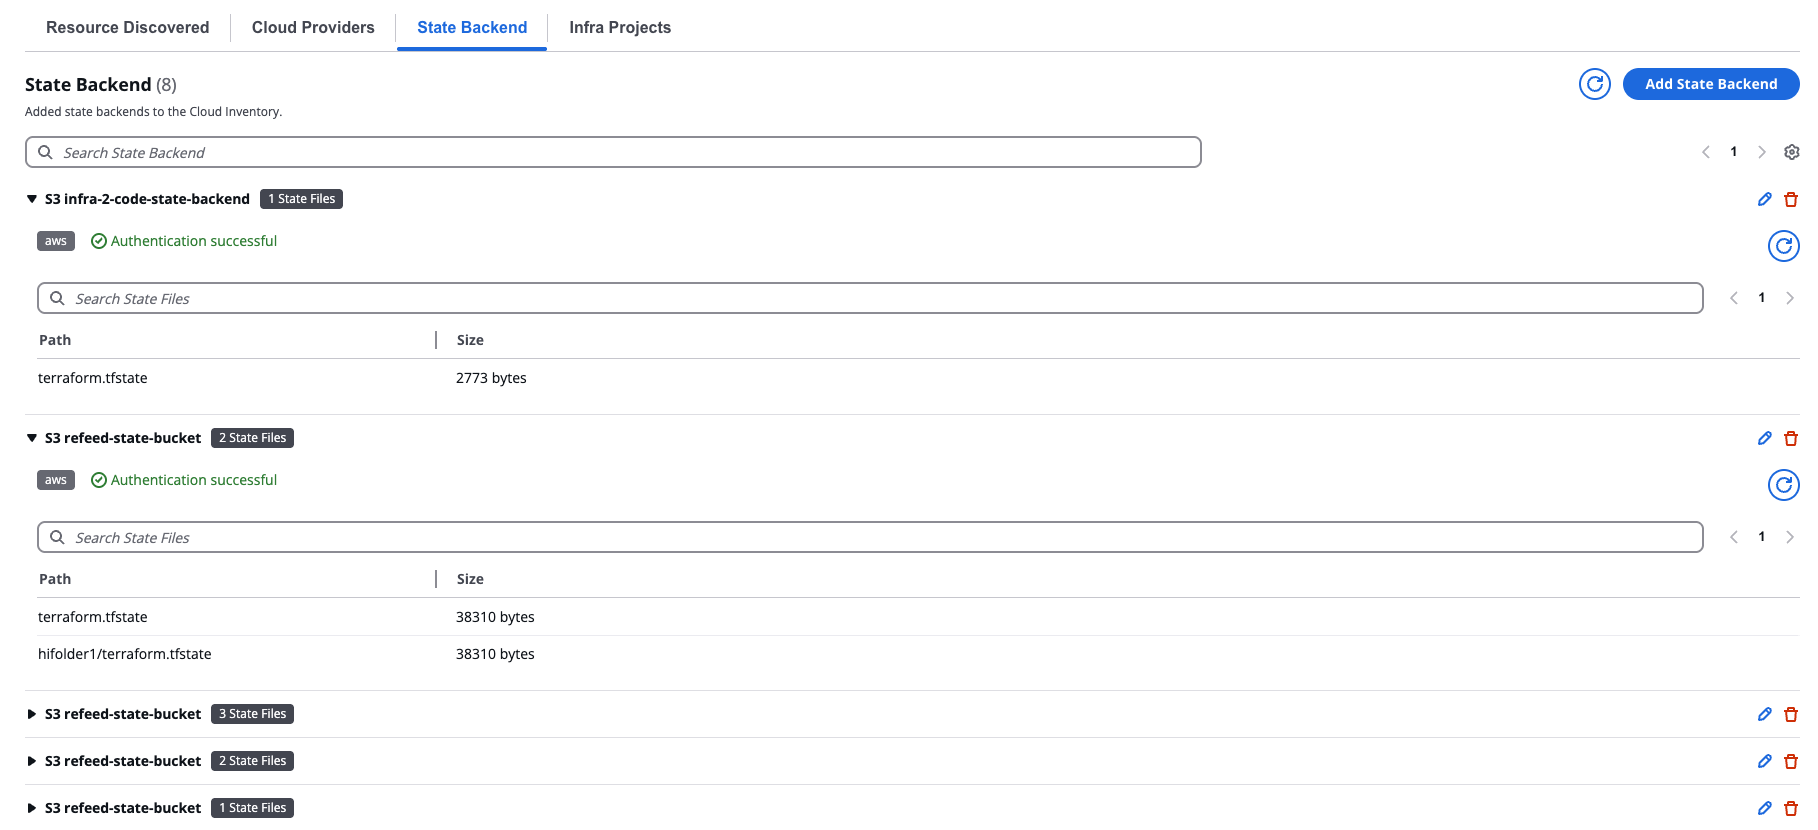
*State Backend*
To add a state backend, select Add State Backends and complete the form.
## AWS S3[](#aws-s3 "Direct link to AWS S3")
Select **AWS S3** from the **Type** dropdown, then complete the following fields:
* **Select Connector** — Connected cloud provider connector to authenticate with your S3 bucket
* **Bucket Region** — Region where your state bucket is located
* **S3 Bucket Name** — Name of your S3 bucket
Select **Discover State Files** to import the state.
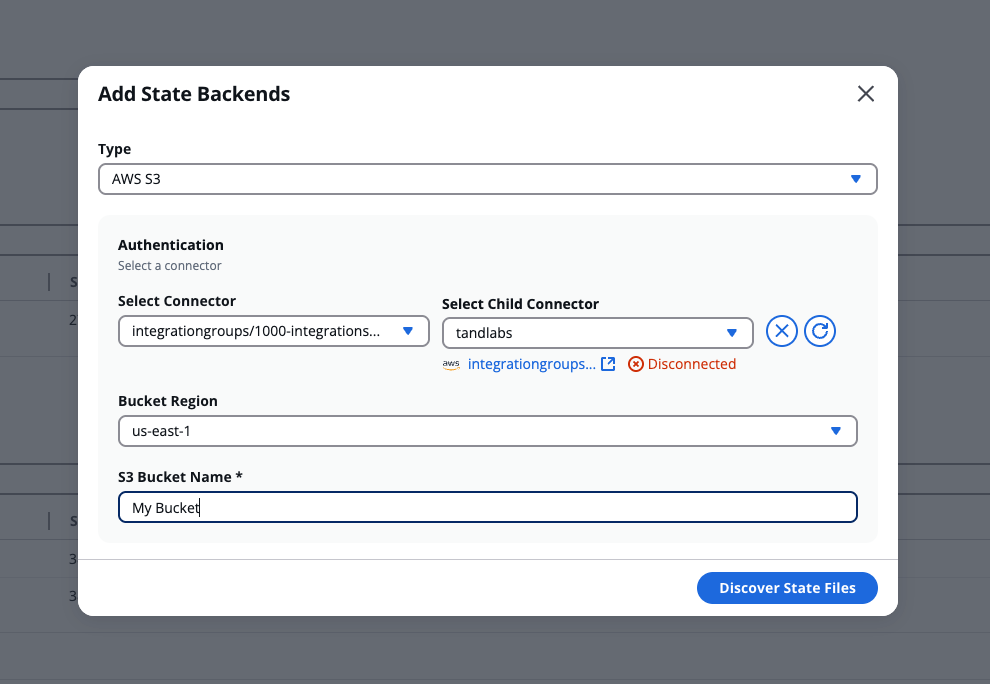
*Add an AWS state backend*
## Azure Blob Storage[](#azure-blob-storage "Direct link to Azure Blob Storage")
note
The Azure principal used to authenticate must have the **Storage Blob Data Reader** role on your Azure Blob Storage account.
Select **Azure Blob Storage** from the **Type** dropdown, then complete the following fields:
* **Storage Account Name** — Name of your Azure storage account
* **Storage Container Name** — Name of the Azure Blob Storage container where your state files are stored
Under **Authentication**, choose one of the following options:
* **Connector** - Select a connected cloud provider connector from the Select Connector dropdown.
* **Access Key** - Enter your storage account access key in the **Storage Account Access Key** field, then select **Add Key**.
Select **Discover State Files** to import the state.
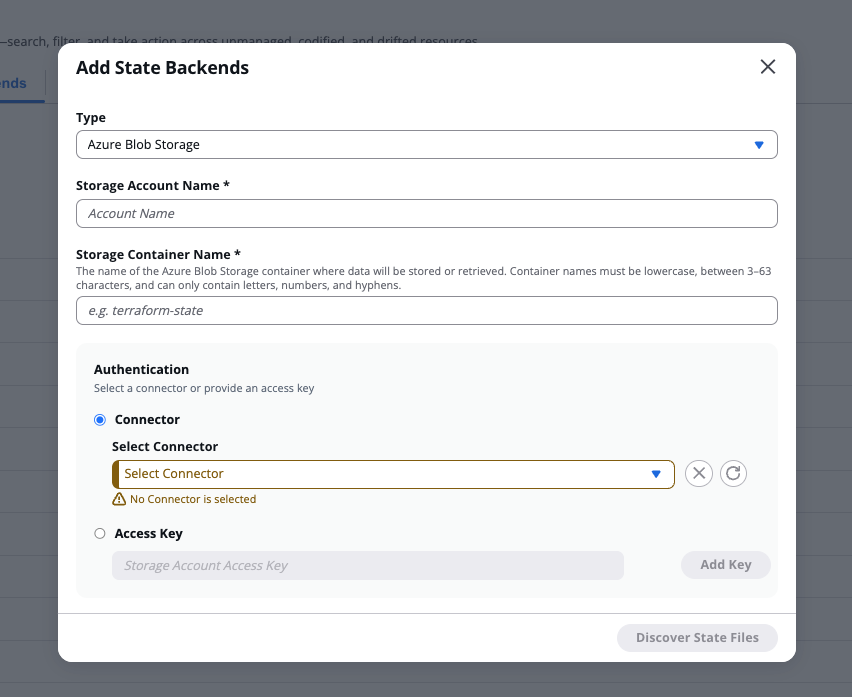
*Add an Azure Blob Storage state backend*
---
# Overview
The **SGOrchestrator** enables compliant provisioning of infrastructure across private or public cloud environments. It empowers users to create infrastructure delivery configurations (called **Workflows**) and securely deploy them to targeted platforms.
## Key features of SGOrchestrator[](#key-features-of-sgorchestrator "Direct link to Key features of SGOrchestrator")
* **No-Code Interface**: Allows teams with limited expertise to provision self-service infrastructure on platforms like AWS and Azure.
* **CI/CD Integration**: Seamlessly integrates with 3rd-party tools to build flexible, end-to-end CI/CD pipelines with built-in compliance enforcement.
* **Extensible Architecture**: Manage cloud deployments across platforms using your preferred Infrastructure as Code (IaC) tooling.
## Core capabilities[](#core-capabilities "Direct link to Core capabilities")
1. **Workflows**: Build infrastructure delivery pipelines in minutes using **Workflow Step Templates** (e.g., Terraform) from the Marketplace.
2. **Deployment**: Deploy infrastructure via pre-defined Workflow and Stack Templates or directly from a Git repository.
3. **Policies**: Write and enforce policies to proactively scan infrastructure for non-compliance.
4. **Secrets Management**: Store and securely expose secrets to the Workflow runtime environment.
5. **Logging**: Maintain detailed logs of configuration and Workflow runs for auditing and review.
6. **Connectors**: Integrate natively with tools like GitHub and cloud platforms such as AWS and Azure.
---